
A callout is a type of text box that also includes a line for pointing to any location on the document. A
callout is helpful when you need to identify and to explain parts of a picture.
To insert a callout, follow these steps:
1. On the Insert tab, in the Illustrations group, click
the Shapes button:

2. In the list of Shapes, select the style of callout that you
want to use:

3. Move the crosshair to where you want the callout to point.
4. Click and hold the mouse button, and then drag to where you want to
place the callout text.
5. Release the mouse button.
6. Type the callout text.
Once you’ve created a callout, you can format it in the same way you format a text box.
To create additional options for callouts, choose the Format Shape… from the popup menu:

In the Format Shape pane, click the Text Options:

See also this tip in French:
Comment ajouter des bulles et légendes aux objets.
Please, disable AdBlock and reload the page to continue
Today, 30% of our visitors use Ad-Block to block ads.We understand your pain with ads, but without ads, we won’t be able to provide you with free content soon. If you need our content for work or study, please support our efforts and disable AdBlock for our site. As you will see, we have a lot of helpful information to share.
![]()
Written by Allen Wyatt (last updated October 18, 2019)
This tip applies to Word 97, 2000, 2002, and 2003
If, for some reason, you don’t like the Comment feature in Word, one alternative is that you can place comments into your document using callouts. These are special text boxes that have a small «tail» that you can point to different locations on your document. Callouts are most closely related to the thought or speech bubbles you see used in comic strips all the time.
To use callouts in your document, do the following:
- If you don’t already have the Drawing toolbar displayed, click on the Drawing tool on the Standard toolbar. Word displays the Drawing toolbar at the bottom of the screen.
- Click on the AutoShapes tool, move your mouse to Callouts on the resulting menu, and then choose a callout type from those presented. Word switches to Page Layout view and transforms your mouse pointer into a crosshairs.
- Click in your document where you want a corner of the callout to appear, and then drag the mouse to the opposite corner. When you release the mouse button, the callout you selected appears over the top of your document.
- Type the text you want to appear within the callout.
- Click outside the callout to again start working with your regular document.
Once placed in your document, you can move the callout around as necessary using the same techniques you would use with any other graphic object. If it bothers you that the callout appears over the top of existing text (and thereby obscures it), you could make sure that you have larger margins set on the document and then make sure the callout balloons are placed within the margins of the document.
Since it can get tedious to repeatedly place callouts in a document, you may want to copy a blank callout to the Clipboard (select it and press Ctrl+C), from where you can paste it anywhere else you need it in your document (simply press Ctrl+V).
WordTips is your source for cost-effective Microsoft Word training.
(Microsoft Word is the most popular word processing software in the world.)
This tip (1721) applies to Microsoft Word 97, 2000, 2002, and 2003.
Author Bio
With more than 50 non-fiction books and numerous magazine articles to his credit, Allen Wyatt is an internationally recognized author. He is president of Sharon Parq Associates, a computer and publishing services company. Learn more about Allen…
MORE FROM ALLEN
Zooming with the Keyboard
Excel doesn’t provide a keyboard shortcut that allows you to zoom in or out on your workbook. It is easy, however, to …
Discover More
Extra Spaces after Inserting a Building Block
Building blocks are a great tool for inserting standard information in your documents. It is also possible, however, to …
Discover More
Saving AutoText Entries with Each Document
AutoText can be a great way to add consistent, common text to a document. Unfortunately, you cannot save AutoText entries …
Discover More
More WordTips (menu)
Automatically Formatting Graphics and AutoShapes
Want to change the graphics formatting defaults in Word? You can customize some of these defaults, saving yourself some time.
Discover More
Keeping a Picture Title with the Picture
Pictures and their titles go together like peanut butter and jelly. (Wow, did I just say that?) Seriously, pictures and …
Discover More
Positioning Graphics Evenly
If you have some graphics inserted in your document, you may want to adjust the horizontal space between those graphics. …
Discover More
![]()
Download Article
![]()
Download Article
Want to cross out words, letters, or entire sentences in Microsoft Word? We’ll show you how to use strikethrough to cross out any text in your Microsoft Word document using a computer, Android, iPhone, iPad, or Windows tablet.
Things You Should Know
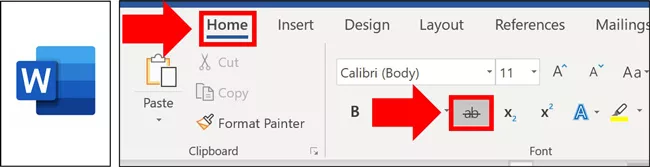
- The strikethrough option is located in the Home tab at the top of Word.
- You can apply a double-line strikethrough using the Font panel’s additional options.
- To remove a strikethrough, highlight the text and click the strikethrough icon. Alternatively, select ‘Clear Formatting’ to remove it.
-

1
Highlight the text you want to strike out. You can do this by clicking and dragging the mouse cursor over the word or phrase.
- Although there is no keyboard shortcut for striking through text, it’ll only take a few seconds to apply the formatting.
-
2
Click the Home tab. If you’re not already on the Home tab, you’ll need to click Home at the top of Word to go there now.
Advertisement
-
3
Click the strikethrough icon. This icon looks like «
ab
» (or «
abc
» in some versions) with a horizontal line through both letters. You’ll see it up near the rest of your font options, such as the options to make words bold and italic. Clicking this icon will cross out all selected text.
- To remove the strikethrough effect, highlight the word or phrase again, and then click the ab icon.
-
4
Apply double-line strikethrough (optional). If you want to cross out the selected word or phrase with two lines instead of one, you can use the double-line strikethrough effect.[1]
Here’s how:- With the word or phrase highlighted, click the small down-arrow on the «Font» panel at the top of the screen.
- Check the box next to «Double strikethrough.»
- Click OK.


Advertisement
-
1
Select the text you want to strike out. To do this, just tap and hold one of the words you want to cross out, and then drag either side of the selection bars until all of the desired text is highlighted.
-
2
Tap the strikethrough icon (Android and Windows tablets only). If you see an icon that has lowercase «
ab
» with a horizontal line crossing through it, you can tap that icon to immediately strike through the selected text. If not, skip to the next step.
-
3
Tap the text formatting icon. It’s the icon of a capital «A» that has three horizontal dots beneath it.[2]
You’ll see this option at the top of the screen if you didn’t see a crossed-out «ab
» icon.
-
4
Tap Strikethrough. This crosses out the selected text.
- If you want to remove the strikethrough effect, select the text again, and then tap the ab icon (if you see it) or tap the text formatting icon and select Clear Formatting.


Advertisement
Ask a Question
200 characters left
Include your email address to get a message when this question is answered.
Submit
Advertisement
Video
Thanks for submitting a tip for review!
About This Article
Article SummaryX
1. Highlight the word or phrase with your mouse cursor.
2. Click the Home tab.
3. Click the icon of a crossed-out «ab.»
Did this summary help you?
Thanks to all authors for creating a page that has been read 395,619 times.
Is this article up to date?
- Remove From My Forums
-
Question
-
In Word 2007, I could insert a callout and the end of the tail would be locked in place so if I moved the text box, the tail end would still point to where I originally placed it. In 2010, I haven’t found a way to lock the tail and when I move the callout
text box, the entire tail moves. This is killing productivity as I then have to change all the tails after I move the callout text box. Any ideas?? Thanks.
Answers
-
Thanks, but this isn’t for adding a connector. I’m annotating air photos and on my picture, I’ve inserted a callout that already has a line, and it is the end of this line (the callout tail) that I want to lock. If I resize the calllout
text box, the line moves and I want it to lock into place so I don’t have to fix the line after making changes to the callout text box. This could be done in 2007 but not (so far that I’ve found) in 2010.
Hmm, I must have missed this in Word 2007. How did you keep the callout “tail” in position in that version?
Stefan Blom, Microsoft Word MVP
-
Marked as answer by
Wednesday, February 15, 2012 6:59 AM
-
Marked as answer by
In this post you’ll learn how to strikethrough text (or cross out text) in Microsoft Word, Excel, and PowerPoint.
Each software works a little bit differently: PowerPoint and Word both have the strikethrough command available in the Ribbon. In addition, for the Microsoft Office programs, if you navigate through the Font dialog box (or Format Cells dialog box in Excel) you get a bunch of other useful text effect options.
If you want to strikethrough text outside of the Microsoft Office suite (like inside a YouTube comment), you can check out the post by Online Sense here.
How to strikethrough text in Word
There are two ways you can strikethrough text in Microsoft Word.
Neither one is better nor worse, it just depends on the number of features you want to get access to. The Font dialog box method below gives you the most text formatting effects.
1. Use the strikethrough command in the Ribbon
To use the Ribbon in Word to create the strikethrough effect, simply:
- Select the text you want to cross out
- Navigate to the Home tab
- Click the Strikethrough command
Note: If you are using the strikethrough effect to show edits and make comments, a better method is to use Microsoft Word’s built-in Comments command. To learn how to add comments in Word, read our guide here.
2. Use the Font dialog box strikethrough command
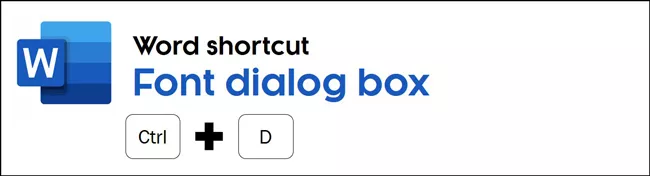
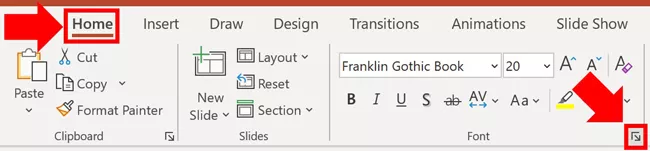
The fastest way to open the Font dialog box in Microsoft Word is with the Ctrl+D keyboard shortcut. If you don’t want to memorize a new shortcut, you can alternatively open it from the Home tab.
- Select the text you want to cross out
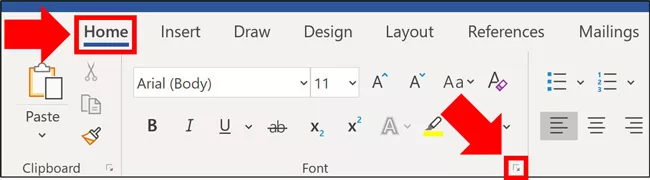
- Go to the Home tab
- Click the downward facing arrow in the Font group
- Select Strikethrough (pictured below)
- Click OK
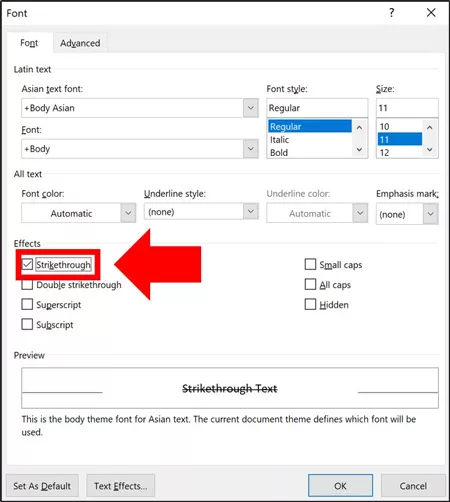
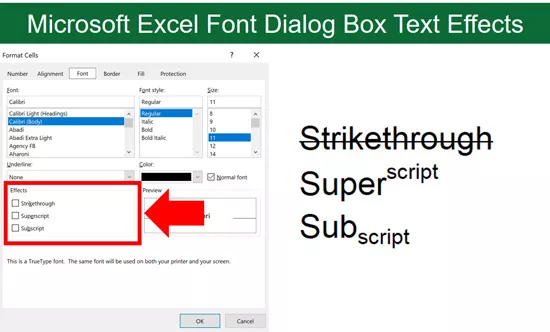
As pictured below, you have a variety of additional text formatting options inside the Font dialog box. To see an example of these different text features, read below.
3. Text effect options in Word
Checking the box creates the crossed out text effect. To remove the text effect, simply open the Font dialog box again and un-check the box.
These options in Word are quite different than what you will find if you migrate to Google docs. To expand your knowledge and learn how to strikethrough on Google docs, read our guide here.
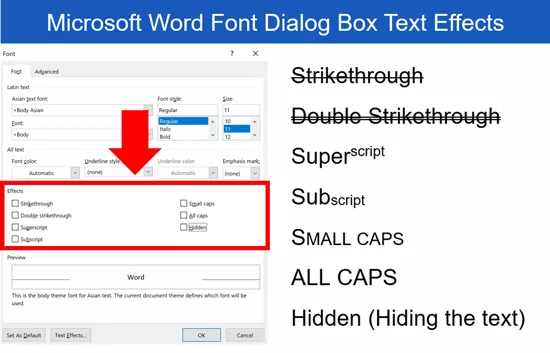
The advantage of using the Font dialog box is that it gives you seven other text effect options (as you can see in the picture above). Here are the keyboard shortcuts for each one:
- Strikethrough: Alt + K
- Double Strikethrough: Alt+L
- Superscript: Alt+P
- Subscript: Alt+B
- Small caps: Alt+M
- All caps: Alt+A
- Hidden: Alt+H
To expand your knowledge and learn how to use the Font dialog box to underline words only and change the underline color of your underline, read our guide here.
Note: To learn all the strikethrough shortcuts for Word, Excel, and PowerPoint, see our guide here.
How to do a strikethrough in Excel
There are 4 different ways you can strikeout text in Excel using the Format Cells dialog box.
The reason that there are so many options in Excel is that you can leverage cell borders to create the diagonal cross-out text effect (described below). But first, let’s start with the basics.
![]()
1. Strikethrough text in Excel
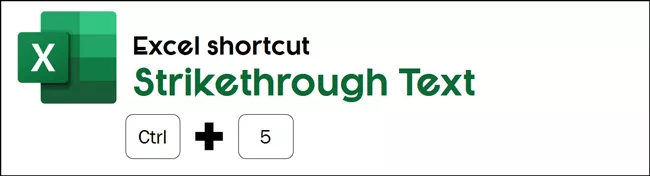
The fastest way to create the strikeout text effect in Excel is to use the Ctrl+5 keyboard shortcut. Simply select your text (or the cell with your text in it) and hit Ctrl+5.
Hitting the Ctrl+5 shortcut once applies the text effect. Hitting the shortcut a second time removes the text effect.
If you don’t want to memorize the shortcut, you can also access the strikethrough command through the Format Cells dialog box.
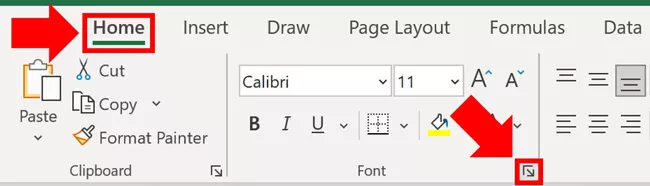
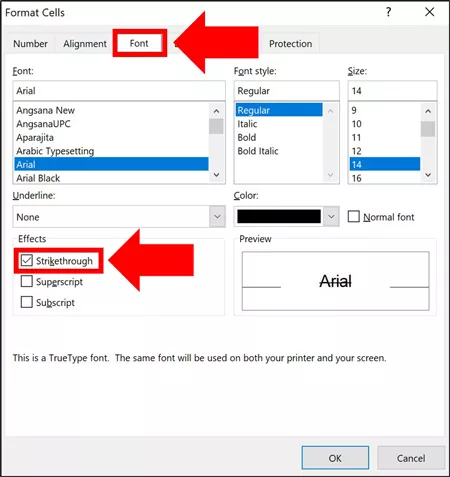
- Select the cells you want to strikeout in your spreadsheet
- Select the Home tab
- Click the downward facing arrow in the Font group
- On the Font tab select Strikethrough (see image below)
- Click OK
Just like any other program, applying the effect once strikes out your text. Applying the effect a second time removes it.
Also please note that the Format Cells dialog box is where you access the Superscript and Subscript commands. To learn more about this, read our guide here.
2. How to diagonally strikethrough text in Excel
In this example, we are going to create a diagonal strikethrough and use the Format Cells keyboard shortcut.
- Select the cells you want to strikeout in your spreadsheet
- Hit Ctrl + 1 to open the Format Cells dialog box (or use the Ribbon command discussed above)
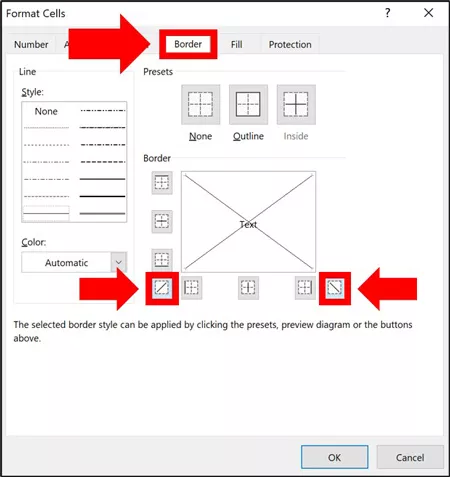
- Navigate to the Border tab
- Add the diagonal lines (picture below )
- Click OK
Applying a diagonal border once applies the effect to your cell. Applying it a second time removes it.
So if you later want to remove this diagonal crossed out effect, simply navigate back to the Format Cells dialog box (Ctrl + 1), navigate to the Border section and re-apply the diagonal cell borders.
3. Other text effect options in Excel
Inside the Format Cells dialog box in Excel, there are 3 other text effects you can apply to your text (as pictured above):
- Strikethrough: Alt + K
- Superscript: Alt + E
- Subscript: Alt + B
To expand your knowledge and learn how to copy and paste formatting in Excel, see the section on the Paste Special shortcut inside our guide here.
How to strikethrough text in PowerPoint
There are two different ways to cross out text in PowerPoint.
You can either use the strikethrough command in the Ribbon or use the Font dialog box. Which method is best depends on how many text effect options you want to apply.
1. Use the strikethrough command in the Ribbon
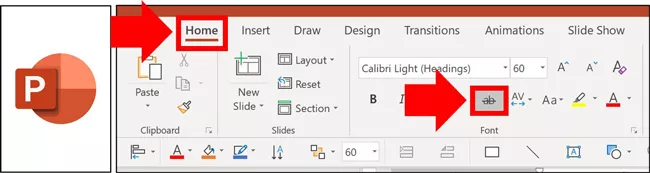
- Select the text you want to cross out
- Navigate to the Home tab
- Click the Strikethrough command
To later remove the crossed-out text effect, simply reapply the strikethrough command or select your text and hit Ctrl + Spacebar on your keyboard to wipe out the text formatting.

2. Use the strikethrough command in the Font dialog box
The fastest way to open the Font dialog box in PowerPoint is to use one of the following three shortcuts (they all do the same thing):
- Ctrl+T
- Ctrl+Shift+P
- Ctrl+Shift+F
If any of the above shortcuts do not work for you, check out our guide here.
If you don’t want to memorize one of the above keyboard shortcuts (which I highly recommend doing), you can also access the Font dialog box from your Ribbon as follows:
- Select the text you want to cross out
- Click the downward-facing arrow in the in Font group
- Select Strikethrough (pictured below)
- Click OK
If you want to apply the Double Strikethrough effect, you have to go through the Font dialog box in PowerPoint.
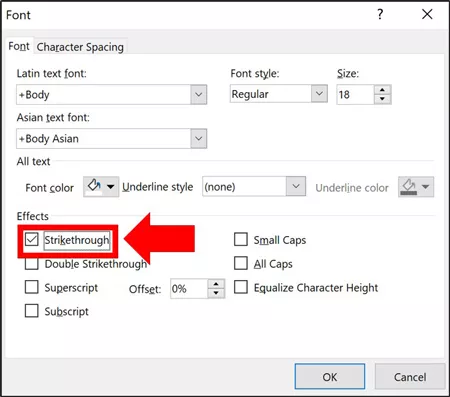
Using the Font dialog box you do not get a live preview of the effect. After selecting the effect(s) you want, click OK to see it applied to your text.
3. Text effect options in PowerPoint
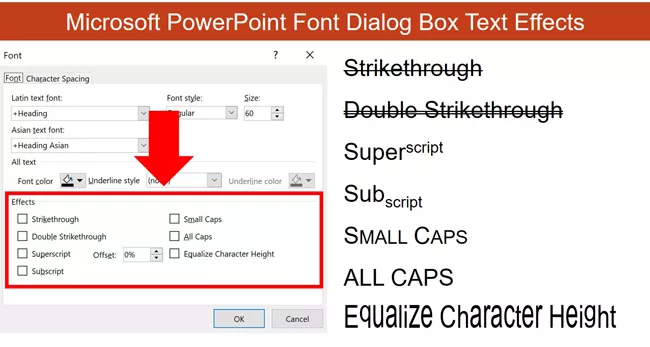
In addition to the strikethrough command, the Font dialog box in PowerPoint gives you 6 other text effects you can apply to your text (as pictured below).
- Strikethrough: Alt + K
- Double Strikethrough: Alt + L
- Superscript: Alt + P
- Subscript: Alt + B
- Small Caps: Alt + M
- All Caps: Alt + A
- Equalize Character Height: Alt + Q
Conclusion
As you can see, there are a variety of ways you can strikethrough text in the Microsoft Office suite.
And while it’s easiest to access the command through the Ribbon in Word and PowerPoint, the Font dialog boxe give you the most text effect options to work with.
If you enjoyed this article, you can learn more about our online courses and presentation resources here.
What’s Next?
Apply or Remove Strikethrough Using Shortcuts in Word
by Avantix Learning Team | Updated March 14, 2021
Applies to: Microsoft® Word® 2010, 2013, 2016, 2019 and 365 (Windows)
You can apply strikethrough to text in Word to cross out or create a line through text. This can be effective to show that something has been removed or deleted. Although you can use Strikethrough on the Home tab in the Ribbon or use the Font dialog box, you can also write your own Strikethrough keyboard shortcut in Microsoft Word.
Recommended article: How to Insert a Line in Word (3+ Ways)
Do you want to learn more about Microsoft Word? Check out our virtual classroom or live classroom Word courses >
What is strikethrough?
Strikethrough is a character format that can be applied to text where a line appears through the selected text. Because it’s a format, it can be removed easily. The most common way to apply strikethrough is to select the text and then click Strikethrough in the Font group on the Home tab in the Ribbon (as an ab with a line through it):

You can also press Alt > H > 4 (Alt, then H and then 4).
Using keyboard shortcuts to access the Font dialog box
To access the Font dialog box using a keyboard shortcut and then apply Strikethrough:
- Select the text you want to strikethrough.
- Press Ctrl + D. The Font dialog box appears.
- Press Alt + K to select Strikethrough (note that k is the underlined letter).
- Press Enter.
Below is the Font dialog box:

Adding Strikethrough to the Quick Access Toolbar
You can also add Strikethrough to the Quick Access Toolbar and then access it using Alt.
It’s usually easier to work with the Quick Access Toolbar if you display it below the Ribbon. If the Quick Access Toolbar is above the Ribbon, click the down arrow to the right of the Quick Access Toolbar and select Show Below the Ribbon from the drop-down menu.
To add Strikethrough to the Quick Access Toolbar:
- Right-click Strikethrough in the Font group on the Home tab in the Ribbon. A drop-down menu appears.
- Select Add to Quick Access Toolbar.
- Click the down arrow to the right of the Quick Access Toolbar and select More commands from the drop-down menu. The Options dialog box appears.
- In the list of commands on the right side of the dialog box, click Strikethrough.
- Click the up arrow that appears on the far right until the button appears at the top of the list (you can move it to the second position, third position, etc.).
- Click OK.
- Press Alt. Key tips appear on the Quick Access Toolbar. If you have moved Strikethrough to the first position, press 1 to apply it. If you have moved Strikethrough to the second position, press 2 to apply it and so on. These are sequential shortcuts, so press Alt and then the number.
Creating a custom keyboard shortcut
You can also create your own keyboard shortcuts in Microsoft Word by customizing the keyboard. This is a great way to create a strikethrough shortcut.
In Microsoft Word (unlike Excel and PowerPoint), you can use File Options to customize your keyboard (note the Customize command at the bottom of the Customize Ribbon category):

To create your own keyboard shortcut for Strikethrough using File Options:
- Click the File tab in the Ribbon.
- Click Options. A dialog box appears.
- In the left panel, click Customize Ribbon.
- In the panel on the right, beside Keyboard Shortcuts, click Customize. The Customize Keyboard dialog box appears.
- Under Categories, click Home Tab.
- Under Commands, click Strikethrough.
- Click in the box below Press new shortcut key.
- Press the keys you want to assign (at the same time). You can press Ctrl + Alt + a letter so that it is less likely to have a conflict with a previously assigned shortcut. You don’t want to reassign common shortcuts such as Ctrl + P. In this case, you could press Ctrl + Alt + S.
- Click Assign.
- Beside Save changes in, select Normal (to save the changes globally). Normal is the default global template.
- Click Close.
- Click OK in the Options dialog box.
Now you can select text and use the keyboard shortcut you assigned (such as Ctrl + Alt + S) to apply strikethrough. Strikethrough is a toggle, so you can use the same shortcut to remove strikethrough.
Below is the Customize Keyboard dialog box:

You can assign keyboard shortcuts to many other commands using this strategy.
Because the keyboard assignments are typically saved in the Normal template, when you exit Word, be sure to save the Normal template when prompted.
Subscribe to get more articles like this one
Did you find this article helpful? If you would like to receive new articles, join our email list.
More resources
How to Generate Random Text in Word
How to Hide Comments in Word (or Display Them)
How to Insert Greek Letters or Symbols in Word (6 Ways)
How to Superscript or Subscript in Microsoft Word (with Shortcuts)
3 Strikethrough Shortcuts in Excel to Cross Out Text or Values in Cells
Related courses
Microsoft Word: Intermediate / Advanced
Microsoft Excel: Intermediate / Advanced
Microsoft PowerPoint: Intermediate / Advanced
Microsoft Word: Long Documents Master Class
Microsoft Word: Styles, Templates and Tables of Contents
Microsoft Word: Designing Dynamic Word Documents Using Fields
VIEW MORE COURSES >
Our instructor-led courses are delivered in virtual classroom format or at our downtown Toronto location at 18 King Street East, Suite 1400, Toronto, Ontario, Canada (some in-person classroom courses may also be delivered at an alternate downtown Toronto location). Contact us at info@avantixlearning.ca if you’d like to arrange custom instructor-led virtual classroom or onsite training on a date that’s convenient for you.
Copyright 2023 Avantix® Learning
Microsoft, the Microsoft logo, Microsoft Office and related Microsoft applications and logos are registered trademarks of Microsoft Corporation in Canada, US and other countries. All other trademarks are the property of the registered owners.
Avantix Learning |18 King Street East, Suite 1400, Toronto, Ontario, Canada M5C 1C4 | Contact us at info@avantixlearning.ca
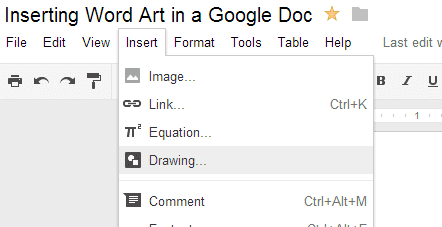
 It’s easy to spruce up documents in Google Apps. Using the insert->drawing feature you insert text boxes, shapes, callouts and word art. Here’s how.
From the Insert menu choose Drawing:
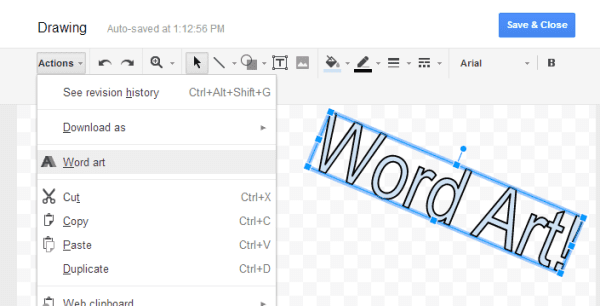
For Word Art in Google Docs:
In the Google Apps drawing window choose Actions then Word Art.
You can also insert shapes, arrows, callouts and equations in Google Docs. For a callout, click the Shapes icon and choose callout.
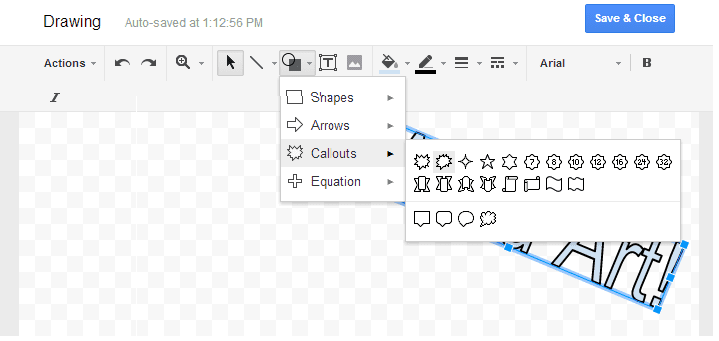
You can change colors of drawings, word art and callouts. You can also right click on a callout in Google Docs and Add or Edit Text

The finished product is a Google Doc with Awesome word Art included. Your only limit is your imagination.
