
The benefits of using Excel for calculation
We are well aware that in today’s world, a machine’s brain works orders of magnitude faster than a human’s brain. By this, I mean that when there is a requirement to calculate some numbers mathematically, we have quickly defaulted to taking out our calculators, mobile phones, and laptops to guarantee quick and accurate results. This is the great boon of the science and technology.
Microsoft Excel is a host application that makes maintenance of documents easy using formulas. For example, formulas can be put to great use with applications like:
- Loan calculation
- Budgeting
- Business relationship documents
- Grade sheet maintenance
- Database maintenance
- Savings calculation
And those formulas can be reused, over and over again. In Excel, if you select a formula in one cell and drag it down, it can easily be copied to other cells and the result is calculated accordingly in each cell.
How a formula is calculated
There is a category named “Calculations” under the “Formulas” menu. It offers three modes of calculation options:
- Automatic
- Automatic except for data tables
- Manual

These options help us decide when and how the calculation of formulas should be carried out in cells.
Automatic
By default, all calculations are automatic. For example, let us assume that cell A1 has a value of 10 and cell B1 has a value of 5. Now, in cell C1, if I enter a formula to add A1 and B1, and press enter, “15” will immediately –automatically — be visible in the cell C1.
This means that we do not need to manually invoke the calculation. It happens as soon as the cursor leaves the cell.

Automatic except for data tables
This option enables Excel to calculate all cells automatically except the ones involving data tables. Here data tables do not mean the normal tables, or the ones loaded through external connections explicitly. It is specifically the Data What-if Analysis Data Table.
Manual
Let us assume we have the same scenario above where cell A1 as a value of 5 and B1 has a value of 10 . Cell C1 is the sum of A1 and B1 ( =sum( A1, B1) ).
Since the default option is “Automatic,” we can see the value of C1 is 15. Now, change the calculation option to “Manual.” Change the value of A1 to 30 and click on enter. You will see that there is no change in the value of cell C1.

Manually, click on the “calculate now” option in the same menu “Formulas & Calculation.” Now we can see that the value of cell C1 has changed to 40.

Using VBA to turn off or turn on Automation Calculations
The code to set or change the calculation options in VBA is very simple and uses application.calculation.
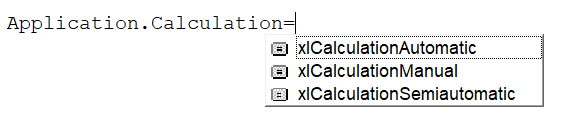
Syntax
Application.Calculation= <mode>
Where the mode can be one of the three below options
- xlCalculationManual
- xlCalculationAutomatic
- xlCalculationSemiAutomatic
Examples
Addition of 2 numbers
Just like above, we’ll add two numbers together in this example. Here we switch the calculation mode to Manual and then again to Automatic to see the difference.
The sum’s value is printed, and a screenshot of the run is also provided for reference.
Sub calculate_demo()

'Initiating values in 2 cells and setting a formula in the 3rd cell

Cells(1, 1).Value = "5"
Cells(1, 2).Value = "10"
Range("C1").Select
    ActiveCell.FormulaR1C1 = "=SUM(RC[-2],RC[-1])"

' print the value of the third cell before changing the calculation options

Debug.Print Cells(1, 3).Value

'Change the calculation option to "Manual" and print the 3rd cell value.
'There would be no change

Application.Calculation = xlCalculationManual
Cells(1, 1).Value = "10"
Debug.Print Cells(1, 3).Value

'Use the option to calculate explicitly and try printing again.
'Value of 3rd cell would have got re-calculated

Application.Calculate
Debug.Print Cells(1, 3).Value

'Change the calculation mode to Automatic again.
'As soon as the values of cells change the 3rd cell ( with formula ) value also changes

Application.Calculation = xlCalculationAutomatic
Cells(1, 1).Value = "3"
Debug.Print Cells(1, 3).Value


End Sub

Validate if a mark is a pass or fail grade
In this example, the first cell is a number and the second cell holds an “if” formula. The value is “Pass” if the value of first cell is greater than 49. If not, the value remains “Fail.”
Sub calculate_demo()

'Initiating values in 2 cells and setting a formula in the 3rd cell

Cells(1, 1).Value = "5"
Cells(1, 2).Value = "10"
Range("C1").Select
    ActiveCell.FormulaR1C1 = "=SUM(RC[-2],RC[-1])"

' print the value of the third cell before changing the calculation options

Debug.Print Cells(1, 3).Value

'Change the calculation option to "Manual" and print the 3rd cell value.
'There would be no change

Application.Calculation = xlCalculationManual
Cells(1, 1).Value = "10"
Debug.Print Cells(1, 3).Value

'Use the option to calculate explicitly and try printing again.
'Value of 3rd cell would have got re-calculated

Application.Calculate
Debug.Print Cells(1, 3).Value

'Change the calculation mode to Automatic again.
'As soon as the values of cells change the 3rd cell ( with formula ) value also changes

Application.Calculation = xlCalculationAutomatic
Cells(1, 1).Value = "3"
Debug.Print Cells(1, 3).Value


End Sub

Concatenate first name and last name to get the full name
This example sets first name, last name, and then uses a formula to concatenate and display the full name. Again, we toggle between the two calculation options to understand its working.
Sub calculate_demo()

'Initiating value in the 1st cell and setting a formula in the 2nd cell

Cells(1, 1).Value = "57"
Range("B1").Select
    ActiveCell.FormulaR1C1 = "=if(RC[-1]>49,""Pass"",""Fail"")"

' print the value of the second cell before changing the calculation options

Debug.Print Cells(1, 2).Value

'Change the calculation option to "Manual" and print the 2nd cell value.
'There would be no change

Application.Calculation = xlCalculationManual
Cells(1, 1).Value = "10"
Debug.Print Cells(1, 2).Value

'Use the option to calculate explicitly and try printing again.
'Value of 2nd cell would have got re-calculated

Application.Calculate
Debug.Print Cells(1, 2).Value

'Change the calculation mode to Automatic again.
'As soon as the value of cell changes, the 2nd cell ( with formula ) value also changes

Application.Calculation = xlCalculationAutomatic
Cells(1, 1).Value = "86"
Debug.Print Cells(1, 2).Value


End Sub

Conclusion
Although the default calculation option of “Automatic” is simple and easy to use, sometimes due to a huge size or volume of data in any Excel workbook, its performance might slow down. In order to handle this situation, we can switch to “Manual” or the “Semi-Automatic” i.e. the “Automatic except for data tables” options to perform calculations only as required.
We may explicitly use the “calculate now” and “calculate sheet” options in our code depending on the area of recalculation. Hence these options are available to users in order to improve performance.
Home / VBA / VBA Calculate (Cell, Range, Row, & Workbook)
By default, in Excel, whenever you change a cell value Excel recalculates all the cells that have a calculation dependency on that cell. But when you are using VBA, you have an option to change it to the manual, just like we do in Excel.

Using VBA Calculate Method
You can change the calculation to the manual before you start a code, just like the following.
Application.Calculation = xlManualWhen you run this code, it changes the calculation to manual.

And at the end of the code, you can use the following line of code to switch to the automatic.
Application.Calculation = xlAutomatic
You can use calculation in the following way.

Sub myMacro()
    Application.Calculation = xlManual
        'your code goes here
    Application.Calculation = xlAutomatic
End Sub
Calculate Now (All the Open Workbooks)
If you simply want to re-calculate all the open workbooks, you can use the “Calculate” method just like below.
CalculateUse Calculate Method for a Sheet
Using the following way, you can re-calculate all the calculations for all the
ActiveSheet.Calculate
Sheets("Sheet1").Calculate
The first line of code re-calculates for the active sheet and the second line does it for the “Sheet1” but you can change the sheet if you want.
Calculate for a Range or a Single Cell
In the same way, you can re-calculate all the calculations for a particular range or a single cell, just like the following.
Sheets("Sheet1").Range("A1:A10").Calculate
Sheets("Sheet1").Range("A1").Calculate
Return to VBA Code Examples
In this Article
- Calculate Now
- Calculate Sheet Only
- Calculate Range
- Calculate Individual Formula
- Calculate Workbook
- Calculate Workbook – Methods That Don’t Work
This tutorial will teach you all of the different Calculate options in VBA.
By default Excel calculates all open workbooks every time a workbook change is made. It does this by following a calculation tree where if cell A1 is changed, it updates all cells that rely on cell A1 and so on. However, this can cause your VBA code to run extremely slowly, as every time a cell changes, Excel must re-calculate.
To increase your VBA speed, you will often want to disable automatic calculations at the beginning of your procedures:
Application.Calculation = xlManualand re-enable it at the end:
Application.Calculation = xlAutomaticHowever, what if you want to calculate all (or part) of your workbooks within your procedure? The rest of this tutorial will teach you what to do.
Calculate Now
You can use the Calculate command to re-calculate everything (in all open workbooks):
CalculateThis is usually the best method to use. However, you can also perform more narrow calculations for improved speed.
Calculate Sheet Only
You can also tell VBA to calculate only a specific sheet.
This code will recalculate the active sheet:
ActiveSheet.CalculateThis code will recalculate Sheet1:
Sheets("Sheet1").CalculateCalculate Range
If you require a more narrow calculation, you can tell VBA to calculate only a range of cells:
Sheets("Sheet1").Range("a1:a10").CalculateCalculate Individual Formula
This code will calculate only an individual cell formula:
Range("a1").CalculateCalculate Workbook
There is no VBA option to calculate only an entire workbook. If you need to calculate an entire workbook, the best option is to use the Calculate command:
CalculateThis will calculate all open workbooks. If you’re really concerned about speed, and want to calculate an entire workbook, you might be able to be more selective about which workbooks are open at one time.
Calculate Workbook – Methods That Don’t Work
There are a couple of methods that you might be tempted to use to force VBA to calculate just a workbook, however none of them will work properly.
This code will loop through each worksheet in the workbook and recalculate the sheets one at a time:
Sub Recalculate_Workbook()
    Dim ws As Worksheet

    For Each ws In Worksheets
        ws.Calculate
    Next ws
End Sub
This code will work fine if all of your worksheets are “self-contained”, meaning none of your sheets contain calculations that refer to other sheets.
However, if your worksheets refer to other sheets, your calculations might not update properly. For example, if you calculate Sheet1 before Sheet2, but Sheet1’s formulas rely on calculations done in Sheet2 then your formulas will not contain the most up-to-date values.
You might also try selecting all sheets at once and calculating the activesheet:
ThisWorkbook.Sheets.Select
ActiveSheet.Calculate
However, this will cause the same issue.
VBA Coding Made Easy
Stop searching for VBA code online. Learn more about AutoMacro — A VBA Code Builder that allows beginners to code procedures from scratch with minimal coding knowledge and with many time-saving features for all users!

Learn More!
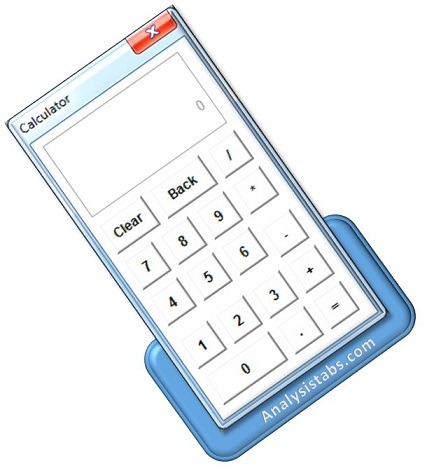
Calculator using Excel VBA UserForm
Calculator using Excel VBA UserForm :Project Objective
Calculator using Excel VBA UserForm. Following is the step by step detailed explanation to automate this project using VBA. How we are doing calculations, clear the text, etc.
Calculator using Excel VBA
- How we are going to develop this project module(The KEY steps)
- Design of the Calculator
- Code and explantion for each control
- Final VBA Module Code(Macro)
- Display Calculator on the WorkSheet
- Instructions to Execute the Procedure
- Download the Project Workbook – Excel Macro File
How we are going to develop this project module (The KEY steps) :
To createc calculator, you can see the design of the userform in the section. Let me explain the key steps to develop this caculator project. We are going to write multiple procedure s for multiple controls with the below approach.
- Step 1: Create UserForm: we have to first create the userform from the Insert menu in VBA Editor.
- Step 2: Place toolbox controls on the created userform: Place required controls on the userform. You can drag the controls from the toolbox and drop controls on the userform.
- Step 3: Set properties and alignment of all controls: Properties of each control has set. It is shown in the design section.
- Step 4: Clear Button: It is used to clear the display area.
- Step 5: Back Button : It is used to go back one digit.
- Step 6: Divide (/) Button: It is used for division.
- Step 7: Multiplcation (*) Button: It is used for multiplication.
- Step 8: Minus (-) Button: It is used for subtraction.
- Step 9: Add (+) Button: It is used for addition.
- Step 10: Dot (.) Button : It is used to add dot to the number.
- Step 11: One (1) Button: It is used to display number 1.
- Step 12: Two (2) Button: It is used to display number 2.
- Step 13: Three (3) Button: It is used to display number 3.
- Step 14: Four (4) Button: It is used to display number 4.
- Step 15: Five (5) Button: It is used to display number 5.
- Step 16: six (6) Button: It is used to display number 6.
- Step 17: Seven (7) Button: It is used to display number 7.
- Step 18: Eight (8) Button: It is used to display number 8.
- Step 19: Nine (9) Button: It is used to display number 9.
- Step 20: Zero (0) Button: It is used to display number .0
- Step 21: EqualTo (=) Button: It is used to perform all calculations like addition, substraction, multiplcation, etc .
- Step 22: Textbox: It is used to display result.
Design of the Calculator :
Now, let us see the design of the calculator project of each control properties and their values on the userform:
| Control | Property | Value |
|---|---|---|
| UserForm | Name | frmCalculator |
| Frame | Name | displayFrame |
| TextBox | Name | txtDisplay |
| Enabled | False | |
| SpecialEffect | 0-frmSpecialEffectFlat | |
| TextAlign | 3-frmTextAlignRight | |
| TextBox | Name | txtRes |
| Value | 0 | |
| Enabled | False | |
| SpecialEffect | 0-frmSpecialEffectFlat | |
| TextAlign | 3-frmTextAlignRight | |
| EnterKeyBehavior | True | |
| CommandButton | Name | cmdBtnclr |
| Caption | Clear | |
| CommandButton | Name | cmdBtnBak |
| Caption | Back | |
| CommandButton | Name | cmdBtnDvd |
| Caption | / | |
| CommandButton | Name | cmdBtnMult |
| Caption | * | |
| CommandButton | Name | cmdBtnMns |
| Caption | – | |
| CommandButton | Name | cmdBtnAdd |
| Caption | + | |
| CommandButton | Name | cmdBtnDot |
| Caption | . | |
| CommandButton | Name | cmdBtnEql |
| Caption | = | |
| CommandButton | Name | cmdBtn1 |
| Caption | 1 | |
| CommandButton | Name | cmdBtn2 |
| Caption | 2 | |
| CommandButton | Name | cmdBtn3 |
| Caption | 3 | |
| CommandButton | Name | cmdBtn4 |
| Caption | 4 | |
| CommandButton | Name | cmdBtn5 |
| Caption | 5 | |
| CommandButton | Name | cmdBtn6 |
| Caption | 6 | |
| CommandButton | Name | cmdBtn7 |
| Caption | 7 | |
| CommandButton | Name | cmdBtn8 |
| Caption | 8 | |
| CommandButton | Name | cmdBtn9 |
| Caption | 9 | |
| CommandButton | Name | cmdBtn0 |
| Caption | 0 |
This is what I used to create calculator design. By changing or setting all the above properties and values of control the form will be looking like below.
Code and explantion for each control:
Step 1: Create userform and do its initialization by double clicking on the userform and add the below code.
Private Sub UserForm_Initialize()
    txtRes.MaxLength = 10
    txtDisplay.MaxLength = 10
End Sub
In the above code we are setting maximum lenth of display numbers is 10. You can change this number.
Step 2: Double click on the textbox (Value-txtRes) and add the following code. Double click on the ‘ Textbox’ and add the below code.
Private Sub txtRes_Change()
     If txtRes.TextLength > 10 Then
        MsgBox "Its Too long to calculate value.", vbInformation
        txtRes.Text = Left(txtRes.Text, 10)
        Exit Sub
    End If
End Sub
In the above code we are displaying message when displaying numbers are exceeding 10.
Step 3: Set properties as mentioned above and do the alignment of all controls as shown above in the screenshot.
Step 4: Double click on the ‘Clear Button’ and add the below code.
Private Sub cmdBtnclr_Click()
    txtRes = 0: txtDisplay = Empty
End Sub
Step 5: Double click on the ‘ Back Button ‘ and add the below code.
Private Sub cmdBtnBak_Click()
    If txtRes <> 0 And txtRes <> "" Then txtRes = Left(txtRes, Len(txtRes) - 1)
End Sub
Step 6: Double click on the ‘ Divide (/) Button’ and add the below code.
Private Sub cmdBtnDvd_Click()
    If txtRes <> 0 Then
        txtDisplay = txtRes
        txtRes = 0
        calVal = "Divide"
    End If
End Sub
Step 7: Double click on the ‘ Multiplcation (*) Button’ and add the below code.
Private Sub cmdBtnMult_Click()
    If txtRes <> 0 Then
        txtDisplay = txtRes
        txtRes = 0
        calVal = "Multiplication"
    End If
End Sub
Step 8: Double click on the ‘ Minus (-) Button’ and add the below code.
Private Sub cmdBtnMns_Click()
    If txtRes <> 0 Then
        txtDisplay = txtRes
        txtRes = 0
        calVal = "Minus"
    End If
End Sub
Step 9: Double click on the ‘ Add (+) Button’ and add the below code.
Private Sub cmdBtnAdd_Click()
    If txtRes <> 0 Then
        txtDisplay = txtRes
        txtRes = 0
        calVal = "Add"
    End If
End Sub
Step 10: Double click on the ‘ Dot (.) Button ‘ and add the below code.
Private Sub cmdBtnDot_Click()
    If txtRes <> 0 Then txtRes = txtRes + "."
End Sub
Step 11: Double click on the ‘ One (1) Button’ and add the below code.
Private Sub cmdBtn1_Click()
    If txtRes = 0 Then
        txtRes = cmdBtn1.Caption
    Else
        txtRes = txtRes + cmdBtn1.Caption
    End If
End Sub
Step 12: Double click on the ‘ Two (2) Button’ and add the below code.
Private Sub cmdBtn2_Click()
    If txtRes = 0 Then
        txtRes = cmdBtn2.Caption
    Else
        txtRes = txtRes + cmdBtn2.Caption
    End If
End Sub
Step 13: Double click on the ‘ Three (3) Button’ and add the below code.
Private Sub cmdBtn3_Click()
    If txtRes = 0 Then
        txtRes = cmdBtn3.Caption
    Else
        txtRes = txtRes + cmdBtn3.Caption
    End If
End Sub
Step 14: Double click on the ‘ Four (4) Button’ and add the below code.
Private Sub cmdBtn4_Click()
    If txtRes = 0 Then
        txtRes = cmdBtn4.Caption
    Else
        txtRes = txtRes + cmdBtn4.Caption
    End If
End Sub
Step 15: Double click on the ‘ Five (5) Button’ and add the below code.
Private Sub cmdBtn5_Click()
    If txtRes = 0 Then
        txtRes = cmdBtn5.Caption
    Else
        txtRes = txtRes + cmdBtn5.Caption
    End If
End Sub
Step 16: Double click on the ‘ six (6) Button’ and add the below code.
Private Sub cmdBtn6_Click()
    If txtRes = 0 Then
        txtRes = cmdBtn6.Caption
    Else
        txtRes = txtRes + cmdBtn6.Caption
    End If
End Sub
Step 17: Double click on the ‘ Seven (7) Button’ and add the below code.
Private Sub cmdBtn7_Click()
    If txtRes = 0 Then
        txtRes = cmdBtn7.Caption
    Else
        txtRes = txtRes + cmdBtn7.Caption
    End If
End Sub
Step 18: Double click on the ‘ Eight (8) Button’ and add the below code.
Private Sub cmdBtn8_Click()
    If txtRes = 0 Then
        txtRes = cmdBtn8.Caption
    Else
        txtRes = txtRes + cmdBtn8.Caption
    End If
End Sub
Step 19: Double click on the ‘ Nine (9) Button’ and add the below code.
Private Sub cmdBtn9_Click()
    If txtRes = 0 Then
        txtRes = cmdBtn9.Caption
    Else
        txtRes = txtRes + cmdBtn9.Caption
    End If
End Sub
Step 20: Double click on the ‘ Zero (0) Button’ and add the below code.
Private Sub cmdBtn0_Click()
    txtRes = txtRes + cmdBtn0.Caption
End Sub
Step 21: Double click on the ‘ EqualTo (=) Button’ and add the below code.
'21. Final Calculations
Private Sub cmdBtnEql_Click()
On Error GoTo ErrOcccered
    'Dim txtRes As Long

    If txtDisplay = "Cannot divide by Zero" Then txtDisplay = Empty

    If txtRes <> "" And calVal <> "" Then
        FNum = Val(txtDisplay): SNum = Val(txtRes)
        Select Case calVal
            Case "Add"
                txtRes = FNum + SNum
            Case "Minus"
                txtRes = FNum - SNum
            Case "Multiplication"
                txtRes = FNum * SNum
            Case "Divide"
                If SNum = 0 Then
                    txtRes = "Cannot divide by Zero"
                Else
                    txtRes = FNum / SNum
                End If
            Case Else

        End Select
        txtdisplay = Empty
    End If
ErrOcccered:

End Sub
Final VBA Module Code(Macro):
Please find the following procedures to create calender project. Please these procedures after creation of the design (as shown in the above) and right click on the userform select ciew code and place it.
‘Variable Declaration
Public tmpVar As String
Public calVal As String

'1. Assign Maximum length to diplay numbers
Private Sub UserForm_Initialize()
    txtRes.MaxLength = 10
    txtTo display.MaxLength = 10
End Sub

'2. To displaying message when exceeding more then 10 numbers on the To display area.
Private Sub txtRes_Change()
     If txtRes.TextLength > 10 Then
        MsgBox "Its Too long to calculate value.", vbInformation
        txtRes.Text = Left(txtRes.Text, 10)
        Exit Sub
    End If
End Sub

'3. Settings properties of the userform.

'4. To clear data in the To display field
Private Sub cmdBtnclr_Click()
    txtRes = 0: txtdisplay = Empty
End Sub

'5. To go back one step.
Private Sub cmdBtnBak_Click()
    If txtRes <> 0 And txtRes <> "" Then txtRes = Left(txtRes, Len(txtRes) - 1)
End Sub

'6. For divide symbol
Private Sub cmdBtnDvd_Click()
    If txtRes <> 0 Then
        txtdisplay = txtRes
        txtRes = 0
        calVal = "Divide"
    End If
End Sub

' 7. For multiplication symbol
Private Sub cmdBtnMult_Click()
    If txtRes <> 0 Then
        txtdisplay = txtRes
        txtRes = 0
        calVal = "Multiplication"
    End If
End Sub

'8. For minus symbol
Private Sub cmdBtnMns_Click()
    If txtRes <> 0 Then
        txtdisplay = txtRes
        txtRes = 0
        calVal = "Minus"
    End If
End Sub

'9. For addition symbol
Private Sub cmdBtnAdd_Click()
    If txtRes <> 0 Then
        txtdisplay = txtRes
        txtRes = 0
        calVal = "Add"
    End If
End Sub

'10. Add Dot to the To display area
Private Sub cmdBtnDot_Click()
    If txtRes <> 0 Then txtRes = txtRes + "."
End Sub

'11. To display Number 1.
Private Sub cmdBtn1_Click()
    If txtRes = 0 Then
        txtRes = cmdBtn1.Caption
    Else
        txtRes = txtRes + cmdBtn1.Caption
    End If
End Sub

'12. To display Number 2.
Private Sub cmdBtn2_Click()
    If txtRes = 0 Then
        txtRes = cmdBtn2.Caption
    Else
        txtRes = txtRes + cmdBtn2.Caption
    End If
End Sub

'13. To display Number 3.
Private Sub cmdBtn3_Click()
    If txtRes = 0 Then
        txtRes = cmdBtn3.Caption
    Else
        txtRes = txtRes + cmdBtn3.Caption
    End If
End Sub

'14. To display Number 4.
Private Sub cmdBtn4_Click()
    If txtRes = 0 Then
        txtRes = cmdBtn4.Caption
    Else
        txtRes = txtRes + cmdBtn4.Caption
    End If
End Sub

'15. To display Number 5.
Private Sub cmdBtn5_Click()
    If txtRes = 0 Then
        txtRes = cmdBtn5.Caption
    Else
        txtRes = txtRes + cmdBtn5.Caption
    End If
End Sub

'16. To display Number 6.
Private Sub cmdBtn6_Click()
    If txtRes = 0 Then
        txtRes = cmdBtn6.Caption
    Else
        txtRes = txtRes + cmdBtn6.Caption
    End If
End Sub
'17. To display Number 7.
Private Sub cmdBtn7_Click()
    If txtRes = 0 Then
        txtRes = cmdBtn7.Caption
    Else
        txtRes = txtRes + cmdBtn7.Caption
    End If
End Sub

'18. To display Number 8.
Private Sub cmdBtn8_Click()
    If txtRes = 0 Then
        txtRes = cmdBtn8.Caption
    Else
        txtRes = txtRes + cmdBtn8.Caption
    End If
End Sub
'19. To display Number 9.
Private Sub cmdBtn9_Click()
    If txtRes = 0 Then
        txtRes = cmdBtn9.Caption
    Else
        txtRes = txtRes + cmdBtn9.Caption
    End If
End Sub

'20. To display Number 0.
Private Sub cmdBtn0_Click()
    txtRes = txtRes + cmdBtn0.Caption
End Sub

'21. Final Calculations
Private Sub cmdBtnEql_Click()
On Error GoTo ErrOcccered
    'Dim txtRes As Long

    If txtDisplay = "Cannot divide by Zero" Then txtDisplay = Empty

    If txtRes <> "" And calVal <> "" Then
        FNum = Val(txtDisplay): SNum = Val(txtRes)
        Select Case calVal
            Case "Add"
                txtRes = FNum + SNum
            Case "Minus"
                txtRes = FNum - SNum
            Case "Multiplication"
                txtRes = FNum * SNum
            Case "Divide"
                If SNum = 0 Then
                    txtRes = "Cannot divide by Zero"
                Else
                    txtRes = FNum / SNum
                End If
            Case Else

        End Select
        txtdisplay = Empty
    End If
ErrOcccered:

End Sub
Display Calculator on the WorkSheet:
Here are steps to display calculator on the userform.
- Place any shape by clicking on insert menu from illustrations group.
- Right click on the shape, selct assign macro.
- select the shape name from the available list and click on OK button.
- Now, go to the Developer tab.
- Design Mode should be turned off from the Controls group.
- Now, go back to the shape and click on the created shape to see the calculator on the userform.
Instructions to Execute the Procedure:
You can download the below file and see the code and execute it.
- Open VBA Editor window or Press Alt+F11.
- Insert userform from the Insert menu.
- Create design as shown in theabove steps..
- Add Procedures by double clicking on userform.
- Run the project by hitting F5 key from the keyboard.
- hit the numbers on the calculator and see the output on the display area.
- And als you can use keyboard keys(up, down, left, right and enter to display numbers.
Download the Calculator Project – Excel VBA Project<:
Here is the Excel macro workbook file to explore the calculator project yourself.
Calculator using Excel VBA
A Powerful & Multi-purpose Templates for project management. Now seamlessly manage your projects, tasks, meetings, presentations, teams, customers, stakeholders and time. This page describes all the amazing new features and options that come with our premium templates.
Save Up to 85% LIMITED TIME OFFER

All-in-One Pack
120+ Project Management Templates
Essential Pack
50+ Project Management Templates
Excel Pack
50+ Excel PM Templates
PowerPoint Pack
50+ Excel PM Templates
MS Word Pack
25+ Word PM Templates
Ultimate Project Management Template
Ultimate Resource Management Template
Project Portfolio Management Templates
VBA Reference
Effortlessly
Manage Your Projects
120+ Project Management Templates
Seamlessly manage your projects with our powerful & multi-purpose templates for project management.
120+ PM Templates Includes:
12 Comments
-
Krishnaprasad Menon
January 2, 2016 at 9:52 AM — ReplyVery nice application.. Thank you very much
-
rahul
August 19, 2016 at 9:27 AM — Reply -
Imran
September 27, 2016 at 7:25 PM — ReplyAwsome .I was thinking it can only be develped in VB6
-
Kim
May 11, 2017 at 8:26 AM — ReplyThanks. It helps me a lot
-
SACHIN
May 30, 2018 at 8:57 AM — Reply -
anurup
July 7, 2018 at 11:00 AM — Replywhat is txtres and txtdisplay variable in here??
-
PNRao
July 27, 2018 at 9:55 PM — ReplytxtDisplay is the main text box used to display the entering values, and the txtRes is the textbox used to display the Result.
-
Godwin Inyene
September 26, 2018 at 1:32 AM — ReplyI love this project, please is there any how we can conmunicate cause there are some section where I got loss.
thanks -
I am sticking at a place that is I can’t understand have you used two text boxes or one, if two then where you drop the second text box (is it inside the main text box, the display one).
need help -
Rey
November 22, 2018 at 10:44 AM — ReplyI’ve got an error, “Compile error. Variable not defined” and highlight blue in calVal=
Private Sub cmdBtnAdd_Click()
If txtRes 0 Then
txtDisplay = txtRes
txtRes = 0
calVal = “Add”
End If
End Sub -
PNRao
July 4, 2019 at 7:09 PM — Replyplease reenter the double quotation marks.
-
PPP
May 12, 2020 at 8:32 PM — Reply
Effectively Manage Your
Projects and Resources
ANALYSISTABS.COM provides free and premium project management tools, templates and dashboards for effectively managing the projects and analyzing the data.
We’re a crew of professionals expertise in Excel VBA, Business Analysis, Project Management. We’re Sharing our map to Project success with innovative tools, templates, tutorials and tips.
Project Management
Excel VBA
Download Free Excel 2007, 2010, 2013 Add-in for Creating Innovative Dashboards, Tools for Data Mining, Analysis, Visualization. Learn VBA for MS Excel, Word, PowerPoint, Access, Outlook to develop applications for retail, insurance, banking, finance, telecom, healthcare domains.
Page load link
Go to Top
Mathematical Calculations in Excel VBA
When numbers are stored in variables, then you are allowed for mathematical calculation in Excel VBA, such as Addition, Subtraction, Multiplication and Division. Here are the examples of basic 4 types of mathematical operation:
Addition calculation:
Type the below codes and run it:
Sub mathAdd()
Dim x As Integer
Dim y As Integer
x = 7
y = 8
Range(«B4»).Value = x + y
End Sub
When you enter these codes in VBA Code window, then it will looks like this:
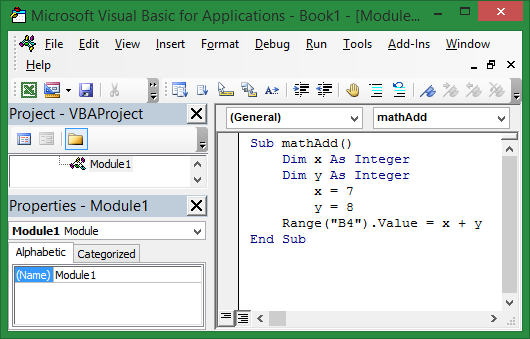
Image 1: Addition calculation in Excel VBA
The mathAdd is new function you have created for running the Addition operation. You can rename this as you want but obviously following the rules of naming a Sub procedure in Excel VBA. Then Dim declared variable names as X and Y where 7 and 8 values are stored. The cell B4 has selected to show the result. And finally for calculating the Addition, just used ‘+’ sign in between X and Y. The result will show in B4 is 15.

Image 2: Addition calculation
You can use another simple way to calculate the Addition operation. But this useful only if the value is fixed and not changed. The result will show the same 15 in B4 cell.
Sub mathAdd()
Dim x As Integer
x = 7 + 8
Range(«B4»).Value = x
End Sub
Subtraction calculation:
Type the below codes and run it:
Sub mathAdd()
Dim x As Integer
Dim y As Integer
x = 7
y = 8
Range(«B4»).Value = x — y
End Sub
When you enter these codes in VBA Code window, then it will looks like this:
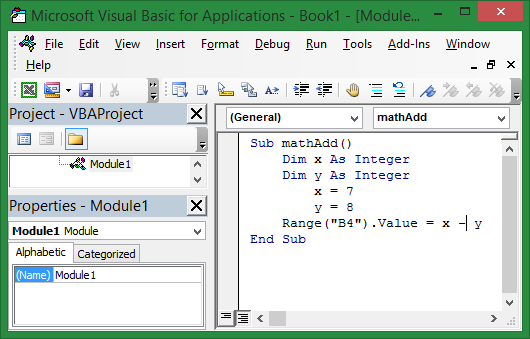
Image 3: Subtraction calculation in Excel VBA
The
mathAdd is new function you have created for running the Subtraction operation. I’ve used the same Sub procedure name to make you clear that, name is not a matter if you follow rules for naming a Sub procedure in Excel VBA. Then Dim declared variable names as
X and Y where 7 and 8 values are stored. The cell B4 has selected to
show the result. And finally for calculating the Subtraction, just used ‘-‘ sign
in between X and Y. This time the result will show in B4 cell is -1.
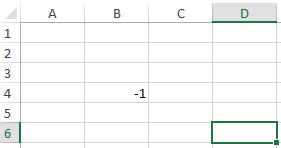
Image 4: Subtract calculation
You can use another simple way to calculate the Subtraction operation. The result will
show the same -1 in B4 cell.
Sub mathAdd()
Dim x As Integer
x = 7 — 8
Range(«B4»).Value = x
End Sub
Multiplication calculation:
Type the below codes and run it:
Sub mathAdd()
Dim x As Integer
Dim y As Integer
x = 7
y = 8
Range(«B4»).Value = x * y
End Sub
When you enter these codes in VBA Code window, then it will looks like this:

Image 5: Multiplication calculation in Excel VBA
The
mathAdd is new function you have created for running the Multiplication
operation. Then Dim declared variable names as
X and Y where 7 and 8 values are stored. The cell B4 has selected to
show the result. And finally for calculating the Multiplication, just used ‘*’
sign
in between X and Y. This time the result will show in B4 cell is 56.

Image 6: Multiplication calculation
You can use another simple way to calculate the Multiplication operation. The result will
show the same 56 in B4 cell.
Sub mathAdd()
Dim x As Integer
x = 7 * 8
Range(«B4»).Value = x
End Sub
Division calculation:
Division sign are 2 types. One is Integer Division () and another is Decimal Division (/). The difference in between these 2 types, forward slash (/) will calculate as Decimal Division and backslash will calculate as Integer Division. That means, If you use backslash () then you will only see the Result as Integer Number. Below is the example of Decimal Division:
Sub mathAdd()
Dim x As Integer
Dim y As Integer
x = 7
y = 8
Range(«B4»).Value = x / y
End Sub
When you enter these codes in VBA Code window, then it will looks like this:

Image 7: Division calculation in Excel VBA
The
mathAdd is new function you have created for running the Division
operation. Then Dim declared variable names as
X and Y where 7 and 8 values are stored. The cell B4 has selected to
show the result. And finally for calculating the Division, just used ‘/’
sign
in between X and Y. This time the result will show in B4 cell is 0.875.

Image 8: Division calculation
You can use another simple way to calculate the Division operation. The result will
show the same 0.875 in B4 cell.
Sub mathAdd()
Dim x As Integer
x = 7 / 8
Range(«B4»).Value = x
End Sub
Exponential calculation:
Type the below codes and run it:
Sub mathAdd()
Dim x As Integer
Dim y As Integer
x = 7
y = 8
Range(«B4»).Value = x ^ y
End Sub
When you enter these codes in VBA Code window, then it will looks like this:

Image 9: Exponential calculation in Excel VBA
The
mathAdd is new function you have created for running the Exponential
operation. You can rename this as you want but obviously following the
rules of naming a Sub procedure in Excel VBA. Then Dim declared variable
names as X and Y where 7 and 8 values are stored. The cell B4 has
selected to show the result. And finally for calculating the Exponention,
just used ‘^’ sign in between X and Y. The result will show in B4 is 5764801.

Image 10: Exponential calculation
You
can use another simple way to calculate the Exponential operation. But
this useful only if the value is fixed and not changed. The result will
show the same 5764801 in B4 cell.
Sub mathAdd()
Dim x As Integer
x = 7 ^ 8
Range(«B4»).Value = x
End Sub
Modulus (Remainder) calculation:
The Modulus operator returns the result of remainder, when divides two numbers. Type the below codes and run it:
Sub mathAdd()
Dim x As Integer
Dim y As Integer
x = 7
y = 8
Range(«A1»).Value = x Mod y
End Sub
When you enter these codes in VBA Code window, then it will looks like this:

Image 11: Modulus (Remainder) calculation in Excel VBA
The
mathAdd is new function you have created for running the Modulus (Remainder)
operation. You can rename this as you want but obviously following the
rules of naming a Sub procedure in Excel VBA. Then Dim declared variable
names as X and Y where 7 and 8 values are stored. The cell A1 has
selected to show the result. And finally for calculating the Remainder,
just used MOD between X and Y. The result will show in A1 is 7.

Image 12: Remainder calculation
You
can use another simple way to calculate the Remainder operation. But
this useful only if the value is fixed and not changed. The result will
show the same 7 in A1 cell.
Sub mathAdd()
Dim x As Integer
x = 7 Mod 8
Range(«A1»).Value = x
End Sub
One thing you should remember that, Excel VBA follows the priority basis mathematical calculation. Division will come first, Multiplication is second, Subtraction is third and Addition is last. So if you thing that, 6 + 15 / 3 will return 7 then you are wrong, it will return 11.
In this lesson you can learn how to add a formula to a cell using vba. There are several ways to insert formulas to cells automatically. We can use properties like Formula, Value and FormulaR1C1 of the Range object. This post explains five different ways to add formulas to cells.
Table of contents
How to add formula to cell using VBA
Add formula to cell and fill down using VBA
Add sum formula to cell using VBA
How to add If formula to cell using VBA
Add formula to cell with quotes using VBA
Add Vlookup formula to cell using VBA
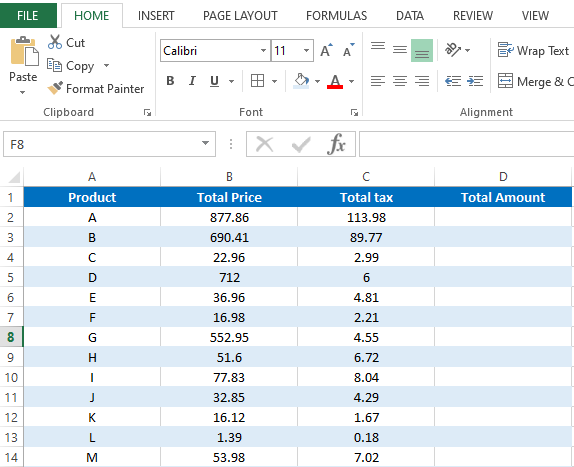
We use formulas to calculate various things in Excel. Sometimes you may need to enter the same formula to hundreds or thousands of rows or columns only changing the row numbers or columns. For an example let’s consider this sample Excel sheet.
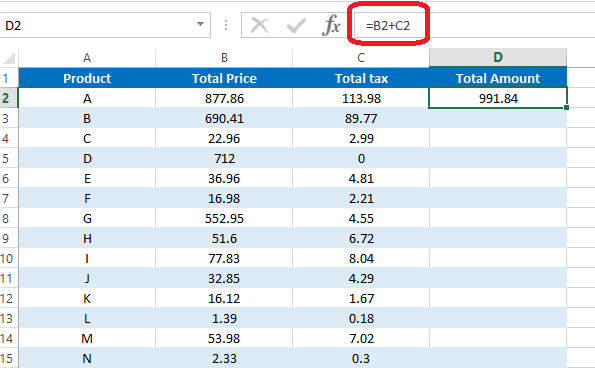
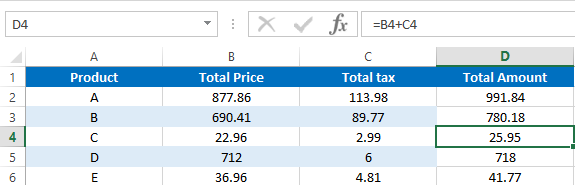
In this Excel sheet I have added a very simple formula to the D2 cell.
=B2+C2
So what if we want to add similar formulas for all the rows in column D. So the D3 cell will have the formula as =B3+C3 and D4 will have the formula as =B4+D4 and so on. Luckily we don’t need to type the formulas manually in all rows. There is a much easier way to do this. First select the cell containing the formula. Then take the cursor to the bottom right corner of the cell. Mouse pointer will change to a + sign. Then left click and drag the mouse until the end of the rows.
However if you want to add the same formula again and again for lots of Excel sheets then you can use a VBA macro to speed up the process. First let’s look at how to add a formula to one cell using vba.
How to add formula to cell using VBA
Lets see how we can enter above simple formula(=B2+C2) to cell D2 using VBA
In this method we are going to use the Formula property of the Range object.
Sub AddFormula_Method1()
Dim WS As Worksheet
Set WS = Worksheets(«Sheet1»)
WS.Range(«D2»).Formula = «=B2+C2»
End Sub
We can also use the Value property of the Range object to add a formula to a cell.
Sub AddFormula_Method2()
Dim WS As Worksheet
Set WS = Worksheets(«Sheet1»)
WS.Range(«D2»).Value = «=B2+C2»
End Sub
Next method is to use the FormulaR1C1 property of the Range object. There are few different ways to use FormulaR1C1 property. We can use absolute reference, relative reference or use both types of references inside the same formula.
In the absolute reference method cells are referred to using numbers. Excel sheets have numbers for each row. So you should think similarly for columns. So column A is number 1. Column B is number 2 etc. Then when writing the formula use R before the row number and C before the column number. So the cell A1 is referred to by R1C1. A2 is referred to by R2C1. B3 is referred to by R3C2 etc.
This is how you can use the absolute reference.
Sub AddFormula_Method3A()
Dim WS As Worksheet
Set WS = Worksheets(«Sheet1»)
WS.Range(«D2»).FormulaR1C1 = «=R2C2+R2C3»
End Sub
If you use the absolute reference, the formula will be added like this.
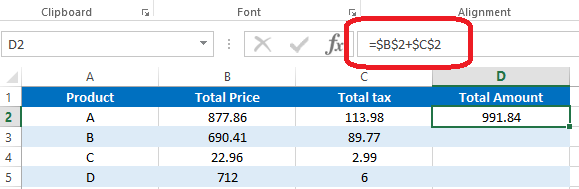
If you use the manual drag method explained above to fill down other rows, then the same formula will be copied to all the rows.
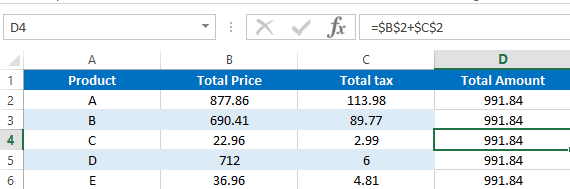
In Majority cases this is not how you want to fill down the formula. However this won’t happen in the relative method. In the relative method, cells are given numbers relative to the cell where the formula is entered. You should use negative numbers when referring to the cells in upward direction or left. Also the numbers should be placed within the square brackets. And you can omit [0] when referring to cells on the same row or column. So you can use RC[-2] instead of R[0]C[-2]. The macro recorder also generates relative reference type code, if you enter a formula to a cell while enabling the macro recorder.
Below example shows how to put formula =B2+C2 in D2 cell using relative reference method.
Sub AddFormula_Method3B()
Dim WS As Worksheet
Set WS = Worksheets(«Sheet1»)
WS.Range(«D2»).FormulaR1C1 = «=RC[-2]+RC[-1]»
End Sub

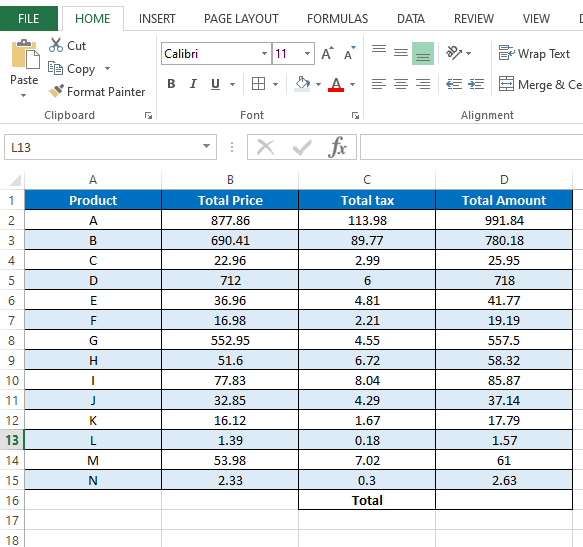
Now use the drag method to fill down all the rows.
You can see that the formulas are changed according to the row numbers.
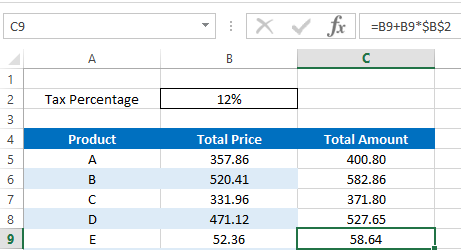
Also you can use both relative and absolute references in the same formula. Here is a typical example where you need a formula with both reference types.
We can add the formula to calculate Total Amount like this.
Sub AddFormula_Method3C()
Dim WS As Worksheet
Set WS = Worksheets(«Sheet2»)
WS.Range(«C5»).FormulaR1C1 = «=RC[-1]+RC[-1]*R2C2»
End Sub
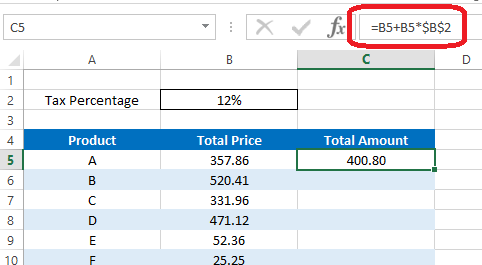
In this formula we have a absolute reference after the * symbol. So when we fill down the formula using the drag method that part will remain the same for all the rows. Hence we will get correct results for all the rows.
Add formula to cell and fill down using VBA
So now you’ve learnt various methods to add a formula to a cell. Next let’s look at how to fill down the other rows with the added formula using VBA.
Assume we have to calculate cell D2 value using =B2+C2 formula and fill down up to 1000 rows. First let’s see how we can modify the first method to do this. Let’s name this subroutine as “AddFormula_Method1_1000Rows”
Sub AddFormula_Method1_1000Rows()
End Sub
Then we need an additional variable for the For Next statement
Dim WS As Worksheet
Dim i As Integer
Next, assign the worksheet to WS variable
Set WS = Worksheets(«Sheet1»)
Now we can add the For Next statement like this.
For i = 2 To 1000
WS.Range(«D» & i).Formula = «=B» & i & «+C» & i
Next i
Here I have used «D» & i instead of D2 and «=B» & i & «+C» & i instead of «=B2+C2». So the formula keeps changing like =B3+C3, =B4+C4, =B5+C5 etc. when iterated through the For Next loop.
Below is the full code of the subroutine.
Sub AddFormula_Method1_1000Rows()
Dim WS As Worksheet
Dim i As Integer
Set WS = Worksheets(«Sheet1»)
For i = 2 To 1000
WS.Range(«D» & i).Formula = «=B» & i & «+C» & i
Next i
End Sub
So that’s how you can use VBA to add formulas to cells with variables.
Next example shows how to modify the absolute reference type of FormulaR1C1 method to add formulas upto 1000 rows.
Sub AddFormula_Method3A_1000Rows()
Dim WS As Worksheet
Dim i As Integer
Set WS = Worksheets(«Sheet1»)
For i = 2 To 1000
WS.Range(«D» & i).FormulaR1C1 = «=R» & i & «C2+R» & i & «C3»
Next i
End Sub
You don’t need to do any change to the formula section when modifying the relative reference type of the FormulaR1C1 method.
Sub AddFormula_Method3B_1000Rows()
Dim WS As Worksheet
Dim i As Integer
Set WS = Worksheets(«Sheet1»)
For i = 2 To 1000
WS.Range(«D» & i).FormulaR1C1 = «=RC[-2]+RC[-1]»
Next i
End Sub
Use similar techniques to modify other two types of subroutines to add formulas for multiple rows. Now you know how to add formulas to cells with a variable. Next let’s look at how to add formulas with some inbuilt functions using VBA.
How to add sum formula to a cell using VBA
Suppose we want the total of column D in the D16 cell. So this is the formula we need to create.
=SUM(D2:D15)
Now let’s see how to add this using VBA. Let’s name this subroutine as SumFormula.
First let’s declare a few variables.
Dim WS As Worksheet
Dim StartingRow As Long
Dim EndingRow As Long
Assign the worksheet to the variable.
Set WS = Worksheets(«Sheet3»)
Assign the starting row and the ending row to relevant variables.
StartingRow = 2
EndingRow = 1
Then the final step is to create the formula with the above variables.
WS.Range(«D16»).Formula = «=SUM(D» & StartingRow & «:D» & EndingRow & «)»
Below is the full code to add the Sum formula using VBA.
Sub SumFormula()
Dim WS As Worksheet
Dim StartingRow As Long
Dim EndingRow As Long
Set WS = Worksheets(«Sheet3»)
StartingRow = 2
EndingRow = 15
WS.Range(«D16»).Formula = «=SUM(D» & StartingRow & «:D» & EndingRow & «)»
End Sub
How to add If Formula to a cell using VBA
If function is a very popular inbuilt worksheet function available in Microsoft Excel. This function has 3 arguments. Two of them are optional.
Now let’s see how to add a If formula to a cell using VBA. Here is a typical example where we need a simple If function.
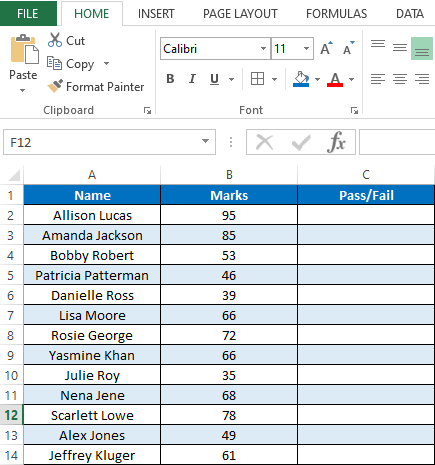
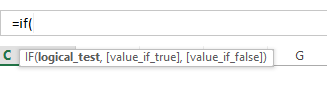
This is the results of students on an examination. Here we have names of students in column A and their marks in column B. Students should get “Pass” if he/she has marks equal or higher than 40. If marks are less than 40 then Excel should show the “Fail” in column C. We can simply obtain this result by adding an If function to column C. Below is the function we need in the C2 cell.
=IF(B2>=40,»Pass»,»Fail»)
Now let’s look at how to add this If Formula to a C2 cell using VBA. Once you know how to add it then you can use the For Next statement to fill the rest of the rows like we did above. We discussed a few different ways to add formulas to a range object using VBA. For this particular example I’m going to use the Formula property of the Range object.
So now let’s see how we can develop this macro. Let’s name this subroutine as “AddIfFormula”
Sub AddIfFormula()
End Sub
However we can’t simply add this If formula using the Formula property like we did before. Because this If formula has quotes inside it. So if we try to add the formula to the cell with quotes, then we get a syntax error.
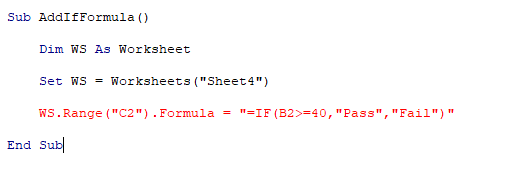
Add formula to cell with quotes
There are two ways to add the formula to a cell with quotes.
Sub AddIfFormula_Method1()
Dim WS As Worksheet
Set WS = Worksheets(«Sheet4»)
WS.Range(«C2»).Formula = «=IF(B2>=40,»»Pass»»,»»Fail»»)»
End Sub
Sub AddIfFormula_Method2()
Dim WS As Worksheet
Set WS = Worksheets(«Sheet4»)
WS.Range(«C2»).Formula = «=IF(B2>=40,» & Chr(34) & «Pass» & Chr(34) & «,» & Chr(34) & «Fail» & Chr(34) & «)»
End Sub
Add vlookup formula to cell using VBA
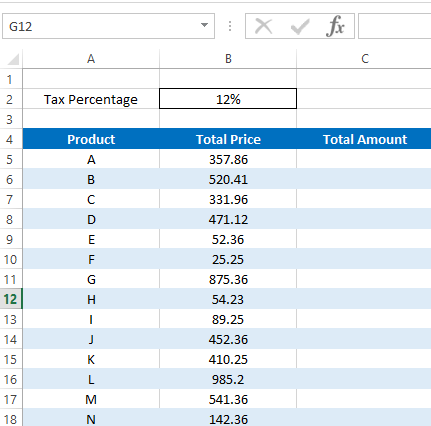
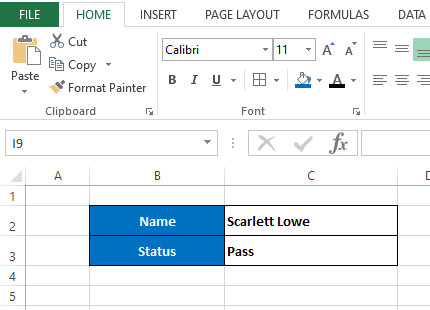
Finally I will show you how to add a vlookup formula to a cell using VBA. So I created a very simple example where we can use a Vlookup function. Assume we have this section in the Sheet5 of the same workbook.
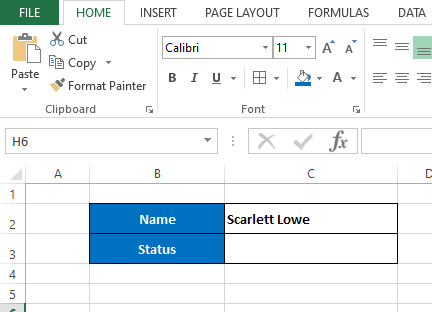
So here when we change the name of the student in the C2 cell, his/her pass or fail status should automatically be shown in the C3 cell. If the original data(data we used in the above “If formula” example) is listed in the Sheet4 then we can write a Vlookup formula for the C3 cell like this.
=VLOOKUP(Sheet5!C2,Sheet4!A2:C200,3,FALSE)
We can use the Formula property of the Range object to add this Vlookup formula to the C3 using VBA.
Sub AddVlookupFormula()
Dim WS As Worksheet
Set WS = Worksheets(«Sheet5»)
WS.Range(«C3»).Formula = «=VLOOKUP(Sheet5!C2,Sheet4!A2:C200,3,FALSE)»
End Sub
| title | keywords | f1_keywords | ms.prod | api_name | ms.assetid | ms.date | ms.localizationpriority |
|---|---|---|---|---|---|---|---|
|
Worksheet.Calculate method (Excel) |
vbaxl10.chm175078 |
vbaxl10.chm175078 |
excel |
Excel.Worksheet.Calculate |
7e807ae0-cd97-d95b-f4c4-af1e5674943e |
05/30/2019 |
medium |
Worksheet.Calculate method (Excel)
Calculates all open workbooks, a specific worksheet in a workbook, or a specified range of cells on a worksheet, as shown in the following table.
Syntax
expression.Calculate
expression A variable that represents a Worksheet object.
Remarks
| To calculate | Follow this example |
|---|---|
| All open workbooks | Application.Calculate (or just Calculate) |
| A specific worksheet | Worksheets(1).Calculate |
| A specified range | Worksheets(1).Rows(2).Calculate |
Example
This example calculates the formulas in columns A, B, and C in the used range on Sheet1.
Worksheets("Sheet1").UsedRange.Columns("A:C").Calculate
[!includeSupport and feedback]