
This tutorial will cover how to create a
simple HTML button which will export a particular list & list view to
Excel.
Materials
Needed:
<input type=»button»
style=»width:180px; height: 75px; 30px;background:gray;
color:white;font-size:larger;
font-weight:bold;»onclick=»window.location.href=’SITEURL/_vti_bin/owssvr.dll?CS=109&Using=_layouts/query.iqy&List={YOUR
LIST ID}&View={YOUR VIEW ID}&CacheControl=1′;» value =»YOUR
BUTTON TEXT»/>
The code above is essentially everything
that you will need for a simple Excel Export button. In order to get the code to work, you will
need to update the SITEURL, YOUR LIST ID, YOUR VIEW ID, & YOUR BUTTON TEXT.
The hardest part of this exercise is to
determine what your list & view ID are, but even that is simple!
To
Obtain Your List & View ID:
1.
Navigate To Your List
2.
Select List Settings
3.
Under Views
a.
Edit the view you would like to
create an export button for
4.
Copy The URL from your browser
a.
It should resemble: SitePath/_layouts/ViewEdit.aspx?List=%7B58B38FF2%2D9F99%2D4279%2DA22C%2DA2CCA95F4D7E%7D&View=%7B5781F798%2DD539%2D4015%2D87FB%2DA4A32925AACC%7D&Source=%252Fsites%252Fustsm%252F%255Flayouts%252Flistedit%252Easpx%253FList%253D%25257B58B38FF2%25252D9F99%25252D4279%25252DA22C%25252DA2CCA95F4D7E%25257D
b.
You can manually break out the
View= & List=, but I personally just use this free translator that is
embedded in the page which does it for you.
To
Implement The Button:
1.
Swap out the necessary snippets
in order to update the HTML code (YOUR BUTTON TEXT, YOUR URL, YOUR LIST ID, and
YOUR VIEW ID) with the information you obtained in “To Obtain Your List &
View ID.”
2.
Place the updated code into a
text file and save it out on your site
3.
On a webpage that you would
like the button, create a content editor web part and link that web part to the
URL of your text file, I would recommend using the relative path
(/local/fakesite/library/filename.etc).
That’s
It Folks!
Dan
Содержание
- QlikView App Dev
- How to export dataGridView data Instantly to Excel on button click?
- 14 Answers 14
- Экспорт данных в Excel
- В этой статье
- Экспорт данных в Excel: основы
- Стандартные сценарии экспорта данных в Excel
- Об экспорте данных в Excel
- Подготовка к экспорту
- Webslesson
- PHP, MySql, Jquery, AngularJS, Ajax, Codeigniter, Laravel Tutorial
- Tuesday, 13 July 2021
- How to Export Html Table to Excel Sheet using JavaScript
- Steps to Export HTML Table Data to Excel using JavaScript
- 1. HTML Table Data
- 2. JavaScript Code
- Conclusion
- Export to excel button
- Sign in
- Tagged as
- Stats
- Comments and Discussions
QlikView App Dev
Discussion Board for collaboration related to QlikView App Development.
- Subscribe to RSS Feed
- Mark Topic as New
- Mark Topic as Read
- Float this Topic for Current User
- Bookmark
- Subscribe
- Mute
- Printer Friendly Page
- Mark as New
- Bookmark
- Subscribe
- Mute
- Subscribe to RSS Feed
- Permalink
- Report Inappropriate Content
I need a button to export particular object or table to excel. is there any way to create button to export excel.
Thanks in advance for your support.
- Mark as New
- Bookmark
- Subscribe
- Mute
- Subscribe to RSS Feed
- Permalink
- Report Inappropriate Content
Maybe create a button, then add Action as follow?
Add a button -> Actions -> Export -> Setup
Then choose the fields you’d like to export and specify File and Format
- Mark as New
- Bookmark
- Subscribe
- Mute
- Subscribe to RSS Feed
- Permalink
- Report Inappropriate Content
Thanks for your reply,
we need to export object, as you said we are unable to setup to export particular object, and the export action after export its exporting combined fields. I have tried with macro its worked as we want, but this macro not working in web view.
can you please tell me is there any way to do this.
Thanks in advance
- Mark as New
- Bookmark
- Subscribe
- Mute
- Subscribe to RSS Feed
- Permalink
- Report Inappropriate Content
Yes, you should be able to use javascript and sheetjs as well. I assume by object you mean a pivot chart or a straight table and not some graphs or pictures.
- Mark as New
- Bookmark
- Subscribe
- Mute
- Subscribe to RSS Feed
- Permalink
- Report Inappropriate Content
I suspect you are using the wrong API for the Export, which is why Ajax is not working, everything is going to run server-side, but I know there is an export API that will run things client-side, believe it is ServerSideExportEx, you will find the QVW with all the APIs in the following link:
Источник
How to export dataGridView data Instantly to Excel on button click?
I have 10k rows and 15 column in my data grid view. I want to export this data to an excel sheet o button click. I have already tried with the below code.
This is working for me but it is taking lots of time to complete exporting process.
Is it possible to export from dataGridView (with 10k rows)to excel instantly on a button click?
Other than this, when I tried copy all dataGridview contents to clip board and then paste it to excel sheet manually, it happen almost instantly.
So is there a way to copy all dataGridView cells to clip board and paste it to excel sheet(with cell formatting) on a button click?
I have code for copy to clipboard as below, but I don’t know how to paste it in to a new excel sheet by opening it.
Please help with an example. I am new to C#.

14 Answers 14
I solved this by simple copy and paste method. I don’t know it is the best way to do this but,for me it works good and almost instantaneously. Here is my code.
This is a great question and I was surprised at how difficult it was to find a clear and complete answer, most of the answers I found were either sudo-code or not 100% complete.
I was able to create a complete solution to copy and save the data from my DataGridView to an excel file based on Jake’s answer so I’m posting my complete solution in the hopes that it can help other new comers to c# like myself 🙂
First off, you will need the Microsoft.Office.Interop.Excel reference in your project. See MSDN on how to add it.

I did not intend to steal @Jake and @Cornelius’s answer, so i tried editing it. but it was rejected. Anyways, the only improvement I have to point out is about avoiding extra blank column in excel after paste. Adding one line dataGridView1.RowHeadersVisible = false; hides so called «Row Header» which appears on the left most part of DataGridView, and so it is not selected and copied to clipboard when you do dataGridView1.SelectAll();
Interop is slow and has other issues, using the the clipboard seems non extensible. Here are two other ways to do this
Work with Excel 2007+ files directly instead of working with Excel, it’ll be much (much) faster. You can use OpenXML (http://openxmldeveloper.org/) which is Microsoft’s SDK. The best way to learn OpenXML is to download the Productivity tool (http://www.microsoft.com/en-us/download/details.aspx?id=5124), ittakes an existing file and generates the code required to create it. Another, perhaps simpler, option is to use ClosedXML (http://closedxml.codeplex.com/). It seems a lot easier to use (look at the example http://closedxml.codeplex.com/wikipage?title=Showcase&referringTitle=Home), but I have no experience with it. I’m sure there are other libraries that wrap work with Excel.
Work with excel via OLEDB. This allows you to work with Excel as if it’s a dababase. See http://www.codeproject.com/Articles/8500/Reading-and-Writing-Excel-using-OLEDB or Performance of OLEDB to read Excel for examples and more details.
I’d start with ClosedXML.
I like Jake’s solution. The problem with no header is resolved by doing the following
of course this only works is you know what the headers should be ahead of time.
that’s what i use for my gridview, try to use it for yr data , it works perfectly :
This answer is for the first question, why it takes so much time and it offers an alternative solution for exporting the DataGridView to Excel.
MS Office Interop is slow and even Microsoft does not recommend Interop usage on server side and cannot be use to export large Excel files. For more details see why not to use OLE Automation from Microsoft point of view.
Interop saves Excel files in XLS file format (old Excel 97-2003 file format) and the support for Office 2003 has ended. Microsoft Excel released XLSX file format with Office 2007 and recommends the usage of OpenXML SDK instead of Interop. But XLSX files are not really so fast and doesn’t handle very well large Excel files because they are based on XML file format. This is why Microsoft also released XLSB file format with Office 2007, file format that is recommended for large Excel files. It is a binary format. So the best and fastest solution is to save XLSB files.
You can use this C# Excel library to save XLSB files, but it also supports XLS and XLSX file formats.
See the following code sample as alternative of exporting DataGridView to Excel:
If you also need to export the formatting of the DataGridView check this code sample on how to export datagridview to Excel in C#.
Источник
Экспорт данных в Excel
С помощью мастера экспорта можно экспортировать данные из базы данных Access в файл формата, распознаваемого приложением Excel. В этой статье описаны процедуры подготовки и экспорта данных в Excel, а также приведены рекомендации по поиску и устранению типичных неполадок, которые могут при этом возникнуть.
В этой статье
Экспорт данных в Excel: основы
При экспорте данных в Excel приложение Access создает копию выбранных данных, а затем сохраняет их в файле, который можно открыть в Excel. Если данные требуется копировать из Access в Excel достаточно часто, можно сохранить параметры операции экспорта для повторного использования и даже запланировать ее автоматический запуск через определенные интервалы времени.
Стандартные сценарии экспорта данных в Excel
В отделе или рабочей группе для работы с данными используется как Access, так и Excel. Данные хранятся в базах данных Access, но для анализа и распространения его результатов используется Excel. Группа выполняет экспорт данных в Excel по мере необходимости, но этот процесс требуется сделать более эффективным.
Вы используете Access, но ваш руководитель предпочитает работать с данными в Excel. Вам приходится регулярно копировать данные в Excel, но вам хотелось бы автоматизировать этот процесс ради экономии времени.
Об экспорте данных в Excel
В приложении Access нет команды «Сохранить как” с возможностью сохранения данных в формате Excel. Чтобы скопировать данные в Excel, необходимо воспользоваться функций экспорта, описанной в этой статье, либо скопировать данные Access в буфер обмена, а затем вставить их в таблицу Excel.
Можно экспортировать таблицу, запрос, форму или отчет, а также отдельные записи в представлении.
В приложении Microsoft Excel есть команда импорта данных из базы данных Access. Ее можно использовать вместо команды экспорта Access, однако с помощью команды импорта в Excel можно импортировать только таблицы и запросы. Дополнительные сведения см. в разделе справки Excel Подключение к внешним данных и их импорт.
Экспортировать макросы и модули нельзя. При экспорте формы, отчета или таблицы с подчиненными формами, отчетами или таблицами экспортируется только главная форма, отчет или таблица. Все подчиненные формы, отчеты и таблицы следует экспортировать в Excel отдельно.
В ходе операции экспорта можно экспортировать лишь один объект базы данных. Однако после нескольких операций экспорта можно выполнить в Excel слияние нескольких листов.
Подготовка к экспорту
Прежде чем выполнять операцию экспорта, следует проверить данные, которые будут экспортироваться, на предмет сообщений об ошибках и ошибочных значений. Ошибки рекомендуется устранить до экспорта данных в Excel. В противном случае в ходе экспорта могут возникнуть неполадки, а в ячейки листа Excel могут быть вставлены пустые значения. Дополнительные сведения о проблемах, которые могут возникнуть при экспорте данных в Excel, см. в разделе Решение проблем, связанных с отсутствующими и неверными значениями.
Если исходным объектом является таблица или запрос, определите, как требуется экспортировать данные: с сохранением форматирования или без него. Выбранный способ экспорта влияет на два аспекта целевого файла: объем экспортируемых данных и формат их отображения. В приведенной ниже таблице представлены результаты экспорта форматированных и неформатированных данных.
Источник
Webslesson
PHP, MySql, Jquery, AngularJS, Ajax, Codeigniter, Laravel Tutorial
Tuesday, 13 July 2021
How to Export Html Table to Excel Sheet using JavaScript
In this tutorial you can find the solution of How to Export or Download the HTML Table Data in Excel Sheet by using JavaScript. Exporting Data to Excel is required feature in our web application. Because by export data functionality will helps to download data from web application to different file format for offline use of data and for this excel format is an ideal for exporting data in file for offline use. There many tutorial we have published for export data to excel at server side scripting using PHP. But if we can perform at client-side for export data into Excel sheet, so it will reduce load on server. So for this for export data to excel , here we will use JavaScript for perform client-side export data to excel sheet.
The client-side export feature will makes our web application more user-friendly. So with the help of JavaScript, we can export HTML table data to Excel format without refresh of web page. Under this tutorial, you can learn How to export HTML table data to excel using JavaScript. In this tutorial, we will use SheetJS JavaScript Library for export HTML table data to Excel.

Steps to Export HTML Table Data to Excel using JavaScript
1. HTML Table Data
For Export HTML data to Excel, here first we have to load some data in HTML table. So here we have make fetch employee table data and load in HTML table with table column like name, address, gender, designation and age. Here we have create HTML table with id employee_data. So this id we will use for fetch this HTML table data in JavaScript code. Under this HTML code we have make one button tag with id export_button, so when use has click on this button, then HTML table data will be download in Excel file format without refresh of web page using JavaScript.
2. JavaScript Code
In this tutorial, we have use SheetJS JavaScript Library for export HTML table data to Excel using JavaScript. So first we have to include following SheetJS library link at header of this HTML web page.
In JavaScript code part, first we have make html_table_to_excel(type) function. This function has use SheetJS Library function and convert or Write HTML table data to Excel format and download in browser without refresh of web page.
Once function is ready then we have to called html_table_to_excel(type) function on button click event, so for trigger button click event, we have use addEventListener method. So when user has click on button then html_table_to_excel(type) function has been called with xlsx file type. So it will download HTML table data in .xlsx format Excel file in browser without refresh of web page at client-side.
Conclusion
This tutorial will helps you to add export feature of download HTML table data in Excel sheet without using third-party jQuery plugin or any server-side script. By follow this tutorial you can easily export HTML table data to Excel using minimal JavaScript code.
If you want to get complete source with .sql file, so please write your email address in comment box. We will send you complete source code file at your define email address.
Источник
Export to excel button

Sign in

Tagged as
Stats
| Last Visit: 31-Dec-99 18:00 Last Update: 19-Mar-23 17:46 | Refresh | 1 234567 Next ᐅ |
 General
  News
News  Suggestion
  Question
  Bug
Bug  Answer
  Joke
Joke  Praise
  Rant
Rant  Admin
Admin
Use Ctrl+Left/Right to switch messages, Ctrl+Up/Down to switch threads, Ctrl+Shift+Left/Right to switch pages.
Источник
Introduction
This document will provide guidelines on how to create an Export to Excel button in PowerApps. If you have any questions, feel free to reach out to me at elin@inviso.dk.
Also, note that:
- I’m using a Swedish version of PowerApps where delimiters are “;”, in most other versions you would use a comma instead “,”. Check if you need to change it for it to work in your version.
- Always be aware of where you are saving files so that only people who should have access to the data can access the files.
- Sometimes when you copy code into PowerApps and PowerAutomate you need to make sure that the apostrophes are the correct format for it to work. You might have to remove them and add them directly in the app or flow.
PowerApps – Part 1
Add a button
Add a button to your canvas, we will write all the code in the OnSelect – part of the button.
Create a collection
To export our table from PowerApps, we will create a collection which the Power Automate flow then can access. The table that I’m exporting is currently a Gallery within PowerApps, if your data is coming from a Table instead you might have to make modifications.
For simple galleries that you want to export, where you have no choice columns and no columns that contain multiple values, for example, a user column that contains name, position, email, and department, you can use the following code to create the collection you want to export:
ClearCollect(ExportDataCollection; Gallery.AllItems)The clear part makes sure you first clear out any previously made collections. To double-check if the collection is correct, go to file -> collections and see that your collection looks the way you want.
For more complex data, where you have choice columns and columns containing multiple values, you can use the following code to get only the values you’re looking for. If you don’t do this, your collection will contain lists and arrays in some columns.
The code below first clears the collection as previously explained, and then creates a collection from the gallery with the specified columns and values. See comments in italics for an explanation.
Clear(ExportDataCollection);;We start with clearing the collection
ForAll( Gallery.AllItems As colCSV;The ForAll function evaluates a formula for all the records in the gallery.
The colCSV is just what we’re naming the Gallery.AllItems to keep as a reference, this is then what we use the table in the rest of the code below.
Collect(ExportDataCollection;
 {'Risk Title': colCSV.'Risk Title';
The first Risk Title is what we’re naming the column in our collection, this can be changed to any text value of choice.
The colCSV is just a reference to our gallery.
The second ‘Risk Title’ is the column value we’re want to save to this column. This is a text value in our data source and therefore we don’t need to specify anything else.
'Risk Owner Email': colCSV.'Risk Owner'.Email;This is an example of a column that has a value that is an array. The risk owner column contains an array of information, and by adding a .Email to the end, we can specify that we want the email address of the person.
'Risk Owner Department': colCSV.'Risk Owner'.Department;We’re using information from the same column as before, but here we’re choosing to save the value of the department to display what department the risk owner belongs to.
'Risk Status': colCSV.'Risk Status'.Value;This is an example of a choice column, we add the .Value in the end to get the value.
 'Risk Due Date': colCSV.'Risk Due Date';
 'Project Name': colCSV.'Project Name'.Value;
 Created: colCSV.Created;
 'Created By': colCSV.'Created By'.Email;
 Modified: colCSV.Modified;
 'Modified By': colCSV.'Modified By'.Email}))
This looks quite complex, but you can use the same technique here to get the right values as you are already doing in your gallery to display the right values. Remember that PowerApps gives you suggestions that make it even easier, this is for example how it looks when I start writing ‘Created By’: colCSV.’Created By’. :

This makes it easier to get the right values. Remember to try this and go to file -> collections to see that the collection looks the way you want.
Format as JSON
In order to set up our connection with PowerAutomate, we need to parse our collection as a JSON to the Power Automate flow. We will make it JSON with the following line of code:
Set(varFormattedJSON; JSON(ExportDataCollection; IndentFour));;Code v1
Your button OnSelect should now look something like this:
Clear(ExportDataCollection);;ForAll( Gallery.AllItems As colCSV;
Collect(ExportDataCollection;
{'Risk Title': colCSV.'Risk Title';
'Risk Owner Email': colCSV.'Risk Owner'.Email;
'Risk Owner Department': colCSV.'Risk Owner'.Department;
'Risk Status': colCSV.'Risk Status'.Value;
'Risk Due Date': colCSV.'Risk Due Date';
'Project Name': colCSV.'Project Name'.Value;
Created: colCSV.Created;
'Created By': colCSV.'Created By'.Email;
Modified: colCSV.Modified;
'Modified By': colCSV.'Modified By'.Email}));;Set(varFormattedJSON; JSON(ExportDataCollection; IndentFour));;PowerAutomate – Part 1
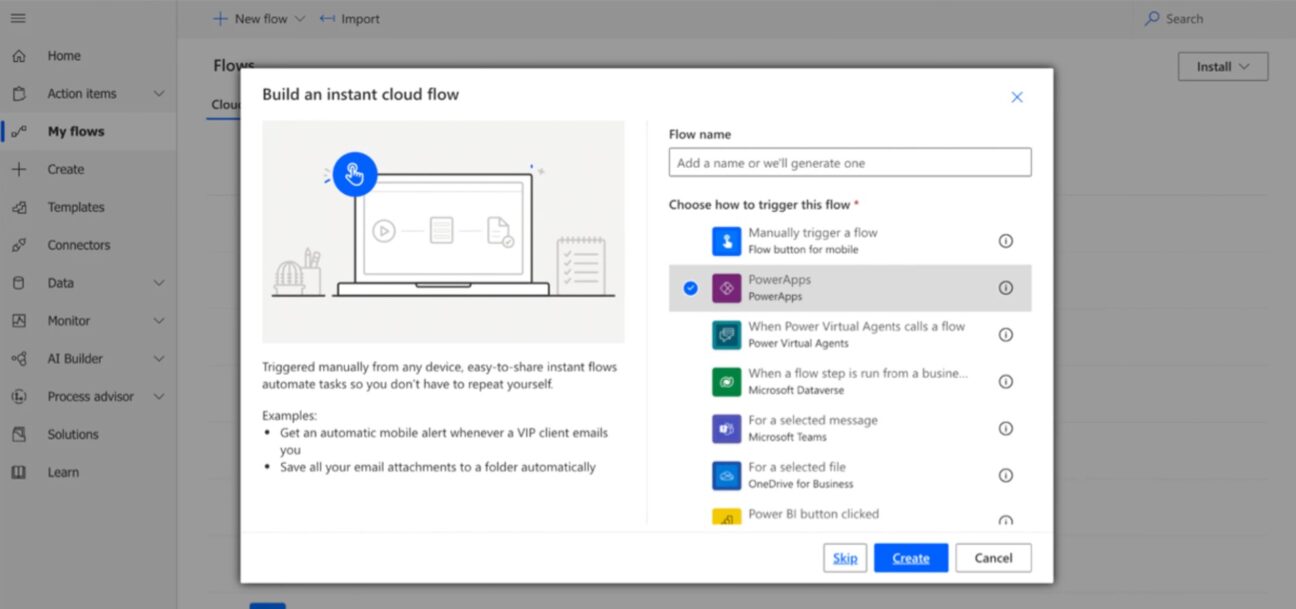
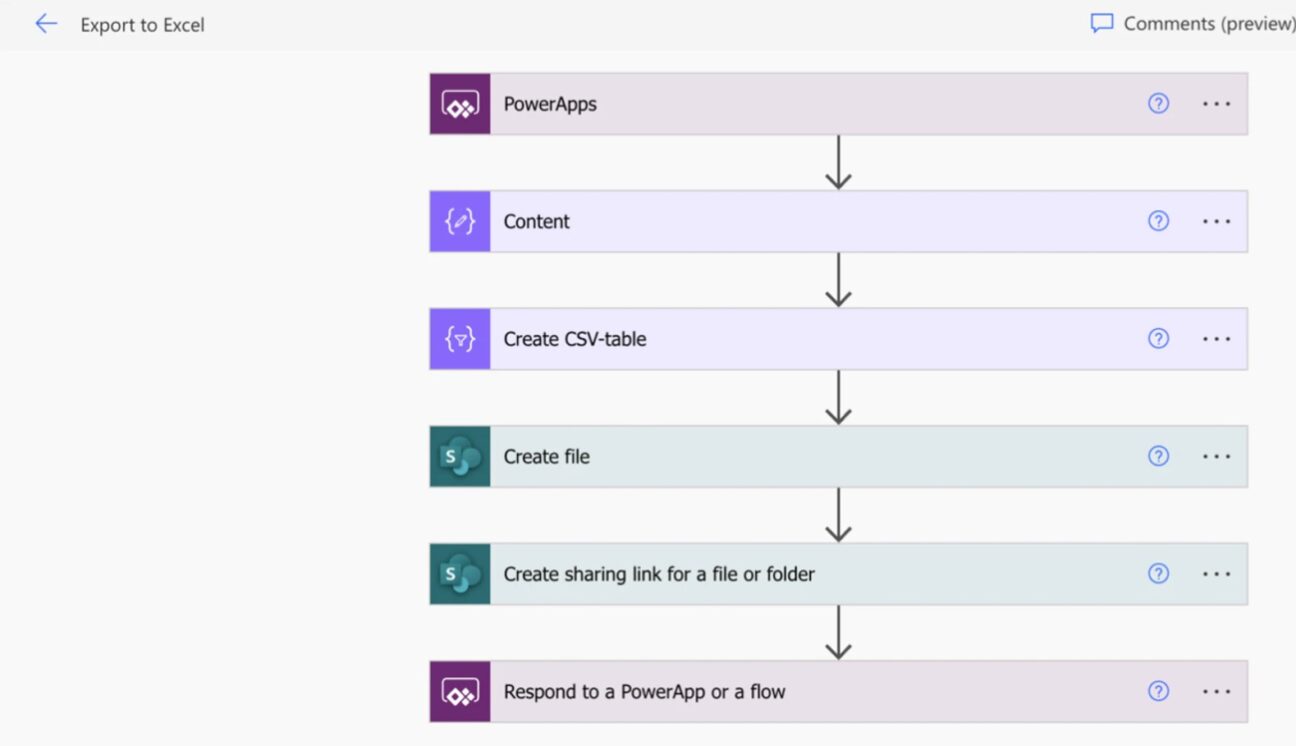
Head over to PowerAutomate and click New flow – > Instant cloud flow -> PowerApps. Name your flow Export to Excel.
PowerApps will automatically be the input for the flow.
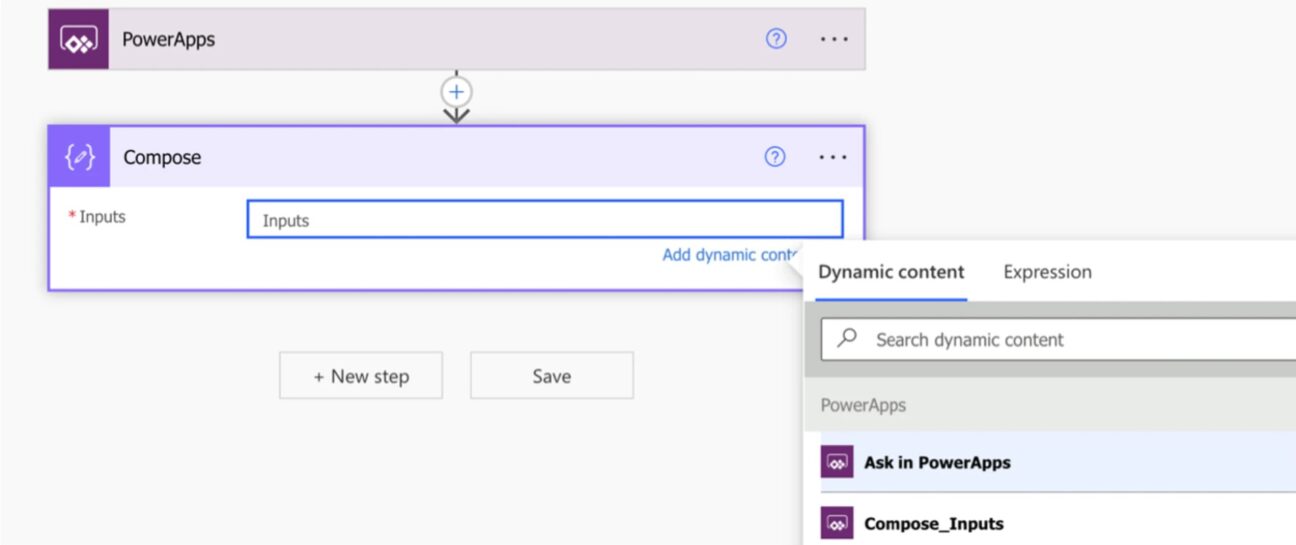
We start with adding a Compose action and we select “Ask in PowerApps”, when you have clicked Ask in PowerApps the Compose_Inputs will pop up as an option.
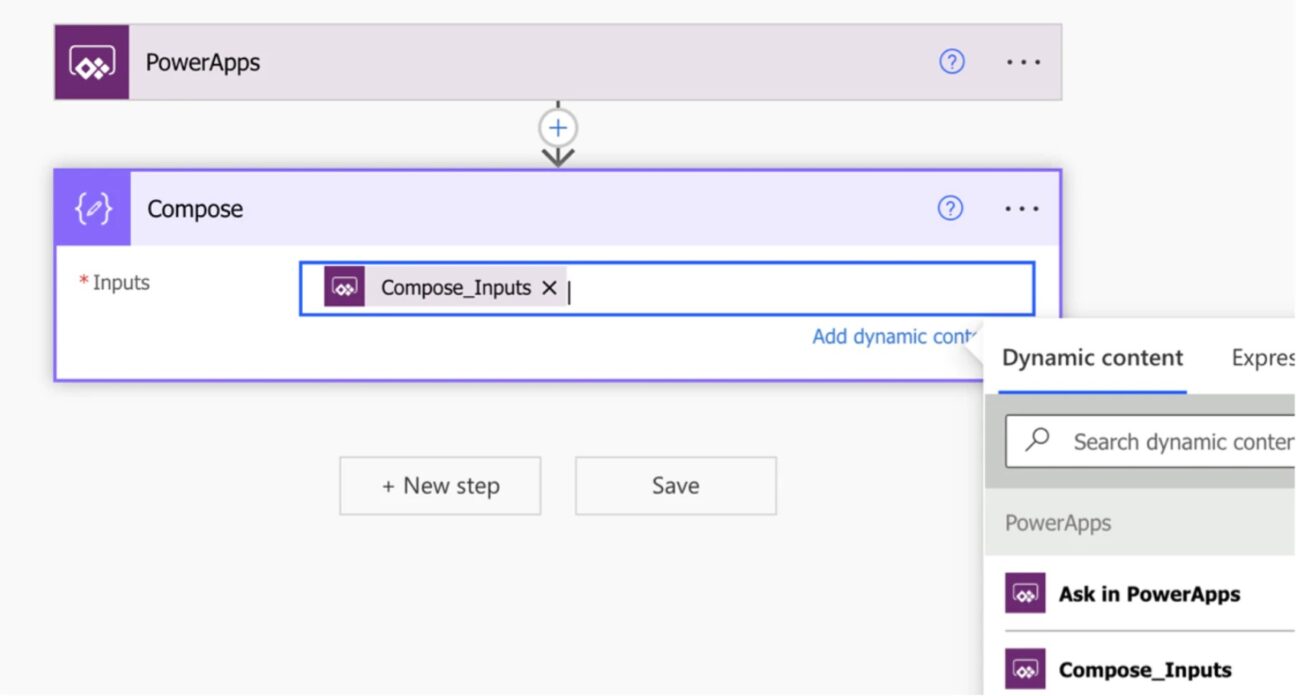
Select Compose_Inputs.
The connection between our flow and our app
Now a very important step comes in, we need to set up the connection between our app and our flow. Save the flow and then head back to our PowerApps.
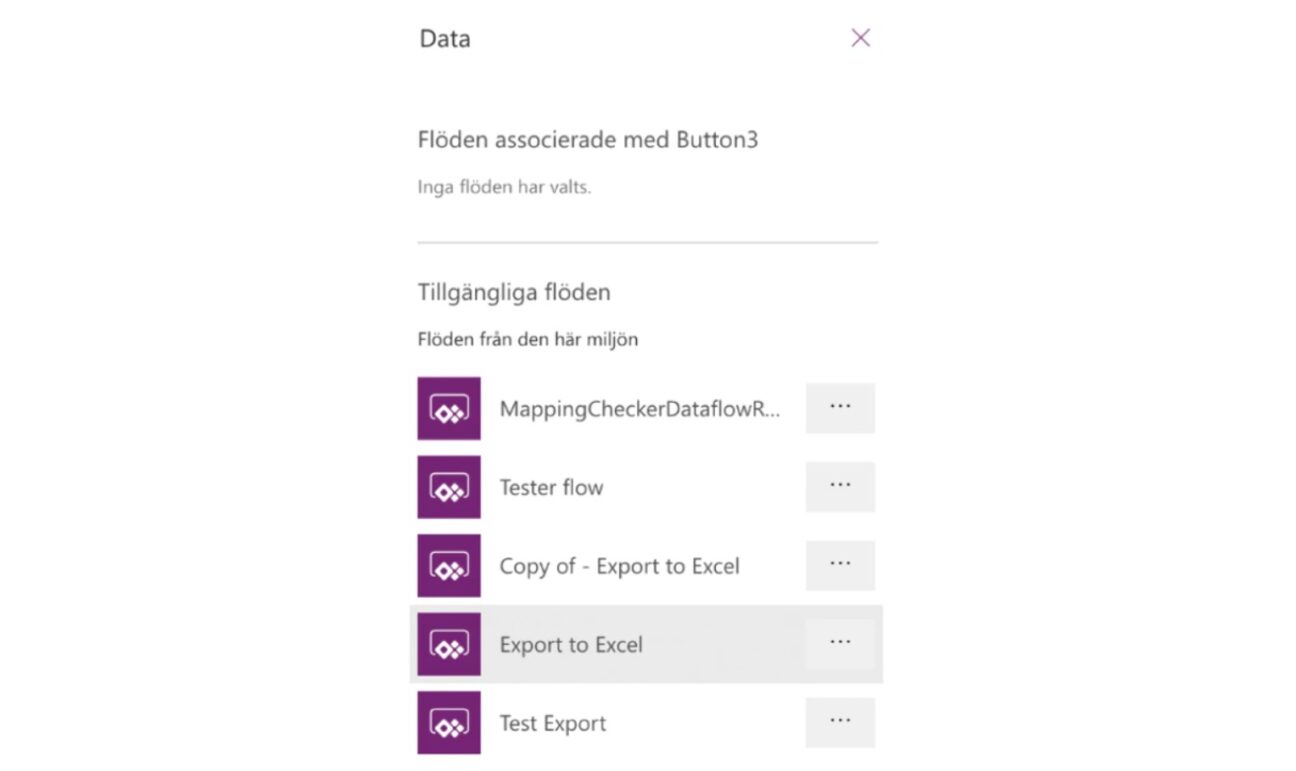
Create a new button and click Action -> Power Automate -> Export to Excel. Your Power Automate workflow will now be added to your PowerApp.
In this new button, add the code from your previous button with this piece of code below it:
ExporttoExcel.Run(varFormattedJSON)Code v2
The full code in this new button should look like this:
Clear(ExportDataCollection);;ForAll( Gallery.AllItems As colCSV;
Collect(ExportDataCollection;
{'Risk Title': colCSV.'Risk Title';
'Risk Owner Email': colCSV.'Risk Owner'.Email;
'Risk Owner Department': colCSV.'Risk Owner'.Department;
'Risk Status': colCSV.'Risk Status'.Value;
'Risk Due Date': colCSV.'Risk Due Date';
'Project Name': colCSV.'Project Name'.Value;
Created: colCSV.Created;
'Created By': colCSV.'Created By'.Email;
Modified: colCSV.Modified;
'Modified By': colCSV.'Modified By'.Email}));;Set(varFormattedJSON; JSON(ExportDataCollection; IndentFour));;ExporttoExcel.Run(varFormattedJSON)You can now click the button and the action will send our collection formatted as JSON to PowerAutomate, we need to do this now so that we can continue working on the PowerAutomate flow with some real data.
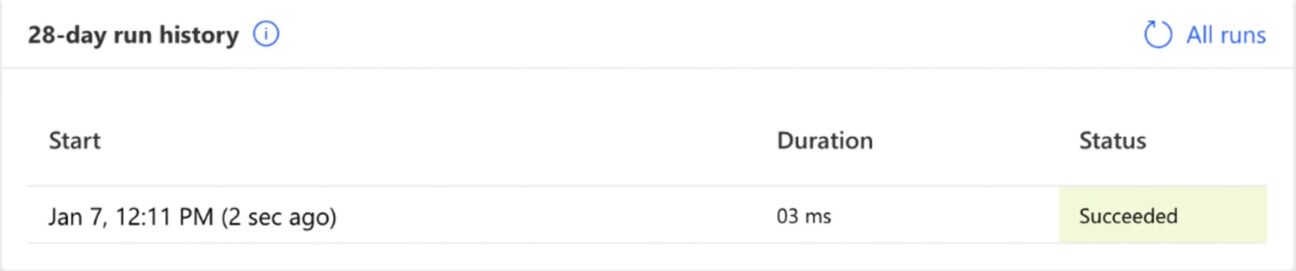
If you go to your flow, you should see this in your run history.
PowerAutomate – Part 2
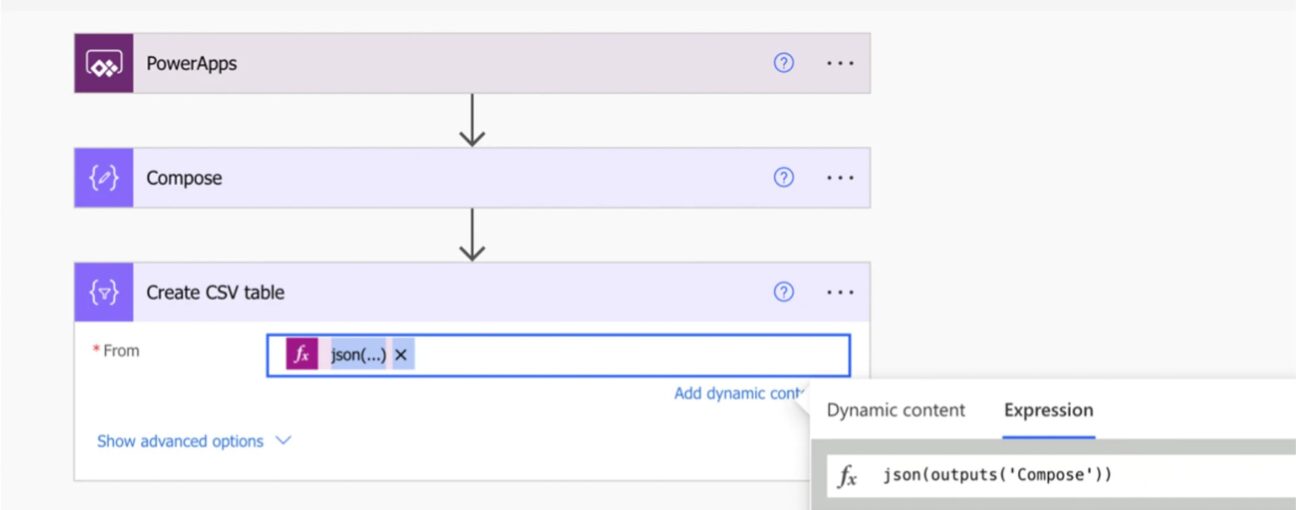
Go back to editing your flow and add the action Create CSV Table. In the From you’ll add the expression json(outputs(‘Compose’)). This action will now make a CSV from the output of the compose action. You can test your flow to see that it works.
In our app, we want the user to get a link when clicking the button. In order to do this, we need to first save the file in a SharePoint location and then create a link that we will send through to the user.
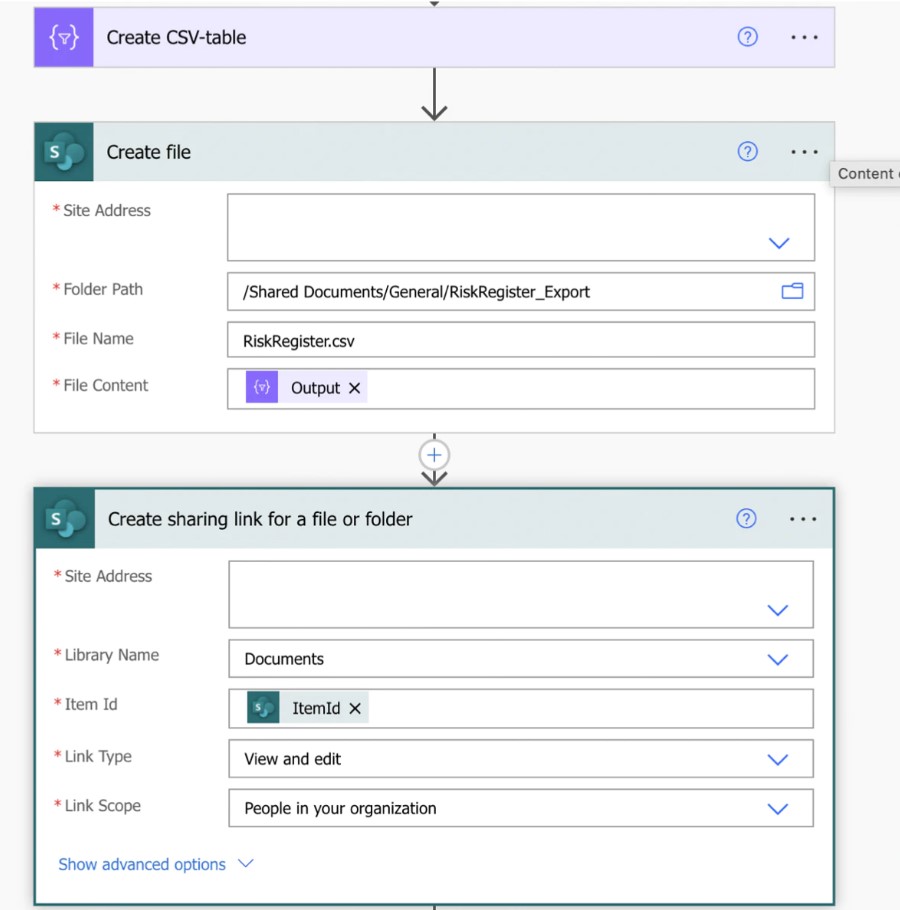
We will use the Create File and Create sharing link actions in PowerAutomate.
In the Create File part, select the site and path you want to save the file to. It’s important that this location is one where only those who should be able to see the data have access. Name the file and select the Output from the Create CSV table as File Content.
In the Create Sharing Link, select the same Site Address as above and the correct Library Name. Your Item Id will come from the Create File action. In the Link Type you can decide if people who open it should be able to edit or only view the file.
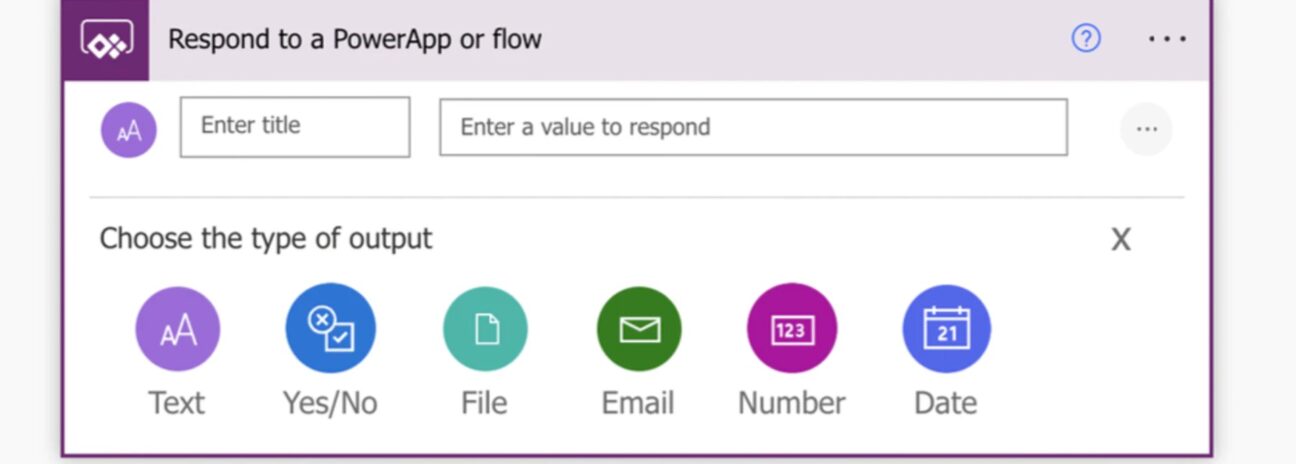
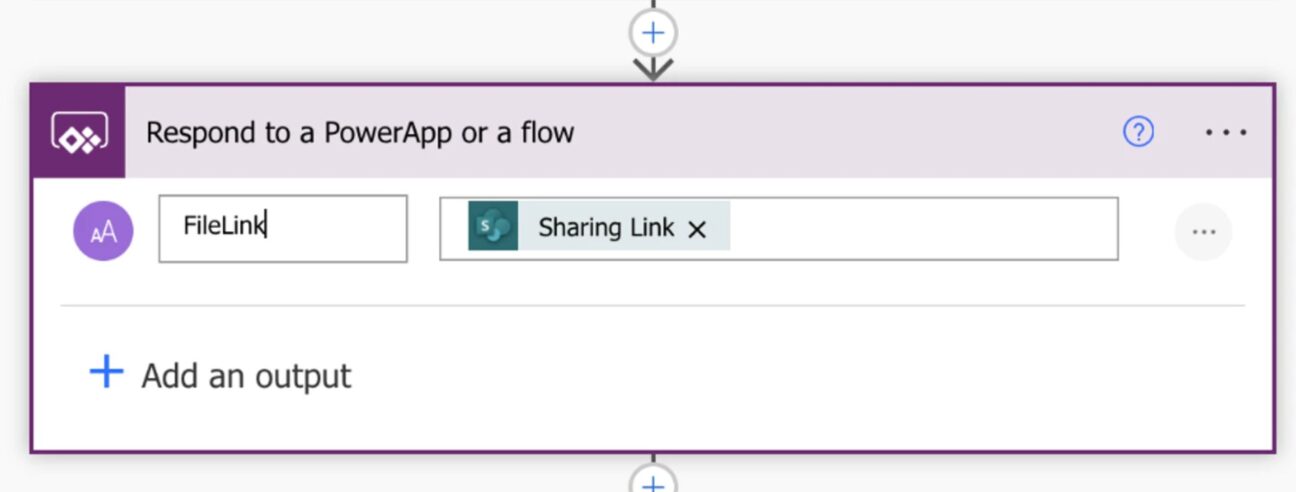
The final action will be to send a response to the PowerApp. Choose the type of output “Text”, here you write a name for the link, I have named mine FileLink, and the value will be the Sharing Link created previously. Our PowerAutomate flow is now done. And the full flow should look like this. Remember to save the app before you return to your PowerApps.
PowerApps – Part 2
When the flow is done, we can return to the previously made button that contains this code (code v2):
Clear(ExportDataCollection);;ForAll( Gallery.AllItems As colCSV;
Collect(ExportDataCollection;
{'Risk Title': colCSV.'Risk Title';
'Risk Owner Email': colCSV.'Risk Owner'.Email;
'Risk Owner Department': colCSV.'Risk Owner'.Department;
'Risk Status': colCSV.'Risk Status'.Value;
'Risk Due Date': colCSV.'Risk Due Date';
'Project Name': colCSV.'Project Name'.Value;
Created: colCSV.Created;
'Created By': colCSV.'Created By'.Email;
Modified: colCSV.Modified;
'Modified By': colCSV.'Modified By'.Email}));;Set(varFormattedJSON; JSON(ExportDataCollection; IndentFour));;ExporttoExcel.Run(varFormattedJSON)We can replace the last bit of code with this one:
Set(varFileLink;ExporttoExcel.Run(JSON(ExportDataCollection;JSONFormat.
IncludeBinaryData)).filelink);;Launch(varFileLink)This code will use the Export to Excel Power Automate flow to create a file link and then launch this file link. Allowing the user to open the data in Excel Online.
Final code
The final code in your button should now look like this:
Clear(ExportDataCollection);;ForAll( Gallery.AllItems As colCSV;
Collect(ExportDataCollection;
{'Risk Title': colCSV.'Risk Title';
'Risk Owner Email': colCSV.'Risk Owner'.Email;
'Risk Owner Department': colCSV.'Risk Owner'.Department;
'Risk Status': colCSV.'Risk Status'.Value;
'Risk Due Date': colCSV.'Risk Due Date';
'Project Name': colCSV.'Project Name'.Value;
Created: colCSV.Created;
'Created By': colCSV.'Created By'.Email;
Modified: colCSV.Modified;
'Modified By': colCSV.'Modified By'.Email}));;Set(varFileLink;ExporttoExcel.Run(JSON(ExportDataCollection;JSONFormat.
IncludeBinaryData)).filelink);;Launch(varFileLink)Test the functionality by clicking the button, if all works you should be provided with a link that goes to excel online and that contains all the data currently visible in the gallery on your app.
Say you have your own button
<a href="javascript:;" style="some button style" class="button_export_excel">Export Excel</a>
And you have your table that you are using the below code for;
$(document).ready(function () {
    var table = $('#example').DataTable({
        "paging": false,
        "info": false,
        searching: false,
        dom: 'Bfrtip',
        buttons: [
            {
                extend: 'excelHtml5'
            }
        ]
    });
});
Then all you need to do is to use this code below:
$('#example').DataTable({
        "paging": false,
        "info": false,
        buttons: [
            {
                extend: 'excel'
            },
            {
                extend: 'csv'
            },
        ]
    });
$('.button_export_excel').click(() => {
    $('#example').DataTable().buttons(0,0).trigger()
})
The 0,0 points to excel and if you want to point to csv you do 0,1.
April 2023 Community Newsletter
Welcome to our April 2023 Community Newsletter, where we’ll be highlighting the latest news, releases, upcoming events, and the great work of our members inside the Biz Apps communities. You can subscribe to the News & Announcements and stay up to date with the latest news from our ever-growing membership network who quickly discover that «Community is bigger on the inside».
LATEST NEWS
Microsoft Business Applications Launch Event — On Demand
Sign up below for an in-depth look into the latest updates from across Microsoft #PowerPlatform and #Dynamics365. Find out about new features, capabilities, and best practices for connecting data to deliver exceptional customer experiences, collaborating using AI-powered analytics, and driving productivity with automation. Guest speakers include Charles Lamanna, Emily He, Georg Glantschnig, Julie Strauss, Jeff Comstock, Lori Lamkin, Mike Morton, Ray Smith, and Walter Sun.
Watch Now: Business Applications Launch Event
Power Platform Connections — Episode Nine
Episode Nine of #PowerPlatform Connections premieres today at 12pm PST, as David Warner II and Hugo Bernier chat to Principal Program Manager Vesa Juvonen, alongside the great work of Troy Taylor, Geetha Sivasailam, Michael Megel, Nathalie Leenders, Ritesh Ranjan Choubey, Clay Wesener, Tristan DEHOVE, Dian Taylor, and Cat Schneider.
Click the link below to subscribe and get notified, with David and Hugo LIVE in the YouTube chat from 12pm PST. And remember to use the hashtag #PowerPlatformConnects on social to have your work featured on the show!
App in a Day — Free Workshop
Looking for a way to build a solution to quickly meet your business needs? Register below for a FREE «App in a Day» workshop to find out how to create custom business applications without writing code!
Microsoft Power Platform In a Day workshops
UPCOMING EVENTS
Directions Asia
Find out more about Directions 4 Partners Asia 2023, which will be taking place in Bangkok on 27-28th April 2023, featuring key speakers Mike Morton, Jannik Bausager and Dmitry Chadayev.
This event is for SMB focused Dynamics partners and their employees to receive product knowledge about Business Central, Power Platform and #DynamicsSales, and to be inspired and motivated by best practices, expert knowledge and innovative ideas.
If you want to meet industry experts, gain an advantage in the SMB-market, and acquire new knowledge about #MicrosoftDynamics Business Central, click the link below to buy your ticket today!
Click here to Register
Iberian Tech Summit
Come take a look at the Iberian Technology Summit which will be held at the Real Marina Hotel & Spa in Olhão, Portugal, between 28-30th April 2023.
The Iberian Technology Summit is the first of its kind with a clear goal to achieve — cross the borders of peninsula and help to empower the community of professionals, workers and businesses to grow stronger together.
Congrats to Kaila Bloomfield, Adam B., Ana Inés Urrutia de Souza and the team for putting together this great event. Click below to find out more details.
Click here to Register
Power Platform Conference 2023
We are so excited to see you for the Microsoft Power Platform Conference in Las Vegas October 3-5th, 2023! But first, let’s take a look back at some fun moments and the best community in tech from MPPC 2022 in Orlando Florida.
Featuring guest speakers such as Heather Cook, Julie Strauss, Nirav Shah, Ryan Cunningham, Sangya Singh, Stephen Siciliano, Hugo Bernier and many more, click the link below to register for the 2023 #MPPC23 today!
www.powerplatformconf.com
COMMUNITY HIGHLIGHTS
Check out our top Super and Community Users reaching new levels! These hardworking members are posting, answering questions, kudos, and providing top solutions in their communities.
Power Apps:
Super Users: @BCBuizer , @WarrenBelz,
Community Users: @mmollet, @Amik, @RJM07
Power Automate:
Super Users: @Expiscornovus , @grantjenkins, @abm
Community Users: @Nived_Nambiar
Power Virtual Agents:
Super Users: @Expiscornovus, @Pstork1,
Community Users: @nikviz, @DaniBaeyens
Power Pages:
Super Users: @ragavanrajan
Community Users: @OOlashyn, @gospa, @Fubar
LATEST PRODUCT BLOG ARTICLES
Power Apps Community Blog
Power Automate Community Blog
Power Virtual Agents Community Blog
Power Pages Community Blog
Check out ‘Using the Community’ for more helpful tips and information:
Power Apps, Power Automate, Power Virtual Agents, Power Pages