
Table of Contents
- How do you get bullets to not indent in Word?
- What is the opposite of tab for bullet points?
- How do I fix auto indent in Word?
- How do you add a space between bullets in Word?
- Why is my Tab not working in Word?
- Why is my Tab key not working?
- How do I put bullets on the same line in Word?
- How do you tab back a bullet in Word?
- How do you fix an indent?
- Why do Bulleted items not work in Word 2007?
- How to change the bullet style in word?
- Where to find Bullet Points in Microsoft Word?
- What happens when you hit Tab on a bullet?
To fix this, click the Microsoft Office button, select Word Options . Under Proofing , click AutoCorrect Options… . Under AutoFormat As You Type tab (in the Automatically as you type section), make sure that the “Set left- and first-indent with tabs and backspaces” option is checked.
How do you get bullets to not indent in Word?
Change bullet indents
- Select the bullets in the list by clicking a bullet.
- Right-click, and then click Adjust List Indents.
What is the opposite of tab for bullet points?
When creating bullet points for an outline you might use the tab key to indent your bullets (make sub points). But if you want to go back to the left with your bullets use shift+tab and it will restore your bullets to the left.
How do I fix auto indent in Word?
Controlling Automatic Indenting
- Display the Word Options dialog box.
- At the left side of the dialog box click Proofing.
- Click AutoCorrect Options button.
- Make sure the AutoFormat As You Type tab is displayed.
- Make sure the Set Left- and First-Indent with Tabs and Backspaces option is cleared.
How do you add a space between bullets in Word?
Select the entire bulleted list. Click Home, and then click Paragraph>Line Spacing. Choose the number of line spaces you want from the drop-down menu, or create custom line spacing by choosing Line Spacing Options….Change line spacing between bullets in a list
- Select the list.
- Click Home>Paragraph Dialog Box Launcher.
To set tab stops in Word 2013, 2016, 2019, or Word for Microsoft 365, do the following: On the Home tab, in the Paragraph group, choose Paragraph Settings. Click the Tabs button. Set the Tab stop position, choose the Alignment and Leader options, and then click Set and OK.
Why is my Tab key not working?
Your Tab key may be disabled by accidentally pressing some keyboard combinations, so you can try enabling the Tab key by pressing the keyboard combinations. Press the Ctrl key twice, and try Tab to see if it works. Press the Windows logo key twice, and see if it fixes your problem.
How do I put bullets on the same line in Word?
Insert multiple bullets in a single line in Word document
- Click Insert > Table.
- Fill the cells with words and select the whole table with clicking the button.
- Click Home > Bullets, and choose a bullet from the drop-down menu.
- Keep the table selected, click Home > Borders > No Border to hide the table borders.
How do you tab back a bullet in Word?
In Microsoft Word you can press the TAB key to move bullets to the right. then you can press TAB again followed by BACKSPACE to move the bullet back again (to the left).
How do you fix an indent?
Change paragraph indents and spacing
- Select one or more paragraphs that you want to adjust.
- Go to Home and then select the Paragraph dialog box launcher .
- Choose the Indents and Spacing tab.
- Choose your settings, and then select OK.
Why do Bulleted items not work in Word 2007?
This behavior occurs because bulleted items and numbered items use an internal tab to align the text with the bullet or with the number in Word 2003 and in earlier versions of Word. However, Word 2007 currently does not use the internal tab.
How to change the bullet style in word?
How to Change the Bullet Style in Word 1 Click next to the text for the bullet you want to change. 2 On the Home tab, in the Paragraph group, select the arrow next to Multilevel List, and then select Change List Level. 3 Select the level where you want the bullet. Each level has a different bullet style. See More….
Where to find Bullet Points in Microsoft Word?
In Microsoft Word, you can quickly access the newly modified List Bullet from the Home tab. You may accomplish this by incorporating it to the gallery of quick styles. The List Bullet will then be displayed under the Home panel. The bullet will be visible in the thumbnail.
What happens when you hit Tab on a bullet?
Now, if you hit Tab you should see the bullet indent. It won’t change “level”, from that solid to a hollow bullet, because that requires entering some text on that line, then hit Enter, then you should be able to hit Tab on the new, 2nd bullet and it should indent and change the level of the bullet from the solid to the hollow one.
Jill
-
#1
I used to be able to use bullets and when I hit enter and tab the bullet
shape would change and it would be indented. Now when I hit tab the bullet
remains on the left margin and only the words are indented to the right.
This is occuring on all my Word documents not just one file. How can I have
the formating back to the way it was with the outline format on all my files?
Advertisements
Suzanne S. Barnhill
-
#2
Word 97 or 2000: On the Edit tab of Tools | Options, check the box for «Tabs
and backspace set left indent.»
Word 2002 or 2003: On the AutoFormat As You Type tab of Tools | AutoCorrect
Options, check the box for «Set left- and first-indent with tabs and
backspaces.»
Word 2007: There is a similar setting somewhere.
Jill said:
I used to be able to use bullets and when I hit enter and tab the bullet
shape would change and it would be indented. Now when I hit tab the bullet
remains on the left margin and only the words are indented to the right.
This is occuring on all my Word documents not just one file. How can I have
the formating back to the way it was with the outline format on all my
files?
Want to reply to this thread or ask your own question?
You’ll need to choose a username for the site, which only take a couple of moments. After that, you can post your question and our members will help you out.
Ask a Question
When using Microsoft Word, we frequently run across issues. The formatting may not function, the bullet points may not line correctly, or the document may not appear properly. When you’re working on something crucial, it’s easy to become frustrated. Knowing how to repair Microsoft Word Bullet Points Not Working can help you save time and accomplish your task more quickly.
How to Create Bullet Style
Creating a personal bullet list style can assist you in organizing your contents in your papers whenever you need to utilize bullets. The instructions outlined here will assist you in styling your bullet in whichever way you deem fit.
Step-1: Create New List
To design your list design, head to the Home tab and then Paragraph block. Then, select Define New List Style from the Multilevel List menu.

Step-2: Give your List Style a Name and Format Numbering
After choosing Define New List Style, assign your list style a name so that you can quickly identify it in future documents. You may call it anything relating to the paragraph styles you’ll be using. ListBullets is the name of the style in this tutorial. Next, select Numbering from the Format menu.

Step-3: In the Multilevel list, organize all layers of bullets
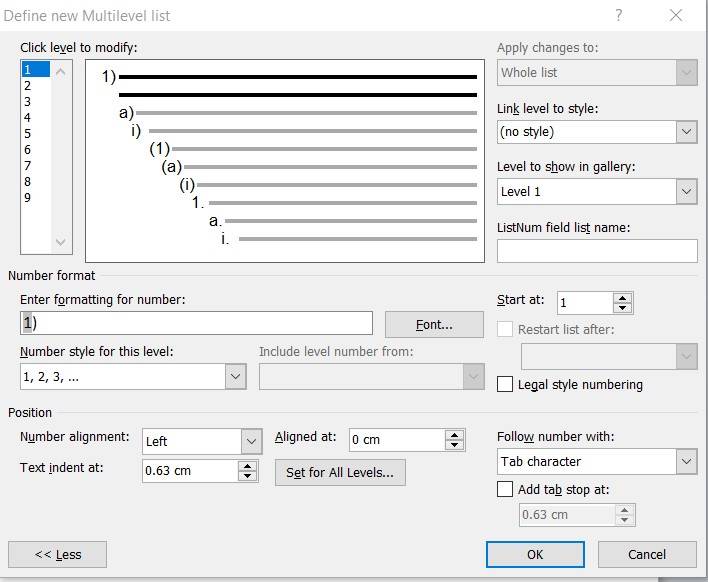
When you choose numbering under the Format options, Modify Multilevel list will appear. In that box, press More. Next, for the first five levels of the list style, apply the List Bullet paragraph style.
Pick level 1 from the ‘Click level to modify’ option. Select List Bullet from the ‘Link level to style’ menu. The paragraph style List Bullet is now attached to the list style’s first level. After that, under the ‘Click level to modify’ list, select level 2 and apply style List Bullet 2. Similarly, do this for levels 3, 4, and 5.
Step-4: Select Bullet Design
Beneath the ‘Click level to modify’ menu, click level 1. Choose the bullet shape you prefer in the ‘Number style for this level’ section as you proceed down the list. Repeat the same for level 2 and all the levels till level 5. Update the “Number style for this level” to none for the remainder of the levels and remove everything from “Enter formatting for number.”
Step-5: Manage Indents for your bullets in all levels
In reality, the default indents are completely appropriate. If you wish to change them, you have two alternatives. Using the “Set for all levels” option is the best approach. Set for All Levels box will appear.
Setting the ‘Aligned at,’ ‘Text indent at,’ or ‘Add tab stop at’ boxes separately is the problematic method. Keep in mind that everything is estimated from the margin.

Step-6: Confirm your settings
The process of building your own bullet list is finished once you’ve added the required indent space and chosen a bullet shape. To confirm your selections, press OK. This is how the final settings will appear.
How to fix bullets in Microsoft Word
Add the Personalized bullet list to Home tab
In Microsoft Word, you can quickly access the newly modified List Bullet from the Home tab. You may accomplish this by incorporating it to the gallery of quick styles. The List Bullet will then be displayed under the Home panel. The bullet will be visible in the thumbnail. You can do this by right-clicking on the name of the personalized bullet list in the Styles panel, then choose Add to Quick Styles from the menu bar. This is how it will appear in Quick Styles.
How to Add a Sub-bullet
Drag your pointer on the section of the text you wish to indent to create a sub-bullet. Click the ellipsis (…) next to the list buttons on the Home tab (as seen below), and afterward, Increase List Level.

How to format bullet points on Word
The bullet library is a subcategory of the font libraries that come with Microsoft Word. This implies you may customize your bullets with a different character. You may, for example, convert your dot bullets to arrows or even a € or $ figure. You may also use an image that you have on your computer or that you discovered on the web.
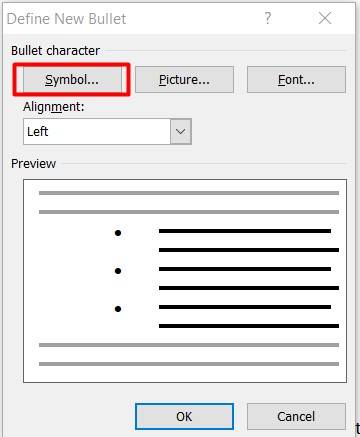
- To select all of the bullets in a list, first, click on one of them.
- Then, next to the bullet icon, press the down arrow.
- Choose Define New Bullet at the bottom of the panel.

- Select Symbol to modify or add a character. Pick a symbol from the symbol library and click OK. After selecting a new character, hit Font to alter the font characteristics. After making changes to the design, size, and font, press OK.
- Click Image to upload a picture. Click From a file to find photos on your computer, or an Image Search to discover an image on the internet in the Insert Pictures window. Select a picture from your PC or a Bing search and then press Open or Insert.

- Click OK if the preview of your new bullets appears adequate. Your bullets will be structured for you, and you are encouraged to be as innovative as you wish with them.
How to Solve Bullet Characters displaying empty boxes
Bullets are represented as empty boxes. When you use the Marlett typeface to construct a bulleted list, Word either adds at least one box or a bullet and a box symbol instead of a single bullet. Click Symbol (Insert menu), choose the Symbol you prefer, and then hit Insert. It’s possible that the text indentations will need to be adjusted. You may also insert a bullet with a different typeface.
Conclusion
Bullet points are commonly used to make your writing more presentable, emphasize essential information or material, summarize something, or illustrate procedures. When utilizing bullet points, you may run into issues, and they may not perform as well as you would want. Creating your own custom bullet style is an excellent approach to solve Microsoft Word Bullet Points not working. Following the procedures indicated above will assist you in resolving any bullet point concerns.
Open Word. Click File and select Options. Click Proofing and select AutoCorrect Options. Under AutoFormat As You Type, Click Set left- and first-indent with tabs and backspacescheck box if it is still not marked, and then click Ok.
Contents
- 1 How do I indent bullets in Word Tab?
- 2 Why doesn’t my bullet indent when I hit tab?
- 3 How do you change the tab level in a bullet?
- 4 How do you fix automatic bullets in Word?
- 5 Why can’t I add bullets in Word?
- 6 Why does my Tab key not work?
- 7 How do you indent on word?
- 8 How do I insert a tabbed list in Word?
- 9 How do you make a tabbed list?
- 10 What is the default tab stop in Word 2016?
- 11 How do I end bullet points in Word?
- 12 How would you change the Bullets of the text to arrow Bullets?
- 13 How do I insert bullets anywhere in Word?
- 14 How do you put bullets in between words in Word?
- 15 Why is the tab button going too far?
- 16 How do I know if my Tab key is working?
- 17 How many spaces is a tab?
- 18 How do I automatically indent paragraphs in Word?
- 19 What is Layout tab?
- 20 What is tabbed list in word?
Click the File tab, and then click Options. In the Proofing category, click AutoCorrect Options. On the AutoFormat As You Type tab, select “Set left and first indent with tabs and backspaces.” Click OK twice.
Why doesn’t my bullet indent when I hit tab?
4 Answers. For 2007 it’s: Office button → “Word Options” → “Proofing” → “AutoCorrect Options” → “AutoFormat As You Type” Check the “Set left- and first-indent with tabs and backspaces” box.
How do you change the tab level in a bullet?
Go into Word> Preferences> AutoCorrect – AutoFormat as you type to make sure the boxes are checked for Automatic bulleted lists & for Set left- and first-indent with tabs and backspaces.
How do you fix automatic bullets in Word?
Turn on or off automatic bullets or numbering
- Go to File > Options > Proofing.
- Select AutoCorrect Options, and then select the AutoFormat As You Type tab.
- Select or clear Automatic bulleted lists or Automatic numbered lists.
- Select OK.
Why can’t I add bullets in Word?
Try selecting everything EXCEPT for the final paragraph mark in the document and then use CTRL+c to copy it to the clipboard and the open a new blank document and use CTRL+v to paste from the clipboard into that document and then see if you can insert a bulleted paragraph in the normal manner.
Why does my Tab key not work?
Your Tab key may be disabled by accidentally pressing some keyboard combinations, so you can try enabling the Tab key by pressing the keyboard combinations.Press the Ctrl key twice, and try Tab to see if it works. Press the Windows logo key twice, and see if it fixes your problem.
How do you indent on word?
293 How do I indent a paragraph in Word?
- Select the paragraph to be indented;
- From the Home tab, Paragraph group, select the dialog box launcher;
- Check that the Indents and Spacing tab is selected;
- In the Indentation section set the indent value you require.
How do I insert a tabbed list in Word?
Work
- Introduction.
- 1On a new line of a Word document, press Tab.
- 2Type the item for the first column.
- 3Press Tab and then type the item for the second column.
- 4Press Enter to end that line and start a new line.
- 5Repeat Steps 1 through 4 for all the items in the list.
How do you make a tabbed list?
Select all lines of text that you want to organize into a two-column tabbed list. Highlight the desired text. Choose a left tab stop from the Tab gizmo on the ruler. If necessary, click the Tab gizmo until the Left tab-stop icon shows up.
What is the default tab stop in Word 2016?
By default, Word has left tab stops set at every half-inch, but you can create your own tab stops in a specific position or change the location of the existing tab stops.
How do I end bullet points in Word?
Stop a bulleted or numbered list
- At the end of the bulleted or numbered list, press RETURN two times.
- Select the line of text that you do not want in the list, and then, on the Home tab, in the Paragraph group, click Bulleted List or Numbered list .
How would you change the Bullets of the text to arrow Bullets?
Click next to the text for the bullet you want to change. On the Home tab, in the Paragraph group, select the arrow next to Multilevel List, and then select Change List Level. Select the level where you want the bullet.
How do I insert bullets anywhere in Word?
If you prefer, you can follow these steps:
- Choose Symbol from the Insert menu. Word displays the Insert Symbol dialog box.
- Make sure that (normal text) is selected in the Font drop-down list. (See Figure 1.)
- In the table of symbols, select the bullet character.
- Click on Insert.
- Click on Close.
How do you put bullets in between words in Word?
Method 1: Use the Insert Symbol command
- On the Insert menu, click Symbol. Microsoft Office Word 2007. On the Insert tab, click Symbols, and then click More Symbols.
- In the Symbol dialog box, click the bullet character.
- Click Insert, and then click Close.
Why is the tab button going too far?
Why is my tab button too far indenting? To select all content in your document, press Ctrl +A. Next, select Format > Align & Indent > Indentation options. In the “Indentation options” panel, make sure the box for “Left” is zero and “Special” is either “None” or the first line is set to 0.5.
How do I know if my Tab key is working?
Press and hold “ALT” and press the “0,0,9” keys on the numeric pad on the keyboard. If the pointer skips some space on the notepad, it means that the TAB function is working and the problem is related to hardware. Checking if the Pointer skips space.
How many spaces is a tab?
Generally, a tab is the same width as 4 to 5 spaces provided the font being used equally sizes each character. For example, the Courier font’s tab equals 5 spaces, whereas the Arial font is 11 spaces to each tab when the font size for both is set to 12.
How do I automatically indent paragraphs in Word?
This can be found in the “Indents and Spacing” tab. Click the drop down menu under “Special”. Select “First Line” to automatically indent the first line of each new paragraph. Enter the indent size.
What is Layout tab?
The Layout tab provides access to page display and layout options. These include page orientation and AutoFit, which is a feature that limits the width of columns in a report to be no wider than the largest value in each column. These options allow you to change the size or orientation of your report.
What is tabbed list in word?
Creating Tabbed Lists. If you have a relatively small amount of data to present, you might choose to display it in a tabbed list, which arranges text in simple columns separated by tabs. You can align the text within the columns by using left, right, centered, or decimal tab stops.

This tutorial shows two ways to create bulleted lists in Microsoft Word. We will also look at how to change list levels and how to change the size and color of bullets.
Quick Links:
- How to Create Bulleted Lists — Basic Method 1
- How to Create Bulleted Lists — Basic Method 2
- How to Change Bulleted List Levels
- How to Change the Size and Color of Bullets
Do you want to customize your bullets by using different symbols or your own images? See “How to Create Custom Bullets in Microsoft Word.”
This tutorial is available as a YouTube video showing all the steps in real time.
Watch more than 200 other writing-related software tutorials on my YouTube channel.
The images below are from Word for Microsoft 365. These steps will also work in Word 2021, Word 2019, Word 2016, Word 2013, and Word 2010. However, your interface may look slightly different in those older versions of the software.
This is the basic method of creating a bulleted list in Word. This method requires you to type each item as you create the list. If you have already typed your list items, see the other basic method shown below.
- Place your cursor where you want to start your bulleted list.
- Select the Home tab in the ribbon.

- Select the menu arrow next to the Bullets button.
![]()
- Choose a bullet style from the Bullet Library.

The first bullet will appear in your document.

- Type your first list item after the bullet and press the Enter key on your keyboard. The next bullet will appear.

- Continue typing your list items and pressing the Enter key until your list is complete.
- After typing the final item, press the Enter key twice to remove your cursor from the list.
How to Create Bulleted Lists in Microsoft Word — Basic Method 2
This method is for existing text formatted as a list.
- Select and right-click the text.
- Select the menu arrow next to the Bullets button in the Mini toolbar. (Alternately, you can select the menu arrow next to the Bullets button in the Home tab, as shown in figure 2.)
![]()
- Choose a bullet style from the Bullet Library (see figure 3).
Your selected items should become a bulleted list.

How to Change Bulleted List Levels in Microsoft Word
Word lets you create bulleted lists with up to nine nested levels. Here are two ways to change the level of list items:
How to Change Bulleted List Levels — Method 1
Important note: This method will not work for the first item in your list.
- Select one or more list items.

- Press the Tab key on your keyboard. Each time you press the Tab key, the bullet will move to the right one level (in this case, from level one to level two).

How to Change Bulleted List Levels — Method 2
This method will work for any item in your list, including the first item.
- Select one or more list items (see figure 8).
- Select the Home tab in the ribbon (see figure 1).
- Select the menu arrow next to the Bullets button (see figure 2).
- Select Change List Level from the drop-down menu.

- Select a list level from the submenu.

Your list item(s) should move to the next level.
How to Change the Size and Color of Bullets in Microsoft Word
By default, the size and color of your bullets will be the same as your text. However, you can manually change the size and color of bullets by selecting them separately from the text.
- Select one bullet. All bullets on that level will also be selected.

- Select the Home tab in the ribbon (see figure 1).
- Select a new font size, font color, or both from the Font group.

Your bullets should change to the new formatting. Repeat these steps for each level in your list, as necessary.

As always, remember to save your file to save your changes.
Related Resources
How to Create and Modify Numbered Lists in Microsoft Word
How to Write Vertical Lists (Ordered and Unordered)
Parallel Structure—The Secret to Beautiful Bullet Points
How to Insert Playing Card Symbols in Microsoft Word
Updated January 11, 2023
- Remove From My Forums
-
Question
-
I up graded to Office 2010 and in Word when I am typing a bullet-ed list and need to indent bullets as sub points, the tab key does not perform the bullet indentation. Can you advise on how to correct this?
Answers
-
Click the File tab, and then click Options. In the Proofing category, click AutoCorrect Options. On the AutoFormat As You Type tab, select “Set left and first indent with tabs and backspaces.” Click OK twice.
Stefan Blom, Microsoft Word MVP
-
Marked as answer by
Wednesday, January 18, 2012 3:17 AM
-
Marked as answer by
Use the button below to copy and paste the bullet point symbol. For more options to insert or type this symbol in Word, keep gliding down the page.
The table below contains some useful information about this symbol.
| Symbol Name | Bullet |
| Symbol | • |
| Alt Code | 0149 |
| Shortuct | Alt+0149 |
You’ll love this guide if you are looking for ways you can insert a bullet point symbol in Microsoft Word.
There are several methods you can use to perform this task. I’ll go through each one of them beginning with the simple ones. However, below is a quick solution:
To insert a bullet point symbol in Word, place the insertion pointer at where you want to insert the symbol, hold down the Alt key, then press 0149 on the numeric keypad, then release the Alt key – this will insert a bullet point symbol into your Word document.
Insert using the Insert Symbol dialog
The bullet point symbol is not readily available on the keyboard.
Therefore, inserting this symbol into Word becomes difficult for some people.
With the help of the Insert Symbol dialog box, you can easily
insert this symbol into your Word document.
Without further ado, below are the steps involved:
- Place the insertion pointer at where you want to
insert the symbol. - Go to the Insert tab.
- In the Symbols group, click on the Symbols button then choose More Symbols from the drop-down.

The Symbol dialog box will appear. This dialog is a
library of all symbols in Microsoft Word.
- Locate the bullet point symbol from the library
of symbols.
To easily locate this symbol, use the Subset dropdown list to display specific types of symbols. You can find the bullet or point symbol in the General punctuation subset.

- Click to select the symbol then click on the Insert button.

As soon as you click on the insert button, a bullet point symbol will be inserted into your Word document.
- Click on the Cancel button to dismiss the
dialog box.
This is how you may insert this and any other symbol in Word using the Symbol Dialog Box.
Copy and Paste
One of the easiest ways to insert this symbol into your Word document is a simple copy and paste.
Below is the symbol if you wish to copy and paste it into your document:
Bullet Symbol Copy & Paste
•
For more interesting options on how to insert this symbol,
read further.
Sometimes, Microsoft Word senses that you’re typing a
bulleted list and uses its AutoFormat As You Type feature to help you.
Thus, if you want to insert a point or bullet at the beginning
of paragraph, place the insertion pointer at the beginning of the new
paragraph, then press the Tab key once, type an asterisk (Shift+8), then
press the Tab key again, Word will convert the asterisk to a bullet or
point.
Alternatively, if you want to add bullet points to your list,
obey the following instructions:
- Type your list. Make sure each item begins a new line.

- Highlight all the list options.

- Go to the Home tab, in the Paragraph group, select the down arrow next to the Bullets option.

- A dropdown list of options will appear, select the Bullet list style to apply it to the selected text.
These steps will insert a bulleted point to the select text
making it a bulleted list.
Insert bullet point in Word using Alt Code (Shortcut)
All the symbols in Microsoft Word have a unique code that can be used to insert the symbols into Word. These codes are known as Alt code.
The Alt code for the Bullet Point Symbol is 0149.
To insert the bullet point symbol into Word using the Alt
Code, please obey the instructions below:
- Place the insertion pointer at where you want to insert the symbol.
- Whilst holding down the Alt key, press the alt code (0149) on the numeric keypad.
- Now release the Alt key.
As soon as you release the Alt key, the bullet point symbol
will be inserted into your Word document at exactly where the insertion pointer
was placed.
Insert Bullet Point symbol using AutoCorrect
Yet, another way you can use to insert the Bullet Point
symbol in Word is through the AutoCorrect feature in Word.
It is a facility designed for correcting spelling mistakes
like thsi to this.
Using this trick, you can assign a shortcut to the bullet point symbol (such as bpsym).
This way, whenever you type the text bpsym, Word will think
that you actually wanted to type • and will convert it into a bullet point automatically.

What makes this approach interesting is that you can assign
any code you want to the symbol and Word will be more than glad to insert the
symbol for you whenever you type the assigned code.
Without further ado, below are the steps you can use to type
Bullet Point symbol in Word using AutoCorrect.
- On the Insert tab, click Symbol and then click
More Symbols… The Symbol dialog appears. - Locate the Bullet Point symbol, then click to
select it.
- Click on the AutoCorrect… button to display the AutoCorrect dialog.

- In the AutoCorrect dialog box, enter the
following:
Replace: BPSYM
With: •

- Click Add, then click OK.
Word will automatically insert the Bullet Point symbol into
your document whenever you type BPSYM.
However, below are some things to note when you are using the AutoCorrect Method to insert the Bullet Point sign.
- If there is any text before or after the
AutoCorrect text, Word will consider the AutoCorrect text as part of the text
and hence will not convert it to the Bullet Point symbol. For example, XBPSYM
will not get converted, but X BPSYM will get converted to X •.
How do I change the default bullets in Word?
Go to Tools Customize and choose the Commands tab. On the left, choose Styles. Click the default numbers button on your toolbar to select it. You’ll now see that Modify Selection is available on the Customize dialog box.
How do I set a default bullet in Word?
Define a new bullet
- Select the text or bulleted list you want to change .
- On the Home tab, in the Paragraph group, click the arrow next to Bulleted List. , and then click Define New Bullet .
- Click Symbol and then click the symbol you want to use.
- Click OK.
How do you change automatic bullets in Word?
Turn on or off automatic bullets or numbering
- Go to File > Options > Proofing.
- Select AutoCorrect Options, and then select the AutoFormat As You Type tab.
- Select or clear Automatic bulleted lists or Automatic numbered lists.
- Select OK.
How do you change sub bullet to main bullet in Word?
Shift + Tab with bullet already there.
How do I make 1.1 bullets in Word?
Number your headings — Word — Microsoft Support
https://support.microsoft.com › en-us › office https://support.microsoft.com › en-us › office
What is the default bullet style?
As a default , Word uses a small dot as the bullet . You can change the bullet to any character you desire. You can change the bullets by following these steps: Choose the Bullets and Numbering option from the Format menu. 03-
How do I reset Bullets and Numbering in Word?
You can do so by following these steps:
- Choose Bullets and Numbering from the Format menu. …
- Make sure the Bulleted tab is displayed. …
- Select one of the seven other formats shown in the gallery.
- If the Reset button becomes available, click it. …
- Click Yes. …
- Repeat steps 3 through 5 for the other gallery formats on the tab.
Why are my bullet points different sizes word?
The size of the bullet symbol may change if you apply formatting to the paragraph mark that terminates the numbered or bulleted item. Select the whole paragraph and (re-)apply the font size . If you set this up with a paragraph style, selecting the whole paragraph and pressing Ctrl+SpaceBar would be the quickest fix.
How do you change the spacing between bullets in Word?
Select the entire bulleted list. Click Home, and then click Paragraph>Line Spacing . Choose the number of line spaces you want from the drop-down menu, or create custom line spacing by choosing Line Spacing Options.
What is the shortcut to change the bullet level in Word?
Faster Numbered and Multi- Level Level changes
- Alt + Shift + RIGHT arrow Down / right one level .
- Alt + Shift + LEFT arrow Up / left one level .
- Alt + Shift + UP arrow Move selected lines UP the list.
- Alt + Shift + DOWN arrow Move selected lines DOWN the list.
How do I move bullet points to the left in Word?
In Microsoft Word you can press the TAB key to move bullets to the right. then you can press TAB again followed by BACKSPACE to move the bullet back again (to the left ).