
Use the button below to copy and paste the bullet point symbol. For more options to insert or type this symbol in Word, keep gliding down the page.
The table below contains some useful information about this symbol.
| Symbol Name | Bullet |
| Symbol | • |
| Alt Code | 0149 |
| Shortuct | Alt+0149 |
You’ll love this guide if you are looking for ways you can insert a bullet point symbol in Microsoft Word.
There are several methods you can use to perform this task. I’ll go through each one of them beginning with the simple ones. However, below is a quick solution:
To insert a bullet point symbol in Word, place the insertion pointer at where you want to insert the symbol, hold down the Alt key, then press 0149 on the numeric keypad, then release the Alt key – this will insert a bullet point symbol into your Word document.
Insert using the Insert Symbol dialog
The bullet point symbol is not readily available on the keyboard.
Therefore, inserting this symbol into Word becomes difficult for some people.
With the help of the Insert Symbol dialog box, you can easily
insert this symbol into your Word document.
Without further ado, below are the steps involved:
- Place the insertion pointer at where you want to
insert the symbol. - Go to the Insert tab.
- In the Symbols group, click on the Symbols button then choose More Symbols from the drop-down.

The Symbol dialog box will appear. This dialog is a
library of all symbols in Microsoft Word.
- Locate the bullet point symbol from the library
of symbols.
To easily locate this symbol, use the Subset dropdown list to display specific types of symbols. You can find the bullet or point symbol in the General punctuation subset.

- Click to select the symbol then click on the Insert button.

As soon as you click on the insert button, a bullet point symbol will be inserted into your Word document.
- Click on the Cancel button to dismiss the
dialog box.
This is how you may insert this and any other symbol in Word using the Symbol Dialog Box.
Copy and Paste
One of the easiest ways to insert this symbol into your Word document is a simple copy and paste.
Below is the symbol if you wish to copy and paste it into your document:
Bullet Symbol Copy & Paste
•
For more interesting options on how to insert this symbol,
read further.
Sometimes, Microsoft Word senses that you’re typing a
bulleted list and uses its AutoFormat As You Type feature to help you.
Thus, if you want to insert a point or bullet at the beginning
of paragraph, place the insertion pointer at the beginning of the new
paragraph, then press the Tab key once, type an asterisk (Shift+8), then
press the Tab key again, Word will convert the asterisk to a bullet or
point.
Alternatively, if you want to add bullet points to your list,
obey the following instructions:
- Type your list. Make sure each item begins a new line.

- Highlight all the list options.

- Go to the Home tab, in the Paragraph group, select the down arrow next to the Bullets option.

- A dropdown list of options will appear, select the Bullet list style to apply it to the selected text.
These steps will insert a bulleted point to the select text
making it a bulleted list.
Insert bullet point in Word using Alt Code (Shortcut)
All the symbols in Microsoft Word have a unique code that can be used to insert the symbols into Word. These codes are known as Alt code.
The Alt code for the Bullet Point Symbol is 0149.
To insert the bullet point symbol into Word using the Alt
Code, please obey the instructions below:
- Place the insertion pointer at where you want to insert the symbol.
- Whilst holding down the Alt key, press the alt code (0149) on the numeric keypad.
- Now release the Alt key.
As soon as you release the Alt key, the bullet point symbol
will be inserted into your Word document at exactly where the insertion pointer
was placed.
Insert Bullet Point symbol using AutoCorrect
Yet, another way you can use to insert the Bullet Point
symbol in Word is through the AutoCorrect feature in Word.
It is a facility designed for correcting spelling mistakes
like thsi to this.
Using this trick, you can assign a shortcut to the bullet point symbol (such as bpsym).
This way, whenever you type the text bpsym, Word will think
that you actually wanted to type • and will convert it into a bullet point automatically.

What makes this approach interesting is that you can assign
any code you want to the symbol and Word will be more than glad to insert the
symbol for you whenever you type the assigned code.
Without further ado, below are the steps you can use to type
Bullet Point symbol in Word using AutoCorrect.
- On the Insert tab, click Symbol and then click
More Symbols… The Symbol dialog appears. - Locate the Bullet Point symbol, then click to
select it.
- Click on the AutoCorrect… button to display the AutoCorrect dialog.

- In the AutoCorrect dialog box, enter the
following:
Replace: BPSYM
With: •

- Click Add, then click OK.
Word will automatically insert the Bullet Point symbol into
your document whenever you type BPSYM.
However, below are some things to note when you are using the AutoCorrect Method to insert the Bullet Point sign.
- If there is any text before or after the
AutoCorrect text, Word will consider the AutoCorrect text as part of the text
and hence will not convert it to the Bullet Point symbol. For example, XBPSYM
will not get converted, but X BPSYM will get converted to X •.

Add text
To add text to your slide, click inside a text placeholder and start typing.
-
To add text bullets, place your cursor in the line of text, and on the Home tab, pick a bullet style.

-
Press Enter to move to the next bullet.

Add a sub-bullet
-
Put your cursor on the line of text you want to indent.
-
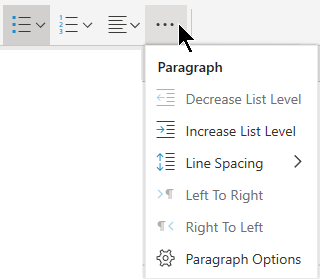
On the Home tab, select the ellipsis (…) next to the list buttons (as illustrated below), and then select Increase List Level.
Keyboard shortcut for Increase List Level: Tab.
Keyboard shortcut for Decrease List Level: Shift+Tab.
The cursor must be at the beginning of the paragraph for the keyboard shortcut to take effect.
Select text
To select a word: Point at the word and double-click the mouse.
To select a paragraph: Point at a word in the paragraph and triple-click.
To add pictures, see Insert a picture.
Need more help?
This wikiHow teaches you how to create a bulleted list in Microsoft Word.
Steps
-
1
Open Microsoft Word. You’ll find it in the Windows menu (Windows) or in the Applications folder (macOS).
-
2
Type the information you want to have in bullet form.
- For example, if you want to make a bulleted list, you may type a list item on its own individual line, press ↵ Enter or ⏎ Return, type the next item, press ↵ Enter or ⏎ Return, etc.
-
3
Highlight the parts you want bulleted. To highlight, click and hold the mouse button before the first letter in the first line, then drag the mouse to the end of the selection. You can lift your finger when you’re done highlighting the area.
-
4
Click the bulleted list button. It’s near the top of the screen in the “Paragraph” tab. It looks like very tiny bulleted list. This add bullets to the beginning of each list item.
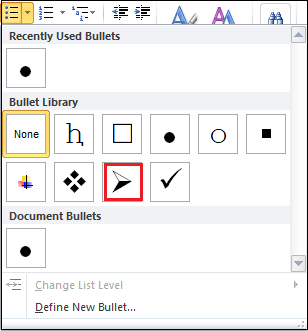
- To use a different type of bullet, such as a square or arrow, click the downward-pointing arrow next to the bulleted list button, then click your desired bullet.


Ask a Question
200 characters left
Include your email address to get a message when this question is answered.
Submit
About this article
Article SummaryX
1. Open Word.
2. Type your list.
3. Highlight your list.
4. Click the bulleted list button.
Did this summary help you?
Thanks to all authors for creating a page that has been read 1,851 times.
Is this article up to date?
Although most of an academic paper should be written with full sentences divided up into paragraphs, bullet points and numbered lists can be useful in some contexts. For instance, vertical lists are particularly useful when giving examples or reporting steps in a process.
Microsoft Word also makes adding lists to a document reassuringly simple. All you need to do is follow the instructions below.
Using Bullet Points in an Essay
Bullet points are useful when listing things non-sequentially (i.e., when there is no specific order in which the items involved should be listed). They should also be reserved for longer lists, as short lists of up to three or four items can be included in the main text.
To add a bullet pointed list to a document in Microsoft Word 2007 or later, simply:
- Place the cursor where you want the list to begin
- Go to “Paragraph” under the “Home” tab on the main ribbon

“Paragraph” options. - Click the “Bullets” button to begin a list (you can select the type of bullet point you want by using the arrow to open a new menu)
- Type the first entry in your list, hitting “Enter” to start the next one
To end your list, hit “Enter” twice after the final item. You can even customize your bullet points with an image of your choosing for a little extra color. We like using eagles, but we admit that this probably isn’t appropriate for most academic documents.

Using Numbered Lists
Numbered lists are appropriate when listing items sequentially or in order of importance. The process for adding a numbered list to a document is similar to adding a bulleted list:
Find this useful?
Subscribe to our newsletter and get writing tips from our editors straight to your inbox.
- Select where you want to begin your list
- Go to the “Paragraph” section of the “Home” tab
- Click the “Numbering” button (you can select a numbering style from the dropdown menu by clicking the arrow)

The “Numbering” options. - Type your first entry, then hit “Enter” to create the next one
As with bulleted lists, you end a numbered list by hitting “Enter” twice after the final item. For more control over the style, select “Define New Number Format” in the numbering menu.
Using Multilevel Lists
Finally, if you really want to push the boat out, you can use a “Multilevel” list. This is useful if you want to include sub-lists within a main list, like in the following:

To add a list like this to your document, you’ll have to:
- Select a list style under “Multilevel List” in the “Paragraph” section of the “Home” tab

Multilevel list options. - Write out your list as normal, beginning each item on a new line
- To adjust the “level” of any given point, simply open the “Multilevel List” menu and select the appropriate option from the “Change List Level” submenu

Changing list level.

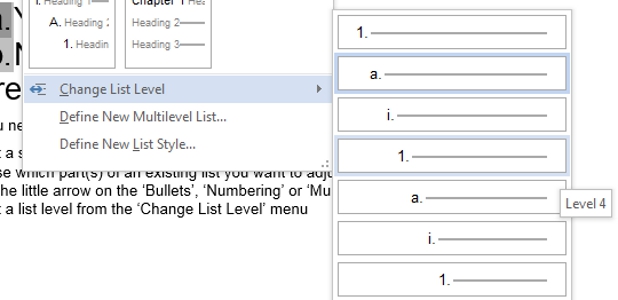
As with the other lists discussed here, you can customize the style of multilevel lists by selecting “Define New Multilevel List” from the menu. This will open a new window where you can modify each level of your chosen list style as required.
Typing the Bullet Point symbol or Dot Sign (•) is very very easy in both windows and mac from a keyboard.
In this guide, I will tell you about various interesting methods using which you can type bullet point symbols in word, excel, etc.
Here’s how
If you are searching for ways to insert bullet points in Microsoft Word, this guide will be of great help to you.
The method you choose depends on the task you are performing. I’ll start with the easiest first.

Here’s a quick fix:
Place the insertion pointer where you wish the bullet point symbol to appear in Word. Keep the Alt key pressed. You then need to press and release the Alt key after pressing 0149 on the numeric keypad.
You will now have bullet point symbols in your Word document.
Insert Using Symbol Dialog Box
Keyboards do not have a bullet point symbol. Because of this, it can be difficult for some people to insert the symbol into Word.
This symbol can be easily inserted into a Word document by using the Insert Symbol dialog box.
I will outline the steps below without further ado:
- Wherever you wish to insert the symbol, place the insertion pointer.
- Select the Insert tab.

- The Insert tab will appear
- Click on the Symbols button under the Symbols group. Click on More Symbols to expand the list.

- Please click on the More Symbol drop-down menu.
A dialog box for selecting a symbol will appear. The Microsoft Word Symbol Library dialog box provides a list of all the symbols within the program.
From the library of symbols, locate the bullet point symbol.
Symbols of specific types can be displayed easily using the Subset dropdown list. Bullet and point symbols are found in the subset of General punctuation.
- From the library of symbols, select the bullet point symbol
- Click on the symbol to select it. Select Insert from the menu.
- Choose the bullet symbol. Then click on Insert

By clicking the insert button, you will automatically insert a bullet point symbol in your Word document.
- If you’d like to cancel this dialog, click on the Cancel button.
This is how the Symbol Dialog Box in Word allows you to insert this and other symbols.
Copy and Paste Bullet Symbol
A simple copy and paste into your Word document is the easiest way to add this symbol.
If you would like to copy the symbol and paste it into your document, it is below:
[su_note note_color=”#FFFFE0″ radius=”15″]
•
[/su_note]
Further reading will provide you with more options for inserting this symbol.
Add Bullet Point Sign to a List
When you type a bulleted list in Microsoft Word, the program is able to detect it. This feature uses its auto-formatting as you type functionality to help you.
Consequently, the insertion pointer must appear at the beginning of each new paragraph if you intend to insert a point or bullet.
Once the Tab key has been pressed, continue. You’ll need to press Shift+8 (asterisk). Once again, press Tab. The asterisk will be converted to a bullet or point in Word.
As an alternative, if you would like to include bullet points in your list, follow these instructions:
- List your items. Each item should be on a new line

- The options in the list should be highlighted.

- You can add bullets to any list you choose
- In the Paragraph group, click the Home tab. Choose Bullets from the drop-down list.

- The options will appear in a dropdown menu. The selected text will be styled as a bullet list when you select the bullet list style.
- You can add bullets to a list by selecting it.

- Using these steps you will create a bulleted list from the select text.
Insert bullet point in Word using Alt Code
To insert the symbols into Word, Microsoft Word has a unique code for each of its symbols. They are called Alt codes.
Bullet Point Symbols have the Alt code 0149.
Here are the instructions for inserting the bullet point symbol with the Alt Code:
- Wherever you wish to insert the symbol, place the insertion pointer.
- Using the numeric keypad, press the alt code (0149) while holding down the Alt key.
- You can now release the Alt key.
You will see the bullet point symbol appear in your Word document immediately after releasing the Alt key.
Insert Bullet Point symbol using AutoCorrect
In addition, you can use the AutoCorrect feature in Word to insert the Bullet Point symbol.
Using it, spelling mistakes can be corrected.
The bullet point symbol can be assigned a shortcut using this trick. (such as bpsym).
This will make Word think you actually wanted to type the bullet point symbol when you type bpsym. The bullet point will be converted automatically.
There is one thing that makes this approach interesting, the symbol can be assigned any code you want. Every time you type the assigned code, Word will insert the appropriate symbol for you.
Below we detail the steps for how to use AutoCorrect to type the Bullet Points in Word.
- Click the Symbol button under the Insert tab.
- Select More Symbols. A dialog box appears to let you select a symbol.
- The Bullet Point symbol can be found here. Choose it by clicking on it.
- The AutoCorrect dialog box is displayed after clicking the AutoCorrect button.
- Select the bullet icon. Then click the AutoCorrect button.

Enter the following in the AutoCorrect dialog box:
[su_note note_color=”#FFFFE0″ radius=”15″]
Replace: BPSYM
With: •
[/su_note]

Click the Add button. Click on OK.
Whenever you type BPSYM into Word, a Bullet Point symbol will appear in your document.
bullet point symbol custom shortcut (cp)
In this case, however, there are several things to keep in mind when you use the AutoCorrect Method.
- Word will consider the AutoCorrect text part of the text if there is any text before or after it. Thus, it won’t be converted to a bullet point symbol. In the case of XBPSYM, no conversion will take place. However, X BPSYM will be converted to X •.
Final Words
This was all about how you can insert or type bullet point in word easily.
Thanks for visiting this blog. We absolutely love your presence.
Related Content:
- Type E with Accent Alt Code
- How to Insert Right Arrow Symbol
- Way to Type Backslash Key
- How to Type Half Symbol in MS Word
- How to Type an UP Arrow Symbol Text
Word’s bullet point function is essential for breaking up vast piles of text, especially if you can’t use graphics or photos in your documents. Word’s standard list of bullets will cover many situations, but making custom bullet points can add polish or humor to your content.
Create your document first and use placeholders for your bullets, such as asterisks or hyphens. (Tip: Use bullets for your lists when the items in the series are of equal importance. Use numbers if the items in the list are prioritized.)
Once the document is complete, experiment with different bullet designs. We’ll start with Word’s default bullets to introduce the process.
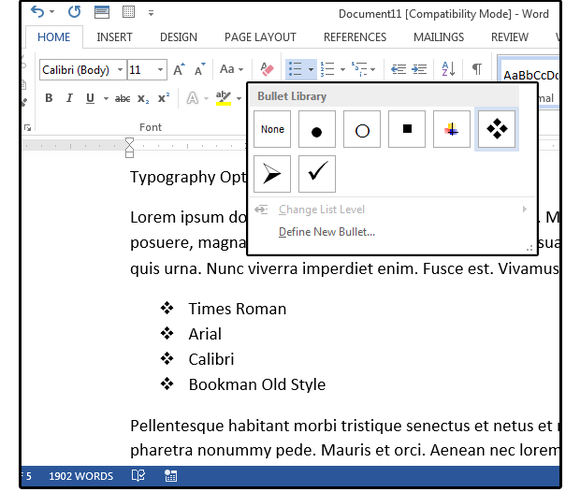
Default Bullets
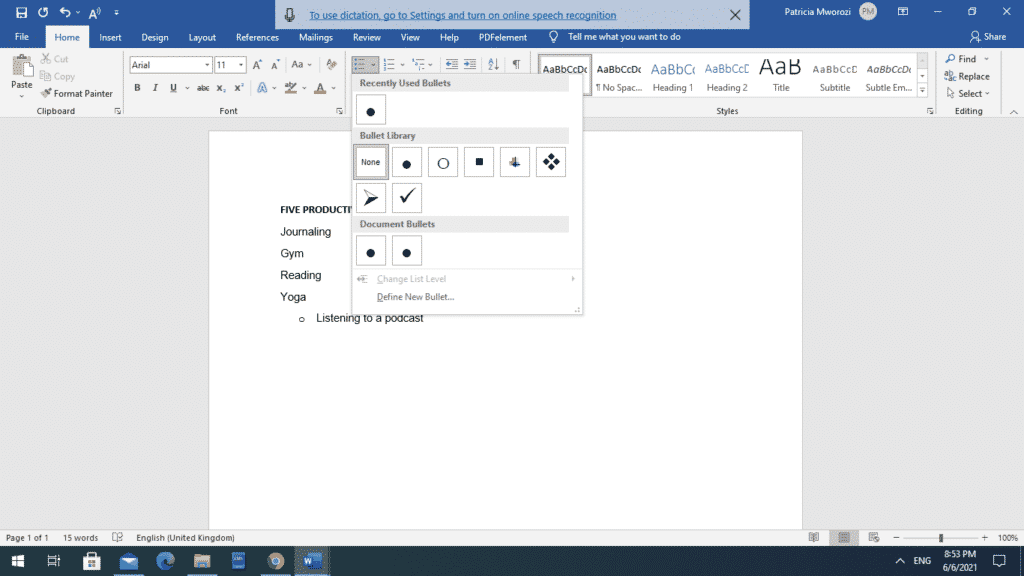
1. Select the content for which you wish to insert bullet points.
2. Go to Home > Paragraph. Locate the bullet icon at top left and click the down-arrow at the right side of that icon. Note: If you hit the icon itself, a bullet will appear wherever your cursor is in your document.
3. From the Bullet Library menu, choose a bullet design, and the new bullet design will appear at your cursor location. If you don’t like the first bullet you choose, click the Undo icon and try another one. Note: Word remembers the last six (or so) bullets used, so after you define a bullet the first time, it appears on the new list.
 JD Sartain
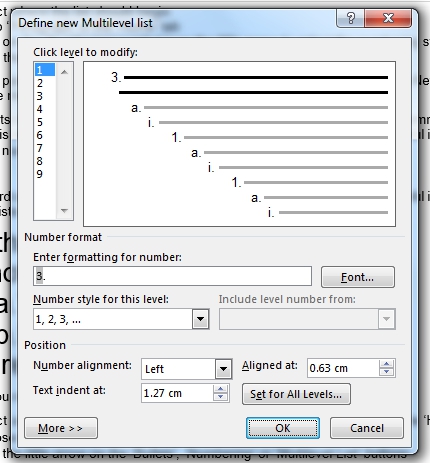
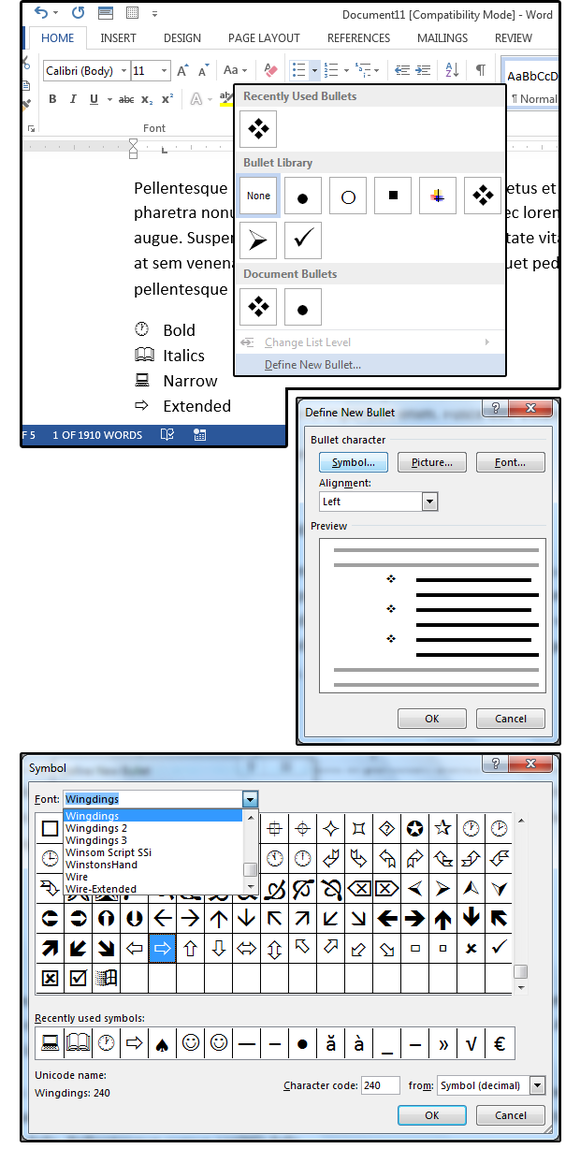
B. Define New Bullets
Creating custom bullets can add some creativity or branding to your content, such as clocks for timesheets, books for reports, or computers for data logs.
1. Highlight the content to which you want to add bullets.
2. Go to Home > Paragraph and select the down-arrow next to the bullet icon.
3. From the Bullet Library menu, scroll down to the bottom, then click the Define New Bullet button.
4. In the Define New Bullet dialog, click the Symbol… button.
5. When the Symbol dialog box opens, notice the font. Word remembers the last font used, and that font shows onscreen.
6. If it’s a text-only font, click the down arrow next to the Font field box. Scroll through the list of fonts and choose one of the Bullet fonts, such as Wingdings, Wingdings 2, Wingdings 3, or Webdings.
7. The selected font fills the boxes in the window with interesting, graphical bullets. Scroll through the list and choose a bullet design.
9. Click the bullet, then click OK, and OK again.
10. Repeat steps 1, 2, and 3 from the Default Bullets section above to change the remaining bullets in this section.
Note: When you select Symbol from the Define New Bullets menu option, your bullet design options are based on the fonts you have installed. Microsoft Word has a few bullet typefaces, and some versions include Wingdings. If you don’t have an acceptable bullet font installed, Google “Bullet Fonts” to find an untold number of free bullet fonts. Select an appropriate site, review the available fonts, then download to your computer.
Fonts are installed through Windows (not Word). Once the bullet font is installed, right-click the font, then choose Install from the popup menu. If it doesn’t show up in Word, close the program, then restart it.
 JD Sartain
C. Bullets from Fonts
If you prefer actual fonts (other than the font you’re using in your document) instead of symbols, you can select your bullet design from the Font button. You can also change the font from the Font group, or use the Define New Bullet dialog’s Font button to change the color or attributes of your bullets.
D. Create custom bullets
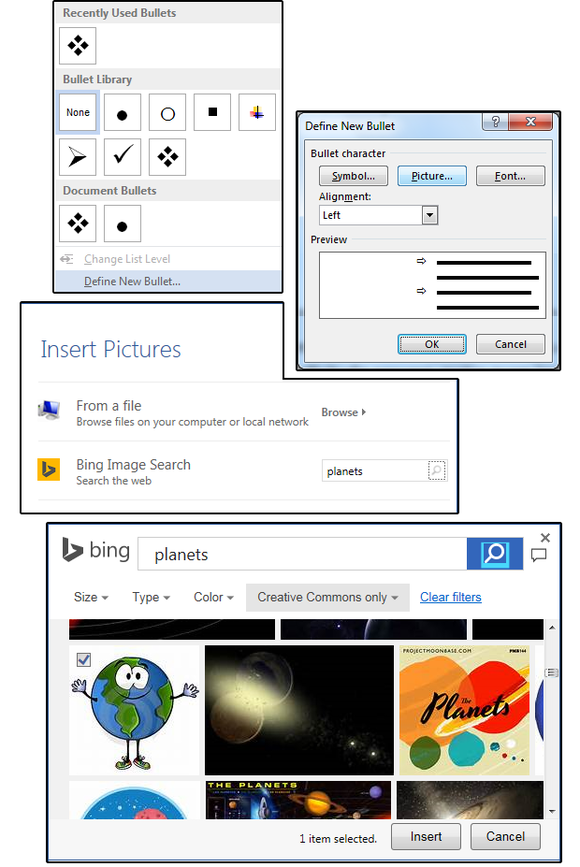
This is where the fun begins. You can actually create custom bullets from any image that exists. Because bullets are so small, detailed images may appear as dark blobs, so consider choosing simple images with minimal lines.
1. Highlight the content to which you want to add bullets.
2. Go to Home > Paragraph and select the down-arrow next to the bullet icon.
3. From the Bullet Library menu, scroll down to the bottom, then click the Define New Bullet button.
4. In the Define New Bullet dialog menu, click the Picture… button.
5. When the Insert Pictures dialog appears, click Browse to choose an image from your computer, or enter a search condition in the Bing Image Search field box.
6. When the Bing Image window opens, scroll through the pictures, select one for your bullets, and click the Insert button. In this example, which is for a document on “green” topics, I chose a caricature of planet Earth.
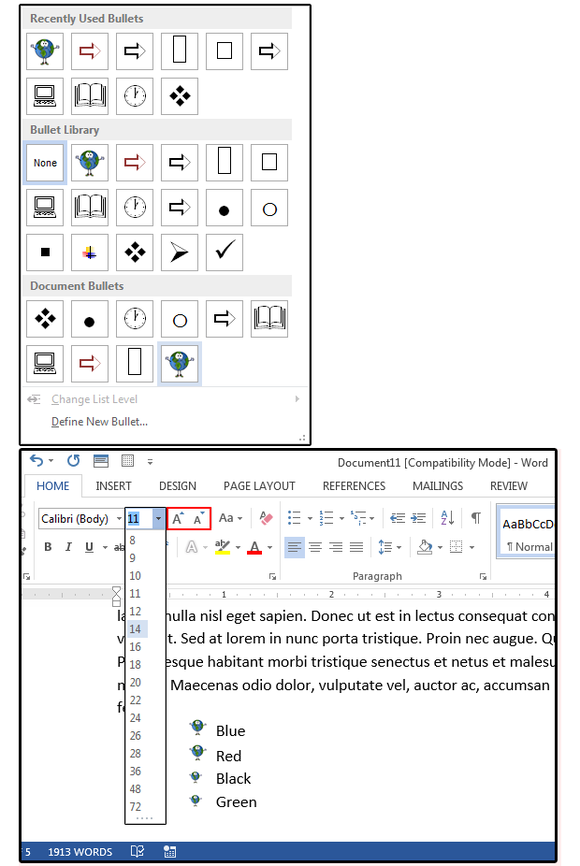
 JD Sartain
7. After the first custom bullet is created, click the Bullets button again, and select the same custom bullet from the Recently Used Bullets menu list.
If the bullets are too small, you can increase the font size on the bullet without affecting the font size of the following text. Highlight your custom image bullet and choose a new size from the Font group; or click the tiny up-arrow above the letter A beside the Font Size box. Here’s the fastest way: Highlight the bullet and enter the combination shortcut key Ctrl+ > (press and hold the Control key, then press the “greater than” symbol key, then release both keys).
There’s a little trick here: You have to hit the Shift key before this key combination to get the “greater than” symbol. It doesn’t show in the shortcut menus, but if you don’t use the Shift key, it won’t work.
Note: When an image is imported as a bullet, it’s treated like a font—as opposed to a graphic—regarding the size, so there are no sizing handles available to rescale it. You must use the font’s point size to alter the image, but notice that the other font attributes do not apply.
 JD Sartain
When we want to list items or points in a text, we use bullets. Bullet points allow us to summarise ideas and facts into short, neatly arranged sentences.
The usual way to add bullet points is to highlight the paragraph in which we want to add bullet points and then choose our preferred style of numbering from the home tab on the ribbon.
However, Word has some shortcuts that can achieve the same thing.
Method 1
- Select the paragraphs to which you want to apply bullet points.

- Press CTRL + Shift + L.
- Word will automatically apply bullet points and insert indents to the paragraphs.
Method 2
- Select the paragraphs to which you want to add bullet points.
- Press Alt + H + U
- Then use the right arrow to go to the bullet of choice.
- Press ‘Enter’ to apply the bullets you have chosen.
- Word will automatically apply these bullet points and insert indents to the paragraphs.
Method 3
Press the * followed by the space bar. A bullet point will automatically appear.
Are you looking for a tool that allows you to save all changes you make to a document while also giving you the ability to collaborate on a paper or article with more than one person?
Look no further than Simul Docs.
All you have to do is download Simul Docs and upload your first draft there.
Simul Docs automatically makes this your first version. Now, someone else can sign in and make their edits. Simul creates another version, different from the first, and saves it separately.
If another person were to make new edits to this document, another version, different from the first and second, is created.
Every time another person opens a version and makes edits, a new version is created with the latest changes.
Assuming you are in a rush and forget to turn on track changes so Simul Docs can automatically record your changes? There is no need to worry. With Simul Docs, all your changes are documented regardless of your online or offline status.
Since it is a collaboration, a bonus feature is the ability to add comments to the document. If you want a colleague to review the changes by a specific time, or any other instructions, you can let them know in the comment section.
Additionally, you can suggest changes, and your colleagues can either reject or accept them when reviewing the document.
Furthermore, with Simul Docs, every version of your document is stored. Do not think that as more versions are created, older ones are deleted. Every paper is saved from the first to the last so that if you want to go back and review them, you have that option.
Do you ever have to work on a written project but have to wait until another person has made their submission? This is not a problem with Simul Docs. All your colleagues can work on a project at once. This avoids missing deadlines because maybe one person did their part too slowly, yet everyone else was on schedule. Or maybe when you were free, it was someone else working on it, and now that you are busy, this work demands your attention. These are all problems of the past.
Suppose another co-worker is supposed to include their input, but they do not have Simul Docs. All you have to do is download the document or forward it by email. Alternatively, you can upload it to any storage software like one drive, and once their changes have been made, they can forward it to you once again, and you can open it in Simul Docs.
Once all the necessary edits have been made, you can save the final version containing all the modifications with one click.
Simul is the most convenient collaborative tool yet. Centralising your written project avoids mishaps like losing your work or losing its original format.
Perks to using Simul Docs:
- You do not have to be in the exact physical location of the person you are collaborating on a document with.
- You can work on the same document at the same time.
- There is no need for physical meetings, video, or conference calls to discuss changes that need to be made to the document.
- Simul Docs saves every single version of the document.
- There is no need for back-and-forth emailing
- Simul prevents loss of work
- Simul Docs retains the original format of the document.
As you can see, Simul Docs is a game-changer in viewing, writing, and editing documents.
Visit simuldocs.com and simplify group edits today.
Bullet point is a symbol that is used to introduce separate items present in a vertical list, sentences, or paragraphs. It is also used to write important information within a document.
The advantage of bullet points is that it allows readers to quickly read and understand the important part of the document, important heading, and more.
A bullet point contains a variety of symbols, including black dots, open circles, rectangles, squares, diamonds, dashes, checkmarks, asterisk, arrows, and more.
Example:
A list of fruit containing black dot bullet points —
- Mango
- Apple
- Grapes
- Papaya
There are the following methods to insert bullet points in Word document —
Method 1: Using the Home Tab
Follow the below mentioned easiest and quickest steps to insert bullet points —
Step 1: Open the new or an existing Word document.
Step 2: Highlight or select the list of items in which you want to insert bullet points.

Note: If the list is not created earlier, then first create a list of items.
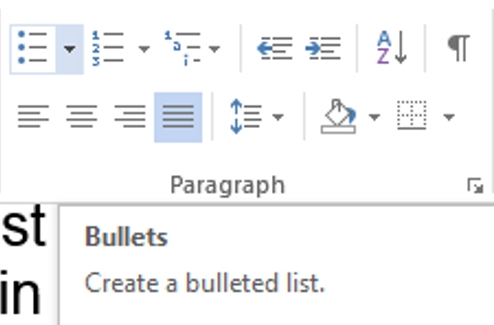
Step 3: Go to the Home tab on the Ribbon and click on the Bullets drop-down icon associated with the Bullets in the Paragraph section.

Note: To insert numbering, click on the numbering drop-down icon next to the Bullets icon.
Step 4: A list of Recently Used Bullets dialog box will appear on the screen. Select the bullet point that you want to insert in the Bullet Library.
The screenshot below shows that bullet points are inserted to the Word document —

Method 2: Using the Symbol tab
You can also insert bullet points using the Symbol tabs. The Symbol tab contains the various option of bullet points.
Follow the below steps to insert bullet points —
Step 1: Open the new or an existing Word document.
Step 2: Place cursor in the document where you want to insert a bullet point.
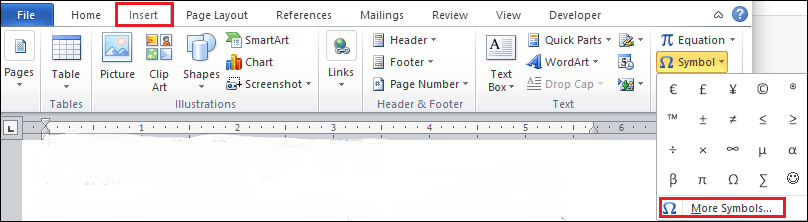
Step 3: Go to the Insert tab on the Ribbon and click on the drop-down menu associated with the Symbols icon in the Symbols section. Click on the More Symbols.
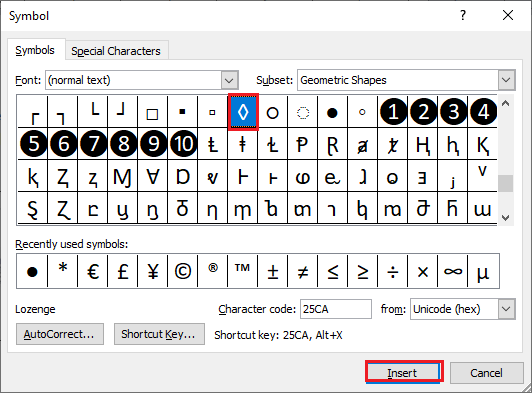
Step 4: A list of the symbols dialog box will appear on the screen. Select a symbol according to your requirement and click on the Insert button at the bottom of the screen.
Now, you can see that Symbol (bullet point) is inserted into the selected place.
Note: Once you insert the symbol in the document, you can use the same symbol from the Home Tab. To access the inserted symbol, go to the Home tab and click on the Bullets drop-down icon in the Paragraph section.
Method 3: Using Keyboard Shortcut Keys
This is the simplest method to insert bullet points using the MS-Word keyboard shortcut keys —
Follow the below instructions to insert bullet point using the keyboard shortcut keys —
- Open the Word document.
- Place the cursor before the text where you want to insert a bullet point.
- Press and hold the Alt key and type Alt code 0149 from the Keyboard.
- Release the Alt key from the Keyboard.
Now, you can see that bullet point (• javaTpoint) is inserted before the text.
Method 4: Create a multi-column bullet list in Word document
Follow the below steps to create a multi-column bullet list in Word document —
Step 1: Open the Word document and type the items on the list.
Step 2: Go to the Insert tab on the Ribbon and click on the Table option in the Tables section.
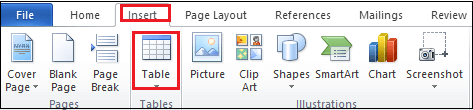
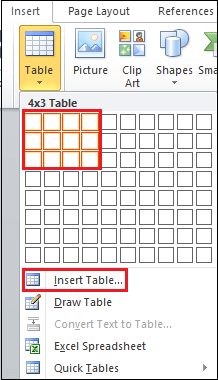
Step 3: An Insert table dialog box will appear on the screen. Select the number of rows and columns, as per your requirement, or you can also click on the Insert Table… option to insert the number of rows and columns manually.
Step 4: Once the Table is inserted to the document, select the table, go to the Home tab, and click on either Bullet or Numbering option in the Paragraph section.
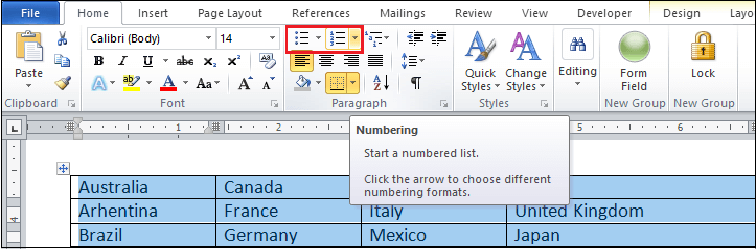
Note: In our case, we are going to use the Numbering option.
Step 5: Now, you can see that numbering is inserted to the table.

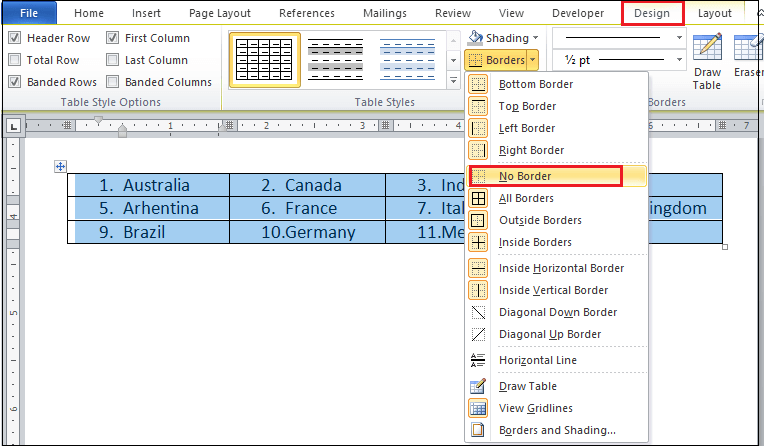
Step 6: If you want to the remove border form the table, then select the table, Go to the Design tab on the Ribbon, and click on the No Broder option from the drop-down menu, as shown in the screenshot below.
Now, you can see that a multi-column bullet list is inserted to the Word document.
After creating a custom bullet point you will Love it because it takes 2 minutes to customize it,
Often time while working in documents you come across a situation where you need to add a different kind of icons or symbols into your documents or you need a new custom bullet point icon to make your report looks awesome.
What most people do is download those icons from the internet and insert manually but the problem is those icons or images will not be scalable and you need to make way more adjustment than you should be doing.
In this article
1
Best solution?
You can download fonts which contains almost all types of icons and symbols. After installing those fonts you can use them by typing simple words and then choosing font name from toolbar just like you switch font for words.
Best Part of Using icons this way is all the icons and symbols are scalable you can increase the font size too big and it will not pixelate just like an SVG icon.
All the letters and icons are mapped to different keys and numbers of your keyboard
To figure out easily what the key is for a specific icon, type all the letters in the document and change font after seeing the icon you want to erase everything, keep the icon there and just copy-paste use or just change the font to know the exact letter or number of icon for future usage.
Custom Bullet Point Icon that will not get pixelated on zoom and print.
For example, if you need a new type of tick icon for your bullet points then either you will look for custom image insertion which will no scale well.
Here is what you can do instead just follow the steps:
Step 1:
Download & Install Fonts
For most of the basic icons download font awesome for windows and install the font.
You can search for more fonts by searching social icon fonts, symbol fonts and more.
Note: You can use any font that is similar to font-awesome, you can even use png but using a font is recommended for variety and print friendly purpose.
Step 2:
After installing the font on your pc, open up your Microsoft Word select bullet points then custom bullet point as shown in below image
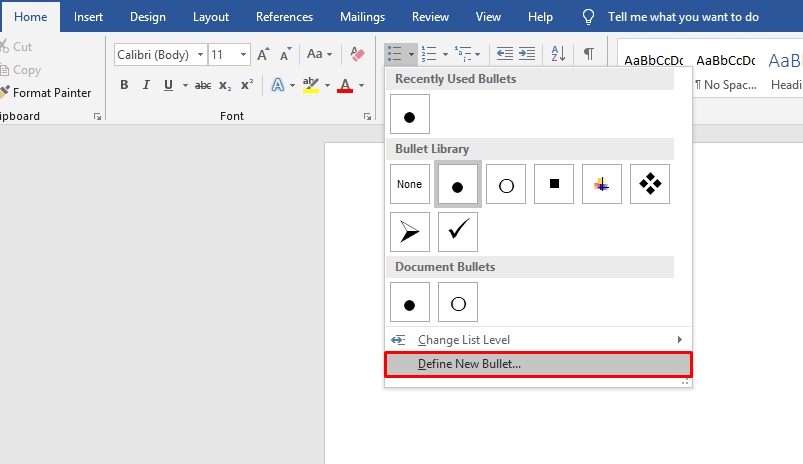
Click Symbol then from dropdown select the particular font which you installed for icons in our case its font awesome.
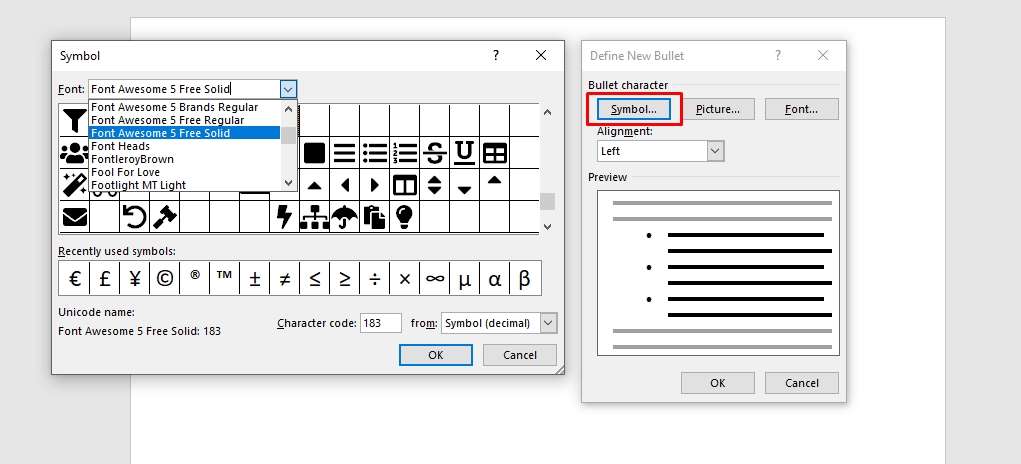
You will see all the icons present there just select which you like for your project or report.
Now you have successfully added custom bullet point which you can see by selecting bullet point options
Here is how our checklist is looking before and after using a custom icon.
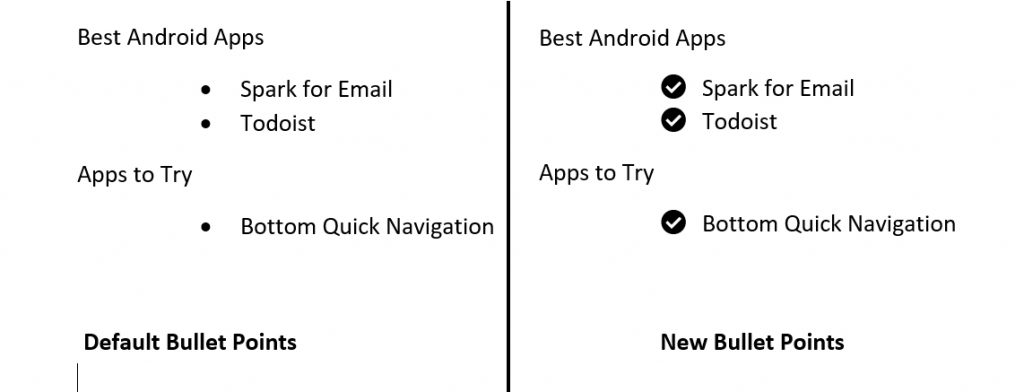
Default Bullet Points vs Custom Bullet Points
Use Cases When You need Custom Icons in MS-Word
- Custom bullet point for making your report look great and not a generic one,
- For Personal touch
Bonus: Use Fonts for Social Media Icons and Logo
Now you know how to customize your bullet points by using fonts that have symbols in it,
Since you already installed those fonts it will be great if you utilize them properly, what I mean is use them
- While making your resume you can use those icon fonts as a phone number icon, icons like LinkedIn, Github, Twitter for better representation,
- Need to Add big icons of company logos without getting them pixelated and not making report heavy in size by using megabytes of images,
Every other use case where an icon is required in your document, spreadsheet or any other text editor that supports custom font you can use them because these fonts are installed on your computer.
Like use font, Social Media Circled to achieve this
![]()
Icons using social media circed font
You can get that from dafont
get more variety from fontspace
If you see closely you will notice that I have coloured some social icons to match them with there real color since they are just a font like others you can apply all your customization on them, you can not do this with png or jpg symbols that easily,
another plus point is since they are just letters used with special you can mix and match lots of other fonts without even disturbing your layout just select the letter and change the font.
Note: Don’t forget to check the license of the font used by you, this is your responsibility to check because not every font is available for commercial use, some require attribution, some developer permit use of font free for personal use, so make sure you take a look at the license.