Add text
To add text to your slide, click inside a text placeholder and start typing.
-
To add text bullets, place your cursor in the line of text, and on the Home tab, pick a bullet style.

-
Press Enter to move to the next bullet.

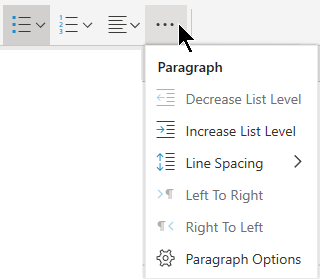
Add a sub-bullet
-
Put your cursor on the line of text you want to indent.
-
On the Home tab, select the ellipsis (…) next to the list buttons (as illustrated below), and then select Increase List Level.
Keyboard shortcut for Increase List Level: Tab.
Keyboard shortcut for Decrease List Level: Shift+Tab.
The cursor must be at the beginning of the paragraph for the keyboard shortcut to take effect.
Select text
To select a word: Point at the word and double-click the mouse.
To select a paragraph: Point at a word in the paragraph and triple-click.
To add pictures, see Insert a picture.
Need more help?
Use the button below to copy and paste the bullet point symbol. For more options to insert or type this symbol in Word, keep gliding down the page.
The table below contains some useful information about this symbol.
| Symbol Name | Bullet |
| Symbol | • |
| Alt Code | 0149 |
| Shortuct | Alt+0149 |
You’ll love this guide if you are looking for ways you can insert a bullet point symbol in Microsoft Word.
There are several methods you can use to perform this task. I’ll go through each one of them beginning with the simple ones. However, below is a quick solution:
To insert a bullet point symbol in Word, place the insertion pointer at where you want to insert the symbol, hold down the Alt key, then press 0149 on the numeric keypad, then release the Alt key – this will insert a bullet point symbol into your Word document.
Insert using the Insert Symbol dialog
The bullet point symbol is not readily available on the keyboard.
Therefore, inserting this symbol into Word becomes difficult for some people.
With the help of the Insert Symbol dialog box, you can easily
insert this symbol into your Word document.
Without further ado, below are the steps involved:
- Place the insertion pointer at where you want to
insert the symbol. - Go to the Insert tab.
- In the Symbols group, click on the Symbols button then choose More Symbols from the drop-down.

The Symbol dialog box will appear. This dialog is a
library of all symbols in Microsoft Word.
- Locate the bullet point symbol from the library
of symbols.
To easily locate this symbol, use the Subset dropdown list to display specific types of symbols. You can find the bullet or point symbol in the General punctuation subset.

- Click to select the symbol then click on the Insert button.

As soon as you click on the insert button, a bullet point symbol will be inserted into your Word document.
- Click on the Cancel button to dismiss the
dialog box.
This is how you may insert this and any other symbol in Word using the Symbol Dialog Box.
Copy and Paste
One of the easiest ways to insert this symbol into your Word document is a simple copy and paste.
Below is the symbol if you wish to copy and paste it into your document:
Bullet Symbol Copy & Paste
•
For more interesting options on how to insert this symbol,
read further.
Sometimes, Microsoft Word senses that you’re typing a
bulleted list and uses its AutoFormat As You Type feature to help you.
Thus, if you want to insert a point or bullet at the beginning
of paragraph, place the insertion pointer at the beginning of the new
paragraph, then press the Tab key once, type an asterisk (Shift+8), then
press the Tab key again, Word will convert the asterisk to a bullet or
point.
Alternatively, if you want to add bullet points to your list,
obey the following instructions:
- Type your list. Make sure each item begins a new line.

- Highlight all the list options.

- Go to the Home tab, in the Paragraph group, select the down arrow next to the Bullets option.

- A dropdown list of options will appear, select the Bullet list style to apply it to the selected text.
These steps will insert a bulleted point to the select text
making it a bulleted list.
Insert bullet point in Word using Alt Code (Shortcut)
All the symbols in Microsoft Word have a unique code that can be used to insert the symbols into Word. These codes are known as Alt code.
The Alt code for the Bullet Point Symbol is 0149.
To insert the bullet point symbol into Word using the Alt
Code, please obey the instructions below:
- Place the insertion pointer at where you want to insert the symbol.
- Whilst holding down the Alt key, press the alt code (0149) on the numeric keypad.
- Now release the Alt key.
As soon as you release the Alt key, the bullet point symbol
will be inserted into your Word document at exactly where the insertion pointer
was placed.
Insert Bullet Point symbol using AutoCorrect
Yet, another way you can use to insert the Bullet Point
symbol in Word is through the AutoCorrect feature in Word.
It is a facility designed for correcting spelling mistakes
like thsi to this.
Using this trick, you can assign a shortcut to the bullet point symbol (such as bpsym).
This way, whenever you type the text bpsym, Word will think
that you actually wanted to type • and will convert it into a bullet point automatically.

What makes this approach interesting is that you can assign
any code you want to the symbol and Word will be more than glad to insert the
symbol for you whenever you type the assigned code.
Without further ado, below are the steps you can use to type
Bullet Point symbol in Word using AutoCorrect.
- On the Insert tab, click Symbol and then click
More Symbols… The Symbol dialog appears. - Locate the Bullet Point symbol, then click to
select it.
- Click on the AutoCorrect… button to display the AutoCorrect dialog.

- In the AutoCorrect dialog box, enter the
following:
Replace: BPSYM
With: •

- Click Add, then click OK.
Word will automatically insert the Bullet Point symbol into
your document whenever you type BPSYM.
However, below are some things to note when you are using the AutoCorrect Method to insert the Bullet Point sign.
- If there is any text before or after the
AutoCorrect text, Word will consider the AutoCorrect text as part of the text
and hence will not convert it to the Bullet Point symbol. For example, XBPSYM
will not get converted, but X BPSYM will get converted to X •.
This wikiHow teaches you how to create a bulleted list in Microsoft Word.
Steps
-
1
Open Microsoft Word. You’ll find it in the Windows menu (Windows) or in the Applications folder (macOS).
-
2
Type the information you want to have in bullet form.
- For example, if you want to make a bulleted list, you may type a list item on its own individual line, press ↵ Enter or ⏎ Return, type the next item, press ↵ Enter or ⏎ Return, etc.
-
3
Highlight the parts you want bulleted. To highlight, click and hold the mouse button before the first letter in the first line, then drag the mouse to the end of the selection. You can lift your finger when you’re done highlighting the area.
-
4
Click the bulleted list button. It’s near the top of the screen in the “Paragraph” tab. It looks like very tiny bulleted list. This add bullets to the beginning of each list item.
- To use a different type of bullet, such as a square or arrow, click the downward-pointing arrow next to the bulleted list button, then click your desired bullet.


Ask a Question
200 characters left
Include your email address to get a message when this question is answered.
Submit
About this article
Article SummaryX
1. Open Word.
2. Type your list.
3. Highlight your list.
4. Click the bulleted list button.
Did this summary help you?
Thanks to all authors for creating a page that has been read 1,851 times.
Is this article up to date?
(Note: This guide on how to add bullet points in Word is suitable for all MS Word versions including Office 365)
Microsoft Word is a very effective software used for documentation purposes and also helps in keeping track of lists. Instead of just having the items one after the other without any visual cues, it’d be better if you could have some bullet points to emphasize the points.
Bullet points help pinpoint certain important information and help the reader understand important points easily. In this article, I will tell you how to add bullet points in Word using 4 easy methods.
You’ll Learn:
- How to Add Bullet Points in Word?
- Add Bullet Points to an Existing List
- Add Bullet Points to a New List
- Add Bullet Points Using Symbols
- Add Bullet Points in Word Using Keyboard Shortcut
- Using the Alt Key
- Using Asterisk or Number
- Define a New Bullet
Related Reads:
How to Insert Watermark in Word? 3 Easy Ways
How to Double Space in Word? 4 Easy Ways
How to Wrap Text in Word? 6 Wrap Text Options Explained
How to Add Bullet Points in Word?
Add Bullet Points to an Existing List
When you download or copy any data, the data might not have bullet points. Also, when you create a list of points in a hurry, you might not have the patience to add bullet points to each entry in the list. In such cases, you can add bullet points to an existing list using this method.
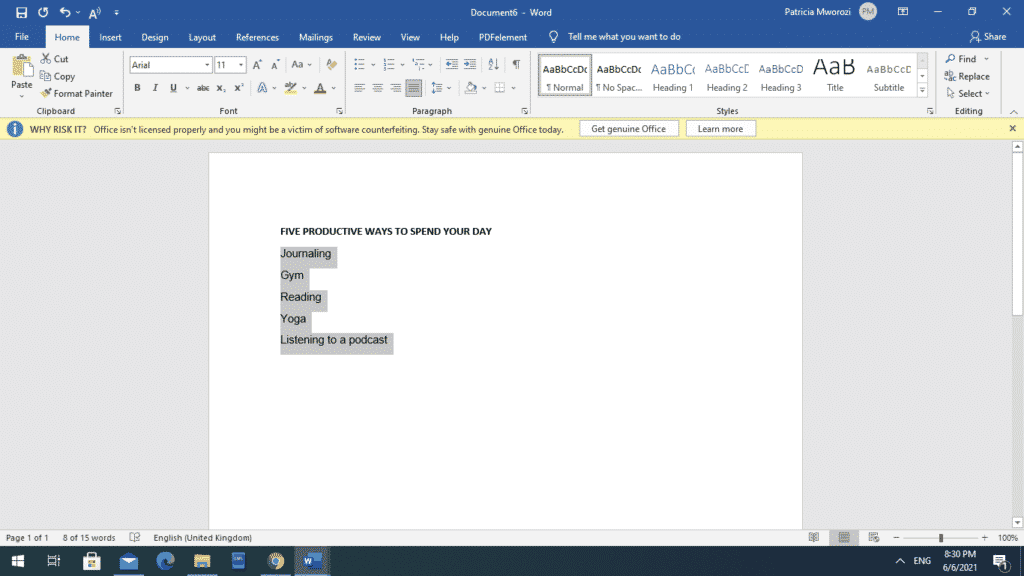
Consider a Word document that has a list of colors.
- To add bullet points, first, select the data.
- Then, navigate to Home. Under the Paragraph section, click on Bullets or Numbering based on your choice.

Note: Instead of navigating between tabs, you can add bullet points to the list using the toolbar which pops up when you select the data.
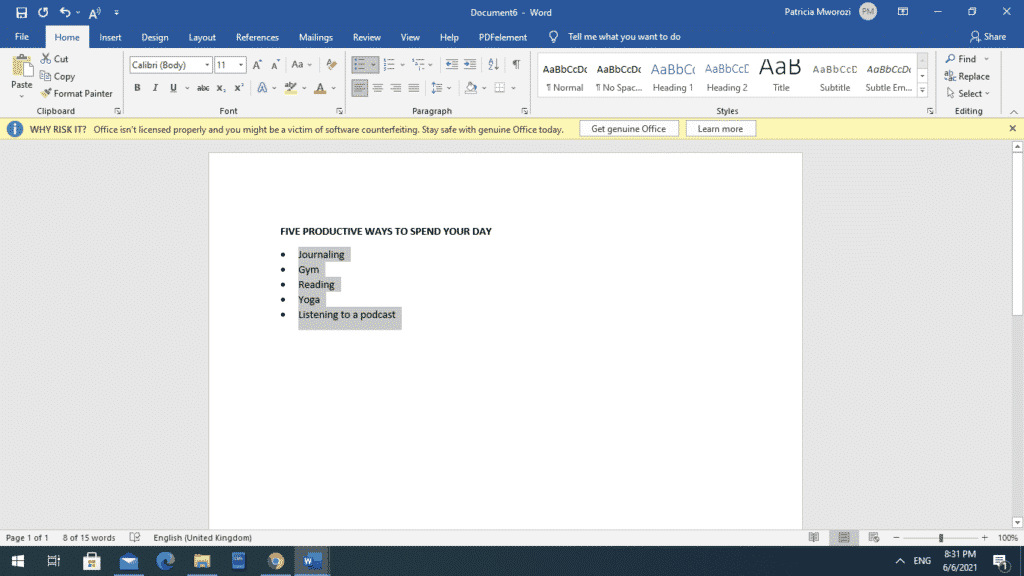
- When you click on the bullets option, only the default bullet pointer (•) gets added to the list. If you want to add a different bullet to the list, select the data and click on the dropdown from Bullets.
- Then, select the bullet you want to add.

If you want to add more entries to the list, press Enter. This adds a bullet point onto a new line and you can type in the next entry.
To exit the bullet mode, press Enter twice. This will revert the list from bullet mode to normal paragraph mode.
Add Bullet Points to a New List
If you want to add bullet points to a list as you create them, you can easily do that using this method.
- First, place the cursor where you want to add bullet points.
- Then, navigate to Home. Under the Paragraph section, select the default bullet point or any bullet point from the dropdown. In this case, let us add the square bullet point.

- Once you click on the bullet point, the indented pointer appears with the cursor next to it.
- You can then type in the data you want to add to the list.
- To add another point or list, press Enter.
- The cursor moves to a new line and a new bullet point is added where you can add your data.

By pressing Enter as you input the data, you can easily create a list in Word. And if you want to stop adding bullet points to the list, press Enter twice.
Add Bullet Points Using Symbols
This is one way to add a variety of bullet points to your lists.
- First, place the cursor where you want to add the bullet point.
- Navigate to Insert. Click on the dropdown from Symbols and select More Symbols.
- This opens up a Symbols dialog box. In the dialog box, scroll up and down, and choose the symbol of your choice for the bullet points.
- Select the symbol and click Insert.

- This adds the selected bullet point to the list.
- Now, you can copy and paste the bullet point to add them anywhere you want in the list.

Suggested Reads:
How to Recover a Word Document ? 4 Proven Ways
How to Convert Speech to Text in Word? A step-by-Step Guide
How to Add Columns in Microsoft Word? All You Need to Know
Add Bullet Points in Word Using Keyboard Shortcut
There is a keyboard shortcut for almost every operation. In Word, using the shortcut keys to add bullet points is easy and effective. There are two ways to add bullet points in Word using shortcut keys.
Using the Alt Key
- Place the cursor in the destination where you want to add the bullet point.
- Now, hold the Alt key and press the Numpad keys 0, 1, 4, and 9 one after the other, i.e. Alt+0149.
- Once you leave the Alt key, the bullet point appears.

Unlike other methods to add the bullet points, pressing Enter won’t add a bullet point in the next line.
Though this method is easy, you cannot add bullet points using shortcut keys to an existing list and can only be added using number keys in the Numpad. You can only use the shortcut keys to insert a bullet point and then add the list.
Note: The number 0149 is the code for the default bullet pointer. If you want to use another symbol for the bullet pointer, navigate to Insert. Click on the dropdown from Symbol and select More Symbols. In the dialog box, click on the symbol you want and remember the shortcut key given below.

Using Asterisk or Number
Using the Alt key and codes is one way to insert bullet points, but there is an easier method to add them.
- If you want to add bullet points, first, place the cursor in the destination.
- Enter an asterisk (*) and press Space.
- This inserts the bullet point in the location.
- In the same way, if you want to insert a numbered list, enter any number and press Space.
- This adds the number pointers to the list.

- You can press Enter and add bullets one after the other.
- And, if you want to exit the bullet mode, press the Enter button twice.
Note: This method works with a new list or an existing list, but the cursor should be placed at the start of the new line for this method to work.
Define a New Bullet
If you take a particular liking to a bullet point, you can add it to the bullet point repository and use them whenever you like with just the click of a button.
- To define a new bullet, navigate to Home. Click on the dropdown from bullet points and select Define New Bullet.

- This opens up a Define New Bullet dialog box.
- From the dialog box, select either the symbol, picture, or font option and choose the bullet point.
- You can also see the preview of how the bullet point will appear in the Preview pane.
- Click OK.

- Now, your selected bullet gets added to the repository.
When you need to use the bullet, just click on the dropdown and select the bullet point.
Also Read:
How to Find and Replace in Word? 7 Simple Methods
How to Superscript in Word? 4 Easy Methods
How to Make a Checklist in Word? 3 Simple Steps
Frequently Asked Questions
How to add bullet points in Word?
First, select the data that you want to list and then navigate to Home. Under the Paragraph section, click on Bullets or Numbering based on your choice. This helps you to add bullet points in Word in an easy way.
What is the shortcut key for adding the bullet points in Word?
Place the cursor in the destination where you want to add the bullet point. Now, hold the Alt key and press the Numpad keys 0, 1, 4, and 9 one after the other i.e. Alt+0149. Once you leave the Alt key, the bullet point appears.
How to add bullet points in Word on Mac?
Place the cursor in the destination where you want to add a bulleted or numbered list. Navigate to Home, click the arrow next to Bullets or Numbering. Click on a bullet to insert it into the destination.
Closing Thoughts
Bullet points and numbered lists are very powerful visual cues to help the user easily ascertain and categorize the information.
In this article, we have seen how to add bullet points in Word in 4 easy ways. You can either choose to add the bullets to an existing list or while creating a new list. You can also use a variety of symbols and shortcut keys to add bullet points in Word.
For more high-quality guides on MS Word or Excel, please visit our free resources section.
SimonSezIT has been effectively teaching Excel for 15 years. We have a very comprehensive set of courses with in-depth training modules covering all major business software.
You can access all these 140+ courses for a low monthly fee. Please visit our courses section for more information about our offers.

Simon Calder

Chris “Simon” Calder was working as a Project Manager in IT for one of Los Angeles’ most prestigious cultural institutions, LACMA.He taught himself to use Microsoft Project from a giant textbook and hated every moment of it. Online learning was in its infancy then, but he spotted an opportunity and made an online MS Project course — the rest, as they say, is history!
Typing the Bullet Point symbol or Dot Sign (•) is very very easy in both windows and mac from a keyboard.
In this guide, I will tell you about various interesting methods using which you can type bullet point symbols in word, excel, etc.
Here’s how
If you are searching for ways to insert bullet points in Microsoft Word, this guide will be of great help to you.
The method you choose depends on the task you are performing. I’ll start with the easiest first.

Here’s a quick fix:
Place the insertion pointer where you wish the bullet point symbol to appear in Word. Keep the Alt key pressed. You then need to press and release the Alt key after pressing 0149 on the numeric keypad.
You will now have bullet point symbols in your Word document.
Insert Using Symbol Dialog Box
Keyboards do not have a bullet point symbol. Because of this, it can be difficult for some people to insert the symbol into Word.
This symbol can be easily inserted into a Word document by using the Insert Symbol dialog box.
I will outline the steps below without further ado:
- Wherever you wish to insert the symbol, place the insertion pointer.
- Select the Insert tab.

- The Insert tab will appear
- Click on the Symbols button under the Symbols group. Click on More Symbols to expand the list.

- Please click on the More Symbol drop-down menu.
A dialog box for selecting a symbol will appear. The Microsoft Word Symbol Library dialog box provides a list of all the symbols within the program.
From the library of symbols, locate the bullet point symbol.
Symbols of specific types can be displayed easily using the Subset dropdown list. Bullet and point symbols are found in the subset of General punctuation.
- From the library of symbols, select the bullet point symbol
- Click on the symbol to select it. Select Insert from the menu.
- Choose the bullet symbol. Then click on Insert

By clicking the insert button, you will automatically insert a bullet point symbol in your Word document.
- If you’d like to cancel this dialog, click on the Cancel button.
This is how the Symbol Dialog Box in Word allows you to insert this and other symbols.
Copy and Paste Bullet Symbol
A simple copy and paste into your Word document is the easiest way to add this symbol.
If you would like to copy the symbol and paste it into your document, it is below:
[su_note note_color=”#FFFFE0″ radius=”15″]
•
[/su_note]
Further reading will provide you with more options for inserting this symbol.
Add Bullet Point Sign to a List
When you type a bulleted list in Microsoft Word, the program is able to detect it. This feature uses its auto-formatting as you type functionality to help you.
Consequently, the insertion pointer must appear at the beginning of each new paragraph if you intend to insert a point or bullet.
Once the Tab key has been pressed, continue. You’ll need to press Shift+8 (asterisk). Once again, press Tab. The asterisk will be converted to a bullet or point in Word.
As an alternative, if you would like to include bullet points in your list, follow these instructions:
- List your items. Each item should be on a new line

- The options in the list should be highlighted.

- You can add bullets to any list you choose
- In the Paragraph group, click the Home tab. Choose Bullets from the drop-down list.

- The options will appear in a dropdown menu. The selected text will be styled as a bullet list when you select the bullet list style.
- You can add bullets to a list by selecting it.

- Using these steps you will create a bulleted list from the select text.
Insert bullet point in Word using Alt Code
To insert the symbols into Word, Microsoft Word has a unique code for each of its symbols. They are called Alt codes.
Bullet Point Symbols have the Alt code 0149.
Here are the instructions for inserting the bullet point symbol with the Alt Code:
- Wherever you wish to insert the symbol, place the insertion pointer.
- Using the numeric keypad, press the alt code (0149) while holding down the Alt key.
- You can now release the Alt key.
You will see the bullet point symbol appear in your Word document immediately after releasing the Alt key.
Insert Bullet Point symbol using AutoCorrect
In addition, you can use the AutoCorrect feature in Word to insert the Bullet Point symbol.
Using it, spelling mistakes can be corrected.
The bullet point symbol can be assigned a shortcut using this trick. (such as bpsym).
This will make Word think you actually wanted to type the bullet point symbol when you type bpsym. The bullet point will be converted automatically.
There is one thing that makes this approach interesting, the symbol can be assigned any code you want. Every time you type the assigned code, Word will insert the appropriate symbol for you.
Below we detail the steps for how to use AutoCorrect to type the Bullet Points in Word.
- Click the Symbol button under the Insert tab.
- Select More Symbols. A dialog box appears to let you select a symbol.
- The Bullet Point symbol can be found here. Choose it by clicking on it.
- The AutoCorrect dialog box is displayed after clicking the AutoCorrect button.
- Select the bullet icon. Then click the AutoCorrect button.

Enter the following in the AutoCorrect dialog box:
[su_note note_color=”#FFFFE0″ radius=”15″]
Replace: BPSYM
With: •
[/su_note]

Click the Add button. Click on OK.
Whenever you type BPSYM into Word, a Bullet Point symbol will appear in your document.
bullet point symbol custom shortcut (cp)
In this case, however, there are several things to keep in mind when you use the AutoCorrect Method.
- Word will consider the AutoCorrect text part of the text if there is any text before or after it. Thus, it won’t be converted to a bullet point symbol. In the case of XBPSYM, no conversion will take place. However, X BPSYM will be converted to X •.
Final Words
This was all about how you can insert or type bullet point in word easily.
Thanks for visiting this blog. We absolutely love your presence.
Related Content:
- Type E with Accent Alt Code
- How to Insert Right Arrow Symbol
- Way to Type Backslash Key
- How to Type Half Symbol in MS Word
- How to Type an UP Arrow Symbol Text
Add bullets to text to make a list in Word for the web
- Place your cursor where you want a bulleted list.
- Click Home> Paragraph, and then click the arrow next to Bullets. Choose a bullet style and start typing.
Contents
- 1 How do I add Bullets in Word?
- 2 How do I type a bullet point?
- 3 Why can’t I add bullets in Word?
- 4 How do I insert a bullet in Word without indent?
- 5 What is the alt code for a bullet?
- 6 How do I automatically indent bullets in Word?
- 7 How do I fix indentations in Word?
- 8 How do I type a squared bullet point?
- 9 How do I type a dot in Windows?
- 10 How do I indent without tab?
- 11 How do you indent bullet points in Word on a Mac?
- 12 Where is the dot on keyboard?
How do I add Bullets in Word?
On the Home tab, in the Paragraph group, click the arrow next to Bullets, and then click Define New Bullet. In Word for Windows: Click Symbol or Picture, and then choose any symbol or picture that you want to use.
How do I type a bullet point?
The keyboard shortcut for the bullet point symbol is Alt + 0149. Alternatively, you can use Alt + 7. To use the keyboard shortcut Alt + 0149 to make a bullet point, follow these steps: Activate the numeric keypad by tapping the Num Lock key.
Why can’t I add bullets in Word?
Try selecting everything EXCEPT for the final paragraph mark in the document and then use CTRL+c to copy it to the clipboard and the open a new blank document and use CTRL+v to paste from the clipboard into that document and then see if you can insert a bulleted paragraph in the normal manner.
How do I insert a bullet in Word without indent?
Click one of the bullets at the level you want to change in the document. Right-click the bullet and select Adjust List Indents in the pop-up menu. In the Adjust List Indents window, change the Bullet position to adjust the bullet indent size or change the Text indent to adjust the text indent size after a bullet.
What is the alt code for a bullet?
List of Alt Codes for entering Bullets and Symbols
| Alt Code | Symbol | Description |
|---|---|---|
| Alt 7 | • | Bullet 1 |
| Alt 8 | ◘ | Bullet 2 |
| Alt 9 | ○ | Bullet 3 |
| Alt 10 | ◙ | Bullet 4 |
How do I automatically indent bullets in Word?
Turn on or off automatic bullets or numbering
- Go to File > Options > Proofing.
- Select AutoCorrect Options, and then select the AutoFormat As You Type tab.
- Select or clear Automatic bulleted lists or Automatic numbered lists.
- Select OK.
How do I fix indentations in Word?
Adjust indents and spacing in Word
- Select one or more paragraphs that you want to adjust.
- Go to Home and then select the Paragraph dialog box launcher .
- Choose the Indents and Spacing tab.
- Choose your settings, and then select OK.
How do I type a squared bullet point?
How to Insert Square Symbol using the Alt Key?
- Place the mouse cursor where you want to insert the square symbol.
- Press the Alt key and type 254 on the numeric keypad.
- Release both the keys and the black square sign will show up.
How do I type a dot in Windows?
Make the middle dot / median dot (·) on Windows :
The technique : Keep the Alt key pressed (key just to the left of the Space bar), then you successively type the numbers 0 1 8 3 then you finally release the Alt key, which will bring up the middle dot / median dot at desired location.
How do I indent without tab?
Don’t use Tab to indent paragraphs in a Word document
- From the Format menu, choose Paragraph.
- Click the Indents And Spacing tab.
- In the Indention section, select First Line from the Special control’s drop-down list.
- Specify the size of the indention using the By control’s drop-down list.
How do you indent bullet points in Word on a Mac?
Adjust the spacing between a bullet or number and text
- Select the list that you want to format.
- On the View menu, click Ruler. The ruler displays the indent markers for the selected bullet.
- Drag the text indent marker. , which is on the bottom of the ruler, to a new position.
Where is the dot on keyboard?
Punctuation
| Character | Name | Windows |
|---|---|---|
| ‘ | Apostrophe | Alt + 0146 |
| · | Interpunct (interpoint, Centred point, Middle dot) | Alt + 0183 |
| • | Bullet | Alt + 0149 |
| ¡ | Inverted exclamation mark | Alt + 0161 |
Are you searching on your keyboard how to insert bullet point symbol [•]?
The bullet point symbol [•] has two main uses.
- It is helpful when conveying key information within a document.
- Secondly, it is used to introduce items in a list that are written vertically.
Inserting the bullet point symbol [•] can be confusing at times.
But you don’t need to worry, because you’re reading the right article
The following are five simple and practical ways to accomplish this task.
Use the Home Tab to type bullet point symbol
Do you have your word document ready?
Let’s go straight to inserting this bullet point symbol.
Open your word document, then select the area you want to apply the bullet point symbol [•]
Have a look at this example.

Taking the above as an example, select the list and go to Home Tab. Click the bullet button on the paragraph section, then choose the bullet point symbol [•]


The following screenshots show the bullet point symbol [•] inserted in the word document.

Use Insert Tab to type bullet point sysmbol
If a bullet point symbol [•] was just available on the keyboard, how would that have made things simple?
Very simple, you may say. But that’s not the case.
You have to navigate through, which at times it’s difficult or even confusing.
But the Insert tab in Word document can have a solution for you.
Check these steps out:
- Put your cursor exactly where you want to insert the bullet point symbol
- Then go to the Insert tab
- Look for the Symbols groupings, then click symbols and on the drop-down arrow select more Symbols
- You will see a Symbol dialogue box, a library containing many symbols that can be used in Microsoft word.
Now you need to look for bullet point symbol [•]


Have you managed to locate it?
Great! There you have a bullet point symbol [•] in your word document.
To make it even simpler, check this out;
There is a display list of specific types of symbols you can choose from on the subset down arrow.
Locate the general punctuation type of subset and pick on the Bullet point symbol [•]

Press the bullet point symbol [•] and click the insert button. The bullet point you selected will be inserted into your word document.

Follow the above simple steps and insert a bullet point symbol [•].
Use keyboard shortcut keys
If you’re looking for the simplest way to insert a bullet point symbol [•], here is how you can easily do it.
Wait a minute! There is something you need to know about symbols in Microsoft Word;
All symbols are assigned unique codes.
These codes can be used to insert symbols into the word document.
These codes are always referred to as Alt Code
These are the steps you can follow to insert a bullet point symbol [•] using the keyboard shortcut.
- Open your document and put the cursor right where you desire to insert the bullet point symbol [•].
- On your keyboard, locate the Alt Key. Press it and hold as you type the Alt code 0149.
- After typing the Alt code 0149, release the Alt key, and the bullet point symbol [•] will be inserted into your word document.
Use autocorrect
This is another way to insert the bullet point symbol [•] into your word document.
The Autocorrect method allows you to create shortcut codes for any symbols in the Word.
For example, you can assign the bullet point symbol [•] a code such as KYXZ
Every time you type this code, the Word will understand you meant to type symbol [•].
This process throughout your typing will automatically be replaced with the bullet point [•].
Let’s go practical with this method;
- Go to the Insert tab, then to the Symbol, and click on More Symbols.
- On the Symbol dialogue that appears, find and select the bullet point symbol [•]
- Locate and click the Autocorrect box at the Right corner of the Symbol dialogue box

Type the code KYXZ as follows
Replace: KYXZ
With: •

Finally, click on the Add box and click OK, and every time you type the code KYXZ, it will be replaced with the bullet point symbol [•].
Use Insert Tab to Create a Multi-Column Bullet List
You can create a multi-column bullet list using the bullet point symbol [•].
Let’s see how we can achieve this method
Open your word document that contains the list of items you would want to insert the bullet point [•].
Locate the Insert tab on the Word, and you will see the Table section right there.

Click the Table section, and an insert box pops up. You need to select rows and columns according to your need.

Now you’ve your table on the word document.
Select it, click the Home tab, go to the Paragraph section and click the bullet library and insert the point symbol [•] into your document.

The bullet point symbol [•] will be applied to the list of items in the table.
Also read: How to Create a Copy of a Word Document
When we want to list items or points in a text, we use bullets. Bullet points allow us to summarise ideas and facts into short, neatly arranged sentences.
The usual way to add bullet points is to highlight the paragraph in which we want to add bullet points and then choose our preferred style of numbering from the home tab on the ribbon.
However, Word has some shortcuts that can achieve the same thing.
Method 1
- Select the paragraphs to which you want to apply bullet points.

- Press CTRL + Shift + L.
- Word will automatically apply bullet points and insert indents to the paragraphs.
Method 2
- Select the paragraphs to which you want to add bullet points.
- Press Alt + H + U
- Then use the right arrow to go to the bullet of choice.
- Press ‘Enter’ to apply the bullets you have chosen.
- Word will automatically apply these bullet points and insert indents to the paragraphs.
Method 3
Press the * followed by the space bar. A bullet point will automatically appear.
Are you looking for a tool that allows you to save all changes you make to a document while also giving you the ability to collaborate on a paper or article with more than one person?
Look no further than Simul Docs.
All you have to do is download Simul Docs and upload your first draft there.
Simul Docs automatically makes this your first version. Now, someone else can sign in and make their edits. Simul creates another version, different from the first, and saves it separately.
If another person were to make new edits to this document, another version, different from the first and second, is created.
Every time another person opens a version and makes edits, a new version is created with the latest changes.
Assuming you are in a rush and forget to turn on track changes so Simul Docs can automatically record your changes? There is no need to worry. With Simul Docs, all your changes are documented regardless of your online or offline status.
Since it is a collaboration, a bonus feature is the ability to add comments to the document. If you want a colleague to review the changes by a specific time, or any other instructions, you can let them know in the comment section.
Additionally, you can suggest changes, and your colleagues can either reject or accept them when reviewing the document.
Furthermore, with Simul Docs, every version of your document is stored. Do not think that as more versions are created, older ones are deleted. Every paper is saved from the first to the last so that if you want to go back and review them, you have that option.
Do you ever have to work on a written project but have to wait until another person has made their submission? This is not a problem with Simul Docs. All your colleagues can work on a project at once. This avoids missing deadlines because maybe one person did their part too slowly, yet everyone else was on schedule. Or maybe when you were free, it was someone else working on it, and now that you are busy, this work demands your attention. These are all problems of the past.
Suppose another co-worker is supposed to include their input, but they do not have Simul Docs. All you have to do is download the document or forward it by email. Alternatively, you can upload it to any storage software like one drive, and once their changes have been made, they can forward it to you once again, and you can open it in Simul Docs.
Once all the necessary edits have been made, you can save the final version containing all the modifications with one click.
Simul is the most convenient collaborative tool yet. Centralising your written project avoids mishaps like losing your work or losing its original format.
Perks to using Simul Docs:
- You do not have to be in the exact physical location of the person you are collaborating on a document with.
- You can work on the same document at the same time.
- There is no need for physical meetings, video, or conference calls to discuss changes that need to be made to the document.
- Simul Docs saves every single version of the document.
- There is no need for back-and-forth emailing
- Simul prevents loss of work
- Simul Docs retains the original format of the document.
As you can see, Simul Docs is a game-changer in viewing, writing, and editing documents.
Visit simuldocs.com and simplify group edits today.
Use Keyboard Shortcuts to Apply Bullet Points to Paragraphs in Word
by Avantix Learning Team | Updated February 10, 2023
Applies to: Microsoft® Word® 2010, 2013, 2016, 2019, 2021 or 365 (Windows)
You can add bullet points in Microsoft Word documents using several keyboard shortcuts. Since bullets are best applied as a paragraph format, the following shortcuts apply to paragraphs. A paragraph is anything with a hard return after it.
Recommended article: How to Turn Off Automatic Bullets and Numbering in Word
Insert default bullet points using Word’s built-in keyboard shortcut
To insert default bullet points using Word’s built-in keyboard shortcut:
- Select the paragraphs to which you want to apply bullets (insert at the beginning).
- Press Ctrl + Shift + L. Word will apply the default bullets and apply indents to the paragraphs.
Insert bullet points using the Bullets drop-down menu
To insert bullet points using the Bullets drop-down menu:
- Select the paragraphs to which you want to apply bullets (insert at the beginning).
- Press Alt > H > U (Alt and then H and then U). A drop-down menu appears.
- Press the right arrow to move through the different types of bullets.
- Press Enter to select the highlighted bullet. Word will apply the bullets and apply indents to the paragraphs.
You can also select Define New Bullet to choose other characters as bullets.
The Bullets drop-down menu includes other types of bullets:

Insert bullet points using AutoCorrect
Using Word’s AutoCorrect, you can also apply bullets as you type. This method can be used before you type the first paragraph.
To insert bullet points using AutoCorrect (this option should be turned on by default):
- Position the cursor at the beginning of a new line where you want to insert a bullet.
- Press Shift + 8 to enter an asterisk (*).
- Press Tab or Spacebar. Word inserts the default bullet and indents the paragraph.
- Type the text for the bulleted paragraph.
- Press Enter at the end of the paragraph. Word should continue the bulleted list.
- To turn off the bullets and return to the Normal style, press Ctrl + Shift + N.
You can also use several other characters for other types of bullets using the AutoCorrect method:
- Type — (two hyphens or dashes at the top of the keyboard) and then press Tab or Spacebar to enter a square bullet.
- Type – (one hyphen or dash) and then press Tab or Spacebar to enter a dash style bullet.
- Type -> (one hyphen and the greater than symbol) and then press Tab or Spacebar to enter a thin arrow.
- Type => (equal sign and the greater than symbol) and then press Tab or Spacebar to enter a thick arrow.
- Type > (greater than symbol) and then press Tab or Spacebar to enter a tail-less arrow.
If you are comfortable using styles in Word, you can also apply styles that include bullets.
Subscribe to get more articles like this one
Did you find this article helpful? If you would like to receive new articles, JOIN our email list.
More resources
How to Remove Hard Returns in Word Documents
14+ Word Selection Shortcuts to Quickly Select Text
How to Superscipt or Subscript in Word (with Shortcuts)
3 Strikethrough Shortcuts in Microsoft Word to Cross Out Text
How to Keep Text Together in Microsoft Word (Paragraphs, Lines or Words)
Related courses
Microsoft Word: Intermediate / Advanced
Microsoft Word: Designing Dynamic Word Documents Using Fields
Microsoft Word: Long Documents Master Class
Microsoft Word: Accessible Word Documents
Microsoft Excel: Intermediate / Advanced
Microsoft PowerPoint: Intermediate / Advanced
VIEW MORE COURSES >
Our instructor-led courses are delivered in virtual classroom format or at our downtown Toronto location at 18 King Street East, Suite 1400, Toronto, Ontario, Canada (some in-person classroom courses may also be delivered at an alternate downtown Toronto location). Contact us at info@avantixlearning.ca if you’d like to arrange custom instructor-led virtual classroom or onsite training on a date that’s convenient for you.
Copyright 2023 Avantix® Learning
Microsoft, the Microsoft logo, Microsoft Office and related Microsoft applications and logos are registered trademarks of Microsoft Corporation in Canada, US and other countries. All other trademarks are the property of the registered owners.
Avantix Learning |18 King Street East, Suite 1400, Toronto, Ontario, Canada M5C 1C4 | Contact us at info@avantixlearning.ca
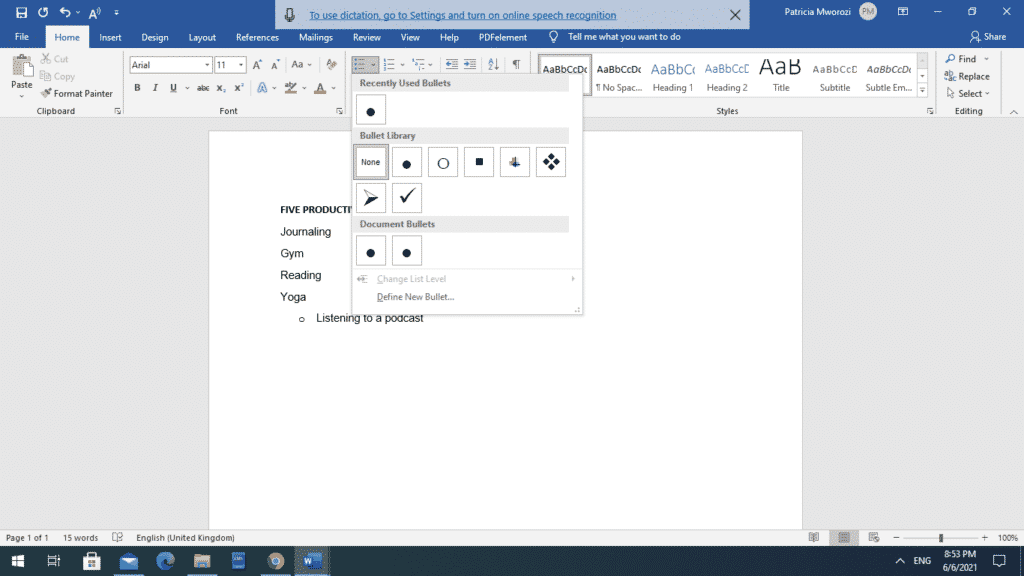
Although most of an academic paper should be written with full sentences divided up into paragraphs, bullet points and numbered lists can be useful in some contexts. For instance, vertical lists are particularly useful when giving examples or reporting steps in a process.
Microsoft Word also makes adding lists to a document reassuringly simple. All you need to do is follow the instructions below.
Using Bullet Points in an Essay
Bullet points are useful when listing things non-sequentially (i.e., when there is no specific order in which the items involved should be listed). They should also be reserved for longer lists, as short lists of up to three or four items can be included in the main text.
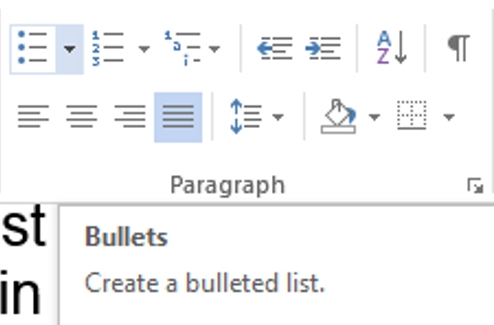
To add a bullet pointed list to a document in Microsoft Word 2007 or later, simply:
- Place the cursor where you want the list to begin
- Go to “Paragraph” under the “Home” tab on the main ribbon

“Paragraph” options. - Click the “Bullets” button to begin a list (you can select the type of bullet point you want by using the arrow to open a new menu)
- Type the first entry in your list, hitting “Enter” to start the next one
To end your list, hit “Enter” twice after the final item. You can even customize your bullet points with an image of your choosing for a little extra color. We like using eagles, but we admit that this probably isn’t appropriate for most academic documents.

Using Numbered Lists
Numbered lists are appropriate when listing items sequentially or in order of importance. The process for adding a numbered list to a document is similar to adding a bulleted list:
Find this useful?
Subscribe to our newsletter and get writing tips from our editors straight to your inbox.
- Select where you want to begin your list
- Go to the “Paragraph” section of the “Home” tab
- Click the “Numbering” button (you can select a numbering style from the dropdown menu by clicking the arrow)

The “Numbering” options. - Type your first entry, then hit “Enter” to create the next one
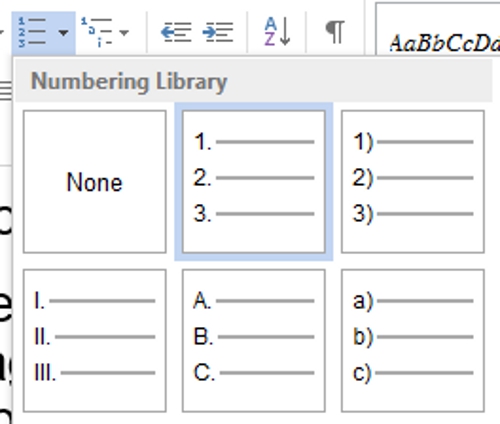
As with bulleted lists, you end a numbered list by hitting “Enter” twice after the final item. For more control over the style, select “Define New Number Format” in the numbering menu.
Using Multilevel Lists
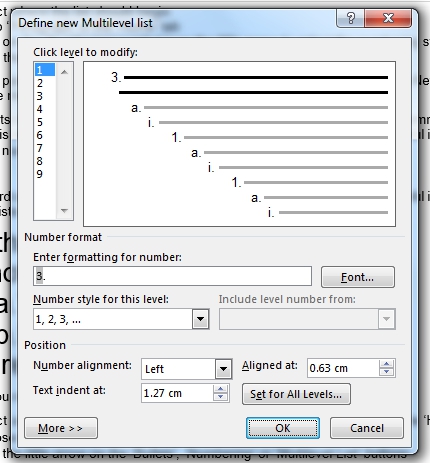
Finally, if you really want to push the boat out, you can use a “Multilevel” list. This is useful if you want to include sub-lists within a main list, like in the following:

To add a list like this to your document, you’ll have to:
- Select a list style under “Multilevel List” in the “Paragraph” section of the “Home” tab

Multilevel list options. - Write out your list as normal, beginning each item on a new line
- To adjust the “level” of any given point, simply open the “Multilevel List” menu and select the appropriate option from the “Change List Level” submenu

Changing list level.

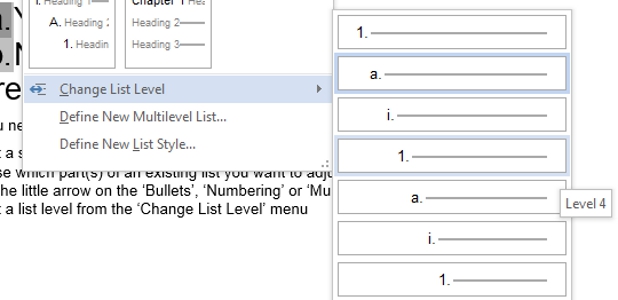
As with the other lists discussed here, you can customize the style of multilevel lists by selecting “Define New Multilevel List” from the menu. This will open a new window where you can modify each level of your chosen list style as required.