
- Remove From My Forums
-
Question
-
Can I use the BULK INSERT command to load a .xls file into SQL Server 2008 DB.
If I cannot is there any other command to do it
Answers
-
Hi,
yes you can import .xls file below a few examples:
— Method#1
INSERT INTO dbo.ImportTest
SELECT * FROM OPENDATASOURCE(‘Microsoft.Jet.OLEDB.4.0’,
‘Data Source=C:ImportData.xls;Extended Properties=Excel 8.0’)…[Sheet1$]
—Method#2
INSERT INTO dbo.ImportTest
SELECT * FROM OPENROWSET(‘Microsoft.Jet.OLEDB.4.0’,
‘Excel 8.0;Database=C:ImportData.xls’, ‘SELECT * FROM [Sheet1$]’)
Please go through the below link for reference:
http://www.mssqltips.com/tip.asp?tip=1207
Hope it helps.
Kiran
-
Proposed as answer by
Sunday, August 15, 2010 3:08 PM
-
Marked as answer by
Ai-hua Qiu
Monday, August 23, 2010 6:32 AM
-
Proposed as answer by
-
-
Proposed as answer by
Naomi N
Sunday, August 15, 2010 3:08 PM -
Marked as answer by
Ai-hua Qiu
Monday, August 23, 2010 6:32 AM
-
Proposed as answer by
| title | description | author | ms.author | ms.date | ms.service | ms.subservice | ms.topic | monikerRange |
|---|---|---|---|---|---|---|---|---|
|
Import data from Excel to SQL Server or Azure SQL Database |
This article describes methods to import data from Excel to SQL Server or Azure SQL Database. Some use a single step, others require an intermediate text file. |
rwestMSFT |
randolphwest |
03/30/2023 |
sql |
data-movement |
conceptual |
=azuresqldb-current||>=sql-server-2016||>=sql-server-linux-2017||=azuresqldb-mi-current |
Import data from Excel to SQL Server or Azure SQL Database
[!INCLUDE SQL Server Azure SQL Database]
There are several ways to import data from Excel files to [!INCLUDE ssnoversion-md] or to Azure SQL Database. Some methods let you import data in a single step directly from Excel files; other methods require you to export your Excel data as text (CSV file) before you can import it.
This article summarizes the frequently used methods and provides links for more detailed information. A complete description of complex tools and services like SSIS or Azure Data Factory is beyond the scope of this article. To learn more about the solution that interests you, follow the provided links.
List of methods
There are several ways to import data from Excel. You may need to install SQL Server Management Studio (SSMS) to use some of these tools.
You can use the following tools to import data from Excel:
| Export to text first ([!INCLUDE ssnoversion-md] and SQL Database) | Directly from Excel ([!INCLUDE ssnoversion-md] on-premises only) |
|---|---|
| Import Flat File Wizard | SQL Server Import and Export Wizard |
| BULK INSERT statement | SQL Server Integration Services (SSIS) |
| BCP | OPENROWSET function |
| Copy Wizard (Azure Data Factory) | |
| Azure Data Factory |
If you want to import multiple worksheets from an Excel workbook, you typically have to run any of these tools once for each sheet.
[!IMPORTANT]
To learn more, see limitations and known issues for loading data to or from Excel files.
Import and Export Wizard
Import data directly from Excel files by using the [!INCLUDE ssnoversion-md] Import and Export Wizard. You also can save the settings as a SQL Server Integration Services (SSIS) package that you can customize and reuse later.
-
In [!INCLUDEssManStudioFull], connect to an instance of the [!INCLUDEssNoVersion] [!INCLUDEssDE].
-
Expand Databases.
-
Right-click a database.
-
Select Tasks.
-
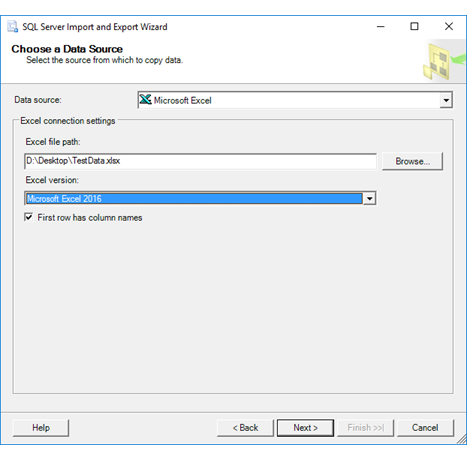
Choose to Import Data or Export Data:
:::image type=»content» source=»../../integration-services/import-export-data/media/start-wizard-ssms.jpg» alt-text=»Start wizard SSMS»:::
This launches the wizard:
:::image type=»content» source=»media/excel-connection.png» alt-text=»Connect to an Excel data source»:::
To learn more, review:
- Start the SQL Server Import and Export Wizard
- Get started with this simple example of the Import and Export Wizard
Integration Services (SSIS)
If you’re familiar with SQL Server Integration Services (SSIS) and don’t want to run the [!INCLUDE ssnoversion-md] Import and Export Wizard, create an SSIS package that uses the Excel Source and the [!INCLUDE ssnoversion-md] Destination in the data flow.
To learn more, review:
- Excel Source
- SQL Server Destination
To start learning how to build SSIS packages, see the tutorial How to Create an ETL Package.
:::image type=»content» source=»media/excel-to-sql-data-flow.png» alt-text=»Components in the data flow»:::
OPENROWSET and linked servers
[!IMPORTANT]
In Azure SQL Database, you cannot import directly from Excel. You must first export the data to a text (CSV) file.
[!NOTE]
The ACE provider (formerly the Jet provider) that connects to Excel data sources is intended for interactive client-side use. If you use the ACE provider on [!INCLUDE ssnoversion-md], especially in automated processes or processes running in parallel, you may see unexpected results.
Distributed queries
Import data directly into [!INCLUDE ssnoversion-md] from Excel files by using the Transact-SQL OPENROWSET or OPENDATASOURCE function. This usage is called a distributed query.
[!IMPORTANT]
In Azure SQL Database, you cannot import directly from Excel. You must first export the data to a text (CSV) file.
Before you can run a distributed query, you have to enable the ad hoc distributed queries server configuration option, as shown in the following example. For more info, see ad hoc distributed queries Server Configuration Option.
sp_configure 'show advanced options', 1;
RECONFIGURE;
GO
sp_configure 'ad hoc distributed queries', 1;
RECONFIGURE;
GO
The following code sample uses OPENROWSET to import the data from the Excel Sheet1 worksheet into a new database table.
USE ImportFromExcel;
GO
SELECT * INTO Data_dq
FROM OPENROWSET('Microsoft.ACE.OLEDB.12.0',
    'Excel 12.0; Database=C:TempData.xlsx', [Sheet1$]);
GO
Here’s the same example with OPENDATASOURCE.
USE ImportFromExcel;
GO
SELECT * INTO Data_dq
FROM OPENDATASOURCE('Microsoft.ACE.OLEDB.12.0',
    'Data Source=C:TempData.xlsx;Extended Properties=Excel 12.0')...[Sheet1$];
GO
To append the imported data to an existing table instead of creating a new table, use the INSERT INTO ... SELECT ... FROM ... syntax instead of the SELECT ... INTO ... FROM ... syntax used in the preceding examples.
To query the Excel data without importing it, just use the standard SELECT ... FROM ... syntax.
For more info about distributed queries, see the following articles:
- Distributed Queries (Distributed queries are still supported in [!INCLUDE sssql19-md], but the documentation for this feature hasn’t been updated.)
- OPENROWSET
- OPENDATASOURCE
Linked servers
You can also configure a persistent connection from [!INCLUDE ssnoversion-md] to the Excel file as a linked server. The following example imports the data from the Data worksheet on the existing Excel linked server EXCELLINK into a new [!INCLUDE ssnoversion-md] database table named Data_ls.
USE ImportFromExcel;
GO
SELECT * INTO Data_ls FROM EXCELLINK...[Data$];
GO
You can create a linked server from SQL Server Management Studio (SSMS), or by running the system stored procedure sp_addlinkedserver, as shown in the following example.
DECLARE @RC INT;
DECLARE @server NVARCHAR(128);
DECLARE @srvproduct NVARCHAR(128);
DECLARE @provider NVARCHAR(128);
DECLARE @datasrc NVARCHAR(4000);
DECLARE @location NVARCHAR(4000);
DECLARE @provstr NVARCHAR(4000);
DECLARE @catalog NVARCHAR(128);

-- Set parameter values
SET @server = 'EXCELLINK';
SET @srvproduct = 'Excel';
SET @provider = 'Microsoft.ACE.OLEDB.12.0';
SET @datasrc = 'C:TempData.xlsx';
SET @provstr = 'Excel 12.0';

EXEC @RC = [master].[dbo].[sp_addlinkedserver] @server,
    @srvproduct,
    @provider,
    @datasrc,
    @location,
    @provstr,
    @catalog;
For more info about linked servers, see the following articles:
- Create Linked Servers
- OPENQUERY
For more examples and info about both linked servers and distributed queries, see the following article:
- How to use Excel with SQL Server linked servers and distributed queries
Prerequisite — Save Excel data as text
To use the rest of the methods described on this page — the BULK INSERT statement, the BCP tool, or Azure Data Factory — first you have to export your Excel data to a text file.
In Excel, select File | Save As and then select Text (Tab-delimited) (*.txt) or CSV (Comma-delimited) (*.csv) as the destination file type.
If you want to export multiple worksheets from the workbook, select each sheet, and then repeat this procedure. The Save as command exports only the active sheet.
[!TIP]
For best results with data importing tools, save sheets that contain only the column headers and the rows of data. If the saved data contains page titles, blank lines, notes, and so forth, you may see unexpected results later when you import the data.
The Import Flat File Wizard
Import data saved as text files by stepping through the pages of the Import Flat File Wizard.
As described previously in the Prerequisite section, you have to export your Excel data as text before you can use the Import Flat File Wizard to import it.
For more info about the Import Flat File Wizard, see Import Flat File to SQL Wizard.
BULK INSERT command
BULK INSERT is a Transact-SQL command that you can run from SQL Server Management Studio. The following example loads the data from the Data.csv comma-delimited file into an existing database table.
As described previously in the Prerequisite section, you have to export your Excel data as text before you can use BULK INSERT to import it. BULK INSERT can’t read Excel files directly. With the BULK INSERT command, you can import a CSV file that is stored locally or in Azure Blob storage.
USE ImportFromExcel;
GO
BULK INSERT Data_bi FROM 'C:Tempdata.csv'
   WITH (
      FIELDTERMINATOR = ',',
      ROWTERMINATOR = 'n'
);
GO
For more info and examples for [!INCLUDE ssnoversion-md] and SQL Database, see the following articles:
- Import Bulk Data by Using BULK INSERT or OPENROWSET(BULK…)
- BULK INSERT
BCP tool
BCP is a program that you run from the command prompt. The following example loads the data from the Data.csv comma-delimited file into the existing Data_bcp database table.
As described previously in the Prerequisite section, you have to export your Excel data as text before you can use BCP to import it. BCP can’t read Excel files directly. Use to import into [!INCLUDE ssnoversion-md] or SQL Database from a test (CSV) file saved to local storage.
[!IMPORTANT]
For a text (CSV) file stored in Azure Blob storage, use BULK INSERT or OPENROWSET. For an examples, see Example.
bcp.exe ImportFromExcel..Data_bcp in "C:Tempdata.csv" -T -c -t ,
For more info about BCP, see the following articles:
- Import and Export Bulk Data by Using the bcp Utility
- bcp Utility
- Prepare Data for Bulk Export or Import
Copy Wizard (ADF)
Import data saved as text files by stepping through the pages of the Azure Data Factory (ADF) Copy Wizard.
As described previously in the Prerequisite section, you have to export your Excel data as text before you can use Azure Data Factory to import it. Data Factory can’t read Excel files directly.
For more info about the Copy Wizard, see the following articles:
- Data Factory Copy Wizard
- Tutorial: Create a pipeline with Copy Activity using Data Factory Copy Wizard.
Azure Data Factory
If you’re familiar with Azure Data Factory and don’t want to run the Copy Wizard, create a pipeline with a Copy activity that copies from the text file to [!INCLUDE ssnoversion-md] or to Azure SQL Database.
As described previously in the Prerequisite section, you have to export your Excel data as text before you can use Azure Data Factory to import it. Data Factory can’t read Excel files directly.
For more info about using these Data Factory sources and sinks, see the following articles:
- File system
- SQL Server
- Azure SQL Database
To start learning how to copy data with Azure data factory, see the following articles:
- Move data by using Copy Activity
- Tutorial: Create a pipeline with Copy Activity using Azure portal
Common errors
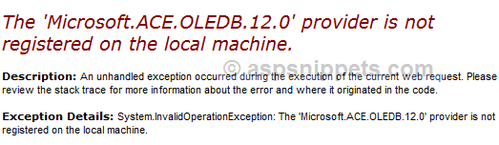
Microsoft.ACE.OLEDB.12.0″ hasn’t been registered
This error occurs because the OLEDB provider isn’t installed. Install it from Microsoft Access Database Engine 2010 Redistributable. Be sure to install the 64-bit version if Windows and [!INCLUDE ssnoversion-md] are both 64-bit.
The full error is:
Msg 7403, Level 16, State 1, Line 3
The OLE DB provider "Microsoft.ACE.OLEDB.12.0" has not been registered.
Cannot create an instance of OLE DB provider «Microsoft.ACE.OLEDB.12.0» for linked server «(null)»
This indicates that the Microsoft OLEDB hasn’t been configured properly. Run the following Transact-SQL code to resolve this:
EXEC sp_MSset_oledb_prop N'Microsoft.ACE.OLEDB.12.0', N'AllowInProcess', 1;
EXEC sp_MSset_oledb_prop N'Microsoft.ACE.OLEDB.12.0', N'DynamicParameters', 1;
The full error is:
Msg 7302, Level 16, State 1, Line 3
Cannot create an instance of OLE DB provider "Microsoft.ACE.OLEDB.12.0" for linked server "(null)".
The 32-bit OLE DB provider «Microsoft.ACE.OLEDB.12.0» cannot be loaded in-process on a 64-bit SQL Server
This occurs when a 32-bit version of the OLD DB provider is installed with a 64-bit [!INCLUDE ssnoversion-md]. To resolve this issue, uninstall the 32-bit version and install the 64-bit version of the OLE DB provider instead.
The full error is:
Msg 7438, Level 16, State 1, Line 3
The 32-bit OLE DB provider "Microsoft.ACE.OLEDB.12.0" cannot be loaded in-process on a 64-bit SQL Server.
The OLE DB provider «Microsoft.ACE.OLEDB.12.0» for linked server «(null)» reported an error.
Cannot initialize the data source object of OLE DB provider «Microsoft.ACE.OLEDB.12.0» for linked server «(null)»
Both of these errors typically indicate a permissions issue between the [!INCLUDE ssnoversion-md] process and the file. Ensure that the account that is running the [!INCLUDE ssnoversion-md] service has full access permission to the file. We recommend against trying to import files from the desktop.
The full errors are:
Msg 7399, Level 16, State 1, Line 3
The OLE DB provider "Microsoft.ACE.OLEDB.12.0" for linked server "(null)" reported an error. The provider did not give any information about the error.
Msg 7303, Level 16, State 1, Line 3
Cannot initialize the data source object of OLE DB provider "Microsoft.ACE.OLEDB.12.0" for linked server "(null)".
Next steps
- Get started with this simple example of the Import and Export Wizard
- Import data from Excel or export data to Excel with SQL Server Integration Services (SSIS)
- bcp Utility
- Move data by using Copy Activity
To use the rest of the methods described on this page – the BULK INSERT statement, the BCP tool, or Azure Data Factory – first you have to export your Excel data to a text file. In Excel, select File | Save As and then select Text (Tab-delimited) (*. txt) or CSV (Comma-delimited) (*. csv) as the destination file type.
How bulk insert works in SQL Server?
BULK INSERT statement BULK INSERT loads data from a data file into a table. This functionality is similar to that provided by the in option of the bcp command; however, the data file is read by the SQL Server process. For a description of the BULK INSERT syntax, see BULK INSERT (Transact-SQL).
How do I batch insert in SQL?
To do a batch insert, we need to use all column names with parenthesis, separated by ‘,’. Let us see an example. First, we will create a table. The following is the CREATE command to create a table.
How do I create a bulk insert file?
We can manually create the format file in notepad but we have an option to generate the format file using BCP utility. Open the Command prompt and paste below mentioned line. Once you have entered above line the utility will ask each field data type, prefix length and field terminator.
Is bulk insert faster than insert?
BULK INSERT can be a minimally logged operation (depending on various parameters like indexes, constraints on the tables, recovery model of the database etc). In case of BULK INSERT, only extent allocations are logged instead of the actual data being inserted. This will provide much better performance than INSERT.
How can I insert more than 1000 rows in SQL Server?
A table can store upto 1000 rows in one insert statement. If a user want to insert multiple rows at a time, the following syntax has to written. If a user wants to insert more than 1000 rows, multiple insert statements, bulk insert or derived table must be used.
How can I insert 1000 rows in SQL at a time?
To add up the rows, the user needs to use insert statement.
- Syntax :
- Example – A table named student must have values inserted into it. It has to be done as follows:
- Output –
- Output –
- insert multiple rows : A table can store upto 1000 rows in one insert statement.
- Syntax :
- Example – Consider a table student.
- Output –
How do you specify text qualifier in bulk insert?
You need to use a ‘format file’ to implement a text qualifier for bulk insert. Essentially, you will need to teach the bulk insert that there’s potentially different delimiters in each field. Create a text file called “level_2. fmt” and save it.
How do I use BCP format?
The format file uses character data formats and a non-default field terminator ( , ). The contents of the generated format file are presented after the command. The bcp command contains the following qualifiers. Specifies the XML format file.
Can I do SQL in Excel?
Using SQL statements in Excel enables you to connect to an external data source, parse field or table contents and import data – all without having to input the data manually. Once you import external data with SQL statements, you can then sort it, analyze it or perform any calculations that you might need.
What is Bulk insert in SQL Server?
SQL Server Bulk Insert – Part 1. According to Wikipedia, ”A Bulk insert is a process or method provided by a database management system to load multiple rows of data into a database table.” If we adjust this explanation in accordance with the BULK INSERT statement, bulk insert allows importing external data files into SQL Server.
What is bulk import?
Bulk import is an “insert or update” record operation. If a matching record is found in the database, it is updated. Otherwise, a new record is created. The bulk import response does not indicate whether a given record was updated or inserted.
How do I insert into SQL?
The SQL INSERT INTO Statement. The INSERT INTO statement is used to insert new records in a table. It is possible to write the INSERT INTO statement in two ways. The first way specifies both the column names and the values to be inserted: INSERT INTO table_name (column1, column2, column3.)
What is Bulk Copy?
Bulk Copy. Bulk Copy also known as BCP is a command line tool installed on your server during SQL installation and is located here: C:\Program Files\Microsoft SQL Server\100\Tools\Binn\bcp.exe BCP is a tool which allows copying large amounts of data from one location to another. You may use this tool from a .NET application,…
In this article I will explain with an example, how to insert data from Excel sheet into SQL Server database table using SqlBulkCopy in C# and VB.Net.
SqlBulkCopy class as the name suggests does bulk insert from one source to another and hence all rows from the Excel sheet can be easily read and inserted using the SqlBulkCopy class.
Database
I have created a simple table named tblPersons whose schema is shown below.
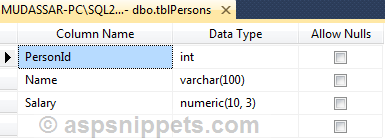
Note: You can download the database table SQL by clicking the download link below.
Download SQL file
Connection String to the Database
<add name=«constr« connectionString=«Data Source=.SQL2008R2;Database=PersonsDB;User Id=mudassar;password=xxxxx«/>
Connection String for Excel 2003 and Excel 2007 or higher formats
The Connection Strings for the Excel files of both 2003 and 2007 or higher formats have been specified in the Web.Config file.
<add name=«Excel03ConString« connectionString=«Provider=Microsoft.Jet.OLEDB.4.0;Data Source={0};Extended Properties=’Excel 8.0;HDR=YES’«/>
<add name=«Excel07+ConString« connectionString=«Provider=Microsoft.ACE.OLEDB.12.0;Data Source={0};Extended Properties=’Excel 8.0;HDR=YES’«/>
HTML Markup
The HTML Markup consists of ASP.Net FileUpload control and a Button to trigger the file upload process.
<asp:FileUpload ID=»FileUpload1″ runat=»server» />
<asp:Button Text=»Upload» OnClick=»Upload» runat=»server» />
Namespaces
You will need to import the following namespaces.
C#
using System.IO;
using System.Data;
using System.Data.OleDb;
using System.Data.SqlClient;
using System.Configuration;
VB.Net
Imports System.IO
Imports System.Data
Imports System.Data.OleDb
Imports System.Data.SqlClient
Imports System.Configuration
Uploading and inserting rows from Excel to SQL Server Table
On the click of the button the Excel file is first uploaded and then saved inside a folder named Files.
Then based on the extension of the Excel file i.e. xls or xlsx, the appropriate connection sting is fetched from the Web.Config file.
Then a connection is established with the Excel file and the name of the first sheet is read into a variable.
Note: I am considering all Excel files with the first row as the Header Row containing the names of the columns, you can set HDR=’No’ if your excel file does not have a Header Row.
Using the fetched Sheet name, a SELECT statement is executed and all the records from the Excel sheet are fetched into a DataTable.
Note: You will notice I have defined columns in DataTable before loading data from Excel file, though it is not necessary but recommended as otherwise all fields will be considered of type string by default.
Now a connection is established with the database and the SqlBulkCopy object is initialized and I have specified the name of the Table using the DestinationTableName property.
Finally the columns are mapped and all the rows from the DataTable are inserted into the SQL Server table.
Note: The mapping of columns of the DataTable and the SQL Server table is optional and you need to do only in case where your DataTable and/or the SQL Server Table do not have same number of columns or the names of columns are different.
C#
protected void Upload(object sender, EventArgs e)
{
//Upload and save the file
string excelPath = Server.MapPath(«~/Files/») + Path.GetFileName(FileUpload1.PostedFile.FileName);
FileUpload1.SaveAs(excelPath);
string conString = string.Empty;
string extension = Path.GetExtension(FileUpload1.PostedFile.FileName);
switch (extension)
{
case «.xls»: //Excel 97-03
conString = ConfigurationManager.ConnectionStrings[«Excel03ConString»].ConnectionString;
break;
case «.xlsx»: //Excel 07 or higher
conString = ConfigurationManager.ConnectionStrings[«Excel07+ConString»].ConnectionString;
break;
}
conString = string.Format(conString, excelPath);
using (OleDbConnection excel_con = new OleDbConnection(conString))
{
excel_con.Open();
string sheet1 = excel_con.GetOleDbSchemaTable(OleDbSchemaGuid.Tables, null).Rows[0][«TABLE_NAME»].ToString();
DataTable dtExcelData = new DataTable();
//[OPTIONAL]: It is recommended as otherwise the data will be considered as String by default.
dtExcelData.Columns.AddRange(new DataColumn[3] { new DataColumn(«Id», typeof(int)),
new DataColumn(«Name», typeof(string)),
new DataColumn(«Salary», typeof(decimal)) });
using (OleDbDataAdapter oda = new OleDbDataAdapter(«SELECT * FROM [« + sheet1 + «]», excel_con))
{
oda.Fill(dtExcelData);
}
excel_con.Close();
string consString = ConfigurationManager.ConnectionStrings[«constr»].ConnectionString;
using (SqlConnection con = new SqlConnection(consString))
{
using (SqlBulkCopy sqlBulkCopy = new SqlBulkCopy(con))
{
//Set the database table name
sqlBulkCopy.DestinationTableName = «dbo.tblPersons»;
//[OPTIONAL]: Map the Excel columns with that of the database table
sqlBulkCopy.ColumnMappings.Add(«Id», «PersonId»);
sqlBulkCopy.ColumnMappings.Add(«Name», «Name»);
sqlBulkCopy.ColumnMappings.Add(«Salary», «Salary»);
con.Open();
sqlBulkCopy.WriteToServer(dtExcelData);
con.Close();
}
}
}
}
VB.Net
Protected Sub Upload(sender As Object, e As EventArgs)
‘Upload and save the file
Dim excelPath As String = Server.MapPath(«~/Files/») + Path.GetFileName(FileUpload1.PostedFile.FileName)
FileUpload1.SaveAs(excelPath)
Dim connString As String = String.Empty
Dim extension As String = Path.GetExtension(FileUpload1.PostedFile.FileName)
Select Case extension
Case «.xls»
‘Excel 97-03
connString = ConfigurationManager.ConnectionStrings(«Excel03ConString»).ConnectionString
Exit Select
Case «.xlsx»
‘Excel 07 or higher
connString = ConfigurationManager.ConnectionStrings(«Excel07+ConString»).ConnectionString
Exit Select
End Select
connString = String.Format(connString, excelPath)
Using excel_con As New OleDbConnection(connString)
excel_con.Open()
Dim sheet1 As String = excel_con.GetOleDbSchemaTable(OleDbSchemaGuid.Tables, Nothing).Rows(0)(«TABLE_NAME»).ToString()
Dim dtExcelData As New DataTable()
‘[OPTIONAL]: It is recommended as otherwise the data will be considered as String by default.
dtExcelData.Columns.AddRange(New DataColumn(2) {New DataColumn(«Id», GetType(Integer)), _
New DataColumn(«Name», GetType(String)), _
New DataColumn(«Salary», GetType(Decimal))})
Using oda As New OleDbDataAdapter((Convert.ToString(«SELECT * FROM [«) & sheet1) + «]», excel_con)
oda.Fill(dtExcelData)
End Using
excel_con.Close()
Dim conString As String = ConfigurationManager.ConnectionStrings(«constr»).ConnectionString
Using con As New SqlConnection(conString)
Using sqlBulkCopy As New SqlBulkCopy(con)
‘Set the database table name
sqlBulkCopy.DestinationTableName = «dbo.tblPersons»
‘[OPTIONAL]: Map the Excel columns with that of the database table
sqlBulkCopy.ColumnMappings.Add(«Id», «PersonId»)
sqlBulkCopy.ColumnMappings.Add(«Name», «Name»)
sqlBulkCopy.ColumnMappings.Add(«Salary», «Salary»)
con.Open()
sqlBulkCopy.WriteToServer(dtExcelData)
con.Close()
End Using
End Using
End Using
End Sub
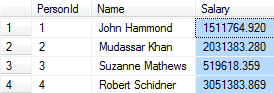
Screenshots
Excel File

Table containing the data from the Excel file
Downloads
Содержание
- Import data from Excel to SQL Server or Azure SQL Database
- List of methods
- Import and Export Wizard
- Integration Services (SSIS)
- OPENROWSET and linked servers
- Distributed queries
- Linked servers
- Prerequisite — Save Excel data as text
- The Import Flat File Wizard
- BULK INSERT command
- BCP tool
- Copy Wizard (ADF)
- Azure Data Factory
- Common errors
- Microsoft.ACE.OLEDB.12.0″ has not been registered
- Cannot create an instance of OLE DB provider «Microsoft.ACE.OLEDB.12.0» for linked server «(null)»
- The 32-bit OLE DB provider «Microsoft.ACE.OLEDB.12.0» cannot be loaded in-process on a 64-bit SQL Server
- The OLE DB provider «Microsoft.ACE.OLEDB.12.0» for linked server «(null)» reported an error.
- Cannot initialize the data source object of OLE DB provider «Microsoft.ACE.OLEDB.12.0» for linked server «(null)»
- Импорт данных из Excel в SQL Server или базу данных Azure
- Список методов
- Мастер импорта и экспорта
- Службы Integration Services (SSIS)
- OPENROWSET и связанные серверы
- Распределенные запросы
- Связанные серверы
- Предварительное требование — сохранение данных Excel как текст
- Мастер импорта неструктурированных файлов
- Команда BULK INSERT
- Средство BCP
- Мастер копирования (ADF)
- Фабрика данных Azure
- Распространенные ошибки
- «Microsoft.ACE.OLEDB.12.0» не зарегистрирован
- Не удалось создать экземпляр поставщика OLE DB «Microsoft.ACE.OLEDB.12.0» для связанного сервера «(null)».
- 32-разрядный поставщик OLE DB «Microsoft.ACE.OLEDB.12.0» не может быть загружен в процессе на 64-разрядной версии SQL Server.
- Поставщик OLE DB «Microsoft.ACE.OLEDB.12.0» для связанного сервера «(null)» сообщил об ошибке.
- Не удалось проинициализировать объект источника данных поставщика OLE DB «Microsoft.ACE.OLEDB.12.0» для связанного сервера «(null)».
Import data from Excel to SQL Server or Azure SQL Database
Applies to: SQL Server Azure SQL Database
There are several ways to import data from Excel files to SQL Server or to Azure SQL Database. Some methods let you import data in a single step directly from Excel files; other methods require you to export your Excel data as text (CSV file) before you can import it.
This article summarizes the frequently used methods and provides links for more detailed information. A complete description of complex tools and services like SSIS or Azure Data Factory is beyond the scope of this article. To learn more about the solution that interests you, follow the provided links.
List of methods
There are a number of methods to import data from Excel. You may need to install SQL Server Management Studio (SSMS) to use some of these tools.
You can use the following tools to import data from Excel:
| Export to text first (SQL Server and SQL Database) | Directly from Excel (SQL Server on-premises only) |
|---|---|
| Import Flat File Wizard | SQL Server Import and Export Wizard |
| BULK INSERT statement | SQL Server Integration Services (SSIS) |
| BCP | OPENROWSET function |
| Copy Wizard (Azure Data Factory) | |
| Azure Data Factory |
If you want to import multiple worksheets from an Excel workbook, you typically have to run any of these tools once for each sheet.
To learn more, see limitations and known issues for loading data to or from Excel files.
Import and Export Wizard
Import data directly from Excel files by using the SQL Server Import and Export Wizard. You also have the option to save the settings as a SQL Server Integration Services (SSIS) package that you can customize and reuse later.
In SQL Server Management Studio, connect to an instance of the SQL Server Database Engine.
Expand Databases.
Right-click a database.
Point to Tasks.
Choose to Import Data or Export Data:

This launches the wizard:
To learn more, review:
Integration Services (SSIS)
If you’re familiar with SQL Server Integration Services (SSIS) and don’t want to run the SQL Server Import and Export Wizard, create an SSIS package that uses the Excel Source and the SQL Server Destination in the data flow.
To learn more, review:
To start learning how to build SSIS packages, see the tutorial How to Create an ETL Package.

OPENROWSET and linked servers
In Azure SQL Database, you cannot import directly from Excel. You must first export the data to a text (CSV) file.
The ACE provider (formerly the Jet provider) that connects to Excel data sources is intended for interactive client-side use. If you use the ACE provider on SQL Server, especially in automated processes or processes running in parallel, you may see unexpected results.
Distributed queries
Import data directly into SQL Server from Excel files by using the Transact-SQL OPENROWSET or OPENDATASOURCE function. This usage is called a distributed query.
In Azure SQL Database, you cannot import directly from Excel. You must first export the data to a text (CSV) file.
Before you can run a distributed query, you have to enable the ad hoc distributed queries server configuration option, as shown in the following example. For more info, see ad hoc distributed queries Server Configuration Option.
The following code sample uses OPENROWSET to import the data from the Excel Sheet1 worksheet into a new database table.
Here’s the same example with OPENDATASOURCE .
To append the imported data to an existing table instead of creating a new table, use the INSERT INTO . SELECT . FROM . syntax instead of the SELECT . INTO . FROM . syntax used in the preceding examples.
To query the Excel data without importing it, just use the standard SELECT . FROM . syntax.
For more info about distributed queries, see the following topics:
- Distributed Queries (Distributed queries are still supported in SQL Server 2019, but the documentation for this feature has not been updated.)
- OPENROWSET
- OPENDATASOURCE
Linked servers
You can also configure a persistent connection from SQL Server to the Excel file as a linked server. The following example imports the data from the Data worksheet on the existing Excel linked server EXCELLINK into a new SQL Server database table named Data_ls .
You can create a linked server from SQL Server Management Studio, or by running the system stored procedure sp_addlinkedserver , as shown in the following example.
For more info about linked servers, see the following topics:
For more examples and info about both linked servers and distributed queries, see the following topic:
Prerequisite — Save Excel data as text
To use the rest of the methods described on this page — the BULK INSERT statement, the BCP tool, or Azure Data Factory — first you have to export your Excel data to a text file.
In Excel, select File | Save As and then select Text (Tab-delimited) (*.txt) or CSV (Comma-delimited) (*.csv) as the destination file type.
If you want to export multiple worksheets from the workbook, select each sheet and then repeat this procedure. The Save as command exports only the active sheet.
For best results with data importing tools, save sheets that contain only the column headers and the rows of data. If the saved data contains page titles, blank lines, notes, and so forth, you may see unexpected results later when you import the data.
The Import Flat File Wizard
Import data saved as text files by stepping through the pages of the Import Flat File Wizard.
As described previously in the Prerequisite section, you have to export your Excel data as text before you can use the Import Flat File Wizard to import it.
For more info about the Import Flat File Wizard, see Import Flat File to SQL Wizard.
BULK INSERT command
BULK INSERT is a Transact-SQL command that you can run from SQL Server Management Studio. The following example loads the data from the Data.csv comma-delimited file into an existing database table.
As described previously in the Prerequisite section, you have to export your Excel data as text before you can use BULK INSERT to import it. BULK INSERT can’t read Excel files directly. With the BULK INSERT command, you can import a CSV file that is stored locally or in Azure Blob storage.
For more info and examples for SQL Server and SQL Database, see the following topics:
BCP is a program that you run from the command prompt. The following example loads the data from the Data.csv comma-delimited file into the existing Data_bcp database table.
As described previously in the Prerequisite section, you have to export your Excel data as text before you can use BCP to import it. BCP can’t read Excel files directly. Use to import into SQL Server or SQL Database from a test (CSV) file saved to local storage.
For a text (CSV) file stored in Azure Blob storage, use BULK INSERT or OPENROWSET. For an examples, see Example.
For more info about BCP, see the following topics:
Copy Wizard (ADF)
Import data saved as text files by stepping through the pages of the Azure Data Factory (ADF) Copy Wizard.
As described previously in the Prerequisite section, you have to export your Excel data as text before you can use Azure Data Factory to import it. Data Factory can’t read Excel files directly.
For more info about the Copy Wizard, see the following topics:
Azure Data Factory
If you’re familiar with Azure Data Factory and don’t want to run the Copy Wizard, create a pipeline with a Copy activity that copies from the text file to SQL Server or to Azure SQL Database.
As described previously in the Prerequisite section, you have to export your Excel data as text before you can use Azure Data Factory to import it. Data Factory can’t read Excel files directly.
For more info about using these Data Factory sources and sinks, see the following topics:
To start learning how to copy data with Azure data factory, see the following topics:
Common errors
Microsoft.ACE.OLEDB.12.0″ has not been registered
This error occurs because the OLEDB provider is not installed. Install it from Microsoft Access Database Engine 2010 Redistributable. Be sure to install the 64-bit version if Windows and SQL Server are both 64-bit.
The full error is:
Cannot create an instance of OLE DB provider «Microsoft.ACE.OLEDB.12.0» for linked server «(null)»
This indicates that the Microsoft OLEDB has not been configured properly. Run the following Transact-SQL code to resolve this:
The full error is:
The 32-bit OLE DB provider «Microsoft.ACE.OLEDB.12.0» cannot be loaded in-process on a 64-bit SQL Server
This occurs when a 32-bit version of the OLD DB provider is installed with a 64-bit SQL Server. To resolve this issue, uninstall the 32-bit version and install the 64-bit version of the OLE DB provider instead.
The full error is:
The OLE DB provider «Microsoft.ACE.OLEDB.12.0» for linked server «(null)» reported an error.
Cannot initialize the data source object of OLE DB provider «Microsoft.ACE.OLEDB.12.0» for linked server «(null)»
Both of these errors typically indicate a permissions issue between the SQL Server process and the file. Ensure that the account that is running the SQL Server service has full access permission to the file. We recommend against trying to import files from the desktop.
Источник
Импорт данных из Excel в SQL Server или базу данных Azure
Применимо к: база данных SQL ServerAzure SQL
Импортировать данные из файлов Excel в SQL Server или базу данных SQL Azure можно несколькими способами. Некоторые методы позволяют импортировать данные за один шаг непосредственно из файлов Excel. Для других методов необходимо экспортировать данные Excel в виде текста (CSV-файла), прежде чем их можно будет импортировать.
В этой статье перечислены часто используемые методы и содержатся ссылки для получения дополнительных сведений. Однако в ней не указано полное описание таких сложных инструментов и служб, как SSIS или Фабрика данных Azure. Дополнительные сведения об интересующем вас решении доступны по ссылкам ниже.
Список методов
Существует несколько способов импортировать данные из Excel. Для использования некоторых из этих инструментов может понадобиться установка SQL Server Management Studio (SSMS).
Для импорта данных из Excel можно использовать следующие средства:
| Сначала экспортировать в текст (SQL Server и база данных SQL) | Непосредственно из Excel (только в локальной среде SQL Server) |
|---|---|
| Мастер импорта неструктурированных файлов | мастер импорта и экспорта SQL Server |
| Инструкция BULK INSERT | Службы SQL Server Integration Services |
| BCP | Функция OPENROWSET |
| Мастер копирования (Фабрика данных Azure) | |
| Фабрика данных Azure. |
Если вы хотите импортировать несколько листов из книги Excel, обычно нужно запускать каждое из этих средств отдельно для каждого листа.
Дополнительные сведения см. в разделе Ограничения и известные проблемы загрузки данных в файлы Excel или из них.
Мастер импорта и экспорта
Импортируйте данные напрямую из файлов Excel с помощью мастера импорта и экспорта SQL Server. Также можно сохранить параметры в виде пакета SQL Server Integration Services (SSIS), который можно настроить и использовать повторно в будущем.
В SQL Server Management Studio подключитесь к экземпляру SQL Server Компонент Database Engine.
Разверните узел Базы данных.
Щелкните базу данных правой кнопкой мыши.
Наведите указатель мыши на пункт Задачи.
Выберите Импортировать данные или Экспортировать данные:


Дополнительные сведения см. в следующих статьях:
Службы Integration Services (SSIS)
Если вы работали с SQL Server Integration Services (SSIS) и не хотите запускать мастер импорта и экспорта SQL Server, создайте пакет SSIS, который использует в потоке данных источник «Excel» и назначение «SQL Server».
Дополнительные сведения см. в следующих статьях:
Чтобы научиться создавать пакеты SSIS, см. руководство How to Create an ETL Package (Как создать пакет ETL).

OPENROWSET и связанные серверы
В базе данных SQL Azure невозможно импортировать данные непосредственно из Excel. Сначала необходимо экспортировать данные в текстовый файл (CSV).
Поставщик ACE (прежнее название — поставщик Jet), который подключается к источникам данных Excel, предназначен для интерактивного клиентского использования. Если поставщик ACE используется на сервере SQL Server, особенно в автоматизированных процессах или процессах, выполняющихся параллельно, вы можете получить непредвиденные результаты.
Распределенные запросы
Импортируйте данные напрямую из файлов Excel в SQL Server с помощью функции Transact-SQL OPENROWSET или OPENDATASOURCE . Такая операция называется распределенный запрос.
В базе данных SQL Azure невозможно импортировать данные непосредственно из Excel. Сначала необходимо экспортировать данные в текстовый файл (CSV).
Перед выполнением распределенного запроса необходимо включить параметр ad hoc distributed queries в конфигурации сервера, как показано в примере ниже. Дополнительные сведения см. в статье ad hoc distributed queries Server Configuration Option (Параметр конфигурации сервера «ad hoc distributed queries»).
В приведенном ниже примере кода данные импортируются из листа Excel Sheet1 в новую таблицу базы данных с помощью OPENROWSET .
Ниже приведен тот же пример с OPENDATASOURCE .
Чтобы добавить импортированные данные в существующую таблицу, а не создавать новую, используйте синтаксис INSERT INTO . SELECT . FROM . вместо синтаксиса SELECT . INTO . FROM . из предыдущих примеров.
Для обращения к данным Excel без импорта используйте стандартный синтаксис SELECT . FROM . .
Дополнительные сведения о распределенных запросах см. в указанных ниже разделах.
- Распределенные запросы (Распределенные запросы по-прежнему поддерживаются в SQL Server 2019, но документация по этой функции не обновляется.)
- OPENROWSET
- OPENDATASOURCE
Связанные серверы
Кроме того, можно настроить постоянное подключение от SQL Server к файлу Excel как к связанному серверу. В примере ниже данные импортируются из листа Excel Data на существующем связанном сервере EXCELLINK в новую таблицу базы данных SQL Server с именем Data_ls .
Вы можете создать связанный сервер в SQL Server Management Studio или запустить системную хранимую процедуру sp_addlinkedserver , как показано в примере ниже.
Дополнительные сведения о связанных серверах см. в указанных ниже разделах.
Дополнительные примеры и сведения о связанных серверах и распределенных запросах см. в следующем разделе:
Предварительное требование — сохранение данных Excel как текст
Чтобы использовать другие методы, описанные на этой странице (инструкцию BULK INSERT, средство BCP или фабрику данных Azure), сначала экспортируйте данные Excel в текстовый файл.
В Excel выберите Файл | Сохранить как , а затем выберите текст (с разделителями табуляции) (*.txt) или CSV (с разделителями-запятыми) (*.csv) в качестве целевого типа файла.
Если вы хотите экспортировать несколько листов из книги, выполните эту процедуру для каждого листа. Команда Сохранить как экспортирует только активный лист.
Чтобы оптимизировать использование средств импорта, сохраняйте листы, которые содержат только заголовки столбцов и строки данных. Если сохраненные данные содержат заголовки страниц, пустые строки, заметки и пр., позже при импорте данных вы можете получить непредвиденные результаты.
Мастер импорта неструктурированных файлов
Импортируйте данные, сохраненные как текстовые файлы, выполнив инструкции на страницах мастера импорта неструктурированных файлов.
Как было описано выше в разделе Предварительное требование, необходимо экспортировать данные Excel в виде текста, прежде чем вы сможете импортировать их с помощью мастера импорта неструктурированных файлов.
Дополнительные сведения о мастере импорта неструктурированных файлов см. в разделе Мастер импорта неструктурированных файлов в SQL.
Команда BULK INSERT
BULK INSERT — это команда Transact-SQL, которую можно выполнить в SQL Server Management Studio. В приведенном ниже примере данные загружаются из файла Data.csv с разделителями-запятыми в существующую таблицу базы данных.
Как было описано выше в разделе Предварительное требование, необходимо экспортировать данные Excel в виде текста, прежде чем вы сможете использовать BULK INSERT для их импорта. BULK INSERT не может считывать файлы Excel напрямую. С помощью команды BULK INSERT можно импортировать CSV-файл, который хранится локально или в хранилище BLOB-объектов Azure.
Дополнительные сведения и примеры для SQL Server и базы данных SQL см. в следующих разделах:
Средство BCP
BCP — это программа, которая запускается из командной строки. В приведенном ниже примере данные загружаются из файла Data.csv с разделителями-запятыми в существующую таблицу базы данных Data_bcp .
Как было описано выше в разделе Предварительное требование, необходимо экспортировать данные Excel в виде текста, прежде чем вы сможете использовать BCP для их импорта. BCP не может считывать файлы Excel напрямую. Используется для импорта в SQL Server или базу данных SQL из текстового файла (CSV), сохраненного в локальном хранилище.
Для текстового файла (CSV), хранящегося в хранилище BLOB-объектов Azure, используйте BULK INSERT или OPENROWSET. Примеры см. в разделе Пример.
Дополнительные сведения о программе BCP см. в указанных ниже разделах.
Мастер копирования (ADF)
Импортируйте данные, сохраненные как текстовые файлы, с помощью пошаговой инструкции мастера копирования Фабрики данных Azure (ADF).
Как было описано выше в разделе Предварительное требование, необходимо экспортировать данные Excel в виде текста, прежде чем вы сможете использовать фабрику данных Azure для их импорта. Фабрика данных не может считывать файлы Excel напрямую.
Дополнительные сведения о мастере копирования см. в указанных ниже разделах.
Фабрика данных Azure
Если вы уже работали с фабрикой данных Azure и не хотите запускать мастер копирования, создайте конвейер с действием копирования из текстового файла в SQL Server или Базу данных SQL Azure.
Как было описано выше в разделе Предварительное требование, необходимо экспортировать данные Excel в виде текста, прежде чем вы сможете использовать фабрику данных Azure для их импорта. Фабрика данных не может считывать файлы Excel напрямую.
Дополнительные сведения об использовании этих источников и приемников фабрики данных см. в указанных ниже разделах.
Чтобы научиться копировать данные с помощью фабрики данных Azure, см. указанные ниже разделы.
Распространенные ошибки
«Microsoft.ACE.OLEDB.12.0» не зарегистрирован
Эта ошибка возникает, так как не установлен поставщик OLE DB. Установите его через Распространяемый пакет ядра СУБД Microsoft Access 2010. Не забудьте установить 64-разрядную версию, если Windows и SQL Server — 64-разрядные.
Полный текст ошибки.
Не удалось создать экземпляр поставщика OLE DB «Microsoft.ACE.OLEDB.12.0» для связанного сервера «(null)».
Это означает, что Microsoft OLEDB не был настроен должным образом. Чтобы устранить проблему, выполните приведенный ниже код Transact-SQL.
Полный текст ошибки.
32-разрядный поставщик OLE DB «Microsoft.ACE.OLEDB.12.0» не может быть загружен в процессе на 64-разрядной версии SQL Server.
Это происходит, когда 32-разрядная версия поставщика OLD DB устанавливается вместе с 64-разрядной версией SQL Server. Чтобы устранить эту проблему, удалите 32-разрядную версию и вместо нее установите 64-разрядную версию поставщика OLE DB.
Полный текст ошибки.
Поставщик OLE DB «Microsoft.ACE.OLEDB.12.0» для связанного сервера «(null)» сообщил об ошибке.
Не удалось проинициализировать объект источника данных поставщика OLE DB «Microsoft.ACE.OLEDB.12.0» для связанного сервера «(null)».
Обе эти ошибки обычно указывают на ошибку разрешений между процессом SQL Server и файлом. Убедитесь, что учетная запись, с которой выполняется служба SQL Server, имеет разрешение на полный доступ к файлу. Мы не рекомендуем импортировать файлы с настольного компьютера.
Источник
Table of Contents
- Introduction
- Building the Environment for Testing
- Creating an Excel File to test
- Installing the necessary components in Windows Server
- Enabling SQL Server Instance to Read File
- Querying and Importing the Spreadsheet
- Conclusion
- References
- See Also
- Other Languages
Introduction
We often have to perform data integration in SQL Server, with different data sources such as «.txt» files (tabular text or with separator character), «.csv» files or «.xls» (Excel) files.
It is always not possible to create a SSIS package to do this data import, a useful alternative is to use OPENROWSET method for importing data.
In this article, we will use data import from Excel files (.xls e .xlsx).
Building the Environment for Testing
So that we see the data import process steps from an Excel file to a table from database, we need:
- Create an Excel file to import sample;
- Configure Windows Server, installing the necessary components;
- Configure the necessary permissions to the SQL instance that we need to obtain data files.
Let’s prepare environment for data import!
Creating an Excel File to test
In this step, we will create an Excel file sample with just a few rows to demo.
Add a header row, to explicitly define the data: «ID», «Item Name» and «Date Created».
The data sequences is only to facilitate the visualization of the content that is being manipulated.
See this Excel file in the image below (click to enlarge)

Installing the necessary components in Windows Server
To get the data through a query inside SQL Server, use an OLE DB Data Provider.
Most files can now use the
Microsoft.ACE.OLEDB.12.0 Data Provider that can be obtained free through Data Connectivity Components.
This package will provide all ODBC and OLEDB drivers for data manipulation, as follow below:
| File Type (extension) | Extended Properties |
| Excel 97-2003 Workbook (.xls) | Excel 8.0 |
| Excel 2007-2010 Workbook (.xlsx) | Excel 12.0 XML |
| Excel 2007-2010 Macro-enabled workbook (.xlsm) | Excel 12.0 Macro |
| Excel 2007-2010 Non-XML binary workbook (.xlsb) | Excel 12.0 |
There are two versions of this package: «AccessDatabaseEngine.exe» for x86 platform and other «AccessDatabaseEngine_x64.exe» for x64 platform.
The minimum system requirements for this installation can be obtained in the same
download package page.
If you are installing the x86 package you must ensure that your user is allowed access to the Temporary directory of your Windows OS.
To know what your Temporary directory open the «Control Panel», click «Advanced System Settings» option. A window will open, select the «Advanced» tab and click the «Environment Variables» button.
A new window will open with your environment variables, including «TEMP» and «TMP» variables, indicating your Temporary directory.
See this windows in the image below (click to enlarge)

So if your operating system is Windows 32-bit (x86) is necessary to include read and write access to the user of your SQL Server instance.
It’s important to remember that the user of your SQL Server instance must be a local user or the default «Local System» account to grant this access.
See this window Service Properties in the image below

Enabling SQL Server Instance to Read File
The settings and permissions to execute a query external data has some details that should be performed to be able to get the data from an Excel files (.xls ou .xlsx) and also other formats.
The execution of distributed queries as OPENROWSET is only possible when the SQL Server instance has the
Ad Hoc Distributed Queries configuration enabled. By default, every SQL Server instance maintains this permission denied.
 Note Note |
|---|
|
The Advanced Settings should only be changed by an experienced professional or a certified professional in SQL Server. It’s important to note not use these commands in Production Databases without previous analysis. |
To enable this feature just use the sp_configure system stored procedure in your SQL instance to display its Advanced Settings in
show advanced options parameter and soon to follow, enable the Ad Hoc Distributed Queries setting to enabling the use of distributed queries.
USE [master]
GO
—CONFIGURING SQL INSTANCE TO ACCEPT ADVANCED OPTIONS
EXEC
sp_configure ‘show advanced options’, 1
RECONFIGURE
GO
—ENABLING USE OF DISTRIBUTED QUERIES
EXEC
sp_configure ‘Ad Hoc Distributed Queries’, 1
RECONFIGURE
GO
These changes in the Advanced settings only take effect after the execution of the RECONFIGURE command.
To get permission granted to use the Data Provider through sp_MSset_oledb_prop system stored procedure to link Microsoft.ACE.OLEDB.12.0 in
SQL Server using AllowInProcess parameter so we can use the resources of the Data Provider and also allow the use of dynamic parameters in queries through of
DynamicParameters parameter for our queries can use T-SQL clauses.
USE [master]
GO
—ADD DRIVERS IN SQL INSTANCE
EXEC
master.dbo.sp_MSset_oledb_prop
N’Microsoft.ACE.OLEDB.12.0′,
N’AllowInProcess’, 1
GO
EXEC
master.dbo.sp_MSset_oledb_prop
N’Microsoft.ACE.OLEDB.12.0′,
N’DynamicParameters’, 1
GO
See
this output SQL script in the image below

After setting up your SQL instance to use the
Microsoft.ACE.OLEDB.12.0 Data Provider and make the appropriate access permissions, we can implement the distributed queries of other data sources,
in this case to Excel files.
Querying and Importing the Spreadsheet
As this demo is for Excel files (.xls) we will perform a query using an OPENROWSET method with the Excel test file that was created earlier in this article.
We use some parameters for this method to be able to data query:
- Data Provider — In this case, using Microsoft.ACE.OLEDB.12.0
- BULK Options — File Version;Where it’s stored; Header (HDR); Import Mode (IMEX)
- Query —
T-SQL statement with or without clauses to data filter and process.
—CONSULTING A SPREADSHEET
SELECT
* FROM
OPENROWSET(‘Microsoft.ACE.OLEDB.12.0’,
‘Excel 12.0; Database=C:MicrosoftTest.xls; HDR=YES; IMEX=1’,
‘SELECT * FROM [Plan1$]’)
GO
See
this output SQL script in the image below

To data group and perform other tasks for data manipulation, the ideal is always load the data into the database. You can insert data into an existing table using the INSERT statement or you can create a table through of INTO command in SELECT statement.
—CONSULTING A SPREADSHEET
SELECT *
INTO
TB_EXAMPLE
FROM OPENROWSET(‘Microsoft.ACE.OLEDB.12.0’,
‘Excel 12.0; Database=C:MicrosoftTest.xls; HDR=YES; IMEX=1’,
‘SELECT * FROM [Plan1$]’)
GO
SELECT * FROM TB_EXAMPLE
GO
See
this output SQL script in the image below

It’s also important to check if the SQL Server Service user has access in Windows directory where Excel files
are stored.
Conclusion
Have the possibility to use an alternative resource for importing data with T-SQL command is very useful, especially when we have to manipulate files in proprietary formats, as for .xlsx files where it’s necessary to use the Data Provider appropriate to obtain
the data correctly and with ease use.
It’s important to watch out that only users that have actually need to manipulate these files can use these resources, while minimizing the vulnerability of their environment through a permission in your SQL Server.
References
- OPENROWSET (Transact-SQL)
- Import Bulk Data by Using BULK INSERT or OPENROWSET(BULK…) (SQL Server)
- OLE DB Providers Tested with SQL Server
- Excel Source
See Also
- Transact-SQL Portal
- Wiki: Portal of TechNet Wiki Portals
Other Languages
- Importando uma planilha Excel para um Banco de Dados SQL Server (pt-BR)
This article was awarded the silver medal in the TechNet
Guru of April 2014
Last fall, my attendance at the SQL Summit was entirely justified by a presentation by Aaron Nelson, a SQL Server MVP on Excel, PowerShell and SQL Server.
Unfortunately, I regularly suffer from having Excel as a data source. In an ideal world, this wouldn’t happen.
Logically, no one would buy a SaaS solution without first figuring out how the data in that system would be accessed and combined with all the other data your organization needs.
Unfortunately, things aren’t always logical.
Too many SaaS solutions provide no way for you to get the data except through creating reports (or worse, using prepackaged reports) which can be dumped into Excel or csv format.
There are many potential issues with this approach.
I’m in the process of preparing my own in depth presentation on this topic, which has led me to write this series of blog posts.
In this series (and in my future presentation) I hope to address as many of the pitfalls as possible.
Personally, I hate blog posts that merely show everything going right. So I’ll be showing you how wonderfully it works—but also how many things can go wrong.
Why You Don’t Want to Use OPENROWSET with Excel
Some of you who have stumbled upon this blog post may wonder why you would even need PowerShell to get data from Excel to SQL Server.
Doesn’t T-SQL let you do this directly? I get it. I’m a T-SQL person and the older I get the fewer new things I want to learn if I don’t have to.
And indeed, it does seems to. If we start with a simple spreadsheet like this:

We can simply load it using the following command:
SELECT *
FROM OPENROWSET('Microsoft.ACE.OLEDB.12.0',
 'Excel 12.0 Xml;
  Database=C:UsersadamOneDrive - Red Three Consulting, IncR and DBlog Posts2018-11-20 Loading Excel Data to PowerShell10 - 1 - Working Spreadsheet.xlsx',
  [Sheet1$])
Code language: SQL (Structured Query Language) (sql)
So, what’s not to like? It turns out, quite a bit.
A few key issues:
- You need to have the Access driver installed on your server.
- You need to create a linked server—and sometimes you’ll need to make changes directly to the registry to get it to work.
- Once that’s done, you’ll have to make more setting changes to SQL Server (which your admin will love—not).
- When you’ve finally got it working, you may then stumble upon this little piece of Microsoft documentation:

I know all this from first hand experience.
The Basics: From Excel to SQL
For all of the following examples, we need to make sure we have two PowerShell modules installed. (For our purposes here, I’m going to assume you’re somewhat new to PowerShell.)
The two modules to install are:
- SQLserver
- ImportExcel.
(More on these in a minute.)
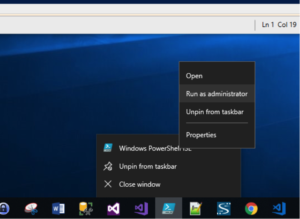
Please note, in order to install modules on PowerShell, we need to launch the PowerShell ISE (Integrated Scripting Environment) as administrator (see below):
This is all we’re going to have to install (i.e. we don’t need to install Excel).
However, we do need to set up two other pieces correctly:
- We need whatever database access we’re using to insert data to an existing table, to create table.
- We need bulk insert privileges, which need to be granted on the server.
Once we start PowerShell ISE, we need to enter the following commands to install the values we need:
install-module -name sqlserver
Install-Module -Name ImportExcel -RequiredVersion 5.4.2
Code language: CSS (css)
The first module provides a wide range of commands to be used with SQL Server. We’ll be mostly interested in Write-SQLTableData (and to a lesser extent, Read-SQLTableData).
The other module, ImportExcel, is an open source project created by Doug Finke. If you use his stuff, you really should make a donation. It has saved me hours and hours of time.
This module allows you do to a wide range of things in Excel using PowerShell. I’ve only used it to read Excel sheets and write out some simple sheets. I’m not quite sure I understand the purpose of all the other use cases, but I have some built-in anti-Excel bias. But I digress.
Once these modules have been installed successfully, it’s best to leave the PowerShell ISE and sign in again without administrator privileges—just to be safe. (Nothing we do is going to change anything on your computer. But it’s always safest to make no assumptions.)
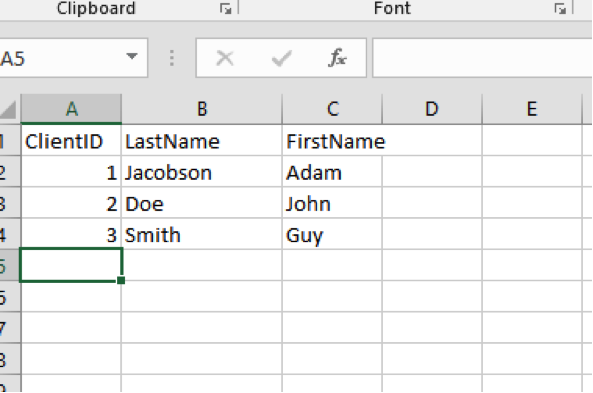
So, now we’re ready to go. Let’s start with a simple spreadsheet that we’re going to move into SQL Server.
Here’s the spreadsheet (again):

And here’s the code we need:
# Variables for Import-Excel
$FolderName = "C:UsersadamOneDrive - Red Three Consulting, IncR and DBlog Posts2018-11-20 Loading Excel Data to PowerShell"
$FileName = "010 - 1 - Working Spreadsheet.xlsx"
$FileNameWithFolder = join-path $FolderName $FileName
$FileNameWithFolder
#Variables for Write-SQLTableData
$SQLServerInstance = "ADAM2017"
$Database = "RedThree"
$SchemaName = "excel"
$TableName = "Example1"
,(Import-Excel -path $FileNameWithFolder -ErrorAction Stop) |
Write-SqlTableData -serverinstance $SQLServerInstance -DatabaseName $Database -SchemaName $SchemaName -TableName $TableName -force -ErrorAction Stop
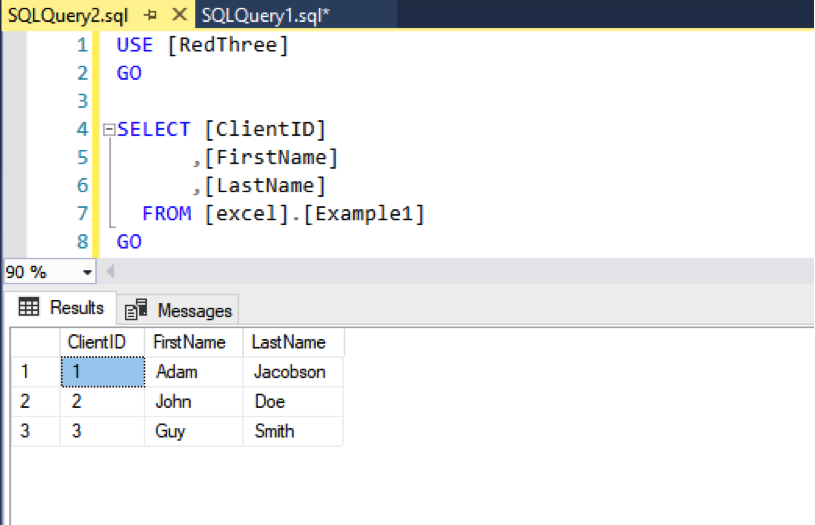
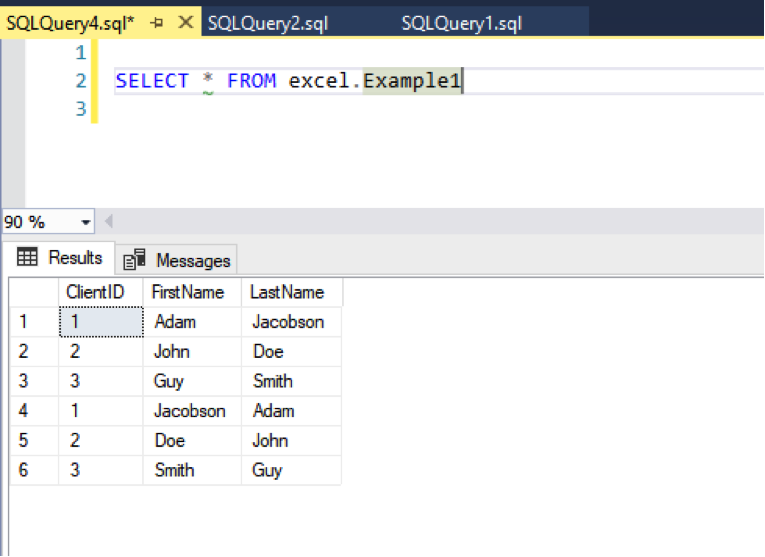
Code language: PowerShell (powershell)When we run this, we see a brand new table on SQL Server with our data.
And voila, we’ve successfully:
- Read the spreadsheet.
- Loaded it into the database.
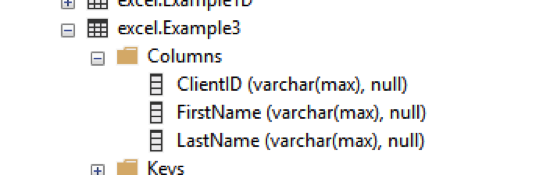
Along the way, we created a new table called excel.Example1.
Checking SQL Server, we see our data:
Looking at the Table definition, we will see that Write-SQLTableData can choose some strange variable types. (I mean, why “float”?):
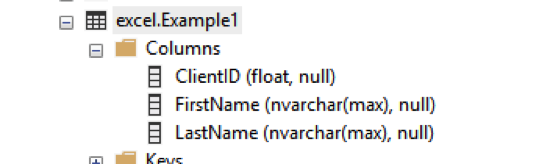
Often, I use the force option to get the table set up but then make changes to the table for my own use.
In this case, I altered the columns so they are all varchar(max).
If you’re curious, you can check the Query Store and see that SQL Server performed a bulk insert command. Here’s what I found:
insert bulk [RedThree].[excel].[Example1] ([ClientID] Float, [FirstName] NVarChar(max) COLLATE SQL_Latin1_General_CP1_CI_AS)
OK, lesson complete. You can continue on your way. Or maybe check out that cat video.
Looking at This Scenario in More Detail
However, if you want more details, let’s continue.
Let’s start by going step by step through this little script. The commands themselves are pretty self-explanatory.
The first command reads the Excel file:

The Pipe symbol then passes it to SQL Server:

Let’s look at some of the less obvious parts of the command.
The Comma at the Beginning
The comma changes the way PowerShell pipes data from the first command to the second command.
It tells PowerShell to complete the first command before sending data to the pipe. This improves the performance of Write-SQLTableData. Dramatically.
I’ve tested this on a 1000-record Excel sheet. With the comma, the load was almost instantaneous. Without a comma, it took about 15 seconds.
“-ErrorAction”
You’ll see this as an option in both commands.
It’s necessary for the proper handling of exceptions with any PowerShell command, not just with the ones we are using. I plan to cover error handling in another post.
“-force”
This tells SQL to create a table if a table with that name doesn’t already exist.
Looking at the Data in PowerShell
If we hadn’t sent the data directly to SQL Server with the pipe, we could have looked at it directly in PowerShell. But I usually want to deal with my data in SQL Server (that is the whole point of all this!).
However, it is helpful when testing to see what’s coming from Excel. This exercise also gives us a little lesson about PowerShell variables.
Let’s give it a try so we can see what happens.
In this case, we suck the data into a variable and then pass it to a grid. Note that this code uses the same variables used above:

And here’s what we see:
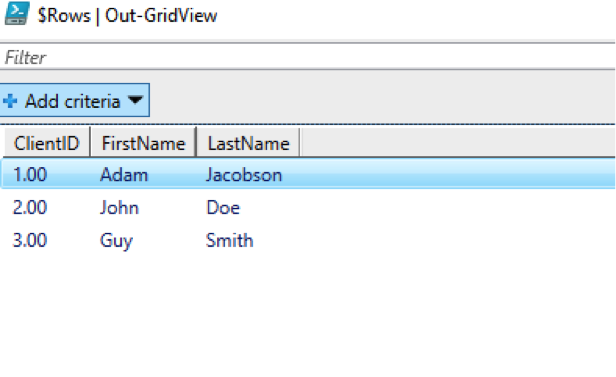
We can see that we have our columns from the spreadsheet.
What’s more interesting is that our array is special. Each “Row” of the array is actually a PowerShell Custom object having three properties: ClientID, FirstName, and LastName.
Therefore, we can treat each row and column from Excel as a row and property of the array of objects. Basically, each row is it’s own object and each column is a property of the object.
Let’s run this little code snippet:
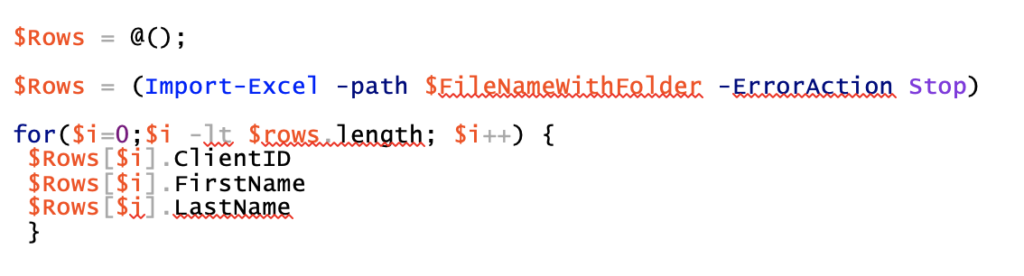
When we do, we get the following output:
In our example of loading data, this might be useful if we wanted to only take certain columns from a given spreadsheet.
This might help you avoid issues where the underlying report changes without anyone telling you. However, I haven’t actually tried this in production.
Still, let’s try it with an example.
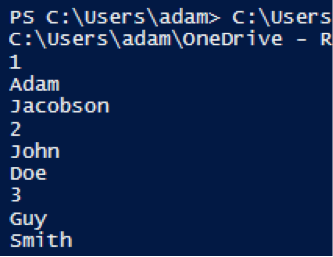
Let’s copy the rows from the sample Excel to a different array with only two of three columns. We then load it to SQL Server:
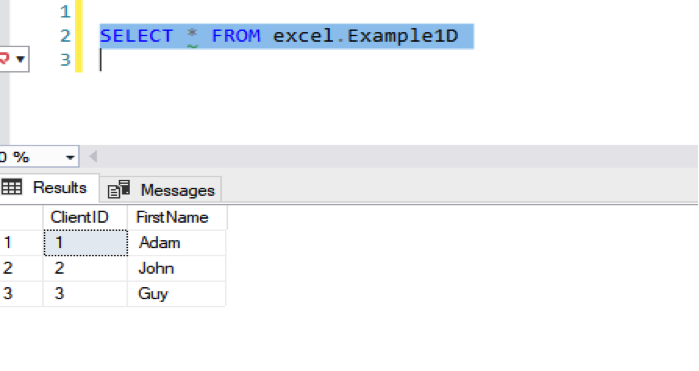
Switching over to SQL Server, we find this:
This methodology would also be useful for moving the file name and the load date into SQL Server.
What Could Possibly Go Wrong?
After months of struggling with OPENROWSET and bulk imports, I was thrilled when I finally got the above approach working. Now I use it every day.
But this is technology, so nothing is perfect. Things can go wrong.
Let’s look at some of them.
Problem #1: Write-SQLTableData Doesn’t (Always) Look at Your Column Names
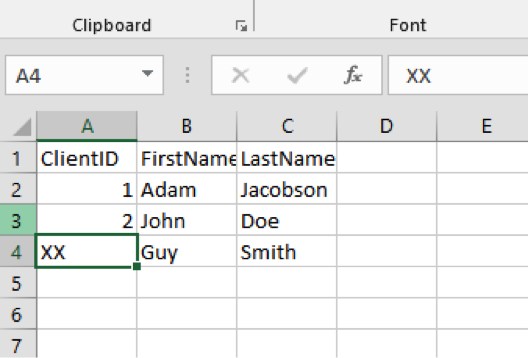
When we used the -force option, we saw that Write-SQLTableData used the names in the first row of our spreadsheet in order to create the table. So, you might guess that it actually cares about those column names. Unfortunately, you would be wrong.
Let’s take our basic spreadsheet and swap the last name and first name columns:
In our previous example, FirstName was column B and LastName was column A.
So, let’s bring this into our excel.Example1 table. (The syntax is the same as above so I won’t repeat it.)
When we check the data, we see the following:
The first three rows are from our first example. Those make sense.
But the last three records went in by column order, not by column name. So “Jacobson” is now a first name.
Basically, once it finds a table it can use, Write-SQLTableData doesn’t look at your columns.
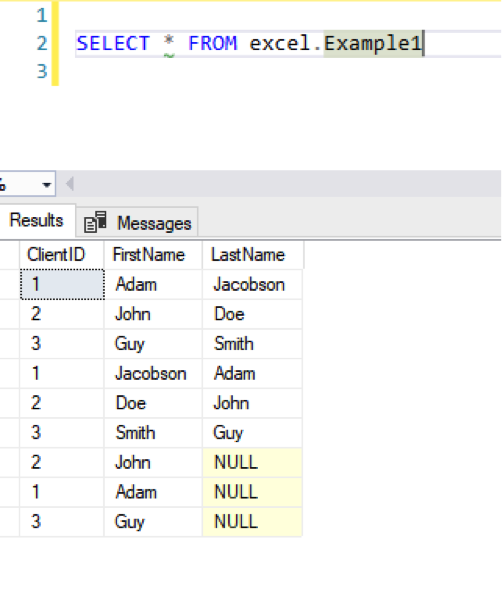
Problem #2: The Number of Excel Columns Doesn’t Match the Number of Columns in Your Table
What if we don’t have enough columns in our spreadsheet? Following the logic above, as long as the columns in your table accept null values, you’ll be fine:
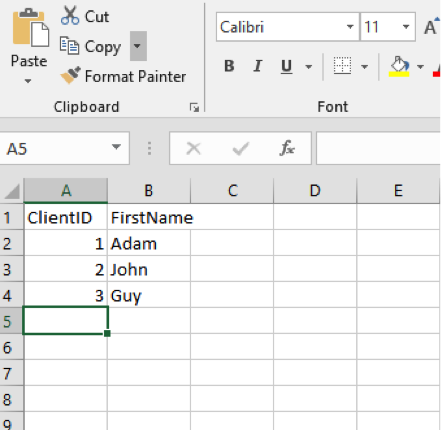
We load this into our excel.Example1 table (which has three columns), and we see that the last column is left null:
What if we have too many columns (as below)? Any guesses?
In this case, Write-SQLTableData gives us an error message:
“The given ColumnMapping does not match up with any column in the source or destination.”
Problem #3: Variable Type Checking (the Most Annoying Thing about Write-SQLTableData)
When we first created our table, we saw that Write-SQLTableData guessed at the types we wanted for each column.
In general, I make all my load table columns into varchar(max) and then deal with type issues in T-SQL. So, you’d think that variable typing wouldn’t be an issue in this stage. But you’d be wrong (again).
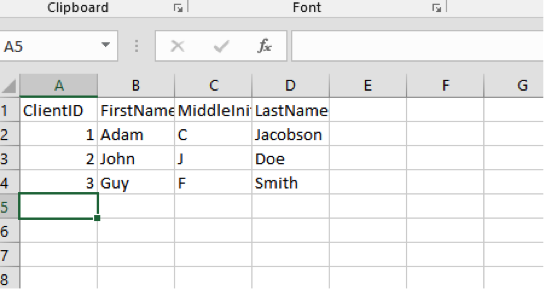
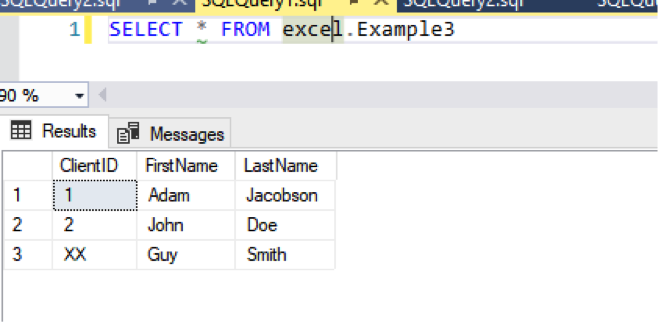
Here’s a small spreadsheet where the third record has a different type of ClientID:
The table we’re using is set to VARCHAR(MAX) for all columns:
When we load the file, however, we receive the following error:
“Write-SqlTableData : Input string was not in a correct format. Couldn’t store <XX> in ClientID Column. Expected type is Double.”
What? Write-SQLTableData is trying to be helpful—it wants your data to be consistent even if the SQL Table itself doesn’t really care.
So, since the column starts out as double, it should remain as double. (Note that the type is driven by Excel. The field may look like an integer to you, but that’s just formatting in Excel.)
There are a couple of ways to solve this problem.
First, we can remove the comma from the beginning of the command. So, instead of this command:

We use this one:

And it actually works:
However, this can really, really slow down processing when we have a large file—as I noted earlier.
Another solution depends on how much you know about the “bad” value.
In general, (but only in general), report data is consistent. So, it’s not so much an issue of bad data in a column, as a superfluous row or two at the end. Like this:
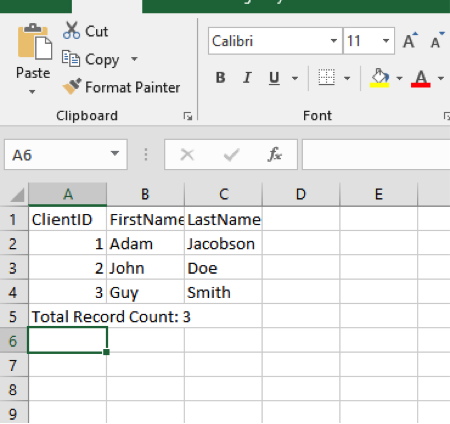
The first thing we can do is make sure every ClientID is actually a number before we pass it.
Remembering back to the example on selected columns, we basically take the array of objects we receive from Import-Excel and test the ClientID for each one before we move the object into an array that we’ll actually import.
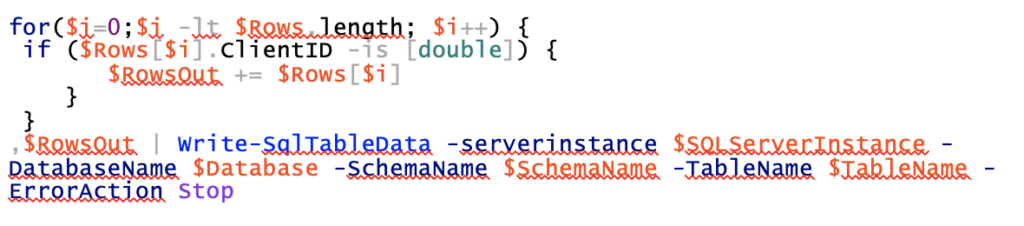
The key line above is where we check that the client id is indeed the correct type.
This method works fine if we feel pretty confident about the issues we are going to have.
However, my general rule is to bring everything thing into SQL Server and deal with the issues there. So, I have another option.
PowerShell doesn’t care if you specify variable types. I’m not going to get into whether that’s a good or bad thing. For our purposes, it just is, and you can’t change that behavior.
However, when preparing our array for import, we CAN specify types for each property. In our case, we want everything to be a string:
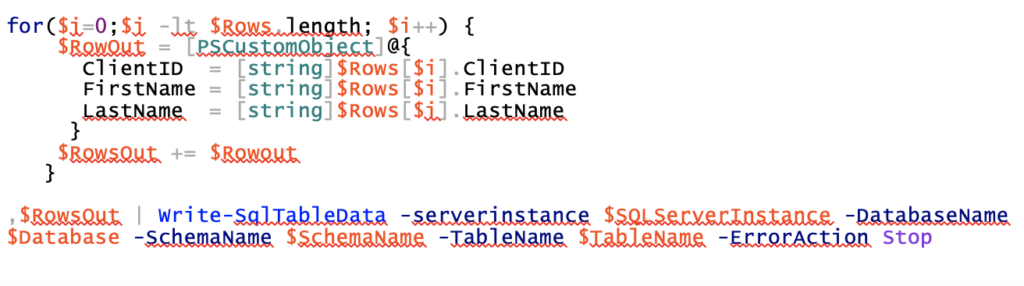
If we look at SQL Server, we see that even “Total Records” was loaded:
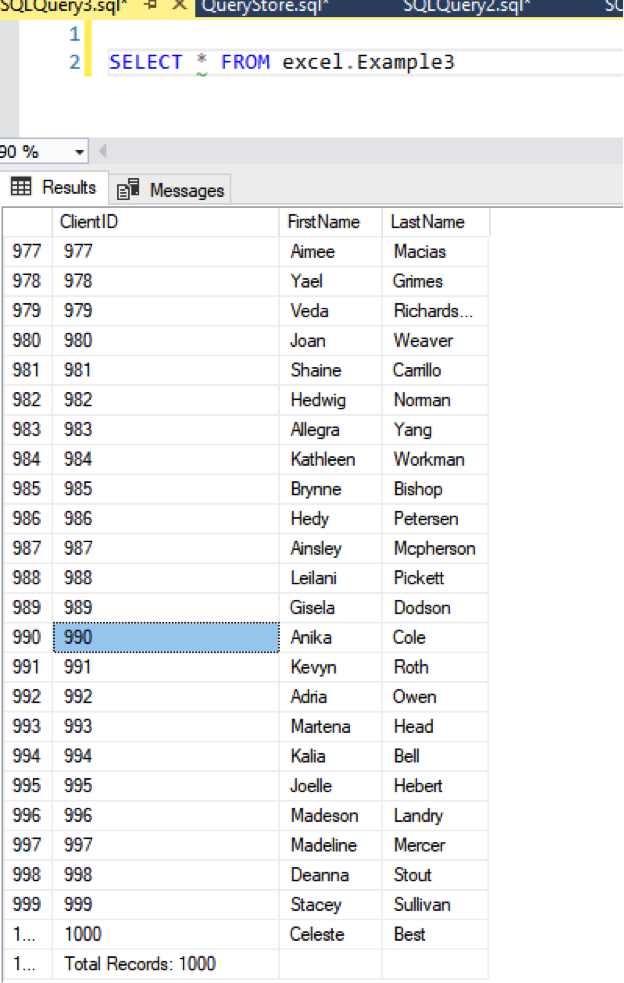
Of course, we’ll have to handle that “Total Records” entry in SQL Server.
Coming Next
I have more to say on this topic, but I’m going to save it for future posts.
Topics will include:
- Dates – All dates are not dates in Excel
- Error Checking
- Calling a stored procedure to actually move the data.