
How to Split a Table in Word
- Start Word and open the document containing the table you would like to split.
- Click the cursor in the first cell of the row in which you want to begin the second table.
- Click the “Layout” tab under the yellow “Table Tools” tab.
- Click the “Split Table” button on the ribbon.
Contents
- 1 Why can I not break a table in Word?
- 2 How do I split a box in a table in Word?
- 3 How do I split a table into two columns in Word?
- 4 Why is my table in Word splitting?
- 5 How do I keep tables together in Word?
- 6 What is the shortcut to split a table in Word?
- 7 How do I split a table in word and keep the header?
- 8 Can you split a table vertically in Word?
- 9 How do I separate columns in a table?
- 10 How do I separate columns in Word?
- 11 How do I split a column in Word?
- 12 How do I remove a page break in a table in Word?
- 13 How do I remove page breaks?
- 14 How do I remove a page break between tables in Word?
- 15 How do you keep rows together in a table?
- 16 How do I keep a table from breaking across pages?
- 17 What is the shortcut key for manual line break?
- 18 How do I split a page in Word vertically?
- 19 How can you split a table Class 9?
- 20 What are the different ways of inserting a table in MS Word 2010?
Why can I not break a table in Word?
How to stop a table from breaking across two pages in Word?
- Select the table which breaks across two pages, and then click Layout (under Table Tools) > Properties.
- In the popping out Table Properties dialog box, (1) enable the Row tab, (2) uncheck the Allow row to break across pages option, and (3) click the OK button.
How do I split a box in a table in Word?
Split cells
- Click in a cell, or select multiple cells that you want to split.
- Under Table Tools, on the Layout tab, in the Merge group, click Split Cells.
- Enter the number of columns or rows that you want to split the selected cells into.
How do I split a table into two columns in Word?
Splitting Cells: Quick Menu Option
- Select the cell you want to split.
- Right click within the selected cell » select Split Cells… The Split Cells dialog box appears.
- In the Number of columns and/or Number of rows boxes, type or use the nudge buttons to select the desired number of rows and/or columns.
- Click OK.
Why is my table in Word splitting?
As your tables get larger, Word automatically breaks tables so the most information can get on each page.Choose Cell Height and Width from the Table menu. Word displays the Cell Height and Width dialog box with the Row tab selected. Make sure the Allow Row to Break Across Pages check box is cleared.
How do I keep tables together in Word?
Keeping Tables on One Page
- Select all the rows in the table.
- Choose Format | Paragraph. Word displays the Paragraph dialog box.
- Make sure the Line and Page Breaks tab is selected. (See Figure 1.)
- Make sure the Keep Lines Together check box is selected.
- Click on OK.
What is the shortcut to split a table in Word?
You can also use an easy shortcut key to split a table into multiple tables, please put the cursor at the cell where you want to split from, and then press Ctrl+ Shift+ Enter keys together to split the table into two parts.
How do I split a table in word and keep the header?
In the table, right–click in the row that you want to repeat, and then click Table Properties. In the Table Properties dialog box, on the Row tab, select the Repeat as header row at the top of each page check box. Select OK.
Can you split a table vertically in Word?
Merging two tables in Word is as easy as splitting them. To merge split tables vertically, simply select the second table, click it then drag it to the right border of the top-right cell.
How do I separate columns in a table?
Split cells
- In the table, click the cell that you want to split.
- Click the Layout tab.
- In the Merge group, click Split Cells.
- In the Split Cells dialog, select the number of columns and rows that you want and then click OK.
How do I separate columns in Word?
You can insert your own column breaks for more control over the document format.
- Place your cursor where you want the column to break.
- Click Layout > Breaks. In Word 2013 or Word 2010, click Page Layout > Breaks.
- A menu with options will appear. Click Column.
- A column break is inserted. Click Home > Show/Hide. to see it.
How do I split a column in Word?
How to Split Text to Columns
- Open the document.
- Select the Page Layout tab.
- In Page Setup group click the Columns command.
- It displays a list of options to split text into columns.
- Select the desired option.
How do I remove a page break in a table in Word?
Open your Word document. Go to Home > Click the Show/Hide button to display all non-printable hidden marks like page breaks, spaces, and non-breaking spaces in the document. Double-click to select a page break and press Delete to remove it.
How do I remove page breaks?
To remove a page break you added in manually, click the Home tab. Click Show/Hide ¶ to display the page breaks in your document. Find the manual page break you want to remove and double click the page break to highlight it. Finally, hit the Delete or Backspace key to remove it.
How do I remove a page break between tables in Word?
Remove a manual page break
- Go to Home and select Show/Hide . This displays page breaks while you’re working on your document.
- Double-click the page break to select it and then press Delete.
How do you keep rows together in a table?
On the Home tab, clickParagraph, and then click the Paragraph tab. To prevent a page break from separating the selected row from the next row, or the final row of the table with the following paragraph, select the Keep together option.
How do I keep a table from breaking across pages?
Questions and answers
- Click into a cell in the row.
- Open the Layout tab under Table Tools and from the Table group select the Properties icon.
- Select the Row tab.
- Turn off the option to ‘Allow row to break across pages’
- Repeat for any other rows in the table.
- Click on OK.
What is the shortcut key for manual line break?
Shift + Enter
Shift + Enter is the shortcut-key for manual line break.
How do I split a page in Word vertically?
How can I split my Word document vertically and duplicate the text on both halves?
- Select & copy the existing text.
- On the Layout tab of the Ribbon in the Text Layout group click the Columns button, select Two.
- Click at the very bottom of the existing text.
- On the Layout tab, Page Setup group click Break, select Column.
How can you split a table Class 9?
To split cells in a table, perform these tasks:
- Place your mouse cursor in the cell you want to split.
- Right-click and choose Cell, then Split Cell Horizontally or Split Cell Vertically, depending on whether you want to split the cell into two columns or rows.
What are the different ways of inserting a table in MS Word 2010?
1) Place your insertion point where you want to insert a table. 2) On the Insert tab, in the Tables group, click Table, and then click Insert Table. 3) Under Table size, enter the number of columns and rows. 4) Under AutoFit behavior, choose options to adjust the table size.
Word for Microsoft 365 Word 2021 Word 2019 Word 2016 Word 2013 More…Less
Once you have a table in Word, you might decide to split that table into two or more tables. This way, you can create smaller tables, or add text in between two tables.
-
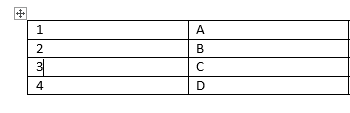
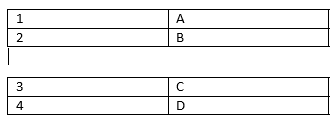
Put your cursor on the row that you want as the first row of your second table. In the example table, it’s on the third row.

When you click inside the table, two new Table tools tabs appear on the ribbon: DESIGN and LAYOUT. These tools are visible only when you are in the table, for example, when you add content to the cells.
-
On the LAYOUT tab, in the Merge group, click Split Table.
The table splits into two tables.
You can split the table further, as long as there are multiple rows.

See Also
Insert a table — Word
Convert text to a table or a table to text
Use a formula in a Word or Outlook table
How to merge two tables
Need more help?
Want more options?
Explore subscription benefits, browse training courses, learn how to secure your device, and more.
Communities help you ask and answer questions, give feedback, and hear from experts with rich knowledge.
Stop a Microsoft Word Table or Row from Breaking Across Pages
by Avantix Learning Team | Updated August 21, 2022
Applies to: Microsoft® Word® 2010, 2013, 2016, 2019, 2021 and 365 (Windows)
There are a few ways to keep a Microsoft Word row or table together on one page. When you want to stop a Word table from breaking across pages, the method you use depends on several factors including the size of the table. You can’t, for example, keep a table on one page if the table is larger than a page. Here, we’re also assuming the table is in the body of the document, not the header or footer.
Note: Buttons and Ribbon tabs may display in a different way (with or without text) depending on your version of Word, the size of your screen and your Control Panel settings. For newer versions of Word, Ribbon tabs may appear with different names. For example, the Table Tools Design tab may appear as Table Design.
Recommended article: How to Format Microsoft Word Tables Using Table Styles (Ultimate Guide)
Do you want to learn more about Microsoft Word? Check out our virtual classroom or in-person classroom Word courses >
Stop a table row from breaking across pages using Table Properties
If you want to simply stop a table row from breaking across pages, you can change the Table Properties:
- Select the row or rows that should not break across pages (you may want to select the entire table).
- Click the Table Layout or Table Tools Layout tab in the Ribbon.
- Click Properties. You can also right-click and choose Properties from the context-sensitive menu. A dialog box appears.
- Click the Row tab. Uncheck the check box to Allow row to break across pages.
- Click OK.
Below is the Table Properties dialog box with the Row tab selected:

Keep table rows together by keeping lines and paragraphs together
Another way to keep a table row or rows together is to force paragraph(s) in cells to keep with the next paragraph(s) and / or to keep the lines of paragraph(s) together. A paragraph is anything with a hard return after it. Also, it’s usually a good idea to turn on Show/Hide ¶ (which appears in the Paragraph group on the Home tab in the Ribbon).
To keep a row or rows together using the keep with next paragraph and / or keep lines together settings:
- Select the cell or cells with the paragraph(s) you wish to keep with next paragraph and keep lines together.
- Click the Home tab in the Ribbon.
- Click the dialog box launcher on the bottom right of the Paragraph group. The Paragraph dialog box appears.
- Click the Line and Page Breaks tab.
- Check Keep lines together to keep the lines of each paragraph together in the cell or cells you’ve selected.
- Check Keep with next to keep each paragraph in the cell or cells you’ve selected with the next paragraph. It’s usually best not to turn this option on for the last paragraph in the table as it will keep the paragraph in the last cell with the next paragraph following the table.
- Click OK.
Below is the Paragraph dialog box with the Line and Page Breaks tab selected:

Keep a table together by starting it on a new page
Another way to keep a table together is to force the first paragraph in the table to start on a new page.
To force the first paragraph in a table to start on a new page:
- Select the first paragraph in the table.
- Click the Home tab in the Ribbon.
- Click the dialog box launcher on the bottom right of the Paragraph group. The Paragraph dialog box appears.
- Click the Line and Page Breaks tab.
- Check Page break before.
- Click OK.
By the way, if you’re comfortable with styles, you could also use various paragraph settings in styles in your tables.
Other issues
If you’ve tried the strategies above and a table is still breaking across pages, there could be a number of reasons.
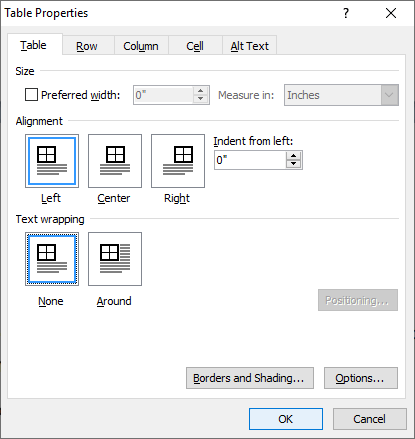
Ensure that the table is set so that it does not wrap around other text:
- Click in the table.
- Click the Table Layout or Table Tools Layout tab in the Ribbon.
- Click Properties. You can also right-click and choose Properties from the context-sensitive menu.
- In the Table Properties dialog box, click the Table tab.
- Click None under Text wrapping.
- Click OK.
Below is the Table Properties dialog box with the Table tab selected:
If a row is still breaking across pages, you may need to turn off the exact row height option:
- Select the row or rows that should not break across pages (you may want to select the entire table).
- Click the Table Layout or Table Tools Layout tab in the Ribbon.
- Click Properties. You can also right-click and choose Properties from the context-sensitive menu. A dialog box appears.
- Click the Row tab. Uncheck the check box to Allow row to break across pages.
- Uncheck Specify Height.
- Click OK.
You can also check for manual page breaks or section breaks in the table and delete them. However, be very careful deleting section breaks as they contain all information for the section.
To delete a page break or section break that has been inserted within a table:
- Ensure Show/Hide ¶ is turned on (which appears in the Paragraph group on the Home tab in the Ribbon).
- Select the problem page break or section break by dragging over it.
- Press Delete.
There can be some other issues like overly large indents in Table Properties so it’s worth checking the properties if you’re still having problems.
Subscribe to get more articles like this one
Did you find this article helpful? If you would like to receive new articles, JOIN our email list.
More resources
4 Ways to Create a Table in Word
How to Create a Table Template in Word
How to Create a Table of Contents in Word
How to Make Columns in Word (Newspaper-style)
How to View Word Count in Microsoft Word (4 Ways)
Related courses
Microsoft Word: Intermediate / Advanced
Microsoft Excel: Intermediate / Advanced
Microsoft PowerPoint: Intermediate / Advanced
Microsoft Word: Long Documents Master Class
Microsoft Word: Styles, Templates and Tables of Contents
Microsoft Word: Designing Dynamic Word Documents Using Fields
VIEW MORE COURSES >
Our instructor-led courses are delivered in virtual classroom format or at our downtown Toronto location at 18 King Street East, Suite 1400, Toronto, Ontario, Canada (some in-person classroom courses may also be delivered at an alternate downtown Toronto location). Contact us at info@avantixlearning.ca if you’d like to arrange custom instructor-led virtual classroom or onsite training on a date that’s convenient for you.
Copyright 2023 Avantix® Learning
Microsoft, the Microsoft logo, Microsoft Office and related Microsoft applications and logos are registered trademarks of Microsoft Corporation in Canada, US and other countries. All other trademarks are the property of the registered owners.
Avantix Learning |18 King Street East, Suite 1400, Toronto, Ontario, Canada M5C 1C4 | Contact us at info@avantixlearning.ca
Sometimes Word just won’t behave…
The problem
Recently I had a client’s Table of Contents (TOC) that got broken somehow (this is in Word 2003). If you look at the screen shot below you can see that there are two places where it is broken — section ‘9.3 Performance Standards…. 141’ is split over two lines, as is section ‘10.0 Implementation’ on page 146. There were a lot more than this, but these will do as the examples.

Broken TOC where heading and page numbers are on different lines
What I tried
I’ve had this before and have usually been able to fix it by doing Ctrl+click on the page number to go the heading that isn’t behaving, pressing Enter a few times at the beginning of the text for that section, creating a new heading with the same text on one of the new lines, applying the appropriate heading style, then deleting the old heading and any excess lines, then updating the TOC. Well, that worked for some of the Heading 3 level headings, but I just couldn’t fix the Heading 1 and 2 levels this way. They were broken.
So I tried several other strategies, none of which worked (e.g. reapply the style to the heading, reinsert the TOC from scratch, use the Organizer to copy across the original heading styles from the template, reassign the template to the doc, etc.).
What worked
What did work was a suggestion from my colleague, Susan Mc. She asked if I’d tried adding new lines ABOVE and BELOW the heading, re-creating the heading above the existing one, then removing all the excess lines and the heading that was misbehaving. I’d been adding the new lines below the heading, so I tried her suggestion — and it worked!
My TOC was back in order and I was happy, and my client was happy too!
However, this solution, while it worked, threw up another problem…
What can go wrong
If any of the headings you replace are cross-referenced within the document, they will become ‘0’ or ‘1.x’ or perhaps Error! Reference source not found’ cross-references — as shown below:

How to find these broken cross-references
Typically you’ll have a word in front of them that you can use to narrow down the search. Let’s use the example above — the incorrect reference is ‘Section 0’. So you need to do a Find (Ctrl+F) and look for ‘section 0’ (without the quotes).
How to fix these broken cross-references
For broken cross-references with a number like ‘0’ (as in the example above) or ‘1.x’, then Ctrl+click on the number and you’ll get taken to where Word thinks the heading is. Somehow Word remembers where the now-deleted heading was, so Ctrl+click takes you to where the new one is. But Word doesn’t know this new heading should be the cross-reference, so you need to reassign it. That’s easy — it’s a bit time-consuming, but it’s easy as you know where it *should* refer to.
However, if you have ‘Error! Reference source not found’ instead of the cross-reference, then you’ll have to figure out what it’s meant to refer to by the context of the text surrounding it, and then reassign it. Not so easy, especially if you’re the editor and not the author.
Other clues
Other clues I had that things might not be right with the headings in this document were the Document Map (View > Document Map) and the Cross-reference dialog box. Here’s part of the Document Map — those blank numbered items are a BIG clue!

Document Map has blank lines where there should be headings
And in the Cross-reference dialog (Insert > Reference > Cross-reference), I had all these extra 1.x’s for the ‘blank’ Headings:

Cross-reference headings are incorrectly listed as 1.1
What caused it in the first place?
I still don’t know what caused this document to get corrupt headings. I had only worked on it a few weeks earlier and it was fine then. However, it went to several authors after that and they added and deleted a lot of information, including copying and pasting an entire section from another document, WITHOUT pasting it as unformatted text. I suspect that’s where the problem occurred — somehow the styles got screwed up (technical term!), and even though they looked fine in the main body of the document, they obviously weren’t right when it came to the document’s structure.
(Update September 2010: I had a similar problem with a Word 2007 document and suspected that Track Changes might be the cause. So I copied the original document and accepted all Track Changes on the copy. When I updated the TOC, everything was back where it should be. It’s likely that Track Changes is the culprit, though I’m sure it’s not helped by people just copy/pasting from other docs.)
I think what I did is a quick fix only, and at some point this entire 200 page document will need to be copied over (using unformatted text!) to a clean template. I hope not — it adds about 4 to 8 hours to my editing process. The copy/paste as unformatted text and reassignment of heading styles is the easy part — reconstructing the many tables and cross-references is the painful part, as is setting up all the section breaks and headers and footers for the various page layouts (these documents have lots of Landscape and A3 pages).
It could all be avoided with the authors taking a little more time and care when they paste in text from another document — even one using the same template. Paste unformatted avoids so many of these conflicting style issues…
See also:
- https://cybertext.wordpress.com/2012/06/20/fixing-some-table-of-contents-update-issues/
[Links last checked August 2009; thanks to Susan Mc who suggested adding new lines in front of the headings]
![]()
Download Article
![]()
Download Article
What if you have one table of data in Word and you want to split it? Splitting a table in Word could be useful in a myriad of ways, like if you want to create smaller tables or add text and other document elements to your data. This wikiHow article teaches you how to split a table in Word on your computer since the feature isn’t available on the mobile app.
-
1
Open the Word document you want to edit. Find and double-click the file you want to edit on your computer, and open it in Microsoft Word.
-
2
Click the table you want to split. This will reveal two new tabs above the toolbar ribbon at the top of your document: Design and Layout.
- If you want to add a new table to your document, click the Insert tab at the top, and click Table on the toolbar.
Advertisement
-
3
Click the row where you want to split your table. The row you select here will be the first row of your second table after splitting.
- For example, if you click the third row of your table, your first table will have two rows after splitting, and your second table will start from the third row.
-
4
Click the Layout tab on the toolbar ribbon. When your table is selected, you can use the tools in this tab to edit its layout.
-
5
Click Split Table icon on the Layout toolbar. This button looks like a four-row table icon split in the middle. You can find it next to Merge Cells and Split Cells in the Merge group.
- This icon will not be visible if you don’t have your cursor clicked in a table row.
- This will split your table into two tables.[1]
- You can also press the keyboard shortcut: Ctrl + Shift + Enter to split the table at your cursor.


Advertisement
Ask a Question
200 characters left
Include your email address to get a message when this question is answered.
Submit
Advertisement
Thanks for submitting a tip for review!
About This Article
Article SummaryX
1. Open the Word document.
2. Click the table.
3. Click the row you want to split from.
4. Click the Layout tab on the toolbar.
5. Click Split Table.
Did this summary help you?
Thanks to all authors for creating a page that has been read 52,140 times.
Is this article up to date?
You are here
Tables in Microsoft Word are great, but the default settings for tables are sometimes not what you want. In particular, Word will split individual rows across two pages if it needs to. If you’d rather have Word break tables up between pages so that each row is kept intact and not split across two pages (i.e. force Word to insert a page break before the row rather than in the middle of the row), this lesson will show you how to do it.
Note that this lesson covers Microsoft Word 2007, 2010 and 2013 for Windows, and Microsoft Word 2011 for Mac.
Tell Microsoft Word not to split table rows across pages
This lesson assumes you have already created a table that spans two or more pages (or will do by the time you’ve finished creating it). Once you’ve done this, follow these steps:
Word will automatically repaginate the document to split the table so that each row is kept intact.
- This means that a row which was previously split between two pages will move onto the following page.
- Note that you can also use this technique to format just one row in your table. Simply right-click in the row inside the table that you want to stop from splitting across pages and follow the steps above.
Make your row settings the default for all future tables (the quick way)
Whilst the techniques described are useful, it’s a nuisance to have to set these options every time you create a new table in a document. In this section, we’ll look at how to make these settings the defaults.
At this point, you have now changed the table settings to match the settings of the current table; you should test it with a new document to ensure that the settings have indeed been set as the default.
Make your row settings the default for all future tables (more options)
It may be that you want more control over how the defaults are set for your tables. The following steps allow you control everything about your default table settings.
If you have any feedback on this lesson on stopping rows from breaking across pages, or you have a question about what was covered in this lesson, please leave us a comment below.
Join our mailing list
Our Comment Policy.
We welcome your comments and questions about this lesson. We don’t welcome spam. Our readers get a lot of value out of the comments and answers on our lessons and spam hurts that experience. Our spam filter is pretty good at stopping bots from posting spam, and our admins are quick to delete spam that does get through. We know that bots don’t read messages like this, but there are people out there who manually post spam. I repeat — we delete all spam, and if we see repeated posts from a given IP address, we’ll block the IP address. So don’t waste your time, or ours. One other point to note — if you post a link in your comment, it will automatically be deleted.
Add a comment to this lesson
Adding a table to a Microsoft Word document is an optimal way to gather and display data, but you may find that two tables can be better than one. There may be strict row requirements when you’re responding to proposal requests or, upon viewing the table, you may just decide that it looks best broken up. With Word, you won’t have to re-enter all of the data. Instead, take advantage of a one-click feature that, while semi-hidden, will let you instantly split your tables.
-
Start Word and open the document containing the table you would like to split.
-
Click the cursor in the first cell of the row in which you want to begin the second table. For example, if your table has five rows, and you want one table of two rows and one table of three rows, click the cursor into the first cell in row three.
-
Click the “Layout” tab under the yellow “Table Tools” tab. Note that you will only see this tab if you’ve clicked inside a table. If you don’t see the tab, try clicking the table again.
-
Click the “Split Table” button on the ribbon. The table is split.