
 Please Note:
This article is written for users of the following Microsoft Word versions: 2007, 2010, 2013, 2016, 2019, and Word in Microsoft 365. If you are using an earlier version (Word 2003 or earlier), this tip may not work for you. For a version of this tip written specifically for earlier versions of Word, click here: Adding an Optional Break.
![]()
Written by Allen Wyatt (last updated August 3, 2019)
This tip applies to Word 2007, 2010, 2013, 2016, 2019, and Word in Microsoft 365
One of the special characters available in Word is the no-width optional break. This character is primarily intended for use in Asiatic languages but can be of use to those of us working in English. Consider the following sentence: The best solution is to write/revise/reissue documents. In this case, you’ve created a very long word consisting of three individual words separated by slashes. As the artificially long word reaches the end of a line, Word treats it as a single word and will move the entire thing to the next line, if wrapping is necessary.
One way around this problem is to insert a no-width optional break after each slash:
- Position the insertion point right after the slash.
- Display the Insert tab of the ribbon.
- Click Symbol, in the Symbols group, and then click More Symbols. Word displays the Symbol dialog box. (See Figure 1.)
- On the Special Characters tab, choose No-Width Optional Break. (You will need to scroll down in the list of characters to find this option.)
- Click Insert.
- Click Close.
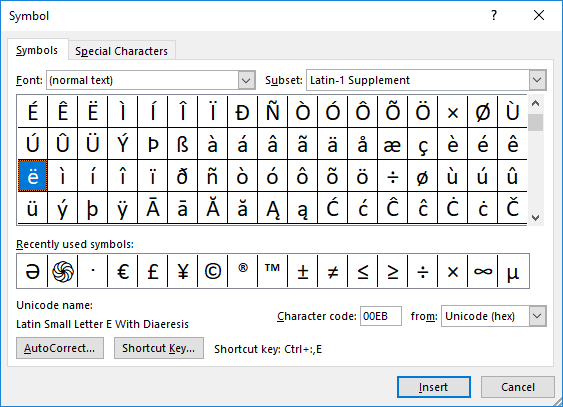
Figure 1. The Symbol dialog box.
What you see on the screen when you insert the no-width optional break depends on how you have configured your system. If you have non-printing characters hidden, then you won’t see a thing, but the character is still there. (You can detect it by moving across the character position by using the left or right arrow keys.) If you have non-printing characters visible on the screen (Word Options | Display | Show All Formatting Marks), then the character shows up as a small, gray double-wall box.
As an interesting side note, you must choose the Show All Formatting Marks on the Display options. If you instead choose the individual character options (Tab Characters, Spaces, Paragraph Marks, Hidden Text, and Optional Hyphens), the no-width optional break still won’t be visible—you must choose All.
Now, as your artificially long word approaches the end of the line, Word wraps the text based on the position of the no-width optional break. Since the character has no width, the result is that it appears like the word wraps right after the slash.
For grammatical purists in the audience, I know that the absolute best solution is to do away with slashes between words. For instance, it would be better to say, «The best solution is to write, revise, or reissue documents.» Unfortunately, not all clients want the grammatically correct solution, or they have a penchant for slashes. In that case, the no-width optional break can be very handy.
WordTips is your source for cost-effective Microsoft Word training.
(Microsoft Word is the most popular word processing software in the world.)
This tip (11555) applies to Microsoft Word 2007, 2010, 2013, 2016, 2019, and Word in Microsoft 365. You can find a version of this tip for the older menu interface of Word here: Adding an Optional Break.
Author Bio
With more than 50 non-fiction books and numerous magazine articles to his credit, Allen Wyatt is an internationally recognized author. He is president of Sharon Parq Associates, a computer and publishing services company. Learn more about Allen…
MORE FROM ALLEN
Wiping a Drive
Want to easily improve the security of your old data? Here’s an addition to the venerable format command that can help.
Discover More
Printing a Process List
There are programs (processes) running in your system all the time. You can view a list of these processes using the Task …
Discover More
Mirroring Documents
Have you ever wanted to have a Word document be accessible through two different folders? Here are several ways you can …
Discover More
Asked by: Berniece Rempel
Score: 4.9/5
(62 votes)
Insert a page break in Word
- Put your cursor where you want one page to end and the next to begin.
- Go to Insert > Page Break.
How do you insert a break in word?
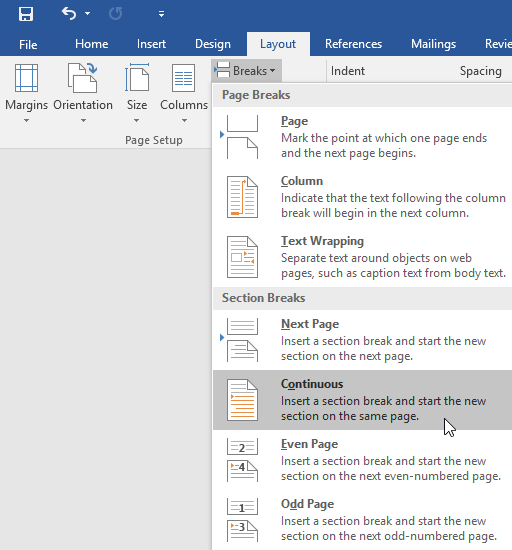
Click where you want to insert the section break. On the Page Layout tab, click on Breaks, and then under Section Breaks, click Next Page. This will insert the section break, and text following the section break will begin on a new page.
What is the word for do not break in word?
To stop words from splitting across lines in a paragraph or paragraphs by turning off automatic hyphenation:
- Select the paragraph or paragraphs.
- Click the Home tab in the Ribbon.
- Click the dialog box launcher on the bottom right corner of the Paragraph group. …
- Click Line and Page Breaks.
- Select or check Don’t Hyphenate.
What are the 4 types of section breaks?
The different kinds of section breaks include next page, continuous, even page, and odd page breaks.
Which section break will start the new section immediately?
Continuous — Inserts a section break and starts the new section immediately, without inserting a page break. Odd Page — Word begins the new section on the next odd-numbered page. This section break is often used for chapters that begin on odd-numbered pages.
19 related questions found
What is section break in MS Word?
Section breaks are used to divide the document into sections. Once section breaks are inserted, you can format each section separately. For example, format a section as a single column for the introduction of a report, and then format the next section as two columns for the report’s body text.
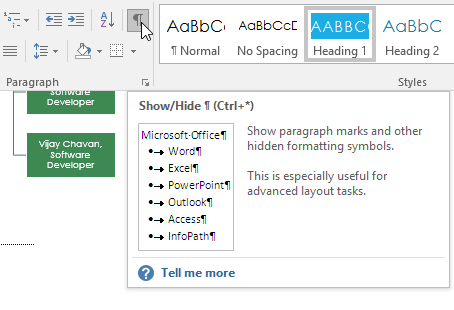
Where is the show Hide button in Word?
On the Home tab, Paragraph group there is a button that looks like a backwards P. This button is the Show/Hide button and toggles the non-printing characters off or on. Note: The Show/Hide button performs the same function as the Show all formatting marks check box on the Display screen of the Word Options window.
Why is my Word document only continuous?
It sounds like you are in Web Layout view. Change to Print Layout view via the View tab of the ribbon. How satisfied are you with this reply?
What is AutoFormat as you type word?
The AutoFormat As You Type tab provides options for formatting that occurs automatically based on what you type. Using this feature can minimize the need to apply changes from the Ribbon.
Why are words cut off in Word?
The line spacing of your text may be set to an exact height. When you set the line spacing to Exactly and select a measurement that is equal to or less than the height of the font, underscore characters may not be displayed and characters that have an ascender, descender, or an umlaut may be cut off.
What is the Do not Break word in CSS?
Wrap the words that you don’t want to break. <p>This is my paragraph. It will wrap normally, except for the part about <span style=»white-space:nowrap»>happily-hyphenated-hillbillies</span>.
Why is my Word document split into sections?
A split screen in Microsoft Word is meant to be helpful when you are writing or editing a section of your document, but you need to refer to a different section at the same time. Using a split screen prevents the need to scroll back and forth between these two locations.
How do I manage sections in Word?
Click in the section that you want to change. On the Format menu, select Document, and then select the Layout tab. In the Section start list, choose the kind of section break that you want.
How do you add a break?
To insert a break:
- Place the insertion point where you want the break to appear.
- Select the Page Layout tab.
- Click the Breaks command. A menu appears. Adding a page break.
- Click the desired break option to create a break in the document.
How do I make Word not continuous?
In the Page Number Format dialog (select Format Page Numbers from the Page Number drop down in the Header & Footer section of the Insert tab of the ribbon), select the radio button for “Continue from previous section”.
Can you make word one continuous page?
Select where you want a new section to begin. Go to Layout > Breaks, and then choose the type of section break you want. Next Page Starts the new section on the following page. Continuous Starts the new section on the same page.
How do I make a page not continuous in Word?
Just turn on Facing Pages in Document Tab and, after turning it on, change the zoom to one page.
What tab is the Show Hide button on?
Word uses various symbols to represent nonprinting characters in Word 2007. To show or hide these on-screen elements that you normally don’t see — such as spaces, tabs, and the Enter key — click the Show/Hide button on the Home tab in the Paragraph group. Click once to show the items; click again to hide them.
Where is the more button on Word?
The More button is ubiquitous throughout Microsoft Office, and appears often in the Ribbon when there is more information to be shared than will fit on your display. The More button is best described as a dropdown arrow with a little line across the top of it, and I want to show you some common places it shows up.
How do I enable intelligent services in Word?
Activating Intelligent Services
- Click the File tab in Word, Excel, PowerPoint, or Outlook.
- Click Options.
- Click the checkbox labeled Enable services, then click OK.
What are section breaks Class 10?
SECTION BREAK
It splits your document into sections. Each section can have its own header/footer formatting. Of this type there are four kinds: next page section breaks, continuous section breaks, even page section breaks, and odd page section breaks.
What is a section break what are its advantages?
In a word processor, like Microsoft Word, a segment break divides your document’s sheets into segments that can have a distinct arrangement or layout. Section breaks allow you to make formatting variations inside each of these segments. For illustration, you could design sheets that have several headers and footers.
How do you unlock section breaks in word?
You can remove section breaks using Find and Replace:
- Click the Home tab in the Ribbon.
- Click Replace in the Editing group or press Ctrl + H. …
- Click More >> to expand the dialog box (if necessary).
- Click in the Find what box.
- From the Special menu, choose Section Break. …
- Click in the Replace with box.
Word for Microsoft 365 Word 2021 Word 2019 Word 2016 Word 2013 Word 2010 Word 2007 More…Less
You can use section breaks to change the layout or formatting of pages in your document.
To change formatting in a document, insert a section break at the beginning of where you want the change. Set up the formatting change just past the new section break. If you want to change formatting again, put in another section break. If your changes are to be on the same page, choose the Continuous section break. Otherwise, choose Next Page, Odd Page, or Even Page section breaks.
If the formatting change occurs in the previous section, press Ctrl or Command + Z and move your cursor to after the section break and try it again.
Use section breaks to layout or format a document
When you insert a section break, choose the type of break that fits the changes you want to make. Here are the types with usage suggestions:
The Next Page command inserts a section break and starts the new section on the next page. This type of section break is useful to start new chapters in a document.
The Continuous command inserts a section break and starts the new section on the same page. A continuous section break is useful to create format changes such as a different number of columns on a page.

The Even Page or Odd Page command inserts a section break and starts the new section on the next even-numbered or odd-numbered page. To start document chapters always on an odd or even page, use the Odd page or Even page section break option.
Need more help?
Want more options?
Explore subscription benefits, browse training courses, learn how to secure your device, and more.
Communities help you ask and answer questions, give feedback, and hear from experts with rich knowledge.
Lesson 14: Breaks
/en/word2016/printing-documents/content/
Introduction
When you’re working on a multi-page document, there may be times when you want to have more control over how exactly the text flows. Breaks can be helpful in these cases. There are many types of breaks to choose from depending on what you need, including page breaks, section breaks, and column breaks.
Optional: Download our practice document.
Watch the video below to learn more about using breaks in Word.
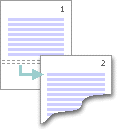
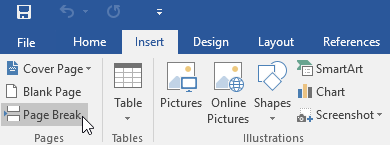
To insert a page break:
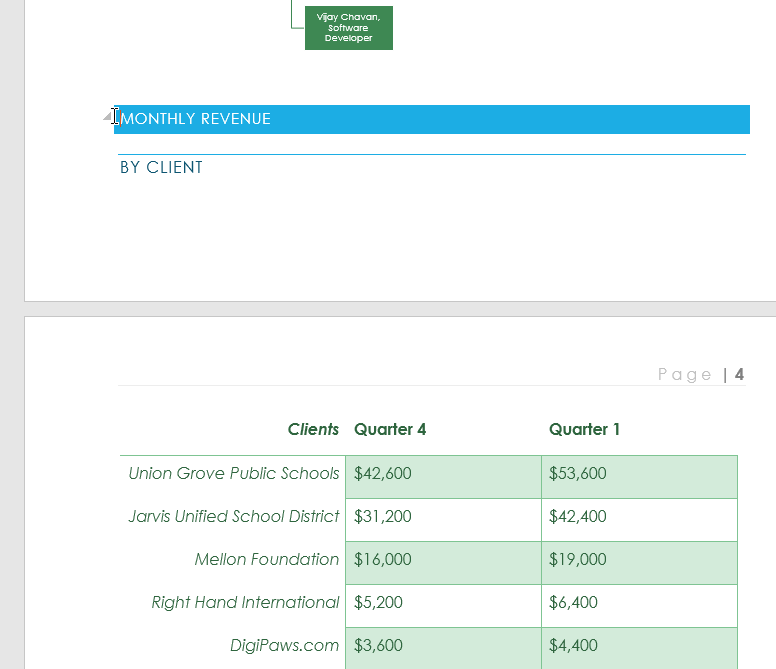
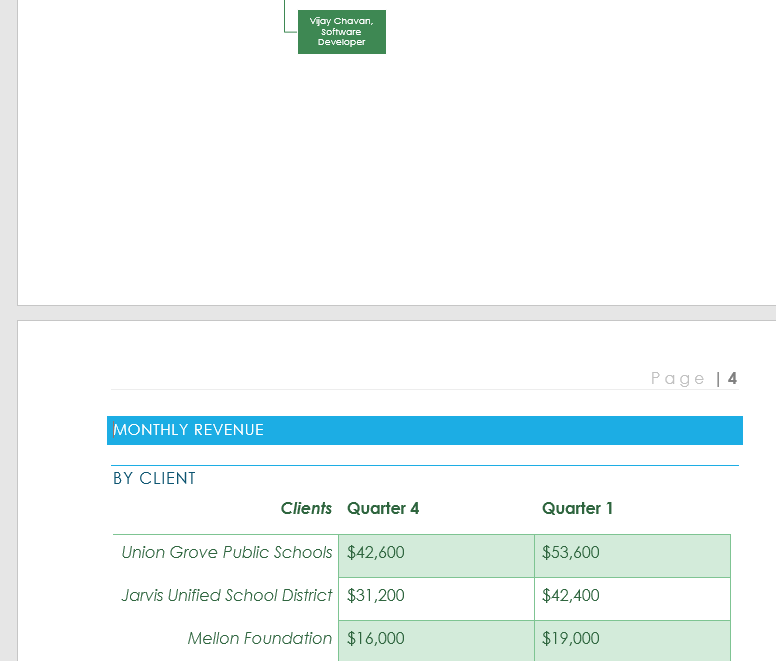
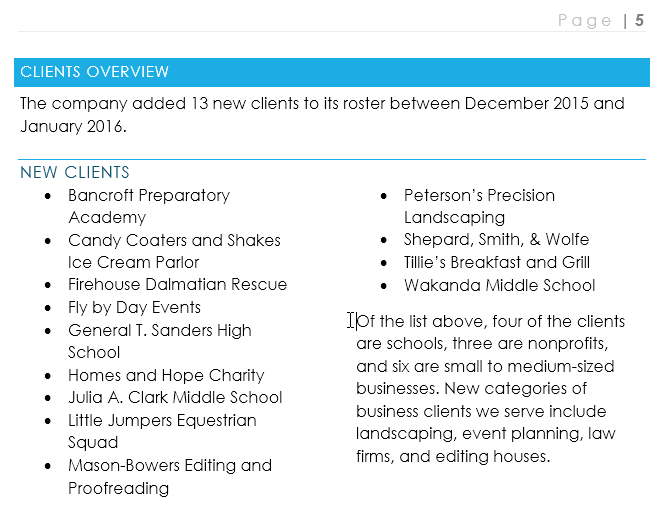
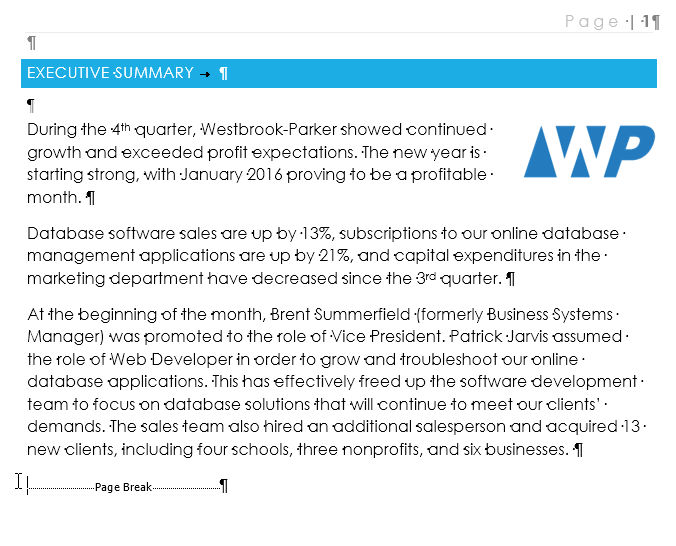
In our example, the section headers on page three (Monthly Revenue and By Client) are separated from the table on the page below. And while we could just press Enter until that text reaches the top of page four, it could easily be shifted around if we added or deleted something in another part of the document. Instead, we’ll insert a page break.
- Place the insertion point where you want to create the page break. In our example, we’ll place it at the beginning of our headings.

- On the Insert tab, click the Page Break command. Alternatively, you can press Ctrl+Enter on your keyboard.
- The page break will be inserted into the document, and the text will move to the next page.
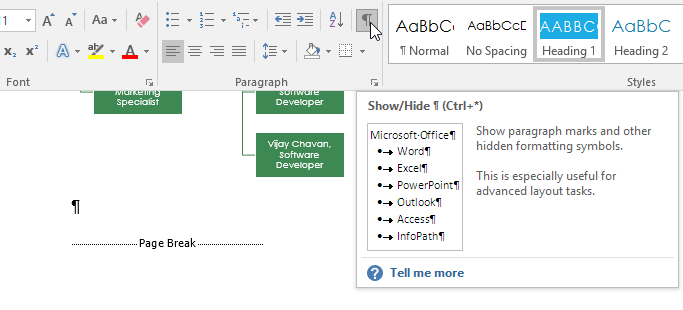
By default, breaks are invisible. If you want to see the breaks in your document, click the Show/Hide command on the Home tab.
Section breaks
Section breaks create a barrier between different parts of a document, allowing you to format each section independently. For example, you may want one section to have two columns without adding columns to the entire document. Word offers several types of section breaks.
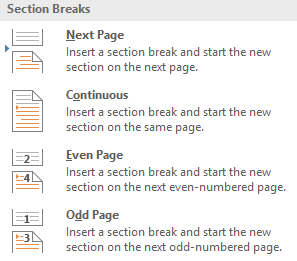
- Next Page: This option inserts a section break and moves text after the break to the next page of the document.
- Continuous: This option inserts a section break and allows you to continue working on the same page.
- Even Page and Odd Page: These options add a section break and move the text after the break to the next even or odd page. These options may be useful when you need to begin a new section on an even or odd page (for example, a new chapter of a book).
To insert a section break:
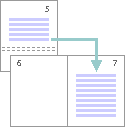
In our example, we’ll add a section break to separate a paragraph from a two-column list.
- Place the insertion point where you want to create the break. In our example, we’ll place it at the beginning of the paragraph we want to separate from two-column formatting.
- On the Page Layout tab, click the Breaks command, then select the desired section break from the drop-down menu. In our example, we’ll select Continuous so our paragraph remains on the same page as the columns.
- A section break will appear in the document.
- The text before and after the section break can now be formatted separately. In our example, we’ll apply one-column formatting to the paragraph.
- The formatting will be applied to the current section of the document. In our example, the text above the section break uses two-column formatting, while the paragraph below the break uses one-column formatting.


Other types of breaks
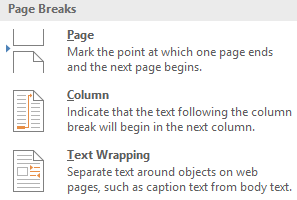
When you want to format the appearance of columns or modify text wrapping around an image, Word offers additional break options that can help:
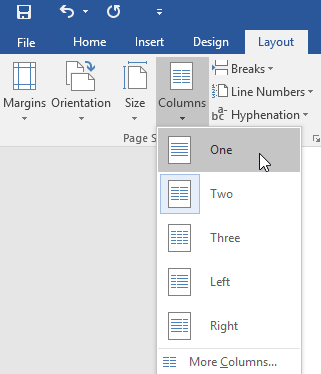
- Column: When creating multiple columns, you can apply a column break to balance the appearance of the columns. Any text following the column break will begin in the next column. To learn more about how to create columns in your document, visit our lesson on Columns.
- Text wrapping: When text has been wrapped around an image or object, you can use a text-wrapping break to end the wrapping and begin typing on the line below the image. Review our lesson on Pictures and Text Wrapping to learn more.
To delete a break:
By default, breaks are hidden. If you want to delete a break, you’ll first need to show the breaks in your document.
- On the Home tab, click the Show/Hide command.
- Locate the break you want to delete, then place the insertion point at the beginning of the break.
- Press the Delete key. The break will be deleted from the document.

Challenge!
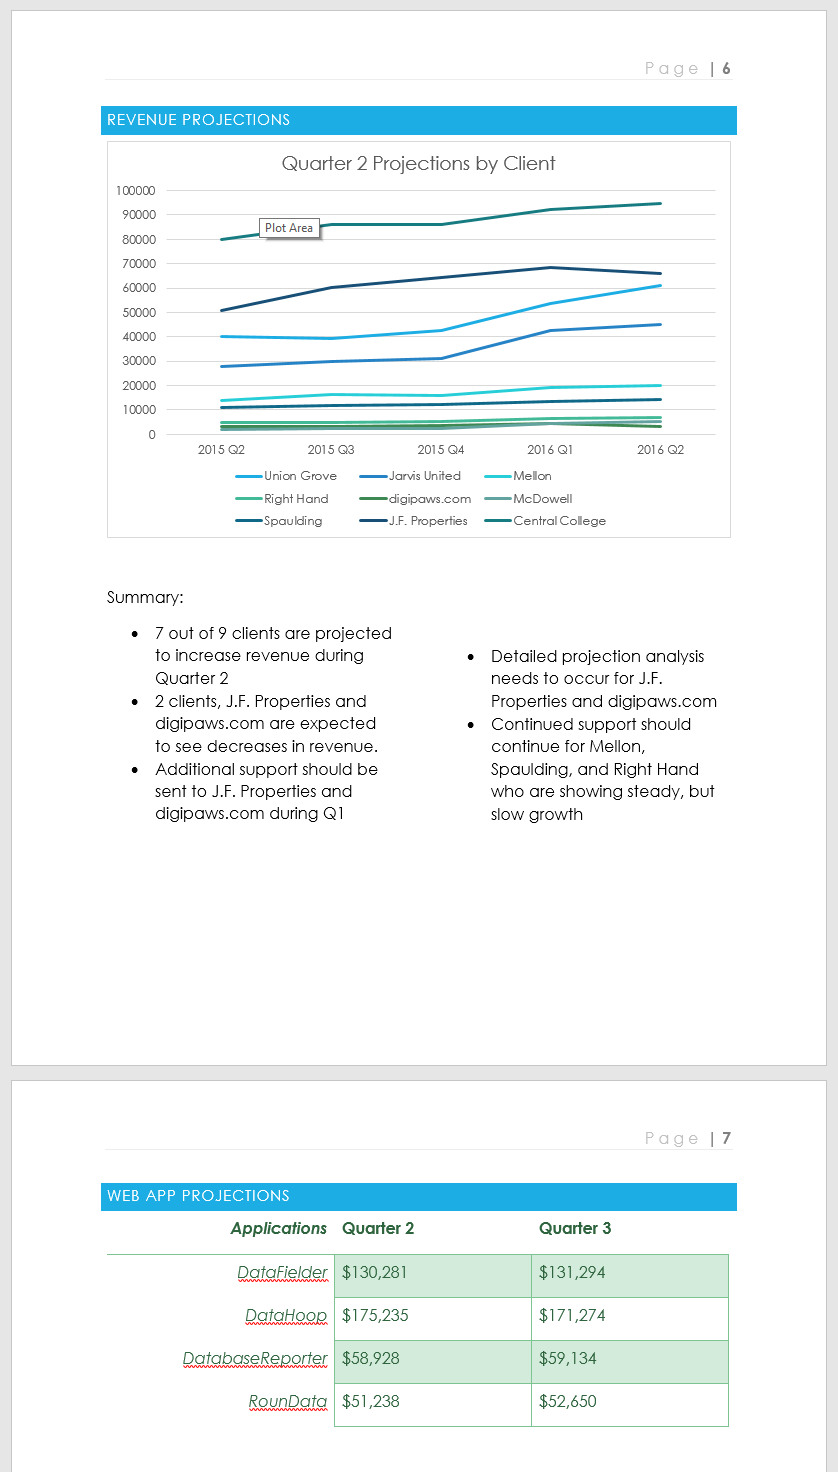
- Open our practice document.
- Scroll to the Revenue Projections section near the end of the document.
- Remove the page break after the Quarter 2 Projections by Client chart.
- Place your cursor at the beginning of the header Web App Projections.
- Insert a Next Page section break.
- In the Page Setup group on the Layout tab, click the Columns drop-down menu and choose One. This formats the page back to one column and should allow the Web App Projections header and the table below it to span across the page. You will learn more about columns in our next lesson.
- When you’re finished, the last two pages should look something like this:

/en/word2016/columns/content/
In word processing, a section is a portion of a document in which you set certain page formatting options, which may be different from those applied to other parts of the document. A document can contain at least one section and as many sections as possible. A section can be as short as a single paragraph or as long as a whole document, and each section can contain its own formatting. Also, each section inherits the formatting that is applied to the entire document, before it was divided into sections. But the different formatting you later apply to each section finally replaces the similar ones inherited from the document before dividing it into sections.
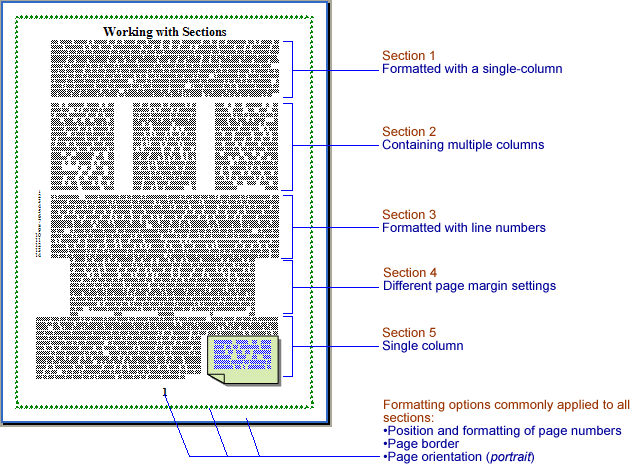 |
| Fig: A multiple sectioned document |
Dividing a Document into Sections
When you start a new document in Word, the entire document consists of only one section. Thus, when you view the document in Normal view, you don’t see any section breaks. If you intend to to apply different page formatting options (such as a different page orientations, margins, paper sizes, columns, etc) to different parts of the document, then you must divide the document into sections. In Word, you can either use the Break command on the Insert menu to manually divide a document into the number of sections you want, or Word can automatically create a new section for you, if you apply to a part of the document, a page formatting which is different from the one applied to other parts of the document. For example, if your document is using the portrait orientation, but the content of a particular page in the document cannot adequately fit horizontally into the portrait-oriented page, you might want to change the orientation of that page to landscape. When you do that, Word will automatically create a new section for that page and from that point forward, until you change the orientation again. Also, Word will automatically insert a section break when you select text in a portion of the document and change the number of columns, or create a table of contents, table of authorities, table of figures, or an index. When a new section is created, Word inserts into your document a nonprinting double-dotted line, indicating the position of the section break. You can see the section breaks in Normal view, or in Print Layout view if you enable the Show/Hide button (¶). Within the nonprinting double-dotted line that indicates a section break is a nonprinting text, with a part enclosed in parentheses indicating the type of section break, e.g, Even page, Continuous, etc. A section break stores the section formatting for the text above it, and also means the end of the section containing the text above the section break.
 |
| Fig: Page showing a section break in Normal view |
Dividing a document into sections will enable you to apply formats that affect only a specific part of the document. When you divide a document into sections, you will be able to change any of the following page formats/elements in a different parts of the document:
|
Inserting a Section Break
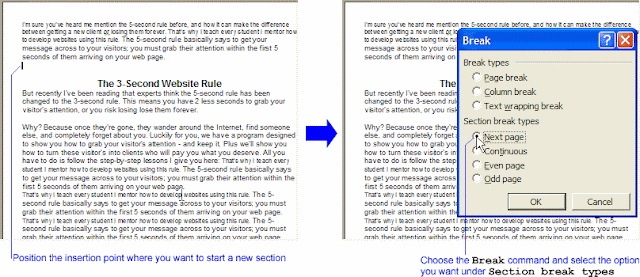
1. Position the insertion point in the position where you want to start a new section.
2. On the Insert menu, click Break.
The Break dialog box is displayed.
3. Under Section break types, click the option that describes where you want the next section to begin.
4. Click OK.
With that, a new section is created. In Normal view (or if you enable the Show/Hide button (¶) in Print Layout, Web Layout, or Outline view), you can identify this with a nonprinting double-dotted line which Word inserts into the document above the position of the insertion point.
 |
| Fig: Inserting a section break |
To delete a section break, you must switch to Normal view. You can also do the same in Print Layout, Web Layout, or Outline view, provided the Show/Hide button (¶) is enabled. You’ve learned that a section break stores the section formatting for the text above it, and that it also means the end of the section containing the text above the section break. This being the case, deleting a section break then means deleting the section formatting for the text above it. Since it will be kind of ‘unfair’ leaving the stripped text of any section formatting, Word ‘mercifully’ makes the text become part of the section that follows it, as well as take on the section formatting of the ‘fostering’ section. In other words, when you delete a section break, you delete the section formatting for the section preceding the section break, and the text, as a result, becomes part of the section that follows it, and at the same time, assumes the formatting of that section. In light of this, be careful while deleting section breaks in Word. However, you can still use the Undo command to restore a section formatting you inadvertently deleted, before you close the document. To delete a section break, please follow these steps:
1. First, switch to Normal view by clicking Normal on View menu.
The document is now displayed in Normal view.
2. Select the section break you want to delete by clicking on it.
3. Press DELETE.
The dotted line is removed, meaning the section break has been successfully removed.
 |
| Fig: Deleting a section break |
Note: From experience, I’ve found that pressing BACKSPACE does not delete a section break in Word XP 2002. So make sure you press DELETE instead of BACKSPACE.
Controlling Section Breaks
When you click the Break command to insert a section break, Word displays the Break dialog box, which offers you a number of options. In the Break dialog box, under Section break types, are the following options: Next page, Continuous, Even page, and Odd page. These options enable you decide where you want a section to begin. Each of the following headings explains the respective option for creating a section break. Being conversant with the behavior of each, or what effect each would have if selected, will enable you choose the appropriate option when creating a section break. Under each heading are helpful tips to help you realize when choosing any of the options is appropriate. As for the first three options — Page break, Column break, and Text wrapping break — under Break types in the Break dialog box, more light is going to be shed on each of them later in this tutorial, or blog.
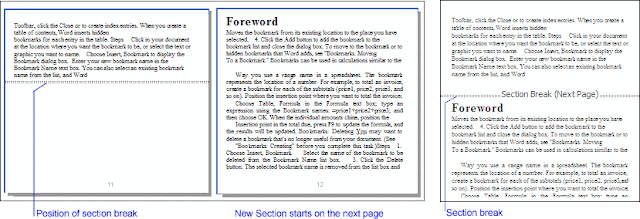
Next Page
If you choose this option, Word breaks the page (by inserting a section break) before the insertion point, but starts the new section on the next page.
See the following images for illustration.
 |
| Fig: In Print Layout View ………………………………………………………………… Fig: In Normal View I |
Tip: Use the Next page option on a part of a document that will require that you change page formats such as page orientation, margins, paper type, vertical alignment of text, page borders, etc.
Continuous
If you choose this option, or if Word automatically applies it, Word inserts a section break before the insertion point (in Print Layout view), and then begins the new section on the same page. This being the case, you may find it hard to notice the break position in Print Layout view, because text in the preceding and in the new sections follow so closely that you may think they merely fall within different paragraphs. You will have to switch to Normal view (or enable the Show/Hide button (¶) in any other view) before you can visibly see the positions of each section break. As long as the paper size, and page orientation settings on adjacent sections which are separated by Continuous section break remain the same (common), text in such sections will continue to be continuously accommodated on the same page. However, the moment you apply a different paper size or page orientation to any of the adjacent sections sharing a common page, Word will automatically overrule your Continuous section break choice, separate the sections, superimpose the Next page section break option, and begin the affected section on a new page. Simply put, if two sections have different settings for paper size or page orientation, Word will begin the new section on a new page, even if you select the Continuous option in the Break dialog box.
See the following images for illustration.
 |
| Fig: Continuous section break. Word inserts a section break and begins the new section on the same page |
Tip: Insert a Continuous section break at the end of a document that is divided into columns where the last column does not fill to the end of the page. Also, use the Continuous section break option if the differences in page formatting settings between the current section and the new section you are about creating are any of line numbering, margins, or number of columns. Two or more sections can remain on the same page even if they have different margin settings, number of columns, or if some have line numbers while others have none. If the preceding section contains multiple columns, Word balances the columns above the section break, and then fills out the page with the new section.
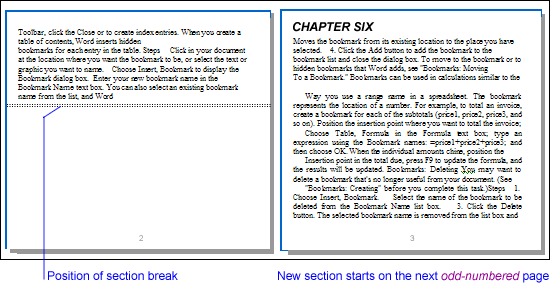
Even Page
Choosing this option, Word inserts the section break (the double-dotted line) before the insertion point (in Print Layout view), and begins the new section on the next even-numbered page. I hope you still remember what an even number is. An even number is an integer (number) that can be divided by 2 without a remainder, e.g 0, 2, 4, 6, 8, …, etc.
 |
| Fig: In Print Layout view |
For example, if on page 3 you choose the Even page option in the Break dialog box, Word will break the current section in page 3 and and then go to page 4 to begin the new section. However, if the section break falls on an even-numbered page, Word will leave the intervening odd-numbered page blank, and start the new section on the next even-numbered page. For instance, if the insertion point is on page 2 when you choose the Even page option, Word will skip page 3 (and leave it blank, of course), and begin the new section on page 4.
See the following images for illustration.
 |
| Fig: In Print Layout view. new section starting on the next even-numbered page |
Tip: This type of section break is most ideal for use for chapters (or other major sections such as Appendix, Index, Glossary, etc) that begin on even-numbered pages. So try forming the habit of using this option (or the Odd page option) for chapters or other important segments of a document, for a consistent and professional look.
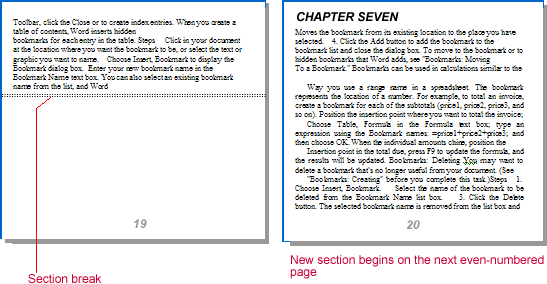
Odd Page
This behaves similar to, and has all the effects and uses as the Even page option, EXCEPT that the new section begins on the next odd-numbered page.
 |
| Fig: In Print Layout view.Odd page section break |
Word leaves the intervening even-numbered page blank and starts the new section on the next odd-numbered page if the section break falls on an odd-numbered page. Don’t forget, odd-numbered pages are pages like, page1, page 3, page 5, page 7, etc.
See the following images for illustration.
 |
| Fig: In Print Layout view. new section starting on the next odd-numbered page |
You must have noticed that on most professionally created textbooks, all new chapters start on either an even-numbered page, or on an odd-numbered page. They are never used together.
How to Change the Type of Section Break
You can easily convert the way a section breaks from one form to another. This topic teaches you how. For example, you can change a section break from Continuous to New page, and vice versa.
- Click in the section you want to change.
- On the File menu, click Page Setup, and then click the Layout tab.
- In the Section start box, click the option that describes where you want the current section to begin.
- Click OK.
 |
| Fig: Click the section to be changed and then display the Page Setup dialog box |
Formatting a Section
As you create a document in Word, you apply different kinds of formatting to relevant elements of the document. Some of the formats affect only characters; some affect entire paragraphs; while some affect as large as an entire section or document. Do not forget that a section can be as short as a paragraph, or as long as an entire document. Formats such as margins, page orientation, page size, headers or footers, columns, line numbering, etc are applied to and affect sections in a document. Each section can be formatted differently. The formats applied to a section are stored in the section break that is placed below the content of that section. So when you delete a section break, you also delete the section formatting for the section containing the text above the section break. As a result, the text in the section whose section break you just deleted becomes part of the text (section) below the section break before it was deleted, and also assumes the formatting of that section. Simply put, deleting a section break means deleting the section formatting for the section preceding the section break. This results in the text in the affected section becoming part of the section that follows, and the text also taking on the formatting of that section. However, before you close the document, you can still use the Undo command to restore a section break you deleted by accident.
Just as character or paragraph formatting can be copied or saved, and transferred to other characters or paragraphs, respectively, in Word, you can also copy section formatting and transfer it to another part of a document. Also, you can save a section break and the formatting it contains and reuse it in future on the same or other documents. I shall share these tips with you later in this tutorial.
Even though each section can be formatted differently, some section formats can still be commonly used by the various sections making up the document. Since, in the face of diversity in section formatting, the various sections can still have some formats in common, a faster and normal procedure in section formatting should be like this:
- Before ever you divide the document into sections, set the formatting options you know will apply to most of the sections.
- After this, go ahead and divide the document into sections. Each section, will as a result, retain and have the settings you have just applied.
- Finally, customize or apply the different formats you want for each section.
How to Copy, Cut and Paste a Section Break
You can copy or cut a section break and reuse it by pasting it into a new location in the same or other Word documents. When you copy or cut a section break, you are in effect copying or cutting the section formatting for the text above the section break. And when you finally paste it into a new location, the text above the section break assumes the formatting contained in the section break. Note that cutting a section break will have the same effect on the text above the section break as when you actually delete the section break. Here are the steps for copying or cutting and pasting a section break.
- First, switch the document to Normal view by choosing Normal in View menu.
- To highlight a section break, move the pointer to the white space at the left of the section break you want, and then click when the pointer changes to a right-pointing arrow.
- To cut or copy the highlighted section break, click either Cut or Copy on the Standard toolbar. Alternatively, select the commands from the Edit menu, or Press CTRL + X to cut, or CTRL + C to copy.
-
To paste the section break and the formatting it contains, position the insertion point in a desired location (below a block of text that is to take on the formatting of the section break you are pasting), and then click the Paste button on the Standard toolbar. You can, alternatively, choose the Paste command from the Edit menu, or press CTRL + V to paste the section break.
The text above the pasted section break now takes on the formatting contained in the section break.
 |
| Fig: Copying or cutting and, pasting a section break |
How to Save a Section Break and the Formatting It Contains
If you like the formatting applied to a particular section and you’d like to reuse it in future, you can save it as an AutoText entry. Here are the steps:
- Highlight the section break you want to store as an AutoText entry.
- On the Insert menu, point to AutoText, and then click New. Alternatively, press ALT + F3. The Create AutoText dialog box is displayed.
- Type a name for the AutoText entry in the box provided.
- Click OK.
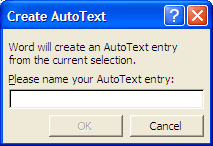 |
| Fig: The Create AutoText dialog box |
How to Retrieve and Reuse a Section Break Stored as an AutoText Entry
- Position the insertion point in a location (below a block of text that is to take on the formatting of the section break you are pasting) where you want a new section to start.
- On the Insert menu, point to AutoText, and then click the name with which you stored the section break as an AutoText entry.
- If the name of the AutoText you want is not included in the AutoText submenu, you can insert the AutoText entry by doing the following:
- On the AutoText sub-menu, click AutoText, and then click the AutoText tab in the AutoCorrect dialog box that displays.
- Type the name of the AutoText entry in the Enter AutoText entries here box.
- Click the Insert button.
 |
| Fig: The AutoCorrect dialog box, displaying the AutoText tab page |
The section break is now inserted and the text above the section break (or before the insertion point) now takes on the formatting contained in the section break inserted through the AutoText entry.
How to Delete a Section Break Stored as an AutoText Entry
If you feel you will no longer need a section break you have saved as an AutoText entry, you can delete it at any time. Doing so will not affect the sections you have created with it.
- On the Insert menu, point to AutoText and then click AutoText on the submenu.
The AutoCorrect dialog box is displayed. - Click the AutoText tab.
- Type the name of the AutoText entry you want to delete, and then click the Delete button.
- Click OK or Close to close the dialog box.
Later in this blog, I will be sharing with you the steps in assigning a shortcut key or button to an AutoText entry.
Thank you for taking your time to read this tutorial. Please check back again for updates and helpful tips. Your visits will surely be worth it. I sincerely appreciate your visits and presence here. If you are finding these tutorials and tips informative and helpful, please kindly recommend this blog to your friends. If, on the other hand, there is any area you feel improvement is needed, please kindly forward a piece of advice. These will be highly welcomed and appreciated. If you did not find the information you are looking for in this blog, please feel free to leave a question using the comment link or box below. I will also appreciate comments from you. Your comments will be promptly reviewed and published and your questions speedily looked into and answered in the best possible manner. Thanks.