
Many of you have asked me or Ryan how you go about boxing answers in Word without MathType. In MathType, it’s simple. You just highlight the text you need, and you click the box option, like so:

But if you don’t use MathType (because you use Word’s Equation Editor 3.0 or because your text isn’t equation-oriented), there is another option for you in Microsoft Word. To box the answer, you just highlight the final answer and click “Outside Borders” in the Paragraph menu.You should not box with a text box. This is way easier anyway, so I’m not so sure why you’d even want to! 🙂

- Posted by in answer, authoring, best practices, borders, boxing, formatting, how to, mathtype, microsoft word, strategy, tips, tips and tricks
-

1
Click the Insert tab.
-
2
On the right side of all of the things you can insert, look for ‘Text Box.’
Advertisement
-
3
Select the text box that you want to use and double click on it.
-
4
Cut and paste the text into the text box.


Advertisement
Ask a Question
200 characters left
Include your email address to get a message when this question is answered.
Submit
Advertisement
Video
-
To change the size of the text box, click on it once, and drag one of the 8 circles.
-
You can change the design of the text box you have selected by going into the format tab.
Thanks for submitting a tip for review!
Advertisement
About This Article
Thanks to all authors for creating a page that has been read 98,464 times.
Is this article up to date?
wikiHow Tech Help Pro:
Level up your tech skills and stay ahead of the curve
Let’s go!
Achieve more control and flexibility with your documents
Updated on September 11, 2022
What to Know
- Select Insert > Text Box > choose a text box template. Select and drag box to the position you want.
- To resize text, select and drag circles around the edge. To rotate text, select and drag the circular arrow.
- Place the cursor inside the text box and type the information you want to appear.
This article explains how to use text boxes in Microsoft Word. Instructions apply to Word for Microsoft 365, Word 2019, Word 2016, and Word 2013.
How to Insert a Text Box in Word
Start by opening the document you want to add a text box to. Then follow the steps below.
-
On the ribbon, select Insert.
-
In the Text group, select Text Box, then choose a text box template.
-
The new text box appears in the middle of the text, and the Shape Format tab is automatically selected.
-
Select and drag the box to the position you want. To resize the text box, select and drag the circles around the edge. To rotate the text box, select and drag the circular arrow at the top of the box.
-
Place the cursor inside the text box and type the information you want to appear there.
Why Use Text Boxes?
When you type text in Microsoft Word, you have options for making it look a particular way on the page (such as changing the page margins), but those options are limited. Text boxes expand your formatting repertoire by offering additional control and flexibility for how your text appears. You can place a text box anywhere within a document and format it with different colors and fonts. This feature is especially helpful for creating a blockquote or a sidebar.
Customize a Text Box
After you create a text box, you can customize it in a number of ways.
-
To bring up options, place the cursor inside the text box and right-click. Choose an option and follow the screen prompts to add a border, change the style, or adjust the way the text box interacts with the other text on the page.
Alternatively, use the controls on the Shape Format tab.
-
To go directly to the Layout Options menu, select the text box, then select the Layout Options icon (it looks like a horseshoe and is located to the right of the text box).
-
Change the text, make more adjustments, or move the box to another location at any time. To delete a text box, select its border, then press Delete on the keyboard.
Thanks for letting us know!
Get the Latest Tech News Delivered Every Day
Subscribe
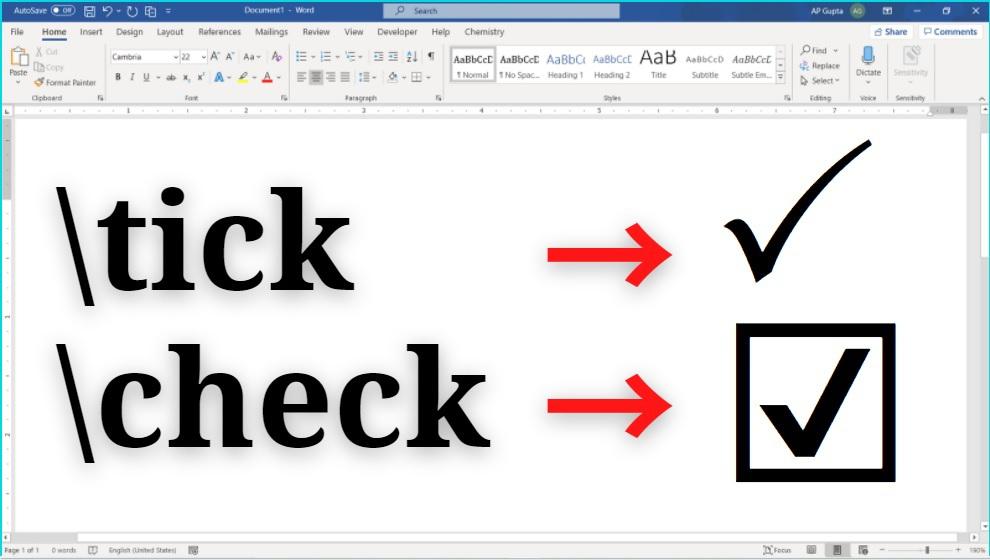
Tick symbol (🗸) also known as a check mark is a symbol for “Yes”. Sometimes tick in a box (☑) is preferred over tick symbol to denote yes or completion. In this blog we have covered, four different ways to insert tick and tick in box symbol in Microsoft Word.
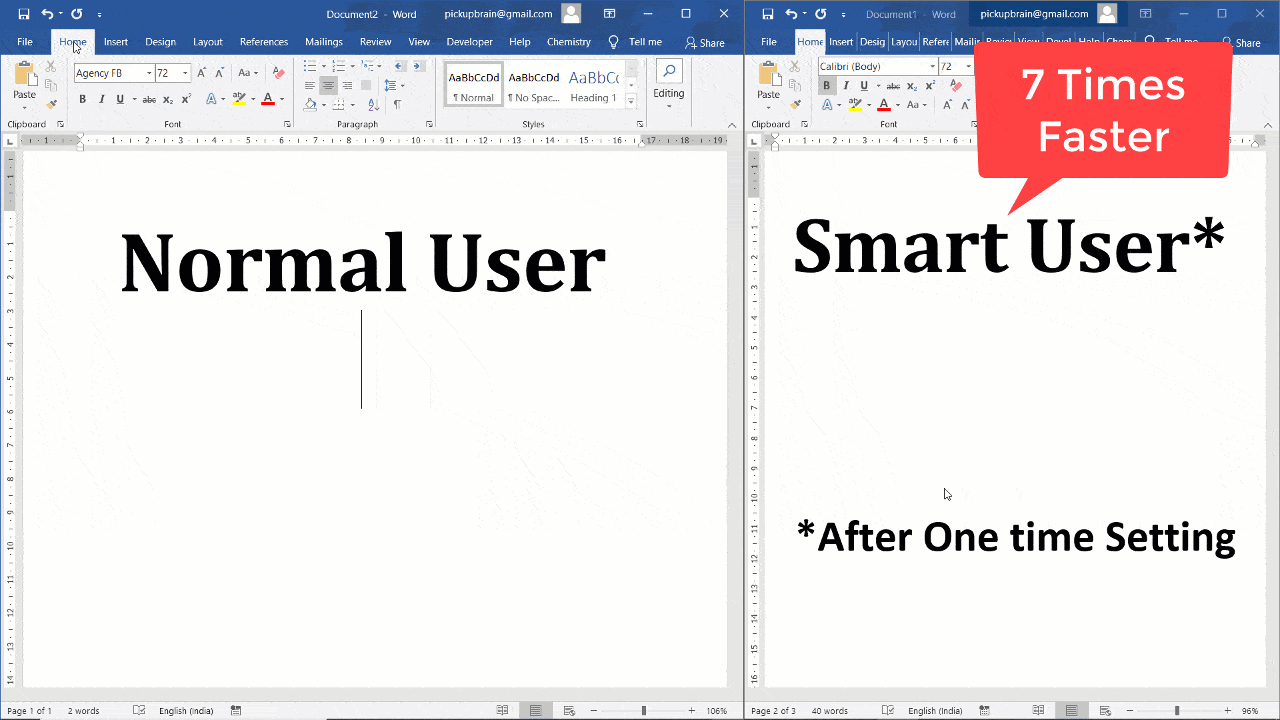
Place your cursor where you want to insert the symbol and use any of the following 4 methods. Method 4 is easiest and up to 7 times faster.
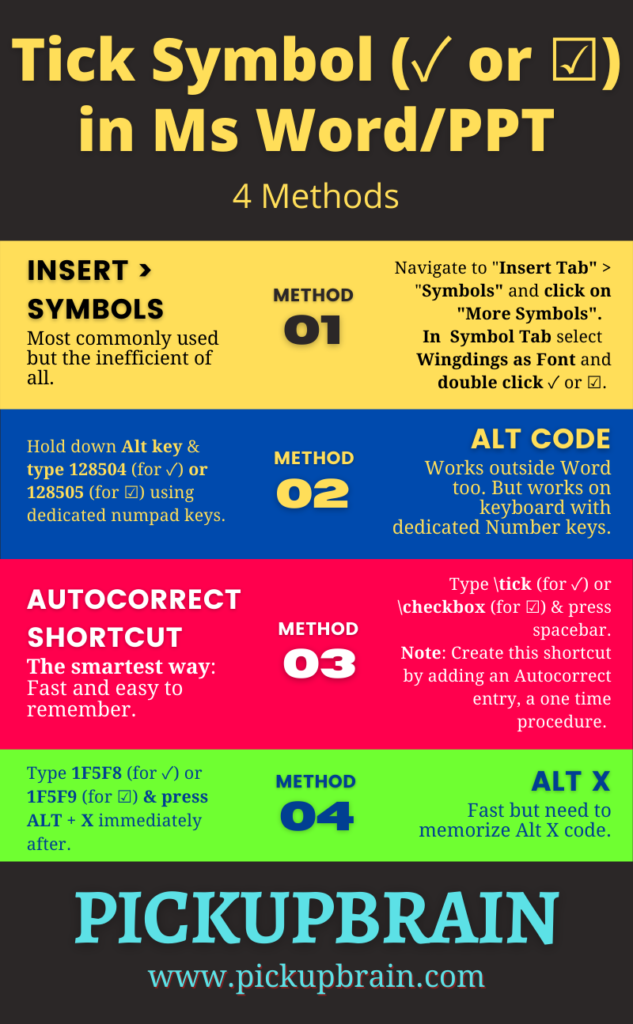
Method 1 – Insert > Symbols
- Navigating Insert Tab > Symbols and select More Symbols
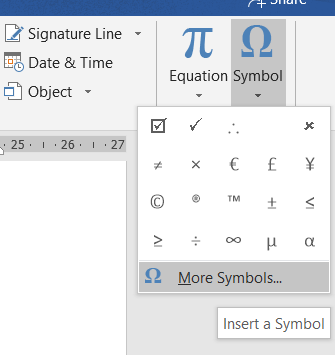
2. Select Symbol Tab > Wingdings Font, and double click on desired symbol i.e. 🗸 or ☑.
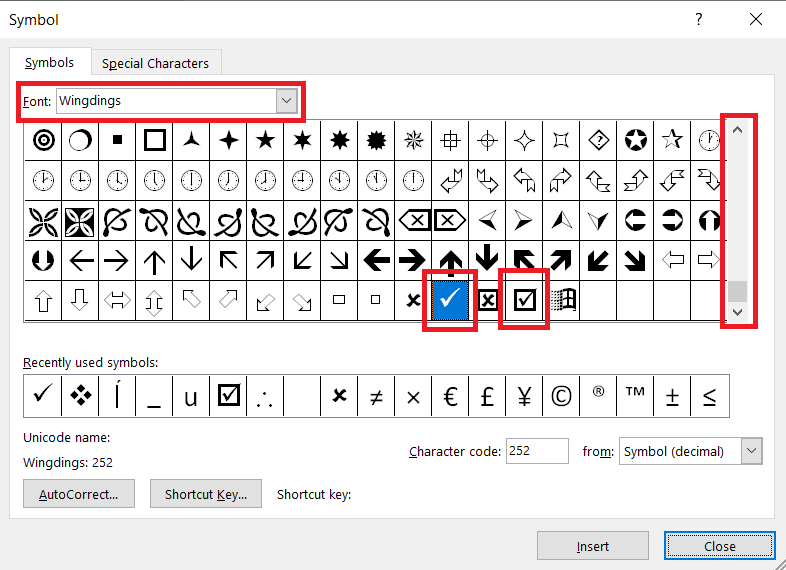
3. Select Close
Method 2 – Alt Code (Requires dedicated Number pad keys)
Ms Word Alt code for Tick (or Check) Mark and Tick in Box are:
| Tick Symbol or Check Mark (🗸) | Tick in Box (☑) |
|---|---|
| 128504 | 128505 |
To insert symbol, type corresponding Alt Code using Number pad (not using numerics key using above letters) while holding down Alt key.
Method 3 – Autocorrect (Fastest method for Tick Symbol Word)
- Create Autocorrect entry
- Locate Tick Symbol or Tick in Box symbol (as shown in Method 1) by navigating to Insert > Symbols > More Symbols and select symbol.
- Click Autocorrect Button to open new AutoCorrect Dialogue box.
- Type desired shortcut text (say tick or checkbox) in Replace.
- Click Add.
- Close Autocorrect and Symbol Window.
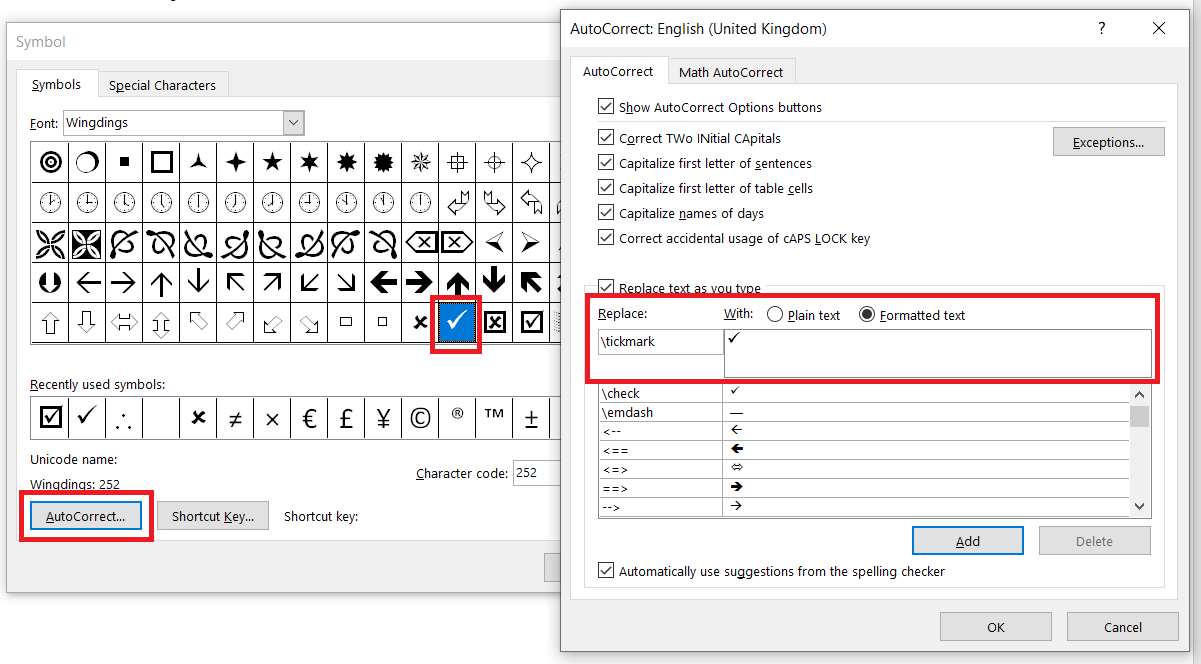
2. Type autocorrect text created in above step and press space (for e.g. tick) to convert into corresponding symbol.
Method 4 – Alt X
Alt X code for Tick (or Check) Mark & Tick in Box are
| Tick Symbol or Check Mark (🗸) | Tick in Box (☑) |
|---|---|
| 1F5F8 | 1F5F9 |
To insert thick (or check) mark, type 1F5F8 and press Alt + X immediately following it. Similarly, for inserting tick in box, type 1F5F8 and press Alt + X.
Summary
There are four different methods to insert tick symbol in Ms Word. Of all, Alt X and Alt Code method requires remembering 4-5 digit code. While, the Insert Symbol and Autocorrect method are straightforward and relatively easy to remember. Of all these, the smartest way to insert tick symbol or tick in box is Autocorrect method as it is fastest and easy to remember.
Related Posts
3 Ways to Keep Text Together in Microsoft Word Documents
by Avantix Learning Team | Updated April 5, 2021
Applies to: Microsoft® Word® 2010, 2013, 2016, 2019, 2021 and 365 (Windows)
You can keep text together in several ways in Word. If you want to keep words or characters together, you can use nonbreaking spaces or nonbreaking hyphens or dashes and insert them using a dialog box or a keyboard shortcut. If you want to keep lines or paragraphs together on the same page, you can apply settings in the Paragraph dialog box (which can be built into styles if you use styles).
You may want to keep the lines in a paragraph together so that the paragraph doesn’t break across pages or you may want to keep a paragraph with the next paragraph and avoid inserting manual page breaks. This can be accomplished easily using the Paragraph dialog box (and can be built into styles if you use styles).
It’s important to understand some key paragraph concepts:
- A paragraph in Word is anything with a hard return after it (you have pressed Enter or Return).
- It’s best to eliminate any blank paragraphs in a long document.
- You can view paragraph marks or symbols by clicking Show/Hide ¶ on the Home tab in the Ribbon in the Paragraph group.
Recommended article: 14 Timesaving Microsoft Word Selection Shortcuts to Quickly Select Text
Do you want to learn more about Microsoft Word? Check out our virtual classroom or live classroom Word courses >
Keeping lines together in a paragraph
To keep the lines in a paragraph together on the same page in Word using the Ribbon:
- Select the paragraph in the Word document with the text you want to keep together. You can simply click in the paragraph to select it.
- Click the Home tab in the Ribbon and click the dialog box launcher on the bottom right of the Paragraph group. The Paragraph dialog box appears.
- Select the Line and Page breaks tab. Word displays options to keep the lines of the paragraph together or to keep the paragraph with the next paragraph.
- Check Keep lines together.
- Click OK. The paragraph will no longer break across pages.
Below is the Paragraph dialog box in Word with Keep lines together selected:

You can also use a context menu to access the Paragraph dialog box (right-click in a paragraph and choose Paragraph from the drop-down menu).
Keeping a paragraph with the next paragraph
To keep a paragraph on the same page with the next paragraph using the Ribbon:
- Click in the paragraph you want to keep with the next paragraph (the next paragraph should not be a blank paragraph).
- Click the Home tab in the Ribbon.
- Click the dialog box launcher on the bottom right of the Paragraph group. The Paragraph dialog box appears.
- Select the Line and Page breaks tab.
- Check Keep with next.
- Click OK.
You can also use a context menu to access the Paragraph dialog box (right-click in a paragraph and choose Paragraph from the drop-down menu).
Keeping text together with nonbreaking spaces
If you want specific words or characters to stay together on the same line (such as De Marco), you can use nonbreaking spaces instead of regular spaces.
To insert a nonbreaking space between two words or characters using a keyboard shortcut:
- Position the cursor between the two words or characters you want to keep together (there should be no space between these characters).
- Press Ctrl + Shift + Spacebar. Word inserts a nonbreaking space.
To insert a nonbreaking space between two words or letters using the Ribbon:
- Position the cursor between the two words or characters you want to keep together (there should be no space between these characters).
- Click the Insert tab in the Ribbon.
- Click Insert Symbol and then More Symbols in the drop-down menu. A dialog box appears.
- Select the Special Characters tab.
- Select Nonbreaking space and click Insert.
- Click Close. Word inserts a nonbreaking space.
Below is the Insert Symbol dialog box to insert a non-breaking space:

Keeping text together with nonbreaking hyphens or dashes
You can also use nonbreaking hyphens or dashes to keep words or characters together (such as co-ordinator or 416‑222‑9999).
To insert a nonbreaking hyphen between two words or characters using a keyboard shortcut:
- Position the cursor between the two words or characters you want to keep together (there should be no space between these characters).
- Press Ctrl + Shift + Underscore (_). Word inserts a nonbreaking hyphen.
To insert a nonbreaking hyphen between two words or characters using the Ribbon:
- Position the cursor between the two words or characters you want to keep together (there should be no space between these characters).
- Click the Insert tab in the Ribbon.
- Click Insert Symbol and then More Symbols in the drop-down menu. A dialog box appears.
- Select the Special Characters tab.
- Select Nonbreaking hyphen and click Insert.
- Click Close. Word inserts a nonbreaking hyphen.
To view nonbreaking spaces, nonbreaking hyphens and paragraph marks:
- Click the Home tab in the Ribbon.
- Click the Show/Hide ¶ in the Paragraph group.
You can turn off the symbols by clicking on the same button.
You can also quickly find and remove nonbreaking spaces or hyphens using the Replace dialog box.
To find and remove nonreaking spaces or hyphens:
- Press Ctrl + H. The Replace dialog box appears. You can also click the Home tab in the Ribbon and click Replace in the Editing group.
- Click More to expand the dialog box if necessary.
- Click in the Find What box.
- Click Special. A drop-down menu appears.
- Select nonbreaking space or nonbreaking hyphen.
- Ensure the Replace with box is empty.
- Click Find Next. Word should find the first nonbreaking space or nonbreaking hyphen.
- Click Replace or Replace All.
- Click Close.
Below is the Replace dialog box:

Although all of these techniques will keep text together, keeping paragraphs together is the most important. If you start using paragraph formatting to keep specific paragraphs together, you can avoid using manual page breaks for pagination.
This article was originally published on July 14, 2017 and has been updated for clarity and content.
Subscribe to get more articles like this one
Did you find this article helpful? If you would like to receive new articles, JOIN our email list.
More resources
How to Center Text Vertically on a Page in Word
How to Insert an Em Dash in Word (4 Ways with Shortcuts)
How to Quickly Remove Hard Returns in Word Documents
How to Insert, Format and Update Cross-References in Word
How to Convert a PDF to Word in Microsoft Word (for Free – No Third Party Programs Needed)
Related courses
Microsoft Word: Intermediate / Advanced
Microsoft Excel: Intermediate / Advanced
Microsoft PowerPoint: Intermediate / Advanced
Microsoft Word: Long Documents Master Class
Microsoft Word: Styles, Templates and Tables of Contents
Microsoft Word: Designing Dynamic Word Documents Using Fields
VIEW MORE COURSES >
To request this page in an alternate format, contact us.
Our instructor-led courses are delivered in virtual classroom format or at our downtown Toronto location at 18 King Street East, Suite 1400, Toronto, Ontario, Canada (some in-person classroom courses may also be delivered at an alternate downtown Toronto location). Contact us at info@avantixlearning.ca if you’d like to arrange custom instructor-led virtual classroom or onsite training on a date that’s convenient for you.
Copyright 2023 Avantix® Learning
Microsoft, the Microsoft logo, Microsoft Office and related Microsoft applications and logos are registered trademarks of Microsoft Corporation in Canada, US and other countries. All other trademarks are the property of the registered owners.
Avantix Learning |18 King Street East, Suite 1400, Toronto, Ontario, Canada M5C 1C4 | Contact us at info@avantixlearning.ca