
Show the Developer tab
If the developer tab isn’t already visible, see Show the Developer tab.
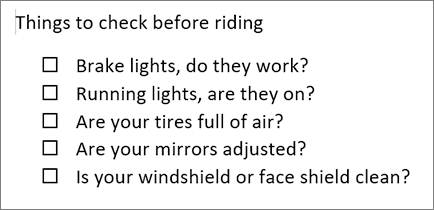
Make your list
-
Type the list.
-
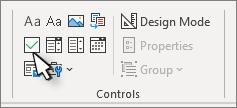
Go to Developer and select the Check Box Content Control at the beginning of the first line.

-
To change the default X to something else, see Make changes to checkboxes.
-
Copy and paste the check box control at the beginning of each line.
-
Select a checkbox to put an X (or other character) in the check box.
Add hanging indentation
If some list items are more than one line long, use hanging indents to align them.
-
Select the list. Bullets or numbers won’t look selected.
-
Go to Home and select the Paragraph dialog box launcher
. -
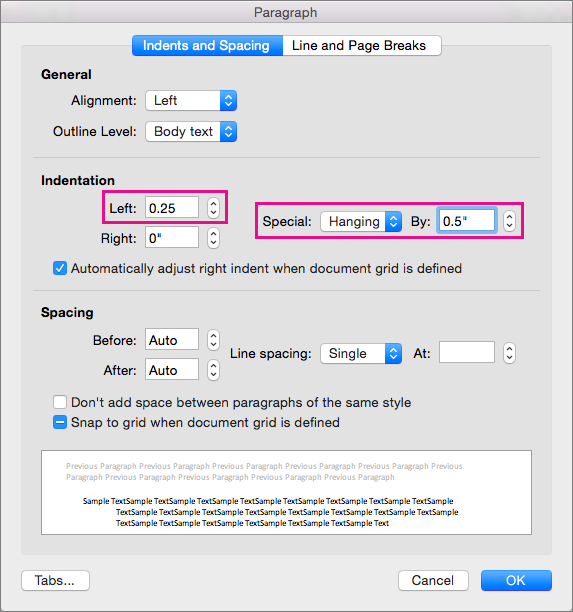
Under Indentation, in the Left box, type 0.25.
-
Under Special, choose Hanging.
-
For By, Word sets a default value of 0.5 inches. Change this if you want your additional lines indented differently.
-
Select OK when finished.
 .
.Lock the text and controls to prevent changes
-
Select the list and checkboxes.
-
Go to Developer >Group > Group.
To unlock the list, select the list and choose Group > Ungroup.
Create a print only list
-
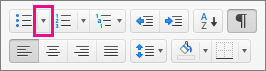
Go to Home and select the down arrow next to the Bullets button.
-
In the drop down menu, select Define New Bullet.
-
Select Symbol and find a box character. If you don’t initially see one, change Font to Wingdings or Segoe UI Symbol.
-
Select OK twice, and create your list.

Make a checklist you can check off in Word
To create a list that you can check off in Word, add content controls for checkboxes to your document.
Show the Developer tab
For more info if the developer tab isn’t already visible in Word, see Show the Developer tab.
Make your list
-
Create your list.
-
Place you cursor at the start of the first line.
-
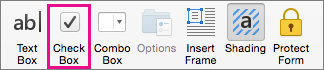
Go to the Developer tab, and then click Check Box.
-
If you want a space after the check box, press Tab or Spacebar.
Use a Tab character if you want to format the list item with hanging indentation, like Word applies to bulleted lists.
-
Select and copy (⌘ + C) the check box and any tabs or spaces.
-
Place the cursor at the start of the each list item, and paste (⌘ + V ) the copied check box and characters.
-
Paste the checkbox at the start of each line in your list.
Add hanging indentation
If some of the list items are longer than one line, use hanging indentation to align them.
-
Select the list.
-
Go to Format and select Paragraph.
-
Under Indentation, type 0.25 in the Left box.
-
In the Special list, choose Hanging.
For By, Word sets a default value of 0.5 inches. Change this if you want your additional lines indented differently.
Make a print only check list
You can replace the bullets or numbers in a list with another symbol, such as a box can be checked on a printed version of your document.
-
Select the entire list.
-
Select Home and select the arrow next to Bullets.
-
Select Define New Bullet.
-
Select Bullet, and choose a symbol from the table of symbols.
For more choices, in the Font box choose a symbol font, such as Wingdings.
-
Select a symbol to use, such as an open box (
) or a three-dimensional box (). -
Select OK, and then select OK again.
 ) or a three-dimensional box (
 ).
).Word for the web supports only the on-paper form of checklist.
-
Write your list, and then select it.
-
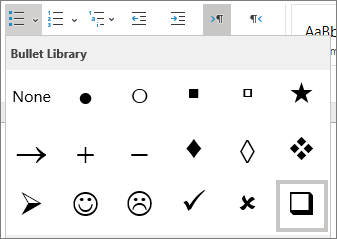
On the Home tab, choose the down-arrow next to the Bullets list to open the bullet library, and then choose the checkbox symbol.
![]()
Download Article
![]()
Download Article
Want to add a check box or tick box to a list or form in Microsoft Word? It’s easy to do, and you can even make it checkable so you can click the box with your mouse. We’ll show you an easy way to add a clickable checkbox using Developer Mode in Microsoft Word.
Steps
-
1
Open a new file in Microsoft Word. Do so by opening the app shaped like a blue W. Then click on File in the menu bar at the top of the screen, and click on New Blank Document.
-
2
Click on File in the menu bar and then Options in the menu.
- On Mac, click on Word in the menu bar and then Preferences… in the menu.
Advertisement
-
3
Click on Customize Ribbon and then Main Tabs in the «Customize the Ribbon:» drop-down menu.»[1]
- On Mac, click on Ribbon & Toolbar in the «Authoring and Proofing Tools» section of the dialog box, then click on the Ribbon tab at the top of the dialog box.
-
4
Check «Developer» in the «Main Tabs» pane.
-
5
Click on Ok.
-
6
Click on Developer. It’s a tab in the upper-right part of the window.
-
7
Position the cursor where you’d like to insert the check box.
-
8
Click on Check Box. It’s in the menu bar at the top of the window.
-
9
Add additional check boxes and text as needed.
-
10
Lock the form. To do so, select the entire list, to be found in the Controls section on the Developer tab, then click on Group and Group.
- On Mac, click Protect Form in the Developer tab toolbar.


Advertisement
Add New Question
-
Question
What should I do if the check box is grayed out in my ribbon?

It is grayed out for me too. However, if you click on the one icon that isn’t — Legacy Tools — then you will find the exact same checkbox, which you should be able to select.
-
Question
How can I enlarge the size of a text box without enlarging the text?
In Word, just dragging the corner of the text box should be sufficient. If the text changes size accidentally, you can always highlight it and change it back to the desired size.
-
Question
How do you make a drop box in word?
Download LibreOffice. Follow the manual on how to add a list or list/add or list/multiselect box (or just look under «insert» in the menu). You can add a data source for the dropdown menu items from a database, a spreadsheet or within the file structure itself.
See more answers
Ask a Question
200 characters left
Include your email address to get a message when this question is answered.
Submit
Advertisement
Thanks for submitting a tip for review!
About This Article
Article SummaryX
1. Open a document.
2. Click File.
3. Select Customize Ribbon and then click Main Tabs.
4. Check the «Developer» box.
5. Click Save.
6. Click Developer.
7. Click where you want to insert the check box.
8. Click Check Box.
9. Add additional boxes and text.
10. Lock the form.
Did this summary help you?
Thanks to all authors for creating a page that has been read 1,240,190 times.
Is this article up to date?
HTTA is reader supported. When you buy through links on our site, we may earn an affiliate commission at no extra cost to you. Learn more.
In today’s article, you’ll learn how to use some keyboard shortcuts plus other methods to type the Box Symbol (text – ☐) in MS Word/Excel using either Windows or Mac.
Just before we begin, I’ll like to tell you that you can also use the button below to copy and paste the Box sign into your work for free.
However, if you just want to type this symbol on your keyboard, the actionable steps below will show you everything you need to know.
Quick Guide for Typing Box Symbol [☐]
To type the Box Symbol on Mac, press Option + 2610 shortcut on your keyboard. For Windows users, simply press down one of the Alt keys and type 9744 using the numeric keypad, then let go of the Alt key.
Note: These shortcuts can work only on MS Word.
The below table contains all the information you need to type this Symbol on the keyboard for both the Mac and the Windows PC.
| Symbol Name | Box Symbol |
| Symbol Text | ☐ |
| Alt Code | 9744 |
| Windows Shortcut | Alt+9744 |
| Mac Shortcut | Option + 2610 |
| Word Shortcut | 2610, Alt+X |

The quick guide above provides some useful shortcuts and alt codes on how to type the Box symbol in Word or Excel on both Windows and Mac.
For more details, below are some other methods you can also use to insert this symbol into your work such as Word or Excel document.
How to type Box Symbol [text] in Word/Excel
Microsoft Office provides several methods for typing Box Symbol or inserting symbols that do not have dedicated keys on the keyboard.
In this section, I will make available for you five different methods you can use to type or insert this and any other symbol on your PC, like in MS Office (ie. Word, Excel, or PowerPoint) for both Mac and Windows users.
Without any further ado, let’s get started.
Using the Box Symbol Alt Code (Windows Only)
The Box Symbol alt code is 9744.
Even though this Symbol has no dedicated key on the keyboard, you can still type it on the keyboard with the Alt code method. To do this, press and hold the Alt key whilst pressing the Box Alt code (i.e. 9744) using the numeric keypad.
This method works on Windows only. And your keyboard must also have a numeric keypad.
Below is a break-down of the steps you can take to type the Box Sign on your Windows PC:
- Place your insertion pointer where you need the Box Symbol text.
- Press and hold one of the Alt keys on your keyboard.
- Whilst holding on to the Alt key, press the Box Symbol’s alt code (9744). You must use the numeric keypad to type the alt code. If you are using a laptop without the numeric keypad, this method may not work for you. On some laptops, there’s a hidden numeric keypad which you can enable by pressing Fn+NmLk on the keyboard.
- Release the Alt key after typing the Alt code to insert the Symbol into your document.

This is how you may type this symbol in Word using the Alt Code method.
Using the Box Symbol Shortcut
For Mac users, the keyboard shortcut for the Box Symbol is Option + 2610. For Windows users, use the Alt Code Shortcut method by pressing down one of the [Alt] keys whilst typing the symbol’s alt code which is 9744.
You must use the numeric keypad to type the alt code. Also, ensure that your Num Lock key is turned on.
Below is a breakdown of the Box Symbol shortcut for Mac:
- First of all, place the insertion pointer where you need to type the symbol (☐).
- Now, press Option + 2610 simultaneously on your keyboard to insert the symbol.
Below is a breakdown of the Box Symbol shortcut for Windows (In MS Word):
- Place the insertion pointer at the desired location.
- Press and hold down the Alt key
- While pressing down the Alt key, type 9744 using the numeric keypad to insert the symbol.
Below is a breakdown of the Box Symbol shortcut for Windows (In MS Word Only):
- Click to place the insertion pointer where you want the Box Symbol to be inserted.
- Type this code – 2610.
- After typing the code and whilst the insertion pointer is still next to the last digit in the code, press Alt + X to convert the code to the symbol.
These are the shortcuts you may use to type the box sign in Word or Excel.
Copy and Paste Box Sign ☐ (text)
Another easy way to get the Box sign on any PC is to use my favorite method: copy and paste.
All you have to do is to copy the symbol sign from somewhere like a web page, or the character map for windows users, and head over to where you need the symbol (say in Word or Excel), then hit Ctrl+V to paste.
Below is the symbol for you to copy and paste into your Word document. Just select it and press Ctrl+C to copy, switch over to Microsoft Word, place your insertion pointer at the desired location, and press Ctrl+V to paste.
☐
Alternatively, just use the copy button at the beginning of this post.
For windows users, obey the following instructions to copy and paste the Box Symbol using the character map dialog box.
- Click on the Start button and search for Character Map. The Character Map app will appear in the search results, click to open.

- The Character Map dialog will appear. Click to check the Advanced view check-box to expand the dialog box for more advanced options.

- On the advanced view, type Ballot Box in the Search box.
- You should now see the Box (☐) Symbol on the character map dialog. If you can’t see it, then you should look through the library of symbols to spot it. When found, double click it to select. Alternatively, click on the Select button.

- After you select the symbol by double-clicking it, it should appear in the Character to copy: field, then click on the Copy button to copy the symbol.
- Switch to your Microsoft Word or Excel document, place the insertion pointer at the desired location, and press Ctrl+V to paste.
This is how you may use the Character Map dialog to copy and paste any symbol on Windows PC.
Using insert Symbol dialog box (Word, Excel, PowerPoint)
The insert symbol dialog box is a library of symbols from where you can insert any symbol into your Word document with just a couple of mouse clicks.
Obey the following steps to insert this symbol (☐) in Word or Excel using the insert symbol dialog box.
- Open your Word document.
- Click to place the insertion pointer where you wish to insert the symbol.
- Go to the Insert tab.

- In the Symbols category, click on the Symbol drop-down and select the More Symbols button.

The Symbol dialog box will appear.
- To easily locate the Box symbol, select Segoe UI Symbol font type in the Font list at the upper left section of the window. Then type 2610 in the character code field at the bottom area of the window. After typing this character code, the Box symbol will appear selected.
- Now click on the Insert button to insert the symbol into your document.

- Close the dialog.
The symbol will then be inserted exactly where you placed the insertion pointer.
These are the steps you may use to insert this Symbol in Word.
Conclusion
As you can see, there are several different methods you can use to type the Box Sign in Microsoft Word.
Using the shortcuts for both Windows and Mac make the fastest option for this task. Shortcuts are always fast.
Thank you very much for reading this blog.
If you have anything thing to say or questions to ask concerning the Box Symbol, please drop it in the comments.
When you create forms or a survey with Microsoft Word, there are two ways you can get people to interact with it.
You can either print it and give it to them to read and fill in or you can ask them to read and answer it online.
In both cases, checkboxes are a great help to get feedback from your audience.
When used with a printout, your audience has the option of filling in the checkboxes with a pen or a pencil to add a cross or a tick mark to signify their disagreement or consent.
This type of checkbox is a visual symbol only, non-interactive and non-clickable, useful only when printed.
When online, you can present them with a digital document with functional or clickable checkboxes pre-filled with either a cross or a tick mark, and your audience has to click on the checkbox to toggle its contents to match their answer.
Microsoft Word allows you to insert both types of checkboxes in your document, and we will show you the two methods for inserting.
However, your document may have a long list making it tedious to insert checkboxes individually.
You may want to have a bulleted list with checkboxes acting as the bullets. However, Word allows you to have a bulleted list with only non-interactive checkboxes, but not with interactive checkboxes. Therefore, we will show you how to insert:
- A single non-interactive checkbox
- A bulleted list of non-interactive checkboxes
- Interactive checkbox
Let’s start.
Method #1: Insert a Single Non-Interactive Checkbox
Step #1: Open your Word Document
Open the Word document that contains the form or survey to which you wish to add non-interactive checkboxes.
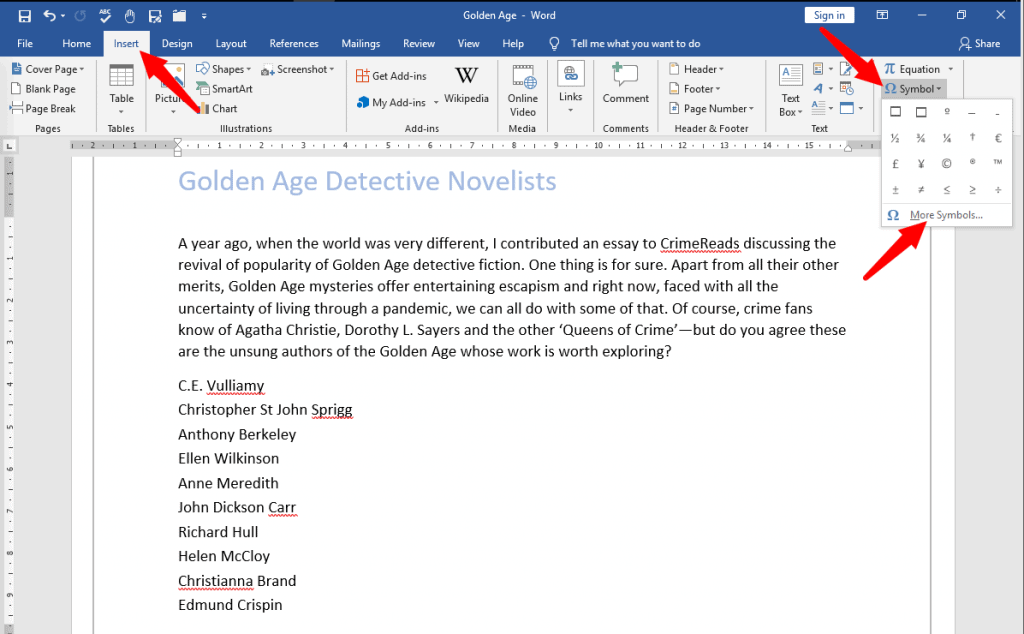
Step #2: Open Symbol Dialog
Position the cursor where you want the first checkbox to appear. Click on the Insert tab in the top menu bar to change the ribbon. Click on Symbol to open a group of symbols and then on More Symbols to open the Symbol Dialog.
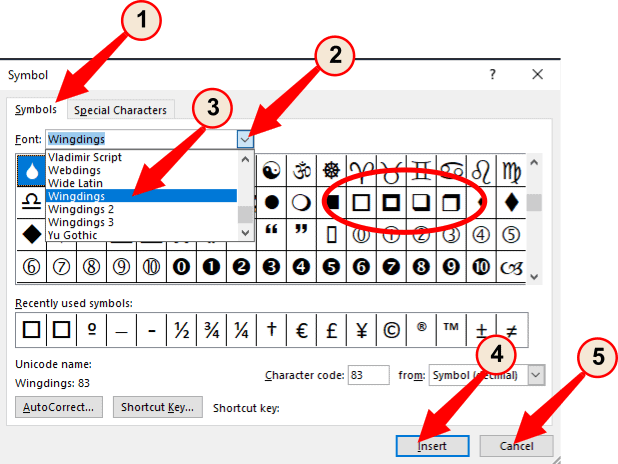
Step #3: Choose the Checkbox
Under the Symbol [1] tab, click on the down arrow on the right side of Font[2] and select Wingdings [3]. Word will display a large number of symbols, from which you can select the type of checkbox you prefer to use in your document. Click on Insert [4] to insert the checkbox symbol into your document. Click on Close [5] to close the Symbol Dialog. From now on, your chosen checkbox appears within the group of symbols under Symbol.
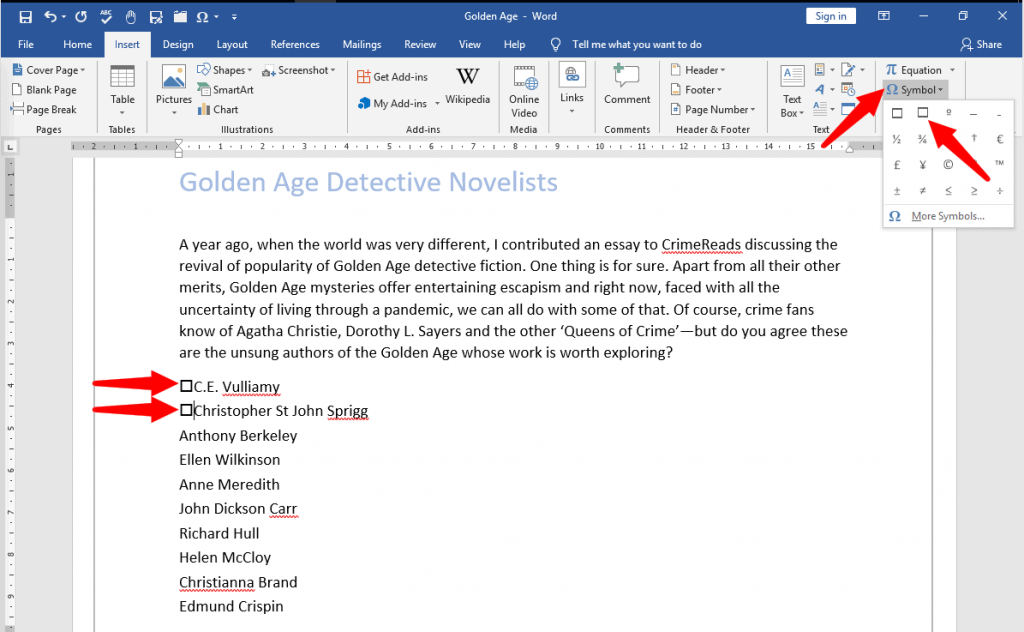
Step #4: Insert another Checkbox
Place the cursor where you want to insert the next checkbox. Click on Symbol under Insert tab (refer Step #2), and click on the checkbox symbol from within the group of symbols on display. This is how your document will now look like.
Method #2: Insert a Bulleted List of Non-Interactive Checkbox
Step #1: Open your Word Document
Open the Word document that contains the form or survey to which you wish to add non-interactive checkboxes. Select the list.
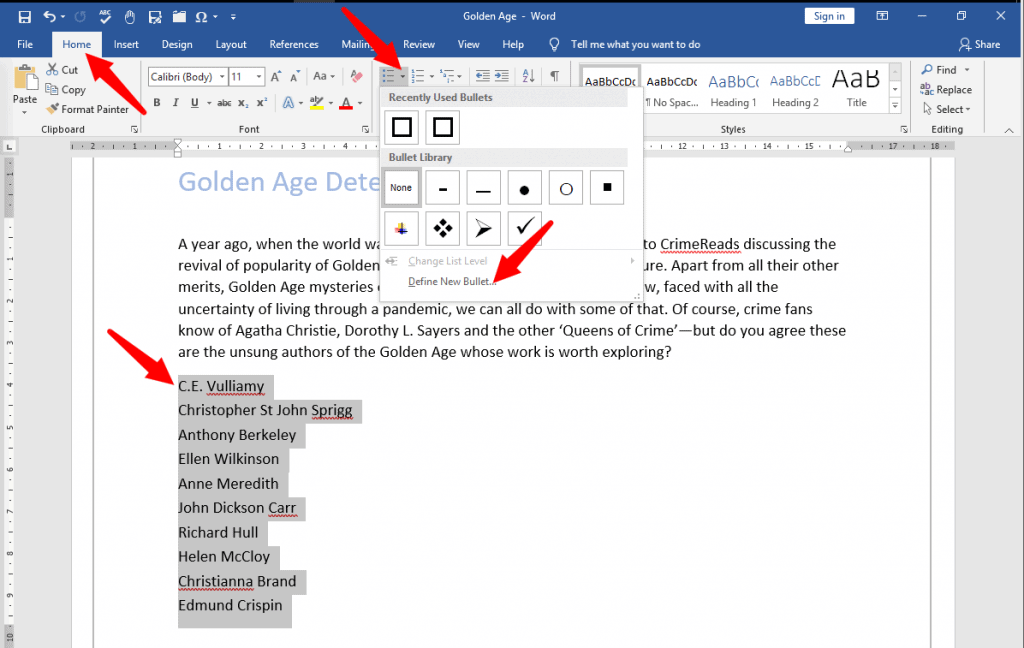
Step #2: Define a new bullet
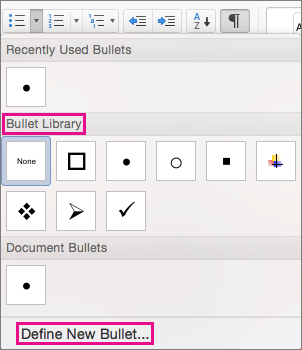
Click on the Home tab on the top menu bar to change the ribbon. Within the section Paragraph, click on the small triangle beside Bullets to open the Bullet Library. Click on Define New Bullet at the bottom. This will open a Define New Bullet Dialog.

Step #3: Choose the checkbox
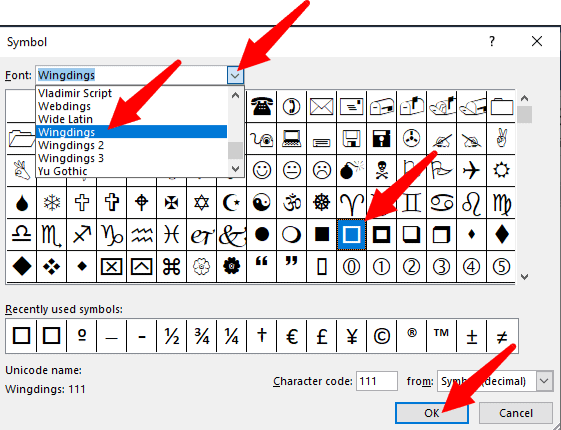
Click on the Symbol tab to open the Symbol dialog. Click on the down arrow on the right side of Font, and select Wingdings. Word will display a large number of symbols, from which you can select the type of checkbox you prefer to use in your document. Click on Ok, and you will return to the Define New Bullet dialog.
Step #4: Insert bulleted checkbox
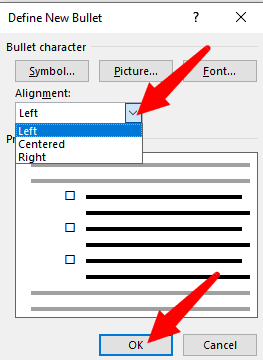
Click on the down arrow under Alignment, and choose where you want to place the checkboxes in the gap preceding the list—on the left, centered, or on the right side. Click Ok to allow Word to place the checkboxes before the list.
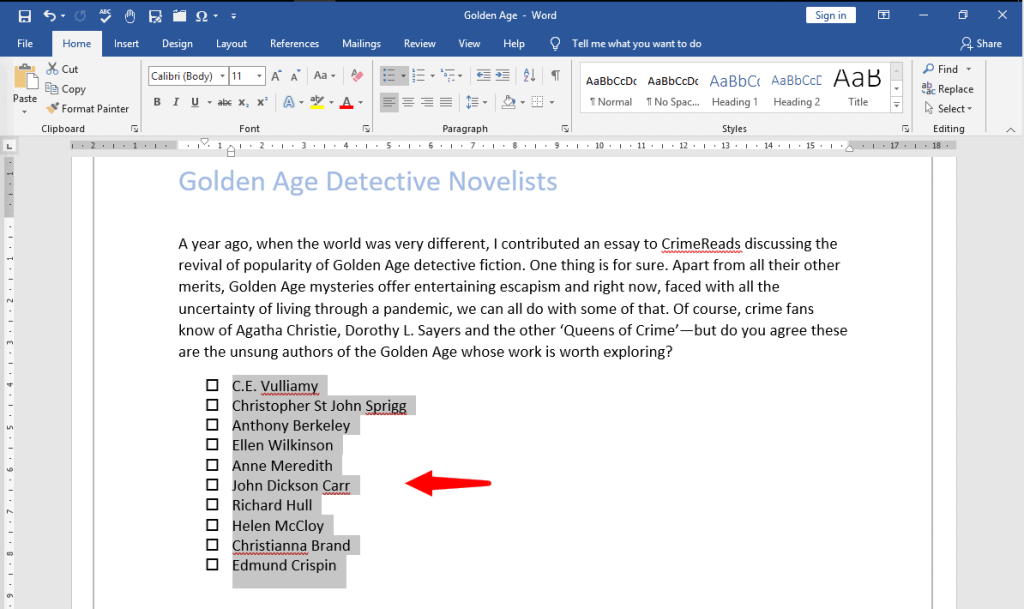
This is how your document will now look like. Word has inserted a non-interactive checkbox against all entries in the list.
Method #3: Insert Interactive checkbox
Step #1: Open your Word Document
Open the Word document that contains the form or survey to which you wish to add interactive checkboxes. Place the cursor at the location where you want the checkbox to appear.
Step #2: Enable Developer Mode
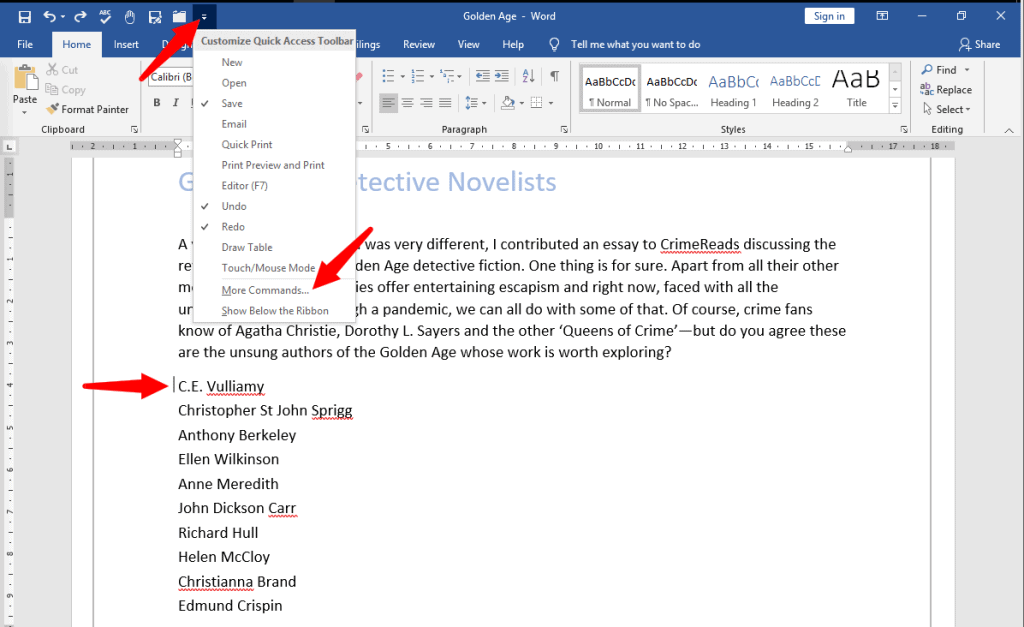
Click on the small triangle in the Quick Access Toolbar to display a drop menu to Customize Quick Access Toolbar. Click on More Commands to open the Word Options dialog.
Click on Customize Ribbon. In the right column, under Customize the Ribbon, click on Developer, making sure a tick-mark appears on the checkbox immediately on the left. Click on Ok to close the dialog. Notice that Word has added a checkbox at the cursor position.

Notice that Word has also added a new tab Developer in its top menu bar.
Step #3: Insert the checkbox
Click on the Developer tab in the top menu bar to change the ribbon. Within the Controls section, click on the Check Box Content Control. You can place additional checkboxes at positions of your choice by placing the cursor there, and clicking on Check Box Content Control for inserting each checkbox.

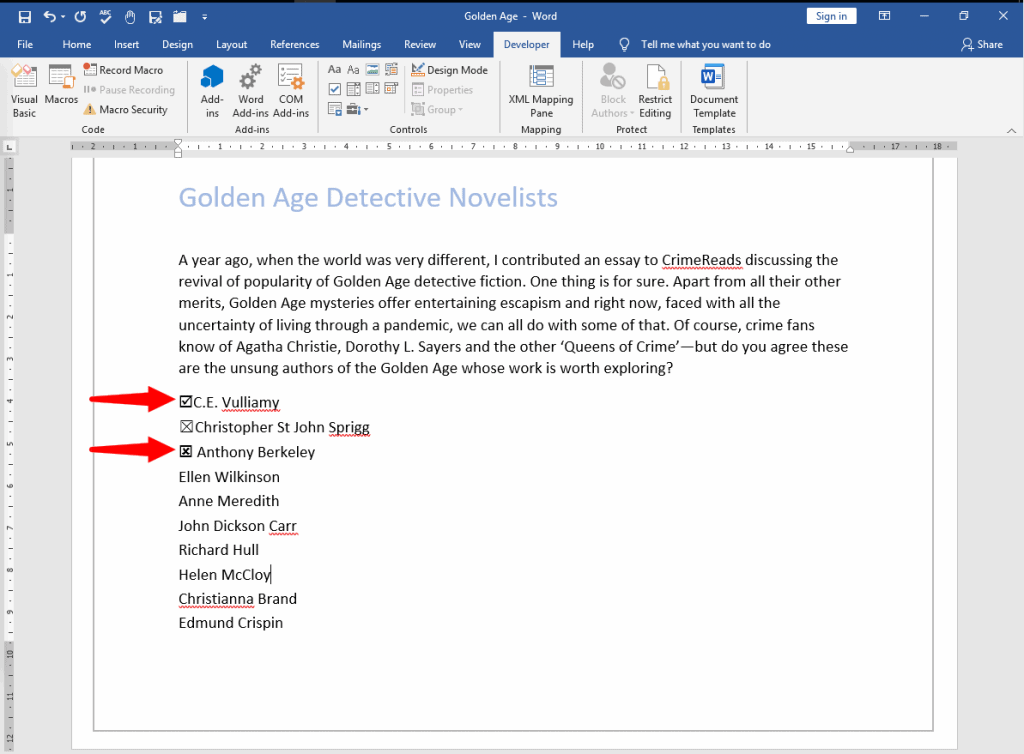
Finally, this is how your document may look like. If you click on any checkbox repeatedly, its contents will change from blank to a cross and back.
Step #4: Modify the checkbox content properties
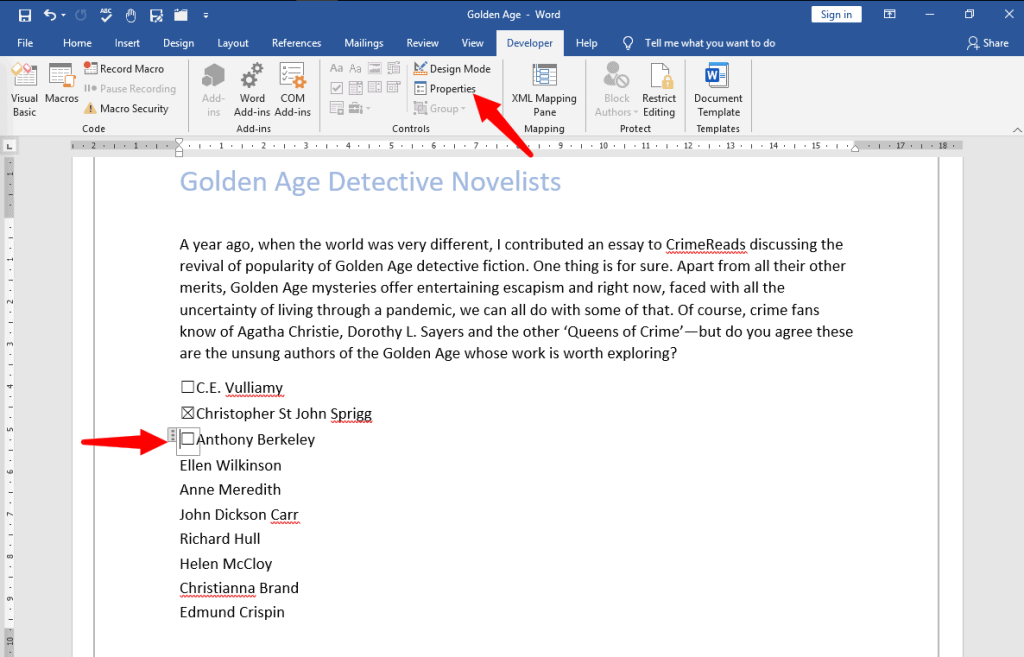
Word allows you to choose the default content of the interactive checkbox from blank, cross, and tick-mark. To modify a specific checkbox, click on it and then click on Properties within the Control section of Developer tab. This will open a Contents Control Properties dialog.
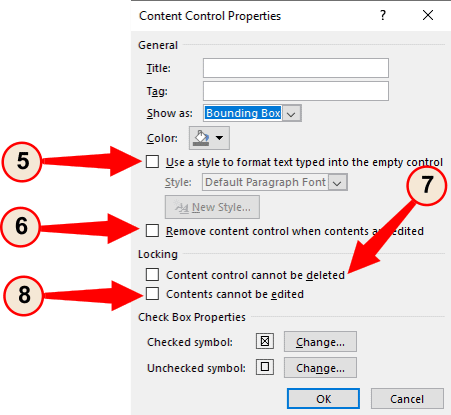
The Contents Control Properties dialog allows changing several properties of the selected checkbox. Under General, you may assign a Title [1] and a Tag [2] to the checkbox. You may also choose to Show as a Bounding Box, Start/End Tag, or as None [3]. You may also choose the color of the checkbox [4].
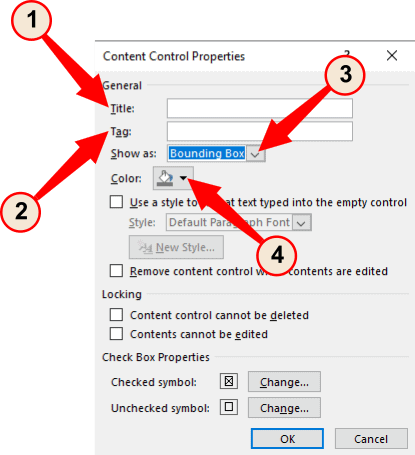
You may also choose to select your own text to appear within the checkbox [5] rather than a cross or tick-mark. You may also choose to make the checkbox contents blank when edited [6]. If necessary, under Locking, you can also choose to disallow deleting a checkbox [7] or prevent its contents from changing [8].
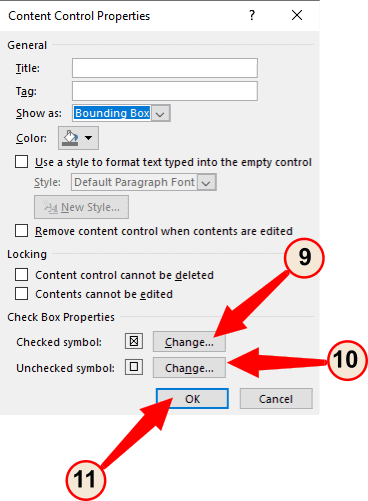
Under Check Box Properties, Word allows you to change the Checked Symbol [9] and the Unchecked Symbol [10]. Clicking on any of the Change tabs will take you to the Symbol Dialog, from where you can choose the Winding symbol of your preference (Refer Step #3 under Method #2). Click on Ok [11] to exit the dialog.
Finally, your document may look like this. Notice that items 1 and 3 have modified interactive checkboxes.
Conclusion
Obtaining feedback from your audience through forms or surveys is always easier when they have to check a few boxes, rather than express their answers. Word allows inserting checkboxes against a list of items, and allows the choice of presenting a printout or digital document to your audience for their feedback. We have shown you how to insert checkboxes in your document in a few simple steps.

First, you need to customize Word’s ribbon and enable the “Developer” tab to show the option to add check boxes. Then, select “Developer” and click the “Check Box Content Control” button to insert a check box into your document. You can also transform Word’s bullets into checkboxes.
When you create surveys or forms with Microsoft Word, check boxes make the options easier to read and answer. We’re covering two good options for doing just that. The first is ideal for documents that you want people to fill out digitally within the Word document itself. The second option is easier if you’re planning to print documents like to-do lists.
Option 1: Use Word’s Developer Tools to Add the Check Box Option for Forms
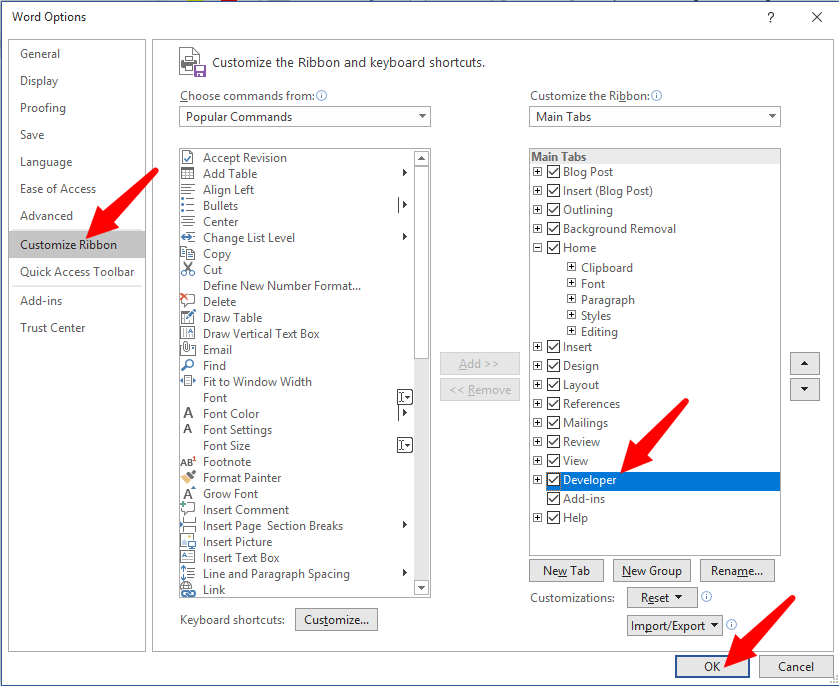
In order to create fillable forms that include checkboxes, you first need to enable the “Developer” tab on the Ribbon. With a Word document open, click the “File” drop-down menu and then choose the “Options” command. In the “Word Options” window, switch to the “Customize Ribbon” tab. On the right-hand “Customize the Ribbon” list, select “Main Tabs” on the dropdown menu.

On the list of available main tabs, select the “Developer” check box, and then click the “OK” button
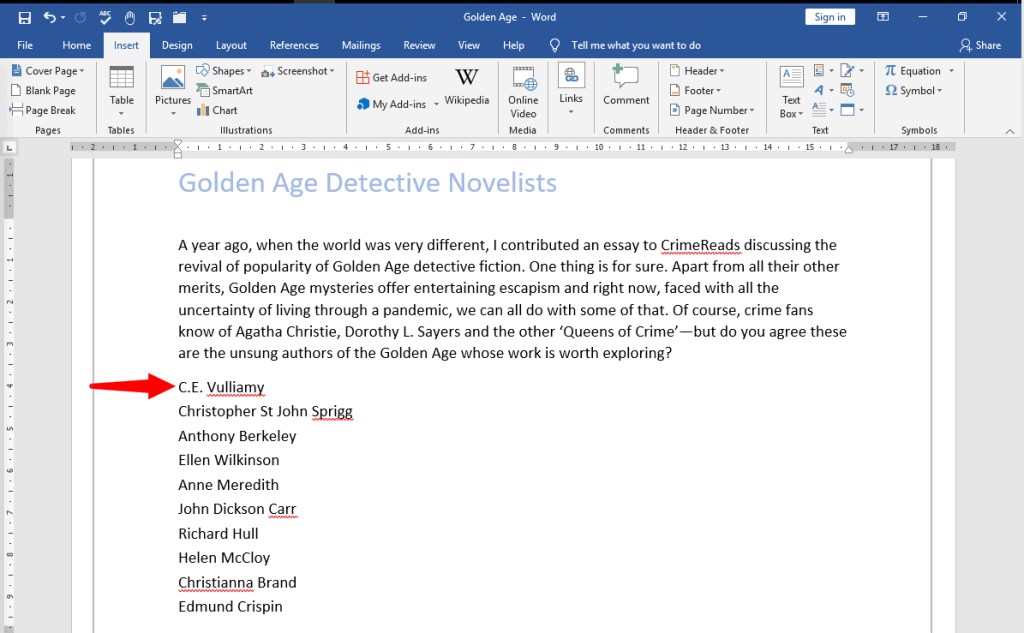
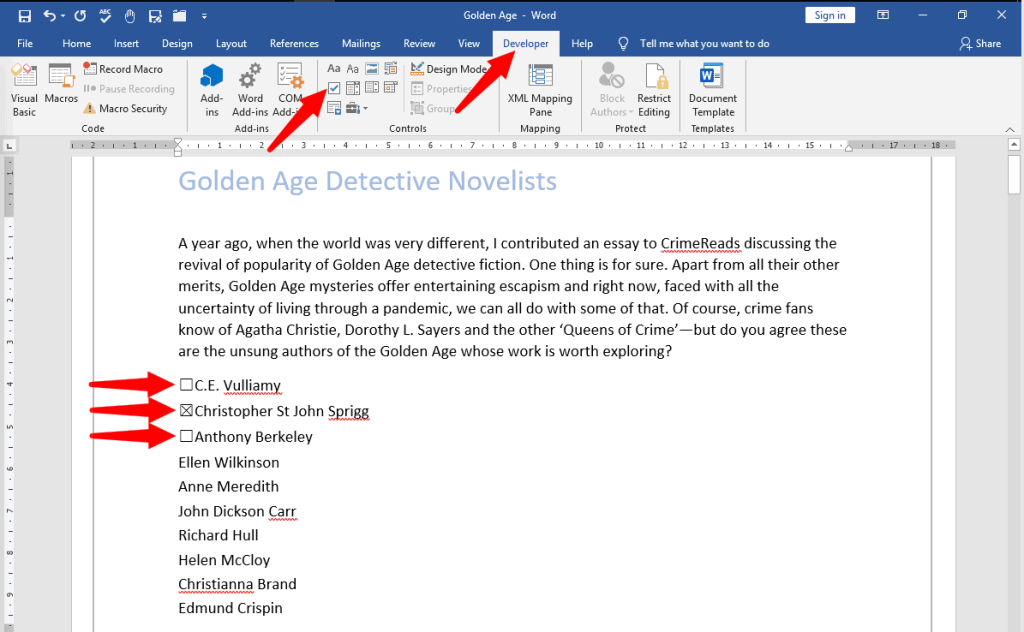
Notice that the “Developer” tab is added to your Ribbon. Just position your cursor in the document where you want a check box, switch to the “Developer” tab, and then click the “Check Box Content Control” button.
You should see a check box appear wherever you placed your cursor. Here, we’ve gone ahead and placed a check box next to each answer and, as you can see, those check boxes are interactive. Click a box to mark it with an “X” (as we’ve done for answers 2, 3, and 4) or select the whole form box (as we’ve done for answer 4) to move the check box around, format it, and so on.
RELATED: How to Create a Fillable Form With Microsoft Word
Option 2: Change Bullets to Check Boxes for Printed Documents
If you’re creating a document to print out—like a to-do list or printed survey—and just want check boxes on it, you don’t have to mess around with adding Ribbon tabs and using forms. Instead, you can create a simple bullet list and then change the bullets from the default symbol to check boxes.
In your Word document, on the “Home” tab, click the small arrow to the right of the “Bullet List” button. On the dropdown menu, select the “Define new bullet” command.
In the “Define New Bullet” window, click the “Symbol” button.
In the “Symbol” window, click the “Font” dropdown and choose the “Wingdings 2” option.
You can scroll through the symbols to find the empty square symbol that looks like a check box, or you just type the number “163” into the “Character Code” box to automatically select it. Of course, if you see a symbol you like better—like the open circle (symbol 153)—feel free to choose that instead.
When you’ve selected your symbol, click the “OK” button to close the “Symbol” window, and then click the “OK” button to close the “Define New Bullet” window, too.
Back in your Word document, you can now type your bullet list. The check boxes appear instead of the regular bullet symbol.
And the next time you need the check box symbol, you don’t have to navigate through that whole set of windows. Just click that small arrow to the right of the “Bullet List” button again, and you’ll see the checkbox listed under the “Recently Used Bullets” section.
Again, this method is really only useful for documents you want to print out. The check box symbols are not interactive, so you can’t check them off inside a Word document.
If you’re also creating spreadsheets and presentations, you may want to learn how to insert checkboxes in Excel and add checkboxes to PowerPoint too.
RELATED: How to Add a Check Mark or Tick Mark in Word
READ NEXT
- › How to Add a Check Mark or Tick Mark in Word
- › How to Count Checkboxes in Microsoft Excel
- › How to Add a Drop-Down List to a Word Document
- › How to Create a Fillable Form With Microsoft Word
- › How to Create a Basic Survey in Microsoft Word
- › Why the Right-Click Menu in Windows 11 Is Actually Good
- › Universal Audio Volt 2 Review: A Workhorse Audio Interface With Vintage Charm
- › Google+ Will Come to a Final End on July 5, 2023