
In this Article
- Creating Text Boxes on VBA forms
- Writing Code Behind Forms
- Creating Text Boxes in an Excel Worksheet
This article will demonstrate how to use a Text Box in Excel VBA.
VBA has the ability to create forms that the user can interact with such as Invoice forms, or Contact details. Text Boxes are controls that can be used within these forms, or Text boxes can be created directly within Excel itself.
Creating Text Boxes on VBA forms
To insert a Text Box into a VBA form, we first need to create the form. This is done in the VBE Editor.
First, Open the VBE Editor in Excel.
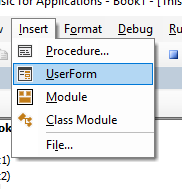
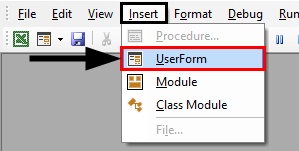
To insert a new user form into your code, select the UserForm option from the Insert Menu.
A new user form will appear in the Project Explorer and will be shown in the Code Window on the right.
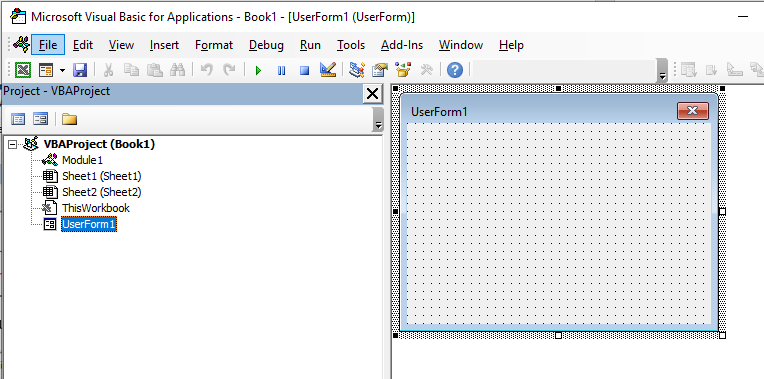
You can rename your form using the Properties box. This should appear below your Project Explorer.
If it is how visible, Press F4 or click View, Properties Window.
Click in the Name property and rename your form.
We can now start populating our form with controls – the text box control is the most popular control along with the label control.
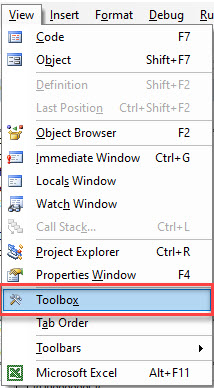
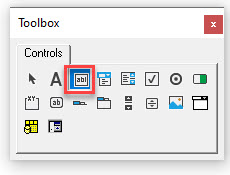
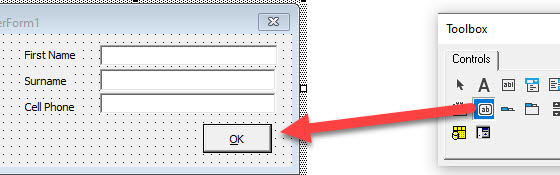
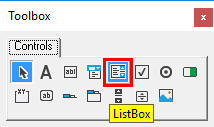
To populate the form with controls, we need to switch on the Toolbox.
In the Menu, select View > Toolbox.
To create a Text Box on your form, select the Text Box control in the Toolbox.
Drag a box shape on the form with your mouse, holding the left button down, and then release the mouse button.

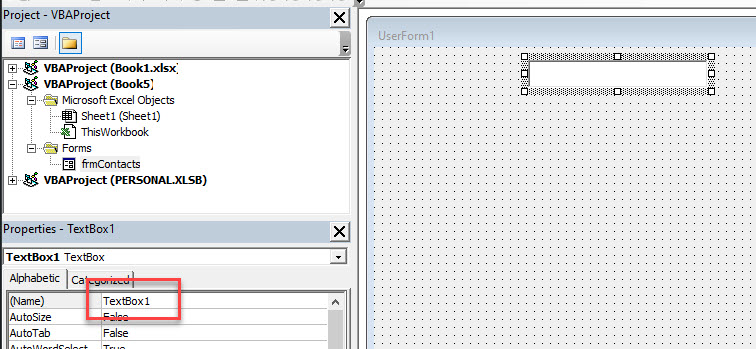
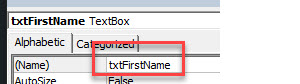
As this is the first Text Box we are creating, it will be named TextBox1. As with the form, you can use the Properties window to rename the text box.
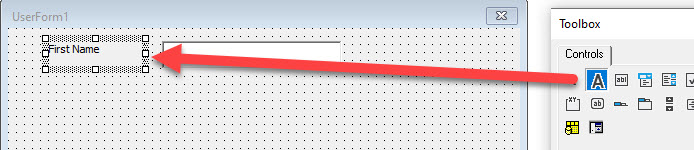
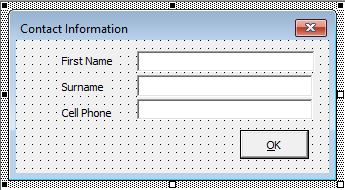
You might need to also create a label for your text box on the form. This is done with a label control. You drag on the form in the same way as you do for a Text Box, and then you can type the required text within the label control eg: First Name as shown below.
To use the form within VBA Code, we would need to add a command button to the form. This is done by selecting the Command Button control in the Toolbox and dragging the button onto your form.
You can then continue to create your form using textboxes, labels and command buttons, renaming them as appropriate.
Writing Code Behind Forms
Once we have created our form, we need to write VBA code to insert the information in our form onto our Excel worksheet. This code is called CBF (Code Behind Forms).
In the the VBE, double-click on the command button to go to the code behind the button.
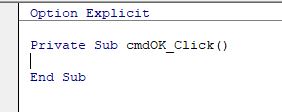
A sub-routine for the click event for the button will be created. We can type our VBA code in this routine. For example:
Private Sub cmdOK_Click()
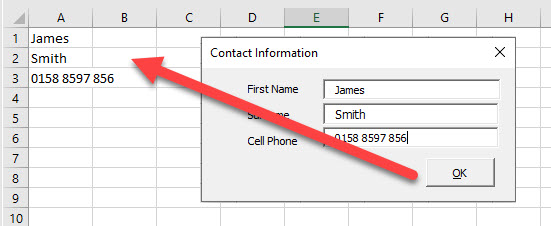
Range("A1") = Me.txtFirstName
Range("A2") = Me.txtSurname
Range("A3") = Me.txtCellPhone
Unload Me
End SubThis routine will put the details typed in the text boxes into Excel, and then close the form.
Creating Text Boxes in an Excel Worksheet
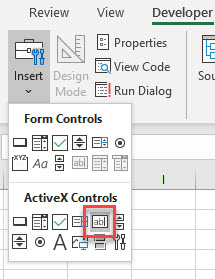
It is also possible to create text boxes within the Excel spreadsheet. In order to do this, you need to have your Developer Ribbon switched on.
Note: If you don’t see the Developer Ribbon, you’ll need to enable it.
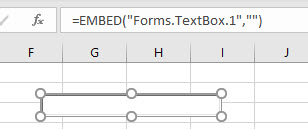
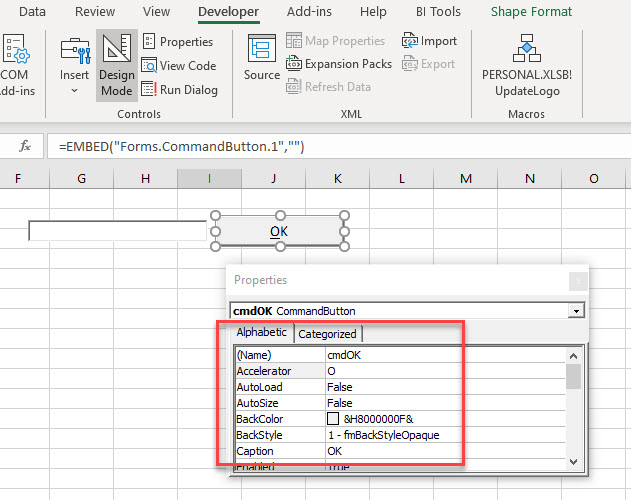
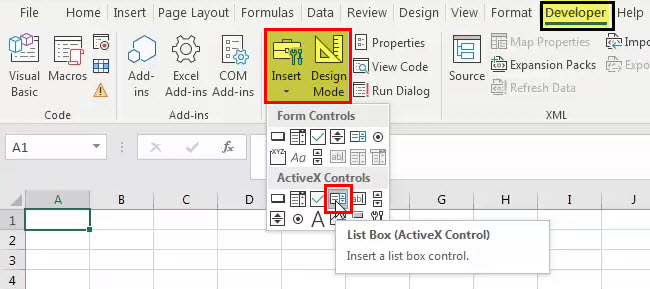
In the Ribbon, select Developer > Insert > ActiveX Controls > TextBox.
Click and drag in your Excel worksheet to draw the text box in the worksheet at the desired position. Release the mouse button to complete drawing the text box.
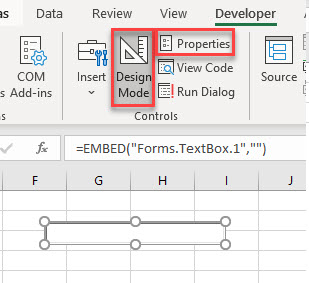
The text box will be in Design Mode. While in this mode, we can size the box, and select the Properties of the text box.
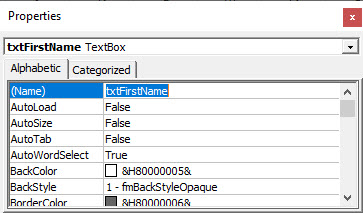
Click on the Properties button to show the Property Window for the text box. In this window, we can change a variety of properties of the text box such as the name of the box, the color of the text, background or border, the border style and the font used for the text in the text box for example.
To use the text box direct in Excel as we have used it in the VBA form above, we need a way to return the data typed into the text box to the Excel sheet. This can be done by adding a ActiveX command button to the worksheet, and using the click_event of this command button to return the information in the text box to the Excel sheet.
In the Ribbon, select Developer > Insert > ActiveX Controls > Command Button to add a command button to your Excel sheet. Switch on the Properties window and change the name of the button, the caption of the button and the Accelerator of the button as shown in the image below.
Double-click on the button to go to the VBA click event of the button and type the following code:
Private Sub cmdOK_Click()
Range("A1") = Me.txtFirstName
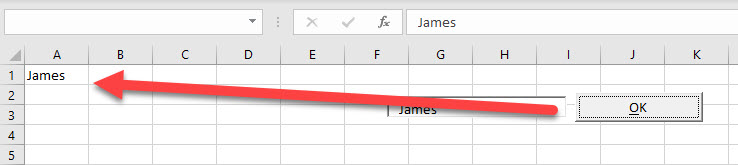
End SubSwitch back to the Excel worksheet, make sure Design Mode is switched off and then type in the created text box.

Click the command button to return the text to Excel.
VBA Coding Made Easy
Stop searching for VBA code online. Learn more about AutoMacro — A VBA Code Builder that allows beginners to code procedures from scratch with minimal coding knowledge and with many time-saving features for all users!

Learn More!
What is List Box in Excel VBA?
The list box in Excel VBA is a list assigned to a variable. This list has various inputs to select from and allows selecting multiple options at once. A list box can be inserted on a UserForm by choosing the list box option.
List boxes use named ranges having certain values. The purpose of using a list box is to display a list of values that users can choose from.
Table of contents
- What is List Box in Excel VBA?
- How to Create List Box in Excel?
- How to Create a List Box in VBA?
- How to Create a List Box on a UserForm?
- How to Add a Dynamic Control to List Box?
- How to add items to list box control in VBA?
- How to clear items from list box control using VBA?
- Example
- The Constants of List Box in VBA
- Frequently Asked Questions
- Recommended Articles
How to Create List Box in Excel?
The steps to create a list box in Excel are listed as follows:
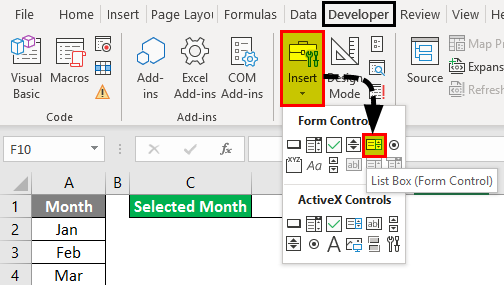
- Step 1: Enable the Developer tab on Excel ribbon to access ActiveX controls. In the Excel Options dialog box, click “customize ribbon in Excel” and select the Developer checkbox.
Step 2: In the Developer tab, click on Insert, followed by the “list box” control. This inserts a new list box in the Excel worksheet.
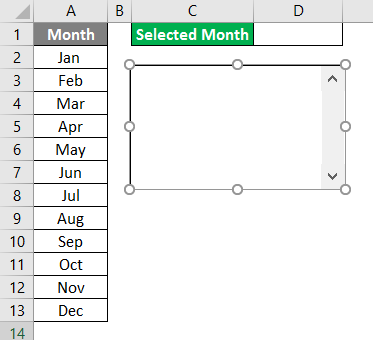
- Step 3: Draw a rectangle in the Excel worksheet to create a list box, as shown in the following image.

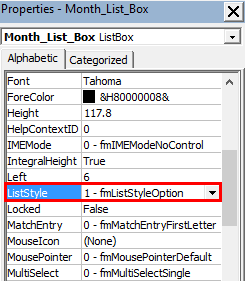
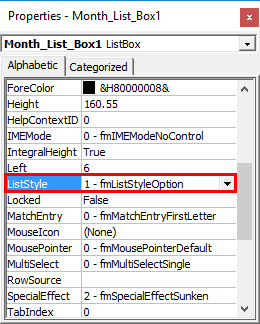
- Step 4: Select the list box, go to the Developer tab, and select “properties”. The “properties” window opens.

- Step 5: In the “properties” window, enter “days” in “ListFillRange”. “Days” is the named range for weekdays.

- Step 6: Click the “MultiSelect” property. From the drop-down list, select “1- fmMultiSelectMulti” as shown in the succeeding image.

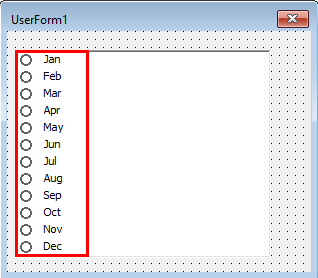
- Step 7: Click the “ListStyle” property. From the drop-down list, select “1- fmListStyleOption”. This adds checkboxes to the left of the listed items, as shown in the following image.
- Step 8: Close the “properties” window. The list box appears as shown in the following image.

Note: You can select “design mode off” by clicking Design Mode. This closes the “design mode”.


How to Create a List Box in VBA?
The steps to create a list box in VBA are listed as follows:
You can download this List Boxes Excel Template here – List Boxes Excel Template
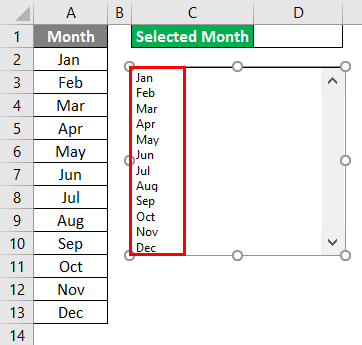
- Step 1: Right-click on the list box and make sure the Design Mode is selected. This links the list box to a cell.
- Step 2: In “properties,” go to the “LinkedCell” property and fill in “B17” as shown in the following image.

- Step 3: In “ListFillRange,” enter “Month.”

- Step 4: The list box appears as shown in the succeeding image.

The data in cell B17 changes when you change your choice in the list box. This is shown in the following image.

How to Create a List Box on a UserForm?
The steps to create a list box on a UserForm are listed as follows:
- Step 1: In the Developer tab, click “Visual Basic” from the Code or Press Alt+F11.

- Step 2: In the Insert menu, click “UserForm.”

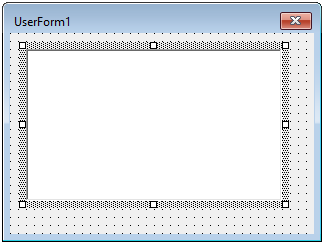
- Step 3: From the toolbox, drag the list box control on the “UserForm.”

- Step 4: Double-click on “UserForm” and select “UserForm event,” as shown in the following screenshot.

- Step 5: Add the following code to the in-between procedure.
Private Sub UserForm_Initialize()
ListBox1.AddItem “MBA”
ListBox1.AddItem “MCA”
ListBox1.AddItem “MSC”
ListBox1.AddItem “MECS”
ListBox1.AddItem “CA”
End Sub

- Step 6: Press F5 to run the code.
How to Add a Dynamic Control to List Box?
The steps to add a dynamic control to the list box on the UserForm using VBAIn VBA, userforms are customized user-defined forms that are designed to accept user input in the form of a form. It has various sets of controls to add such as text boxes, checkboxes, and labels.read more are listed as follows:
- Step 1: From the toolbox, add a “CommandButton” on the “UserForm.”

- Step 2: Right-click on the “Commandbutton” and click “properties.”

- Step 3: Change the caption of the “CommandButton” to “Create_Listbox.”

- Step 4: Double-click on the command button and the following code appears.
Private Sub CommandButton1_Click()
End Sub

- Step 5: Name the following procedure as “Add_Dynamic_Listbox.”
Sub Add_Dynamic_Listbox()
‘Add Dynamic List Box and assign it to object ‘LstBx’
Set LstBx = UserForm3.Controls.Add(“Forms.ListBox.1”)
‘List Box Position
LstBx.Left = 20
LstBx.Top = 10
End Sub
- Step 6: Click F5 to run the macro.
How to add items to list box control in VBA?
The code to add items to list box control in VBA is mentioned as follows:
Private Sub Insert _Items _To_LstBox ()
ListBox1.AddItem “Item 1”
ListBox1.AddItem “Item 2”
ListBox1.AddItem “Item 3”
ListBox1.AddItem “Item 4”
ListBox1.AddItem “Item 5”
End Sub
How to clear items from list box control using VBA?
The code to clear items from the list box control in VBA is mentioned as follows:
Sub Clr_LstBx()
UserForm3.ListBox1.Clear
End Sub
Example
Let us say we have daily sales data. We want to prepare a graphical user interface of this sales data that allows us to select items from a list box. To fetch the sales details, we have to change the Index cell to “cell link” and apply the VLOOKUP formulaThe VLOOKUP excel function searches for a particular value and returns a corresponding match based on a unique identifier. A unique identifier is uniquely associated with all the records of the database. For instance, employee ID, student roll number, customer contact number, seller email address, etc., are unique identifiers.
read more as shown in the following images.


The Constants of List Box in VBA
The constants, their values, and description are given in the following table:

Frequently Asked Questions
#1 – How to use a list box in Excel?
The list boxes are used to manage tables within a UserForm. The rows of information are managed neatly without an unnecessary display of information within the UserForm.
A user can scroll through the items of the list box. The setting of the “selection type” allows users to select multiple options from a list box. As the user selects an item from the list box, an action is undertaken with such selection.
By default, the list box gives an output that matches the index number of the selected item. Thus, if the fourth item is selected, the output will be number 4.
#2 – How to populate a list box in Excel VBA?
Usually, the list box needs to be populated with values every time the Workbook is opened. The procedure “Open” is executed every time the Workbook opens.
The following code must be used to populate a list box:
With Sheet1.lstListBox
.AddItem “James”
.AddItem “Kelly”
.AddItem “Elizabeth”
.AddItem “George”
.AddItem “William”
End With
With this code, the list box is populated with 5 names–James, Kelly, Elizabeth, George, and William.
#3 – How to retrieve data from a list box in Excel?
The data can be used effectively only if it is retrieved properly. The steps to retrieve data from a list box are mentioned as follows:
1. Select “Format Control” from the menu after right-clicking the list box.
2. In the box titled “Cell Link”, type the coordinates of an empty cell.
3. Select the cell in which data from the list box will be displayed. The following formula must be used:
“=INDEX([begin cell]:[end cell],[cell link],0)”
Note: The “begin cell” stands for the first cell of the list. The “end cell” stands for the last cell of the list. The “cell link” stands for the cell whose coordinates were typed in the second step.
#4 – What is the difference between a list box and a combo box?
The differences between a list box and a combo box are listed as follows:
– A list box consists of a list of items and allows users to select one or more options. In contrast, a combo box consists of a combination of a text box and a drop-down list. The text box enables users to type an item. The drop-down list allows users to select an item.
– A list box displays all items in a given area at once, while a combo box displays one item at a time. The items of the drop-down list of a combo box are visible when the user clicks
it.
– In a list box, the user has to choose from the available items, whereas in a combo box, a user can type an item that is not there in the list.
– A list box is used where the input is restricted to the items on the list. However, a combo box is used where a list of suggested choices is mentioned.
– A list box uses more space because the full list is displayed at once. On the other hand, a combo box fits in a small space because the list is displayed only on the clicking of the
down arrow.
- A list box in Excel is a list assigned to a variable that can be used to select multiple items.
- On a UserForm, a list box can be inserted by selecting the list box option.
- While creating a list box in Excel, the details in “ListFillRange,” “MultiSelect,” and “ListStyle” properties have to be entered.
- The “design mode” can be switched off by clicking the “Design Mode.”
- While creating a list box on a UserForm, either click “Visual Basic” or press Alt+F11
Recommended Articles
This has been a guide to List Box in Excel VBA. Here we discuss how to create List Box in Excel Worksheet and on UserForms, along with practical examples and downloadable templates. You may also look at these useful functions in Excel –
- Edit Drop-Down List in ExcelDropdowns in Excel assist a user in manually entering data in a cell with some specific values to choose from.read more
- Checkbox in ExcelA checkbox in excel is a square box used for presenting options (or choices) to the user to choose from.read more
- VBA MsgBoxVBA MsgBox function is an output function which displays the generalized message provided by the developer. This statement has no arguments and the personalized messages in this function are written under the double quotes while for the values the variable reference is provided.read more
What is List Box in Excel VBA?
List Box is one of the tools under user form in VBA. As the name itself suggests list box will hold all the list of values given by the user. In VBA List box comes with a user form. In this article, we will see how to create a list box and how to hold values in the list box in Excel VBA.
List Box is a box which can hold values in it. From this list of items, the user can select the item shown in the list box.
We can also draw a list box in a regular excel sheet as well.
How to Create List Box in Excel?
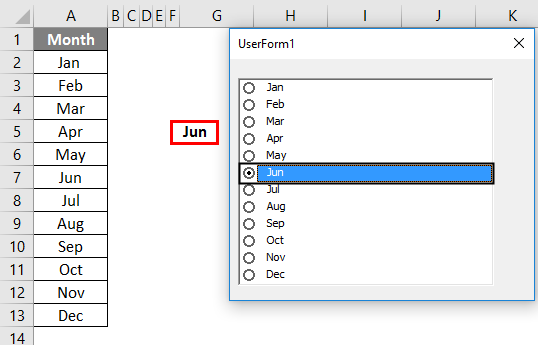
Assume you have a list of the month in one of the excel sheet.
For this list of months, we will create a list box. Follow the below steps to create the List Box in excel worksheet:
Step 1: Go to Developer Tab. Under developer, tab Go to Insert option, and under insert, option Go to Form Control, under form control select List Box.
Step 2: After selecting the list box, draw the list box in the excel sheet.
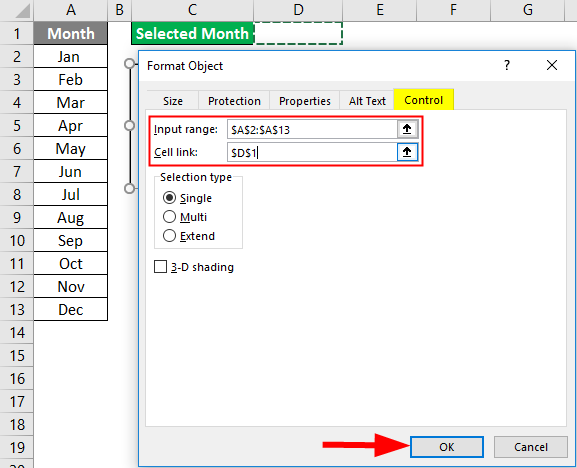
Step 3: Right-click on the inserted list box and select Format Control.

Step 4: Under Format Control, go to Control. Select the input range as month name range and give the cell reference to cell D1 and then click on Ok.
Step 5: We will have a list of the month in the list box.
Step 6: Select any of the items in the list box and see the change in cell D1 .
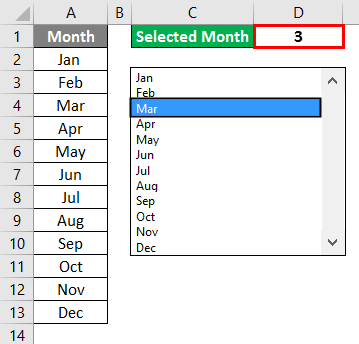
So, we got 3 as a result in cell D1 because Mar is the third item in the list.
How to Create List Box in VBA?
Create a list box is not that easy; as we have seen in the above example, you need to have a considerable amount of knowledge of Excel VBA Macros.
You can download this VBA List Box Excel Template here – VBA List Box Excel Template
VBA List Box – Example #1
Understanding of VBA List Box.
You can consider the following example for a better understanding of the VBA List Box.
Follow the below steps to create a list box in VBA.
Step 1: In the Visual Basic window, Insert the User form.
Step 2: As soon as you insert the user form, you can see the toolbox along with the user form.
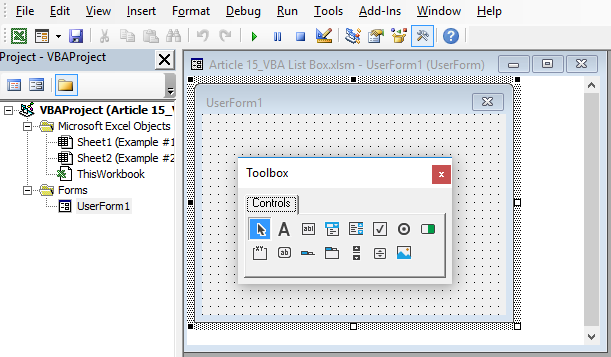
Step 3: In this toolbox, select List Box.
Step 4: Draw this list box on the user form.
Step 5: After inserting the list box, give a proper name to this list box under the Properties window.
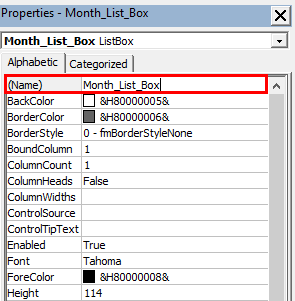
Note: If you don’t see this list box, press the F4 key, you will see a properties window like the above one.
Step 6: Scroll down and find “Row Source”. In this, type the range of values of your month name along with the sheet name.
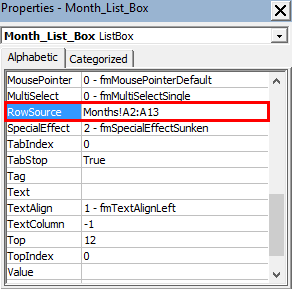
Step 7: As soon as you give the reference, you can see the month names in the list box.

Step 8: Now, in the list box properties window, select line style as “1 – fmListStyleOption”.
Step 9: As soon as you select the line style, you can see the impact immediately.
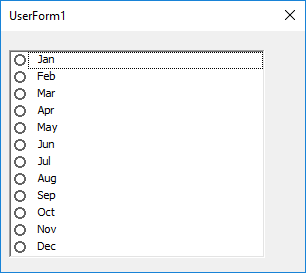
Step 10: Run this code; you will see a list box in separately.
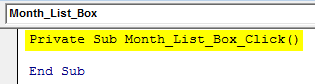
Step 11: Now, we will add macro code to store the data selected by the user. Double click on the list box. You will see a separate macro name like the one below.
Private Sub Month_List_Box_Click()

End Sub
Step 11: When the user selects the month, we will store the data in cell G5. In order to store the input given by the user, add the below code.
Private Sub Month_List_Box_Click()

  Range("G5").Value = Month_List_Box.Value

End Sub
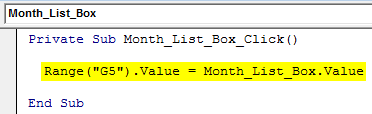
Step 12: Now, if you run the code and select any of the months, we can see the value selected by the user in the G5 cell.
I have selected Jun, so I can see Jun in the G5 cell. Like this, we can use a list box in your VBA projects to take input from the users.
VBA List Box – Example #2
Add.Items Method to Add Values to List Box
Follow the below steps to create a list box in VBA.
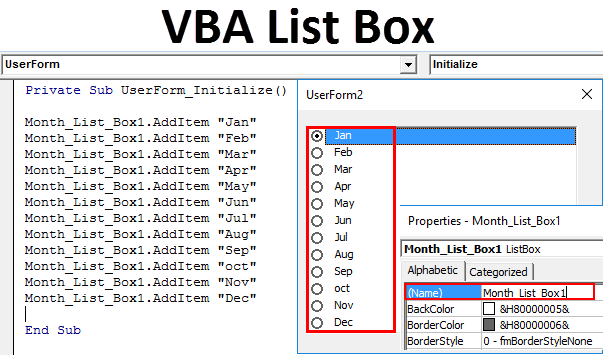
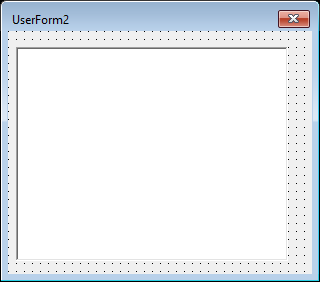
Step 1: Create a New UserForm. Here it is UserForm2.
Step 2: Add List box in the Userform 2.
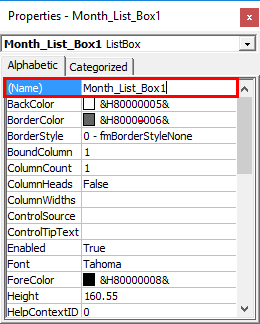
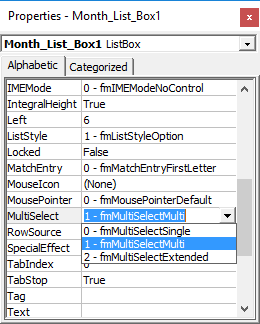
Step 3: After inserting the list box, give a proper name to this list box under the Properties window, i.e. Month_list_Box1.
Step 4: Now, in the list box properties window, select line style as “1 – fmListStyleOption”.
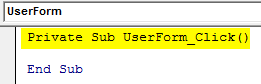
Step 5: Double click on the user form. You will see an auto inserted macro like the below one.
Private Sub UserForm_Click()

End Sub
Step 6: By placing a cursor inside the macro, select “Initialize”.
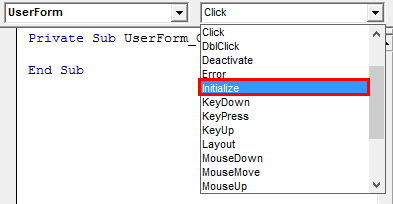
Step 7: As soon as you selected “Initialize”, we can see a new macro to be created just below the current one.
Private Sub UserForm_Initialize()

End Sub
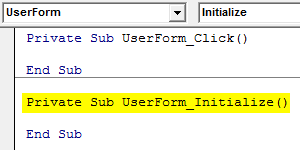
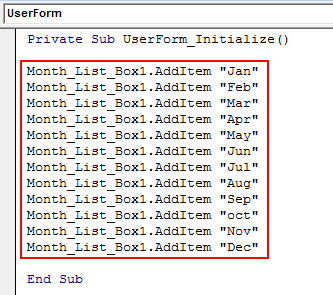
Step 8: Delete the old macro. Under UserForm, initialize write the below code to add items to the list box.
Private Sub UserForm_Initialize()

Month_List_Box1.AddItem "Jan"
Month_List_Box1.AddItem "Feb"
Month_List_Box1.AddItem "Mar"
Month_List_Box1.AddItem "Apr"
Month_List_Box1.AddItem "May"
Month_List_Box1.AddItem "Jun"
Month_List_Box1.AddItem "Jul"
Month_List_Box1.AddItem "Aug"
Month_List_Box1.AddItem "Sep"
Month_List_Box1.AddItem "oct"
Month_List_Box1.AddItem "Nov"
Month_List_Box1.AddItem "Dec"

End Sub
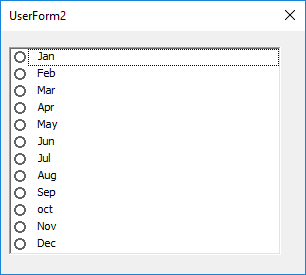
Step 10: Now press the F5 button to run the code, and you will get the following output.
Things to Remember
- If you are directly giving cell reference, then you need to specify the sheet name and cell reference. (You need to add exclamation (!) symbol in front of sheet name).
- You can also add items to the list box by using Add.Item method.
- If you want to allow the user to select more than one item, then you need to select the “fmMultiSelectMult” option under Multi-Select in the Properties window.
Recommended Articles
This is a guide to VBA List Box. Here we discuss how to Create a List Box in Excel and in VBA along with practical examples and a downloadable excel template. You can also go through our other suggested articles –
- VBA Replace
- VBA ByVal
- VBA Arrays
- VBA XML
A text box is an empty field where a user can fill in a piece of text. To create a text box in Excel VBA, execute the following steps.
1. On the Developer tab, click Insert.
2. In the ActiveX Controls group, click Text Box.

3. Drag a command button and a text box on your worksheet.
4. Right click the command button (make sure Design Mode is selected).
5. Click View Code.

Note: you can change the caption and name of a control by right clicking on the control (make sure Design Mode is selected) and then clicking on Properties. Change the caption of the command button to Import Data. For now, we will leave TextBox1 as the name of the text box.
6. Add the following code line:
TextBox1.Text = «Data imported successfully»
7. Click the command button on the sheet (make sure Design Mode is deselected).
Result:

8. To clear a text box, use the following code line:
TextBox1.Value = «»
Note: although in some situations it can be useful to directly place a text box on your worksheet, a text box is particularly useful when placed on a Userform.
 In this VBA Tutorial, you learn how to create input boxes with both the InputBox function and the Application.InputBox method. This includes:
- How to create an InputBox.
- How to create an InputBox with multiple lines.
- How to create an InputBox that works with a specific type of data.
- How to handle the cases where the user clicks the Cancel button of the InputBox.
This VBA InputBox Tutorial is accompanied by an Excel workbook containing the macros I use in the examples below. You can get immediate access to this example workbook by clicking the button below.

Related VBA and Macro Tutorials
The following VBA and Macro Tutorials may help you better understand and implement the contents below:
- General VBA constructs and structures:
- Read a Macro Tutorial for beginners here.
- Learn the definitions of several basic and important VBA terms here.
- Learn how to specify macro security settings here.
- Learn how to work with the Visual Basic Editor here.
- Learn about the Excel VBA Object Model here.
- Learn how to refer to cell ranges here.
- Learn how to create Sub procedures here.
- Learn how to work with object properties here.
- Learn how to work with object methods here.
- Learn how to declare and work with variables here.
- Learn how to work with data types here.
- Learn how to work with functions here.
- Learn how to work with loops here.
- Learn how to work with arrays here.
- Practical VBA applications and macro examples:
- Learn how to work with worksheets here.
- Learn how to convert strings to numbers here.
- Learn how to create message boxes here.
- Learn how to create UserForms here.
You can find additional VBA and Macro Tutorials in the Archives.
#1: Create InputBox with InputBox function
VBA code to create InputBox with InputBox function
To create a basic InputBox with the VBA InputBox function, use a statement with the following structure:
InputBoxVariable = InputBox(Prompt:=PromptString, Title:=TitleString, Default:=DefaultInputString)
Process to create InputBox with InputBox function
To create a basic InputBox with the VBA InputBox function, follow these steps:
- Create an input box with the InputBox function (InputBox(…)).
- Assign the value returned by the InputBox function to a variable (InputBoxVariable = InputBox(…)).
VBA statement explanation
Item: InputBoxVariable
InputBoxVariable is the variable you want to hold the value returned by the InputBox function.
The InputBox function returns a String.
Item: =
The = operator assigns a value to a variable or property.
Use the = operator to assign the value returned by the InputBox function (InputBox(…)) to InputBoxVariable.
Item: InputBox(…)
The InputBox function:
- Displays an input box;
- Waits for the user to either (i) input text and click the OK button (or press the Enter key), or (ii) click the Cancel button (or press the Esc key); and
- Returns a string with the contents of the text box in the input box (when the user clicks OK or presses Enter).
If you want to handle the cases where the user clicks on the Cancel button or presses Esc, please refer to the appropriate section of this Tutorial.
Item: Prompt:=PromptString
The Prompt argument of the InputBox function is a string displayed as the message in the input box. Prompt is a required argument.
You generally specify PromptString as a string expression.
The maximum length of PromptString is roughly 1024 characters. However, this maximum length may vary slightly depending on the width of the characters within PromptString.
PromptString can be composed of multiple lines. To create an input box with multiple lines, please refer to the appropriate section of this Tutorial.
Item: Title:=TitleString
The Title argument of the InputBox function is a string expression displayed as the title in the title bar of the input box.
Title is an optional argument. If you omit the Title argument, the title of the input box is “Microsoft Excel”.
You generally specify TitleString as a string expression.
Item: Default:=DefaultInputString
The Default argument of the InputBox function is a string expression displayed inside the text box of the input box. DefaultInputString is, therefore, the default response.
Default is an optional argument. If you omit the Default argument, the text box is empty.
Macro example to create InputBox with InputBox function
The following macro example:
- Creates a basic input box with the InputBox function.
- Assigns the value returned by the InputBox function to a variable (myInputBoxVariable = inputBox(…)).
- Displays a message box with the value held by the variable.
Sub CreateInputBoxFunction()
    'source: https://powerspreadsheets.com/
    'creates an input box with the InputBox function
    'for further information: https://powerspreadsheets.com/excel-vba-inputbox/

    'declare variable to hold value returned by InputBox
    Dim myInputBoxVariable As String

    '(1) create InputBox, and (2) assign value returned by InputBox function to variable
    myInputBoxVariable = inputBox(Prompt:="Create Excel VBA InputBox", Title:="This is an Excel VBA InputBox", Default:="Enter VBA InputBox value here")

    'display message box with value held by variable
    MsgBox "Your input was: " & myInputBoxVariable

End Sub
Effects of executing macro example to create InputBox with InputBox function
The following GIF illustrates the results of executing the macro example. As expected, Excel displays a basic input box using the InputBox function.

#2: Create InputBox with Application.InputBox method
VBA code to create InputBox with Application.InputBox method
To create a basic InputBox with the VBA Application.InputBox method, use a statement with the following structure:
InputBoxVariable = Application.InputBox(Prompt:=PromptString, Title:=TitleString, Default:=DefaultInput)
Process to create InputBox with Application.InputBox method
To create a basic InputBox with the VBA Application.InputBox method, follow these steps:
- Create an input box with the Application.InputBox method (Application.InputBox(…)).
- Assign the value returned by the Application.InputBox method to a variable (InputBoxVariable = Application.InputBox(…)).
VBA statement explanation
Item: InputBoxVariable
InputBoxVariable is the variable you want to hold the value returned by the Application.InputBox method.
The Application.InputBox method returns a Variant.
Item: =
The = operator assigns a value to a variable or property.
Use the = operator to assign the value returned by the InputBox function (InputBox(…)) to InputBoxVariable.
Item: Application.InputBox(…)
The Application.InputBox method:
- Displays an input box’
- Waits for the user to either (i) input information and click the OK button (or press the Enter key), or (ii) click the Cancel button (or press the Esc key); and
- Returns the information entered in the dialog box (if the user clicks OK or presses Enter) or the False Boolean value (if the user clicks Cancel).
Item: Prompt:=PromptString
The Prompt parameter of the Application.InputBox method is a string displayed as the message in the input box. Prompt is a required parameter.
You generally specify PromptString as a string expression.
You can also specify PromptString as a number, a date or a Boolean. In such cases, Excel coerces the number, date or Boolean to a string.
PromptString can be composed of multiple lines. To create an input box with multiple lines, please refer to the appropriate section of this Tutorial.
Item: Title:=TitleString
The Title parameter of the Application.InputBox method is the title displayed in the title bar of the input box.
Title is an optional parameter. If you omit the Title parameter, the title of the input box is “Input”.
The Title parameter is of the Variant data type.
Item: Default:=DefaultInput
The Default parameter of the Application.InputBox method is the value displayed inside the text box of the input box. DefaultInput is, therefore, the default response.
Default is an optional parameter. If you omit the Default parameter, the text box is empty.
The Default parameter is of the Variant data type.
Macro example to create InputBox with Application.InputBox method
The following macro example:
- Creates a basic input box with the Application.InputBox method.
- Assigns the value returned by the Application.InputBox method to a variable (myInputBoxVariable = Application.inputBox(…)).
- Displays a message box with the value held by the variable.
Sub CreateInputBoxMethod()
    'source: https://powerspreadsheets.com/
    'creates an input box with the Application.InputBox method
    'for further information: https://powerspreadsheets.com/excel-vba-inputbox/

    'declare variable to hold value returned by InputBox
    Dim myInputBoxVariable As Variant

    '(1) create InputBox, and (2) assign value returned by Application.InputBox method to variable
    myInputBoxVariable = Application.inputBox(Prompt:="Create Excel VBA InputBox", Title:="This is an Excel VBA InputBox", Default:="Enter VBA InputBox value here")

    'display message box with value held by variable
    MsgBox "Your input was: " & myInputBoxVariable

End Sub
Effects of executing macro example to create InputBox with Application.InputBox method
The following GIF illustrates the results of executing the macro example. As expected, Excel displays a basic input box using the Application.InputBox method.

#3: Create InputBox with multiple lines using InputBox function
VBA code to create InputBox with multiple lines using InputBox function
To create an InputBox containing multiple lines with the VBA InputBox function, use a statement with the following structure:
InputBoxMultipleLinesVariable = inputBox(Prompt:=PromptString1 & NewLineCharacter & PromptString2 & ... & NewLineCharacter & PromptString#)
Process to create InputBox with multiple lines using InputBox function
To create an InputBox containing multiple lines with the VBA InputBox function, follow these steps:
- Create an input box with the InputBox function (InputBox(…)).
- Specify the message displayed in the message box (Prompt:=PromptString1 & NewLineCharacter & PromptString2 & … & NewLineCharacter & PromptString#) as an appropriately concatenated (with the & character) combination of:
- Strings (PromptString1, PromptString2, …, PromptString#); and
- Characters that create a new line or line break (NewLineCharacter).
- Assign the value returned by the InputBox function to a variable (InputBoxMultipleLinesVariable = InputBox(…)).
VBA statement explanation
Item: InputBoxMultipleLinesVariable
InputBoxMultipleLinesVariable is the variable you want to hold the value returned by the InputBox function.
The InputBox function returns a String.
Item: =
The = operator assigns a value to a variable or property.
Use the = operator to assign the value returned by the InputBox function (InputBox(…)) to InputBoxVariable.
Item: inputBox(…)
The InputBox function:
- Displays an input box;
- Waits for the user to either (i) input text and click the OK button (or press the Enter key), or (ii) click the Cancel button (or press the Esc key); and
- Returns a string with the contents of the text box in the input box (when the user clicks OK or presses Enter).
If you want to handle the cases where the user clicks on the Cancel button or presses Esc, please refer to the appropriate section of this Tutorial.
Item: Prompt:=PromptString1 & NewLineCharacter & PromptString2 & … & NewLineCharacter & PromptString#
The Prompt argument of the InputBox function is a string displayed as the message in the input box. Prompt is a required argument.
You generally specify Prompt as a string expression.
The maximum length of Prompt is roughly 1024 characters. However, this maximum length may vary slightly depending on the width of the characters you work with.
To create an input box with multiple lines, you build the string expression assigned to Prompt by concatenating as many strings (PromptString1, PromptString2, …, PromptString#) and new line characters (NewLineCharacter) as required. For these purposes:
- PromptString1, PromptString2, …, PromptString# are the strings (excluding the new line characters) that determine the message in the input box.
- The & operator carries out string concatenation. Therefore, & concatenates the different strings and new line characters.
- NewLineCharacter is a character or character combination returning 1 of the following:
- Carriage return.
- Linefeed.
- Carriage return linefeed combination.
- New line (which is platform specific).
Specify NewLineCharacter using any of the constants or character codes (with the Chr function) listed below:
| Constant | Equivalent Chr function | General description |
| vbLf | Chr(10) | Linefeed |
| vbCr | Chr(13) | Carriage return |
| vbCrLf | Chr(13) & Chr(10) | Carriage return linefeed combination |
| vbNewLine | Chr(13) & Chr(10) in Excel for Windows or Chr(13) in Excel for Mac | New line character, which is platform specific |
Macro example to create InputBox with multiple lines using InputBox function
The following macro example:
- Creates an input box containing multiple lines (Create Excel VBA InputBox” & vbNewLine & “with multiple lines) with the InputBox function.
- Assigns the value returned by the InputBox function to a variable (myInputBoxMultipleLinesVariable = inputBox(…)).
- Displays a message box with the value held by the variable.
Sub CreateInputBoxFunctionMultipleLines()
    'source: https://powerspreadsheets.com/
    'creates an input box with multiple lines using the InputBox function
    'for further information: https://powerspreadsheets.com/excel-vba-inputbox/

    'declare variable to hold value returned by InputBox
    Dim myInputBoxMultipleLinesVariable As String

    '(1) create InputBox with multiple lines, and (2) assign value returned by InputBox function to variable
    myInputBoxMultipleLinesVariable = inputBox(Prompt:="Create Excel VBA InputBox" & vbNewLine & "with multiple lines")

    'display message box with value held by variable
    MsgBox "Your input was: " & myInputBoxMultipleLinesVariable

End Sub
Effects of executing macro example to create InputBox with multiple lines using InputBox function
The following GIF illustrates the results of executing the macro example. As expected, Excel displays an input box containing multiple lines using the InputBox function.

#4: Create InputBox with multiple lines using Application.InputBox method
VBA code to create InputBox with multiple lines using Application.InputBox method
To create an InputBox containing multiple lines with the VBA Application.InputBox method, use a statement with the following structure:
InputBoxMultipleLinesVariable = Application.InputBox(Prompt:=PromptString1 & NewLineCharacter & PromptString2 & ... & NewLineCharacter & PromptString#)
Process to create InputBox with multiple lines using Application.InputBox method
To create an InputBox containing multiple lines with the VBA Application.InputBox method, follow these steps:
- Create an input box with the Application.InputBox method (Application.InputBox(…)).
- Specify the message displayed in the message box (Prompt:=PromptString1 & NewLineCharacter & PromptString2 & … & NewLineCharacter & PromptString#) as an appropriately concatenated (with the & character) combination of:
- Strings (PromptString1, PromptString2, …, PromptString#); and
- Characters that create a new line or line break (NewLineCharacter).
- Assign the value returned by the Application.InputBox method to a variable (InputBoxMultipleLinesVariable = Application.InputBox(…)).
VBA statement explanation
Item: InputBoxMultipleLinesVariable
InputBoxMultipleLinesVariable is the variable you want to hold the value returned by the Application.InputBox method.
The Application.InputBox method returns a Variant.
Item: =
The = operator assigns a value to a variable or property.
Use the = operator to assign the value returned by the InputBox function (InputBox(…)) to InputBoxVariable.
Item: Application.InputBox(…)
The Application.InputBox method:
- Displays an input box’
- Waits for the user to either (i) input information and click the OK button (or press the Enter key), or (ii) click the Cancel button (or press the Esc key); and
- Returns the information entered in the dialog box (if the user clicks OK or presses Enter) or the False Boolean value (if the user clicks Cancel).
Item: Prompt:=PromptString1 & NewLineCharacter & PromptString2 & … & NewLineCharacter & PromptString#
The Prompt parameter of the Application.InputBox method is a string displayed as the message in the input box. Prompt is a required parameter.
You generally specify Prompt as a string expression. You can also specify Prompt as a number, a date or a Boolean. In such cases, Excel coerces the number, date or Boolean to a string.
To create an input box with multiple lines, you build the expression assigned to Prompt by concatenating as many strings (PromptString1, PromptString2, …, PromptString#) and new line characters (NewLineCharacter) as required. For these purposes:
- PromptString1, PromptString2, …, PromptString# are the strings (excluding the new line characters) that determine the message in the input box.
- The & operator carries out string concatenation. Therefore, & concatenates the different strings and new line characters.
- NewLineCharacter is a character or character combination returning 1 of the following:
- Carriage return.
- Linefeed.
- Carriage return linefeed combination.
- New line (which is platform specific).
Specify NewLineCharacter using any of the constants or character codes (with the Chr function) listed below:
| Constant | Equivalent Chr function | General description |
| vbLf | Chr(10) | Linefeed |
| vbCr | Chr(13) | Carriage return |
| vbCrLf | Chr(13) & Chr(10) | Carriage return linefeed combination |
| vbNewLine | Chr(13) & Chr(10) in Excel for Windows or Chr(13) in Excel for Mac | New line character, which is platform specific |
Macro example to create InputBox with multiple lines using Application.InputBox method
The following macro example:
- Creates an input box containing multiple lines (Create Excel VBA InputBox” & vbNewLine & “with multiple lines) with the Application.InputBox method.
- Assigns the value returned by the Application.InputBox method to a variable (myInputBoxMultipleLinesVariable = Application.inputBox(…)).
- Displays a message box with the value held by the variable.
Sub CreateInputBoxMethodMultipleLines()
    'source: https://powerspreadsheets.com/
    'creates an input box with multiple lines using the Application.InputBox method
    'for further information: https://powerspreadsheets.com/excel-vba-inputbox/

    'declare variable to hold value returned by InputBox
    Dim myInputBoxMultipleLinesVariable As Variant

    '(1) create InputBox with multiple lines, and (2) assign value returned by Application.InputBox method to variable
    myInputBoxMultipleLinesVariable = Application.inputBox(Prompt:="Create Excel VBA InputBox" & vbNewLine & "with multiple lines")

    'display message box with value held by variable
    MsgBox "Your input was: " & myInputBoxMultipleLinesVariable

End Sub
Effects of executing macro example to create InputBox with multiple lines using Application.InputBox method
The following GIF illustrates the results of executing the macro example. As expected, Excel displays an input box containing multiple lines using the Application.InputBox method.

#5: Create InputBox that works with a specific data type using InputBox function
VBA code to create InputBox that works with a specific data type using InputBox function
To create an InputBox that works with a specific data type with the VBA InputBox function, use a macro with the following statement structure:
InputBoxTypeVariable = InputBox(Prompt:=PromptString)
If IsFunction(InputBoxTypeVariable) Then
    StatementsIfInputIsType
Else
    StatementsIfInputIsNotType
End If
Process to create InputBox that works with a specific data type using InputBox function
To create an InputBox that works with a specific data type with the VBA InputBox function, follow these steps:
- Create an input box with the InputBox function (InputBox(…)).
- Assign the value returned by the InputBox function to a variable (InputBoxTypeVariable = InputBox(…)).
- Use an If… Then… Else statement for the following:
- Testing whether the type of data held by the variable is the one you want to work with (IsFunction(InputBoxTypeVariable)).
- Executing the appropriate group of statements depending on whether the type of data held by the variable is the one you want to work with (StatementsIfInputIsType) or not (StatementsIfInputIsNotType).
VBA statement explanation
Line #1: InputBoxTypeVariable = InputBox(Prompt:=PromptString)
Item: InputBoxTypeVariable
InputBoxTypeVariable is the variable you want to hold the value returned by the InputBox function.
The InputBox function returns a String.
Item: =
The = operator assigns a value to a variable or property.
Use the = operator to assign the value returned by the InputBox function (InputBox(…)) to InputBoxVariable.
Item: InputBox(…)
The InputBox function:
- Displays an input box;
- Waits for the user to either (i) input text and click the OK button (or press the Enter key), or (ii) click the Cancel button (or press the Esc key); and
- Returns a string with the contents of the text box in the input box (when the user clicks OK or presses Enter).
If you want to handle the cases where the user clicks on the Cancel button or presses Esc, please refer to the appropriate section of this Tutorial.
Item: Prompt:=PromptString
The Prompt argument of the InputBox function is a string displayed as the message in the input box. Prompt is a required argument.
You generally specify PromptString as a string expression.
The maximum length of PromptString is roughly 1024 characters. However, this maximum length may vary slightly depending on the width of the characters within PromptString.
PromptString can be composed of multiple lines. To create an input box with multiple lines, please refer to the appropriate section of this Tutorial.
Lines #2, #4 and #6: If IsFunction(InputBoxTypeVariable) Then | Else | End If
Item: If… Then… Else… End If
The If… Then… Else statement conditionally executes a group of statements (StatementsIfInputIsType or StatementsIfInputIsNotType) depending on the value of an expression (Isfunction(InputBoxTypeVariable)).
Item: IsFunction(InputBoxTypeVariable)
The condition of the If… Then… Else statement is an expression returning True or False.
When you work with an input box and a specific data type using this macro structure, you can check the type of data held by InputBoxTypeVariable by working with certain VBA built-in functions (an IsFunction), as appropriate. These include the following functions:
| Function | Returns True if InputBoxTypeVariable… | Returns False if InputBoxTypeVariable… |
| IsDate | Is a date or recognizable as a valid date | Isn’t date or isn’t recognizable as a valid date |
| IsError | Is an error value | Isn’t an error value |
| IsNumeric | Can be evaluated/recognized as a number | Can’t be evaluated/recognized as a number |
Line #3: StatementsIfInputIsType
Statements executed if the tested condition (IsFunction(InputBoxTypeVariable)) returns True. In other words, these statements are executed if the input entered by the user in the input box is of the appropriate type.
Line #5: StatementsIfInputIsNotType
Statements executed if the tested condition (IsFunction(InputBoxTypeVariable)) returns False. In other words, these statements are executed if the input entered by the user in the input box isn’t of the appropriate type.
Macro example to create InputBox that works with a specific data type using InputBox function
The following macro example:
- Creates an input box with the InputBox function.
- Assigns the value returned by the InputBox function to a variable (myInputBoxTypeVariable = inputBox(…)).
- Checks whether the value held by the variable is numeric (IsNumeric(myInputBoxTypeVariable)).
- If the value is numeric, displays a message box with the value held by the variable.
- If the value isn’t numeric, displays a message box asking the user to try again and enter a number.
Sub CreateInputBoxFunctionDataType()
    'source: https://powerspreadsheets.com/
    'creates an input box that works with a number using the InputBox function
    'for further information: https://powerspreadsheets.com/excel-vba-inputbox/

    'declare variable to hold value returned by InputBox
    Dim myInputBoxTypeVariable As String

    '(1) create InputBox that works with a number, and (2) assign value returned by InputBox function to variable
    myInputBoxTypeVariable = inputBox(Prompt:="Create Excel VBA InputBox that works with a number")

    'check if user entered a number and, if appropriate, execute statements
    If IsNumeric(myInputBoxTypeVariable) Then

        'display message box with value held by variable
        MsgBox "Your input was: " & myInputBoxTypeVariable

    'if user didn't enter a number, execute statements
    Else

        'display message box confirming that user didn't enter a number
        MsgBox "Please try again and enter a number"

    End If

End Sub
Effects of executing macro example to create InputBox that works with a specific data type using InputBox function
The following GIF illustrates the results of executing the macro example. As expected:
- Excel identifies whether the input box created with the InputBox function contains a number; and
- Displays the appropriate message box.

#6: Create InputBox that works with a specific data type using Application.InputBox method
VBA code to create InputBox that works with a specific data type using Application.InputBox method
To create an InputBox that works with a specific data type with the VBA Application.InputBox method, use a statement with the following structure:
InputBoxTypeVariable = Application.InputBox(Prompt:=PromptString, Type:=TypeValue)
Process to create InputBox that works with a specific data type using Application.InputBox method
To create an InputBox that works with a specific data type with the VBA Application.InputBox method, follow these steps:
- Create an input box with the Application.InputBox method (Application.InputBox(…)).
- Specify the data type you want to work with by working with the Type parameter of the Application.InputBox method (Type:=TypeValue).
- Assign the value returned by the Application.InputBox method to a variable (InputBoxTypeVariable = Application.InputBox(…)).
VBA statement explanation
Item: InputBoxTypeVariable
InputBoxTypeVariable is the variable you want to hold the value returned by the Application.InputBox method.
The Application.InputBox method returns a Variant.
Item: =
The = operator assigns a value to a variable or property.
Use the = operator to assign the value returned by the InputBox function (InputBox(…)) to InputBoxVariable.
Item: Application.InputBox(…)
The Application.InputBox method:
- Displays an input box’
- Waits for the user to either (i) input information and click the OK button (or press the Enter key), or (ii) click the Cancel button (or press the Esc key); and
- Returns the information entered in the dialog box (if the user clicks OK or presses Enter) or the False Boolean value (if the user clicks Cancel).
Item: Prompt:=PromptString
The Prompt parameter of the Application.InputBox method is a string displayed as the message in the input box. Prompt is a required parameter.
You generally specify PromptString as a string expression.
You can also specify PromptString as a number, a date or a Boolean. In such cases, Excel coerces the number, date or Boolean to a string.
PromptString can be composed of multiple lines. To create an input box with multiple lines, please refer to the appropriate section of this Tutorial.
Item: Type:=TypeValue
The Type parameter of the Application.InputBox method specifies the data type returned.
Set the Type parameter using the values listed below. If required, you can set the Type parameter to be a sum of several of these values.
| Value | Basic description | Additional comments |
| 0 | Formula | Application.InputBox returns the formula in the form of text. Cell references inside the formula are returned as A1-style references. |
| 1 | Number | |
| 2 | Text | |
| 4 | Boolean | |
| 8 | Range object | Use the Set statement to assign the Range object returned by Application.InputBox to an object variable. |
| 16 | Error | |
| 64 | Array of values |
Type is an optional parameter. If you omit the Type parameter, the Application.InputBox method returns text.
Macro example to create InputBox that works with a specific data type using Application.InputBox method
The following macro example:
- Creates an input box that returns a number (Type:=1) with the Application.InputBox method.
- Assigns the value returned by the Application.InputBox method to a variable (myInputBoxTypeVariable = Application.inputBox(…)).
- Displays a message box with the value held by the variable.
Sub CreateInputBoxMethodDataType()
    'source: https://powerspreadsheets.com/
    'creates an input box that works with a number using the Application.InputBox method
    'for further information: https://powerspreadsheets.com/excel-vba-inputbox/

    'declare variable to hold value returned by InputBox
    Dim myInputBoxTypeVariable As Variant

    '(1) create InputBox that works with a number, and (2) assign value returned by Application.InputBox method to variable
    myInputBoxTypeVariable = Application.inputBox(Prompt:="Create Excel VBA InputBox that works with a number", Type:=1)

    'display message box with value held by variable
    MsgBox "Your input was: " & myInputBoxTypeVariable

End Sub
Effects of executing macro example to create InputBox that works with a specific data type using Application.InputBox method
The following GIF illustrates the results of executing the macro example. As expected:
- Excel identifies whether the input box created with the Application.InputBox method contains a number; and
- If the entered input isn’t a number, displays a warning.

#7: Create InputBox and check if user clicks Cancel button with InputBox function
VBA code to create InputBox and check if user clicks Cancel button with InputBox function
To create an InputBox with the VBA InputBox function and check if the user clicks Cancel, use a macro with the following statement structure:
InputBoxCancelVariable = InputBox(Prompt:=PromptString)
If StrPtr(InputBoxCancelVariable) = 0 Then
    StatementsIfCancel
ElseIf InputBoxCancelVariable = "" Then
    StatementsIfNoInput
Else
    StatementsIfInputAndOK
End If
Process to create InputBox and check if user clicks Cancel button with InputBox function
To create an InputBox that works with a specific data type with the VBA InputBox function, follow these steps:
- Create an input box with the InputBox function (InputBox(…)).
- Assign the value returned by the InputBox function to a variable (InputBoxCancelVariable = InputBox(…)).
- Use an If… Then… Else statement for the following:
- Testing whether the user clicked Cancel (StrPtr(InputBoxCancelVariable) = 0) or entered no input prior to clicking OK (InputBoxCancelVariable = “”).
- Executing the appropriate group of statements depending on whether the user clicked Cancel (StatementsIfCancel), entered no input prior to clicking OK (StatementsIfNoInput) or entered input and clicked OK (StatementsIfInputAndOK).
VBA statement explanation
Line #1: InputBoxCancelVariable = InputBox(Prompt:=PromptString)
Item: InputBoxCancelVariable
InputBoxCancelVariable is the variable you want to hold the value returned by the InputBox function.
The InputBox function returns a String.
Item: =
The = operator assigns a value to a variable or property.
Use the = operator to assign the value returned by the InputBox function (InputBox(…)) to InputBoxVariable.
Item: InputBox(…)
The InputBox function:
- Displays an input box;
- Waits for the user to either (i) input text and click the OK button (or press the Enter key), or (ii) click the Cancel button (or press the Esc key); and
- Returns a string with the contents of the text box in the input box (when the user clicks OK or presses Enter).
According to the Microsoft Developer Network, the InputBox function returns a zero-length string (“”) when the user clicks Cancel (or presses Esc). When checking if the user clicks Cancel using this macro structure, you rely on a quirk of the InputBox function which allows you to work with StrPtr.
Item: Prompt:=PromptString
The Prompt argument of the InputBox function is a string displayed as the message in the input box. Prompt is a required argument.
You generally specify PromptString as a string expression.
The maximum length of PromptString is roughly 1024 characters. However, this maximum length may vary slightly depending on the width of the characters within PromptString.
PromptString can be composed of multiple lines. To create an input box with multiple lines, please refer to the appropriate section of this Tutorial.
Lines #2, #6 and #8: If StrPtr(InputBoxCancelVariable) = 0 Then | Else | End If
Item: If… Then… Else… End If
The If… Then… Else statement conditionally executes a group of statements (StatementsIfCancel, StatementsIfNoInput or StatementsIfInputAndOK) depending on the value of an expression (StrPtr(InputBoxCancelVariable) = 0 or InputBoxCancelVariable = “”).
Item: StrPtr(InputBoxCancelVariable) = 0
The condition of the If… Then… Else statement is an expression returning True or False.
When you check if the user clicks the Cancel button using this macro structure, you can work with the StrPtr function. StrPtr is an undocumented function. You can usually work with the StrPtr function to obtain the address of a variable.
When the user clicks Cancel, no string is assigned to InputBoxCancelVariable. Therefore, if the user clicks Cancel, StrPtr(InputBoxCancelVariable) = 0 returns True.
Line #3: StatementsIfCancel
Statements executed if the tested condition (StrPtr(InputBoxCancelVariable) = 0) returns True. In other words, these statements are executed if the user clicks Cancel.
Line #4: ElseIf InputBoxCancelVariable = “” Then
Item: ElseIf… Then
The If… Then… Else statement conditionally executes a group of statements (StatementsIfCancel, StatementsIfNoInput or StatementsIfInputAndOK) depending on the value of an expression (StrPtr(InputBoxCancelVariable) = 0 or InputBoxCancelVariable = “”).
Item: InputBoxCancelVariable = “”
The condition-n of the If… Then… Else statement is an expression returning True or False.
You can check if the user didn’t enter any input prior to clicking OK by testing whether InputBoxCancelVariable holds a zero-length string (“”). In other words, if the user doesn’t enter any input and clicks the OK button, InputBoxCancelVariable = 0 returns True.
Line #5: StatementsIfNoInput
Statements executed if the tested condition (InputBoxCancelVariable = “”) returns True. In other words, these statements are executed if the user doesn’t enter any input and clicks the OK button.
Line #7: StatementsIfInputAndOK
Statements executed if none of the tested conditions (StrPtr(InputBoxCancelVariable) = 0 or InputBoxCancelVariable = “”) return True. In other words, these statements are executed if the user enters an input and clicks the OK button.
Macro example to create InputBox and check if user clicks Cancel button with InputBox function
The following macro example:
- Creates an input box with the InputBox function.
- Assigns the value returned by the InputBox function to a variable (myInputBoxCancelVariable = inputBox(…)).
- Checks whether user clicked Cancel (StrPtr(myInputBoxCancelVariable) = 0). If the user clicked Cancel, displays a message box confirming this.
- If the user didn’t click Cancel, checks whether the user entered no input prior to clicking OK (myInputBoxCancelVariable = “”). If the user entered no input prior to clicking OK, displays a message box confirming this.
- If the user entered input and clicked OK, displays a message box with the value held by the variable.
Sub CreateInputBoxFunctionCancel()
    'source: https://powerspreadsheets.com/
    '(1) creates an input box with the InputBox function, and (2) handles case where user clicks Cancel button
    'for further information: https://powerspreadsheets.com/excel-vba-inputbox/

    'declare variable to hold value returned by InputBox
    Dim myInputBoxCancelVariable As String

    '(1) create InputBox, and (2) assign value returned by InputBox function to variable
    myInputBoxCancelVariable = inputBox(Prompt:="Create Excel VBA InputBox and work with Cancel button")

    'check if user clicked Cancel button and, if appropriate, execute statements
    If StrPtr(myInputBoxCancelVariable) = 0 Then

        'display message box confirming that user clicked Cancel button
        MsgBox "You clicked the Cancel button"

    'check if user entered no input and, if appropriate, execute statements
    ElseIf myInputBoxCancelVariable = "" Then

        'display message box confirming that user entered no input
        MsgBox "You didn't enter an input"

    'if user didn't click Cancel button and entered input, execute statements
    Else

        'display message box with value held by variable
    MsgBox "Your input was: " & myInputBoxCancelVariable

    End If

End Sub
Effects of executing macro example to create InputBox and check if user clicks Cancel button with InputBox function
The following GIF illustrates the results of executing the macro example. As expected:
- Excel displays an input box created with the InputBox function.
- The macro identifies whether the user:
- Clicks the Cancel button;
- Enters no input prior to clicking OK; or
- Enters input and clicks OK.
- Excel displays the appropriate message box depending on the actions taken by the user.

#8: Create InputBox and check if user clicks Cancel button with Application.InputBox method
VBA code to create InputBox and check if user clicks Cancel button with Application.InputBox method
To create an InputBox with the VBA Application.InputBox method and check if the user clicks Cancel, use a macro with the following statement structure:
InputBoxCancelVariable = Application.InputBox(Prompt:=PromptString)
If (TypeName(InputBoxCancelVariable) = "Boolean") And (InputBoxCancelVariable = "False") Then
    StatementsIfCancel
ElseIf InputBoxCancelVariable = "" Then
    StatementsIfNoInput
Else
    StatementsIfInputAndOK
End If
Process to create InputBox and check if user clicks Cancel button with Application.InputBox method
To create an InputBox with the VBA Application.InputBox method and check if the user clicks Cancel, follow these steps:
- Create an input box with the Application.InputBox method (Application.InputBox(…)).
- Assign the value returned by the Application.InputBox method to a variable (InputBoxCancelVariable = Application.InputBox(…)).
- Use an If… Then… Else statement for the following:
- Testing whether the user clicked Cancel ((TypeName(InputBoxCancelVariable) = “Boolean”) And (InputBoxCancelVariable = “False”)) or entered no input prior to clicking OK (InputBoxCancelVariable = “”).
- Executing the appropriate group of statements depending on whether the user clicked Cancel (StatementsIfCancel), entered no input prior to clicking OK (StatementsIfNoInput) or entered input and clicked OK (StatementsIfInputAndOK).
VBA statement explanation
Line #1: InputBoxCancelVariable = Application.InputBox(Prompt:=PromptString)
Item: InputBoxCancelVariable
InputBoxCancelVariable is the variable you want to hold the value returned by the Application.InputBox method.
The Application.InputBox method returns a Variant.
Item: =
The = operator assigns a value to a variable or property.
Use the = operator to assign the value returned by the InputBox function (InputBox(…)) to InputBoxVariable.
Item: Application.InputBox(…)
The Application.InputBox method:
- Displays an input box’
- Waits for the user to either (i) input information and click the OK button (or press the Enter key), or (ii) click the Cancel button (or press the Esc key); and
- Returns the information entered in the dialog box (if the user clicks OK or presses Enter) or the False Boolean value (if the user clicks Cancel).
Item: Prompt:=PromptString
The Prompt parameter of the Application.InputBox method is a string displayed as the message in the input box. Prompt is a required parameter.
You generally specify PromptString as a string expression.
You can also specify PromptString as a number, a date or a Boolean. In such cases, Excel coerces the number, date or Boolean to a string.
PromptString can be composed of multiple lines. To create an input box with multiple lines, please refer to the appropriate section of this Tutorial.
Lines #2, #6 and #8: If (TypeName(InputBoxCancelVariable) = “Boolean”) And (InputBoxCancelVariable = “False”) Then | Else | End If
Item: If… Then… Else… End If
The If… Then… Else statement conditionally executes a group of statements (StatementsIfCancel, StatementsIfNoInput or StatementsIfInputAndOK) depending on the value of an expression (((TypeName(InputBoxCancelVariable) = “Boolean”) And (InputBoxCancelVariable = “False”)) or InputBoxCancelVariable = “”).
Item: TypeName(InputBoxCancelVariable) = “Boolean” And InputBoxCancelVariable = “False”
The condition of the If… Then… Else statement is an expression returning True or False.
The Application.InputBox method returns the False Boolean value when the user clicks Cancel. Therefore, when you check if the user clicks the Cancel button using this macro structure, you test whether 2 conditions are met.
Condition #1: TypeName(InputBoxCancelVariable) = “Boolean”
TypeName(InputBoxCancelVariable) = “Boolean” checks whether InputBoxCancelVariable is a Boolean value.
For these purposes, work with the TypeName function, which returns a string with information about the variable passed as argument (InputBoxCancelVariable). Therefore, TypeName(InputBoxCancelVariable) = “Boolean”:
- Returns True if InputBoxCancelVariable is a Boolean. This occurs, among others, when the user clicks Cancel.
- Returns False if InputBoxCancelVariable isn’t a Boolean.
Condition #2: InputBoxCancelVariable = “False”
InputBoxCancelVariable = “False” checks whether InputBoxCancelVariable holds the string “False”. Therefore, InputBoxCancelVariable = “False”:
- Returns True if InputBoxCancelVariable holds “False”. This occurs, among others, when the user clicks Cancel.
- Returns False if InputBoxCancelVariable doesn’t hold “False”.
Condition #1 And Condition #2
When you check if the user clicks the Cancel button using this macro structure, both conditions #1 (TypeName(InputBoxCancelVariable) = “Boolean”) and #2 (InputBoxCancelVariable = “False”) must be met.
The And operator performs a logical conjunction. Therefore, the condition of the If… Then… else statement returns True if the user clicks Cancel.
Line #3: StatementsIfCancel
Statements executed if the tested condition ((TypeName(InputBoxCancelVariable) = “Boolean”) And (InputBoxCancelVariable = “False”)) returns True. In other words, these statements are executed if the user clicks Cancel.
Line #4: ElseIf InputBoxCancelVariable = “” Then
Item: ElseIf… Then
The If… Then… Else statement conditionally executes a group of statements (StatementsIfCancel, StatementsIfNoInput or StatementsIfInputAndOK) depending on the value of an expression (((TypeName(InputBoxCancelVariable) = “Boolean”) And (InputBoxCancelVariable = “False”)) or InputBoxCancelVariable = “”).
Item: InputBoxCancelVariable = “”
The condition-n of the If… Then… Else statement is an expression returning True or False.
You can check if the user didn’t enter any input prior to clicking OK by testing whether InputBoxCancelVariable holds a zero-length string (“”). In other words, if the user doesn’t enter any input and clicks the OK button, InputBoxCancelVariable = 0 returns True.
Line #5: StatementsIfNoInput
Statements executed if the tested condition (InputBoxCancelVariable = “”) returns True. In other words, these statements are executed if the user doesn’t enter any input and clicks the OK button.
Line #7: StatementsIfInputAndOK
Statements executed if none of the tested conditions (((TypeName(InputBoxCancelVariable) = “Boolean”) And (InputBoxCancelVariable = “False”)) or InputBoxCancelVariable = “”) return True. In other words, these statements are executed if the user enters an input and clicks the OK button.
Macro example to create InputBox and check if user clicks Cancel button with Application.InputBox method
The following macro example:
- Creates an input box with the Application.InputBox method.
- Assigns the value returned by the Application.InputBox method to a variable (myInputBoxCancelVariable = Application.inputBox(…)).
- Checks whether user clicked Cancel ((TypeName(myInputBoxCancelVariable) = “Boolean”) And (myInputBoxCancelVariable = “False”)). If the user clicked Cancel, displays a message box confirming this.
- If the user didn’t click Cancel, checks whether the user entered no input prior to clicking OK (myInputBoxCancelVariable = “”). If the user entered no input prior to clicking OK, displays a message box confirming this.
- If the user entered input and clicked OK, displays a message box with the value held by the variable.
Sub CreateInputBoxMethodCancel()
    'source: https://powerspreadsheets.com/
    '(1) creates an input box with the Application.InputBox method, and (2) handles case where user clicks Cancel button
    'for further information: https://powerspreadsheets.com/excel-vba-inputbox/

    'declare variable to hold value returned by InputBox
    Dim myInputBoxCancelVariable As Variant

    '(1) create InputBox, and (2) assign value returned by Application.InputBox method to variable
    myInputBoxCancelVariable = Application.inputBox(Prompt:="Create Excel VBA InputBox and work with Cancel button")

    'check if user clicked Cancel button and, if appropriate, execute statements
    If (TypeName(myInputBoxCancelVariable) = "Boolean") And (myInputBoxCancelVariable = "False") Then

        'display message box confirming that user clicked Cancel button
        MsgBox "You clicked the Cancel button"

    'check if user entered no input and, if appropriate, execute statements
    ElseIf myInputBoxCancelVariable = "" Then

        'display message box confirming that user entered no input
        MsgBox "You didn't enter an input"

    'if user didn't click Cancel button and entered input, execute statements
    Else

        'display message box with value held by variable
        MsgBox "Your input was: " & myInputBoxCancelVariable

    End If

End Sub
Effects of executing macro example to create InputBox and check if user clicks Cancel button with Application.InputBox method
The following GIF illustrates the results of executing the macro example. As expected:
- Excel displays an input box created with the Application.InputBox function.
- The macro identifies whether the user:
- Clicks the Cancel button;
- Enters no input prior to clicking OK; or
- Enters input and clicks OK.
- Excel displays the appropriate message box depending on the actions taken by the user.

#9: Create InputBox and check if user clicks Cancel button when working with cell range and Application.InputBox method
VBA code to create InputBox and check if user clicks Cancel button when working with cell range and Application.InputBox method
To create an InputBox that works with a cell range using the VBA Application.InputBox method and check if the user clicks Cancel, use a macro with the following statement structure:
Dim InputBoxRangeCancelVariable As Range
On Error Resume Next
Set InputBoxRangeCancelVariable = Application.InputBox(Prompt:=PromptString, Type:=8)
On Error GoTo 0
If InputBoxRangeCancelVariable Is Nothing Then
    StatementsIfCancel
Else
    StatementsIfRangeInput
End If
Process to create InputBox and check if user clicks Cancel button when working with cell range and Application.InputBox method
To create an InputBox that works with a cell range using the VBA Application.InputBox method and check if the user clicks Cancel, follow these steps:
- Explicitly declare an object variable to hold a reference to the Range object representing the cell range (Dim InputBoxRangeCancelVariable As Range).
- Enable error-handling with the On Error Resume Next statement.
- Create an input box with the Application.InputBox method (Application.InputBox(…)).
- Set the Type parameter of the Application.InputBox method to 8 (Type:=8), which results in Application.InputBox returning a Range object.
- Assign the value returned by the Application.InputBox method to the object variable (InputBoxRangeCancelVariable = Application.InputBox(…)).
- Disable error-handling withe the On Error GoTo 0 statement.
- Use an If… Then… Else statement for the following:
- Testing whether the user clicked Cancel (InputBoxRangeCancelVariable Is Nothing).
- Executing the appropriate group of statements depending on whether the user clicked Cancel (StatementsIfCancel) or not (StatementsIfRangeInput).
VBA statement explanation
Line #1: Dim InputBoxRangeCancelVariable As Range
The Dim statement declares the InputBoxRangeCancelVariable object variable as of the Range object data type and allocates storage space.
When you check if the user clicks the Cancel button while working with a cell range using this macro structure, you explicitly declare the object variable that holds the reference to the cell range returned by the Application.InputBox method.
Line #2: On Error Resume Next
The On Error Resume Next statement enables an error-handling routine and specifies that, when a run-time error occurs, control goes to the statement following that where the error occurred.
When you check if the user clicks the Cancel button while working with a cell range using this macro structure, On Error Resume Next handles the error caused by line #3 (Set InputBoxRangeCancelVariable = Application.InputBox(Prompt:=PromptString, Type:=8)) if the user clicks Cancel. This error is usually run-time error 424 (object required).
If you don’t declare the InputBoxRangeCancelVariable object variable explicitly, the behavior of the macro and the error caused when the user clicks Cancel usually differs from what I describe in this VBA Tutorial.
Line #3: Set InputBoxRangeCancelVariable = Application.InputBox(Prompt:=PromptString, Type:=8)
Item: Set… =…
The Set statement assigns the object reference returned by the Application.InputBox method (Application.InputBox(…)) to InputBoxRangeCancelVariable.
Item: InputBoxRangeCancelVariable
InputBoxRangeCancelVariable is the object variable you want to hold the Range object returned by the Application.InputBox method.
When working with a cell range and the Application.InputBox method, Application.InputBox usually returns a Range object, unless the user clicks on the Cancel button. The cases where the user clicks on the Cancel button are handled by the On Error Resume Next statement.
Therefore, if you explicitly declare InputBoxRangeCancelVariable when working with this macro structure, you can usually declare it as of the Range object data type.
Item: Application.InputBox(…)
The Application.InputBox method:
- Displays an input box;
- Waits for the user to either (i) input information and click the OK button (or press the Enter key), or (ii) click the Cancel button (or press the Esc key); and
- Returns the information entered in the dialog box (if the user clicks OK or presses Enter).
Item: Prompt:=PromptString
The Prompt parameter of the Application.InputBox method is a string displayed as the message in the input box. Prompt is a required parameter.
You generally specify PromptString as a string expression.
You can also specify PromptString as a number, a date or a Boolean. In such cases, Excel coerces the number, date or Boolean to a string.
PromptString can be composed of multiple lines. To create an input box with multiple lines, please refer to the appropriate section of this Tutorial.
Item: Type:=8
The Type parameter of the Application.InputBox method specifies the data type returned.
When working with a cell range, set Type to 8. In such case, Application.InputBox returns a Range object.
Line #4: On Error GoTo 0
The On Error GoTo 0 statement disables the error-handler enabled in line #2.
Lines #5, #7 and #9: If InputBoxRangeCancelVariable Is Nothing Then | Else | End If
Item: If… Then… Else… End If
The If… Then… Else statement conditionally executes a group of statements (StatementsIfCancel or StatementsIfRangeInput) depending on the value of an expression (InputBoxRangeCancelVariable Is Nothing).
Item: InputBoxRangeCancelVariable Is Nothing
The condition of the If… Then… Else statement is an expression returning True or False.
The Is operator compares InputBoxRangeCancelVariable and Nothing. This expression returns True if both refer to the same.
Nothing is the default value for an object variable. Therefore, if the user clicks Cancel, InputBoxRangeCancelVariable Is Nothing returns True.
Line #6: StatementsIfCancel
Statements executed if the tested condition (InputBoxRangeCancelVariable Is Nothing) returns True. In other words, these statements are executed if the user clicks Cancel.
Line #8: StatementsIfRangeInput
Statements executed if the tested condition (InputBoxRangeCancelVariable Is Nothing) returns False. In other words, these statements are executed if the user enters/selects a cell range as input.
Macro example to create InputBox and check if user clicks Cancel button when working with cell range and Application.InputBox method
The following macro example:
- Enables error-handling (On Error Resume Next).
- Creates an input box that returns a Range object (Type:=8) with the Application.InputBox method.
- Assigns the object reference returned by the Application.InputBox method to an object variable (Set myInputBoxRangeCancelVariable = Application.inputBox(…)).
- Disables error-handling (On Error GoTo 0).
- Checks whether user clicked Cancel (myInputBoxRangeCancelVariable Is Nothing).
- If the user clicked Cancel, displays a message box confirming this.
- If the user didn’t click Cancel, displays a message box with the range reference of the cell range represented by the variable (myInputBoxRangeCancelVariable.Address).
Sub CreateInputBoxMethodCellRangeCancel()
    'source: https://powerspreadsheets.com/
    '(1) creates an input box that works with cell ranges using the Application.InputBox method, and (2) handles case where user clicks Cancel button
    'for further information: https://powerspreadsheets.com/excel-vba-inputbox/

    'declare object variable to hold reference to Range object (cell range) returned by InputBox
    Dim myInputBoxRangeCancelVariable As Range

    'enable error-handling
    On Error Resume Next

    '(1) create InputBox that works with cell range, and (2) assign value returned by Application.InputBox method to variable
    Set myInputBoxRangeCancelVariable = Application.inputBox(Prompt:="Create Excel VBA InputBox that works with cell range and handles Cancel button", Type:=8)

    'disable error-handling
    On Error GoTo 0

    'check if user clicked Cancel button and, if appropriate, execute statements
    If myInputBoxRangeCancelVariable Is Nothing Then

        'display message box confirming that user clicked Cancel button
        MsgBox "You clicked the Cancel button"

    'if user didn't click Cancel button, execute statements
    Else

        'display message box with address of cell range represented by object variable
        MsgBox "Your input was: " & myInputBoxRangeCancelVariable.Address

    End If

End Sub
Effects of executing macro example to create InputBox and check if user clicks Cancel button when working with cell range and Application.InputBox method
The following GIF illustrates the results of executing the macro example. As expected:
- Excel displays an input box created with the Application.InputBox function. The InputBox allows the user to select a cell range.
- The macro identifies whether the user:
- Clicks the Cancel button; or
- Selects or otherwise enters an appropriate cell range.
- Excel displays the appropriate message box depending on the actions taken by the user.
