
Word for Microsoft 365 Word for Microsoft 365 for Mac Word 2021 Word 2021 for Mac Word 2019 Word 2019 for Mac Word 2016 Word 2016 for Mac Word 2013 Word 2010 Word 2013 Developer Word Starter 2010 More…Less
Sometimes, putting a border around text will work better in your document than inserting a text box or a one-cell table, to achieve a similar look.
-
Select a word, line, or paragraph.
-
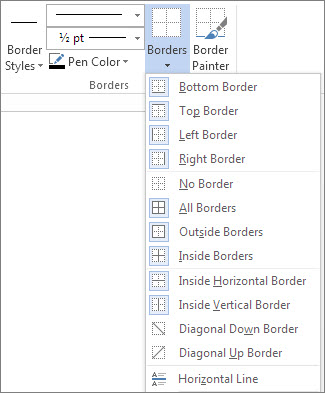
Go to Home > Borders, and then open the menu of border choices.

-
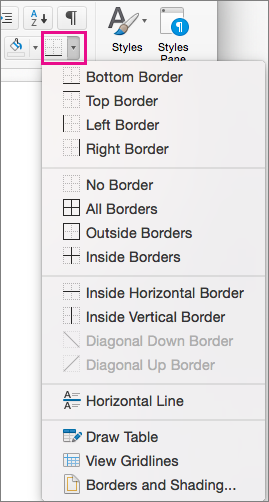
Choose the type of border you want:
Customize the border
-
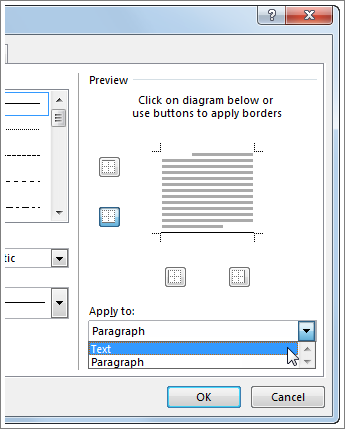
After you’ve selected your text and found the basic type of border you’d like, open the Borders menu again, and choose Borders and Shading.
-
Make your choices for style, color, and width, and then apply the choice with the buttons in the Preview section of the dialog box. When the preview is the way you want it, click OK.
Note: Make sure that the Apply to box has the correct setting: Text or Paragraph.
See Also
Add, change, or delete borders from documents or pictures
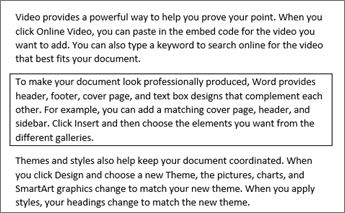
You can add a border to an individual word, a line of text, or an entire paragraph. You can make borders as plain or fancy as you want.
You can also add a border to a picture, put a border around a table, add a border to an individual page.
Add a border to selected text
-
Select a word, line, or paragraph.
-
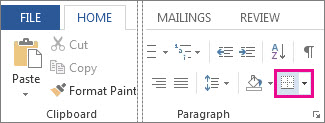
On the Home tab, click the arrow next to the Borders button.
-
In the Borders gallery, click the border style that you want to apply.
Customize the text border
-
After you’ve selected your text and found the basic type of border you’d like, click the arrow next to the Borders button again, and then click Borders and Shading.
-
In the Borders and Shading dialog box, change Setting, Style, Color, and Width to create the border style that you want.
Note: To make sure the border style is correctly applied, set Apply to to Text or Paragraph. If you haven’t selected any text, you can only set Apply to to Paragraph.
-
Click OK to apply your selected border styles.
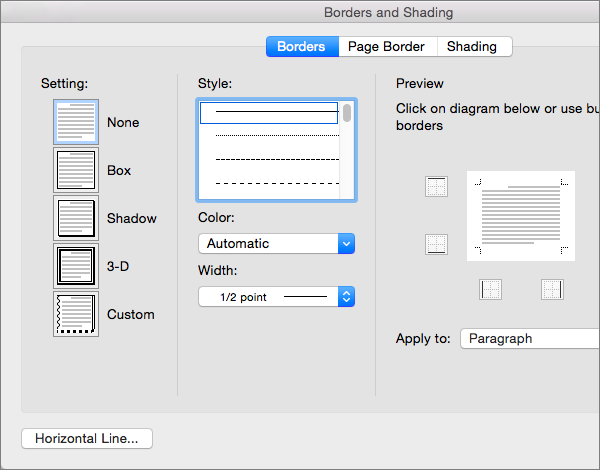
Tip: You can also fill the area of your selected text with color. In the Borders and Shading dialog box, click Shading to select a color and patterns. The color you pick in the Fill list fills the rectangular area; the color you select from the Color menu is applied to the rectangular area in a pattern you select from the Style list.
See Also
Add, change, or delete borders from documents or pictures
Add a border to a table
Need more help?
You can stick a box around any spate of words or paragraphs: Select the text you want to box in. Choose the Borders and Shading command from the bottom of the Border menu. If you want to apply the border to only text (words) and not to the entire paragraph, choose Text from the Apply To drop-down list.
How do I Colour a box around text in Word?
Change the text color Select the shape or text box. On the Drawing Tools Format tab, click Text Fill > More Fill Colors. In the Colors box, either click the color you want on the Standard tab, or mix your own color on the Custom tab.
How do you put a box around a paragraph?
Add a border to selected text Select a word, line, or paragraph. On the Home tab, click the arrow next to the Borders button. In the Borders gallery, click the border style that you want to apply.
Can you put a border around a text box?
Add a custom border Right-click the text box, AutoShape, picture, or object that you want to add the border to. Select the appropriate Format <object> menu item and click the Colors and Lines tab. Click BorderArt. Click Select Picture.
How do you make a text box transparent in Word 2020?
Word Right-click the text box that you want to make invisible. On the shortcut menu, click Format Text Box. On the Colors and Lines tab, in the Fill section, click the arrow next to Color, and then click No Color. On the Colors and Lines tab, in the Line section, click the arrow next to Color, and then click No Color.
How do I turn a text box into a frame?
Converting a Text Box to a Frame Right-click on the text box. Word displays a Context menu. Choose the Format Text Box from the Context menu. Word displays the Format Text Box dialog box. Click on the Text Box tab. (See Figure 1.) Click on Convert to Frame. Click on OK.
How do I put a border around a paragraph in Word?
How to Put Borders Around a Paragraph in Word 2016 Place the insertion pointer in a paragraph. Click the Home tab. In the Paragraphs group, click the triangle next to the Borders command button. The Borders menu appears. Choose a border style from the menu.
How do I create a text box without borders?
Remove the border Select the text box or shape. If you want to change multiple text boxes or shapes, click the first text box or shape, and then press and hold Ctrl while you click the other text boxes or shapes. On the Format tab, click Shape Outline, and then click No Outline.
How do you type a box?
Add a text box Go to Insert > Text Box, and then select Draw Text Box. Click or tap in the document, and drag to draw the text box the size that you want. To add text to a text box, select inside the text box, and then type or paste text. Notes:.
How do I change the opacity of text in Word?
Click the “Shape Fill” down arrow from the “WordArt Styles” section of the “Format” tab. Click “More Fill Colors” and then use the slider underneath the “Transparency” section to choose your desired opaqueness. Click the “OK” button.
How do you put a box around multiple paragraphs in Word?
Re: Single Border Around Multiple Paragraphs Put the cursor at the far left of the first (bulleted) paragraph and press Shift+tab (to remove the list indent) Repeat #1 for the second bulleted paragraph. Select all eight paragraphs. Apply the box border.
How do you make a text box without lines in Word?
To remove the border from a text box, follow these steps: Either click on the border of the text box or position the insertion point within the text box. Select the Text Box option from the Format menu. Click on the Colors and Lines tab, if necessary. In the Color drop-down list, select No Line. Click on OK.
How do I put a frame around a picture in Word?
Add a border to a picture Select the picture that you want to apply a border to. On the Page Layout tab, in the Page Background group, select Page Borders. In the Borders and Shading dialog box, on the Borders tab, choose one of the border options under Settings. Select the style, color, and width of the border.
Why can’t I add a text box in Word?
If any part of the document is protected, insertion of pictures and text boxes (which in Word are actually graphic objects) is disabled. It seems you’re limiting the restriction to headers and footers.
How to Edit a Textbox in Word Click anywhere in the Word text box to enter editing mode. Click and drag your mouse across a section of text to edit it. Click the “Home” tab to access text formatting tools.
How do you make a text box transparent in CSS?
Setting Transparent Boxes You can set the CSS transparent background for boxes by adding the opacity property to multiple <div> elements. Tip: you should notice that texts inside boxes take the opacity of the CSS transparent background. The RGBA function allows you to keep the text opacity.
How do I change the opacity of a footer?
Go to Insert > Header & Footer. On the right side of the white area at the top of the document, select Options > Different First Page. Type your content into the header or footer on the first page. Select outside the header or footer to exit.
How do I put a border around a section in Word?
To apply a border to a section, select the text and go to Borders > Borders and Shading > Borders > border style options > OK. For a whole page, go to Insert > Text Box > Draw Text Box and format the text box border as desired. You can also add a border to table cells or an entire table.
How do I create a custom border in Word?
To create a custom page border in Word: Open Word and click on the Design tab. Under Page Layout, click Page Borders. Click Page Border in the Borders and Shading window. Select the Custom option from the list of choices. This is when the real fun begins. Click OK to create the border.
How do I open the borders and shading dialog box in Word?
Click the Home tab. In the Paragraph group, click the triangle by the Borders button to display the Borders menu. Choose the Borders and Shading command. The Borders and Shading dialog box appears, as shown here.
-
1
Click the Insert tab.
-
2
On the right side of all of the things you can insert, look for ‘Text Box.’
Advertisement
-
3
Select the text box that you want to use and double click on it.
-
4
Cut and paste the text into the text box.


Advertisement
Ask a Question
200 characters left
Include your email address to get a message when this question is answered.
Submit
Advertisement
Video
-
To change the size of the text box, click on it once, and drag one of the 8 circles.
-
You can change the design of the text box you have selected by going into the format tab.
Thanks for submitting a tip for review!
Advertisement
About This Article
Thanks to all authors for creating a page that has been read 98,464 times.
Is this article up to date?
wikiHow Tech Help Pro:
Level up your tech skills and stay ahead of the curve
Let’s go!

When you need to highlight a portion of text, it’s not always convenient to use a text box. To emphasize a paragraph while keeping it within the main content, you can put a border around that text in Word instead.
You can put a border around specific text, such as a single sentence, or an entire paragraph. Let’s look at how to do both as well as customize the border.
Select the text you want to surround with a border and go to the Home tab. Click the drop-down arrow next to Borders and choose “Borders and Shading.”

Use a Setting option on the left or the buttons below Preview on the right to add the border around the text. You can also adjust the Style, Color, and Width settings in the center of the window to customize the line for the border.
RELATED: How to Add Borders to or Change Borders on a Table in Word
In the Apply To drop-down box on the right side, select “Text” and when you finish, click “OK” to apply the border.
You’ll then see your text outlined with a border.
Put a Border Around a Paragraph
If you have an entire paragraph you’d like to place a border around, the process is similar. However, you have a few extra customization options.
RELATED: How to Put Borders Around Images in Microsoft Word
Select the paragraph you want to surround with a border and head to the Home tab. Click the Borders drop-down arrow and pick one of the quick border options such as Outside Borders or All Borders.
This places the border around the paragraph from margin to margin on each side and gives you a fast way to add the border. But you can also customize the border and adjust the space between the border and the text.
Select the bordered paragraph, click the drop-down arrow next to Borders on the Home tab, and choose “Borders and Shading.”
Like with customizing the border for specific text, you can change the Style, Color, and Width for the border line. Confirm that “Paragraph” is selected in the Apply To drop-down box. Then, to adjust the spacing, click “Options” on the right side of the window.
At the top, use the arrows or enter the number of points for the spacing on the top, bottom, left, and right of the border in relation to the text. As you make the changes, you’ll see a preview directly below. Click “OK” when you finish.
Make any other adjustments you want in the Borders and Shading window and click “OK” when you’re done to apply the border.
RELATED: How to Change Page Margins in Word
Remove a Border From Text in Word
If you decide later to remove a border you’ve added, it takes only a few clicks. Select the text or paragraph containing the border and revisit the Home tab. Click the drop-down arrow next to Borders and pick “No Border.”
Text boxes in Word are great ways to call out portions of text. But if you want to keep your text in line with the rest and simply highlight a small piece, consider surrounding it in a border. For other types of borders, take a look at how to create a page border in Word.
READ NEXT
- › How to Mirror or Flip Text in Microsoft Word
- › How to Outline Text in Adobe Photoshop
- › Google+ Will Come to a Final End on July 5, 2023
- › The Best DNS Servers for Secure Browsing
- › Get to Your Windows 11 Desktop: 7 Fastest Methods
- › Universal Audio Volt 2 Review: A Workhorse Audio Interface With Vintage Charm
- › Why the Right-Click Menu in Windows 11 Is Actually Good
- › Why One Ultrawide Is Better Than Two Monitors
How-To Geek is where you turn when you want experts to explain technology. Since we launched in 2006, our articles have been read billions of times. Want to know more?
![]()
Written by Allen Wyatt (last updated May 29, 2021)
This tip applies to Word 2007, 2010, 2013, 2016, 2019, and Word in Microsoft 365
Timothy apparently hit some control key that caused paragraphs in his document to appear in a box. The box enlarges with long sentences; pressing Enter begins a new box. The boxes do not print (thankfully), but they appear in new blank documents. It is as if there is a one-cell table, but there isn’t. Selecting the paragraphs and formatting for «no border» does not make the boxes go away. If Timothy just knew what to call it, he’s sure he could find the answer, but he’s stumped as to why this is happening.
If this problem crops up and you are using Word 2013 or a later version, it is very possible that you’ve inadvertently turned on the display of text boundaries. In older versions of Word, turning on text boundaries displayed a border on the page corresponding to the margins. In Word 2013 or a later version, the text boundaries are displayed around each paragraph on the page. (See Figure 1.)

Figure 1. Text boundaries appear around individual paragraphs.
If this is your problem, you can turn off the display of text boundaries in this manner:
- Display the Word Options dialog box. (In Word 2007 click the Office button and then click Word Options. In Word 2010 or a later version, display the File tab of the ribbon and then click Options.)
- At the left side of the screen click Advanced.
- Scroll through the options until you see the Show Document Content section. (See Figure 2.)
- Make sure the Show Text Boundaries check box is cleared.
- Click OK.
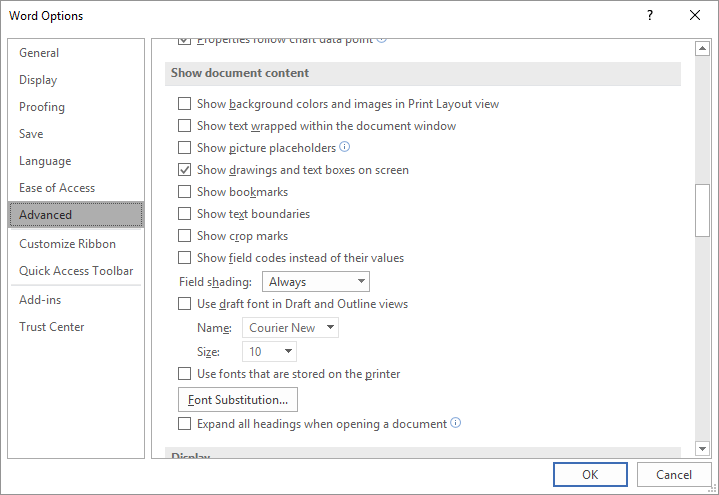
Figure 2. Advanced options in the Word Options dialog box.
If that does not fix your problem (or if you are not using Word 2013 or a later version), then check the style formatting for the Normal paragraph style. (How you modify styles has been discussed frequently in other WordTips.) In the universe of styles, the Normal style holds preeminence. It is the «root» style for almost all other built-in styles, and even for many custom styles.
The bottom line is that if the Normal style is formatted to have a box around it, then there is a good chance that all your paragraphs will have boxes around them. Check the style formatting and remove any boxes that may be associated with the style, and your problem may be immediately fixed.
In all honesty, though, the problem probably isn’t related to the Normal paragraph style. If it were, then the boxes would also print, and Timothy specifically said that his boxes didn’t print. There is, however, one final possibility—document or template corruption.
If the problem occurs in only a single document or a handful of documents, it could be that either the document or the template on which the document is based is corrupted in some way. Start by locating the Normal template (outside of Word) and renaming it to something else. Then, start Word and open the offending document. Create a new document and copy everything from the problem document (with the exception of the ending paragraph mark) to the new document. This process is detailed in this tip:
https://wordribbon.tips.net/T013284
WordTips is your source for cost-effective Microsoft Word training.
(Microsoft Word is the most popular word processing software in the world.)
This tip (10385) applies to Microsoft Word 2007, 2010, 2013, 2016, 2019, and Word in Microsoft 365.
Author Bio
With more than 50 non-fiction books and numerous magazine articles to his credit, Allen Wyatt is an internationally recognized author. He is president of Sharon Parq Associates, a computer and publishing services company. Learn more about Allen…
MORE FROM ALLEN
Duplexing Documents, by Default
If you have a printer that will print on both sides of a piece of paper, you may want to use that ability within Word. …
Discover More
Handling Validation for Proper Latitude
When setting up Excel for data entry, you often have to be concerned with what values are acceptable. For example, if …
Discover More
Different CSV Formats
Excel provides different CSV formats you can use to export your workbook data for use with other programs. What are those …
Discover More