
Text boxes in an MS Word document are a very useful feature. Text within a box acts as a highlight for the reader. Here, we will show you how to:
- Add a Text Box
- Remove a Text Box
- Customize a Text Box Border
- Change Border Color
- Create Dashed Border
- Change Border Thickness
Let us begin.
Step #1: Open the Word document.
Open the Word document where you want to add the text box.
Step #2: Add the Text Box
Position the cursor where you want the text box to appear.
In the top menu bar, click on the Insert tab to change the ribbon.

In the section Text, click on the Text Box icon to open a dialog box for Built-In text boxes.

Click on the text box you find suitable. We select the Simple Text Box.

Word adds the text box in the document.

Remove a Text Box
Step #1: Open the Word document.
Open the Word document that has at least one text box.
Step #2: Remove the text box
Click on the text box boundary to select it.

Press the Delete button on your keyboard.
Word will delete the text box from your document.
Customize a Text Box Border
Step #1: Open the Word document.
Open the Word document that has at least one text box.
Step #2: Customize the text box border
Click on the text box boundary to select it.

Right-click on the text box boundary to open a menu.
Click on Format AutoShape/Picture.

This opens a dialog box for Format Text Box.
Click on the Colors and Lines tab.

Change Border Color
Under Line, click on the down arrow on the right-hand side of Color:.

This opens a dialog box for Theme Colors and Standard Colors.
Click on the color of your choice.

The chosen color will appear against the Color: tab under Line.

Note: At this point, you can click on OK at the bottom of the dialog box to exit. Word will change the color of the box to your chosen color. Else, move to the next step to make more changes.
Create Dashed Border
In the Format Text Box dialog box, under Line, click on the down arrow on the right side of Dashed:.

This opens a choice for different dashed lines.
Select the most suitable dashed line.

The chosen dashed line will appear against the Dashed: tab under Line.

Note: At this point, you can click on OK at the bottom of the dialog box to exit. Word will make the changes to the text box as per your choices above. Else, move to the next step to make more changes.
Change Border Thickness
In the Format Text Box dialog box, under Line, click on the down arrow on the right side of Style:.

This opens a choice for lines of a different style.
Each line style has its weight in points on its left.
Select the line most suitable to you.

The chosen line style will appear against the Style: tab.
The weight of the chosen line style will appear against the Weight: tab under Style:.

The choice of line styles offers only a few discrete weights.
To change the line weight, select the number next to Weight:.
Change the number as you like.

Click on OK at the bottom of the Format Text Box dialog box to exit.
Word will make the changes to the text box according to all your choices.

Conclusion
Follow our step-by-step instructions to add or delete text boxes in your Word document. Beautify your text boxes with our instructions. We have shown you how to change the border color, style of the border line, and the thickness of the border.

When you need to highlight a portion of text, it’s not always convenient to use a text box. To emphasize a paragraph while keeping it within the main content, you can put a border around that text in Word instead.
You can put a border around specific text, such as a single sentence, or an entire paragraph. Let’s look at how to do both as well as customize the border.
Select the text you want to surround with a border and go to the Home tab. Click the drop-down arrow next to Borders and choose “Borders and Shading.”

Use a Setting option on the left or the buttons below Preview on the right to add the border around the text. You can also adjust the Style, Color, and Width settings in the center of the window to customize the line for the border.
RELATED: How to Add Borders to or Change Borders on a Table in Word
In the Apply To drop-down box on the right side, select “Text” and when you finish, click “OK” to apply the border.
You’ll then see your text outlined with a border.
Put a Border Around a Paragraph
If you have an entire paragraph you’d like to place a border around, the process is similar. However, you have a few extra customization options.
RELATED: How to Put Borders Around Images in Microsoft Word
Select the paragraph you want to surround with a border and head to the Home tab. Click the Borders drop-down arrow and pick one of the quick border options such as Outside Borders or All Borders.
This places the border around the paragraph from margin to margin on each side and gives you a fast way to add the border. But you can also customize the border and adjust the space between the border and the text.
Select the bordered paragraph, click the drop-down arrow next to Borders on the Home tab, and choose “Borders and Shading.”
Like with customizing the border for specific text, you can change the Style, Color, and Width for the border line. Confirm that “Paragraph” is selected in the Apply To drop-down box. Then, to adjust the spacing, click “Options” on the right side of the window.
At the top, use the arrows or enter the number of points for the spacing on the top, bottom, left, and right of the border in relation to the text. As you make the changes, you’ll see a preview directly below. Click “OK” when you finish.
Make any other adjustments you want in the Borders and Shading window and click “OK” when you’re done to apply the border.
RELATED: How to Change Page Margins in Word
Remove a Border From Text in Word
If you decide later to remove a border you’ve added, it takes only a few clicks. Select the text or paragraph containing the border and revisit the Home tab. Click the drop-down arrow next to Borders and pick “No Border.”
Text boxes in Word are great ways to call out portions of text. But if you want to keep your text in line with the rest and simply highlight a small piece, consider surrounding it in a border. For other types of borders, take a look at how to create a page border in Word.
READ NEXT
- › How to Mirror or Flip Text in Microsoft Word
- › How to Outline Text in Adobe Photoshop
- › Google+ Will Come to a Final End on July 5, 2023
- › The Best DNS Servers for Secure Browsing
- › Get to Your Windows 11 Desktop: 7 Fastest Methods
- › Universal Audio Volt 2 Review: A Workhorse Audio Interface With Vintage Charm
- › Why the Right-Click Menu in Windows 11 Is Actually Good
- › Why One Ultrawide Is Better Than Two Monitors
How-To Geek is where you turn when you want experts to explain technology. Since we launched in 2006, our articles have been read billions of times. Want to know more?
Used sparingly, borders are a great way to get attention. Here’s how to add a line, pattern, or custom border to a text box, picture, and other objects in Word, PowerPoint, or Excel for Mac.
Note: If you didn’t add the border to the shape, text box, picture, or other object in Mac Office, you can’t change or remove the border for the object.
Word
Add or remove a border for a shape or text box
-
Select the shape or text box to which you want to add or remove a border.
-
Click Shape Format, and then click the arrow next to Shape Outline.

-
Do any of the following:
To
Do This
Add or change the color of the border
Either click the color that you want, or mix your own color by clicking More Outline Colors.
Add or change the thickness of the border
Point to Weight, and then choose the line weight that you want.
Add or change the style of the border
Point to Dashes, and then click the line style that you want.
Remove the border from the shape or text box
Click No Outline.

Add or remove a picture border
-
Select the picture to which you want to add or remove a border.
-
Click Picture Format, and then click the arrow next to Picture Border.
-
Do any of the following:
To
Do This
Add or change the color of the border
Either click the color you want, or mix your own color by clicking More Outline Colors.
Add or change the thickness of the border
Point to Weight, and then choose the line weight you want.
Add or change the style of the border
Point to Dashes, and then click the line style you want.
Remove the border from the picture
Click No Outline.

PowerPoint
Add or remove a border for a shape or text box
-
Select the shape or text box to which you want to add or remove a border.
-
Click Shape Format, and then click the arrow next to Shape Outline .
-
Do any of the following:
To
Do This
Add or change the color of the border
Either click the color you want, or mix your own color by clicking More Outline Colors.
Add or change the thickness of the border
Point to Weight, and then choose the line weight you want.
Add or change the style of the border
Point to Dashes, and then click the line style you want.
Remove the border from the shape or text box
Click No Outline.

Add or remove a picture border
-
Select the picture whose border you want to add or remove.
-
Click Picture Format, and then click the arrow next to Picture Border.
-
Do any of the following:
To
Do This
Add or change the color of the border
Either click the color you want, or mix your own color by clicking More Outline Colors.
Add or change the thickness of the border.
Point to Weight, and then choose the line weight you want.
Add or change the style of the border
Point to Dashes, and then click the line style you want.
Remove the border from the picture
Click No Outline.

Excel
Add or remove a border for a shape or text box
-
Select the shape or text box to which you want to add or remove a border.
-
Click Shape Format, and then click the arrow next to the Shape Outline.
-
Do any of the following:
To
Do This
Add or change the color of the border
Either click the color you want, or mix your own color by clicking More Outline Colors.
Add or change the thickness of the border
Point to Weight, and then choose the line weight you want.
Add or change the style of the border
Point to Dashes, and then click the line style you want.
Remove the border from the shape or text box
Click No Outline.

Add or remove a picture border
-
Select the picture whose border you want to add or remove.
-
Click Picture Format, and then click the arrow next to Picture Border.
-
Do any of the following:
To
Do This
Add or change the color of the border
Either click the color you want, or mix your own color by clicking More Outline Colors.
Add or change the thickness of the border
Point to Weight, and then choose the line weight you want.
Add or change the style of the border
Point to Dashes, and then click the line style you want.
Remove the border from the picture
Click No Outline.

Word
Do any of the following:
Add a border to a shape or text box
-
Select the shape or text box that you want to add a border to.
-
On the Format tab, under Shape Styles, click Line.
-
Do any of the following:
To
Do This
Add a colored border
Either click the color that you want, or mix your own color by clicking More Colors.
Add a border of a specific thickness
Point to Weights, and then choose the line weight that you want.
Add a border of a specific style
Point to Dashed, and then click the line style that you want.

Add borders to a table
-
Select the table that you want to add borders to.
-
Do any of the following:
To
Do This
Add a colored border
On the Tables tab, under Table Styles, click the arrow next to Lines, and then either click the color that you want, or mix your own color by clicking More Colors.
Add a border of a specific thickness
On the Tables tab, under Draw Borders, click the Line Weight
pop-up menu and choose the thickness that you want the borders to be.Add a border of a specific style
On the Tables tab, under Draw Borders, click the Line Style
pop-up menu, and choose the line style that you want the borders to have. -
On the Tables tab, under Draw Borders, click the arrow next to Borders
and then select or clear the table borders that you want.
 pop-up menu and choose the thickness that you want the borders to be.
 pop-up menu, and choose the line style that you want the borders to have.
 and then select or clear the table borders that you want.
Add a border to a picture
-
Select the picture that you want to add a border to.
-
On the Format Picture tab, under Picture Styles, click the arrow next to Border
. -
Do any of the following:
To
Do This
Add a colored border
Either click the color that you want, or mix your own color by clicking More Colors.
Add a border of a specific thickness
Point to Weights, and then choose the line weight that you want.
Add a border of a specific style
Point to Dashed, and then click the line style that you want.
PowerPoint
Do any of the following:
Add a border to a shape or text box
-
Select the shape or text box that you want to add a border to.
-
On the Format tab, under Shape Styles, click Line.
-
Do any of the following:
To
Do This
Add a colored border
Either click the color that you want, or mix your own color by clicking More Colors.
Add a border of a specific thickness
Point to Weights, and then choose the line weight that you want.
Add a border of a specific style
Point to Dashed, and then click the line style that you want.
Add borders to a table
-
Select the table that you want to add borders to.
-
Do any of the following:
To
Do This
Add a colored border
On the Tables tab, under Table Styles, click the arrow next to Lines, and then either click the color that you want, or mix your own color by clicking More Colors.
Add a border of a specific thickness
On the Tables tab, under Draw Borders, click the Line Weight
pop-up menu and choose the thickness that you want the borders to be.Add a border of a specific style
On the Tables tab, under Draw Borders, click the Line Style
pop-up menu, and choose the line style that you want the borders to have. -
On the Tables tab, under Draw Borders, click the arrow next to Borders
and then select or clear the table borders that you want.

Add a border to a picture
-
Select the picture that you want to add a border to.
-
On the Format Picture tab, under Picture Styles, click the arrow next to Border
. -
Do any of the following:
To
Do This
Add a colored border
Either click the color that you want, or mix your own color by clicking More Colors.
Add a border of a specific thickness
Point to Weights, and then choose the line weight that you want.
Add a border of a specific style
Point to Dashed, and then click the line style that you want.
Excel
Do any of the following:
Add a border to a shape or text box
-
Select the shape or text box that you want to add a border to.
-
On the Format tab, under Shape Styles, click Line.
-
Do any of the following:
To
Do This
Add a colored border
Either click the color that you want, or mix your own color by clicking More Colors.
Add a border of a specific thickness
Point to Weights, and then choose the line weight that you want.
Add a border of a specific style
Point to Dashed, and then click the line style that you want.
Add a border to a picture
-
Select the picture that you want to add a border to.
-
On the Format Picture tab, under Picture Styles, click the arrow next to Border
. -
Do any of the following:
To
Do This
Add a colored border
Either click the color that you want, or mix your own color by clicking More Colors.
Add a border of a specific thickness
Point to Weights, and then choose the line weight that you want.
Add a border of a specific style
Point to Dashed, and then click the line style that you want.
See also
Add, change, or remove a page border
Reading
a lengthy text document can make anyone bored in minutes. However, there are
few simple ways to make your documents more attractive and appealing to the
reader. One such option is to add colorful text boxes in-between paragraphs.
This is a useful way to show important action points on full text based
documents. In this article, let us explore how to create text box in Word
document.
Related: How to quickly add dividers in Word?
We
will discuss the following options based on Word 2016 or later version.
- Create text box from existing text
- Creating empty text box
- Changing text box size and position
- Changing text direction
- Deleting borders
Creating
Text Box from Existing Text
You can convert any of the existing text paragraph and list to a text box in Word. Let’s see how to do that.
- First open your document and select the paragraph you want to convert to a text box.
- Switch to the “Insert” tab from the ribbon menu.
- Open the “Text Box” menu.
- Word offers a selection of predefined text boxes, for example for creating sidebars with quotes.
- However, for converting the existing text, select the entry “Draw Text Box” in the lower pane.

This will instantly add a bordered text box around
the selected text. Word treats text boxes as a drawing and you can design the
box as per your need using the “Drawing Tools” menu. You can move the text
boxes anywhere in the document, depending on the layout. This can be useful for
the design of flyers and brochure.
Creating
Empty Text Box
Of course, you do not necessarily need existing text to
create a new text box. Alternatively, you can also create empty text boxes and
enter the text into them later.
- Place the cursor where you want to insert a text box.
- Reopen the “Insert” menu and select “Text Box” option.
- Click the “Draw Text Box” menu item. You will see the cursor now changed to cross hair shape.
- Draw out the text box while holding down the left mouse button.
- Then enter the text into the text box.
- You can look at the various options in the context menu of your text box for designing your text box.

Changing
Text Box Size and Position
When
you have created a text box out, you have various options for editing. You can
design it, change the size and place it anywhere in your document.
- You can change the size of the box using the handles on the edges of it. Word will automatically adjust the text content inside the box.
- It is also possible to freely move the box using the mouse. You can hover over the mouse to change the cursor into a star shape, allowing you to drag the box.
- Formatting is also possible as usual, for example, right-click on the selected text to use the Mini toolbar and format the text in bold or change the alignment.
- You can click on the “Layout Options” button on the side of the text box to wrap text box with the content on your document.

Changing
Text Direction
Within
a text box, you can also influence the text direction. Besides the default
horizontal alignment the text can also run vertically.
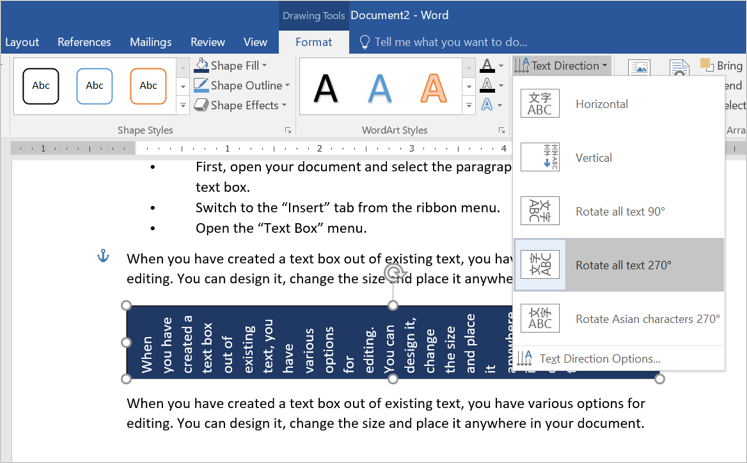
- What about if you want to rotate the text inside text box? This is also
very easy. Open the “Text Direction”. - Double click on the text box to open “Drawing Tools” menu. Click on the
“Text Direction” menu and select the entry, “Rotate all text 270°”. - The text is now set vertically in the text box and you can adjust the
format and position of the box.
- You can move the text box between paragraphs or columns by dragging the
box while keeping the left mouse button pressed.
Related: How to embed Excel table in Word document?
Deleting
Borders and Content
By
default, text boxes are displayed with borders, but you do not have to keep
them. You can easily remove the borders.
- Click on the text box to open the “Drawing Tools” and select “Shape Outline”
button under “Format” menu. - Now, select the entry “No Outline” to remove the borders from the box.
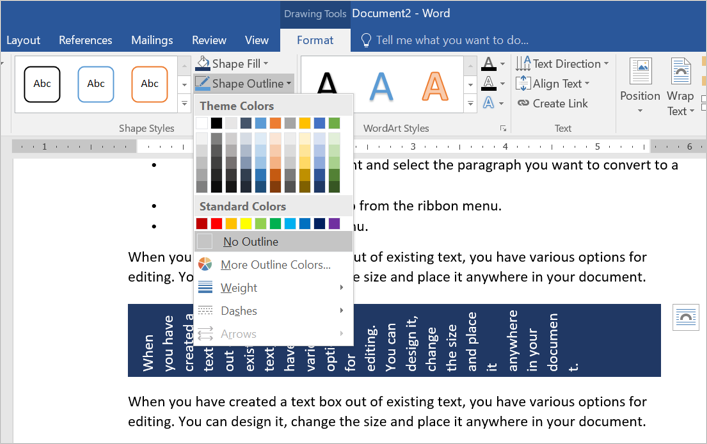
- You can also apply different colors, weight and styles to the border if
you want. - In order to delete a text box content, simply click inside the box and
edit or delete the content. Alternatively, select the text box by clicking on
the border and press delete to completely delete the box. - In this respect, text boxes behave in the same way as other drawing
objects.
Using Text Box Templates
The best and easy way to use text box in Word is to
select one of the predefined text box template. You can select from one of the good-looking
templates from the “Text Box” menu dropdown.

For example, you can use text box in a sidebar
format or choose one of the colorful formats. You can adjust the layout
positions to align the content beside the box.

You can also customize the text box and create a
custom template as a Quick Parts.
- First, select the box you want to use as templates.
- Go to “Insert > Text Box” and choose “Save Selection to Text Box Gallery” option.
- Fill up the details to create a new building block.
- You can view the saved template under “Text Box” menu dropdown from next time onwards.
Other Formatting Options
The “Formatting Tools” menu offers various
additional options for customizing your text box content. You can double click
on any text box to view the menus applicable for drawing object. Below are some
of the activities you can do with the formatting tools:
- Apply shape styles like fill, effects and borders.
- Create WordArt inside text box.
- Change text direction.
- Position and wrap the content around the text box.
What is a border in Word?
A border in MS Word is a line, a set of lines, or designed shapes that appear around the boundaries of pages/images/shapes/textboxes.
Page borders are mostly used to design flyers and brochures, and sometimes book covers. Borders can be lines of different styles and weights or colorful graphics as illustrated in the picture below.

To add a page border in Word:
- Launch Microsoft Word.
- Click on the Design tab for Word 2013, 2016 and 2019.
- Click on the Page Layout tab for Word 2010 and older.
- In the Page Background group, click on Page Borders.

The Borders and Shading dialog box will appear. This
dialog box offers options for you to choose the style or size of border for
your page or pages.
- Select the Box option. This will give you a square border around your pages.
- In the Style section, select the type of line you want if you want to use a line or group of lines as your border.
- You can also change the color and width of the line.

- Instead of using a line, you can also use some
designed shapes or art as borders in your Word document.

NOTE: By default, Word adds the borders to all the pages in the document. If you don’t want this behavior, in the Apply to drop-down, select the first page only to add borders to only the first page. You can also break your pages into sections so that you can add borders to those sections alone.

How to make a custom border in word
It is very simple to make a custom border in Word.
- First, click to activate the Design tab.
- In the Page Background group, click the Page Border command to display the Borders and Shading dialog.
- Under the Settings group, select the Custom option from the list of choices. Now set the border styles and widths.

- Also, go to the Apply to box to decide whether you want the border to be applied to the entire document. Word will apply borders to every page in the document by default.
How to remove border in word
To remove border in Word:
- Click on the Design tab.
- In the Page Background group, click on Page
Borders. The Borders and Shading window will appear. - Click on None under Setting at the
left.

The none option will remove all the borders on all the pages
in your Word document.
How to add a Christmas border in word
To add a Christmas border in Word:
- Click on the Design tab.
- In the Page Background group, click on Page Borders. The Borders and Shading window will appear.
- Click on Box option under Settings at the left.
- Click on the Art dropdown, scroll up and down until you see the Christmas tree, click on it.
- Now click OK to add a Christmas border into Your Word document.

How to add a paragraph border in word
Aside from adding page borders in Word, you can also add
paragraph borders.
As a page border surrounds the entire page, a paragraph border surrounds only the selected paragraph.
Thus, to add a paragraph border in Word:
- Click anywhere inside the paragraph to which the
border will be added. - Click on the Home tab.
- In the Paragraph group, click on the Borders
command - A list of border options appears, click on Outside
Borders. - A line border will now surround the entire
paragraph.

How to add border to picture in word
Pictures in your document look fancier when framed.
There are different preset styles of borders you can add to
a picture to make it look nicer in your document. This feature is called Picture
Styles in MS Word.
The quickest way to add a border to a picture is to choose a preset style from the Styles gallery.
Obey the instructions below:
- Click to select the picture to add the border.

- Upon selecting the picture, a Picture Tool Format will appear on the ribbon. Click on this tab.
- In the Picture Style group, select the picture style that you like.
- The selected border will be added to the picture.

how to remove text box border in word
To remove text box border in Word:
- Click to select the text box.

- The Format tab will appear. If you don’t
see the Format tab, make sure the text box is selected. - Click on the Format tab.
- Click Shape Outline in the Shape Styles
category. - Then click on No Outline.

The No Outline command will remove the text box border from your Word document.