
Contents
- 1 How do I make a book jacket in Word?
- 2 What do you write on the spine of a book?
- 3 Does Word have a book template?
- 4 Can you design a book in Word?
- 5 How do you insert a back page in Word?
- 6 What is the format for a book?
- 7 How do you layout a book?
- 8 What is the spine of a hardcover book?
- 9 What is the spine of the book called?
- 10 What is the size of a book spine?
- 11 What is book spine poetry?
- 12 How do I make a book spine in Canva?
- 13 Do authors use Microsoft Word?
- 14 What app do you use to write a book?
- 15 How do you start an outline for a book?
- 16 How do you make a book on the computer?
- 17 Is Microsoft Word free?
- 18 How do I insert a blank cover page in Word without page numbers?
- 19 How do I create a custom cover page in Word for Mac?
- 20 What are the 5 parts of a book?
How do I make a book jacket in Word?
Add a cover page
- On the Insert tab, in the Pages group, click Cover Page.
- Click a cover page layout from the gallery of options. After you insert a cover page, you can replace the sample text with your own text by clicking to select an area of the cover page, such as the title, and typing your text.
What do you write on the spine of a book?
Your spine should be striking and interesting, but not too overwhelming. The spine of a book only needs the title, the author’s name, and maybe the logo of your publishing company, space-permitting. But if you have a bigger book, interesting and attractive images could make your spine look great.
Does Word have a book template?
Yes, Microsoft Word offers several templates within the application, including book templates to choose from. Different sizes and formats are offered, depending on the type of book you are writing.
Can you design a book in Word?
Microsoft Word comes with pre-built page settings for creating books. Whether you’re creating a memoir or event guide, these settings let you create a beautiful book or booklet, from start to finish.
How do you insert a back page in Word?
At the end of your document, Insert > Break and then choose either next-page or even-page. Undo Link to Previous setting in any header or footer and then erase content (assuming you do not want this on your back cover page.
What is the format for a book?
Formatting is how your manuscript looks and reads. Things like font size, page color, word count, page number, line spacing, paragraph breaks–everything that goes into the visual appearance. This means manuscript format is the proper way your manuscript should look when you send it in for editing.
How do you layout a book?
Book Layout: 9 Easy Steps for Designing the Perfect Layout
- SIZE. First, you need to understand what type of project you’re working with.
- BINDING. Another important consideration for your book is what type of durable soft-cover binding you will be utilizing.
- OUTLINE.
- MARGINS & BLEEDS.
- TYPOGRAPHY.
- BODY COPY.
- IMAGES.
- NAVIGATION.
What is the spine of a hardcover book?
The Spines of hardcover books and perfect bound books are often printed upon, because these types of books usually have spines wide enough to display printed information The Spine of a book refers to the outside edge of the book where the pages are gathered and bound.
What is the spine of the book called?
textblock spine
Book Block or Text block – The block of internal pages that make up the book. Spine (textblock spine) – The spine is where the signatures and textblock are bound.
What is the size of a book spine?
This depends on what paper you have. The spine size for a paperback book will need to be over 3mm. The spine size for a hardback book will need to be over 9mm.
What is book spine poetry?
Book spine poetry is considered “found” poetry; that is, a poem made up of words from other sources. You, the poet, aren’t writing the words, trying to fit a form, or looking for words that rhyme. Instead, with book spine poetry, you simply arrange books so their titles to create a poem.
How do I make a book spine in Canva?
First, how to add a book cover spine in Canva:
Select template and stretch it to cover the entire canvas. Go to Elements – Shapes and find the colored square element. Change the color of the square to match the desired color of your spine. Stretch the square to cover the “spine” area of the KDP cover template.
Absolutely, many (most) authors use Microsoft Word, if not while writing the book, then in the editing process. Every editor I’ve ever worked with has sent me a Word file back with Track Changes and Comments for me to work on. I usually write in Word, too, but recently I started using Scrivener to write and outline in.
What app do you use to write a book?
Here are seven writing apps designed specifically for creative writing, with various organizational tools to take your work to the next level.
- Reedsy Book Editor. Price: Free.
- Scrivener. Price: Free trial for 30 days, $45 license fee.
- Ulysses.
- iA Writer.
- yWriter.
- Storyist.
- Final Draft.
- Grammarly.
How do you start an outline for a book?
How to Create a Novel Outline
- Craft your premise. This is the underlying idea for your story.
- Determine your setting. In a novel, the setting (time, place) can be just as important as the characters.
- Get to know your characters. Write character profiles.
- Construct your plot. Construct a timeline of events.
- Write your scenes.
How do you make a book on the computer?
Create a Booklet or Book using Word
Launch ‘Microsoft Word‘. Then, on the PAGE LAYOUT tab, click the icon at the bottom-right corner of the Page Setup group to bring up the Page Setup window. Next, on the Margins tab, under Pages, change the setting for ‘Multiple pages’ into Book fold.
Is Microsoft Word free?
Much like Google Docs, Microsoft has Office Online and in order to access it all you need to do is sign up for a free Microsoft account. You can use Word, Excel, PowerPoint, OneNote and Outlook at no cost.
How do I insert a blank cover page in Word without page numbers?
On the Page Setup dialog box, click the Layout tab and select the Different first page check box in the Headers and footers section so there is a check mark in the box. Click OK. You’ll notice there is no page number on the first page of your document now.
How do I create a custom cover page in Word for Mac?
How to Insert a Cover Page in a Word for Mac Document
- Click the Insert tab.
- Click the Cover Page button to open a drop-down gallery of cover page templates.
- Click a cover page template to insert it into your document.
- Customize the cover page with your text.
What are the 5 parts of a book?
These are the parts of a book you need & what we’ll cover in detail for you:
- Book Cover.
- Title Page.
- Copyright.
- Table of Contents.
- Dedication.
- Foreword.
- Prologue.
- Epilogue.
(for Createspace, Lightning Source, or IngramSpark)
This is a guide to formatting your book in Microsoft Word (2010). We’ll be making a 6″x9″ PDF for print; but you can easily change the document to another size. You can watch these three videos, or go through the guide down below. You can start your own document from scratch, or download our free package of formatting templates to get started quickly.
Part 1: Setting Paragraph Styles
How to format a book for print in MS Word — Tutorial #1
Part 2: setting up headers, page numbers and footings
How to format a book for print in MS Word — Tutorial #2
Part 3: Front matter and back matter suggestions
How to format a book for print in MS Word — Tutorial #3
PS. Our FREE book formatting templates have this stuff built in. Click here to download them now.
A Quick Trick for Outlining your Book
Did you know you can drag and drop whole sections around in MS Word (just like you can in Scrivener)? It helps a ton with organization.
Make your book beautiful… without the headache
Psst… learning to format your own books can be a pain in the ass. It’s easier with our beautifully designed, 100% free templates. They’ve already helped over 20,000 authors publish successfully. Click here to download them all.


Keep scrolling for an in-depth tutorial. You should also check out our NEW book formatting tutorial series (updated in 2017 — don’t worry, it’s free too).


How to format a book in Microsoft Word (with pictures)
Getting started
Open a new document. Click “size”>> “More paper sizes” and set the document to 6”x9” (or your book size).

Then set the margins and gutter. Make sure to apply to the “whole document” instead of “this section.”

I set this one to 1″ margins on the top and bottom (a bit too much on the top). The «Gutter» is extra space on the inside. Recently (2014) I’ve noticed that Createspace book spines are much more glued-together, so the gutter may need to be a little bigger. Copy and paste your text into the document (or, if you’ve already been writing in Word, save the document as a new file (to be safe) and then start formatting.
Setting Paragraphs
Highlight some text and click on the «line options» tab. Set the indent for the first line of paragraphs to .2 or so (I started with .3, but that’s too much).

Make sure there’s no space before or after the paragraph, and justified text. Select the font you want to use. With that text still selected, right click, go to “Styles” and “Update Normal to Match Selection.” Now your whole document is using the “Normal style.”

Then select the first paragraph of your book, click line spacing options again, but set the first line indent at 0.0. This time, right click and “Save the selection as a new style.” Save it as “First Paragraph.” 
Chapter Pages
Next, we’re going to separate all the chapters. This will be really important later when we start adding headers and footers. So put the cursor before any of the text, go to “Page Layout” >> “Breaks” and “Next Page.”

If you’ve done this right, the first page will say “First page Footer, Section 1” and the top of the next page will say “First Page Header, Section 2.”

Click into the headers area (by clicking the space at the top of the page) and make sure you’ve checked «Different First Page” and “Different Odd and Even Pages.”

Because this is the first page of the first chapter, you can begin styling the chapter pages. To make use of Word’s built in Table of Contents function, it’s best to start with Word’s preset “Heading One.”

Just type “Chapter One”, select it, pick “Heading 1” from the styles, then change the size and font, select the text and right-click, then under «styles» click “Update Heading One to match selection.” (I’ve changed the font to no-indent, black, and «Bebas Neue.») You may want to expand the text by bringing up the fonts menu (Ctrl+D on Windows) go to advanced, spacing and “expanded.”
You should also check to make sure there’s no indent on your chapter title, so that it’s really centered.

If you have a “Navigation” window open on the left side, this heading should show up right away.

Now you may want to style the first sentence. Select the first few words, and transform them to uppercase by going to the “Change Case” button on the Home menu.

Then, to add a Dropcap, put the cursor before the first letter of the first sentence, then go to the Insert panel and click the DropCap feature.

You can change the font of the drop cap to stand out even more, but getting the positioning right can be tricky. If you want the Dropcap to take two lines instead of three, choose “Drop Cap options” from the menu.
Now that our first page is ready, move down to the second page and click in the top area to select the header. Up on the menu, the “Link to Previous” is probably selected. You want to click on it to unlink it (just for the first pages, so they don’t link with the front matter. For the remaining pages, you’ll want link to previous selected). I’ll type in “Book Title”, get the style right and then save it as a new quick style (“headers”).

I’ll align right. If you have “gutter” set up, you can see that the “inside” of the page (on the left) has more spacing. You want to align your headers and footers to the outside, so make sure it’s on the side of the page with the smaller margins.
Then I’ll go into the footers area, click “Insert”, then page numbers>>current position>>plain number. This enters a page number field. Mine starts on page 3. If I want to change this, I could go to Insert>>page numbers>>Format page numbers and then choose “start at #…” instead of “continue from previous section.”

Then I can go down to the next page. Because I’ve selected “Different Odd & Even Pages” I can make this page a little different, by aligning left and typing “Author Name.”
Then, instead of inserting the page number again, I can just select and copy the page number field from the previous page, and paste it into the footer of this page – aligning it left like the header. To check my work, I’ll go to “View” and hit the “Two pages” so I can make sure that it looks OK.

There’s a little too much space between my headers and the content… but that’s because I set my top page margins to 1” (a bit much). I’ll leave it for now. The headings and page numbers look fine, so I’ll go back to View>> 100% and continue on. The whole first chapter should look pretty good now.
If I want to style section breaks I could… a simple way is to use the “First Paragraph” style again with all caps on the first few words, but no dropcaps.

When I get down to the bottom of the chapter, I’ll put the cursor below the text, select Page layout>>Breaks >> and hit “Next Page” again.
Because this is the first page of a new section, and we’ve selected “Different First Page” this page should be blank, with no headers and footers, so you can style it like the first Chapter Page. In Word, it’s hard to line up everything exactly.
The best way to get it 100% consistent is to select and copy from just above the first paragraph to the top of the page, including all the spaces and Chapter Header, and then pasting it the first page of the next chapter. That’s also a little faster than redoing everything manually. Then I can just change the text to “Chapter Two”.
The following pages in the book should have the same headers and footers, and the page numbers should be automatic. So all you need to do is skip through and adding «Next Page» breaks between every chapter, and styling the chapter pages. If your page numbers aren’t working for any reason, make sure the “Link to Previous” option is selected. If they still aren’t connecting, go to format page numbers and “continue from previous.”

You can also just select the page number field from the previous section and copy it into the one that’s broken. If you’ve been setting all your quick styles (first paragraph, normal, header, headings, page numbers) going through the chapters like this should be pretty fast.
If you get stuck with anything, it will probably be with the headings and footers and page numbers. When you finish styling your chapters, switch to Two-Pages view so you can check everything over. Right and left-align can be confusing, even if you are viewing it in Two-Pages mode, because Word may not show it as it actually prints.

Just keep in mind the extra wide margins are the inside gutter, so these are aligned on the outside, even though they look like they will be on the inside. If you’ve been using the “Heading 1” style, Word has automatically been adding in your chapters to the navigation, which you should see on the navigation panel on the left.

So let’s go back to the front and add the “front matter”, including the table of contents.
Still here? You’re working too hard.
A lot of this stuff is already done for you in my formatting templates. I made them to help indie authors save time and money, without making amateur book design and formatting mistakes. Seriously, you should download the free package. I’ll also send you my email series on publishing books that sell — I’ve been told it’s life changing.


🔒100% secure download. No spam, ever.
Adding the Copyright Page, Title Page and TOC
Put the cursor before chapter one and add a new “Next Page” break.
You’ll need these pages: 1. Title Page 2. Copyright page 3. Table of Contents 4. Dedication.
Your title page will want to match the cover pretty closely – see if your designer will give you the fonts he used – you may need to space out the lettering quite a bit. If you ask, your designer can probably save you a transparent PNG of the cover text (just like on the cover, but without the art) that you can add into the title page.
Your copyright page will look something like this (you can use this if you want):
TITLE Copyright © 2013 by Author Name.
All rights reserved. Printed in the United States of America. No part of this book may be used or reproduced in any manner whatsoever without written permission except in the case of brief quotations em- bodied in critical articles or reviews.
This book is a work of fiction. Names, characters, businesses, organiza- tions, places, events and incidents either are the product of the author’s imagination or are used fictitiously. Any resemblance to actual persons, living or dead, events, or locales is entirely coincidental.
For information contact; address www.website.com
Book and Cover design by Designer
ISBN: 123456789
First Edition: Month 2013
10 9 8 7 6 5 4 3 2 1
The «10 9 8 7 6 5 4 3 2 1» on the bottom refers to the editions, so if it goes until “1” it means first edition. If this was the fourth edition, you’d write: «10 9 8 7 6 5 4». These numbers should be close to the bottom of the page. It can be centered, left or right aligned, and with much smaller font size (9 or 10).
If you’re indie publishing, the copyright page isn’t a big deal – in fact you can stand out by using something more creative. I tend to use a simple message like “Feel free to share this – just don’t try to pass it off as your own! If you enjoy this book, I really hope you’ll do me the favor of leaving a review. You can connect with me @creativindie.” There’s something to be said for trying to look as professional as possible though, especially with the print book; but I also think it’s fine to «own up to» and even take pride in the fact that you self-published, as some skeptics may feel you’re «trying to hide it» otherwise. Make another “next page” break. Then go to the “references” tab and hit Table of Contents.

You should get an automatic Table of Contents. You may need to delete some areas, or change the fonts and styles (if you do, make sure to save it as a new style… it’s really annoying to keep restyling it if you forget to do this). Because this table is automatic, you can “Update Table” and “Update Page Numbers Only” if you do rewrites or add content later.

For the TOC, you probably need to make the text about 14pt, and add a little more spacing. If this is a novel, you don’t really need a table of contents, but that’s up to you. For the front pages, you’ll probably want to make sure there’s no indents anywhere, so everything is properly aligned.
Be a little careful on these front pages – if a header or footer gets added in, and a later page is set to “link to previous” – then when you delete it on the front pages it will erase the headers and footers throughout the book. Instead, go to the next page with headers and uncheck “link to previous” – then you can delete the headers on the front pages. Also, the copyright page is usually on the back of the title page (on the left hand side), while the dedication, Table of Contents and Chapter One usually starts on the right hand side – this means you’ll have to leave some blank pages in between.

You can zoom way out to see everything together. Sometimes I need to use a real book, or picture the pages on my hand and flip my palm back and forth, to get this right. Note – some books have all chapter pages on the right hand side – if you want to do that, just add an extra blank page by adding more “Next Page” breaks, and make sure they aren’t connected to any headers or footers so they stay blank.
That’s it – I’m going to attach the sample I made for this tutorial, you can download it by clicking these links: Template-sample(.docx) Template-sample (.doc) (They won’t look the same unless you have the same fonts… so the first thing you’ll want to do is change the
Chapter Heading font to something that matches your book. Hopefully you’ve already got a great book cover, but if not, take a look at my huge list of best fonts per genre here.) If you get stuck and are frustrated, I highly recommend finding someone on Fiverr.com. Pay them $10~25 to fix whatever problem you’re stuck on; it’s worth it.
Ps) It can save some time if you learn a few useful keyboard shortcuts for MS Word. There’s a full list here. The one I use the most is «Ctrl+z» which undoes your last action.
Was this useful?
If so, please share it! If you need a book cover, you should check out the sister site, www.diybookcovers.com — it has more free tools and templates to make your book look good. If you haven’t done so yet, you should sign up for my email list. Not only will you get a bunch of professional book design and formatting templates, I’ll also send a free email series on everything I’ve learned after helping launch hundreds of bestsellers (and making a full-time living from my own fiction and non-fiction books).
PS. I’m not just some guy on the internet… I’ve got a PhD in Literature, have spoken on book design at publishing conferences around the world, and was featured in CNN for renting castles to use as writing retreats. You can also check out my main book cover design site, or my blog Creativindie.com where I help authors and artists produce and sell their best work.
We will start with a blank document and set our page size and margins. Word can offer you various templates to use but you ideally want to start with a blank document and format your book to your own specification.

Microsoft Word – Pages Size
After we have chosen our blank document it is time to choose the page size. There are plenty of sizes to choose from and it is something that will need a lot of thinking. Today we will format a B-Format book at 198mm high x 129mm wide. This is a standard size for a novel. If you are struggling to find a page size that you think is suitable for your book, then head over to our other post for more information – Hardback and Paperback Book Sizes.
To change the page size, we go to Layout > Size > More Paper Sizes…

This will bring up another window where we can input our own custom size.
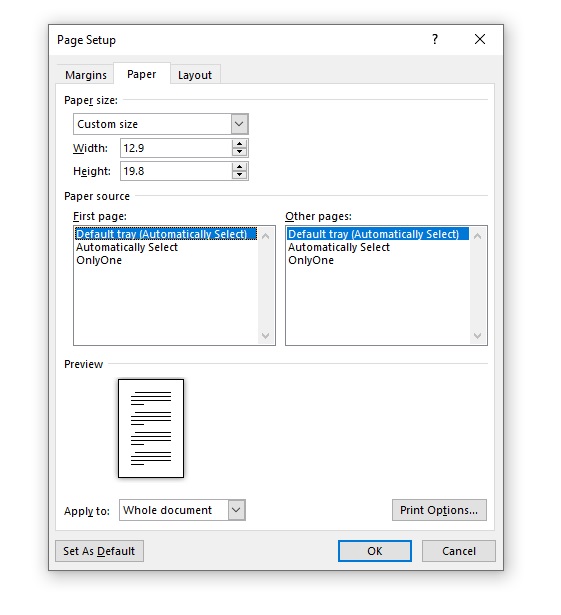
Under paper size, you want to click the drop-down box and select custom size and then fill out the width and height of the finished paper size you want. In our case, we want a book 198mm high x 129mm wide. As my word document measurements are in cm’s we will fill this out accordingly. You will need to check if your document is in mm’s, cm’s, inches etc. The paper source we will leave as default for now.
After we have filled out the height of 19.8 cm’s and the width of 12.9 cm’s and selected to apply to the whole document, it is time to move on to the next part, the margins.
Microsoft Word – Page Margin
As standard Word will set the margins to 1″ / 2.54cm. The margin size you will want will depend on a few different factors;
- The final page length of your book
- Finished size of your book
- Fiction or non-fiction
- Your book’s genre
There are a few other factors to consider but the best advice we have given our customers is to have a look at other books which are like yours and simply measure the margins. You will find that many books will be different, you just need to choose the right size for your book.
We are going to choose margin sizes of 18mm for the left and right and 15mm for the top and bottom. When we set this up in Microsoft Word it will be 1.8cm left and right and 1.5cm top and bottom.
Microsoft Word – Gutter Size
We then have the option of setting the gutter and the gutter position. This is a term used in the printing industry which describes the side on which a book will be bound. For a normal book printed and bound in the UK, Europe, USA and many other countries, this will be on the left-hand side. The gutter measurement allows us to set extra space on the bound side. This means you have equal margin space on the left and right sides of your document, plus extra space for when all the pages get bound together so you don’t have to ‘break’ the spine of the book.
The gutter measurement will depend on how many pages your book will be. For a small number of pages in the range of 20 to 50, a gutter size of 5mm may be sufficient. However, if you have a large number of pages, 300+ you may want to increase the gutter size to 10mm. Again, this is something that if you are unfamiliar with, you will want to have a look at some books in the same genre and decide.
For our book, we are going to use a gutter size of 5mm and set it to the left-hand side, the orientation set to portrait and the multiple pages option set to mirror margins.

We now have a document that is starting to look like a traditional book but we are far from finished. You should have something which looks like the image below.

Formatting a book in Microsoft Word is very similar to Adobe InDesign and other typesetting software. We are now going to work on the paragraph styles. You can bring up the paragraph options under the layout tab and click the little arrow underneath. For our novel, we are going to use a basic style which is common in most fiction novels.
The alignment will be set to justify and the outline level will be body text. The indentation will be set to 0cm but under special we will set the first-line indentation. For our book, we are going to have a 5mm first-line indent. Again, have a look at other books and make a decision based on what you feel would look right for your book. The spacing of the paragraphs will be set to 0pt before and after and the line spacing set to single.

You will now have a book that looks like the one below. You will notice that in this paragraph style we have set indents for every first line of every paragraph. Now with our book, we don’t want to have the first line of the first paragraph indented. We will have to manually adjust this setting by clicking on the first line of the first paragraph and adjusting the margins using the step above.

Microsoft Word – Chapter Titles
The next step will be to start amending our chapter titles. The chapter titles should be in a larger font than the rest of the text with some additional spacing between the top of the page and the main body of the text. For our book, we are going to use the same font as the main body but in 16pt. The spacing is a personal preference, use what you think is best for your book.
This is how the first page of the main body of our book looks. We are starting to get a nice clean layout that resembles a standard novel.

Now we will start to look into the fonts for our book. This part could be a whole post all to itself as there are many different variables. For more of an understanding of fonts you could check out some of the following posts; How to Choose the Right Font for Your Book, How to Choose the Right Font for your Design and What Font Should You Use for Your Book.
To change the font of your book you will need to click on the home tab at the top of the document. You will then be able to see all the standard options to edit your book. Select what font you will like from the drop-down and the font size. Remember if you have already set your chapter size if you change the font size with all the text selected it will apply that font size setting to everything.

Our book is going to be set in Garamond at 12pt. This is a popular font type used in novels. Some other popular fonts are Palatino and Minion Pro but there are thousands of fonts to choose from so make sure you have a good look around before you decide.

We are now going to add page numbers to our book. To do this you want to go to, Insert > Page Number > Bottom of Page and then select a style that has the page number in the middle of the page.

You will then have page numbers added to every page of your document. The page numbers will need spacing in the footer. Our book is going to have a spacing of 1.25cm Header from Top and 0.3cm Footer from the Bottom.
This is how our book now looks.
We have a completed book that has been formatted in Microsoft Word which when exported as a PDF will be press-ready. There are a few little extras that can make your book look more professional but unfortunately, Microsoft Word doesn’t provide those options. Formatting a book in Word is not able to replace professional typesetting software such as InDesign but it can do a very good job of providing you with a press-ready PDF file that looks fantastic and will be suitable for 90% of books.
If you need helping to format your book to print we recommend the services of Book Design UK.
Watch
Shop
Explore
When autocomplete results are available use up and down arrows to review and enter to select. Touch device users, explore by touch or with swipe gestures.
Explore
Education

Save
From
sparklebox.co.uk
Microsoft Word templates that enable you to add text to old-style book spines.

SparkleBox
57k
followers
More information
Editable book spine templates (SB6235) — SparkleBox
School Displays
Library Displays
Library Plan
Library Ideas
40 Book Challenge
Parts Of A Book
High School Library
Reading Adventure
Summer Reading Program
More information
Editable book spine templates (SB6235) — SparkleBox
Comments
A few years ago I put out a package of DIY book cover templates in Microsoft Word and revolutionized publishing with a how-to guide to designing amazing book covers in an easy to use program you’re already familiar with. But it took me a while longer to figure out how to customize your front cover into a full print cover for Createspace or other POD providers.
I shared a guide to doing just that on DIY Book Covers a couple months ago but am now sharing it with you, for free, so that you can design your own full print covers in MS Word.
Disclaimer: This is a hack or a workaround, so it involves a lot of steps and isn’t a smooth, seamless process. It’s *much* easier to make covers in photoshop or a graphic design tool. I’m currently rebuilding my online book cover maker so when that’s ready, I’ll make more templates for it. In the meantime, if you already have a front cover, you can hire someone cheap on fiverr to make the fullprint covers for you, and it’ll probably look much better.


HOW TO MAKE A FULL PRINT COVER IN MS WORD
If you’ve never used MS Word as a design tool, you should first check out www.diybookcovers.com and sign up to get the free sample package and guides. Your full print cover will only be as good as your front cover; so getting the best possible front cover is a necessary first step.
Ideally you’ve already finished a book cover you’re happy with, converted it to a JPG and used it to sell your ebook. But now you want to make a full print cover for Createspace KDP Print (or Lightning Source, or others).
You need to know the final word count of your formatted book, so if you haven’t formatted your book for print yet, you need to do it before you start your full print cover.
I set up some free templates and guides to book formatting here to help you out:
www.diybookformats.com
Once that’s all done, you can download a print template that’s specific for your book. You’ll need to add your content and format it, so you know the final page count to calculate the right spine width. But once you’ve got it, you can use a template generator, open the template into MS word or a design program like Photoshop, and add your images and text.
Createspace KDP and Lightning Source IngramSpark templates
Createspace is dead, but the original links now forward to the KDP dashboard for convenience. Lightning Source now has an easier to use dashboard… but I don’t recommend it.
You can just click this link to get there: be careful to choose print or cream pages, it makes a difference in total spine width. You’ll probably want “no bleed” for the interior, unless you have fullpage images that go to the margin.
If you’re using IngramSpark, you can download a template here.
However, I’m pretty sure the KDP print templates still round to the nearest 4th page or so, which can make a little difference especially on longer books, so I recommend using Bookow’s KDP print template generator.
Most books will be “black and white” – set your book size and page count. “Cream” paper is better for most fiction and non-fiction. “White” is only good for specialized non-fiction or coursebooks, or if you’re printing color pictures.
Once you click “Build Template” you’ll get a .zip file to download which includes a PDF and a PNG file.
PS. BookBaby also offers print book services.
PPS. I keep saying “createspace” down below because this is an older article; but KDP print works basically the same, just with a new name.
Calculating the Book Cover Size
The templates come with a lot of extra white space. I usually use Photoshop to trim this off. If you want to set up a Word file that’s just the right size, you’ll need to calculate this yourself:
For Createspace, you need to add .125” of trim size to all the edges.
So for a 6”x9” book:
Height= 9″ + 0.125″ (top margin) + .125″ (bottom margin) = 9.25″
Width= 6″ + 0.125″ (outside margin) + 6″ + 0.125″ (outside margin) + spine width.
To calculate the spine width,
White paper: multiply page count by 0.002252
Cream paper: multiply page count by 0.0025
So, for a 6”x9” book of 200 pages, my height= 9.25” and my width equals spine (200×0.0025= 0.5”) + 6″ + 0.125″ + 6″ + 0.125″ = 12.75.”
But you can also just open one of the files you downloaded, and it will tell you the spine width clearly. Interestingly though, my sample template generated by Createspace came out to a spine width of .49” instead of .5” as it should have; I’ve also noticed the spine can be off especially for very large books (600+pages) so Createspace’s calculations aren’t perfect.

In the generated template on the left side, it will tell you the “Page Layout Size” (the size of the sheet of paper they are printing on) and the Black Dotted Line = Trim Edge. So another simple way to calculate would be to take those dimensions, 12.49” x 9.0” and add .25” to each for the trim. I’m going to go ahead and round that .49” up to .50”.
So now I can set up a new Word document, with custom page size of 9.25” x 12.75”
When you download your template from Createspace you’ll get a PDF and a PNG version – the PNG version you can use in Word.

All I have to do is set up my new document, with the custom size 9.25” x 12.75”.
I don’t need any margins, so I’ll set all my margins at zero.

Then I can drag that PNG template into the Word file.
At first it will center somewhere in the middle of the page and be too small, because there’s a lot of extra white space around the template.
I’ll use the “Crop” tool to crop pretty close to the edges of the template. The closer you can crop, the better. You can zoom in to be even more precise. Try to crop it right on the line, to get rid of all the outside white space without cutting into the pink borders.

book cover design templates in MS Word
Then, I’ll double click on the template, choose the “Wrap Text” options and set the image to “behind text.”

That makes it so I can drag, move and resize the image however I want.
Now I can drag and move the template until the edges of the template line up with the edges of my document.
You’ll probably have to zoom in and out to match it up perfectly. It can be hard to do with the mouse alone; you can also use the arrow keys on your keyboard to move it up, down, left or right just a tiny bit at a time.
If you make it too big, you won’t be able to grab the edges anymore and you’ll have to move it over to the side until you can grab an edge to resize. If you get the top and left corner perfect, you can focus on stretching the bottom right corner – zooming in close will let you resize with more accuracy.

The advantage of this is that the document is now the perfect size, and you can organize the elements without worrying about the parts that go off the page. What you see is what you get. Once you finish all the art and text, you can Just save it as a PDF and your full print cover is done.
AN EASIER WAY
But another, much simpler way to do all that, is using an online converter to change your PDF template into a Word file
http://www.pdfonline.com/pdf-to-word-converter
That gives me a page that looks like this.

In this case, the template is already the right size, and all the white space is “extra” – it will get cut off during printing. So you can fit the art over the template, leave the white space as is, save as PDF and it will still work just fine.
(The same goes with Lightning Source Templates: the one you download comes with a lot of extra paper space, which you can leave in or crop out, it doesn’t matter).
Preparing the Book Cover Art
The easiest way to bring the art into your full print cover template, is to make the front, spine and back art unique, 1 piece layers, without the text. If you’ve already made an ebook / front cover using my templates, you’ll have to adjust the text a bit, because now you have extra margins on the top, bottom and sides.
So the text on your front cover will all need to be made a little smaller, moved away from the edges and a little to the left side (because there is extra trim on only the right side on the front, and only the left side on the back).
I’m going to open up one of my front cover templates (#71fiction) and get started.
PS. I have a big list of places you can find the best stock photography for book cover art. Though more recently I’ve been playing with AI tools like midjourney.

First, I’m going to open the Selection Pane and select all the text layers. Then I’ll hit CTRL+C to copy those layers, click into my other document with the template, and CTRL+V to paste the layers. I can move them around to get them centered.

Then I’ll click the eye symbol on the selection panel to hide all the text layers, and do the same thing with all the images – selecting, copying and pasting them all into the new document.
That worked, but if I’m using the full template (without cropping at the edges) it looks pretty messy, and now it’s hard to see where my edges are.

I’m going to try it again… this time I’ll hide the text layers and save the art as a PDF. I had trouble saving directly from Word to PDF this time…
So I used an online converter:
http://www.freepdfconvert.com
Rather than saving as a PDF, you can also try using Word’s “Print” feature to Print/Save is as a PDF with Adobe, Nitro PDF or another PDF tool. Sometimes this will save beyond the borders of the image, but you can crop it after you save as a JPG and import it to your cover file.
There are many workarounds or online converters you can try.
Then I used my PDF to JPG converter:
Now I have a clean, 6×9 @300dpi (1800 x 2700 pixels) JPG image of the cover, that I can just drag and drop into my Word file (or insert>>image). I’ll set it to Wrap Text>>Behind Text again, then resize and position it to fill the front and line up with the dotted line of the spine.
NOTE: since we’re preparing this for print, you should read Chris McMullen’s article on preserving image quality in MS Word.
Some of his tips include:
“The first step is to disable automatic picture compression, while realizing that this step – all by itself – is not sufficient. In Word 2010, for example, click the File tab, scroll down below Help to find Options (at first hidden toward the bottom of the list), select Advanced, scroll down to Image Size and Quality, and check the box that says, “Do not compress images in file.” Do this before inserting any images into the file.
Don’t copy and paste pictures into the Word document. Instead, click Insert and then Picture.
Don’t use Save As to convert the Word document to PDF. Instead, print the file to PDF using a Word-to-PDF converter. For self-publishing, find a PDF converter that allows fonts to be embedded in the file and transparency to be flattened.”
Now I can move around my text to center it – make sure to keep away from the edges (unless your text purposely goes near the edge). Createspace is very picky about its trim space though; if you have anything that looks like text extending of the edge of the cover, Createspace will flag it and not let it through (unless you manually contact customer service and ask them to ignore it).
Something else to keep in mind – since you have extra trim space now you’ll have to extend your top, bottom and right border a bit. If you have a central image or character, that fits nicely between the text, you may need to keep those the same size and only stretch the background to fill the extra space (in which case, you’d need to do that in the original front cover file while you still have layers, by making the center objects smaller and a little to the left, before saving the whole think as a JPG).

So this time I just saved the image art as a PDF>>JPG and put it in, and resized it until it filled the front.
Usually I can just take a little bit of the front cover, like a strip of the very left side, and use it as the spine. In this one, I just copied the front cover image, put it behind the front cover, and shifted it to the left until it hit the dotted line on the other side of the spine. Then I made another copy, put it behind the spine layer, and shifted it all the way over to the other side. Because the horizon isn’t even, I flipped the back cover image so the horizons would match up evenly.

For the spine, I can just copy the text layers, rotate them 90degrees clockwise, and resize them to fit in the spine. If I have a publisher logo or anything I can add it in as well.
The back is more complicated: I don’t want the character there, and there’s a lot more text that needs to stand out. So there are a few options: If you have more landscape you can just use it. For example the original picture of this girl is much wider. I could start over and keep all the extra landscape, maybe stretch it out a bit, use the same gradients, and use it for the back. It would look OK… but it would be a little tricky because of the lighter, almost white sky and the dark treeline.
You need your text to stand out by contrast. You can use a light shadow or glow, but it’s preferable to use natural contrast by putting light text over dark areas and vice versa.
You could also just use a flat pattern or grunge background for a lot of books – search google for “Grunge desktop” or “background texture” and you’ll see what I mean. You may find something with the right feel or style, and if you change the colors a bit it will match nicely with the front. (Something like this for example):

You’ll have to be careful with the spine text – it has to fit inside of the pink margins, so make sure there’s no overlap. You might want to copy the background template layer, and put a new layer on top of everything, that you can toggle on and off to check (or, just hide the image layers while you put in the text, then set them to show again).
What I’m actually going to do for this cover, is add a new shape. Normally I’d add a rectangle and make it near black or white. I can also go to “more colors” and set a transparency level if I want some of the background to show through; but in this case I mostly want to hide the girl. Just for fun, I chose a shape with some rounded corners and added a yellow stroke. It’s a little strange but fine for YA.

Then I add in a text layer, matching the fonts with the front cover. I usually like to start with a quote, review or callout text (something larger to grab attention).
Then you can add in the rest of your edited, killer, captivating and extremely important back cover copy – the same copy you’ll use for your Amazon description probably. It’s really important to make this awesome, so get help on Fiverr.com from someone who knows what they’re doing (most writers have difficult writing their own summary… you need to give away just enough, but not too much, and use compelling language).
ISBNS and Barcodes
If you’re using Createspace, you could just save as a PDF and upload: Createspace will add in a barcode (I have to make sure I’ve left enough space on the back, where that yellow rectangle is on the template). However, CS won’t add in a price, and a lot of bookstores won’t store your book without a price on the book and in the barcode.
Since you may want to try and work with some bookstores, and it’s pretty easy, you might as well add in your own price. I always recommending pricing higher, so that you can discount in person (you can still experiment with your book’s pricing – the Amazon price doesn’t have to match the price on the book.)
So you might set it to $14.95, for example, even if you plan to sell it for $10. That way you can say it’s 35% off.
If you don’t have an ISBN yet, you can start your project on Createspace to get one, or buy some directly from Bowker. If you get a free one from Createspace, the publisher listed on Amazon will be “Createspace.” You can pay a little more to change that (it will display your publisher name on Amazon, even though if anybody looks up the real ISBN on Bowker they will still find Createspace listed) or you can pay even more to have it registered to your publisher name in Bowker.
Once you have an ISBN, you can use my free barcode generator here.
Or alternatively, Bookow has a free ISBN barcode tool too.
There are instructions on how to use it. But the barcode files it gives are PDF or EPS, so I’ll have to use my PDF to JPG converter again:
Then I’ll insert the JPG. The price is embedded, but written in code, so I’ll add a normal $Price and add it into the white barcode box. I can also add a link to my website, a short author bio or picture, or social media icons. They’re kind of fun… they won’t actually click of course so you need to add your Twitter handle or Facebook page link. When you add links, just start from www.

As long as everything is in the right place, it should be ready to upload.
You can test it at home but the colors and quality probably won’t be as good as KDP’s printers. You should also make sure the barcode works – if you have a smart phone, download a barcode scanner app and scan the barcode straight from your computer screen (it will only work if your ISBN is already registered to your book though).
Matte or Glossy?
KDP offers both options now. Generally speaking, glossy is better for fiction, especially for covers with a lot of dark patches or rich colors. Colors don’t show up as brightly on matte… however matte can look more professional and sturdy. Matte is usually best for simple, white covers like non-fiction.
But you may want to print out one of each (just order, switch the setting and re-order) before you decide for sure.
Also, when you upload, you’ll be prompted to use KDP’s automatic previewer – be warned that it’s sensitive and will often flag things that aren’t really problems. So if it’s giving you a lot of grief but you think things are OK, just submit the file, wait for approval and order a proof.
That’s it! If you want a PDF version of this guide, along with the four full cover templates I put in the top of this post, you can download those for free here:
DOWNLOAD the cover design templates (click here)
If you like them, please share!
Book Cover Design Resources for Authors
-
Best Book Cover Software, Designers and Services
-
How to Design the Best Book Cover in 8 Simple Steps
- Custom book cover design (Creativindie)
- Book cover design templates and 3D mockups
- My favorite book cover designers
- where to find images for your cover design
- Best fonts for cover design
Cover Design Secrets: download my free guide
I’ve helped design over 1000 book covers, including hundreds of bestsellers – download my free book to learn all the insider secrets I use to sell more books. Click here to get it now. I’ll also share some of the advanced book marketing tactics I’ve used to make a full-time income with my writing.

Full print book cover design Templates
Honestly I’m exhausted just reading this post. I’m sure I’ve made videos about it, but if you’re still here I’d like to point out, Microsoft Word is not meant for book cover design. You *can* do it, but there are better and easier options. If you already have a front cover, you can just hire someone on Fiverr.com to do the spine and back for you; or my new design tool should work pretty well once I sort out the details, so you can just grab a template, upload it to my tool, and start adding text.
Front and ebook covers especially are crucial for book sales, so even though I try to help people DIY their book design, you really need to consider whether you shouldn’t just get someone else to handle it, or buy a cheap premade, or start with one of my genre templates at least. The spine and back are less important – unless you plan to sell a lot of print/paperbacks at events or something, and even then it’s very easy to look rough and homemade if you don’t know what you’re doing.
That said, I hope this book design tutorial helped or solved your specific problem. If not, I hope you’ll browse around my resources for a better solution – I have lots of useful things for authors!

I’m a philosophy dropout with a PhD in Literature. I covet a cabin full of cats, where I can write fantasy novels to pay for my cake addiction. Sometimes I live in castles.
Create a booklet or book
-
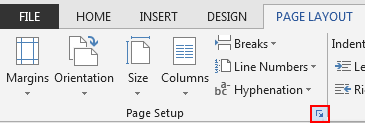
Go to Layout and select the Page Setup dialog launch icon at the bottom-right corner.

-
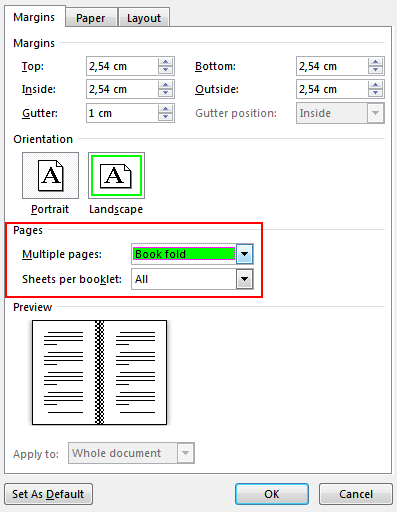
On the Margins tab, change the setting for Multiple pages to Book fold. The orientation automatically changes to Landscape.
Tip: If you have a long document, you might want to split it into multiple booklets, which you can then bind into one book. Under Sheets per booklet, choose how many pages to print per booklet.
-
Select and increase the value of Gutter to reserve space on the inside fold for binding.
-
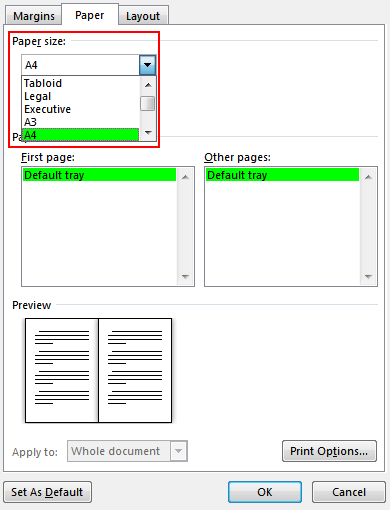
Go to the Paper tab and select the Paper size. The final size of the booklet is one half width of the paper size.
Tip: You can add many embellishments to your booklet’s appearance. For example, to add borders to every page, on the Layout tab of the Page Setup window, click Borders.
-
Click OK. If your document already has content, the text is formatted automatically, but you might need to adjust objects like images and tables manually.
Print settings for booklets
When you print the booklet, check the print settings to make sure you print on both sides of the paper and flip the papers correctly for the printing to work as intended.
-
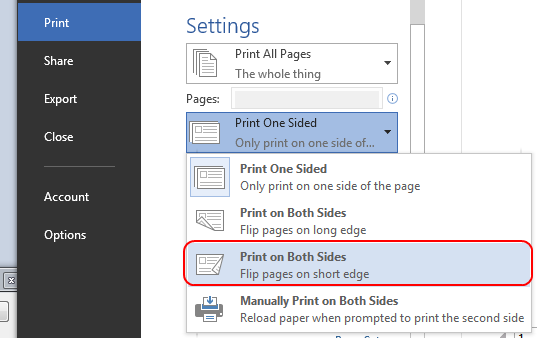
Go to File > Print.
-
If your printer supports automatic printing on both sides, change Print One Sidedto Print on Both Sides. Choose the option Flip pages on short edge to avoid printing the second side of each sheet upside down.
-
If your printer doesn’t support automatic printing on both sides, select Manually Print on Both Sides, and feed the pages back to the printer when prompted. To avoid pages from printing upside down, flip the sheets on the short edge of the paper according to your printer’s instructions.
Tip: For a professional touch, consider adding page numbers in the header or the footer. For more info, see Add page numbers.
See Also
Create a booklet using a Word template
Booklet: Page numbering tips.
Create different headers or footers for odd and even pages
Get Microsoft publishing templates
Create a booklet or book
-
Go to Layout > Margins > Custom Margins.
-
Change the setting for Multiple pages to Book fold. The orientation automatically changes to Landscape.
Tip: If you have a long document, you might want to split it into multiple booklets, which you can then bind into one book. Under Sheets per booklet, choose how many pages to print per booklet.
-
To reserve space on the inside fold for binding, increase the width of the Gutter.
-
You can add many embellishments to your booklet’s appearance. For example, to add borders to every page, on the Layout tab of the Custom Margins window, select Borders.
-
Select OK.
If your document already has content, the text is formatted automatically, but you might need to adjust objects like images and tables manually.
-
Go to File > Page Setup and check the paper size. Keep in mind that the final size of the booklet is one half of the paper size. Make sure your printer is stocked with paper of the right size.
Print settings for booklets
When you print the booklet, check the print settings to make sure you print on both sides of the paper and flip the papers correctly for the printing to work as intended. If your printer supports automatic printing on both sides, follow these steps.
-
Click File > Print.
-
Under Two-sided, select Booklet.
Tip: For a professional touch, consider adding page numbers in the header or the footer. For more info, see Add page numbers.
Note: If your printer doesn’t support automatic printing on both sides, you’ll need to print each page manually.
See Also
Create a booklet using a Word template
Booklet: Page numbering tips.
Create different headers or footers for odd and even pages
Get Microsoft publishing templates
At DiggyPOD, we offer free book templates for the author wanting to publish a book. Before sending your book to print, you will need to layout the book. You will need a template for the inside pages of the book, and a template for the outside cover of your book. Below you will find our free Microsoft Word book templates for the inside pages. You will also want to check out our Free Book Cover Templates.
These book templates are set-up for Microsoft Word and have the correct page size and margins already set-up for you to use. Download the correct page size template you want to use:
If you already have your manuscript typed, then you can watch our video tutorial below to learn how to set-up the page size and margins to create your own book template. You can use this same tutorial to create a custom size book template as well.
This video walks you through setting up the book template margins and the correct page size for your book:
If having difficulties viewing the video you may view on YouTube.
Follow these instructions to set up a book template:
- Go to Page Layout and select «Margins.»
- Select «Custom Margins.»
- Select «Mirror Margins» under Multiple Pages.
- Adjust the margin values to match the following:
• Top: .5
• Bottom .5
• Inside: .8
• Outside: .5
• Gutter: 0 - Select «Portrait» under Orientation.
- Select «Whole Document» under Apply To.
- Switch over to the Paper tab.
- Adjust the height and width to match the paper size your book will be printed in.
- Select «OK» to save the changes.
If you want the interior pages to bleed (where the artwork goes right to the edge of the paper) and are using Microsoft Word, or any other word processing program, you will need to add .125″ to each side of the document to accommodate for the excess paper that will be trimmed off.
For example: If you want a 5.5″ x 8.5″ finished trim size, you will need to add .125″ to all four sides of your document, which will create a 5.75″ x 8.75″ page size. We will trim off .125″ from each side to give you a finished trim size of 5.5″ x 8.5″.
For a professional interior book layout, we recommend that you keep any elements you don’t want trimmed off, at least a .5″ from the top, outside, bottom, and .8″ from the binding side of the book. Also remember to select Mirror Margins, when setting up your custom page size in Microsoft Word.
If you are using Microsoft Word, or any other word processing program, it can be very difficult to set up bleeds correctly and have everything line up evenly throughout the interior of the book. We suggest using a more robust piece of software like Adobe InDesign. Adobe does offer a free trial for 30 days, and has monthly plans as well.
If you are using a page layout program like Adobe InDesign, and want certain pages to bleed, you will need to include the bleeds and crop marks when you export your file as a PDF file. Adobe offers a great help section on how to set-up your document with bleeds using InDesign.
Pro Tip: When using any Adobe product to export PDF’s, always use the PDF/x-1a:2001 setting. This setting will alert you to any low resolution images and embed all of your fonts as well.
What is Font Embedding?
Font Embedding is when all the font information is captured from your computer and stored inside the PDF file.
Why is Font Embedding so Important?
If the fonts are not embedded in your PDF files, the type can reflow and become distorted. Even common Fonts like Times need to be embedded, because what we have found is there are many different versions of the Common Fonts.
The good news is that embedding Fonts is quite Easy. DiggyPOD recommends using the DoPDF utility to embed the fonts, please view our PDF Video Tutorial on creating a print ready pdf file.
Mac computers will automatically Embed the fonts, so no need to worry about embedding the fonts.
Can I send in the Cover and Text in the same file?
No. DiggyPOD needs separate PDF files, PDF files for the Book Cover, and one PDF file for the Text file. If the Cover artwork is part of the Text file, it will mess up the Margins of the Text, after the Cover is extracted. Please review our Cover Template for details on how to set up the Book Cover.
PDF Page size must match the Book Trim Size
The Text PDF files must be the same size as the book trim size being ordered. If PDF book files are supplied as 8.5 x 11, but you want a 5.5 x 8.5 book trim size, then the files will have to be reduced, which reduces the fonts and all the elements in the PDF files. Reducing the file size is not recommended, because it will make the type small and hard to read.
DiggyPOD has a Video Tutorial at the top of this page, that will show you how you set-up your files to the correct trim size.
Page numbers on the binding side of the Book Text File
We recommend that your page numbers, header, or footers are not on the binding side of the book. A easy way to avoid this common book printing problem is to have your page numbers, headers, or footers at the bottom center of the book. If you are still unsure, just simply print out two pages that are front and back and place them back to back to see if everything is okay.
Can I send in a new file, if I find mistakes when proofing?
Yes. But please be aware that we charge $40.00 for each new file that is submitted. We put a lot of work and time into quality checking each file, and when you send a new file, we have to start the process again from the beginning.
What if there are issues with my files? Can you fix them?
Most of the time, we can fix most common issues with your files. We do offer a Simple File Fix service, that cost is $35.00. You can choose this option when you place your order, and if there are any common issues with the files, we will fix them. If there isn’t anything to be fixed, we refund the $35.00 to you.
The $35.00 Simple File Fix Service includes up to three fixes, if the files have four or more problems, we will contact you and let you know if we can fix the issues and what the charge will be. We will also let you know what issues we fixed when we upload the online proof for your approval.
If you have to send in new files that we cannot fix. The charge is $40.00 for each new file because we have to start over our quality check of the file.
Do I count the blank pages in the files as pages?
Yes. Blank pages are counted as a page, we will not remove any blank pages.
Can I send my Word Files to you, instead of PDF files?
No. If you send the Word file to us, it will reflow and cause all sorts of formatting issues. When you send us your book files in PDF, we don’t have to worry about the Text reflowing.
Will I see a proof before you print my order?
Yes. All new orders get an online proof of the Book Cover and Text file before we go to print. You can also order a hard copy proof when placing your order. The online proof is free, but the hard copy proof is an extra fee.
All of your Videos are for Microsoft Word, can I use a different program?
Yes. Most of DiggyPOD’s customers use Microsoft Word, but you can use any program that you like to use. We also have quite a few customers that use Adobe Creative Suite. Some common programs that we recommend to avoid using are: Powerpoint, Paint, and any other program that saves items in low resolution. We also recommend not to use any graphics from websites, as most graphics on websites are only 72 dpi, and print in low resolution.
I’m using Adobe Creative Suite, what PDF setting should I use?
Adobe Creative Suite is great for laying out a book, we recommend exporting your PDF’s using the PDF/x-1a:2001 setting. This setting will automatically embed your fonts, and alert you if there are any low resolution graphics.
If you have any questions about our book templates or need additional assistance, please call us at (877) 944-7844. A real person always answers the phone during business hours. At DiggyPOD, we’re happy to help turn your publishing dream into reality.