

-
Select Insert > Page Number, and then choose the location and style you want.
-
If you don’t want a page number to appear on the first page, select Different First Page.
-
If you want numbering to start with 1 on the second page, go to Page Number > Format Page Numbers, and set Start at to 0.
-
When you’re done, select Close Header and Footer or press Esc.
Tip: To get back to a header or footer to make changes, double-click in the header or footer area.
-
On the Insert tab, click the Page Number icon, and then click Page Number.
-
Select a location, and then pick an alignment style. Word automatically numbers every page, except designated title pages.
-
To change the numbering style, select Format and then choose the formatting you want to use.
-
Select OK twice to close both dialog boxes.
Table of contents
- Formatting a Book in Microsoft Word
- Font
- Setting Paragraphs and Spacing
- Chapter Headings
- Table of Contents
- Double-Check Your Work!
- Next Steps: Formatting for Print in Microsoft Word
- Book Size and Page Setup
- Margins
- Copy and Paste Your Book
- Header
- Footer
- Triple Check Your Work!
- Formatting With Atticus
There are a ton of options available for formatting your manuscript before you can upload it to the various online vendors or book printing companies. Even a simple Google search can give you nearly endless options. It’s pretty overwhelming. But, since many people are familiar with Microsoft Word, I decided an article on how to format a book with Word is in order.
Presenting a nice-looking book to readers is essential. If it looks unprofessional, it’s going to be harder to gain readers and build your reputation. That’s why formatting your manuscript is so important. So whether you’re looking to format your manuscript for an ebook or a print book (or both), this guide can help!
First, we’ll talk about formatting an ebook and then a print book, since they’re both a little different. But, it’s a good idea to read through the whole thing, because formatting for an ebook sets you up for formatting for print.
In this article, you will learn:
- Formatting chapter headings in Word
- How to format your book for print in Word
- Setting up the book size and page format
- Formatting your book in Atticus vs. Word
Let’s dive right in.
Note: If yours is a picture book or one that has lots of images, graphs, blockquotes, illustrations, and the like, Word is not the best option for formatting. You’ll probably want to go with a professional formatting service or try your hand at formatting with a fixed-layout file manuscript format. You can check out this article on KDP for help with image-heavy books.
Formatting a Book in Microsoft Word
First off, you need to make sure you have everything ready to go in your document. This means having the title page, introduction, preface, etc. in place. Many writers are so excited with their finished and edited manuscript that they forget about the seemingly little things that can have a big impact on readers.
If you’re not sure what goes into the front and back matter of a book, check out this article.
Font
Start with a standard font size and style, like 12-point and Times New Roman or Arial. These will make your life easier and your readers will thank you, whether they’re reading your Kindle book or your print book.
Once you have all the parts of your book organized in your manuscript and your text size and style set, it’s time to get formatting.
Setting Paragraphs and Spacing
Getting paragraph indentations and spacing are important for a professional-looking ebook. You can help Kindle Direct Publishing (or whichever platform you’re going to sell on) by making sure these are all within the proper bounds. Make sure you’re in the Home tab for proper navigation.
First, click on the Paragraph bar at the top of your screen. Set the alignment to left and make sure the Outline Level is set to Body Text.
Next, under the Indentation heading, there’s a Special column on the right. Set that to First Line and place the indentation at 0.2”.
Then you’ll want to make sure that Line Spacing is set to Single.
Chapter Headings
Formatting your chapter headings correctly differentiates them from the rest of the text so that when the manuscript is transformed into ebook format, the ebook reader will know when a new chapter is starting.
To do this, place your cursor on a chapter title. Then click on the Styles tab. A window should open up on the right side of your screen.
Click the Heading 1 style. You’ll see the heading change. Once it has changed, you can select whatever font style you want without removing the Heading 1 style from the chapter heading.
Repeat this process for all the chapter headings in your book, making sure they’re all the same font.
Once you have all of them changed, you can go to the View tab and check the box for the Navigation Pane. You’ll then be able to view your headings on a window on the left side of your screen. You can also jump to a chapter by clicking on your chapter title in the Navigation Pane.
Table of Contents
Next, you’ll want to create a table of contents (TOC).
Decide where you want your table of contents (it should have its own page after the title and copyright pages). Place the cursor there and then navigate to the References tab and click on the Table of Contents. Select Automatic Table 1.
Go to Table of Contents again and select Custom Table of Contents from near the bottom of the menu. When the box pops up, set the Show Levels option to 1. Then unclick the Show Page Numbers box above that.
It will ask you if you want to replace your current TOC. Click OK.
Next, you’ll need to add a bookmark to the TOC. Highlight the word Contents at the top of the table of contents. Navigate to the Insert tab. Under the Links heading, select Bookmark. Label the bookmark TOC.
That’s it! I can’t say that it’s easy exactly, but it’s not the hardest thing in the world. Next, you can upload the .docx MS Word document to Kindle Direct Publishing and Amazon will convert it to an EPUB file for you.
Double-Check Your Work!
Now, it’s important to make sure the final products look good. One drawback of formatting with Word is that the Kindle ebooks often have some issues in formatting, so you need to go through it with a fine-tooth comb, paying special attention to the text and formatting.
Of course, if you’d rather not go through all the hassle outlined above, you can also use Atticus to format your ebook! But, more on that later. First, let’s talk about formatting your book for print.
Next Steps: Formatting for Print in Microsoft Word
For best results in print formatting, you’ll want to follow the steps above for ebook formatting. Print formatting is more involved, but it works off the same basic structure that I described above.
So, once you have your chapter headings, your font size, paragraph spacing, and TOC all ready to go, you can continue with the print formatting directions below.
The easiest way to go about this is to use a new blank document that you can cut and paste your manuscript into. So, do the following on your new blank document to get it ready for your manuscript.
Hint: You can also search for a Word template to download and transfer your text into. There are free and paid template options out there made expressly for MS Word. These still often require some trial and error to get the proper book format.
Book Size and Page Setup
Before you can do anything, you need to decide which size your book will be. There are several different options available. The most popular sizes in the U.S. are 5” x 8”, 5.5 x 8.5”, and 6” x 9”. If you’re not sure which page size to choose, pick up a book from your bookshelf that seems like a good size for your book and measure it. Chances are it’s one of the three sizes above.
If you choose another page size, head over to the print-on-demand company of your choice to make sure they support the size you want to use.
In your blank document, navigate to the Layout tab. Click on the Size option and select More Paper Sizes at the bottom to enter your desired size. For this demonstration, I used the page size 5.5” x 8.5”.
Margins
Next, navigate to the Margins tab on the left-hand side of the Layout toolbar. Click on it and select Custom Margins at the very bottom of the dropdown menu. Depending on your book’s word count, you may have a little room to make them smaller. The important thing is to not make them too small because doing so can cut off some of the text when the book is bound.
You generally don’t want to go smaller than 0.325”. For this book, we’ll set all the margins to 0.75”. When you preview your book before you send it to be printed, you’ll be able to ensure that none of the text is cut off by the binding.
Copy and Paste Your Book
Now is a good time to copy and paste your manuscript into the formatted document. This way you can have a different document for print books and one for ebooks. Plus, the next section is easier when you can see what you’re doing and where your different sections start.
Once your manuscript is pasted into the formatted Word file, head over to the Insert toolbar. Then navigate to the Header tab. Once you click it, a dropdown menu will appear and you’ll be able to choose the header style you like best for your book.
If you’re not sure, take a look at a couple of your books to see what style you like best. Usually, the header is used for the author’s name and the title of the book. Most of the time the text of the header is smaller, but not always. It’s always differentiated in some way from the main text.
Next, let’s put a footer in that’s just the page numbers. But, the kicker is that you don’t want page numbers for your title page, TOC, or your copyright page. You want the first page of your book to be where the numbers start. Here’s how you do this:
Make sure you exit out of the Header and Footer section to go back to the Home toolbar. Move your cursor to the bottom of the last page before your novel begins. Then go to the Layout toolbar and find the Breaks tab. Find the Section Breaks in the dropdown menu and select the Next Page Section Break (not to be confused with a regular page break).
This will create a different section for your front matter and another for the main text of your book, which will allow you to add page numbers only where you want them.
Next, go to the bottom of your first page — the page where you want the numbers to start, and double click on the bottom margin. The page should change, letting you know that you’re in the footer section.
Next, you’ll see that the top toolbar has switched automatically to the Header and Footer tab. The Link to Previous button should be highlighted. Deselect this.
Then, navigate to the left and find the Page Number button. Click it to access the dropdown menu. Select whichever style of page number you like. The numbers should only start at the bottom of the page you’re on.
Once you’re done adding the page numbers, you’ll have a print-formatted manuscript!
Triple Check Your Work!
Upload your finished product to Amazon along with your cover and take a look through their printed book preview feature to make sure it looks good and that none of the text gets cut off.
As you can tell, working with Microsoft Word is not the best (or the easiest) way to format your book, whether you’re working with print or ebooks.
If you want a much easier and faster way to format your books, Atticus is the way to go.
Video: How to Format a Book in Word
For a nice summary of this article, along with a few of my own personal thoughts on the subject, be sure to check out this video on how to format a book in Microsoft Word.
Want more videos like this? Be sure to subscribe to my YouTube channel for weekly videos!
Formatting With Atticus
Atticus is a brand new all-in-one formatting and writing software that yours truly (and a great team) has been working hard on for a long while now. It allows you to customize your book layout with several different options — all with a few clicks of the mouse.
You can choose to write your entire book in Atticus or you can simply import your Word document or Google doc when you’re ready to devote a few minutes to formatting.
Atticus gives you the option to change the text style and size. You can use the preview option to see how the text will look in different formats.
You can choose from seventeen different chapter heading styles with ease, and Atticus will format them all automatically. Even within those options, you can customize titles, subtitles, and even how the numbers show up. Whether you’re writing a nonfiction book or a fiction book, there’s a template for you in Atticus.
You can also customize the paragraph styles, making them indented or spaced. You can also add custom paragraph breaks or choose from existing ones. There’s an option for lead-in small caps and, of course, the always classy drop cap option. And, you can preview the changes in real-time.
Atticus also makes it easy to change your headers and footers without all the trouble that doing it in MS Word entails. You can choose what page number format you want, as well as what header format.
And, perhaps best of all, it also allows you to pick your print options easily. Atticus will then automatically format it, giving you an excellent-looking file that you can use with any print-on-demand companies. You can use it as a word processor or just for book formatting. Or both!
So if you want to save time (and time is money, especially for indie authors, isn’t it?), then head on over to Atticus.io and get yourself a copy for a one-time price. No monthly fees here. And you’ll always get the latest updates as we continually upgrade and make Atticus even better.
There are certain elements in a book that are controlled by a master setting in MS Word, for example page number style, page header/footers etc. Sometimes, however, we need to use more than one style for these elements within the same book. In this article, we will see how to do different formatting for different parts of the book. This will be achieved using sections. Some specific things we’d look at are
- Different styles of page numbers in different parts of the book
- Different headers and footers in different parts of the book
- Different vertical alignment of text in different parts of the book
Using Sections in MS Word
There are several things that you want to appear through out the book, e.g. page numbers, some common text in the header or footer etc. For many such things, MS Word provides master settings so that you don’t have to enter them manually on each page. However, a problem arises when you want to make exceptions for some pages in the book. For example, let us assume you have inserted the page numbers using the master setting. But there pages with chapter headings and sketches where you do not want the page numbers to appear. In MS Word, there is no way of making such exceptions for particular pages. If you try to delete page number from one page, you will end up deleting page numbers from all the pages. So how do we overcome this problem?
The solution to this lies in defining sections. Section is a unit which has its own master settings for things like page numbers and header/footer. One section can have any number of pages starting at 1 and there can be any number of sections in a document.
In Word 2007, page break and section break options can be found in «Page Layout» tab. Under «Page Setup» click on «Breaks» and select appropriate Break type. In earlier versions of word, break option can be found under ‘Insert’ menu.
Different Page Number Styles, Headers and Footers
So how can we use sections for removing page numbers from one particular page? Let us try to understand this with an example. Suppose chapter one of the book is on pages 1-16. Page 17 has the chapter heading, page 18 is empty and on page 19, the second chapter starts. I want the page numbers to be present on pages 1-16, and again from page 19 onwards. But there should be no page numbers on pages 17-18. See this file for example. Here is what we can do to achieve this:
- Type normally up to Page No. 16 with page numbers inserted.
- At the end of Page No. 16, click on Insert->Break->Section Break (Next Page). This will create Page 17.
- Now go to Page 17 and click on Insert->Break->Page Break to insert the empty page 18.
- Then go to Page 18 and once again click on Insert->Break->Section Break (Next Page). This will create Page 19.The page numbers will be visible on each of the pages.
- Double click on the footer area of any of the pages. It will show section numbers on header and footer. Pages 1-16 will be in Section 1, 17-18 in Section 2 and page 19 in Section 3. These sections have been created by the section breaks we inserted.
- In the header and footer mode itself, click on the footer area of Page 17 or 18 (section 2). In the toolbar, there would be an option called «Linked to Previous», which is enabled by default. Disable it by clicking on it. Repeat the same thing for page 19. Now Section 2 is unlinked from Section 1 and Section 3 from Section 2. So their headers and footers can be formatted differently.
- Go back to page 17 or 18 and delete the Page Number from footer. It will not affect the previous or the following sections.
The above steps also tell us what is to be done to achieve different formatting of Headers and Footers in different parts of the book.
- Put the pages that require different formatting into a different section.
- Make sure that the header and footer of this section are not linked to the previous one and that of the next one are not linked to this one.
- Make the changes in header and footer as needed.
Some other things you can achieve by following a similar procedure are
- Having the name of the chapter in the header (Making each chapter a different section unlinked to the previous or the next one and make a header for each of them).
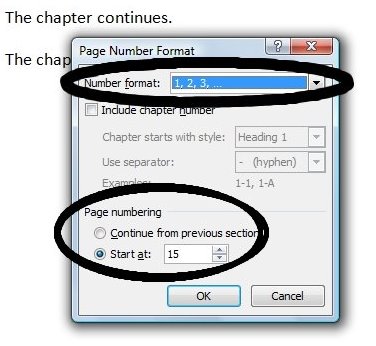
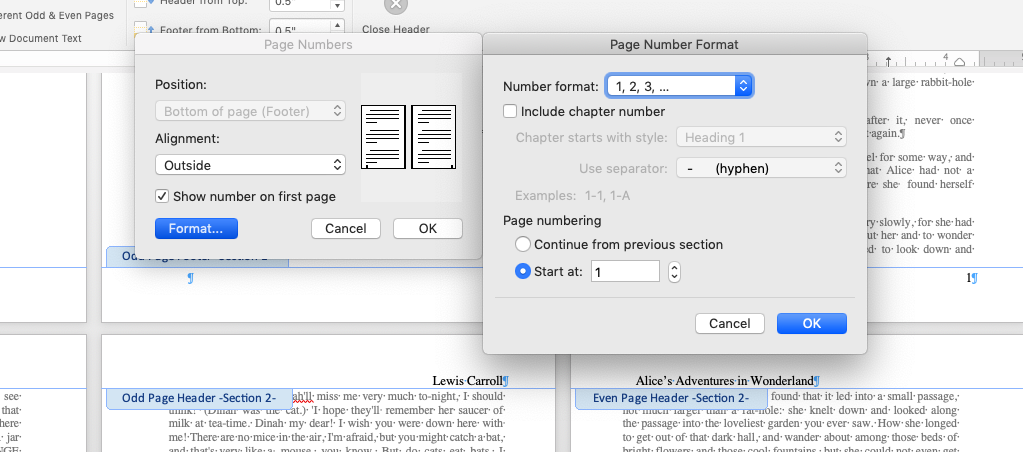
- Using different systems of page numbering in different parts. Example: roman numerals for page numbers until the first chapter and then page numbers starting with 1 again at first chapter. Check this file for an example. To achieve this
-
- Insert a section break where the chapter starts.
- Unlink the headers and footers of the section from the previous one.
- In the first section, go to Format Page Numbers option. Here in the Number Format drop-down, select the roman numeral format.
- Go to Format Page Numbers option in the second section. Select the normal Indo-Arabic format in Number Format Dropdown. Also in the Page Numbering option, select «Start at» and type 1 in the text box. Click «OK» and you should be done.
Following screenshot should assist in locating the right options for page number formatting.
Different vertical alignment of content in different parts
Another interesting thing that can be useful for formatting in conjunction with sections is vertical alignment of content on pages. If you go to Page Setup, in the layout tab, there is an option page: Vertical Alignment.
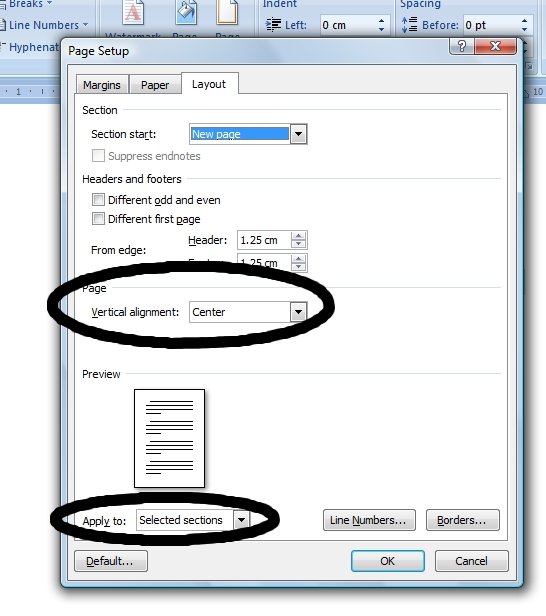
Generally it will set to Top. For some sections, however, you may want the text to be center aligned vertically, e.g. the chapter headings. One way of achieving that is to insert new lines but it is not a clean solution. And you may often have to adjust it to achieve the right position for centering. Here is a cleaner solution using sections.
- Put that page into a separate section
- Go to Page Setup->Layout, select vertical alignment as center and apply the changes to only that particular section.
This file, for example, has the chapter heading, center aligned vertically.
Conclusion
Sections are a very handy feature for achieving all those hard to get formatting niceties in the book. So, now apply as many section breaks as you need and achieve the most suitable formatting for the various parts of your book.
We will start with a blank document and set our page size and margins. Word can offer you various templates to use but you ideally want to start with a blank document and format your book to your own specification.

Microsoft Word – Pages Size
After we have chosen our blank document it is time to choose the page size. There are plenty of sizes to choose from and it is something that will need a lot of thinking. Today we will format a B-Format book at 198mm high x 129mm wide. This is a standard size for a novel. If you are struggling to find a page size that you think is suitable for your book, then head over to our other post for more information – Hardback and Paperback Book Sizes.
To change the page size, we go to Layout > Size > More Paper Sizes…

This will bring up another window where we can input our own custom size.
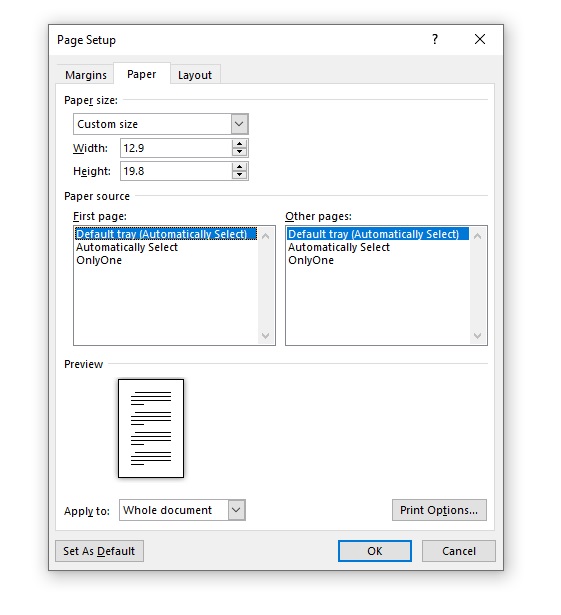
Under paper size, you want to click the drop-down box and select custom size and then fill out the width and height of the finished paper size you want. In our case, we want a book 198mm high x 129mm wide. As my word document measurements are in cm’s we will fill this out accordingly. You will need to check if your document is in mm’s, cm’s, inches etc. The paper source we will leave as default for now.
After we have filled out the height of 19.8 cm’s and the width of 12.9 cm’s and selected to apply to the whole document, it is time to move on to the next part, the margins.
Microsoft Word – Page Margin
As standard Word will set the margins to 1″ / 2.54cm. The margin size you will want will depend on a few different factors;
- The final page length of your book
- Finished size of your book
- Fiction or non-fiction
- Your book’s genre
There are a few other factors to consider but the best advice we have given our customers is to have a look at other books which are like yours and simply measure the margins. You will find that many books will be different, you just need to choose the right size for your book.
We are going to choose margin sizes of 18mm for the left and right and 15mm for the top and bottom. When we set this up in Microsoft Word it will be 1.8cm left and right and 1.5cm top and bottom.
Microsoft Word – Gutter Size
We then have the option of setting the gutter and the gutter position. This is a term used in the printing industry which describes the side on which a book will be bound. For a normal book printed and bound in the UK, Europe, USA and many other countries, this will be on the left-hand side. The gutter measurement allows us to set extra space on the bound side. This means you have equal margin space on the left and right sides of your document, plus extra space for when all the pages get bound together so you don’t have to ‘break’ the spine of the book.
The gutter measurement will depend on how many pages your book will be. For a small number of pages in the range of 20 to 50, a gutter size of 5mm may be sufficient. However, if you have a large number of pages, 300+ you may want to increase the gutter size to 10mm. Again, this is something that if you are unfamiliar with, you will want to have a look at some books in the same genre and decide.
For our book, we are going to use a gutter size of 5mm and set it to the left-hand side, the orientation set to portrait and the multiple pages option set to mirror margins.

We now have a document that is starting to look like a traditional book but we are far from finished. You should have something which looks like the image below.

Formatting a book in Microsoft Word is very similar to Adobe InDesign and other typesetting software. We are now going to work on the paragraph styles. You can bring up the paragraph options under the layout tab and click the little arrow underneath. For our novel, we are going to use a basic style which is common in most fiction novels.
The alignment will be set to justify and the outline level will be body text. The indentation will be set to 0cm but under special we will set the first-line indentation. For our book, we are going to have a 5mm first-line indent. Again, have a look at other books and make a decision based on what you feel would look right for your book. The spacing of the paragraphs will be set to 0pt before and after and the line spacing set to single.

You will now have a book that looks like the one below. You will notice that in this paragraph style we have set indents for every first line of every paragraph. Now with our book, we don’t want to have the first line of the first paragraph indented. We will have to manually adjust this setting by clicking on the first line of the first paragraph and adjusting the margins using the step above.

Microsoft Word – Chapter Titles
The next step will be to start amending our chapter titles. The chapter titles should be in a larger font than the rest of the text with some additional spacing between the top of the page and the main body of the text. For our book, we are going to use the same font as the main body but in 16pt. The spacing is a personal preference, use what you think is best for your book.
This is how the first page of the main body of our book looks. We are starting to get a nice clean layout that resembles a standard novel.

Now we will start to look into the fonts for our book. This part could be a whole post all to itself as there are many different variables. For more of an understanding of fonts you could check out some of the following posts; How to Choose the Right Font for Your Book, How to Choose the Right Font for your Design and What Font Should You Use for Your Book.
To change the font of your book you will need to click on the home tab at the top of the document. You will then be able to see all the standard options to edit your book. Select what font you will like from the drop-down and the font size. Remember if you have already set your chapter size if you change the font size with all the text selected it will apply that font size setting to everything.

Our book is going to be set in Garamond at 12pt. This is a popular font type used in novels. Some other popular fonts are Palatino and Minion Pro but there are thousands of fonts to choose from so make sure you have a good look around before you decide.

We are now going to add page numbers to our book. To do this you want to go to, Insert > Page Number > Bottom of Page and then select a style that has the page number in the middle of the page.

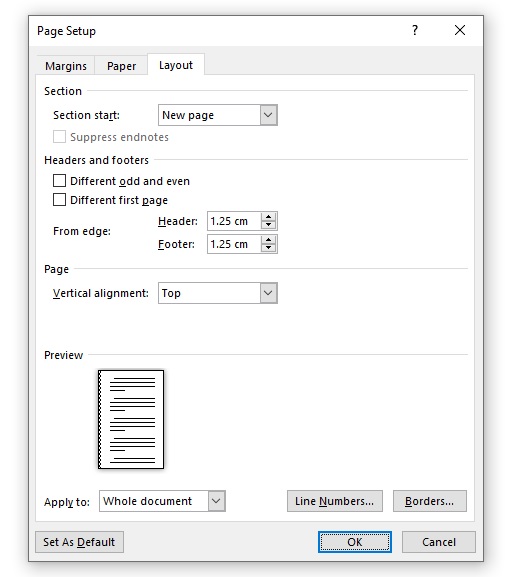
You will then have page numbers added to every page of your document. The page numbers will need spacing in the footer. Our book is going to have a spacing of 1.25cm Header from Top and 0.3cm Footer from the Bottom.
This is how our book now looks.
We have a completed book that has been formatted in Microsoft Word which when exported as a PDF will be press-ready. There are a few little extras that can make your book look more professional but unfortunately, Microsoft Word doesn’t provide those options. Formatting a book in Word is not able to replace professional typesetting software such as InDesign but it can do a very good job of providing you with a press-ready PDF file that looks fantastic and will be suitable for 90% of books.
If you need helping to format your book to print we recommend the services of Book Design UK.
If you’re publishing and using print-on-demand to sell your book, you know the pain and frustration page formatting causes. Today, we’re going to cover one of the more annoying and (unnecessarily) challenging steps when using Microsoft Word: adding page numbering to your file.
Here’s a tl;dr version, for those of you in a hurry:
Adding Page Numbers in Microsoft Word
- Finishing Writing and Editing
Finalize the content before you do any page layout. You should also add any styling and general formatting before you mess with page numbers.
- Add Breaks
Use Page Breaks for controlling where content appears on the page and Section Breaks to control section-by-section headers.
- Format Header and Footer
Each section break defines a new Header and Footer. Check the settings for all your sections before inserting page numbering.
- Insert Page Numbers
Add the Page Numbers and review each section for proper linking and accuracy.
Step 1: Finish Your File
Do not, under any circumstances, add page numbers before you have finished editing and revising your book. It’s a waste of time and energy. Book formatting is best approached in a thoughtful order; page numbering being among the last steps.
So before you insert page numbers, see to your page layout design. That includes formatting your text, adding styles, setting your page margins, and any images or graphics. Create and add all the front matter and back matter too.
Finally, the last part of formatting your book design ties directly to your page numbering: adding breaks. That’s our next step, but first, turn on Reveal Non-Printing Characters.

Non-Printing Characters include spaces, returns, and breaks. You’ll want these revealed so you can properly add breaks to your file.
Step 2: Add Breaks
Breaks—Page Breaks and Section Breaks—divide the page dynamically, so that when you export your PDF for printing, the spacing will stay uniform.
Please, NEVER use hard returns to create space on the page.
Breaks will allow you to segment and section your file. Importantly, breaking your file into sections allows you to control which pages have page numbers.
Think about it; have you ever bought a book that has a page number on the very first page (the title or half-title usually)? Go grab a couple books off your shelf and have a look. I’ll wait.

I’m guessing you found that the front matter didn’t have any page numbering. Then you get to the first official page of the book and the page numbering begins at 1.
Create Something
Create your book and share it with the world.
Create Something
Create your book and share it with the world.
Page Break
Inserting a Page Break tells Word to stop adding content and move to the next page. Simple as that.

If your book uses the same numbering style for the entire file and you don’t have unique header content, add a Page Break at the end of every chapter to start the next chapter on a new page.
Section Break
Word has four kinds of Section Break you can use:
- Section Break (Next Page) – starts the new section on the next page
- Section Break (Continuous) – starts the new section on the current page
- Section Break (Odd Page) – starts the new section on the next odd page
- Section Break (Even Page) – starts the new section on the next even page
Use the ‘Next Page’ Section Break until you’re very comfortable with Word formatting. A Section Break (Next Page) works exactly like a Page Break with one addition—the file is split into a new ‘section’ on either side of the Break.

Use a Section Break (Next Page) to make each chapter a unique section of the document. You’ll have the control to add unique content for the Header (like chapter titles) for each section.
Word offers a lot of options to format the Header and Footer. With all of your breaks added, start with the first section and work sequentially to update the settings for the header/footer in each section.

- Link to Previous – This setting defaults to being ‘ON’ so you have to check it for all your sections. If selected, the header and footer will link to the header and footer in the previous section. If you plan to add unique content for each section, you must turn off Link to Previous for all sections.
- Different First Page – A lot of authors like to leave off the header and/or footer on the first page of a section. Check this box and you’ll be able to format the first page of the section separately from the rest of the section.
- Different Odd & Even Pages – If you want to have different content on the odd and even pages (like a title on one side and author on the other) you need to check this option.
Step 4: Insert Page Numbers
If you just used page breaks to separate chapters, you’ve got it easy.
Head to the first page you want your numbers to appear on (probably the first page of the first chapter) and double-click on the footer. While in the footer, the ribbon should swap to the header/footer menu and you’ll see the ‘Insert Page Numbers’ button.
Here we see the Page Number menu and the Format… menu opened beside it. Select the alignment for your page numbering. Also set the Start at: to 1 so that the page I’m currently on will show ‘1’ in the footer. Click ‘OK’ for both menus and your page numbering will appear in the footer.
Be sure to close the header and footer (just double-click in the body of your page) to see how the page numbering will look.
If your chapters will have unique content in the header, you’ll need to insert section breaks at the end of each chapter. With that done, add page numbering to the first section. For each successive section, you’ll need to change the formatting when you insert the page numbers: select Continue from the previous section in the Page Number Format menu.

This will link the page numbering independently of the Footer linking, allowing us free to edit the Header/Footer for other content without breaking the page numbering.
Simplifying the Complex
The best way to keep page numbering simple is to do it last. This gives you the freedom to design the pages of your file without having to set up a section and ensures once you get to that step, there won’t be any additional changes to disrupt the page numbering.
Microsoft Word’s method of page numbering is much more challenging than tools like Adobe InDesign or Affinity Publisher—but these publishing programs are designed for more complex book layouts. Microsoft Word is primarily a word processor and will always struggle to match tools like InDesign for page layout.
Last note: if you’re looking at Word and what you see doesn’t match the screenshots in this article, it’s likely because your version of Word and mine are not the same. Microsoft (infuriatingly) has a tendency to change the layout and location of various commands when they update the Office software. You may need to refer to their help pages for information about your version of Word.
Book Design And Print-On-Demand Services
Once you’ve got all your pages numbered and you’ve added header content, the last test is to export a PDF for printing. Most print-on-demand companies require a PDF to print. I would be very skeptical of a printer that DIDN’T require a PDF.
Finally, once you’re satisfied with your layout in Word and the PDF looks good too, you’re ready to make a print order for a proof copy to see how the book (and your page numbering!) will look in print.
Get Started
Create a free Lulu account today to print and
publish your book for readers all over the world.
Get Started
Create a free Lulu account today to print and publish your book.

Paul H
Paul is the Content Marketing Manager at Lulu. When he’s not entrenched in the publishing and print-on-demand world, he likes to hike the scenic North Carolina landscape, read, sample the fanciest micro-brewed beer, and collect fountain pens. Paul is a dog person but considers himself cat tolerant.

Microsoft Word offers an easy way to add different styles of page numbers to your document. If you’ve got a simple document, it works well enough. But if you’ve worked with Word for a while and use it to create more complex documents, you know page numbering can get a little flaky. So let’s take a closer look.
To add page numbers to your Word document, switch over to the “Insert” tab on the Ribbon and then click the “Page Number” button in the “Header & Footer” section.

A drop-down menu shows several different options for where you’d like the page numbers to appear—top of the page, bottom of the page, and so on. The last couple of options let you format your page numbers more precisely (something we’ll look at a bit later in this article) or remove page numbers from your document.
Hover over one of the first four options and a page number gallery appears. Each option in the gallery gives you a general idea of how the page numbers will look on your page.
Once you find an option you like, go ahead and click it to have Word automatically number all the pages of your document in that style. In this example, we’ve selected the “Accent Bar” style in the “Page X” format.
RELATED: How to Insert Page X of Y into a Header or Footer in Word
If you inserted page numbers at the top or bottom of the page, the header or footer area of your document automatically opens up, and you can make any addition you like around your new page numbers. When you’re ready to get back to your document, you can tap the “Close Header & Footer” button on the Ribbon or double-click anywhere in your document outside the header or footer area.
That’s the simple version of adding page numbers, and it works well enough if you’ve got a simple document—one where you want all the pages numbered, and you want them numbered using the same convention.
For some documents, though, you’ll want to get a little fancier. For example, what if you don’t want the page number to appear on the first page of the document (or on the first page of each section)? Or what if you want the page number placement to be different on odd and even pages, the way it is in a book? Or what if you have different sections that you want to be numbered differently—like an introduction or table of contents where you want Roman numerals instead of the Arabic numerals used in the rest of your document?
Well, Word has a way to do all of that.
How to Make Page Numbering Not Appear on the First Page of a Document or Section
When your first page is a title page, you might want to use a different footer or header for it than you use in the rest of your document and you might not want the page number to show up on that page. When you open your header or footer section by double-clicking somewhere in those areas, Word opens a new “Design” tab on the Ribbon in a section named “Header & Footer Tools.”
On that tab, you’ll find a “Different First Page” option.
The critical thing to know here is that this option applies to the section of the document where your insertion point is currently placed. If you only have one section in your document, selecting the “Different First Page” option makes the current header and footer disappear from the first page of your document. You can then type in different information for your header or footer on the first page if you want.
If you have multiple sections in your document, you can change the header and footer for the first page of each section. Say you were writing a book with different chapters and you had each chapter set up in its own section. If you didn’t want the regular header and footer (and page numbers) showing up on the first page of each section, you can just place your insertion point somewhere in that section and then enable the “Different First Page” option.
How to Number Odd & Even Pages Differently
You can also set up page numbering so that the position of the page numbers is different on odd and even pages. You’ll find that most books take this approach so that the page number appears toward the left side on the left (even) pages and toward the right side on the right (odd) pages. This prevents the page numbers from being obscured by the book’s binding and makes them easier to see as you flip through pages.
Word also has an option for that. On that same “Design” tab in the “Header & Footer Tools” section of the Ribbon, just click the “Different Odd & Even Pages” option.
Word automatically formats the page numbers to appear the way they would in a book, and you can then make any manual adjustments you want.
How to Add Different Numbers and Formats to Different Sections
Most documents use Arabic numerals (1, 2, 3, etc.) in the main body of the document and some use Roman numerals (i, ii, iii, etc.) for different sections like the table of contents, introduction, and glossary. You can set up your document this way in Word, too.
The first thing you’ll need to do is create different sections in your document for these different parts of your document. So, for example, if you wanted your table of contents and introduction to be numbered differently than the main body of your document, you’d need to create a different section up front to hold those parts.
To do this, place your insertion point at the very beginning of your document (if you haven’t already created that preliminary content) or place it right before the first page of your main content (if you have already created the preliminary content).
Switch over to the “Layout” tab on the Ribbon and click the “Breaks” button.
In the drop-down menu, click the “Next Page” option. As the description says, this creates a section break and starts the new section on the next page.
Now that you’ve created the separate section, you can change the format of the page numbers there. The first thing you’ll want to do is break the link between your new preliminary section and the next section where the main body of your document starts. To do that, open up the header or footer area (wherever you have your page numbers) in the main section of your document. On the “Design” tab in the “Header & Footer Tools” section of the Ribbon, click the “Link to Previous” option to break the link to the previous section’s header and footer.
Now that you’ve broken the link, you can fix the page numbering the way you want it. This takes a few steps.
Start by opening up the header and footer area of any page in that preliminary section. You’ll see that the page numbering persists from before you created the new section break.
Right-click the page number and choose the “Format Page Numbers” command from the context menu.
In the Page Number Format window, select the type of numbers you want to use for the section from the “Number Format” drop-down menu. Here, we’ve gone with standard lowercase Roman numerals. Click “OK” when you’re done.
And you can see that our page numbering in that section has changed to Roman numerals.
There’s one more step you’ll need to take, though. Scroll down to the first page in your next section (the one with the main body of your document). You’ll see that the page numbering likely doesn’t start off at page one. That’s because it maintained the same numbering it had before you created that additional section.
It’s an easy fix, though. Right-click the page number and choose the “Format Page Numbers” command from the context menu.
In the Page Number Format window, select the “Start At” option and then set the box at the right to “1” to start the section off on page one.
That’s all there is to it. Now you should have two sections with different numbers and formats.
Controlling Page Numbers Using Fields
Word numbers all your pages, but those numbers remain hidden unless you tell Word to display them. By inserting a field code anywhere on the page, you can tell Word to reveal the page number. This option gives you fine control over page numbers. It also lets you put numbers anywhere you need and not just in the headers, footers, and margins. For example, you could put them in a text box if you wanted to.
Place your insertion point where you’d like to insert page numbers and then press Ctrl+F9 to insert a pair field brackets, which look like this: { }. Then, type “PAGE” inside the brackets like this:
You can also use a few switches along with the PAGE command that gives you some control over the style in which your numbers appear. Use one of the codes below to give your numbers the look you need.
{ PAGE * Arabic }
{ PAGE * alphabetic }
{ PAGE * ALPHABETIC }
{ PAGE * roman }
{ PAGE * ROMAN }
To finish, right-click anywhere between the brackets and choose the “Update Field” command from the context menu.
Here’s an example of a page number we’ve inserted into a text box at the bottom right of our page.
Fixing Broken Page Numbers
If your page numbers are broken in a document—maybe they appear non-sequentially or restart seemingly at random—it’s almost always because of problems with sections.
For Word, a document isn’t really a thing when it comes to formatting. Word breaks things down into sections, paragraphs, and characters—and that’s it.
To fix broken page numbering, start by identifying the sections in your document. The easiest way to do this is to switch over to the “View” menu on the Ribbon and then click the “Draft” button to enter draft view.
In draft view, Word shows you exactly where section breaks occur and what kinds of breaks they are.
When you’ve identified the location of your section breaks, switch back over to the Print Layout view (so you can see headers and footers easier). This is where you’ll need to start doing some detective work.
Make sure that that the sections where you want continuous page numbering have their headers and footers linked together and that sections where you don’t want continuous numbering have that link broken. You can also use the methods we’ve covered in this article to make sure the page numbering of sections start at the right number
READ NEXT
- › How to Add Page Numbers to Google Docs
- › Learn These Microsoft Word Features to Make College Easier
- › How to Rearrange Pages in Microsoft Word
- › How to Print Double-Sided in Microsoft Word
- › How to Cross-Reference in Microsoft Word
- › How to Create a Book in Microsoft Word
- › BLUETTI Slashed Hundreds off Its Best Power Stations for Easter Sale
- › The New NVIDIA GeForce RTX 4070 Is Like an RTX 3080 for $599
How to Add Page Numbers in Word
Create page numbers in Word 2013, 2016, 2019 and Microsoft 365
Updated on October 16, 2020
What to Know
- Go to the Insert tab > Page Number > Page Number > Top of Page (Header) or Bottom of Page (Footer).
- Under Alignment, select Left, Right, or Center > OK.
- To format the page numbering, click Header or Footer > Format > choose format. Double-click anywhere in the document.
This article explains how to add pages numbers to documents in Word 2019, 2016, 2013, and Word for Microsoft 365.
If your Microsoft Word document is long (or book-length), you might want to add page numbers to the header or footer. When you print a document, the headers and footers can be printed as well.
The steps for adding pages numbers is basically the same for Word 2019, 2016, 2013, and Word for Microsoft 365.
-
Place your cursor at the first page of your document or where you want page numbers to begin.
-
Select the Insert tab.
-
Select Page Number in the Header & Footer group.
-
Select Page Number again from a drop-down menu.
-
Under Position, select Top of Page (Header) or Bottom of Page (Footer) to indicate where to place the numbers on the page.
Under Alignment, select Left, Right, or Center.
Select OK to save the selections and exit the menu.
-
Select Header or Footer on the toolbar to format the page numbering.
-
Select a format from the menu options.
-
Double-click anywhere in the document to hide the header and footer areas.
Customize Headers and Footers
You can also customize the headers and footers in all versions of Microsoft Word. You do that from the same area where you added page numbers.
To begin, select Header or Footer to see your options.
In recent editions of Word, you can also get additional header and footer styles online from Office.com.
Thanks for letting us know!
Get the Latest Tech News Delivered Every Day
Subscribe
![]()
Download Article
Easily add page numbers to the header or footer in your Microsoft Word document
![]()
Download Article
- Inserting (PC & Mac)
- Formatting (PC & Mac)
- Inserting (Mobile)
- Video
- Expert Q&A
- Tips
|
|
|
|
|
Adding page numbers in Microsoft Word is easy! Whether you’re writing a 10-page essay or a thesis paper, there are a variety of ways to customize the page numbers. Use the Insert tab to quickly add page numbers. From there, you can change the formatting and numbering options. This wikiHow guide will show you how to add page numbers to your Microsoft Word document on Windows and macOS, as well as in the Word mobile app on your Android, iPhone, or iPad.
Things You Should Know
- On desktop or mobile, go to the Insert tab, then select «Page Number» to add page numbers.
- Double-click the page number to make changes to the font, color, or style.
- Double-click the header or footer, then go to Page Number > Format Page Numbers for additional options.
-

1
Click Insert. This is in the tab menu bar at the top of Word. Alternatively, double-click the top or bottom of the page to open the Header or Footer editing menu.
- Don’t forget to save your work as you go!
-
2
Click Page Number. This opens a pop-up menu for choosing where to place the page numbers.[1]
- In the Insert menu, Page Number is near the center.
- In the Header & Footer design tab, Page Number is on the left.
Advertisement
-
3
Choose a page number position. This can be in the header or footer, and located left, center, or right.
- You can also toggle the option to include the page count in the page numbering (e.g. 1 of 3).
- Selecting a page number position will open the “Header & Footer” tab.


Advertisement
-
1
Double-click a page number. This will select it and show a pop-up menu with options for changing the font, color, and style. This change will edit every page number automatically.
- You could even cross out the page numbers if that’s your style.
-
2
Start numbering on the second page. If you want the first page to have no numbering, and start at 1 on the second page, follow these steps:
- Double-click the header or footer to open the Header & Footer design tab.
- Check the “Different First Page” checkbox.
- Click Page Number then Format Page Numbers.
- Select “Start at” and change it to 0.
-
3
Restart page numbers by using page breaks. If you want to start a new numbering later in the document, you’ll need to use a page break.
- Place your cursor at the beginning of the page you want to restart the numbering on.
- Go to the Layout tab, then click Breaks.
- Select Next Page in the Breaks options menu.
- Double-click the header or footer in the second section. This will open the Header & Footer design tab.
- Click Page Number then Format Page Numbers.
- Select the radio button labeled «Start At,» then select «1» to restart the page count at 1.
-
4
Use «Format Page Numbers» for additional changes. This can be located by going to Insert > Page Number > Format Page Numbers. You can change:
- The number format. You can change this to Roman numerals, letters, or another style.
- The chapter number.
- The starting number.
-
5
Click Close Header and Footer. This will return you to editing the body of the document. Alternatively, press Esc to close the header and footer editor.


Advertisement
-
1
Open your Word document on your Android, iPhone, or iPad. It’s easy to use Word on your phone or tablet to insert page numbers into your document.
-
2
Tap the more button. While in Edit mode in the Word mobile app, tap the more button (three horizontal dots).
-
3
Tap Home. Then, select Insert to switch to the Insert menu.
-
4
Choose Page Numbers. Then, select the placement location for the numbers.
-
5
Format the page number. After selecting the placement, double-click the page number. Then, tap the text edit button (the icon with the letter A and a pen). You can change the font, size, color, and more!
-
6
Go to Headers and Footers. This is in the Insert menu. You can set a different first page, change how odd and even pages look, or remove the page numbers entirely.
- When working in Online mode, any changes made in the app will appear on your desktop version of Word.


Advertisement
Add New Question
-
Question
In the insert box, the page number icon is grayed out and not available for use. How do I activate it?

Kyle Smith is a wikiHow Technology Writer, learning and sharing information about the latest technology. He has presented his research at multiple engineering conferences and is the writer and editor of hundreds of online electronics repair guides. Kyle received a BS in Industrial Engineering from Cal Poly, San Luis Obispo.
wikiHow Technology Writer
Expert Answer
The page numbering feature isn’t available in certain layouts. Go to View and select Print Layout. If this doesn’t resolve the issue, try restarting and/or updating Microsoft Word.

Ask a Question
200 characters left
Include your email address to get a message when this question is answered.
Submit
Advertisement
Video
-
If you plan on creating a complex header or footer (like your name, or a title), try and add the page numbers first. They will be much easier to work with.
-
Looking for money-saving deals on Microsoft Office products? Check out our coupon site for tons of coupons and promo codes on your next subscription.
Thanks for submitting a tip for review!
Advertisement
About This Article
Article SummaryX
1. Click Insert.
2. Click Page Number.
3. Select a position.
4. Choose a style.
Did this summary help you?
Thanks to all authors for creating a page that has been read 423,281 times.
Is this article up to date?
So You Want to Write a Book with MS Word
If you intend to assemble and manipulate large amounts of text in Word and would like to minimize the time you spend fighting Word, it’s a good idea to have an understanding of how Word works.
If you are hoping for an easy template for a book, you should realize that there is no such single item. There are as many potential templates as there are books. However, if you format your text according to the structure of your book, following the principles introduced and linked here, you can plug the same text into any template to control the visual appearance, and reformat and reorganize your entire book very quickly.
This webpage will also point you toward how to set up Word to write a book, a dissertation, or other long document projects that require multiple chapters. If you follow the principles introduced in this article, Word will automatically update all those things that change as you edit. For instance, it will create a table of contents and update the page numbers as you shuffle chapters, and will re-number your figures and fix the cross-references when you add another figure.
The title of this article refers to “books,” but these are principles that apply to many types of long documents. Word has been known to handle 10,000 pages in a single file, and these approaches probably start being extremely useful at about 30 pages. This article is designed to redirect you to some of the most useful pages on the web that elucidate the necessary concepts in detail, although there is also a fair amount of introductory overview on this page. This page is also designed as a gateway so that you only have to bookmark or share one link that will direct you to many useful references.
This one article answers ninety percent of the most common questions relating to books and theses, so if you are looking for a quick fix, start there. You could also try these Step by Step Instructions from a Professional Writer, which will point you toward some of the most fundamental concepts—it’s a rather more efficient but also more elliptical introduction to the process than this page. Otherwise, this compilation of links assumes that you are interested in learning how to control Word, and attempts to get you started on that task.
Although each version of Word has different features, these are general principles that apply to all versions since Word 97, including versions for the Macintosh. Note: The next versions of Word after WinWord 2003/MacWord 2004 will incorporate a new file format, XML. XML should make long document writing easier, but it is not yet clear how or whether XML will change Word. These principles should still apply, however.
Is This the Right Article for You?
If you are actually hoping to print a bunch of pages that you can fold in half and staple into a booklet, see here: WinWord;MacWord. These principles may not be necessary for you, although they should be useful if your booklet has a lot of text.
If your book is going to have multiple graphics on every page and will resemble a coffee-table book more than a novel, you may want to consider page layout software, programs that will give you more control over graphic placement than Word does and will let you flow text around images. For Windows, try Microsoft’s Publisher; on a Mac, try Apple’s Pages. The more powerful incarnations of such features are found in Adobe InDesign or Quark Xpress, both offering 30-day trials.
Contents
Overview
General Principles
- How Word Thinks
- Working Efficiently
- Keep Your Doc Fast
- Prevent Corruption
Basic Techniques
- Styles
- Templates
- Sections
- Understanding Your Document
- Navigating Your Document
- Appearance
Special Cases
- Numbering
- Tables of Contents
- Images, Tables, Figures, Equations
- References and Bibliography
- Dealing With Other People: Reviewers, Multiple Authors, Printers
- Keeping Chapters in Separate Files
- Master Documents
More Information
- Customizing Word
- Additional Resources
- If You Still Have Questions
| Full Contents | General Principles | Basic Techniques | Special Cases | More Information |
Overview
Authors generally write one chapter at a time, so that each chapter takes life as a separate entity. However, it’s tricky to print sequentially numbered pages, create a table of contents, or use cross-references when each chapter is a separate file. Word promises to make combining chapters easy with the Master Document feature, but this is likely to corrupt your documents and you are advised to avoid it.
Instead, you will generally be best off if you combine your entire document into one file and format it consistently. To do this, the most fundamental concepts you need to understand are Styles, Templates, and Sections. Section breaks between your chapters will let you mimic many of the things that you thought you needed separate files to do. Styles and templates help you enforce consistency while minimizing the work you have to do.
Styles are about structure. Working so extensively with Word demands that you learn to think a little bit like Word thinks. There are two facets to writing a book in Word. In the manuscript phase, you write and collect all the text that is part of the book. In the formatting phase, you decide what the book will look like. These are very different actions. In the first phase, you need to format the text according to the structure of the book, not according to what you want it to look like. You don’t tell Word that you want the text under the picture to be centered and bold, you tell Word that this piece of text is a caption, by applying the Caption style. In the second phase, you tell Word what you want a caption to look like, by defining the Caption style. As long as the book is formatted according to the role each piece of text plays, it is very easy to change your mind about what you want a caption, or a heading, or a footnote, to look like. Formatting according to structure allows you to implement the final touches very easily. When the thesis czars demand 12pt footnotes, not 10pt, it only takes you a few seconds to change the Footnote style to 12pt. When the publisher asks you to use underline instead of italics, it only takes you a few seconds to change the Emphasis style.
Templates hold sets of style definitions. Templates also hold layout instructions, such as margin size and the location of page numbers. As long as all of the text is formatted according to structure, you can simply change the template you are using and redo the look of your entire manuscript in just a few seconds. If you want to use one font for print and another for the web, you simply insert the same text into a Print Template and a Web Template, and voilà, all the appearance changes are made for you.
You should realize that Word is designed for user customization and if you are writing or editing long documents, it will definitely be worth the trouble to add your own keyboard shortcuts, create your own toolbars, and record the occasional macro. This page does not emphasize such tricks, but there is a section at the end to get you started customizing Word. This page also finishes off with links to additional resources. In particular, an article titled “Bend Word to Your Will” may be useful, as it is an even more extensive compilation of tips on using and customizing Word, many of them addressed to people who are doing long documents. Also realize that there are usually multiple ways to accomplish the same task in Word.
If you are already well into the writing process, it is not too late to apply these suggestions. In fact, it’s easier to understand how styles and templates work if you already have a lot of text you can play around with, and it’s easier to design a template when you have a rough sense of the structure of your document. Just do a Save As… TestFileName to protect your work in progress, and experiment to your heart’s content. Experimentation is often the best way to learn to control Word.
If you choose not to combine the chapters, you can and should still use most of these techniques. Basing each chapter on the same custom template and using styles will still be the best way to achieve consistent formatting. Word offers slightly more complex features that enable you to manage sequential page numbering and tables of contents, etc., across multiple files. Those tips are not so well documented, but you will find a few links below.
This article is divided into a number of subsections. As the linked articles were usually written to answer specific questions, not designed to walk someone through the process of writing a book, you may find repetition, and you may find indirect answers that require you to apply what you learn and your understanding of Word to your particular situation.
Mac users: articles written based on WinWord usually hold true for MacWord, but keyboard shortcuts often need to be translated; for references to Tools>Options, substitute Word>Preferences. Many of these links (any at http://word.mvps.org) will require you to hit refresh several times if you try to access them with Safari.
If you are familiar with web design, using styles in Word instead of directly applied formatting is very similiar to using CSS, and is based on the same principle of separating content from presentation. Cascading styles in Word, however, refers to the ability for a style to be based on a different style and to inherit most of its properties from that style. Templates in Word are not nearly as powerful as templates in a program such as Dreamweaver or GoLive—once the document has been created the link with the template is broken, and you can no longer update layout or text elements, as you can with web templates. You can still use the Word template to change style definitions, however, rather like a CSS stylesheet, but you have to consciously enable it.
| Full Contents | General Principles | Basic Techniques | Special Cases | More Information |
General Principles
- How Word Thinks
- Working Efficiently
- Keep Your Doc Fast
- Prevent Corruption
How Word Thinks
This article has a brief discussion of how Word understands the composition of a document, which is very different from the way you might understand it.
You should also realize that Word doesn’t think in terms of pages. A somewhat more extended and less technical discussion of what that means may be found here.
Though I know it may be hard to believe, the Help system can often be extremely helpful. There is a lot of information in the Help topics. It’s often tricky to find the right topic, so you might have to try a few guesses, but Help pleasantly surprises me more often than not.
Working Efficiently
Word is supposedly set up to «help» the novice user. For anyone writing a book, you want to turn off most of Word’s «helpful» features. In general, taking control of Word requires overriding many of its defaults.
Setting Up Word
Word has a number of features that let you quickly enter repetitive material, whether that material consists of plain text abbreviations for long words, accented or formatted text, tables, graphics, or fields.
Exploiting AutoCorrect
Using AutoText
When you are in composition mode, try to keep your hands on the keyboard as much as possible. This might mean you leave layout and some formatting for the editing process, rather than the composing process.
Useful Keyboard Shortcuts
Creating a Keyboard Shortcut
Keeping Your Long Document Fast
Word is a memory hog, and can slow down when working on very long documents. You will be happiest with plenty of RAM, or memory (and of course plenty of free hard drive space). In addition:
- Use styles conscientiously. Keeping track of style tags imposes less load on Word than keeping track of an infinitude of direct formatting.
- Work in Normal view as much as possible; turn off background repagination if you can bear it (Tools>Options>General), but note that it will be turned on again automatically if you shift to Print Layout view.
- Images, tables, graphics, and equations will all slow down your document, but see below for tips on those.
Keeping Your Long Document Uncorrupted
Again, styles reduce the possibility of corruption by giving Word less to keep track of. Here is an article discussing other causes of corruption.
Realize that Word does not have an AutoSave feature, only an AutoRecover in case of crashes. You can, however, set Word to automatically create backups, which will keep a copy of the last saved version of the file. In Tools>Options>Save, check the box for “always create backup copy”.
You should also try to train your fingers to hit Ctrl-S to save whenever they are not busy. My personal preference is to do a File>Save As FileName# at the beginning of every major editing session, whether I’m editing for textual content or for format. Avoid using Word’s Version feature, as it has been linked to corruption.
You should also set up a good backup strategy.
If your document does become corrupted, see these links:
- WinWord versions
- MacWord versions
Section breaks hold a great deal of information about the document, and can sometimes corrupt. Many experts will advise you toavoid section breaks. As long as these are used for good reason (beginning a chapter with «different first page” header/footer, a change in page orientation or number of columns), they should be acceptable. You can use StyleRef fields to change the text of a header/footer without section breaks, as detailed in this article.
| Full Contents | General Principles | Basic Techniques | Special Cases | More Information |
Basic Techniques
- Styles
- Templates
- Sections
- Understanding Your Document
- Navigating Your Document
- Appearance
Styles
Styles are collections of formatting instructions that let you change the formatting of large amounts of text with just a few simple steps. If you select all your text, then go up to the toolbar and change it from 10pt to 12pt, that is called direct formatting, because you have directly applied formatting to the text. An alternative is style-based formatting. Styles deal with structure, not appearance. You assign styles to text depending on the role that text plays—chapter heading, footnote, block quotation—not depending on what you want that text to look like.
You need to understand styles because Word thinks in terms of styles, and if you use direct formatting in a book, Word will fight you on every single page. You might compare it to giving a person directions in Italian when that person speaks Spanish.
An introduction to styles
Why use Word’s built-in heading styles?
How to save yourself hours by using Outline View properly
Why does text change format when I copy it into another document?
How to Apply A Style
How to Modify A Style
How styles in Word cascade
What is the difference between the Normal and Body Text styles?
Default Paragraph Font Explained
One neat trick: you can use Find & Replace to easily change styles throughout a document. [Article forthcoming]
Templates
Custom templates let you set the layout you want, and can hold a set of custom styles so that Heading 1 in the Web version of your book does not look the same as Heading 1 in the print version of your book.
Creating a Template — The Basics (Part I)
Creating a Template (Part II)
If you start by creating a custom template for your book, you will invariably find that you keep changing the style definitions and what the layout looks like. It’s very easy to switch templates by using Insert>File to insert the book into a new doc based on a different template, or to attach a different template through Tools>Templates and Add-ins. If you attach a template, all it will do is update the styles. If you have changed layout elements such as margins, or text in the header/footer, you need to use Insert>File. Insert>File has the additional benefit of creating another backup.
What Happens When You Attach a Template
Sections
As said above, section breaks between your chapters let you mimic many of the things that you thought you needed separate files to accomplish. You can have different headers and footers, you can restart page numbering, you can restart footnote numbering, etc. However, if possible, you should avoid section breaks. The more section breaks a document has, the more complex it is, and the more chances for corruption.
Making the most of headers and footers
How to set up a document with front matter numbered separately
Working with sections
How is it possible to copy an entire document into another document without bringing across the header and footer?
Where section breaks are necessary, it may be easier to leave adding them until the end. If you know what you want as the end result, you can take advantage of the fact that Word links sections by default, but once you have unlinked the headers and footers, you may find you need to repeat actions as you change what you want. You can use StyleRef fields to change the text of a header/footer without section breaks, as detailed toward the end of this article.
More Useful StyleRef Tricks
Understanding Your Document
With long documents, it is especially important to know what is going on behind the scenes. If you don’t take advantage of all the ways that Word offers to see the structure of your document, you will cripple your ability to manipulate Word and control your document.
The most important of these tools, the Style Width area and nonprinting characters, are introduced here.
What do all those funny marks, like the dots between the words in my document, and the square bullets in the left margin, mean?
How the Styles and Formatting Pane Works
Navigating Your Document
How to save yourself hours by using Outline View properly. Actually, you can do a lot more with Outline View than just navigate—you can rearrange entire sections. Be sure to read this article.
How the Document Map works in Microsoft Word
Document Map Glitches and Fixes
You can also use the Browse Object to easily navigate to specific items in your document.
I Want My Document to Look Perfect!
One thing that might help is to remember the separation between the composing/editing and the formatting process. You don’t really need to worry about what the book will look like until someone else is going to see it, and even then, you might want to ignore formatting, for various reasons. Until then, use the format that works best for your comfort as you type and edit the text.
If your book has a lot of graphics or tables, however, you do want to think about the layout in advance. There are some questions to consider in Layout Planning: Advice from a Professional Typesetter.
Typographical Tips from Microsoft Publisher
Improving the Bottom Line: Toward a more uniform page length
Creating a book, as opposed to writing a manuscript, is as much an artistic endeavor as a technical one. Consistent use of styles and templates build the foundation for a manuscript you can work with easily, but the formatting layered on top of that can be as unique and individual as the book itself. If the publisher has not laid down rules, and you are designing the appearance of the book yourself, you might start by browsing the appropriate section of a library or bookstore, the section where you want to see your book. When you find books you find visually appealing, copy the title page and table of contents, and make some notes to use for inspiration.
| Full Contents | General Principles | Basic Techniques | Special Cases | More Information |
Special Cases
- Numbering
- Tables of Contents
- Images, Tables, Figures, Equations
- References and Bibliography
- Dealing With Other People: Reviewers, Multiple Authors, Printers
- Keeping Chapters in Separate Files
- Master Documents
Numbering
Are you using outline numbering in your book? For example: Chapter 3 has a section 3.1 then a subsection 3.1.1. You need to set up outline numbering. Numbering in Word can be extremely complicated, but follow these directions for an unbreakable system.
Create Numbered Headings
Number Headings and Figures in Appendixes
If all you want is a chapter number in the header and table of contents, see here.
Word’s Numbering Explained
Page Numbering in Word
Tables of Contents, Index, and Glossary
If you use Word properly, it will create a table of contents for you, and update the numbers as the text changes.
How to create a table of contents in Microsoft Word
TOC Tips and Tricks—make your table of contents do exactly what you want
Customizing your table of contents with switches
How can I include just part of a paragraph in my table of contents?
Whenever I update my Table of Contents it acquires unwanted tabs, and I have to press Ctrl+Q to get rid of them
Creating a Table of Contents Spanning Multiple Documents
Creating an Index in Word
How can I automatically generate an index in Word?
How to create a glossary
If Your Document Has Tables or Graphics (Equations, Figures, Images)
The Insert>Caption feature will automatically number and renumber images, tables, equations for you, and let you set cross-references to the captions, which will also update to match changed numbers. You can use a custom label, such as Exhibit, if you prefer. If you want Word to include the chapter number with the figure number, however, you must set up outline numbering.
Tables and Images can slow down your document. Link graphics as much as possible and don’t display them except when absolutely necessary. On the View tab of Tools>Options, check the box for «Picture placeholders» and clear the box for «Drawings.» This will suppress the display of all graphics, so that Word does not waste energy displaying them when you are editing the main text.
Avoid long tables, especially single-row tables. If you must have long tables, find ways to split them: for example, let subheads be in text paragraphs outside the table. In addition, the Document Map will not see headings that are inside a table. Individual tables can also become corrupted.
Table Basics
How can I create a landscape section—and still have a portrait page number?
The draw layer: a metaphysical space (and how to bring it back down to earth)
There are many more articles on the Word MVP FAQ site, well worth browsing—a whole page of links for Drawing/Graphics and another page for Tables, Fields, Forms.
If you are using equations, you might want to consider MathType, the big brother to the built-in Equation Editor. The makers of MathType provide Equation Editor to Microsoft for use in Word. If you download the trial version but do not purchase it, MathType will automatically convert to MathType Lite after thirty days. Even MathType Lite has a few more features than Equation Editor, and MathType Lite is cross-platform, while Equation Editor is not.
References and Bibliography, Etc.
This article gives a general overview of academic citations in Word and answers several questions, including how to put an appendix after your endnotes, what to do when random lines appear, and how to create endnotes in alphabetical order, yet still have them autonumbered by Word.
Why do my footnotes sometimes end up on a different page from their references in the text?
I want the numbers in my footnotes not to be superscripted, and I want the numbers to be followed by a dot and a tab
Dealing with Other People: Reviewers, Multiple Authors, Printers
If other people are reading your work, and they intend to use Word’s Track Changes feature to edit and respond to it, be sure to read this link so that you know how Track Changes works. You might need to send it to the reviewer too.
If you are coordinating multiple authors, you may choose not to worry about all of this (styles, templates, sections) until the book has finished the editing process. At that point, go through and reformat it. The tedious drudgery of reformatting is likely to be far less frustrating than attempting to force multiple collaborators to follow these suggestions. See Understanding Your Documentfor some tips to make the process easier, as well as Customizing Word. Also see this more detailed Advice from a Professional on coordinating multiple authors and dealing with multiple levels of review.
One exception: you may want to use templates to share macros and custom toolbars with collaborators.
If you are sending camera-ready copy to a professional printer, see here for a procedure to create crop marks.
If You Choose Not to Combine the Chapters
Creating a Table of Contents Spanning Multiple Documents
See the “Number Pages Across Files” section here.
IncludeText Fields can partially substitute for the Master Document feature.
Steve Hudson (aka Word Heretic) on how to make Master Documents work safely
Master Documents
Why Master Documents corrupt
How to recover a Master Document
With care, long document professionals who are expert in their use of Word manage to use Master Documents safely, particularly in more recent versions. Here are some instructions.
Steve Hudson (aka Word Heretic) on how to make Master Documents work safely
| Full Contents | General Principles | Basic Techniques | Special Cases | More Information |
More Information
- Customizing Word
- Additional Resources
- If You Still Have Questions
Customizing Word
The Word MVP FAQ site has an entire section on Customizing Word, but these three articles are the most frequently useful.
How to assign a command or a macro to a toolbar
How to assign a command or a macro to a keyboard shortcut
Creating a macro with no programming experience using the recorder
Don’t forget about the Tools>Customize dialog—there are far more predefined commands in that dialog than there are on the menus or common toolbars, and you can set up Word to access them quickly.
Additional Resources
Check out the Word MVP FAQ site, of course, but it almost has too much information to easily find what you need. (What’s an MVP?) Here are some sites that are likely to be most useful with reference to long documents:
The Editorium is directed toward those who edit, write, or typeset in MS Word, and its free newsletter has a wealth of useful tips. You can read the current and back issues online.
MVP Suzanne S. Barnhill’s site (author of many of the articles linked above, she also provided much of the advice in the text).
MVP Shauna Kelly’s site (author of many of the articles linked above).
MVP Stephanie Krieger’s blog concentrates on long and complex documents.
MVP Margaret Aldis has some articles that may be useful.
MVP Clive Huggan’s “Bend Word to Your Will” is a massive, dictionary-style compilation of tips and tricks for using Word, written especially with reference to MacWord.
Microsoft also provides training on their Office Online site. In particular, users of Office 2003 can take online tutorials, including some on headers and footers, and Tables of Contents.
If You Still Have Questions
This article is not designed to answer all questions, but merely to provide a convenient access point for existing webpages that are useful for long documents. If you still have questions or run into specific problems, you can ask on a newsgroup. If you have never heard of newsgroups, start with this article, which also explains the different ways you can access various newsgroups.
Tips from MVPs on posting to Word newsgroups
Google Groups archives the questions and answers on newsgroups, as well as offering access to most newsgroups. You can click here to search the archives of the Word-dedicated newsgroups hosted by Microsoft, mostly with reference to Windows versions.
If you want to use Microsoft’s Web interface to the newsgroups they host, start here for Word and other products within Office. This interface requires a Passport account to post, but you can search on that link without signing in.
Mac Users: there are Mac-specific newsgroups, although Mac-specific answers are not required for most long document questions. If you have problems with any of the linked articles, you can ask in those newsgroups to confirm whether the articles should hold true on the Mac, and for translation to Mac-speak if necessary. Again, when you see a references to Tools>Options, substitute Word>Preferences. Many of these links (any at http://word.mvps.org) will require you to hit refresh several times if you try to access them with Safari.
| Full Contents | General Principles | Basic Techniques | Special Cases | More Information |
This tutorial shows how to add page numbers in Microsoft Word. Then, we will format page numbers, remove page numbers from the first page, and start the second page with page number 1.
Table of Contents
- How to add page numbers
- How to format page numbers
- How to remove the page number from the first page
- How to start the second page with page number 1
Do you want to start your page numbers on a specific page? Please see “How to Start Page Numbers on a Specific Page in Microsoft Word (PC & Mac).”
This tutorial is available as a YouTube video showing all the steps in real time.
Watch more than 200 other writing-related software tutorials on my YouTube channel.
The images below are from Word for Microsoft 365. These steps will also work in Word 2021, Word 2019, Word 2016, Word 2013, and Word 2010. However, your interface may look slightly different in those older versions of the software.
Are you on a Mac? Please see “How to Add Page Numbers in Word for Mac.”
Important Note: Page numbers added to the top of the page or the bottom of the page will be inserted into the header or footer. The page numbers will replace any existing text placed in the same location within the header or footer. Therefore, you should add page numbers before adding other elements to the header or footer.
- Select the Insert tab in the ribbon.

- Select the Page Number button in the Header & Footer group.

- Select a location to insert the page numbers from the drop-down menu:
-
- Top of Page (in the header)
- Bottom of Page (in the footer)
- Page Margins
- Current Position
The Current Position option is the current location of your cursor in the header, footer, or body of the text. If the current position is in the body of the text, the page number will only appear on the current page. It won’t appear in the same location on other pages.

- Select additional location and style options from the submenu. (The options will depend on the selection made in step 3.)

Your page numbers should appear immediately.
How to Format Page Numbers in Microsoft Word
This section shows how to change the number format, include chapter numbers, and start on a specific page.
- Select the Insert tab in the ribbon (see figure 1).
- Select the Page Number button in the Header & Footer group (see figure 2).
- Select Format Page Numbers from the drop-down menu.

- Select the options you want from the Page Number Format dialog box.
-
- Number format (e.g., numerals, letters, Roman numerals)
- Include chapter number (This option only works if you already established heading numbers.)
- Continue from previous section (When this option is selected, your sections will be number continuously. If you do not want the page numbers to continue from the previous section, select Start at.)
- Start at (This option will default to page 1. However, if you enter another number, such as 5, the page number 5 will appear on the first page of the document or first page of the section.)

- Select the OK button.

Your page number formatting should be applied immediately.
How to Remove the Page Number from the First Page in Microsoft Word
You may want to remove the page number from the first page because it is a title page or a cover page.
- Select the Insert tab in the ribbon (see figure 1).
- Select the Header or Footer button in the Header & Footer group. (Choose the location where your page numbers are located.)

- Select Edit Header or Edit Footer from the drop-down menu.

- Select Different First Page in the Options group in the Header & Footer tab.
Pro Tip: The Header & Footer tab only appears while you are working in headers or footers.

The page number on the first page should disappear. If the page number does not disappear, select it and press the Delete key to remove it manually.
How to Start the Second Page with Page Number 1 in Microsoft Word
After removing the page number from the first page, as shown in the previous section, you can force the second page to start with page number 1.
- Select the Page Number button in the Header & Footer group.

- Select Format Page Numbers from the drop-down menu (see figure 5).
- Enter the number 0 into the Start at menu in the Page Number Format dialog box.

- Select the OK button (see figure 7).
The page number on the second page should be changed to number 1.
- Select the Close Header and Footer button.

Related Resources
How to Adjust Page Margins in Microsoft Word
How to Adjust Line Spacing in Microsoft Word
How to Insert Page Breaks in Microsoft Word
How to Use the Editor in Word for Microsoft 365 (Spelling & Grammar Check)
Updated April 05, 2023