Create a booklet or book
-
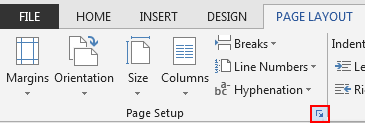
Go to Layout and select the Page Setup dialog launch icon at the bottom-right corner.

-
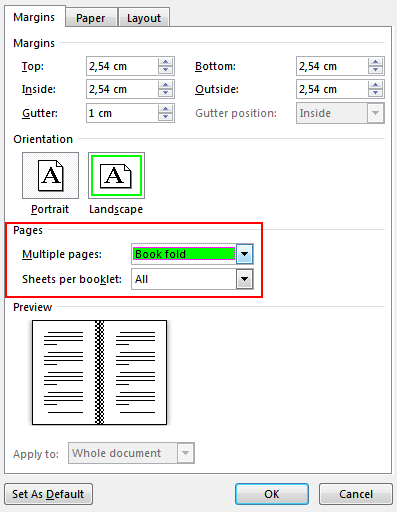
On the Margins tab, change the setting for Multiple pages to Book fold. The orientation automatically changes to Landscape.
Tip: If you have a long document, you might want to split it into multiple booklets, which you can then bind into one book. Under Sheets per booklet, choose how many pages to print per booklet.
-
Select and increase the value of Gutter to reserve space on the inside fold for binding.
-
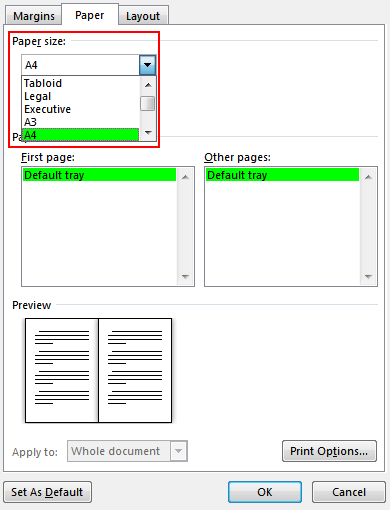
Go to the Paper tab and select the Paper size. The final size of the booklet is one half width of the paper size.
Tip: You can add many embellishments to your booklet’s appearance. For example, to add borders to every page, on the Layout tab of the Page Setup window, click Borders.
-
Click OK. If your document already has content, the text is formatted automatically, but you might need to adjust objects like images and tables manually.
Print settings for booklets
When you print the booklet, check the print settings to make sure you print on both sides of the paper and flip the papers correctly for the printing to work as intended.
-
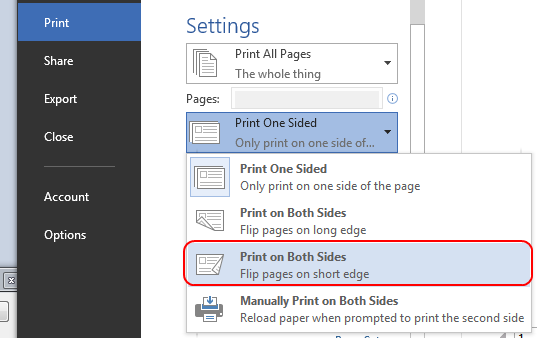
Go to File > Print.
-
If your printer supports automatic printing on both sides, change Print One Sidedto Print on Both Sides. Choose the option Flip pages on short edge to avoid printing the second side of each sheet upside down.
-
If your printer doesn’t support automatic printing on both sides, select Manually Print on Both Sides, and feed the pages back to the printer when prompted. To avoid pages from printing upside down, flip the sheets on the short edge of the paper according to your printer’s instructions.
Tip: For a professional touch, consider adding page numbers in the header or the footer. For more info, see Add page numbers.
See Also
Create a booklet using a Word template
Booklet: Page numbering tips.
Create different headers or footers for odd and even pages
Get Microsoft publishing templates
Create a booklet or book
-
Go to Layout > Margins > Custom Margins.
-
Change the setting for Multiple pages to Book fold. The orientation automatically changes to Landscape.
Tip: If you have a long document, you might want to split it into multiple booklets, which you can then bind into one book. Under Sheets per booklet, choose how many pages to print per booklet.
-
To reserve space on the inside fold for binding, increase the width of the Gutter.
-
You can add many embellishments to your booklet’s appearance. For example, to add borders to every page, on the Layout tab of the Custom Margins window, select Borders.
-
Select OK.
If your document already has content, the text is formatted automatically, but you might need to adjust objects like images and tables manually.
-
Go to File > Page Setup and check the paper size. Keep in mind that the final size of the booklet is one half of the paper size. Make sure your printer is stocked with paper of the right size.
Print settings for booklets
When you print the booklet, check the print settings to make sure you print on both sides of the paper and flip the papers correctly for the printing to work as intended. If your printer supports automatic printing on both sides, follow these steps.
-
Click File > Print.
-
Under Two-sided, select Booklet.
Tip: For a professional touch, consider adding page numbers in the header or the footer. For more info, see Add page numbers.
Note: If your printer doesn’t support automatic printing on both sides, you’ll need to print each page manually.
See Also
Create a booklet using a Word template
Booklet: Page numbering tips.
Create different headers or footers for odd and even pages
Get Microsoft publishing templates
Table of contents
- Formatting a Book in Microsoft Word
- Font
- Setting Paragraphs and Spacing
- Chapter Headings
- Table of Contents
- Double-Check Your Work!
- Next Steps: Formatting for Print in Microsoft Word
- Book Size and Page Setup
- Margins
- Copy and Paste Your Book
- Header
- Footer
- Triple Check Your Work!
- Formatting With Atticus
There are a ton of options available for formatting your manuscript before you can upload it to the various online vendors or book printing companies. Even a simple Google search can give you nearly endless options. It’s pretty overwhelming. But, since many people are familiar with Microsoft Word, I decided an article on how to format a book with Word is in order.
Presenting a nice-looking book to readers is essential. If it looks unprofessional, it’s going to be harder to gain readers and build your reputation. That’s why formatting your manuscript is so important. So whether you’re looking to format your manuscript for an ebook or a print book (or both), this guide can help!
First, we’ll talk about formatting an ebook and then a print book, since they’re both a little different. But, it’s a good idea to read through the whole thing, because formatting for an ebook sets you up for formatting for print.
In this article, you will learn:
- Formatting chapter headings in Word
- How to format your book for print in Word
- Setting up the book size and page format
- Formatting your book in Atticus vs. Word
Let’s dive right in.
Note: If yours is a picture book or one that has lots of images, graphs, blockquotes, illustrations, and the like, Word is not the best option for formatting. You’ll probably want to go with a professional formatting service or try your hand at formatting with a fixed-layout file manuscript format. You can check out this article on KDP for help with image-heavy books.
Formatting a Book in Microsoft Word
First off, you need to make sure you have everything ready to go in your document. This means having the title page, introduction, preface, etc. in place. Many writers are so excited with their finished and edited manuscript that they forget about the seemingly little things that can have a big impact on readers.
If you’re not sure what goes into the front and back matter of a book, check out this article.
Font
Start with a standard font size and style, like 12-point and Times New Roman or Arial. These will make your life easier and your readers will thank you, whether they’re reading your Kindle book or your print book.
Once you have all the parts of your book organized in your manuscript and your text size and style set, it’s time to get formatting.
Setting Paragraphs and Spacing
Getting paragraph indentations and spacing are important for a professional-looking ebook. You can help Kindle Direct Publishing (or whichever platform you’re going to sell on) by making sure these are all within the proper bounds. Make sure you’re in the Home tab for proper navigation.
First, click on the Paragraph bar at the top of your screen. Set the alignment to left and make sure the Outline Level is set to Body Text.
Next, under the Indentation heading, there’s a Special column on the right. Set that to First Line and place the indentation at 0.2”.
Then you’ll want to make sure that Line Spacing is set to Single.
Chapter Headings
Formatting your chapter headings correctly differentiates them from the rest of the text so that when the manuscript is transformed into ebook format, the ebook reader will know when a new chapter is starting.
To do this, place your cursor on a chapter title. Then click on the Styles tab. A window should open up on the right side of your screen.
Click the Heading 1 style. You’ll see the heading change. Once it has changed, you can select whatever font style you want without removing the Heading 1 style from the chapter heading.
Repeat this process for all the chapter headings in your book, making sure they’re all the same font.
Once you have all of them changed, you can go to the View tab and check the box for the Navigation Pane. You’ll then be able to view your headings on a window on the left side of your screen. You can also jump to a chapter by clicking on your chapter title in the Navigation Pane.
Table of Contents
Next, you’ll want to create a table of contents (TOC).
Decide where you want your table of contents (it should have its own page after the title and copyright pages). Place the cursor there and then navigate to the References tab and click on the Table of Contents. Select Automatic Table 1.
Go to Table of Contents again and select Custom Table of Contents from near the bottom of the menu. When the box pops up, set the Show Levels option to 1. Then unclick the Show Page Numbers box above that.
It will ask you if you want to replace your current TOC. Click OK.
Next, you’ll need to add a bookmark to the TOC. Highlight the word Contents at the top of the table of contents. Navigate to the Insert tab. Under the Links heading, select Bookmark. Label the bookmark TOC.
That’s it! I can’t say that it’s easy exactly, but it’s not the hardest thing in the world. Next, you can upload the .docx MS Word document to Kindle Direct Publishing and Amazon will convert it to an EPUB file for you.
Double-Check Your Work!
Now, it’s important to make sure the final products look good. One drawback of formatting with Word is that the Kindle ebooks often have some issues in formatting, so you need to go through it with a fine-tooth comb, paying special attention to the text and formatting.
Of course, if you’d rather not go through all the hassle outlined above, you can also use Atticus to format your ebook! But, more on that later. First, let’s talk about formatting your book for print.
Next Steps: Formatting for Print in Microsoft Word
For best results in print formatting, you’ll want to follow the steps above for ebook formatting. Print formatting is more involved, but it works off the same basic structure that I described above.
So, once you have your chapter headings, your font size, paragraph spacing, and TOC all ready to go, you can continue with the print formatting directions below.
The easiest way to go about this is to use a new blank document that you can cut and paste your manuscript into. So, do the following on your new blank document to get it ready for your manuscript.
Hint: You can also search for a Word template to download and transfer your text into. There are free and paid template options out there made expressly for MS Word. These still often require some trial and error to get the proper book format.
Book Size and Page Setup
Before you can do anything, you need to decide which size your book will be. There are several different options available. The most popular sizes in the U.S. are 5” x 8”, 5.5 x 8.5”, and 6” x 9”. If you’re not sure which page size to choose, pick up a book from your bookshelf that seems like a good size for your book and measure it. Chances are it’s one of the three sizes above.
If you choose another page size, head over to the print-on-demand company of your choice to make sure they support the size you want to use.
In your blank document, navigate to the Layout tab. Click on the Size option and select More Paper Sizes at the bottom to enter your desired size. For this demonstration, I used the page size 5.5” x 8.5”.
Margins
Next, navigate to the Margins tab on the left-hand side of the Layout toolbar. Click on it and select Custom Margins at the very bottom of the dropdown menu. Depending on your book’s word count, you may have a little room to make them smaller. The important thing is to not make them too small because doing so can cut off some of the text when the book is bound.
You generally don’t want to go smaller than 0.325”. For this book, we’ll set all the margins to 0.75”. When you preview your book before you send it to be printed, you’ll be able to ensure that none of the text is cut off by the binding.
Copy and Paste Your Book
Now is a good time to copy and paste your manuscript into the formatted document. This way you can have a different document for print books and one for ebooks. Plus, the next section is easier when you can see what you’re doing and where your different sections start.
Once your manuscript is pasted into the formatted Word file, head over to the Insert toolbar. Then navigate to the Header tab. Once you click it, a dropdown menu will appear and you’ll be able to choose the header style you like best for your book.
If you’re not sure, take a look at a couple of your books to see what style you like best. Usually, the header is used for the author’s name and the title of the book. Most of the time the text of the header is smaller, but not always. It’s always differentiated in some way from the main text.
Next, let’s put a footer in that’s just the page numbers. But, the kicker is that you don’t want page numbers for your title page, TOC, or your copyright page. You want the first page of your book to be where the numbers start. Here’s how you do this:
Make sure you exit out of the Header and Footer section to go back to the Home toolbar. Move your cursor to the bottom of the last page before your novel begins. Then go to the Layout toolbar and find the Breaks tab. Find the Section Breaks in the dropdown menu and select the Next Page Section Break (not to be confused with a regular page break).
This will create a different section for your front matter and another for the main text of your book, which will allow you to add page numbers only where you want them.
Next, go to the bottom of your first page — the page where you want the numbers to start, and double click on the bottom margin. The page should change, letting you know that you’re in the footer section.
Next, you’ll see that the top toolbar has switched automatically to the Header and Footer tab. The Link to Previous button should be highlighted. Deselect this.
Then, navigate to the left and find the Page Number button. Click it to access the dropdown menu. Select whichever style of page number you like. The numbers should only start at the bottom of the page you’re on.
Once you’re done adding the page numbers, you’ll have a print-formatted manuscript!
Triple Check Your Work!
Upload your finished product to Amazon along with your cover and take a look through their printed book preview feature to make sure it looks good and that none of the text gets cut off.
As you can tell, working with Microsoft Word is not the best (or the easiest) way to format your book, whether you’re working with print or ebooks.
If you want a much easier and faster way to format your books, Atticus is the way to go.
Video: How to Format a Book in Word
For a nice summary of this article, along with a few of my own personal thoughts on the subject, be sure to check out this video on how to format a book in Microsoft Word.
Want more videos like this? Be sure to subscribe to my YouTube channel for weekly videos!
Formatting With Atticus
Atticus is a brand new all-in-one formatting and writing software that yours truly (and a great team) has been working hard on for a long while now. It allows you to customize your book layout with several different options — all with a few clicks of the mouse.
You can choose to write your entire book in Atticus or you can simply import your Word document or Google doc when you’re ready to devote a few minutes to formatting.
Atticus gives you the option to change the text style and size. You can use the preview option to see how the text will look in different formats.
You can choose from seventeen different chapter heading styles with ease, and Atticus will format them all automatically. Even within those options, you can customize titles, subtitles, and even how the numbers show up. Whether you’re writing a nonfiction book or a fiction book, there’s a template for you in Atticus.
You can also customize the paragraph styles, making them indented or spaced. You can also add custom paragraph breaks or choose from existing ones. There’s an option for lead-in small caps and, of course, the always classy drop cap option. And, you can preview the changes in real-time.
Atticus also makes it easy to change your headers and footers without all the trouble that doing it in MS Word entails. You can choose what page number format you want, as well as what header format.
And, perhaps best of all, it also allows you to pick your print options easily. Atticus will then automatically format it, giving you an excellent-looking file that you can use with any print-on-demand companies. You can use it as a word processor or just for book formatting. Or both!
So if you want to save time (and time is money, especially for indie authors, isn’t it?), then head on over to Atticus.io and get yourself a copy for a one-time price. No monthly fees here. And you’ll always get the latest updates as we continually upgrade and make Atticus even better.
We will start with a blank document and set our page size and margins. Word can offer you various templates to use but you ideally want to start with a blank document and format your book to your own specification.

Microsoft Word – Pages Size
After we have chosen our blank document it is time to choose the page size. There are plenty of sizes to choose from and it is something that will need a lot of thinking. Today we will format a B-Format book at 198mm high x 129mm wide. This is a standard size for a novel. If you are struggling to find a page size that you think is suitable for your book, then head over to our other post for more information – Hardback and Paperback Book Sizes.
To change the page size, we go to Layout > Size > More Paper Sizes…

This will bring up another window where we can input our own custom size.
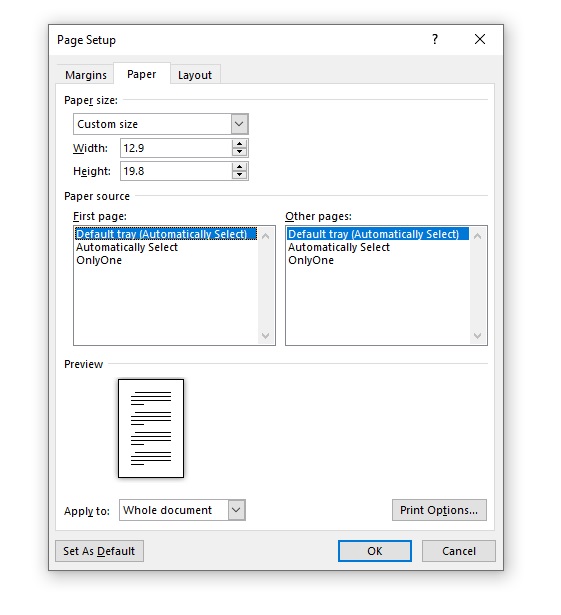
Under paper size, you want to click the drop-down box and select custom size and then fill out the width and height of the finished paper size you want. In our case, we want a book 198mm high x 129mm wide. As my word document measurements are in cm’s we will fill this out accordingly. You will need to check if your document is in mm’s, cm’s, inches etc. The paper source we will leave as default for now.
After we have filled out the height of 19.8 cm’s and the width of 12.9 cm’s and selected to apply to the whole document, it is time to move on to the next part, the margins.
Microsoft Word – Page Margin
As standard Word will set the margins to 1″ / 2.54cm. The margin size you will want will depend on a few different factors;
- The final page length of your book
- Finished size of your book
- Fiction or non-fiction
- Your book’s genre
There are a few other factors to consider but the best advice we have given our customers is to have a look at other books which are like yours and simply measure the margins. You will find that many books will be different, you just need to choose the right size for your book.
We are going to choose margin sizes of 18mm for the left and right and 15mm for the top and bottom. When we set this up in Microsoft Word it will be 1.8cm left and right and 1.5cm top and bottom.
Microsoft Word – Gutter Size
We then have the option of setting the gutter and the gutter position. This is a term used in the printing industry which describes the side on which a book will be bound. For a normal book printed and bound in the UK, Europe, USA and many other countries, this will be on the left-hand side. The gutter measurement allows us to set extra space on the bound side. This means you have equal margin space on the left and right sides of your document, plus extra space for when all the pages get bound together so you don’t have to ‘break’ the spine of the book.
The gutter measurement will depend on how many pages your book will be. For a small number of pages in the range of 20 to 50, a gutter size of 5mm may be sufficient. However, if you have a large number of pages, 300+ you may want to increase the gutter size to 10mm. Again, this is something that if you are unfamiliar with, you will want to have a look at some books in the same genre and decide.
For our book, we are going to use a gutter size of 5mm and set it to the left-hand side, the orientation set to portrait and the multiple pages option set to mirror margins.

We now have a document that is starting to look like a traditional book but we are far from finished. You should have something which looks like the image below.

Formatting a book in Microsoft Word is very similar to Adobe InDesign and other typesetting software. We are now going to work on the paragraph styles. You can bring up the paragraph options under the layout tab and click the little arrow underneath. For our novel, we are going to use a basic style which is common in most fiction novels.
The alignment will be set to justify and the outline level will be body text. The indentation will be set to 0cm but under special we will set the first-line indentation. For our book, we are going to have a 5mm first-line indent. Again, have a look at other books and make a decision based on what you feel would look right for your book. The spacing of the paragraphs will be set to 0pt before and after and the line spacing set to single.

You will now have a book that looks like the one below. You will notice that in this paragraph style we have set indents for every first line of every paragraph. Now with our book, we don’t want to have the first line of the first paragraph indented. We will have to manually adjust this setting by clicking on the first line of the first paragraph and adjusting the margins using the step above.

Microsoft Word – Chapter Titles
The next step will be to start amending our chapter titles. The chapter titles should be in a larger font than the rest of the text with some additional spacing between the top of the page and the main body of the text. For our book, we are going to use the same font as the main body but in 16pt. The spacing is a personal preference, use what you think is best for your book.
This is how the first page of the main body of our book looks. We are starting to get a nice clean layout that resembles a standard novel.

Now we will start to look into the fonts for our book. This part could be a whole post all to itself as there are many different variables. For more of an understanding of fonts you could check out some of the following posts; How to Choose the Right Font for Your Book, How to Choose the Right Font for your Design and What Font Should You Use for Your Book.
To change the font of your book you will need to click on the home tab at the top of the document. You will then be able to see all the standard options to edit your book. Select what font you will like from the drop-down and the font size. Remember if you have already set your chapter size if you change the font size with all the text selected it will apply that font size setting to everything.

Our book is going to be set in Garamond at 12pt. This is a popular font type used in novels. Some other popular fonts are Palatino and Minion Pro but there are thousands of fonts to choose from so make sure you have a good look around before you decide.

We are now going to add page numbers to our book. To do this you want to go to, Insert > Page Number > Bottom of Page and then select a style that has the page number in the middle of the page.

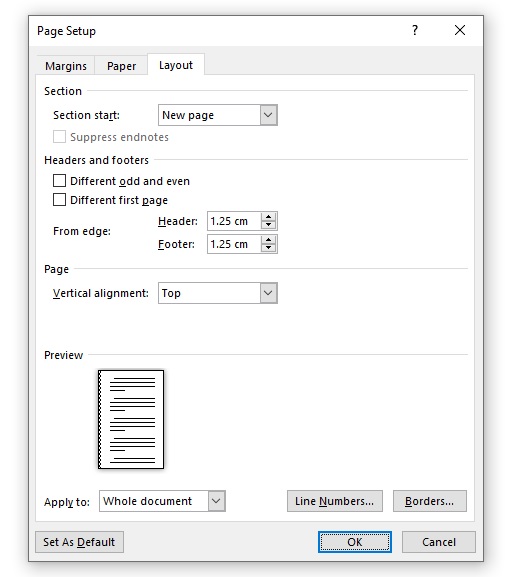
You will then have page numbers added to every page of your document. The page numbers will need spacing in the footer. Our book is going to have a spacing of 1.25cm Header from Top and 0.3cm Footer from the Bottom.
This is how our book now looks.
We have a completed book that has been formatted in Microsoft Word which when exported as a PDF will be press-ready. There are a few little extras that can make your book look more professional but unfortunately, Microsoft Word doesn’t provide those options. Formatting a book in Word is not able to replace professional typesetting software such as InDesign but it can do a very good job of providing you with a press-ready PDF file that looks fantastic and will be suitable for 90% of books.
If you need helping to format your book to print we recommend the services of Book Design UK.
Правильно отформатированный текст книги не только приятно читать, он позволяет избежать ошибок при загрузке файла на ЛитРес: Самиздат.
Разбираем по пунктам, как же правильно отформатировать текст вашей книги в текстовом редакторе Microsoft Word* (версия 2007 и выше).
Для публикации книги с помощью платформы ЛитРес: Самиздат вам необходимо загрузить файл с текстом. Правильно подготовленный файл позволит избежать проблем, которые могут возникнуть при загрузке.
Мы принимаем файлы в форматах docx и fb2. При этом формат fb2 подходит для опытных верстальщиков, которые знают основы верстки в этом формате. Для всех остальных авторов (а их большинство), мы рекомендуем формат DOCX — его можно отформатировать так, что после загрузки и преобразования файла получится хорошая электронная книга с навигацией по главам, которую будет удобно и приятно читать.
Но перед тем, как загрузить файл на сайт, нужно его подготовить в соответствии с нашими рекомендациями. Давайте пошагово разберём, как это сделать.
Откройте текстовый редактор Word, а затем текст своей книги. Если вы используете базовые настройки программы, то, скорее всего, текст будет выглядеть так:

Главная особенность электронной книги в том, что читать ее можно почти на любом устройстве, в любое время и в любом месте. На электронных устройствах для чтения текст книг отображается по-разному, и в этом их достоинство. Так, читатель сам может увеличить или уменьшить размер шрифта, выбрать фон и стиль текста — чтобы ему было комфортно читать.
А вот чтобы весь ваш текст полностью дошёл до читателя, заголовки не перепутались, а картинки никуда не уехали, нужно правильно отформатировать документ с книгой. Поэтому переходим к следующему шагу.
Для начала очистите весь текст от лишних стилей. Даже если вы не вставляли в текст никаких цитат из других файлов, есть вероятность, что у вас мог сбиться стиль одного из абзацев, и в таком случае текст книги после загрузки может получиться неоднородным.
Чтобы форматировать стили, выделите весь текст через комбинацию клавиш Ctrl+A. Теперь обратитесь к панели стилей и выберите в выпадающем списке «Очистить формат».

Шаг 3. Отформатировать заголовки
Самая частая причина «ошибки при загрузке» — неверно отформатированные заголовки в файле. Заголовками в электронной книге могут быть главы (как с индивидуальными названиями, так и просто по номерам, например, «Глава 1») или названия отдельных произведений (рассказов, повестей, стихотворений в сборнике). Заголовки важно обозначить определенными стилями, чтобы правильно сформировалось оглавление электронной книги.
Чтобы отформатировать заголовок, найдите в тексте название или номер главы, выделите нужный фрагмент («Часть первая» в примере) и найдите «Панель стилей» в верхнем меню справа. Выберите «Заголовок 1», и текст сразу примет нужный вид.

Не выделяйте заголовки полужирным или курсивом, их начертание определяется программами/устройствами чтения.
Если ваша книга имеет более сложную «вложенность», например, как «Война и мир» (4 тома, 12 частей и несколько десятков глав), используйте стили «Заголовок 2» и «Заголовок 3» для вложенных частей.
Чтобы увидеть, как формируется оглавление вашей книги, включите область навигации (Строка меню — Вид — Боковая панель — Переходы или перейдите на вкладку «Вид» в Главном меню и поставьте галочку в пункте «Область навигации».

ВАЖНО!
- Проверьте, чтобы после заголовков не было пустых строк. На следующей строке после заголовка обязательно должен быть какой-то текст.
- Проверьте, пустые строки не были размечены стилями заголовков. Это можно увидеть в области навигации:

ВАЖНО!
Если в заголовке присутствуют символы иностранного языка, например, «Построение web-сайта», чтобы заголовок правильно перевелся в формат электронной книги, необходимо сначала набрать заголовок в программе «Блокнот», затем скопировать текст заголовка целиком в файл MS Word, где вы работаете над книгой, и только после этого присвоить стиль заголовка нужного уровня
Проверьте, нет ли лишних колонтитулов, номеров страниц, остатков содержания. Если что-то осталось, обязательно удалите.

Шаг 5. Проверить иллюстрации
Проверьте, чтобы все картинки были вставлены ТОЛЬКО через последовательность действий Вставка — Из файла.
Не «перетягивайте» картинки из интернета или с рабочего стола — в этом случае вместо иллюстрации вы получите пустую рамку в тексте (в лучшем случае) или ошибку в файле.
Если у изображения есть подпись, то текст подписи необходимо вставлять на следующую строку за изображением, а после подписи оставлять 1 пустую строку. Подписи к изображениям можно также выделять курсивом, чтобы они отличались от основного текста книги.
Также проверьте, чтобы у каждого изображения формат обтекания был «в тексте». Для этого нажмите правой кнопкой мыши на иллюстрацию и найдите в свойствах изображения раздел «Размер и положение». Перейдите на вкладку «Обтекание текстом» и выберите вариант «в тексте».

Проверьте, чтобы диалоги в вашей книге не преобразовались в автоматические списки с маркерами. Это необходимо сделать вручную.
Ещё несколько важных моментов.
Сноски должны быть сделаны специальной функцией «Сноска», иначе во время загрузки сноски могут слететь. Для создания сноски поставьте курсор в конце того слова или фразы, которому хотите дать уточнение и выберите раздел «Ссылка» на панели управления. Там нажмите кнопку «Вставить сноску».
Когда вы напишете определение в появившейся внизу сноске, она закрепится за выбранным словом. И даже если оно изменит своё положение при изменении текста, сноска будет появляться на той странице, на которой находится слово.
Схемы, таблицы, уравнения и формулы должны быть сделаны в виде иллюстраций и располагаться ровно в том месте, где вы рассчитываете увидеть их в электронной версии книги.
Если вы хотите выделить большой фрагмент текста или у вас в тексте есть отдельное стихотворение, то сделайте дополнительную пустую строку до и после этого фрагмента.
Не меняйте межстрочный интервал и интервал между абзацами.
Выделяйте ключевые слова жирным шрифтом и курсивом, но не применяйте разрядку и подчёркивание.
Была ли данная статья полезна для Вас?
Many new writers will reach this common barrier when it comes to publishing their first book. That barrier is formatting.
Once you have written your wonderful book, had it edited and proofread, you may be wondering, right… how do I turn this into an actual book?
Before the final stage of submitting to your chosen self-publishing platform, you will need to format your book. This can be done on various book formatting programs or you could hire a freelancer to do it for you.
But if you want to learn how to do this yourself, and do so inexpensively, then you may want to consider formatting your book in Microsoft Word. Which, I suppose you already have — hence, you reading this post!
Chances are you already have Microsoft Word installed on your PC, making it an easily accessible and free option for your book formatting needs. It is also quite a straight forward solution — especially if you have written a Novel or largely text-based book.
Illustrated books, however, are a little different — but you can learn about that here if you wish.
In addition to the pre-created book and booklet formats, Microsoft Word provides parametrized layouts that can be used to create a beautiful book, whether you’ve written a memoir or sharing your romance novel for the world to read.

You Should Read This Next 👇

Table Of Contents
- Creating Your Book In Word
- Margins
- Gutter
- Other Things To Consider When Formatting Your Book In Microsoft Word
- Free Pre-Edited Downloadable Microsoft Word Formatted Documents
- Hiring A Freelancer To Edit And Format Your Book
Creating Your Book In Word

First, start by opening Word. It’s recommended that you adjust the following settings before writing your content so that you won’t run into issues with formatting later.
Margins
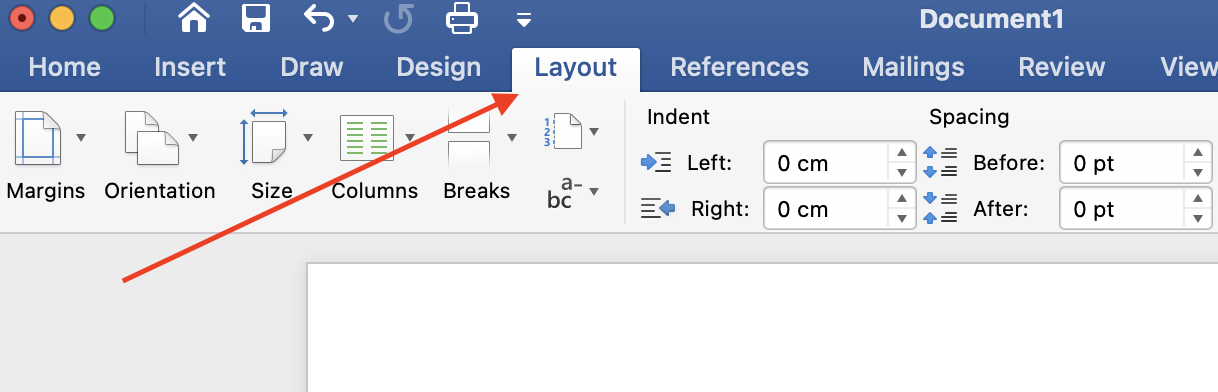
Once you’re in Word, head over to the “Layout” tab and look for the “Margins” icon
From the “Margins” section, you’re able to adjust the parameters for the margins of your book page. These values should reflect your chosen book size and page amount. You may use a book margin calculator or use your book submission platform for reference.
Gutter
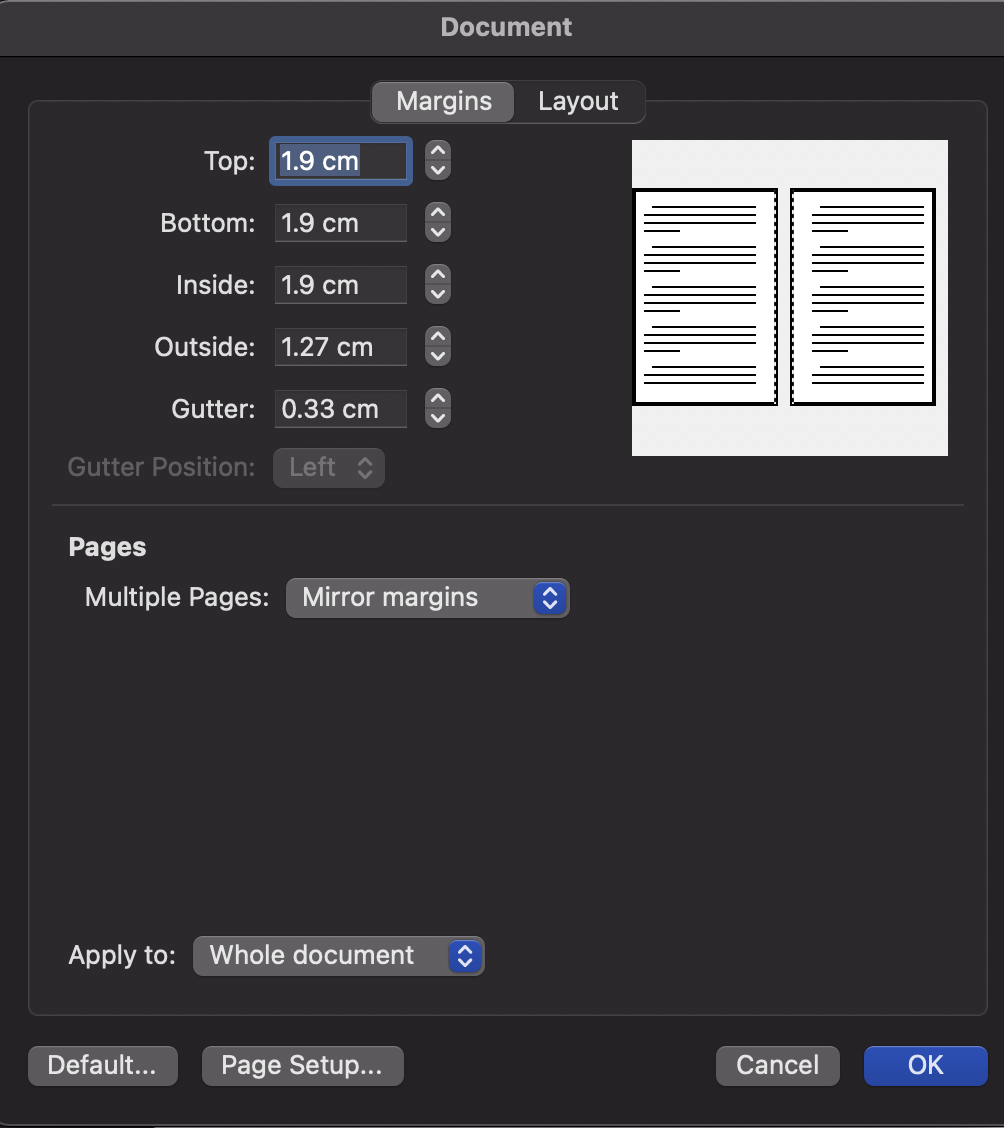
By default, the “Gutter” margin is set to 0. This is likely to cause problems down the line, as the gutter margin is the total space between the content of your book and the fold where the pages of the book will be bound together.

You Should Read This Next 👇
You should either set this to a 1” margin, or whatever you have been advised to set it to based on your chosen book size (the platform you are submitting your book on will provide guidance on this). This will ensure the content of your book doesn’t get cut off by the fold.
Now, select the “Multiple Pages” drop-down, and then select “Mirror Margins”. Then, click “OK.”
This is just a basic set-up guide to show you how to adjust margins and format your book for print or ebook distribution. However, there are a tonne of things you can do through word, such as add page numbers on each page or alternate pages. Add a table of contents for easier navigation etc. So be sure to explore all of your options and play around with the in-built book formatting features in Microsoft Word.
Other Things To Consider When Formatting Your Book In Microsoft Word
- Microsoft Word documents may be difficult to export when they contain complicated formatting (e.g. tables, text sidebars, and insets).
- Do not adjust the margin lengths in your ebook as many platforms convert it to content that is re-flowable and can be viewed with various font sizes.
- Try not to insert empty lines of text to produce blank pages.
- Rather than copying and pasting, add your images straight into your document.
- Insert page breaks when you can at the end of chapters.
Free Pre-Edited Downloadable Microsoft Word Formatted Documents
So, now that you know how to edit your margins yourself, it might be a good time to mention that there are also pre-adjusted documents that you can also download for free.

You Should Read This Next 👇
They are word documents and are already set up for specific book sizes;
| Page size without bleed | Page size with bleed |
|---|---|
| 5″ x 8″ (12.7 x 20.32 cm) | 5.125″ x 8.25″ (13 x 20.92 cm) |
| 5.06″ x 7.91″ (12.85 x19.84 cm) | 5.185″ x 8.16″ (13.15 x 20.44 cm) |
| 5.25″ x 8″ (13.34 x 20.32 cm) | 5.375″ x 8.25″ (13.64 x 20.92 cm) |
| 5.5″ x 8.5″ (13.97 x 21.59 cm) | 5.626″ x 8.75″ (14.27 x 22.19 cm) |
| 6″ x 9″ (15.24 x 22.86 cm) | 6.125″ x 9.25″ (15.54 x 23.46 cm) |
| 6.14″ x 9.21″ (15.6 x 23.39 cm) | 6.265″ x 9.46″ (15.9 x 23.99 cm) |
| 6.69″ x 9.61″ (16.99 x 24.4 cm) | 6.815″ x 9.86″ (17.29 x 25 cm) |
| 7″ x 10″ (17.78 x 25.4 cm) | 7.125″ x 10.25″ (18.08 x 26 cm) |
| 7.44″ x 9.69″ (18.9 x 24.61 cm) | 7.565″ x 9.94″ (19.2 x 25.21 cm) |
| 7.5″ x 9.25″ (19.05 x 23.5 cm) | 7.625″ x 9.5″ (19.35 x 24.1 cm) |
| 8″ x 10″ (20.32 x 25.4 cm) | 8.125″ x 10.25″ (20.52 x 26 cm) |
| 8.5″ x 11″ (21.59 x 27.94 cm) | 8.625″ x 11.25″ (21.89 x 28.54 cm) |
| 8.25″ x 6″ (20.96 x 15.24 cm) | 8.375″ x 6.25″ (21.26 x 15.84 cm) |
| 8.25″ x 8.25″ (20.96 x 20.96 cm) | 8.375″ x 8.5″ (21.26 x 21.56 cm) |
| 8.27″ x 11.69″ (21 x 29.7 cm) | 8.395″ x 11.94″ (21.3 x 30.3 cm) |
| 8.5″ x 8.5″ (21.59 x 21.59 cm) | 8.625″ x 8.75″ (21.89 x 22.19 cm) |
You can download those for free, here.
Likewise, you can use Kindle’s free formatting tool, Kindle Create to compile very professional books with all the trimmings!
Hiring A Freelancer To Edit And Format Your Book
As an author, I am always looking for ways to improve my book before hitting publish. I want to make sure that it is free of any typos or grammatical errors. I also want to ensure that the pacing is good and that the storyline flows smoothly. To do this, I use Grammarly to go through my books with a fine-toothed comb.

You Should Read This Next 👇
I also hire a freelancer on Fiverr as a second set of eyes in the editing process and to format the book according to the publishing platform’s guidelines. This extra step in the editing process has really helped me to improve the quality of my books. I’ve shared some recommended editing services below 👇
Likewise, manuscript formatting and book cover design can be outsourced just as easily; choose a trusted seller and your book is as good as sold (cheesy, I know — and not really, you still need to build a winning marketing plan!)
Use our box below to find a freelancer for any and all of your book publishing needs:
(for Createspace, Lightning Source, or IngramSpark)
This is a guide to formatting your book in Microsoft Word (2010). We’ll be making a 6″x9″ PDF for print; but you can easily change the document to another size. You can watch these three videos, or go through the guide down below. You can start your own document from scratch, or download our free package of formatting templates to get started quickly.
Part 1: Setting Paragraph Styles
How to format a book for print in MS Word — Tutorial #1
Part 2: setting up headers, page numbers and footings
How to format a book for print in MS Word — Tutorial #2
Part 3: Front matter and back matter suggestions
How to format a book for print in MS Word — Tutorial #3
PS. Our FREE book formatting templates have this stuff built in. Click here to download them now.
A Quick Trick for Outlining your Book
Did you know you can drag and drop whole sections around in MS Word (just like you can in Scrivener)? It helps a ton with organization.
Make your book beautiful… without the headache
Psst… learning to format your own books can be a pain in the ass. It’s easier with our beautifully designed, 100% free templates. They’ve already helped over 20,000 authors publish successfully. Click here to download them all.


Keep scrolling for an in-depth tutorial. You should also check out our NEW book formatting tutorial series (updated in 2017 — don’t worry, it’s free too).


How to format a book in Microsoft Word (with pictures)
Getting started
Open a new document. Click “size”>> “More paper sizes” and set the document to 6”x9” (or your book size).

Then set the margins and gutter. Make sure to apply to the “whole document” instead of “this section.”

I set this one to 1″ margins on the top and bottom (a bit too much on the top). The «Gutter» is extra space on the inside. Recently (2014) I’ve noticed that Createspace book spines are much more glued-together, so the gutter may need to be a little bigger. Copy and paste your text into the document (or, if you’ve already been writing in Word, save the document as a new file (to be safe) and then start formatting.
Setting Paragraphs
Highlight some text and click on the «line options» tab. Set the indent for the first line of paragraphs to .2 or so (I started with .3, but that’s too much).

Make sure there’s no space before or after the paragraph, and justified text. Select the font you want to use. With that text still selected, right click, go to “Styles” and “Update Normal to Match Selection.” Now your whole document is using the “Normal style.”

Then select the first paragraph of your book, click line spacing options again, but set the first line indent at 0.0. This time, right click and “Save the selection as a new style.” Save it as “First Paragraph.” 
Chapter Pages
Next, we’re going to separate all the chapters. This will be really important later when we start adding headers and footers. So put the cursor before any of the text, go to “Page Layout” >> “Breaks” and “Next Page.”

If you’ve done this right, the first page will say “First page Footer, Section 1” and the top of the next page will say “First Page Header, Section 2.”

Click into the headers area (by clicking the space at the top of the page) and make sure you’ve checked «Different First Page” and “Different Odd and Even Pages.”

Because this is the first page of the first chapter, you can begin styling the chapter pages. To make use of Word’s built in Table of Contents function, it’s best to start with Word’s preset “Heading One.”

Just type “Chapter One”, select it, pick “Heading 1” from the styles, then change the size and font, select the text and right-click, then under «styles» click “Update Heading One to match selection.” (I’ve changed the font to no-indent, black, and «Bebas Neue.») You may want to expand the text by bringing up the fonts menu (Ctrl+D on Windows) go to advanced, spacing and “expanded.”
You should also check to make sure there’s no indent on your chapter title, so that it’s really centered.

If you have a “Navigation” window open on the left side, this heading should show up right away.

Now you may want to style the first sentence. Select the first few words, and transform them to uppercase by going to the “Change Case” button on the Home menu.

Then, to add a Dropcap, put the cursor before the first letter of the first sentence, then go to the Insert panel and click the DropCap feature.

You can change the font of the drop cap to stand out even more, but getting the positioning right can be tricky. If you want the Dropcap to take two lines instead of three, choose “Drop Cap options” from the menu.
Now that our first page is ready, move down to the second page and click in the top area to select the header. Up on the menu, the “Link to Previous” is probably selected. You want to click on it to unlink it (just for the first pages, so they don’t link with the front matter. For the remaining pages, you’ll want link to previous selected). I’ll type in “Book Title”, get the style right and then save it as a new quick style (“headers”).

I’ll align right. If you have “gutter” set up, you can see that the “inside” of the page (on the left) has more spacing. You want to align your headers and footers to the outside, so make sure it’s on the side of the page with the smaller margins.
Then I’ll go into the footers area, click “Insert”, then page numbers>>current position>>plain number. This enters a page number field. Mine starts on page 3. If I want to change this, I could go to Insert>>page numbers>>Format page numbers and then choose “start at #…” instead of “continue from previous section.”

Then I can go down to the next page. Because I’ve selected “Different Odd & Even Pages” I can make this page a little different, by aligning left and typing “Author Name.”
Then, instead of inserting the page number again, I can just select and copy the page number field from the previous page, and paste it into the footer of this page – aligning it left like the header. To check my work, I’ll go to “View” and hit the “Two pages” so I can make sure that it looks OK.

There’s a little too much space between my headers and the content… but that’s because I set my top page margins to 1” (a bit much). I’ll leave it for now. The headings and page numbers look fine, so I’ll go back to View>> 100% and continue on. The whole first chapter should look pretty good now.
If I want to style section breaks I could… a simple way is to use the “First Paragraph” style again with all caps on the first few words, but no dropcaps.

When I get down to the bottom of the chapter, I’ll put the cursor below the text, select Page layout>>Breaks >> and hit “Next Page” again.
Because this is the first page of a new section, and we’ve selected “Different First Page” this page should be blank, with no headers and footers, so you can style it like the first Chapter Page. In Word, it’s hard to line up everything exactly.
The best way to get it 100% consistent is to select and copy from just above the first paragraph to the top of the page, including all the spaces and Chapter Header, and then pasting it the first page of the next chapter. That’s also a little faster than redoing everything manually. Then I can just change the text to “Chapter Two”.
The following pages in the book should have the same headers and footers, and the page numbers should be automatic. So all you need to do is skip through and adding «Next Page» breaks between every chapter, and styling the chapter pages. If your page numbers aren’t working for any reason, make sure the “Link to Previous” option is selected. If they still aren’t connecting, go to format page numbers and “continue from previous.”

You can also just select the page number field from the previous section and copy it into the one that’s broken. If you’ve been setting all your quick styles (first paragraph, normal, header, headings, page numbers) going through the chapters like this should be pretty fast.
If you get stuck with anything, it will probably be with the headings and footers and page numbers. When you finish styling your chapters, switch to Two-Pages view so you can check everything over. Right and left-align can be confusing, even if you are viewing it in Two-Pages mode, because Word may not show it as it actually prints.

Just keep in mind the extra wide margins are the inside gutter, so these are aligned on the outside, even though they look like they will be on the inside. If you’ve been using the “Heading 1” style, Word has automatically been adding in your chapters to the navigation, which you should see on the navigation panel on the left.

So let’s go back to the front and add the “front matter”, including the table of contents.
Still here? You’re working too hard.
A lot of this stuff is already done for you in my formatting templates. I made them to help indie authors save time and money, without making amateur book design and formatting mistakes. Seriously, you should download the free package. I’ll also send you my email series on publishing books that sell — I’ve been told it’s life changing.


🔒100% secure download. No spam, ever.
Adding the Copyright Page, Title Page and TOC
Put the cursor before chapter one and add a new “Next Page” break.
You’ll need these pages: 1. Title Page 2. Copyright page 3. Table of Contents 4. Dedication.
Your title page will want to match the cover pretty closely – see if your designer will give you the fonts he used – you may need to space out the lettering quite a bit. If you ask, your designer can probably save you a transparent PNG of the cover text (just like on the cover, but without the art) that you can add into the title page.
Your copyright page will look something like this (you can use this if you want):
TITLE Copyright © 2013 by Author Name.
All rights reserved. Printed in the United States of America. No part of this book may be used or reproduced in any manner whatsoever without written permission except in the case of brief quotations em- bodied in critical articles or reviews.
This book is a work of fiction. Names, characters, businesses, organiza- tions, places, events and incidents either are the product of the author’s imagination or are used fictitiously. Any resemblance to actual persons, living or dead, events, or locales is entirely coincidental.
For information contact; address www.website.com
Book and Cover design by Designer
ISBN: 123456789
First Edition: Month 2013
10 9 8 7 6 5 4 3 2 1
The «10 9 8 7 6 5 4 3 2 1» on the bottom refers to the editions, so if it goes until “1” it means first edition. If this was the fourth edition, you’d write: «10 9 8 7 6 5 4». These numbers should be close to the bottom of the page. It can be centered, left or right aligned, and with much smaller font size (9 or 10).
If you’re indie publishing, the copyright page isn’t a big deal – in fact you can stand out by using something more creative. I tend to use a simple message like “Feel free to share this – just don’t try to pass it off as your own! If you enjoy this book, I really hope you’ll do me the favor of leaving a review. You can connect with me @creativindie.” There’s something to be said for trying to look as professional as possible though, especially with the print book; but I also think it’s fine to «own up to» and even take pride in the fact that you self-published, as some skeptics may feel you’re «trying to hide it» otherwise. Make another “next page” break. Then go to the “references” tab and hit Table of Contents.

You should get an automatic Table of Contents. You may need to delete some areas, or change the fonts and styles (if you do, make sure to save it as a new style… it’s really annoying to keep restyling it if you forget to do this). Because this table is automatic, you can “Update Table” and “Update Page Numbers Only” if you do rewrites or add content later.

For the TOC, you probably need to make the text about 14pt, and add a little more spacing. If this is a novel, you don’t really need a table of contents, but that’s up to you. For the front pages, you’ll probably want to make sure there’s no indents anywhere, so everything is properly aligned.
Be a little careful on these front pages – if a header or footer gets added in, and a later page is set to “link to previous” – then when you delete it on the front pages it will erase the headers and footers throughout the book. Instead, go to the next page with headers and uncheck “link to previous” – then you can delete the headers on the front pages. Also, the copyright page is usually on the back of the title page (on the left hand side), while the dedication, Table of Contents and Chapter One usually starts on the right hand side – this means you’ll have to leave some blank pages in between.

You can zoom way out to see everything together. Sometimes I need to use a real book, or picture the pages on my hand and flip my palm back and forth, to get this right. Note – some books have all chapter pages on the right hand side – if you want to do that, just add an extra blank page by adding more “Next Page” breaks, and make sure they aren’t connected to any headers or footers so they stay blank.
That’s it – I’m going to attach the sample I made for this tutorial, you can download it by clicking these links: Template-sample(.docx) Template-sample (.doc) (They won’t look the same unless you have the same fonts… so the first thing you’ll want to do is change the
Chapter Heading font to something that matches your book. Hopefully you’ve already got a great book cover, but if not, take a look at my huge list of best fonts per genre here.) If you get stuck and are frustrated, I highly recommend finding someone on Fiverr.com. Pay them $10~25 to fix whatever problem you’re stuck on; it’s worth it.
Ps) It can save some time if you learn a few useful keyboard shortcuts for MS Word. There’s a full list here. The one I use the most is «Ctrl+z» which undoes your last action.
Was this useful?
If so, please share it! If you need a book cover, you should check out the sister site, www.diybookcovers.com — it has more free tools and templates to make your book look good. If you haven’t done so yet, you should sign up for my email list. Not only will you get a bunch of professional book design and formatting templates, I’ll also send a free email series on everything I’ve learned after helping launch hundreds of bestsellers (and making a full-time living from my own fiction and non-fiction books).
PS. I’m not just some guy on the internet… I’ve got a PhD in Literature, have spoken on book design at publishing conferences around the world, and was featured in CNN for renting castles to use as writing retreats. You can also check out my main book cover design site, or my blog Creativindie.com where I help authors and artists produce and sell their best work.
If you want to write a book, you’ll need book writing software that’s up to the task. Yes, you can invest in dedicated book writing programs. But you don’t have to: a great writing tool is likely already at your fingertips, if you know how to write a book using Microsoft Word.
There’s a lot of book writing software out there. Many of these programs claim to offer intuitive use, help with organization, and even say they’ll keep you from distraction. The options can be overwhelming.
There’s still one tried and true option if you’re not interested in all that (or can’t afford the fancier programs): Microsoft Word.
I write most of my books in Microsoft Word, not to mention short stories. Here’s the rundown of how to write a book using Microsoft Word, and why that might be your best choice.
The Benefits of Microsoft Word for Book Writing
You most likely already have it. And so does everybody else. Word is the standard, accepted across platforms, and is easy to access for non-writers (your beta readers). It’s been around forever, so most people know how to use it.
There are book formatting templates. A ton of them. They have them for short story format and for manuscript format. Personally, I don’t use those templates, but they’re a nice baseline for beginners, or even old hats that just want to hurry up and write without setting up their document first.
It’s simple and uncluttered. There are a ton of apps and programs out there that will allow you to keep your plot structure notes close at hand, to rearrange your chapters with the click of a button, and to keep detailed character profiles right in the program. That’s all a little too much for me. I prefer handwritten notes and nothing else blocking my screen while I’m typing and Word gives me that.
It is worth noting that if all that sounds appealing to you, you can do those things in Word as well, it just won’t be as fancy as other programs.
Hey writer: the first step to writing a book is coming up with a great idea. The second step is figuring out the structure of your book. If you have an idea but you need help with the structure, check out our new book The Write Structure. In it, we’ll teach you how to apply timeless story structure principles to write a great book. Get The Write Structure »
How to Navigate Your Book in Microsoft Word
When you have a 90,000-word manuscript, navigating becomes daunting. Luckily there are ways to do it in Word that make it easier if you know where to look.
Chapter Headings
Word doesn’t divide your book into chapters for you like some other programs. There will be no easy way to click and drag to rearrange chapters.
What I recommend is using headings. On Word’s Home page, there are already standard headings listed. Definitely mess with them and change their formatting to something simple.
No one needs giant blue words as their chapter headings. (You can set your simpler formatting as your default style as well, so you don’t have to change it every time.)
Make the title or number of each chapter a heading. Then you can easily bounce around to different chapters through the navigation pane (check the Navigation Pane box under the View menu).
Bookmarks
These basically work the same way as headings, but they’re for anywhere in your document. Have a specific scene you need to do more research on? You can bookmark it and jump back to it later.
Bookmark by going to the Insert menu and clicking Bookmark. Name your bookmark and voilà. You can delete them easily from the popup menu as well.
Find and Replace
CTRL+F brings up a simple search option to find words and phrases in your document. CTRL+H brings up the full gambit. From that dialogue box, you can search, replace certain words with others (i.e. Jennifer now becomes Julia all through the manuscript), and go to any page, section, heading, bookmark, etc. that you need to go to.
Microsoft Word is Great for Editing Your Book
Word has a ton of options for editing your story, including comments, tracking changes, and comparing documents. All of these are under the Review menu.
I use the comments feature to make notes to myself where I need to recheck facts or add description later. It’s easy to navigate through the comments with the search feature or the buttons under the Review menu. Don’t forget to remove them all before saving your document as a PDF or sending it off to an editor.
Tracking changes is awesome and a lot of editors (for short stories anyway) will use this feature to collaborate with you during the editing process. You can accept or reject changes or even revert back to the original.
Finally, make sure you have grammar and spellcheck on! Grammar check even allows you to check style issues (like how to use an ellipsis correctly) and passive voice. It’s invaluable.
Pro tip: To keep you on track while you’re writing, turn off some of the more fine-tuning features of grammar check. There’s nothing that will ruin your flow more than a bunch of underlining you feel like you need to take care of immediately. I recommend running the full check when you’re done (or at least done for the day).
Formatting Your Book in Microsoft Word
Make sure you’re familiar with standard manuscript format for novels and formatting short stories. Take a look at those links and follow their instructions. You don’t want to get rejected out of hand because you tried some weird formatting that’s hard to look at.
One of the biggest gripes I see from editors is writers using spaces to indent paragraphs. Don’t do this. It makes it super hard on them when they’re putting a book together. Instead, use the ruler in Word (under the View menu) or the paragraph settings (under the Home menu) to adjust your tabs. A half inch is standard.
Despite what most of us were taught in school, the standard is now one space after periods, not two. This is another sticking point with editors, so don’t do it. If you’re used to two, there’s a grammar check feature in Word you can turn on to highlight every time you use two spaces.
Finally, use the page break option to break for a new chapter, not enter or a million spaces. You can find the page break under the Insert menu.
Pro tip: When in doubt about your formatting, you can turn on the Show/Hide option under the Home menu (looks like a paragraph symbol) to see all your formatting symbols.
Now That You’ve Mastered Microsoft Word, Go Write Your Book
Don’t let choosing writing software stagnant your writing. Don’t overthink it. You don’t need to keep up with the Joneses with the latest writing technology that’s trotted out on tech forums and in writing chats.
The important thing about writing a book is actually writing it. No fancy book writing software is going to help you with that.
So get writing!
Ever used Word to write a book? Do you have any more tips for how to write a book using Word? Let me know in the comments!
PRACTICE
Take fifteen minutes to write. Just write. Don’t worry about page setup, formatting, or which program you’re going to use. Open up Word or get out a pen and paper if you’d like!
When you’re done, share your writing in the comments. Don’t forget to comment on your fellow writers’ work!

Sarah Gribble
Sarah Gribble is the author of dozens of short stories that explore uncomfortable situations, basic fears, and the general awe and fascination of the unknown. She just released Surviving Death, her first novel, and is currently working on her next book.
Follow her on Instagram or join her email list for free scares.
Self-publishing a book on Amazon, as has been pointed out before, is a great way to build up passive income and support your business.
However, there are several steps that need to be followed in order to have a professional product. Chief among these is book formatting.
There are many ways to format your book, from paid programs to free programs, and even Microsoft Word.
In this article, we will discuss how to format a book in Microsoft Word, either from scratch or from a template, so you can understand all the important elements of a well-formatted book and why they matter.
Format a Book in Word from Scratch or Get a Template?
I’ll be honest with you. Formatting a book in word is a bit hard. Yes, it’s an inexpensive way to go, especially if you already have access to Microsoft Word, which most writers do.
For that reason, a template might be a good place to start, and then you can modify it from there.
See this tool to get a sampling of free templates for Microsoft Word, allowing you to choose between fiction and nonfiction, as well as the many different trim sizes.

Armed with a free template, you’ll find that the below steps are much easier to do, and can build out an even more professional looking book with minimal effort.
But if you need to start from scratch, or your formatting needs are different from the templates listed above, don’t despair. You can do it with a little know-how and the right mindset.
How to Create a Book in Word; The Difference between Ebooks and Print Formatting
When it comes to formatting a book, it’s a lot different from formatting an essay or blog post. You’re probably going to want to have an eBook and a Print book.
For an ebook, the file format you will most likely need is an Epub. These files are universally accepted by all markets and are the best file to target.
To format a book as an ePub file, you won’t have to worry about trim size, margins, and font. You do, however, have to worry about linking your table of contents, providing links to anything else that you want in your book, as well as making sure your chapter headings are correct, your images show up right, etc.
Later on, I’ll discuss some of the free book format software that will turn your Word doc into a proper ePub file.
For a print book, you’ll need to take many steps in order to properly format a PDF for printing presses. You’ll need to select your trim size and properly adjust margins and more.
So, in order to ensure you’ve properly formatted your word for PDF export, let’s dive into some of those steps now.
How to Format a Book in Word; Formatting Requirements
Most of these requirements relate to the print book, but a few are important to keep in mind for formatting the ebook as well.
Trim Size
The trim size refers to the literal height and width of your book. There are a few standard trim sizes, such as 5” x 8”, 5.5 x 8.5”, and 6” x 9”. However, Microsoft Word will let you set the trim size wherever you need it.
To change the trim size in Microsoft Word, go to the layout tab, click on the size option, and select more paper sizes at the bottom, as seen here:

Margins
Next, you have your margins on all four sides of your paper.
These can be adjusted from the layout toolbar. You’ll want to look up Amazon’s margin suggestions for your trim size, as it can change.

The Gutter Margin
When book formatting in word for a printed book, it is especially important to note the Gutter margin.
This is the margin that exists on the inside of your book, closest to the spine, that is a little larger than the other three margins. It is often easy to miss because it alternates from one page to the other, but thankfully Word has a setting for this.
Font

To start with, pick a standard font and style, such as a 12-point font, and an open source font such as Open Sans or Garamond.
Note: make sure you have the rights to the font you use, as many fonts are actually restricted for commercial use.
Paragraph Settings

The paragraph settings relate to your indentations, spaces between paragraphs, making sure the lines are not too close together, etc.
This is more of a stylistic choice, but you want to make sure your text is not too dense on the page, and that it is not too sparse either.
Also consider the genre of what you are writing. For example, nonfiction books sometimes put spaces between their paragraphs, whereas fiction never does this. Additionally, books for younger readers tend to have larger fonts and line heights.
Chapter Headings

There are a few things you need to pay attention to when formatting your chapter headings. First, make sure you use a page break after the end of the last chapter, so that your new chapter starts on the next page.
Next, make sure you are using headings rather than just larger fonts. This will help Microsoft Word to know how to structure your table of contents.
And speaking of which…
Table of Contents

Once you have all of your chapter headings ready to go, it’s time to develop your table of contents.
You will then need to navigate to the references tab and click on table of contents. Run through the settings there until you get a style that you like.
Table of contents can be a little tricky, especially if you want page numbers for them, but if you have done your headings right, half the work is already done.
Headers and Footers

To insert your headers and footers, go to the Insert tab and look for a section that says “Header”. Click on that and you will see a drop-down that lets you choose the header style.
For the footer, you only need page numbers. But this is complicated by the fact that you don’t need page numbers on your title page, table of contents, etc.
To do this properly, go to the first page of your actual novel, after all of the front matter, then go to the Layout toolbar and find the Brakes tab. Here you can find a “Section Break” which is different from a page break. Add this after the last page of your front matter, and before the first page of your novel.

Next, go to the first page of your actual book, where you want the page numbers to start, and double-click on the bottom margin.
You should then find the page number button, which will give you another drop-down menu. You can then select whatever style you like.
Front and Back Matter
Every book usually has front and back matter, these include things like the copyright page, the table of contents, an afterword by the author, and an “Also by” page.
There can be different requirements for each of these, so it’s important to understand each of the different parts of a book before you start. I recommend this article.
Check Your Work
I cannot stress enough how important it is to double and triple check your work before you create the final versions of your formatted book.
This isn’t just regular grammar and spelling issues, but instead, is about things that might have happened to your book after formatting the above. Taking some of the steps we discussed, things could shift around. Therefore, it is important to check your book and ensure it looks good, both grammatically and visually.
Here are some of the common issues you should look for when doing a final check of your work:
- Look for widows and orphans: this is where a stray line in a paragraph starts the first page, or the first line of a paragraph starts at the end of a page. To learn more about them, check here.
- Check for properly formatted dialogue: There are many rules to formatting dialogue and you need to check that each is followed in case your book has it.
- Check Hyphenation: Sometimes words might not be hyphenated and this can throw off the look of a paragraph or drag on, in case the program didn’t catch it.
- Shift in Point of View: In fiction, this can be the mistake of writing the wrong tense or style and the Character’s point of view, or POV, shifts from a single, to second and or third POV. To learn more about that, check here.
Convert to the Appropriate Files
Like I discussed above, if you are converting to an ebook, you’re going to want an EPUB file.
If you are formatting for print, you will want a PDF file. Thankfully, Microsoft Word makes it very easy to export to a PDF.
However, to convert to an ebook, you will need an external program. You can find these online or use a program like Calibre or Kindle Create to convert it to an EPUB.
But if you want to make it even easier, you can use a designated book formatting software designed for this, which should automatically generate the appropriate files.
So let us discuss a few of those.
The Best Book Format Software Alternatives
While Microsoft Word is a powerful program, and can absolutely format a book, there are other programs designed to make this much easier.
For example, Microsoft Word does not export to ebook formats, lacks any kind of automation for trim size, margins, headers, page numbers, etc., and it is next to impossible (requiring highly advanced skills) to add full-bleed images. And that’s just a sample.
Other programs are designed to make this easy, especially the paid options. For example…
The best paid alternative: Atticus

Atticus is an all-in-one writing and book formatting tool that will not only automatically take care of everything I’ve listed above, but will also generate all the files you need to publish your book on Amazon or elsewhere. Plus it’s available on all platforms, including Mac, Windows, Chromebook, and Linux.
It only costs $147, and while there are other options out there, they can run closer to $250.
Pros of Atticus:
- Trim size, margins, headers, page numbers, etc. are all automated and can be changed with the click of a button (without having to look up all of Amazon’s requirements
- It has a robust chapter theme creator, allowing you to customize titles, subtitles, chapter numbers, images, and even full-page image spreads
- It supports embedded images and full-bleed images easily
- It is a multi-functional tool that lets you write a book as well as format it
- Extremely easy to use
- Available online and offline
- Available on Windows, Mac, Linux, and Chromebook
- Affordable pricing compared to competitors
- Can create ebook and printed books
Cons of Atticus:
- Not built for more complex layouts like magazines (for which you’d need Adobe InDesign)
- Still working on some features
The best free book formatting alternative: Kindle Create

There are few good formatting programs that are free, but if we could pick one, it would be Kindle Create.
Kindle Create was developed by Amazon itself, and while it is severely lacking in advanced features that you can get with Microsoft Word or Atticus, it can do a basic job, and will output the files you need. As long as you don’t have any fancy requirements for your book, you can get by with this program.
Pros of Kindle Create:
- Free
- Easy to use
- Can create ebook and printed books
Cons of Kindle Create:
- Doesn’t have a chapter theme builder
- Only exports in Amazon-compatible files
- The finished look seems cheap
- Only suitable for extremely simple books
- Limited customizable options
- Only works well with Amazon
How to Format a Book in Word; A Little Effort Goes a Long Way
Formatting is one of those things that few people think about, but everyone notices when it’s bad.
For that reason, putting in a little effort to format your book right is important.
The easiest and most economical way of doing it is to get a dedicated formatting program, but you can absolutely do it with Microsoft Word, and doing it there will actually educate you in all the best practices for formatting, knowledge that will come in handy no matter what book and business ideas you have.
But whatever you do, be sure to check your work, and don’t cut corners. Even a small mistake can pull the reader out of your book.

Guest Author Bio
Dave Chesson is the creator of Kindlepreneur.com, a website devoted to teaching advanced book Marketing which even Amazon KDP acknowledge as one of the best by telling users to “Gain insight from Kindlepreneur on how you can optimize marketing for your books.” Having worked with such authors as Orson Scott Card, Ted Dekker and more, his tactics help both Fiction and Nonfiction authors of all levels get their books discovered by the right readers. He’s also the founder of Publisher Rocket, a book marketing software, and Atticus.io, a book writing and formatting software.
Бумажные книги постепенно отходят на второй план и, если современный человек что-то и читает, то делает это, чаше всего, со смартфона или планшета. Дома для аналогичных целей можно использовать компьютер или ноутбук.
Существуют специальные форматы файлов и программы-читалки для удобного чтения электронных книг, но многие из них также распространяются в форматах DOC и DOCX. Оформление таких файлов зачастую оставляет желать лучшего, поэтому в данной статье мы расскажем, как сделать книгу в Ворде хорошо читабельной и пригодной для печати именно в книжном формате.
Создание электронной версии книги
1. Откройте текстовый документ Word, содержащий книгу.

Примечание: Если вы скачали файл DOC и DOCX из интернета, вероятнее всего, после открытия он будет работать в режиме ограниченной функциональности. Чтобы его отключить, воспользуйтесь нашей инструкцией, описанной в статье по ссылке ниже.
Урок: Как убрать режим ограниченной функциональности в Ворде
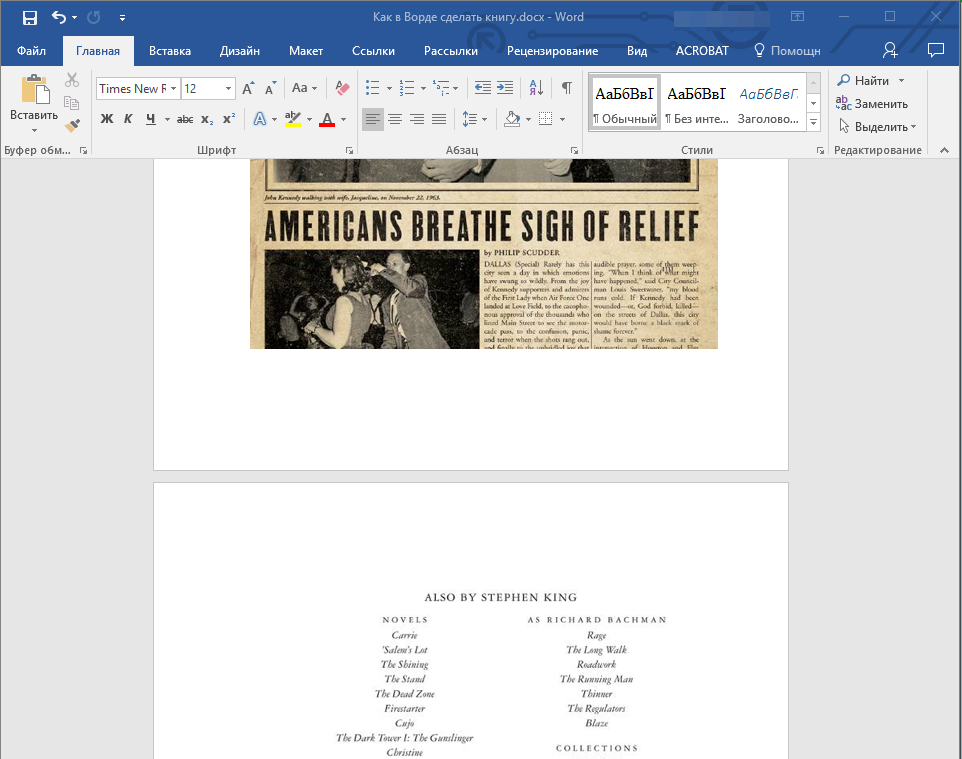
2. Пройдитесь по документу, вполне возможно, что в нем содержится много лишнего, информации и данных, которые вам не нужны, пустые страницы и т.д. Так, в нашем примере это газетная вырезка в начале книги и список того, к чему Стивен Кинг приложил свою руку к моменту написания новеллы “11/22/63”, которая и открыта в нашем файле.
3. Выделите весь текст, нажав “Ctrl+A”.

4. Откройте диалоговое окно “Параметры страницы” (вкладка “Макет” в Word 2012 — 2016, “Разметка страницы” в версиях 2007 — 2010 и “Формат” в 2003).

5. В разделе “Страницы” разверните меню пункта “Несколько страниц” и выберите “Брошюра”. Это автоматически изменит ориентацию на альбомную.
Уроки: Как сделать буклет в Ворде
Как сделать альбомный лист

6. Под пунктом “Несколько страниц” появится новый пункт “Число страниц в брошюре”. Выберите 4 (по две страницы с каждой стороны листа), в разделе “Образец” вы можете увидеть, как это будет выглядеть.
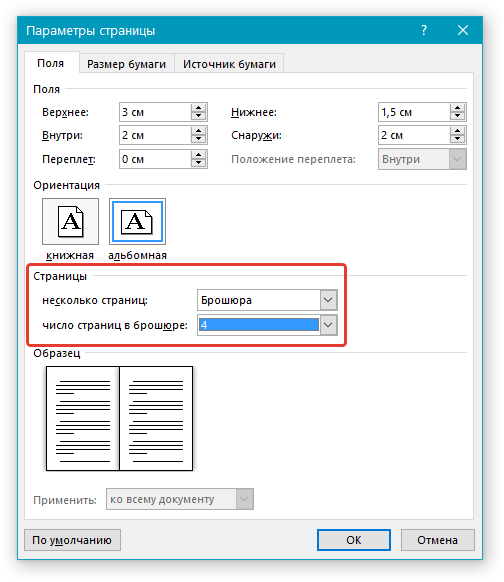
7. С выбором пункта “Брошюра” настройки полей (их название) изменились. Теперь в документе есть не левое и правое поле, а “Внутри” и “Снаружи”, что логично для книжного формата. В зависимости от того, как вы будете скреплять свою будущую книгу после печати, выберите подходящий размер полей, не забыв о размере переплета.

-
Совет: Если вы планируете склеивать листы книги, размера переплета в 2 см будет достаточно, если же вы хотите ее сшить или скрепить каким-нибудь другим образом, проделывая отверстия в листах, лучше сделать “Переплет” немного больше.
Примечание: Поле “Внутри” отвечает за отступ текста от переплета, “Снаружи” — от внешнего края листа.
Уроки: Как сделать отступ в Ворде
Как изменить поля страницы
8. Проверьте документ, нормально ли он выглядит. Если текст “разъехался”, возможно, виной этому являются колонтитулы, которые необходимо подкорректировать. Для этого в окне “Параметры страницы” перейдите во вкладку “Источник бумаги” и задайте необходимый размер колонтитулов.

9. Снова просмотрите текст. Возможно, вас не устраивает размер шрифта или сам шрифт. Если это необходимо, изменить его, воспользовавшись нашей инструкцией.

Урок: Как изменить шрифт в Word
10. Вероятнее всего, с изменением ориентации страницы, полей, шрифта и его размера, текст сместился по документу. Для кого-то это не имеет значения, но кто-то явно пожелает сделать так, чтобы каждая глава, а то и каждый раздел книги начинался с новой страницы. Для этого в тех местах, где заканчивается глава (раздел), нужно добавить разрыв страницы.

Урок: Как добавить разрыв страницы в Ворде
Проделав все вышеописанные манипуляции, вы придадите своей книге “правильный”, хорошо читабельный вид. Так что можно смело переходить к следующему этапу.
Примечание: Если в книге по каким-то причинам отсутствует нумерация страниц, вы можете сделать ее вручную, воспользовавшись инструкцией, описанной в нашей статье.
Урок: Как пронумеровать страницы в Word
Печать созданной книги
Завершив работу с электронной версией книги, ее необходимо распечатать, предварительно убедившись в работоспособности способности принтера и достаточных запасах бумаги и краски.
1. Откройте меню “Файл” (кнопка “MS Office” в ранних версиях программы).
2. Выберите пункт “Печать”.

-
Совет: Открыть параметры печати можно и с помощью клавиш — просто нажмите в текстовом документе “Ctrl+P”.
3. Выберите пункт “Печать на обоих сторонах” или “Двусторонняя печать”, в зависимости от версии программы. Поместите бумагу в лоток и нажмите “Печать”.
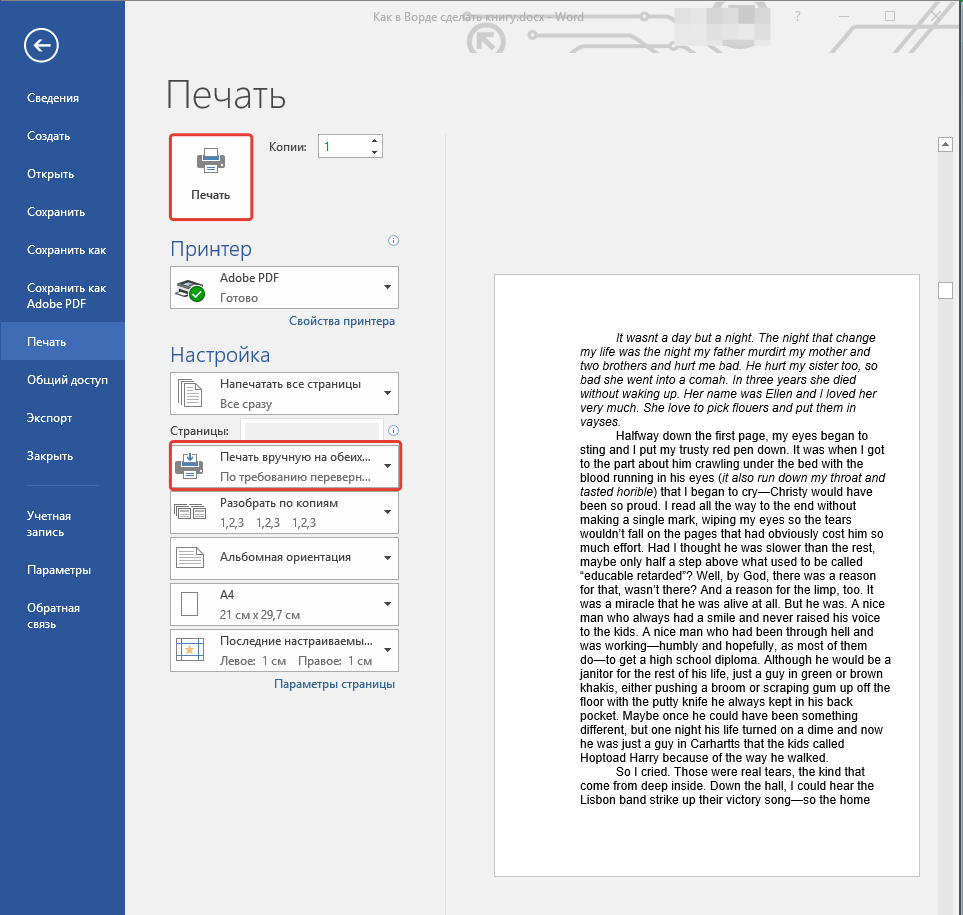
После того, как будет напечатана первая половина книги, Ворд выдаст следующее уведомление:
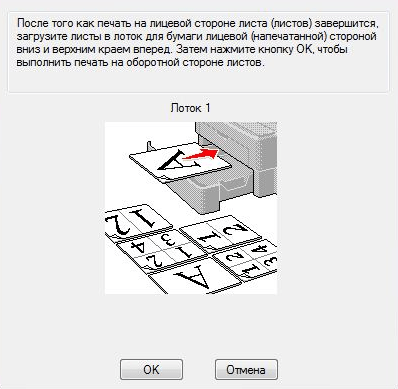
Примечание: Инструкция, которая отображается в данном окне, является стандартной. Следовательно, представленный в ней совет подойдет не для всех принтеров. Ваша задача — понять, как и на какой стороне листа печатает ваш принтер, как он выдает бумагу с распечатанным текстом, после чего ее нужно зеркально перевернуть и поместить в лоток. Нажмите кнопку “ОК”.
-
Совет: Если боитесь допустить ошибку непосредственно на этапе печати, для начала попробуйте распечатать четыре страницы книги, то есть, один лист с текстом с двух сторон.
После того, как печать будет завершена, вы можете скрепить, сшить или склеить свою книгу. Листы при этом нужно складывать не так, как в тетрадке, а сгибать каждый из них посередине (место для переплета), а затем складывать друг за другом, согласно нумерации страниц.
На этом мы закончим, из этой статьи вы узнали, как в MS Word сделать книжный формат страницы, самостоятельно сделать электронную версию книги, а затем распечатать ее на принтере, создав физическую копию. Читайте только хорошие книги, осваивайте правильные и полезные программы, коей является и текстовый редактор из пакета Microsoft Office.
This is a fast and easy tutorial on formatting the layout of your 8.5 x 11 inch book in Microsoft Word. The instructions below will put your manuscript in the correct format for an 8.5 x 11 inch book and they conform to Amazon’s KDP required formatting guidelines for an 8.5 x 11 inch book as well. Let’s begin.
Start by creating a new document or opening your manuscript in Microsoft Word, and then:
- Go to the Top Ribbon and click “Layout”, and then click on the tiny arrow in the lower right corner (Page Setup).
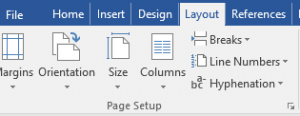
2. Once inside Page Setup, you will see a window with three tabs. Each tab requires adjustments. Match the items as they are noted in the diagrams below:
Margins Setup
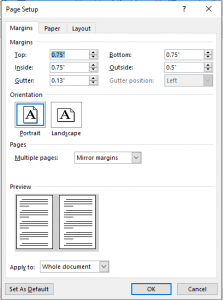
Paper Size Setup 
Layout Setup
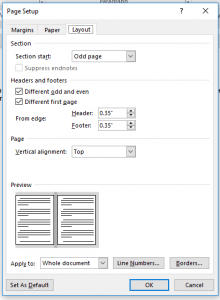
3. Click “Ok” and be sure to save your document.
That’s it!
Once you have configured your document using these steps, your manuscript will be formatted for an 8.5 x 11 inch book. If you need further information on KDP’s guidelines, you can find them here: KDP Guidelines
Happy writing!
I hope you enjoyed this post. Thank you for visiting!
Maureen Bartone
Writer. Creator. Designer. Lover of coffee and words and music.