

1. INTRODUCTION
In this post I show you how to bold a set of data in a Word document (e.g.: all words/numbers) automatically using the tool “Find and Replace“.
I hope it helps.
2. HOW TO BOLD A SET OF DATA ON A WORD DOCUMENT
- On the top right corner of the document, click on Find > Advanced Find.
- Find > More > Special > Any Digit/Letter.
- Click now on the Replace tab > Format > Font > Bold.
- Replace All.


3. ANY QUESTION?
Leave them on the comments.
RELATED:
I saw a previous post labeled: “Find and high light all numbers in a certain range: MS Word 2013”
The answer was specific for the asker but doesn’t totally solve my problem.
I am trying to highlight all numbers to allow a global BOLDing of the number as per this block of text:
• MX-01 prep bench
• B & S – YCJSF-1 – Steamer
• Approx 750mm width x 900mm depth x 1300mm height
• Jet burners to be 130Mj
• Provide with REMOVABLE stainless steel HEAT DEFLECTOR fitted to rear of upstand at top
• Available from B & S Ph +61 ( 03 ) 9469 4754 info@bscommercialkitchens.com
• Provide flexible gas connection and safety cable to allow max 1200mm travel
• Ensure length of gas line after installation is min 100mm longer than cable when fully extended to ensure no visible kinking or crushing of the gas line is evident
Refer Section 6.0 Noodle Cookers in Associated Works Section of specification for general specification details
I would like all numbers to be bold but when I used the previous post after changing a couple of things to [12345678910][0-9]{2}[!0-9] I missed some of the bolding especially on the 1 numbers at the front of a number block and also it bolded the first m in eg 1200mm
![]()
Giacomo1968
52.1k18 gold badges162 silver badges211 bronze badges
asked Jan 25, 2021 at 1:25
![]()
You could try:
- Find what:
([0-9]{1,}) - Replace with:
1 - Click on Format > Font > Font style, set it to Bold.
- Search options: Use Wildcards
See image below for reference. Click Replace All to change the numbers’ font to bold.

answered Jan 25, 2021 at 6:56
![]()
Reddy LutonadioReddy Lutonadio
15.9k4 gold badges14 silver badges34 bronze badges
If you’ve modified the font in a Microsoft Word document then you have likely selected the text that you want to change, then chosen the font, font size, or font color that you wanted to use. Maybe you’ve even explored using cursive fonts in Word to see if that was what you wanted. This method is going to work for most formatting changes that you want to use in Microsoft Word.
In fact, you can often change the font of page numbers in Word by simply selecting one of the page numbers in the document, then using the options in the Font section of the ribbon to create the desired format.
But if that isn’t working for you then it may be time to familiarize yourself with styles in Microsoft Word. These are predefined, customizable groups of formatting choices that you can apply to a selection.
This tutorial is going to show you how to find and change the Page Number style in your Microsoft Word document then apply it to the page numbers in your document.
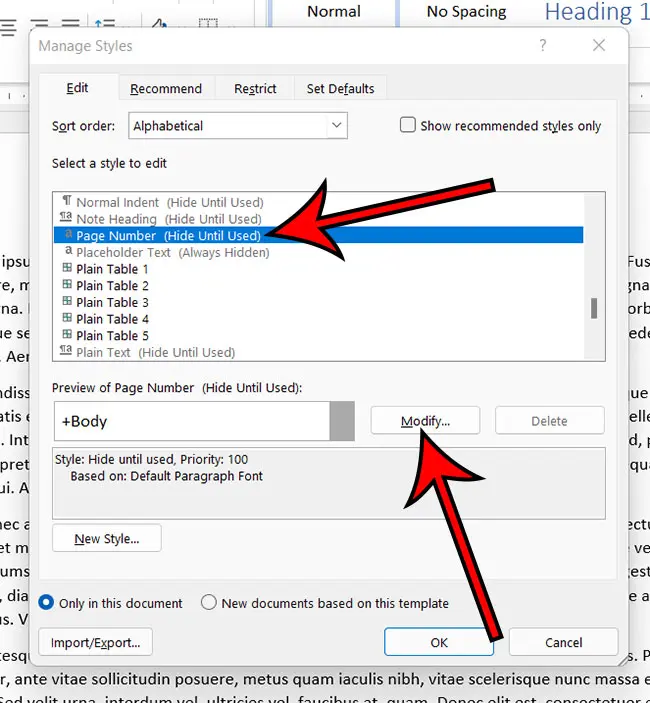
- Open the document.
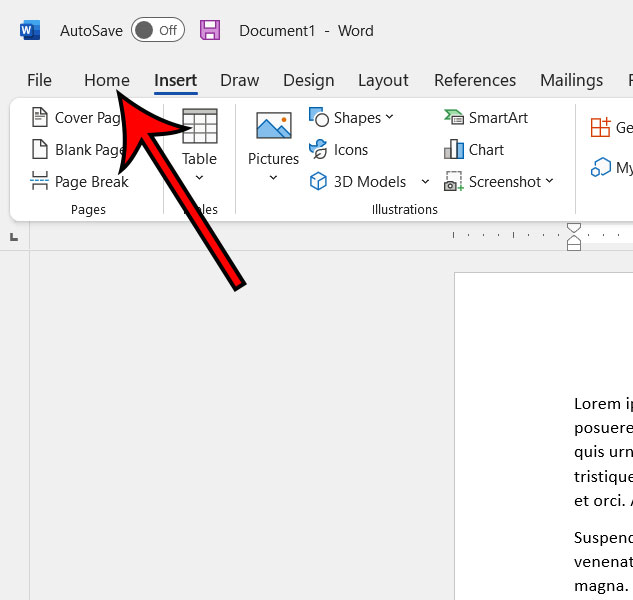
- Click the Home tab.
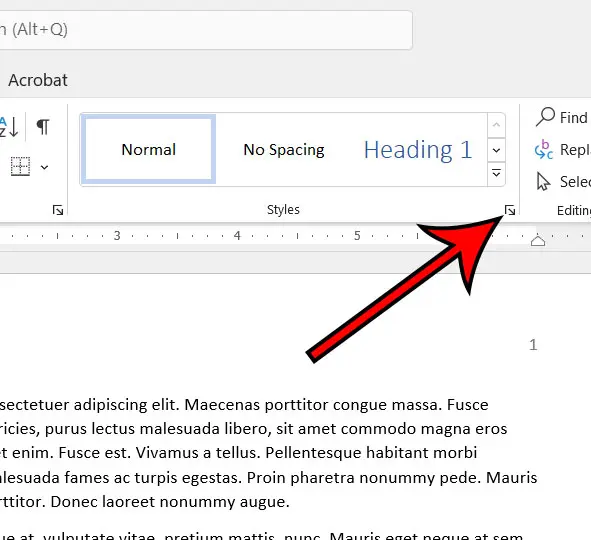
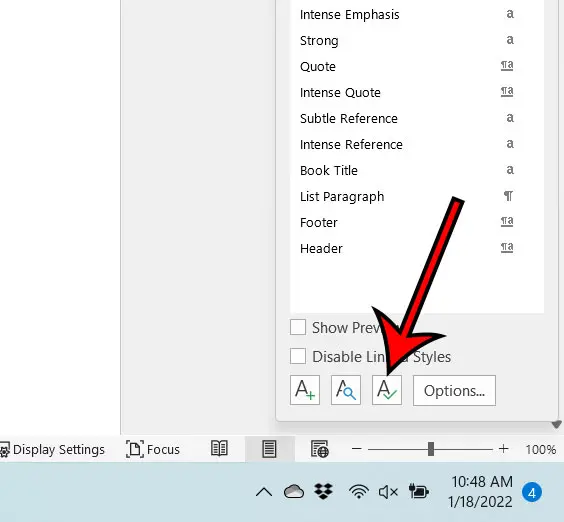
- Click the Manage Styles button in the Styles window.
- Choose Page Number from the list.
- Click Modify.
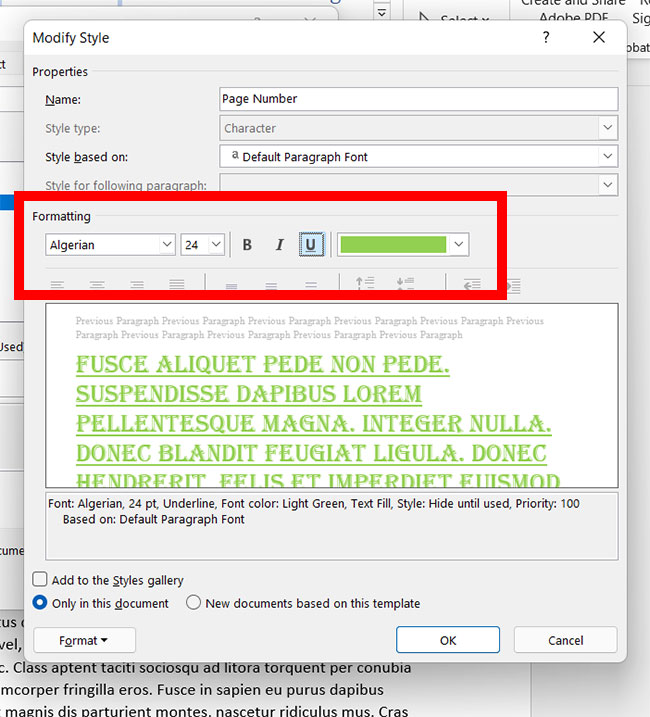
- Change the font.
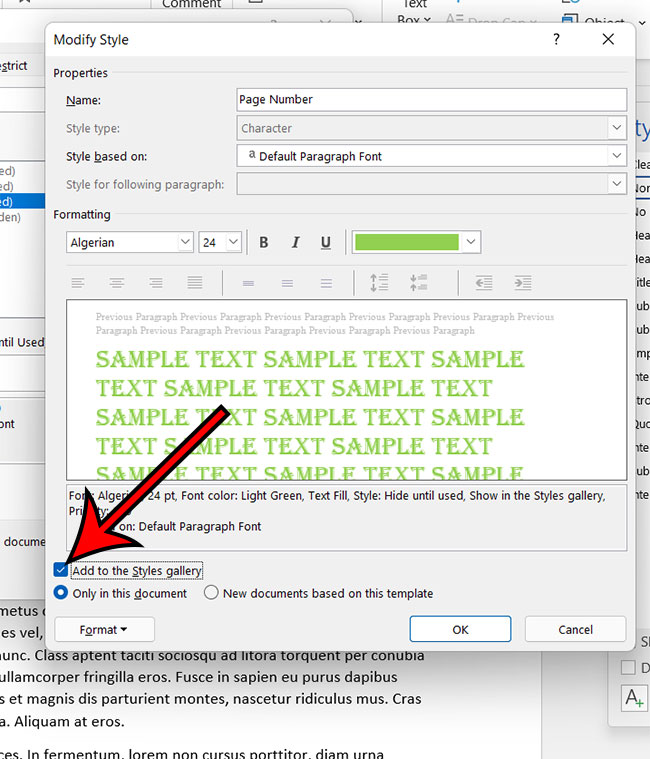
- Check the Add to Styles gallery box, then click OK.
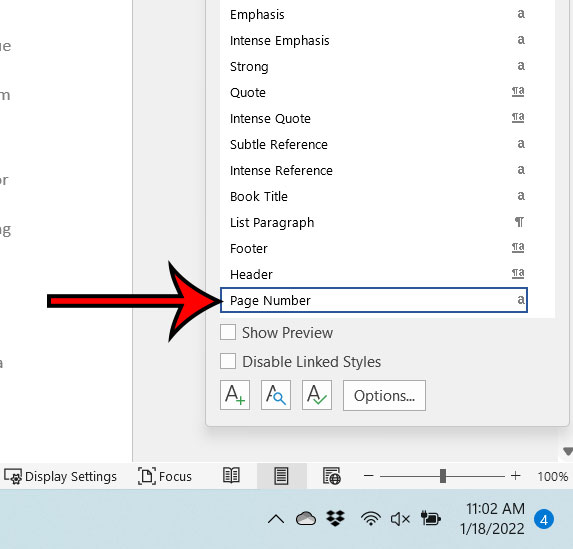
- Select the page number in your document, then click the Page Number style.
Our article continues below with additional information on changing the font of page numbers in Microsoft Word, including pictures of these steps.
Last update on 2023-04-13 / Affiliate links / Images from Amazon Product Advertising API
| As an Amazon Associate, I earn from qualifying purchases.
If you have ever wondered how to change the formatting of your spreadsheet data, then our convert text to number Excel method may be what you’re looking for.
Formatting Page Numbers in Word (Guide with Pictures)
The steps in this article were performed in Microsoft Word for Office 365 but will work in most other versions of Word as well.
Step 1: Open the document containing the page numbers that you want to modify.
Step 2: Choose the Home tab at the top of the window.
Step 3: Click the Styles button at the bottom-right corner of the Styles group in the ribbon.
It’s a small button and it looks like a square with a diagonal arrow facing the bottom-right corner.
Step 4: Click the Manage Styles button at the bottom of the Styles window.
It’s the button that looks like a capital A with a checkmark on it.
Step 5: Select the Page Number option from the list.
You may need to change the sort order to “Alphabetical” to find it more easily.
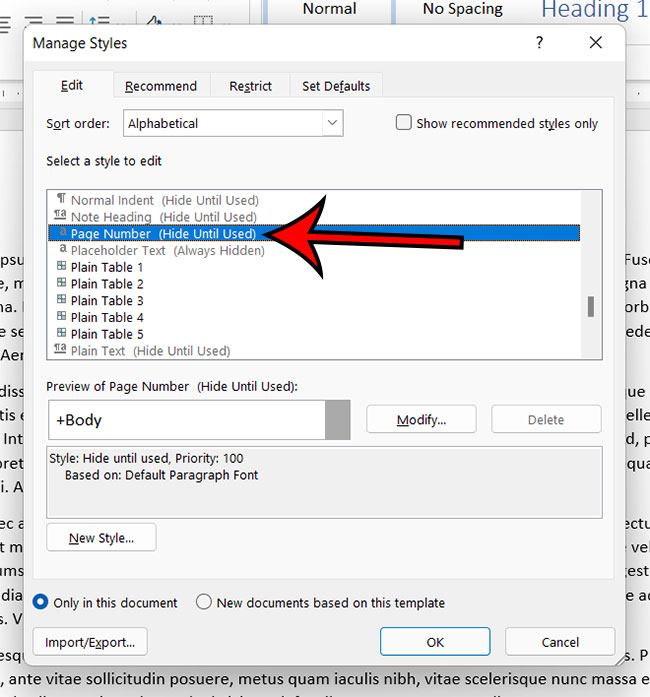
Step 6: Click the Modify button at the center of the window, to the right of the Page Number preview.
Step 7: Change the font in the Formatting section of the Modify Style window.
Noe that you can also change the font size and color, as well as apply bold, italics, or underline to the style.
Step 8: Check the Add to the Styles gallery box at the bottom-left corner of the window, then click the OK button.
If you want to keep this style available for future documents that use the Normal template, then choose the New documents based on this template option.
Step 9: Select a page number in your document (or insert one, if you haven’t yet) then click the Page Number option from the Styles window.
You can continue below for additional discussion on using styles to format page numbers in a Microsoft Word document.
More Information on How to Change the Font of Page Numbers with Styles in Word
While we have focused primarily on the page number style in the article above as a way to adjust the appearance of your page numbers, you can also format your page numbers the same way that you format most other text in the document.
You can do this by selecting the page numbers in the header or footer, clicking the Home tab, then using the options in the Font section to change the appearance o the page numbers.
This allows you to do things like change the font size of the page numbers, or to change the color of the page numbers in your Word document.
When you are modifying the page number style in Microsoft Word you have the option of saving that style to the current template. If you aren’t using a custom template then you are likely in the “Normal” template. If you elect to save the style to the current template then you will have access to it for future documents so that you can use the page number style that you just modified.
If you added your page numbers from the Insert menu you can go back to that location, click the Page Numbers drop down menu, then select Format Page Numbers. Here you can do things like change the number format, include chapter numbers, and adjust how the page numbering progresses throughout the document. You can also remove page numbers from that Page Numbers dropdown menu as well.
Another way to open the Styles menu is to press Ctrl + Alt + Shift + S on your keyboard. This keyboard shortcut for the Styles menu can be handy if you find yourself changing styles on a regular basis.
Conclusion
The steps above discuss modifying the page style that is associated with the page numbers in your document. Working with styles is an effective way to keep certain elements in your document using the same styling so that everything looks uniform as you create your document.
While the process of creating the page number style can be a little longer the first time you do it, it’s actually pretty quick if you elect to save the style to your document template. You simply need to select the page number in the future then click on the Page Number style in the Styles section of the Home tab.
So if you aren’t able to format your page numbers the same way that you format document text, then the style method in this article can be a good solution.
Additional Sources

Matthew Burleigh has been writing tech tutorials since 2008. His writing has appeared on dozens of different websites and been read over 50 million times.
After receiving his Bachelor’s and Master’s degrees in Computer Science he spent several years working in IT management for small businesses. However, he now works full time writing content online and creating websites.
His main writing topics include iPhones, Microsoft Office, Google Apps, Android, and Photoshop, but he has also written about many other tech topics as well.
Read his full bio here.
Double strike or Blackboard bold is a typeface style that is often used for certain
symbols in mathematical texts, in which certain lines of the symbol (usually vertical or
near-vertical lines) are doubled. The symbols usually denote number sets (see some of usual
symbols below).
To type the symbols in Double strike or Blackboard bold in the equation Microsoft Word
(to insert equation into your text, click Alt+=), do one of the following:
- Under Equation Tools, on the Design tab, in the Symbols group,
click the More button:
In the top of list of symbols choose Scripts:

In the Scripts list, in the Double-Struck group, choose the symbol you
prefer:


- Type double + capital or lowercase letter:
Capital letters in the Double strike or Blackboard bold:
| Symbol | Code | Description |
|---|---|---|
| doubleA | Represents the algebraic numbers or affine space in algebraic geometry. Occasionally represents the algebraic numbers, the algebraic closure of ℚ (more commonly written integers, an important subring of the algebraic numbers. |
|
| doubleB | Sometimes represents a ball, a Boolean domain, or the Brauer group of a field. | |
| doubleC | Represents the set of complex numbers. | |
| doubleD | Represents the unit (open) disk in the complex plane (and by generalisation 𝔻n may mean the n-dimensional ball) — for example as a model of the Hyperbolic plane. Occasionally 𝔻 may mean the decimal fractions (see number) or split-complex numbers. |
|
| doubleE | Represents the expected value of a random variable, or Euclidean space, or a field in a tower of fields, or the Eudoxus reals. |
|
| doubleF | Represents a field. Often used for finite fields, with a subscript to indicate the order. Also represents a Hirzebruch surface or a free group, with a subset to indicate the number of generators (or generating set, if infinite). |
|
| doubleG | Represents a Grassmannian or a group, especially an algebraic group. | |
| doubleH | Represents the quaternions (the H stands for Hamilton), or the upper half-plane, or hyperbolic space, or hyperhomology of a complex. |
|
| doubleI | The closed unit interval or the ideal of polynomials vanishing on a subset. Occasionally the identity mapping on an algebraic structure, or an indicator function, or the set of imaginary numbers (i.e., the set of all real multiples of the imaginary unit, more commonly indicated i ℝ). |
|
| doubleJ | Occasionally represents the set of irrational numbers, RQ (ℝℚ). | |
| doubleK | Represents a field, typically a scalar field. This is derived from the German word Körper, which is German for field (literally, «body»; cf. the French term corps). May also be used to denote a compact space. |
|
| doubleL | Represents the Lefschetz motive. | |
| doubleM | Sometimes represents the monster group. The set of all m-by-n matrices is sometimes denoted 𝕄(m, n). |
|
| doubleN | Blackboard bold capital N (for natural numbers set). | |
| doubleO | Represents the octonions. | |
| doubleP | Represents projective space, the probability of an event, the prime numbers, a power set, the irrational numbers, or a forcing poset. |
|
| doubleQ | Blackboard bold capital Q (for rational numbers set). | |
| doubleR | Represents the set of real numbers. ℝ>0 represents the positive reals, while ℝ≥0 represents the non-negative real numbers. |
|
| doubleS | Represents a sphere, or the sphere spectrum, or occasionally the sedenions. | |
| doubleT | Represents the circle group, particularly the unit circle in the complex plane (and 𝕋n the n-dimensional torus), or a Hecke algebra (Hecke denoted his operators as Tn or 𝕋ℕ), or the tropical semi-ring, or twistor space. |
|
| doubleU | ||
| doubleV | Represents a vector space or an affine variety generated by a set of polynomials. | |
| doubleW | Occasionally represents the set of whole numbers (here in the sense of non-negative integers), which also are represented by ℕ0. |
|
| doubleX | Occasionally used to denote an arbitrary metric space. | |
| doubleY | ||
| doubleZ | Represents the set of integers. |
Some lowercase letters in the Double strike or Blackboard bold:
| Symbol | Code | Description |
|---|---|---|
| doublea | ||
| doubleb | ||
| doublec | ||
| doubled | May represent the differential symbol. | |
| doublee | Occasionally used for the mathematical constant e. | |
| doublef | ||
| doubleg | ||
| doubleh | ||
| doublei | Occasionally used for the imaginary unit. | |
| doublej |
See also this tip in French:
Comment insérer rapidement des symboles double barre ou blackboard gras dans l’équation Word.
Please, disable AdBlock and reload the page to continue
Today, 30% of our visitors use Ad-Block to block ads.We understand your pain with ads, but without ads, we won’t be able to provide you with free content soon. If you need our content for work or study, please support our efforts and disable AdBlock for our site. As you will see, we have a lot of helpful information to share.
Hi all, this has been giving me a lot of trouble, and it’s been a bit confusing. Tried searching online but nothing directly related, or nothing worked for me. Basically, all I’d like to do is have my list styled in this method:
1. Item 1 bold
a) sub item 1 regular
2. Item 2 bold
a) sub item 2 regular
I’m working on a template, so I’d like the user to be able to have this already set up once they start a numbered list.
But no matter what I try, the sub item/second level of the list is always bold. I’ve tried playing with «Styles», «Define new multilevel list»…everything, but I can’t seem to get it to do this. I’m also very confused as how these different settings talk/overwrite each other. It seems like there are 3 different ways to do the same thing, but not sure which takes precedent and why there are these many ways to do the same thing.
Any help, or direction would be appreciated. Even you can walk me through this as if it’s a blank slate. I might have broken something along the way, so I don’t mind starting over again.
Thanks!

Changing the type of numbers used in a numbered list is easy, but what if you want to change the formatting on just the numbers–say, make the numbers bold, but not the text? It’s not obvious how to do that, but it can be done.
RELATED: How to Change the Type of Numbers Used in a Numbered List in Word
This trick works on both numbered and bulleted lists.
The formatting for a number in a numbered list is contained in the paragraph mark at the end of that item. So, before you change the formatting of the numbers on a numbered list, you need to show the paragraph marks in your document. Click the “Home” tab and then click the “Show/Hide ¶” button in the Paragraph section.

To change the formatting for one number in the list, select only the paragraph mark at the end of that item.
Then, you can apply formatting to that paragraph mark, and the number.
For example, we made the number on the first item red and bold in our example.
If you want to change the formatting for more than one number, but not all of them, hold down the Ctrl key while you select the paragraph marks for the numbers you want to change. Then, apply the desired formatting.
If you want to change the formatting for all the numbers in the list, put the cursor directly over one of the numbers in the list and click. All the numbers in the list are selected. Apply the formatting as usual.
When you apply formatting to the items in the list, that formatting is also applied to the numbers. But, the formatting you applied only to the numbers is also kept. For example, if we select the items in the list in the our example and apply italics, the text of the items will be italic, but the numbers will now be red, bold, and italic. If you remove formatting applied to the items in the list, the formatting you applied to just the numbers remains.
To remove the formatting specific to the numbers, follow these steps again to select one of the numbers or multiple numbers and turn off the formatting.
READ NEXT
- › How to Make a PowerPoint Presentation From an Outline
- › BLUETTI Slashed Hundreds off Its Best Power Stations for Easter Sale
- › Google Chrome Is Getting Faster
- › How to Adjust and Change Discord Fonts
- › The New NVIDIA GeForce RTX 4070 Is Like an RTX 3080 for $599
- › Expand Your Tech Career Skills With Courses From Udemy
- › This New Google TV Streaming Device Costs Just $20
How-To Geek is where you turn when you want experts to explain technology. Since we launched in 2006, our articles have been read billions of times. Want to know more?

Image Source
How to Change Font of Line Numbers in Word – A Complete Guide
Line numbers can be very handy in a document. They help you navigate quickly through the text and smoothen the flow of a presentation. Usually, line numbers come with preset font settings. In some cases, these default settings may not go with the font of the rest of your document text.
This article will teach you how to change font of line numbers in Word. But first, here is a little information about the software in question.
What is Microsoft Word?
Microsoft Word is a classic word processing software, developed and owned by the company Microsoft. The first version of Word was called “Multi-Tool Word” and was launched in the year 1983 for Xenix systems. Since then, the software has undergone multiple upgrades and now runs on many platforms including Windows, Android, MacOS and iOS.
Apart from functioning as a writing tool, Word offers multiple features to users. These include – a thesaurus, a dictionary, a built-in spell checker and many utilities for the editing and manipulation of text. Word also offers predesigned templates (which include features like Heading, Text Font, Paragraph, Page numbering, etc.). Users can choose to design their own custom templates and save the file for future use.
Images in common bitmap format (like GIF and JPG) can also be imported to Word for display. Users can design simple line-art using some of Word’s drawing tools. There also many images to choose in the ClipArt gallery of Microsoft Word.
The focus of this article is on how to change font of line numbers in Word. Before beginning, it is important to understand what line numbers are.
What are Line Numbers?
Microsoft Word allows users to insert line numbers into a document. The purpose of line numbers is to number each line of the document in order. This makes navigation through the document much easier. It also helps in preparing notes and pointers as you can easily recall a line number, instead of scrolling the entire document looking for it.
The font of line numbers is similar to any other text in the document. It has its own style. But changing the font of line numbers is not as simple as changing the style of your main document text. No worries, you will discover how to alter the style of line numbers later in this article.
Before you learn how to change font of line numbers, you should learn how to add line numbers in the first place.
How to Add Line Numbers?
To add line numbers to your document, follow the following instructions –
- Drag your mouse cursor over to the “Page Layout” tab on the Ribbon (second bar from top of the screen) and click on it.
- Find and click on the “Line Numbers” option on the Commands Toolbar under the “Page Layout” tab.
- A drop-down menu will appear. It contains many options like None, Continuous, Restart Each Page and more. Choose as per your requirement. For example, if you click on the “Restart Each Page” option then the first line of each page will begin at “1”.
- You can also click on the “Line Numbering Options” button at the bottom of the menu. This will open the “Page Setup” dialogue box.
- Now click on the “Line Numbers” button, which will open the “Line Numbers” dialogue box.
- You can set your line numbering configurations by checking “Add line numbering” box.
- Once you are done, click on the “OK” button at the bottom of the box.
These steps will add line numbers to your document. In the next section, you will learn how to change font of line numbers in Word.
How to Change Font of Line Numbers in Word?

Image Source – Unsplash
You will notice that the font or style of the line numbers is the same as the default paragraph font style. The thing is, even if you change the text font of your document, the font of the line numbers remains unchanged.
There is no direct method of changing the styles of the line numbers. But you can try changing the style through some alterations. In this section, you will discover some ways to do so.
Method 1 – Modify the Line Number Font
Follow the steps mentioned below –
- Open the “Styles” window on your Word document. To do this, simply press “Alt + Ctrl + Shift + S”. This will open the “Styles” window. Or, drag your mouse cursor over to the “Home” tab on the Ribbon and click on it. A drop-down menu will appear. Find and click on the “Styles” option. This will also open the “Styles” window.
- Look for the option “Line Number” style. When you find it, right click on it and a menu box will appear beside it.
- In the “Line Number” style menu box, look for the “Modify” option. Once you get it, click on it. This will open the “Modify Style” box.
- In the “Modify Style” box you will see many options like – Properties, Name, Style Type, Style Based On, etc. Look for the heading “Formatting”.
- Under “Formatting” you will notice a couple of options to alter and style your font. These include – Font Type, Font Size, “Bold”, “Italics”, “Underline” and Font Color. Set the formatting for the font of your line numbers. Once you are done, click on the “OK” button at the bottom of the “Formatting” window.
- Now look at the line numbers on the left margin of your document. You will notice that the new font changes have taken affect.
Method 2 – Change the Normal Style to Alter the Font of Line Numbers
As previously discussed, the line numbers share the same font as the default paragraph style. If you truly want to format the style of line numbers to go with the font of the rest of your document, then skip the Ribbon. In Word, the Ribbon is a user interface element which contains tabs like Home, Page Layout, References and more. To change the font of your line numbers, you should not alter text font through the Ribbon options.
Instead, you must opt for modifying the “Normal” style. You will also find the option to change line number style in the “Modify Style” box. Follow these steps –
- Use the same shortcut used in Method 1 (“Alt + Ctrl + Shift + S”). Go to the “Styles” window.
- Find the option “Normal” style and right click on it.
- Look for the “Modify” option. Once you get it, click on it. This will open the “Modify Style” box.
- In the “Modify Style” box you will see many options. Look for the heading “Formatting”.
- Under “Formatting” you will notice a couple of options to alter and style your font. Set the formatting for the font of your line numbers. Once you are done, click on the “OK” button at the bottom of the “Formatting” window.
- Now look at the line numbers on the left margin of your document. You will notice that the new font changes have taken affect.
This method has a limitation. It changes the color of the line numbers to match the color of the document text. But, the font type and the font size of the line numbers remain the same.
Method 3 – Run Word Macro for Changing Line Number Font
If you are still looking for more ways to change the font of line numbers, here is another one. This step is a little more complicated than the previous two methods. Simply, follow these steps –
- To begin, you must trigger the VBA (Visual Basic) editor on your Word document. Press “Alt + F11” to open the VBA Window.
- Then click on the “Normal” project in the “Select” window.
- Drag your mouse cursor over the “Insert” tab on the Ribbon and click on it. A drop-down menu will appear. Find and click on the “Module” option.
- To open the new module, simply double-click on it.
- You must paste the macro (mentioned below) in there:
MACRO:
Sub AlterLineNumberStyle()
Dim objDoc As Document
Set objDoc = ActiveDocument
With objDoc.Styles(“Line Number”).Font
.Name = “Arial”
.Size = 12
.ColorIndex = wdBlue
End With
End Sub
- Notice the Font specifications mentioned under “With objDoc.Styles(“Line Number”).Font” in the macro above. You can alter the font of line numbers as per your requirement. For example, in the macro mentioned above, the font specifications are –
Font Type – Arial
Font Size – 12
Font Color – Blue
- So, the font of the line numbers would be: Size 12 Arial in blue color.
- After pasting the macro, click on the “Run” button on the Commands Toolbar. The symbol for “Run” is a small play button.
Notice how the font of the line numbers changes in the main document. You can alter the line numbers style by changing the constants in the VBA macro.
Hope you now know how to change font of line numbers in Word. The methods mentioned above are the simplest and most effective ways to alter the style of line numbers as per your need for aesthetics or functionality.