
You can change the look of a line shape by changing its color, line style, or weight. If you are using Excel, Outlook, Word, or PowerPoint, you can apply a predefined Quick Style to quickly change the look of your line.
Note: These features are available only in the desktop versions of the programs listed above.
What do you want to do?
-
Add a Quick Style to a line
-
Change the color of a line
-
Make a line dotted or dashed
-
Change the weight of a line
-
Work with lines in Project
-
Format cell borders in Excel
Add a Quick Style to a line
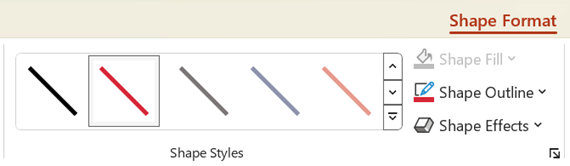
Quick Styles for lines include theme colors from the document theme, shadows, line styles, gradients, and three-dimensional (3-D) perspectives. When you position your pointer over a Quick Style thumbnail, you can see how the style affects your line. Try different Quick Styles until you find one that you like.
-
Select the line you want to change.
If you want to change multiple lines, select the first line, and then press and hold Ctrl while you select the other lines.
-
On the Format tab, click the Quick Style you want.

To see more Quick Styles, click the More button
.Note: If you don’t see the Format tab, make sure you’ve selected the line.
 .
.Top of Page
Change the color of a line
-
Select the line that you want to change.
If you want to change multiple lines, select the first line, and then press and hold CTRL while you select the other lines.
-
On the Format tab, click the arrow next to Shape Outline, and then click the color that you want.
Note: If you don’t see the Format tab, make sure you’ve selected the line.
To use a color that isn’t a theme color, click More Outline Colors, and then click the color you want on the Standard tab, or mix your own color on the Custom tab. Custom colors and colors on the Standard tab are not updated if you later change the document theme.

Top of Page
Make a line dotted or dashed
-
Select the line you want to change.
If you want to change multiple lines, select the first line, and then press and hold CTRL while you select the other lines.
-
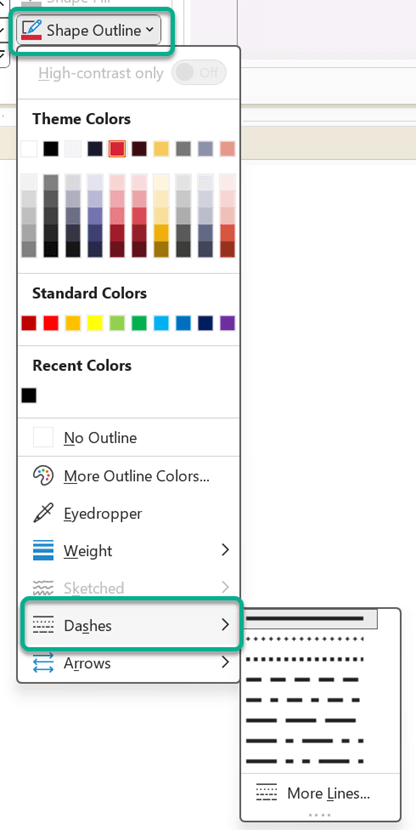
On the Format tab, click the arrow next to Shape Outline.
Note: If you don’t see the Format tab, make sure you’ve selected the line.
-
Point to Dashes, and then click the style you want.
To create a custom style, click More Lines, and then choose the options that you want.
Top of Page
Change the weight of a line
-
Select the line that you want to change.
If you want to change multiple lines, select the first line, and then press and hold Ctrl while you select the other lines.
-
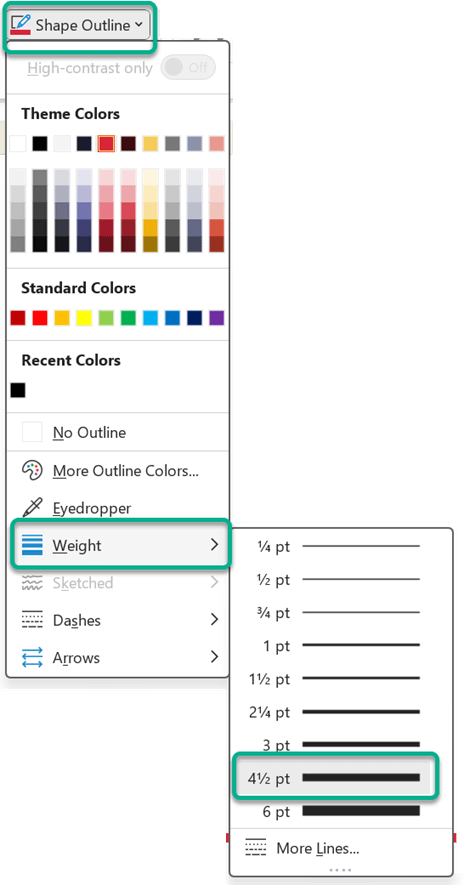
On the Format tab, click the arrow next to Shape Outline.
Note: If you don’t see the Format tab, make sure you’ve selected the line.
-
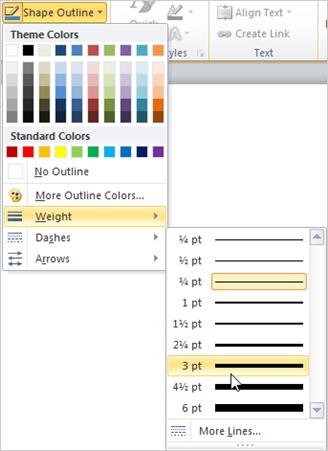
Point to Weight, and then click the line weight that you want.
To create a custom line weight, click More Lines, and then choose the options that you want.
Note: To draw a double line, draw a single line, copy and paste a second line next to it, and then group the two lines.
Top of Page
Format cell borders in Excel
If you want to apply line styles and colors to borders in Excel spreadsheets or tables, see the following articles:
-
Apply or remove cell borders
-
Create and apply a border cell style
-
Show or hide gridlines on a worksheet
Top of Page
Work with lines in Project
You need to have a Gantt chart open to follow these steps.
-
Right-click the line you want to change and click Properties.
-
Under Line, choose a color from the Color list and a line thickness from the Line list.
Top of Page
See Also
Draw or delete a line or connector
Format the bar chart of a Gantt Chart view in Project
Important:
Office 2010 is no longer supported. Upgrade to Microsoft 365 to work anywhere from any device and continue to receive support.
Upgrade now
What do you want to do?
-
Add a Quick Style to a line
-
Change the color of a line
-
Make a line dotted or dashed
-
Change the weight of a line
Add a Quick Style to a line
Quick Styles for lines include theme colors from the document theme, shadows, line styles, gradients, and three-dimensional (3-D) perspectives. Try different Quick Styles until you find one that you like. With live preview, when you position your pointer over a Quick Style thumbnail, you can see how the Quick Style affects your line.
-
Select the line that you want to change.
If you want to change multiple lines, select the first line, and then press and hold CTRL while you select the other lines.
-
Under Drawing Tools, on the Format tab, in the Shape Styles group, click the Quick Style that you want.
To see more Quick Styles, click the More button
.
Example of the Shape Styles group on the Format tabIf you do not see the Drawing Tools or Format tabs, make sure that you have selected the line. You might have to double-click the line to open the Format tab.

Top of Page
Change the color of a line
-
Select the line that you want to change.
If you want to change multiple lines, select the first line, and then press and hold CTRL while you select the other lines.
-
Under Drawing Tools, on the Format tab, in the Shape Styles group, click the arrow next to Shape Outline, and then click the color that you want.
Example of the Shape Styles group on the Format tab.If you do not see the Drawing Tools or Format tabs, make sure that you have selected the line. You might have to double-click the line to open the Format tab.
To change to a color that is not in the theme colors, click More Outline Colors, and then either click the color that you want on the Standard tab, or mix your own color on the Custom tab. Custom colors and colors on the Standard tab are not updated if you later change the document theme.
Top of Page
Make a line dotted or dashed
-
Select the line that you want to change.
If you want to change multiple lines, select the first line, and then press and hold CTRL while you select the other lines.
-
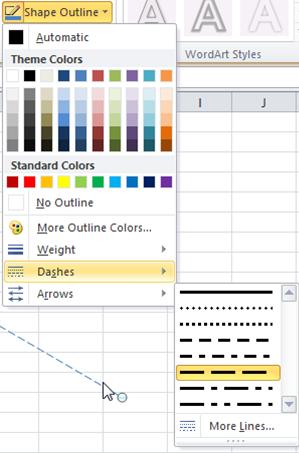
Under Drawing Tools, on the Format tab, in the Shape Styles group, click the arrow next to Shape Outline.
If you do not see the Drawing Tools or Format tabs, double-click the line to make sure that you selected it.
-
Point to Dashes, and then click the line style that you want.
To create a custom style, click More Lines, and then choose the options that you want.
Top of Page
Change the weight of a line
-
Select the line that you want to change.
If you want to change multiple lines, select the first line, and then press and hold CTRL while you select the other lines.
-
Under Drawing Tools, on the Format tab, in the Shape Styles group, click the arrow next to Shape Outline.
If you do not see the Drawing Tools or Format tabs, double-click the line to make sure that you selected it.
-
Point to Weight, and then click the line weight that you want.
To create a custom line weight, click More Lines, and then choose the options that you want.
Note: To draw a double line, draw a single line, copy and paste a second line next to it, and then group the two lines.
Top of Page
See Also
Draw or delete a line or connector
What do you want to do?
-
Add a Quick Style to a line
-
Change the color of a line
-
Make a line dotted or dashed
-
Change the weight of a line
-
Work with lines in Publisher
Add a Quick Style to a line
Important: Quick Styles are available only in these 2007 Microsoft Office system programs: Excel, Outlook, Word, and PowerPoint.
Quick Styles for lines include theme colors from the document theme, shadows, line styles, gradients, and three-dimensional (3-D) perspectives. Try different Quick Styles until you find one that you like. When you place your pointer over a Quick Style thumbnail, you can see how the Quick Style affects your line.
-
Select the line that you want to change.
If you want to change multiple lines, select the first line, and then press and hold CTRL while you select the other lines. For more information about selecting lines, see Select a shape or other object.
-
Under Drawing Tools, on the Format tab, in the Shape Styles group, click the Quick Style that you want.
To see more Quick Styles, click the More button
.If you do not see the Drawing Tools or Format tabs, double-click the line to make sure that you selected it.
Top of Page
Change the color of a line
-
Select the line that you want to change.
If you want to change multiple lines, select the first line, and then press and hold CTRL while you select the other lines. For more information about selecting lines, see Select a shape or other object.
-
Under Drawing Tools, on the Format tab, in the Shape Styles group, click the arrow next to Shape Outline, and then click the color that you want.
If you do not see the Drawing Tools or Format tabs, double-click the line to make sure that you selected it.
To change to a color that isn’t in the theme colors, click More Outline Colors, and then either click the color that you want on the Standard tab, or mix your own color on the Custom tab. Custom colors and colors on the Standard tab are not updated if you later change the document theme.
Make a line dotted or dashed
In Excel, Outlook, PowerPoint, and Word
-
Select the line that you want to change.
If you want to change multiple lines, select the first line, and then press and hold CTRL while you select the other lines. For more information about selecting lines, see Select a shape or other object.
-
Under Drawing Tools, on the Format tab, in the Shape Styles group, click the arrow next to Shape Outline.
If you do not see the Drawing Tools or Format tabs, double click the line to make sure that you selected it.
-
Point to Dashes, and then click the line style that you want.
To create a custom style, click More Lines, and then choose the options that you want.
Change the weight of a line
In Excel, Outlook, PowerPoint, and Word
-
Select the line that you want to change.
If you want to change multiple lines, select the first line, and then press and hold CTRL while you select the other lines. For more information about selecting lines, see Select a shape or other object.
-
Under Drawing Tools, on the Format tab, in the Shape Styles group, click the arrow next to Shape Outline.
If you do not see the Drawing Tools or Format tabs, double click the line to make sure that you selected it.
-
Point to Weight, and then click the line weight that you want.
To create a custom line weight, click More Lines, and then choose the options that you want.
Top of Page
Work with lines in Publisher
-
Select the line that you want to change.
If you want to change multiple lines, select the first line, and then press and hold CTRL while you select the other lines.
-
On the Drawing toolbar, click Dash Style
, Line/Border Style , or the arrow next to Line Color , and then click the style that you want.To change to a color that is not displayed, click More Outline Colors, and then either click the color that you want on the Standard tab, or mix your own color on the Custom tab.
To create a custom weight, click More Lines, and then choose the options that you want.
 , Line/Border Style
  , or the arrow next to Line Color
  , and then click the style that you want.
Top of Page
See Also
Draw or delete a line or connector
Line Highlighting
- To highlight a single line, move your cursor to the start of the line you want to highlight.
- Hold down a Shift key on your keyboard.
- With the Shift key held down, press the End key on your keyboard.
- A single line is highlighted.
Contents
- 1 How do you highlight a whole line?
- 2 How do I color a line in Word?
- 3 How do you highlight a horizontal line in Word?
- 4 How do you highlight an entire line in Word without text?
- 5 How do you highlight multiple lines of text in Word?
- 6 How do I create a border line in Word?
- 7 How do I bold a line in Word?
- 8 How do I change the color of a line in a Word table?
- 9 What is the shortcut key for highlighting text?
- 10 How do I highlight an entire document using the keyboard?
- 11 What are the 4 alignment options?
- 12 How do I select a line shape in Word?
- 13 How do I selectively copy text?
- 14 How do I bold an underline in Word?
- 15 How do I fill a border with color in Word?
- 16 How do I change the color of the bottom border in Word?
- 17 How do I change the color of an outline in paint?
- 18 How do you highlight text that Cannot be highlighted?
- 19 What are the 20 shortcut keys?
- 20 Is there a keyboard shortcut for highlighting Mac?
How do you highlight a whole line?
If you want to highlight a whole line of text, move your cursor to the start of the line, hold the Shift key, and then press the Down arrow . You may also use the shortcut key combination Shift + End . If you want to highlight all text (the entire page), press the shortcut key Ctrl + A .
How do I color a line in Word?
Change the color of a line
- Select the line that you want to change. If you want to change multiple lines, select the first line, and then press and hold CTRL while you select the other lines.
- On the Format tab, click the arrow next to Shape Outline, and then click the color that you want.
How do you highlight a horizontal line in Word?
Select a Horizontal Line
To do this, click the arrow on the Borders button, select “Borders and Shading” and then click the “Horizontal Line” button.
How do you highlight an entire line in Word without text?
Press and hold the SHIFT and RIGHT ARROW keys. Let go of the keys once you reach the end of the line. You’ll notice that MS Word highlights the line by passing through each character. Alternatively, you can press and hold the SHIFT + CTRL + RIGHT ARROW keys, so the highlighting goes through each word instead.
How do you highlight multiple lines of text in Word?
More Information
- Select the first item that you want. For example, select some text.
- Press and hold CTRL.
- Select the next item that you want. Important Be sure to press and hold CTRL while you select the next item that you want to include in the selection.
How do I create a border line in Word?
Inserting a line using the Borders and Shading dialog box
- Select the paragraph(s) to which you want to add a line.
- Click the Home tab in the Ribbon.
- Click Borders in the Paragraph group.
- Select Borders and Shading.
- Select a border style, color and width.
How do I bold a line in Word?
Step 1: Go to the Word document where you want to add a bold line. Step 2: Press the “Enter key” to make a space between text and line. Step 3: Press and hold the Shift and dash (“-“) keys. Once the line is drawn on the page, press “Enter Key.” You can see the Word automatically generate a bold line on the page.
How do I change the color of a line in a Word table?
Add or change the line color
- Click the table or select the cells where you want to add or change borders.
- On the Tables tab, under Draw Borders, click the arrow next to Line Color. , and then click the line color that you want.
- On the Tables tab, under Draw Borders, click the arrow next to Borders.
What is the shortcut key for highlighting text?
Adding highlighting: Select the text you want to highlight, then press Ctrl+Alt+H. Removing highlighting: Select the highlighted text, then press Ctrl+Alt+H.
How do I highlight an entire document using the keyboard?
Note: To select an entire document, press CTRL+A. Press SHIFT+RIGHT ARROW. Press SHIFT+LEFT ARROW. Place the insertion point at the beginning of the word, and then press CTRL+SHIFT+RIGHT ARROW.
What are the 4 alignment options?
There are four main alignments: left, right, center, and justified. Left-aligned text is text that is aligned with a left edge. Right-aligned text is text that is aligned with a right edge.
How do I select a line shape in Word?
Tips for selecting shapes and objects
- To select one object, click or tap the object.
- To select multiple shapes in a group, press and hold Shift or Ctrl while you click or tap the shapes.
How do I selectively copy text?
How to Copy and Paste Text from Multiple Locations in Microsoft…
- Select the block of text you want to copy.
- Press Ctrl+F3.
- Repeat the two steps above for each additional block of text to copy.
- Go to the document or location where you want to paste all of the text.
- Press Ctrl+Shift+F3.
How do I bold an underline in Word?
Change the underline style and color
- Select the text that you want to underline.
- Go to Home and select Font dialog box launcher . Tip: You can also use the keyboard shortcut Ctrl+D.
- Use the Underline style drop-down list to select an underline style.
How do I fill a border with color in Word?
Change the inside (fill) color
- Select the shape or text box.
- On the Drawing Tools Format tab, click Shape Fill > More Fill Colors.
- In the Colors box, either click the color you want on the Standard tab, or mix your own color on the Custom tab.
How do I change the color of the bottom border in Word?
Click the “Box” button on the left of the “Page Border” tab’s window. Click the “Color” drop-down menu and choose a color for the border. This color will apply to any black default borders under the “Style” or “Art” drop-down menus, but you can still get more colorful.
How do I change the color of an outline in paint?
Click the eyedropper-shaped icon in the “Tools” section at the top of the Paint window. Click the color you want to replace. This will assign the color to the “Color 1” section at the top of the Paint window.
How do you highlight text that Cannot be highlighted?
Place the cursor near the text you need to copy. Then press the Windows key + Q and drag the cursor. You should see a blue box that you can now highlight the text by dragging the cursor.
What are the 20 shortcut keys?
Basic Windows keyboard shortcuts
- Ctrl+Z: Undo. No matter what program you’re running, Ctrl+Z will roll back your last action.
- Ctrl+W: Close.
- Ctrl+A: Select all.
- Alt+Tab: Switch apps.
- Alt+F4: Close apps.
- Win+D: Show or hide the desktop.
- Win+left arrow or Win+right arrow: Snap windows.
- Win+Tab: Open the Task view.
Is there a keyboard shortcut for highlighting Mac?
You can click and drag to highlight text, but it’s much faster to do so with the following keyboard shortcuts: Shift+Left or Right Arrow: Highlights previous or next character. Shift+Up or Down Arrow: Highlights previous or next line of text. Shift+Command+Up or Down Arrow: Highlights all text above or below cursor.
|
03-21-2018, 07:16 AM |
|||
|
|||
|
How to bold a whole line in Word based on a word or character on the line How to bold a whole line in Word based on a word or character on the line Hello, +—3 Dog Night
| Fantasy Girl.mp3 +—3 Dog Night
|


|
03-21-2018, 10:56 AM |
|
First, I am assuming that, in Word jargon, you mean a paragraph, rather than a line. If not, you should! For someone who has done a few of these, it becomes second nature. For the rest, it is a bit complex. First Stage — Create and use a Style In the alternative, you could create your own paragraph style. Stage 2: Replace
If everything turns bold, press undo (Ctrl+Z) and write back. You don’t have paragraphs. This is easily remedied, but one thing at a time.
|
|
03-21-2018, 11:01 AM |
|
One of the advantages of using a built-in heading style is shown in the screenshot. They show up in the Navigation Pane (and in tables of contents).
|
|
03-21-2018, 11:34 AM |
|||
|
|||
|
Thank you Charles,
|
|
03-21-2018, 12:49 PM |
|
The ^13 is for the paragraph mark when using Wild Card option. Use a different style for the second line. If I used Heading 1 for the first, I would use Heading 2 for the second. Again, these styles can be modified to look the way you want. The is a special character that means I really want to search for the next character even though it otherwise would mean something else in a wildcard search. So, you would search for: Finding and replacing characters using wildcards Wildcard use is a bit arcane. I am finally getting a slight grasp of it.
|
|
03-21-2018, 01:58 PM |
|||
|
|||
|
Charles, Thank you!
|
|
03-21-2018, 04:48 PM |
|
You are welcome.
|
Insert Lines in Microsoft Word Documents
by Avantix Learning Team | Updated October 9, 2021
Applies to: Microsoft® Word® 2010, 2013, 2016, 2019 and 365 (Windows)
You can insert a line in Word using the Ribbon or by using keyboard shortcuts. It’s best to avoid drawing lines and instead insert border lines in Microsoft Word (normally paragraph borders) so the line or lines will move as you edit the document.
In this article, we’ll focus on inserting lines using borders attached to paragraphs. In Microsoft Word, anything with a hard return after it is a paragraph. If you use border lines, you can customize the type of border, line thickness and color. You can also include paragraph border lines in styles so they will appear throughout your document. If you draw lines using Insert Shapes, you’ll have to worry about the line being inline or floating.
You can insert a line in Word in 3 ways using borders:
- Use the Borders command on the Home tab in the Ribbon
- Select and apply different types of lines using the Borders and Shading dialog box
- Insert different types of lines using keyboard shortcuts (which add lines using AutoCorrect)
Recommended article: How to Keep Text Together in Microsoft Word
Do you want to learn more about Microsoft Word? Check out our virtual classroom or live classroom Word courses >
Inserting a line using the Borders button
To insert a line in Word above and / or below a paragraph using the Borders button:
- Select the paragraph(s) to which you want to add a line.
- Click the Home tab in the Ribbon.
- Click Borders in the Paragraph group. A drop-down menu appears.
- Select the line you want to use.
Below is the Borders command in the Ribbon in Word:
![]()
Removing lines using the Borders command
To remove a border line or lines from one or more paragraphs:
- Select the paragraph(s) with the border lines you want to remove.
- Click the Home tab in the Ribbon and then click Borders. A drop-down menu appears.
- Choose No Border from the drop-down menu.
Inserting a line using the Borders and Shading dialog box
You can apply a line or custom border lines to one or more paragraphs using the Borders and Shading dialog box.
To insert a line in Word above and / or below a paragraph using the Borders and Shading dialog box:
- Select the paragraph(s) to which you want to add a line.
- Click the Home tab in the Ribbon.
- Click Borders in the Paragraph group. A drop-down menu appears.
- Select Borders and Shading. A dialog box appears.
- Select a border style, color and width.
- Click between the guides in the sample area on the right (above or below the sample).
- Click Options (if required), enter any offset amounts to control the distance between the line and the paragraph and click OK.
- In Apply to, ensure Paragraph is selected.
- Click OK.
Below is the Borders and Shading dialog box where you can add a line or lines to paragraphs:

Removing lines using the Borders and Shading dialog box
To remove lines from one or more paragraphs using the Borders and Shading dialog box:
- Select the paragraph(s) with the lines you want to remove.
- Click the Home tab in the Ribbon and click Borders. A drop-down menu appears.
- Select Borders and Shading. A dialog box appears.
- Click None in the Setting area.
- In Apply to, ensure Paragraph is selected.
- Click OK.
Inserting a line using keyboard shortcuts
You can also insert a horizontal line using keyboard shortcuts (which insert border lines as AutoCorrect entries).
Type the following characters and then press Enter or Return to insert lines:
- To insert a plain single line, type three hyphens (—).
- To insert a plain double line, type three equal signs (===).
- To insert a dotted line, type three asterisks (***).
- To insert a bold single line, type three underlines (___).
- To insert a wavy line, type three tildes (~~~).
- To insert a triple line, type three number signs or hash tags (###).
To remove these lines, select the paragraph with the line, click the Borders button on the Home tab and select No Border.
Subscribe to get more articles like this one
Did you find this article helpful? If you would like to receive new articles, join our email list.
More resources
How to Double Space in Word (4 Ways)
14 Shortcuts to Quickly Select Text in Microsoft Word
4 Ways to Insert or Type the Pound Symbol in Word (£)
How to Create a Hanging Indent or First Line Indent in Microsoft Word
How to Insert an Em or En Dash in Microsoft Word (4 Ways with Shortcuts)
Related courses
Microsoft Word: Intermediate / Advanced
Microsoft Excel: Intermediate / Advanced
Microsoft PowerPoint: Intermediate / Advanced
Microsoft Word: Long Documents Master Class
Microsoft Word: Styles, Templates and Tables of Contents
Microsoft Word: Designing Dynamic Word Documents Using Fields
VIEW MORE COURSES >
Our instructor-led courses are delivered in virtual classroom format or at our downtown Toronto location at 18 King Street East, Suite 1400, Toronto, Ontario, Canada (some in-person classroom courses may also be delivered at an alternate downtown Toronto location). Contact us at info@avantixlearning.ca if you’d like to arrange custom instructor-led virtual classroom or onsite training on a date that’s convenient for you.
Copyright 2023 Avantix® Learning
Microsoft, the Microsoft logo, Microsoft Office and related Microsoft applications and logos are registered trademarks of Microsoft Corporation in Canada, US and other countries. All other trademarks are the property of the registered owners.
Avantix Learning |18 King Street East, Suite 1400, Toronto, Ontario, Canada M5C 1C4 | Contact us at info@avantixlearning.ca
Microsoft Word has many functionalities, including inserting horizontal lines. This guide will teach you four methods to insert a horizontal line in Word.
Many people choose to work with Microsoft Word for its extensive features and the ability to customize their documents. With tools such as inserting a line in Word, you can easily create separate sections, add visual interest to your page, and add that extra professional touch to win over your readers.
In this article, you will learn how to insert a line in Word and change how your lines look in all versions of Word.
To insert a line into a Word document using the built-in Horizontal Line tool:
- Place the cursor where you want to insert a line.
- Go to the Home tab.
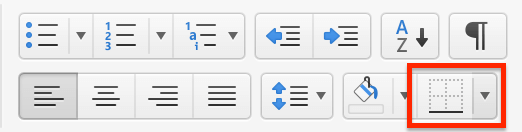
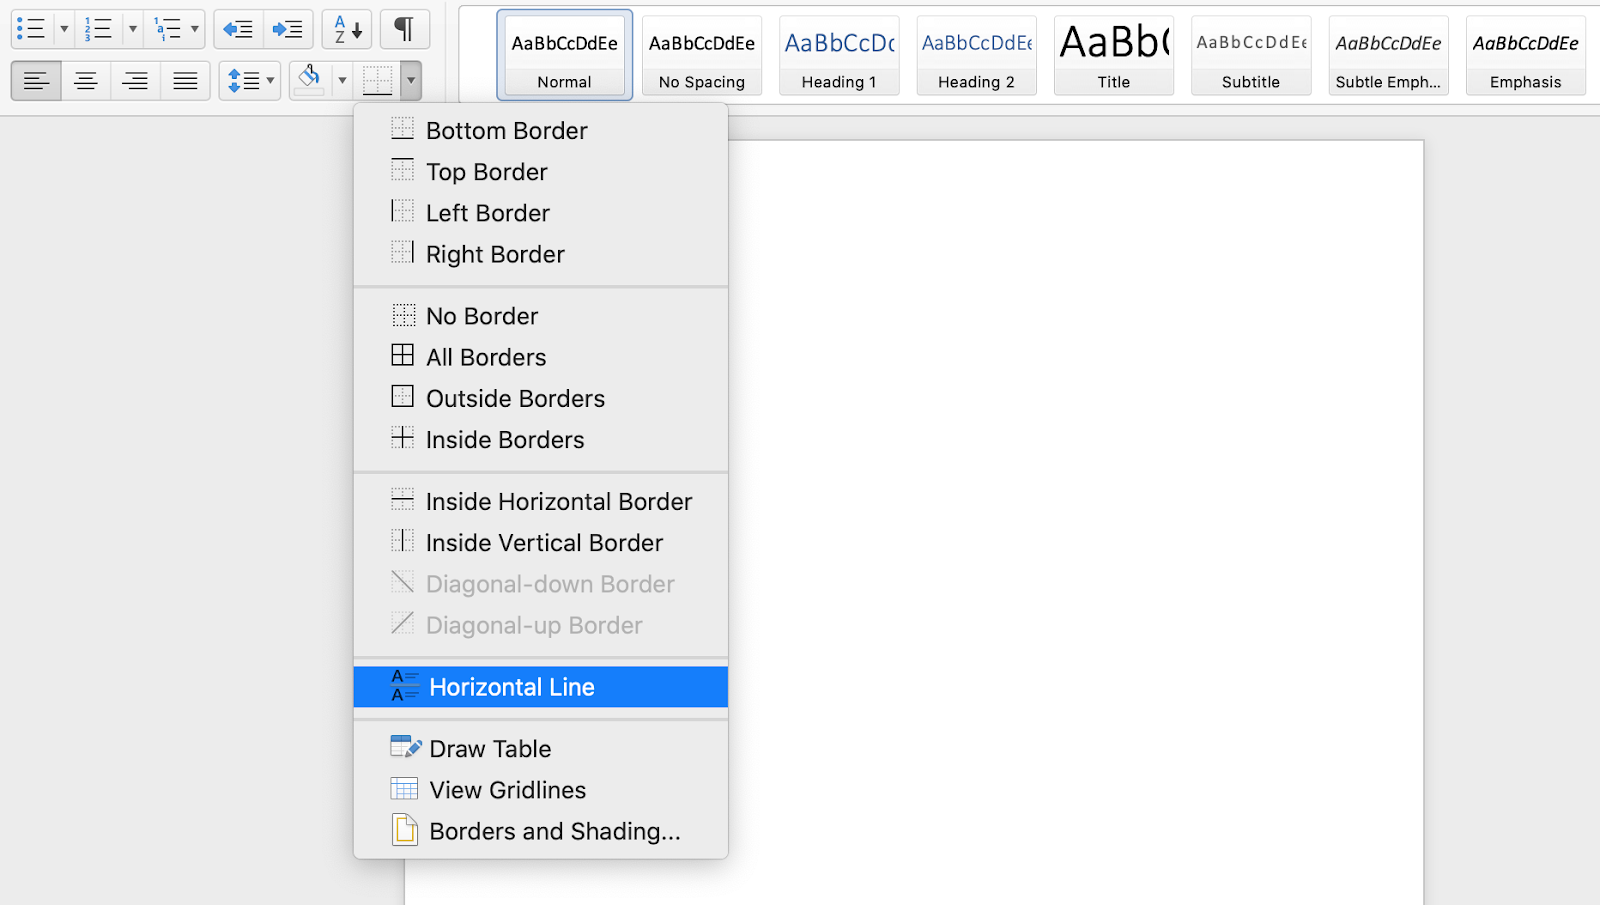
- In the Paragraph group, select the Borders drop-down arrow and choose Horizontal Line.
- To change the line’s look, double-click the line in the document.
Let’s discuss these steps in detail!
Method 1: How to Insert a Horizontal Line in Word
Microsoft Word has a built-in tool specifically for inserting all kinds of horizontal lines. You can find it by following these instructions:
- Place your blinking cursor where you want to insert a line in your document.
- Open the Home tab from the Ribbon interface on top of your screen. This is the default tab when you create or open a document.
- In the Paragraph section, click on the arrow next to the Borders icon (as shown in the image below).

- Choose Horizontal Line from the drop-down menu. This will insert a plain, solid line into your document, which you can leave as is or customize.

- To customize the line, double-click on it once it’s in your document. The Format Horizontal Line dialog box will open in a new window.
- Change all attributes you want to modify and click the OK button.
Method 2: Use keyboard shortcuts (AutoFormat) to insert a line in Word
By far, the most efficient way of inserting a line in Word is the AutoFormat feature, especially when looking for style.
This only allows you to insert horizontal lines. However, it gives you the ability to choose from a variety of styles. All you need to do is type the correct symbols and automatically hit the enter key on your keyboard to insert a full-page length line.
Here are all the lines you can insert by using the AutoFormat shortcuts in most desktop versions of Word:
- To insert a solid single horizontal line: Type three hyphens (—) & Press Enter.

- To insert a solid double line: Type three equal signs (===) & Press Enter.
- To insert a Dotted line: Type three asterisks (***) & Press Enter.

- To insert a Bold single line: Type three underlined symbols (___) & Press Enter.

- To insert a Wavy line: Type three tildes (~~~) & Press Enter.

- To insert Triple line with a thick center: Type three number signs (###) & Press Enter


All of these lines adjust to the full length of your document, or when inserted into a column, adjust to the width of the column.
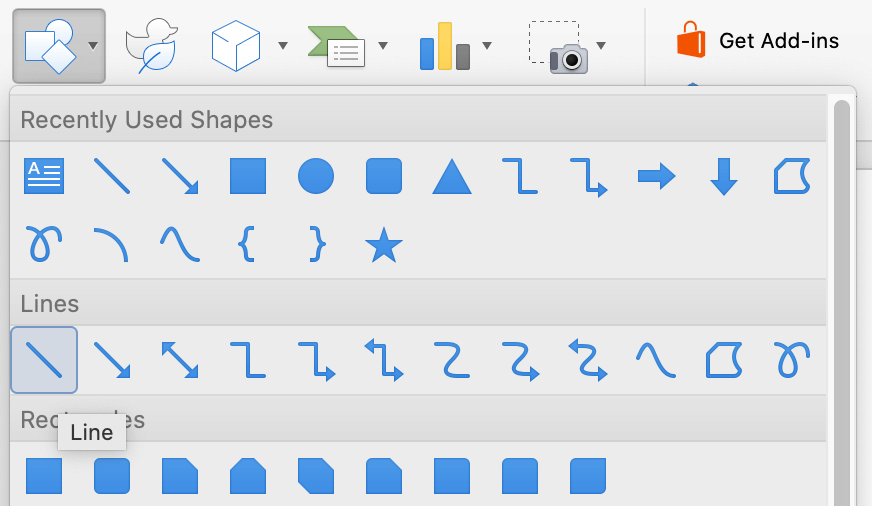
Method 3: Use the Shapes function to draw a line in Word
The third way of adding a line to your Word document is by using the Shapes inside the application. This allows you to draw both horizontal and vertical lines or lines going in any direction. Here’s how you can use this tool in Word.
- Place your blinking cursor where you want to insert a line in your document.
- Select the Insert tab in the Ribbon interface, which can be found at the top of your screen.
- Expand the Shapes group inside the Illustrations section, as shown below on the image.

- In the Lines group, select a line that you want to insert.

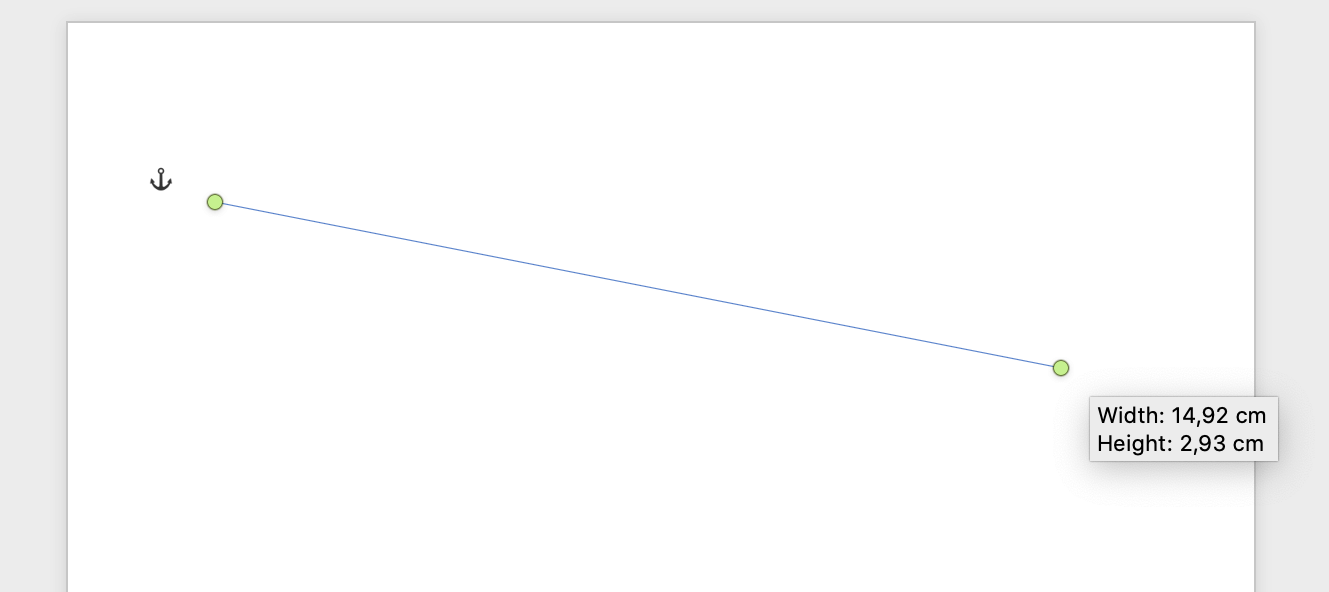
- Click and drag your cursor inside your document to draw a line. You can hold the Shift key to ensure your line is perfectly aligned.
- Let go of your mouse button to insert the line into your document.

- To customize your line, select it by clicking on it once and opening the Shape Format (or simply Format in some versions of Word) tab in the Ribbon.

Final thoughts
We hope that this article was able to help you learn how to insert a horizontal or vertical line in Word. You can now customize your documents further and deliver more professional products.
Now that you’re a PRO in inserting a line in Word consider subscribing to our Newsletter for more tips and GET 10% off Your Purchase!
Further Reading
> How to Insert a Signature in Microsoft Word
> How to Sort by Date in Excel
> How to Wrap Text in PowerPoint
> Insights into the Windows 10 Start Menu
465
465 people found this article helpful
Use these three methods to quickly insert a line in your document
Updated on December 4, 2020
What to Know
- AutoFormat: Type the three characters for the desired line style > Enter.
- Horizontal Line tool: In Home tab, select Borders drop-down menu > Horizontal Line.
- Shapes menu: Go to Insert > Shapes. In Lines group, select and drag a line shape across the page.
This article covers three ways to insert horizontal lines in Word for Microsoft 365, Word 2019, Word 2016, Word 2013, and Word 2010.
Use AutoFormat to Insert a Line in Word
You can quickly insert a line into a Word document with the AutoFormat feature. To create a line, place the cursor in the location that you’d like to insert it, type the three characters for the desired line style, then press Enter.
To create the different types of lines, press the associated keys on the keyboard:
- Plain single line: Three hyphens (—)
- Plain double line: Three equal signs (===)
- Broken or dotted line: Three asterisks (***)
- Bold single line: Three underline symbols (___)
- Wavy line: Three tildes (~~~)
- Triple line with a thick center: Three number signs (###)
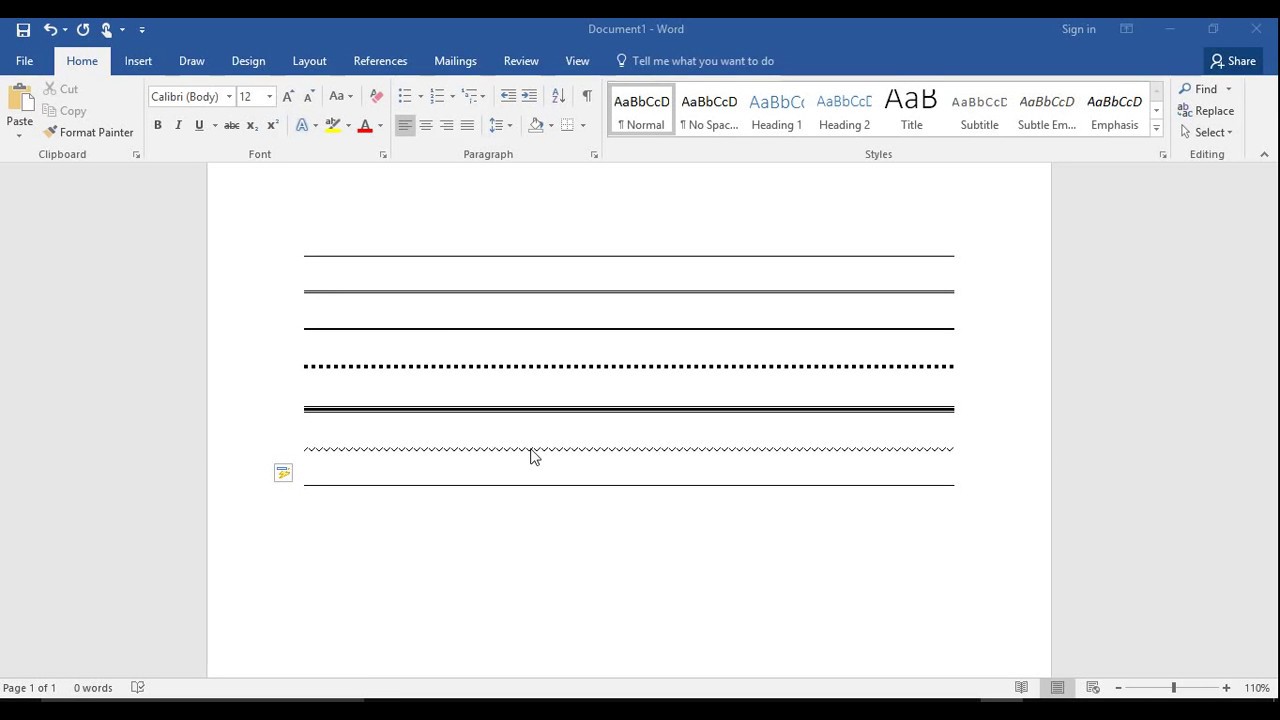
Here’s what each of these line types looks like in Word:
Use the Horizontal Line Tool to Insert a Line in Word
To insert a line into a Word document using the built-in Horizontal Line tool:
-
Place the cursor where you want to insert a line.
-
Go to the Home tab.
By default, the Home tab is selected when you open a new or existing Word document.
-
In the Paragraph group, select the Borders drop-down arrow and choose Horizontal Line.
-
To change the look of the line, double-click the line in the document.
-
In the Format Horizontal Line dialog box, modify the width, height, color, and alignment of the line.
Use the Shapes Menu to Insert a Line in Word
A third way to add a line to a Word document is to draw it on the page. The Shapes menu contains several line options, including lines with arrow points on one or both ends. After you draw the line, customize the color and appearance.
-
Place the cursor in the spot where you want to insert a line.
-
Go to the Insert tab.
-
In the Illustrations group, select the Shapes drop-down arrow.
-
In the Lines group, choose a line shape.
-
In the Word document, drag across the location where you want the line to appear.
-
To change the look of the line, select the line to enable the Shape Format tab. (Some versions of Word call this Format.)
-
Go to the Shape Format tab and change the color, use a different line style, or apply effects.
FAQ
-
How do I change line spacing in Word?
To fix spacing in Word, highlight the text whose spacing you want to change and select the Home tab. Next to Paragraph, select the down arrow to expand the options. In the Spacing section, set the amount of space before and after line breaks or choose a preset line-spacing option.
-
How do I add a signature line in Word?
To insert a signature line in Word, go to the Insert tab and select Signature Line. Selecting few or no options leaves a blank line, and a signature line will appear in the document.
-
How do I add line numbers in Word?
To add line numbers in Word, go to Layout > Page Setup > Line Numbers and choose Continuous, Restart Each Page or Restart Each Section > Line Numbering Options.
Thanks for letting us know!
Get the Latest Tech News Delivered Every Day
Subscribe
Text formatting is used to make some parts of text stand out so that they attract attention of the viewer. Microsoft Word 2007 allows you to make the text bold, italicize it or underline it for emphasizing the text.
In this tutorial, you will learn how to make text in a MS Word 2007 document bold, italicized and underlined.
Task
For this tutorial, start a new document and type the following text into it:
Examination Schedule
Date: Wednesday, 8th January 2013
Venue: Patna Science College
0900-1200 hrs: Pre University (Hall-11)
1400-1700 hrs: B.Sc. (Hall-12)
Save the document as “Exam Schedule”.
Your task is to
- apply bold text formatting to the entire first line, “Date” in second line, “Venue” in third line and the timings in fourth and fifth lines;
- italicize “Patna Science College” and
- underline “Hall-11” and “Hall-12” in fourth & fifth lines.
Step-by-Step Instructions
Create a new document, type the text mentioned in the task assignment above and save it with the name “Exam Schedule”.
Method-1: Text Formatting Using Ribbon
- Select the first line.
- Click ‘Home’ tab on the Ribbon (see Figure 1).
- Click ‘B’ in the ‘Font’ group. The selected text will become bold.
- Repeat steps 1-3 for “Date”, “Venue”, “0900-1200 hrs” and “1400-1700 hrs”. All selected text will become bold.
- Select “Patna Science College”
- Click ‘I’ on the Ribbon. Selected text will be italicised.
- Select “Hall-11”.
- Click ‘U’ on the Ribbon. Selected text will be underlined.
- Repeat steps 7 and 8 for “Hall-12”.
 |
| Figure 1: Home Tab and Formatting Buttons |
 |
| Figure 2: Font Dialog Box |
TIP!
In MS Word, you can select multiple parts of text and apply the desired format at one go following the steps below:
- Click in the margin by the side of the first line to select it.
- Press the Ctrl button and, while keeping it pressed, select “Date”, “Venue”, “0900-1200 hrs” and “1400-1700 hrs”. You will find that all selected text is simulteneously highlighted.
- Now Click ‘B’ on the Ribbon. All highlighted text will become bold.
- You can similarly underline “Hall-11” and “Hall-12” simultaneously.
Method-2: Text Formatting Using Font Dialog Box
- Select the first line, “Date”, “Venue”, “0900-1200 hrs” and “1400-1700 hrs” as explained above.

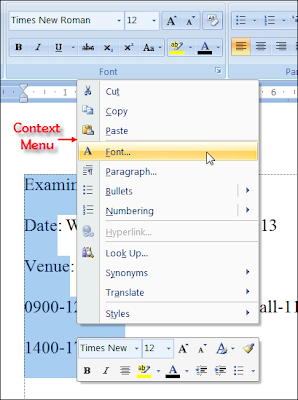
Figure 3: Context menu - Click the ‘Font Dialog Launcher’ (it is the down pointing arrow in the bottom right corner of the Font group on ‘Home’ tab – see Figure 1). This will bring up the Font Dialog (see Figure 2). Alternatively, you can also launch the ‘Font’ dialog box by right clicking the selected text and choosing ‘Font’ from the ‘Context Menu’ (see Figure 3).
- Click the ‘Font’ tab, if it is not already selected.
- In the ‘Latin Text’ section, click ‘Bold’ in the ‘Font Style’ list. MS Word will show the result of this action in the preview window of the dialog box.
- Click ‘OK’ button. The selected text will become bold.
- Select “Patna Science College” and launch the ‘Font’ dialog box.
- In the ‘Latin Text’ section, click ‘Italic’ in the ‘Font Style’ list to italicize selected text and click the ‘OK’ button.
- Select “Hall-11” and “Hall-12” and launch the ‘Font’ dialog box.
- In ‘All Text’ section, click the inverted triangle in the ‘Underline Style’ box. A drop down list will open showing several underlining styles.
- Select single underline style. The selected text will be underlined.
Method-3: Text Formatting Using Keyboard Shortcuts
MS Word provides keyboard shortcuts for text formatting – Ctrl+B for making selected text bold, Ctrl+I for italicizing and Ctrl+U for underlining.
- Select the first line, “Date”, “Venue”, “0900-1200 hrs” and “1400-1700 hrs”.
- Press Ctrl+B, i.e. press the Ctrl key and the letter key B together. Selected text will become bold.
- For underlining, select «Patna Science College» and press Ctrl-U. The selected text will be underlined
- For italicizing, select “Hall-11” and “Hall-12” and press Ctrl-I. The selected text will become italicized.
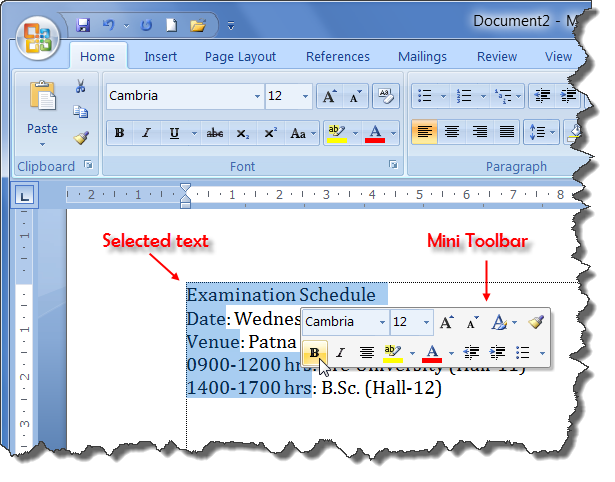
Method-4: Text Formatting Using Mini Toolbar
- Select the first line, “Date”, “Venue”, “0900-1200 hrs” and “1400-1700 hrs”. A semi-transparent Mini Toolbar will appear near the mouse pointer.
- Move the pointer to the Mini Toolbar. The toolbar will become fully visible (see Figure 3).
- Click ‘B’ in the Mini Toolbar. Selected text will become bold.
- For italicizing, select the text and click ‘I’ in the Mini Toolbar. The selected text will be italicised.
- The Mini Toolbar does not have the underline button. Hence, for underlining you would need to use one of the methods explained earlier.
 |
| Figure 4: Mini Toolbar |
TIP!
If you wish to emphasize the first line still more by making it bold, underlined and italicized at the same time, select the first line press Ctrl+B, Ctrl+U and Ctrl+I successively and the text of first line will appear bold, underlined and italicized.
After formatting text as explained above, the text in the document will look like this:
Examination Schedule
Date: Wednesday, 8th January 2013
Venue: Patna Science College
0900-1200 hrs: Pre University (Hall-11)
1400-1700 hrs: B.SC.-I (Hall-12)
Clearing Text Formatting
You will be using this document for other exercises where the bold, italic and underline formatting is not required in the first line.
- To clear formatting, select this line and click ‘Home’ tab.
- Click the ‘Clear Formatting’ button in the ‘Font’ group. All formatting will be cleared in the first line.
TIP!
Bold, italics and underline formatting commands are toggle commands. First application of these commands formats the text and second application removes the formatting done by the first application. Hence, if you select bold text and press Ctrl+B, the bold formatting will be removed.
After you have completed the above task, select the first line and make it bold once again. The text in ‘Exam Schedule’ document will look like this:
Examination Schedule
Date: Wednesday, 8th January 2013
Venue: Patna Science College
0900-1200 hrs: Pre University (Hall-11)
1400-1700 hrs: B.SC.-I (Hall-12)
Save the document before exiting MS Word 2007.
Recap
Bold, italics and underline formatting can be applied to text in a MS Word document using
- the formatting buttons ‘B’, ‘I’ and ‘U’ on Home tab,
- the ‘Font’ dialog ,
- keyboard shortcuts Ctrl+B, Ctrl+I and Ctrl+U, and
- the formatting buttons on the mini toolbar
We appreciate you reading this guide in its entirety. Visit us again for news and useful advice in the future. It will be worthwhile for you to visit. I truly value your coming by and being here. If you find these instructions and advice useful and instructive, kindly tell your friends about our website. On the other hand, if you believe that there is any area that could use better, kindly share your suggestions. These will be much embraced and valued. Use the comment section below to provide suggestions or ask questions. Your questions will be swiftly investigated and properly addressed, and your comments will be promptly examined and published. Thanks.
TheTechieSenior.com is reader supported. We may earn a commission if you buy through links on this site. As an Amazon Associate, we earn from qualifying purchases. Learn more here.
Everyone has seen text that is bold, italicized, or underlined. This article will teach you how to easily bold, italicize, or underline in MS Word.
Table of Contents
The instructions given in this article work the same and are applicable to both the Windows and Mac versions of Microsoft Word. However, the design and appearance of the font boxes and other controls that are mentioned may be different between the Mac and Windows versions. This article may include instructions that aren’t available in the Android, iOS, or iPadOS versions*.
How to Bold, Italicize, or Underline in MS Word
The processes for bolding, italicizing, or underlining are nearly identical in Microsoft Word. For sake of clarity for those who only need to know how to do one of the three, I’ve broken each into its own process.
For any of them, the process begins with selecting the words you wish to format. That selection can be any length, from one character to an entire document. The methods for selecting a block of text are fairly universal across computers and different apps. In case you are new to computers or are brand new to MS Word or other word processing software, here is how to select text.
You’ll know your text is selected when it remains shaded or highlighted without you touching the keyboard.
How to select a section of text in MS Word (and most other apps).
Following are some ways to select a specific subset of words as well as selecting all words at one time.
A simple way to select content – method one:
- Click your mouse or trackpad just to the left of the first word you want to format.
- Hold the shift key down and click just to the right of the last word or character you wish to format.
- Your selection should be highlighted now.
A simple way to select content – method two:
You can also make your selection with just your mouse or trackpad.
- Click and hold your mouse or trackpad at the beginning of the selection.
- Drag across and down until all of your intended text is highlighted.
Select all words or characters within a document:
If you are working on a document in which you want every character formatted a certain way, you can select the entire document with one key combination.
- Hold the keys Command on a Mac or Control in Windows.
- Tap the A key.
All of the text in your document should be selected and highlighted.
What is bold in Microsoft Word?
Bold is used when you want a section of your document to stand out. This is an example of bold text within a paragraph. You might use bold to highlight headings such as the one just above this paragraph. It can be used for emphasis within sentences. Titles are often bolded.

A Microsoft Word feature called Styles can also be used to bold headings, but we’ll stick to the most basic methods in this article. (Hint: Styles are found in the ribbon after you tap the Home tab.)
How to bold text in MS Word.
I’ll list the methods for bolding text from the simplest and quickest to the most complex. For any of the first three methods you’ll first need to select the text you wish to format as bold.
1) The fastest way to bold text in Microsoft Word:
• Select the word or words you wish to bold.
• Use the keys Command + B on a Mac or Control + B in Windows to bold them. The keys must be pressed at the same time.
2) The second easiest method for bolding text:
• Select the text you wish to turn bold.
• In the Home tab of MS Word, look for the section that contains the drop-down box to change the font. Just under that box is a row of buttons that begins with one labeled with a bold uppercase B. That is the bold button.
• Select it to bold your selection. (The button will appear depressed when active.)
• Unselect it to unbold text.
• Select the words you want to bold.
• Right-click the selected text.
• From the menu that pops up, select Font…
• A font control box will open. At the top of the box, be sure Font is selected.
• In the center of the first line is a section titled Font Style. Click the list just below Font Style and choose Bold.
To use this method to return to normal text, follow the same steps but choose Regular from the list of choices.
How to italicize words in Microsoft Word.
The methods for italicizing and underlining text in Microsoft Word are very similar to the method we used to bold text. However, to eliminate any chance of confusion, I’ll give the details separately for each.
1) The easiest and quickest way to italicize words in Microsoft Word:
• Select the text you wish to bold following the instructions above.
• Use the keys Command + I on a Mac or Control + I in Windows to italicize the text.
2) The second easiest method for italicizing words:
• Select the block of text you wish to have italicized.
• In the Home tab of MS Word, look for the section that contains the drop-down box to change the font. It’s the same section where you found the Bold button in the previous instruction.
• In the row of buttons that begins with a bold uppercase B, the second button is an italicized I. Select it to italicize your text.
• Unselect it to return to normal text.
There may be times that you would italicize large blocks of text. For example, italics are frequently used to indicate quoted text in books and other forms of writing. Accordingly, you can italicize a single letter or many paragraphs at one time. Select the letters, words, or sentences you want to italicize.
• Using a mouse or trackpad, right-click the selected text.
• From the menu that pops up, select Font…
• The same font control box that you used in the third method of making text bold will open. At the top of the box, be sure Font is selected.
• Click the list just below the title, Font Style. You notice that you have two choices of italics—Italics and Bold Italics. Select whichever you need.
• Use the same steps to return to normal text. Just choose Regular from the list of choices.
How to underline text in Microsoft Word.
Select your section of content as instructed above.
1) The quickest way to underline a selection in Microsoft Word:
• Find the characters you would like to underline. Select them by following the instructions above.
• Use the keys Command + U on a Mac or Control + U in Windows to underline the text. Be sure you press Command or Control and the letter U at the same time.
2) The second easiest method for underlining in Microsoft Word:
• Select the block of text you wish to have underlined.
• In the Home tab of MS Word, look for the section that contains the drop-down box to change the font. It’s the same section where you found the Bold button in the previous instruction.
• In the row of buttons that begins with a bolded uppercase B, the third button is an underlined U. Select it to underline your text.
• Unselect it to return to normal text.
3) As in bolding and italicizing, there is a slower method to underline using the right-click menu.
Underlines aren’t normally used on large blocks of text, partly because they can make consecutive lines of text difficult to read. However, you can underline as much text as you wish.
• Select the words that should be underlined.
• Using a mouse or trackpad, right-click the text you want to underline.
• From the menu that pops up, select Font…
• The same font control box that you used in the third method of bolding and italicizing text will open. At the top of the box, be sure Font is selected.
• This time skip to the second row of controls labeled Color and Underline. The first control on that row controls font color. The second control allows you to select from a large variety of underlines.
• Select whichever you prefer.
In the list of underline styles, the first is Words only. If you choose Words only, the underline will show only under the actual words. Spaces between words will not be underlined. The other choices in the list will result in an underline that spans from the beginning of the text you selected to the end of the selection, including the spaces between words.
To return to normal text with no underline, use the same steps but this time choose (none) for the underline style.
Bonus tip: If you know in advance that you will want a line of text to be bold, italicized, or underlined, place your cursor at the point in the document where the text is to begin. Click the bold, italic, or underline button in the Home tab of the ribbon and begin typing. The text from the point where you located your cursor should now be bold, italicized, or underlined.
You can click all three – bold, italics, and underline at the same time. When you type your text will have all three formats applied at one time, as you type it.
When you’re ready to go back to regular font weight, click the bold, italic, or underline button again. From that point on, your text will return to normal.
You’ll learn more Microsoft Word hints and tips here.
* The instructions given here often refer to icons in the ribbon. The icons discussed are part of the basic set of icons available when Microsoft Word is installed. The ribbon in Microsoft Word is highly customizable. If you have made changes to your ribbon, it is possible that an icon mentioned may not be visible in your installation of MS Word.
I have a word document that looks like this:
randomword: definition
anotherrandomword: definition
yetanotherrandomword: definition
multiple word term: definition
and I want to make it look like this:
randomword: definition
anotherrandomword: definition
yetanotherrandomword: definition
multiple word term: definition
I cant do this manually because I have hundreds of lines, how do I do this?
![]()
Bob
60.4k24 gold badges189 silver badges215 bronze badges
asked Apr 26, 2012 at 1:16
![]()
This has a caveat, in that it needs a return character at the beginning of the file in order to match the beginning of the line. Also, it bolds the colon.
Search replace, and enable «Use wildcards»
In the search box, enter
^13(*:)
This searches for a return character, followed by a sequence of characters ending in a colon.
In the replace box, enter
^p1
Then click Formatting / Font / Bold
The ^p replaces the return character with a return character, and the 1 matches what was found in the brackets in the search pattern. So basically it replaces what it found in the search, but adds bold formatting.
answered Apr 26, 2012 at 2:17
![]()
PaulPaul
58.6k18 gold badges142 silver badges166 bronze badges
Try this: If they’re all in a row, hold the alt key and start at the top, drag your cursor down and select all of the words. Then, hit cntrl+b, or just click ‘Bold’… This should work, unless some words are a lot longer than others, in which case parts of other words will be bolded as well.
answered Apr 26, 2012 at 2:05
![]()
cutrightjmcutrightjm
4,3494 gold badges31 silver badges50 bronze badges
1
this works better
- First, open search and replace box in Microsoft Word. You might click Ctrl + F buttons and then
- In the search box, enter:
(^013[!:]*:). - Enable «Use wildcards» after clicking More >> button.
- In the replace box, enter:
1. - Then, choose Formatting/Font/Bold after clicking More >> button.
- Lastly, click Replace All button.
![]()
answered Aug 22, 2022 at 15:51
![]()