
Word for Microsoft 365 Word 2021 Word 2019 Word 2016 Word 2013 Word 2010 Word 2007 More…Less
In Word, you can make your text bold in three ways: use the Bold button on the Mini toolbar, use the Bold button on the Home tab, or use the keyboard shortcut.
Make text bold
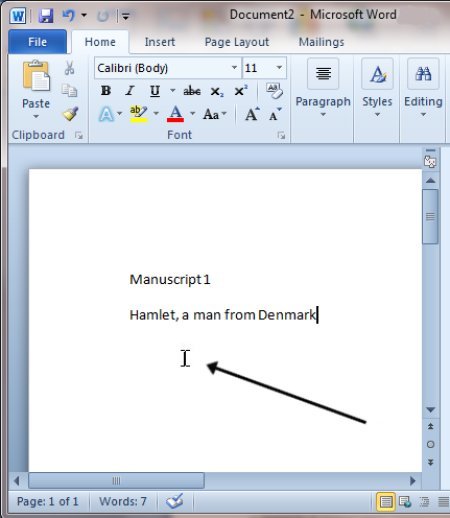
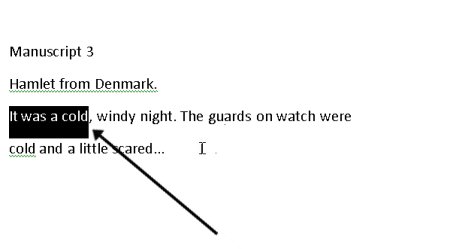
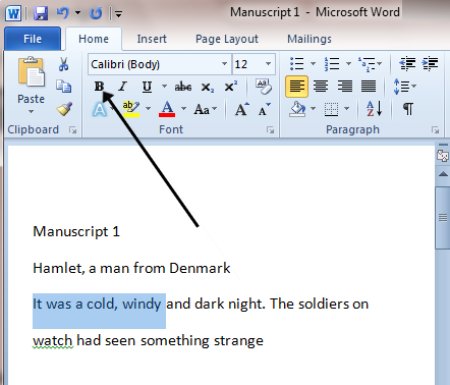
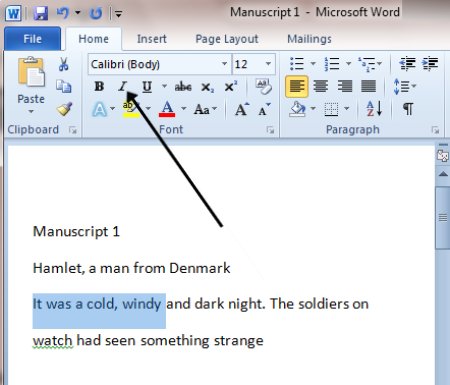
Select the text that you want to make bold, and do one of the following:
-
Move your pointer to the Mini toolbar above your selection and click Bold
 .
. -
Click Bold
in the Font group on the Home tab. -
Type the keyboard shortcut: CTRL+B.
Note: Click Bold  or type the keyboard shortcut again to unbold the text that you selected.
Need more help?
Word for Microsoft 365 Word 2021 Word 2019 Word 2016 Word 2013 Word 2010 Word 2007 More…Less
In Word, you can make your text bold in three ways: use the Bold button on the Mini toolbar, use the Bold button on the Home tab, or use the keyboard shortcut.
Make text bold
Select the text that you want to make bold, and do one of the following:
-
Move your pointer to the Mini toolbar above your selection and click Bold
. -
Click Bold
in the Font group on the Home tab. -
Type the keyboard shortcut: CTRL+B.
Note: Click Bold or type the keyboard shortcut again to unbold the text that you selected.
Need more help?
Содержание
- Способ 1: Панель инструментов
- Способ 2: Горячие клавиши
- Отмена полужирного начертания
- Вопросы и ответы

Способ 1: Панель инструментов
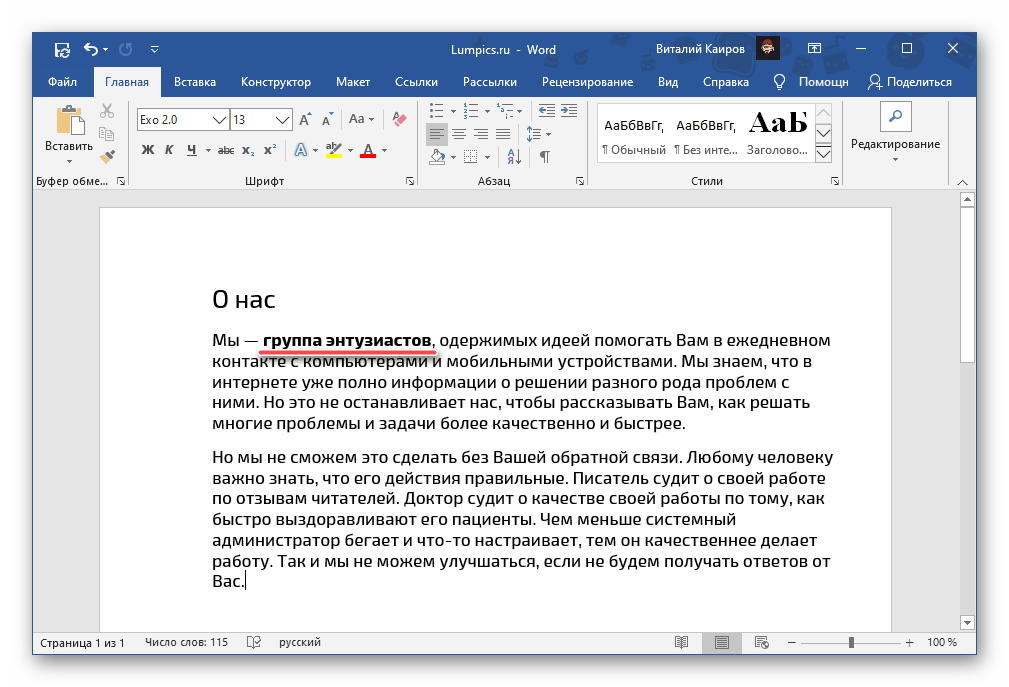
Тип начертания текста, который большинство пользователей привыкли называть жирным, на деле является полужирным. Сделать его в Ворд можно следующим образом:
Читайте также: Как сделать текст курсивом в Word
- Выделите текст, который необходимо преобразовать в полужирный, или установите указатель курсора (каретку) в том месте, где вы планируете начинать его ввод.
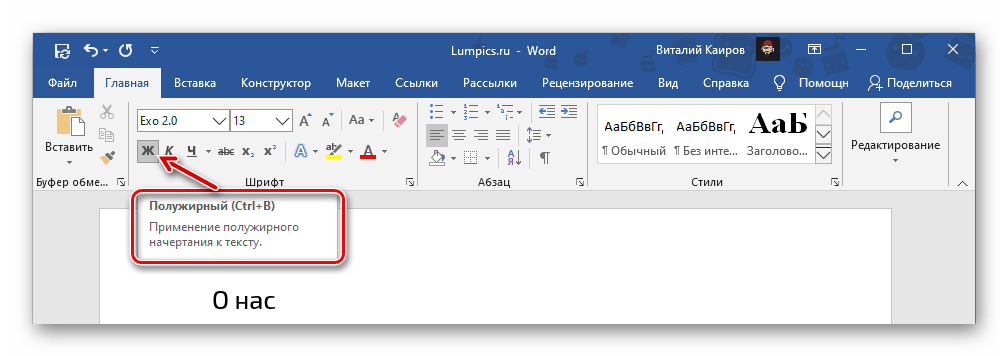
- Нажмите по кнопке «Ж» (в англоязычных версиях Microsoft Office это «B»), расположенной во вкладке «Главная», в группе инструментов «Шрифт».
- Начертание выделенного текста станет полужирным. Если же вы только собираетесь создавать запись, таковыми будут все вводимые символы, пока вы не смените форматирование.


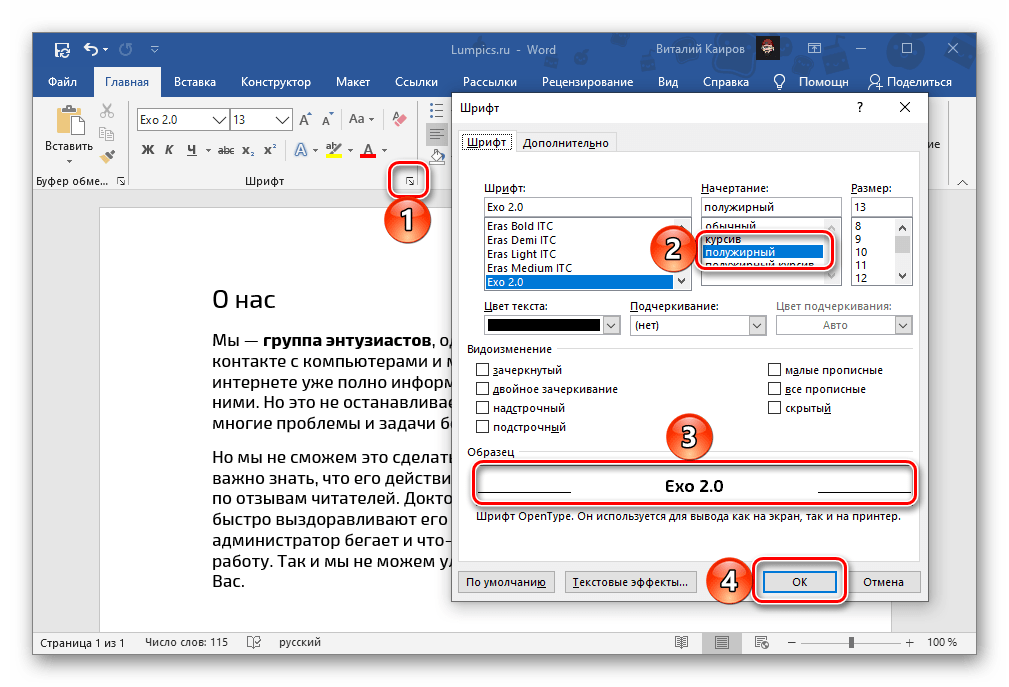
При желании для выбранного типа начертания можно задать дополнительные параметры — для этого нужно вызвать меню группы инструментов «Шрифт» (1). В открывшемся окне вы можете выбрать шрифт, начертание текста, его размер, цвет и другие опции. Все изменения отображаются в окне предварительного просмотра (3), а для их подтверждения нужно просто нажать «ОК».
Читайте также: Изменение шрифта и форматирование текста в Ворде
Способ 2: Горячие клавиши
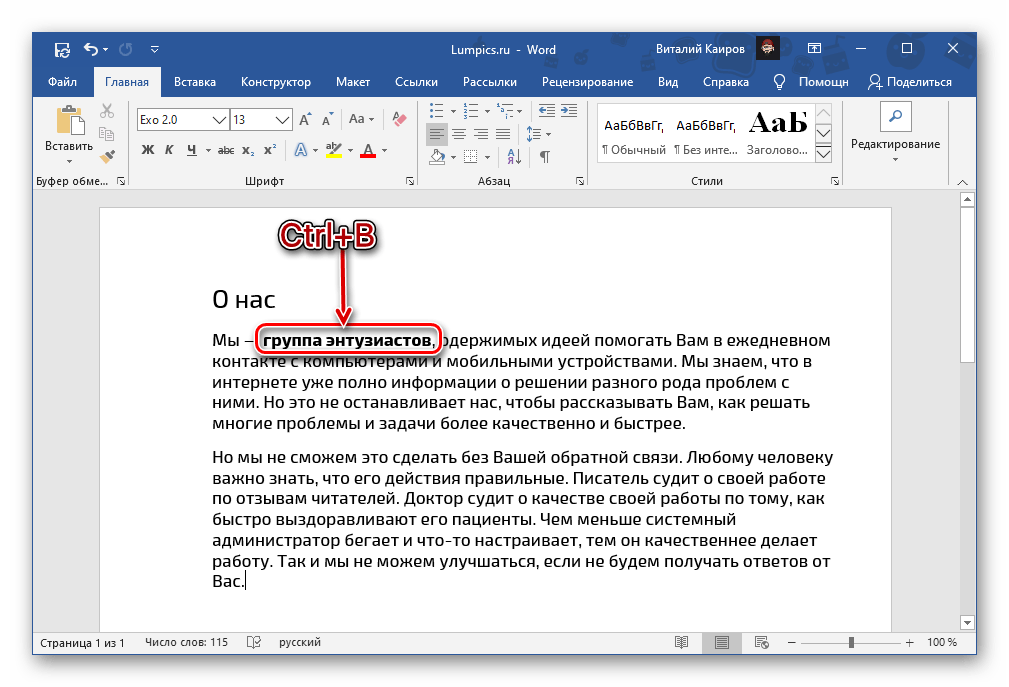
Значительно более простой метод, посредством которого можно сделать полужирное начертание или преобразовать в него уже написанный текст, заключается в использовании комбинации клавиш. Она отобразится, если навести указатель курсора на уже знакомую нам по предыдущему способу кнопку «Ж», расположенную в группе инструментов «Шрифт» на ленте Microsoft Word.
«Ctrl+B» (b — bold)
Установите каретку в том месте документа, где планируете вводить текст в полужирном начертании, или выделите необходимый фрагмент, после чего нажмите обозначенные выше клавиши. К слову, эта комбинация работает практически во всех программах, где есть возможность хотя бы базового форматирования текста.
Читайте также: Горячие клавиши для удобной работы в Ворде
Отмена полужирного начертания
Если вы по ошибке включили полужирное начертания или сделали таковым не тот фрагмент текста, просто выделите его повторно и нажмите кнопку «Ж» на панели инструментов или «Ctrl+B» на клавиатуре.

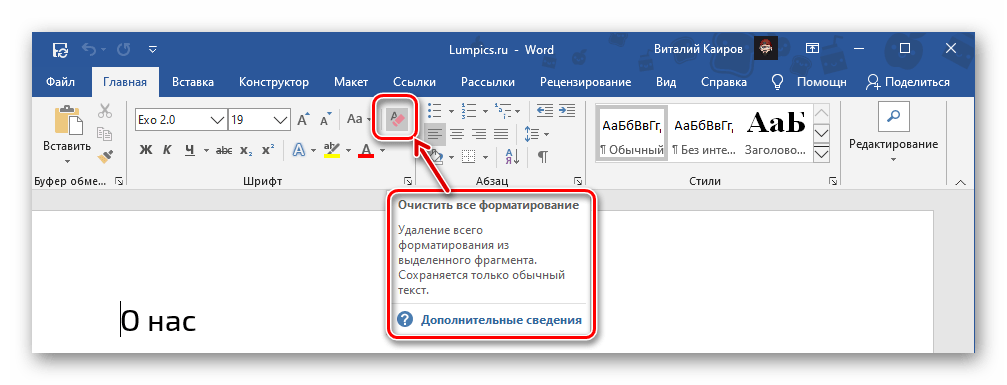
В качестве более жесткой альтернативы, убирающей не только обозначенный вариант написания, но и форматирование текста (тип шрифта, его размер, стиль), можно использовать обозначенную на изображении ниже кнопку «Очистить все форматирование» — буква «А» с ластиком.
Читайте также:
Как очистить форматирование документа Word
Как отменить последнее действие в Word
Еще статьи по данной теме:
Помогла ли Вам статья?
When working in Microsoft Word, you should always balance the content and look of your document equally. You might have a really convincing essay or the best business proposal in your company, but if it’s a block of text without formatting, the effect might be undesirable when you start to display your work.
Something you can do to avoid this is utilizing text styles. In order to put more emphasis on specific words or sentences, you need to make them stand out from the rest of your body text. In this article, we will teach you how you can make your text bold, italic or underline in Microsoft Word.
Things you’ll need
- A device with Microsoft Word installed and activated.
How to make text Bold Italic or Underlined in Word
Now, onto the step-by-step guide.
- Launch Word, then either open an existing document or create a new one from the welcome screen.
- If you only want to change the size and font of a portion of your text, you need to select it. Hold down the left mouse key and make your selection. Now, only the selected text will be affected by any changes. If you want to change your entire document, you need to select everything by pressing the Ctrl + A keys on your keyboard.

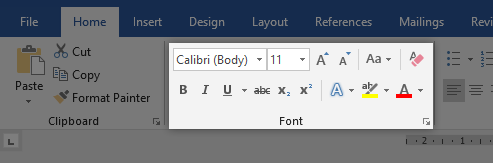
- Go to the Home tab in your Ribbon. This is where you can find most of the basic text formatting tools in Word.

- Locate the Font section.

- To make text bold, click on the B icon in the formatting ribbon. This is located under the current font used in your document.

- To make text italic, click on the I icon in the formatting ribbon. This is located under the current font used in your document.
- To underline text, click on the U icon in the formatting ribbon. This is located under the current font used in your document.
- Pro tip: use keyboard shortcuts! You can achieve the same text effects simply by pressing down a couple of keys on your keyboard. Here’s what you need to know about formatting text with shortcuts in Word:
- To make your selected text bold or start writing text in bold, press the Crtl + B keys on your keyboard.
- To make your selected text italic or start writing text in italic, press the Ctrl + I keys on your keyboard.
- To make your selected text underlined or start writing underlined text, press the Ctrl + U keys on your keyboard.
- You can combine these formatting styles with one another. Any combination is possible, meaning that you can make your text bold-italic or even underlined while bold.


We hope that this article was able to help you learn how to apply simple formatting to your text in Microsoft Word. Do you know someone who’s starting out with Word and other Microsoft Office products?
Don’t forget to share this article with them! Your friends, classmates, colleagues or employees can all get help in getting started with Word. If you want to learn more about Word or other Microsoft Office suite applications, feel free to browse our section of guides.
If you’re looking for a software company you can trust for its integrity and honest business practices, look no further than SoftwareKeep. We are a Microsoft Certified Partner and a BBB Accredited Business that cares about bringing our customers a reliable, satisfying experience on the software products they need. We will be with you before, during, and after all the sales.
Being able to change the style of font can make your document more interesting. Different styles of text such as bold or italics can make text stand out. Underlining can be useful for headings.
This guide explains how to make text bold, italic or underlined in Microsoft Word 2010. Earlier versions of Word will use similar steps or concepts.
You’ll need:
- A computer with Microsoft Word installed.
Follow these step-by-step instructions to format text in Microsoft Word
Step 1: Open an existing Word document or start a new document and type your text.
Step 2: If you’d like to change some of the text that you’ve already typed to a different font, it will need to be selected or highlighted with the mouse first. When the mouse pointer is moved over a text area, the pointer will change from an arrow to a ‘text select’ or ‘I-beam’ icon.
Step 3: Select the text that you wish to edit or change the formatting.
Step 4: To change the selected font to bold, click B in the formatting ribbon at the top of the document.
Step 5: To change the selected font to italics, click I in the formatting ribbon at the top of the document.
Step 6: To change the selected text so that it’s underlined, click U in the formatting ribbon at the top of the document.

Step 7: It’s also possible to change selected text using a combination of keyboard shortcuts, which some people find easier than using the mouse.
- To make text bold, select and highlight the text first. Then hold down Ctrl (the control key) on the keyboard and press B on the keyboard.
- To make text italic, select and highlight the text first. Then hold down Ctrl (the control key) on the keyboard and then press the I on the keyboard.
- To underline text, select and highlight the text first. Then hold down Ctrl (the control key) on the keyboard and then press the U on the keyboard.
This guide was last updated on May 2022
How can a Digital Champion approach help your organisation?
Take our online assessment to find out.
It takes 10 minutes. There are no strings attached. At the end, you get a tailored report with recommendations and a free, practical guide to running a Digital Champions project.
Get started with our interactive planner.

Bold, Italic, Underline Functions in Microsoft Word
In this article, let’s find out the Bold, Italic, and Underline functions in Microsoft Word, and how to use them.
These three commands or fonts are often used by writers, usually to indicate certain words and also to indicate unfamiliar words.
Well, if you want to know, you can follow the article below which explains the functions and how to use the three commands in Microsoft Word, here’s a full explanation.
FUNCTIONS AND HOW TO USE BOLD, ITALIC, AND UNDERLINE IN MICROSOFT WORD
These three types of fonts have different functions and how to use them is fairly similar, here is the complete tutorial.
1. Bold function and how to use it
Bold is a type of font that has a command with character level performance, serves to thicken the shape of the letter. Here’s how to use it.
- The first block of text or letters you want to change.
- Then click the “B” icon on the “Home” ribbon.
- Or you can use the shortcut “CTRL + B“.
- Done, see the example above, guys!
2. Italic Function and How to Italic
Italic type is a font that serves to italicize a letter, here’s how.
- Select the text or letters to which you want to add an Italic font.
- Then click the “I” icon on the “Home” ribbon.
- Or you can use the shortcut “CTRL + I“.
- Done, see the example above, guys!
3. Underline Function
Underline is a character formatting command that serves to underline a letter, here’s how to use it.
- The block of letters to which you want to add an Underline format.
- Then click the “U” icon on the “Home” ribbon.
- To make it easier you can use the shortcut “CTRL + U“.
- Done, see the example above, guys!
Well, that’s an explanation of the functions and how to use Bold, Italic, and Underline in Microsoft Word.

MS Word
How to Make Letterhead in Microsoft Word
![]()
Published
1 year ago
on
November 18, 2021

How to make a letterhead in Word correctly and neatly is actually easy, but surely there are still many of you who don’t know how to make it.
In an official letter, of course, there is a letterhead and there is always a line at the bottom right. Well, it turned out to be quite easy to make you know.
Apart from being the introduction to a letter, letterhead is also commonly used as a place to write the identity of the letter, such as the identity of the sender and recipient.
For those of you who want to know how to make it, here we explain in full the steps to make a letterhead in Word for you.
HOW TO MAKE LETTERHEAD IN WORD
You should know how to make a letterhead in Word this time, guys, especially when you want to send letters between agencies.
Although not all agencies use it, it doesn’t hurt you to try and find out how to make this letterhead, here are the steps!
- First, open your Word.
- Place the cursor at the back of the last word of the letterhead
- Then select the menu Borders – Borders and Shading.
- After the border menu appears, all you have to do is select the line you want on the menu with a sign like this.
Don’t rush to click Ok, because there’s one more thing you have to do to make it, guys. In the section below, remove it or set it like this to make the line only exist at the bottom, and then Ok.
Yeah, you have successfully drawn the line, Guys, it’s easy and fast, right, how to make a letterhead in Word?
You don’t need to be confused anymore about how to make it. For beginners, making letterhead or letterhead does sound quite difficult.
In fact, how to make a letterhead in Word is fairly easy as long as you already know the procedure. After all, the letterhead cannot be made casually because it is an official identity.
The letterhead contains the official identity of an institution, agency, or company. Well, you can create an official identity on the letterhead in Microsoft Word.
MS Word
How to Create a Background in Microsoft Word
![]()
Published
1 year ago
on
November 18, 2021

This way of making a background in Word aims to beautify the appearance of the document and make it more attractive Guys.
Usually, this is often found in the use of proposals, certificates, covers, and not infrequently in job applications.
With this function, how do you make it? It’s so easy. Yes, although there are several ways you can do this, you can follow this tutorial in full.
HOW TO MAKE A BACKGROUND IN WORD
This background function is very useful if you want to create a document that upholds the originality of Guys, for example, a thesis.
In addition to having to know how to create a table of contents in Microsoft Word, you may also need to know how to create a background in your thesis document, especially in showing the results of the tests you did.
How to make this background is also needed if you want to make an official letter from the agency. Besides needing to know how to make letterhead lines in Word, you also need to know how to add a background to the letter. Here’s how:
- The first thing you can do is change the color.
- Go to Design – Page Color – and immediately choose a color like this.
That is the easiest way and you can change the color according to your needs or tastes, guys. In addition to this method, you can also replace it with an image that you have.
The method is almost the same, guys, pay attention to the following rare:
- Go to the Design menu.
- Click Page Color.
- Select Fill Effects.
- Next, select the tab Picture – Select Picture – From a File.
- Then find the image you have and press Ok
- Finished! The background will change.
But, you also need to remember that both methods will not appear when you print either color or image.
To make it appear when printing, then you need to go to the File menu – Options – Display – and check the Print background colors and Image.
Well, after you go through these few steps, the background will change and also enter when you print, GRATZ!!! It’s easy to make a background in Word.
MS Word
How to Create a Signature in Word
![]()
Published
1 year ago
on
November 11, 2021
There are several ways to make a signature in Microsoft Word. And the method is really easy, just follow the steps below, guys!
Making a signature is really needed, especially in the digital era like now, right? Of course, you need a signature in your Word file, so from that our Team will provide this tutorial in detail.
Actually, you can also use a third application or additional devices such as pens that support your PC or laptop. But this is the easiest way without using other devices and applications Guys.
HOW TO CREATE A SIGNATURE IN WORD
You need to sign first, Guys on a piece of white paper. Make sure the paper is really white and the pen has colour ink that you can really see clearly.
This function is for later photos or files the resolution will be smaller Guys. Not only that, but the customized color saturation will also reduce the thickness of the pen color, you know.
So make sure you give a signature with a clear enough emphasis. Here’s how to create a signature in Word:
- Prepare a white paper with a signature on it. Photos using a smartphone or you can directly scan the signature through a scanner.

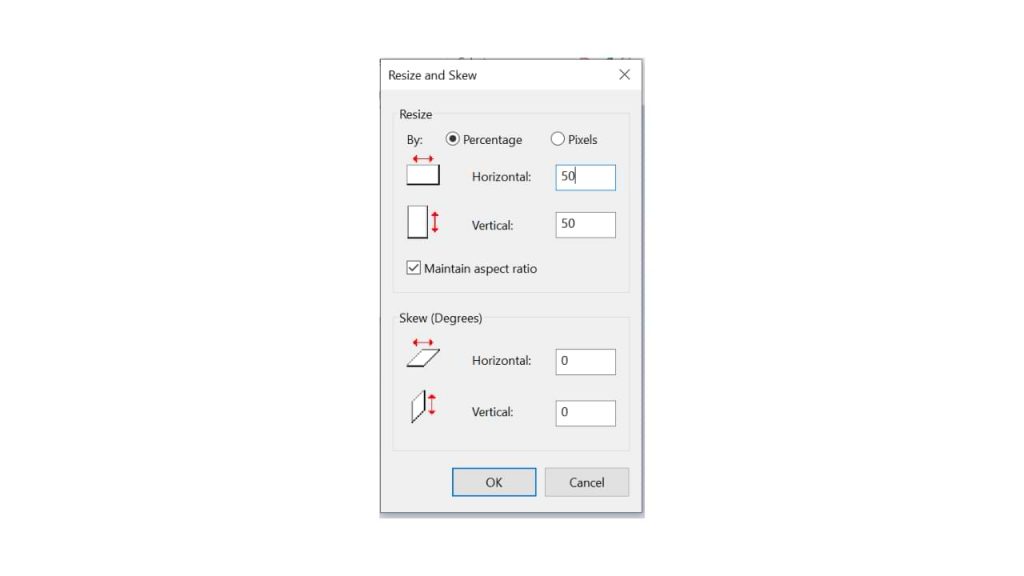
- You can reduce the resolution and crop it so that the photo focuses on the signature. For convenience, click the image file > Edit.
- On the Paint menu, you can resize to reduce the resolution. Choose 50 per cent resolution, fill Horizontal 50 and Vertical 50
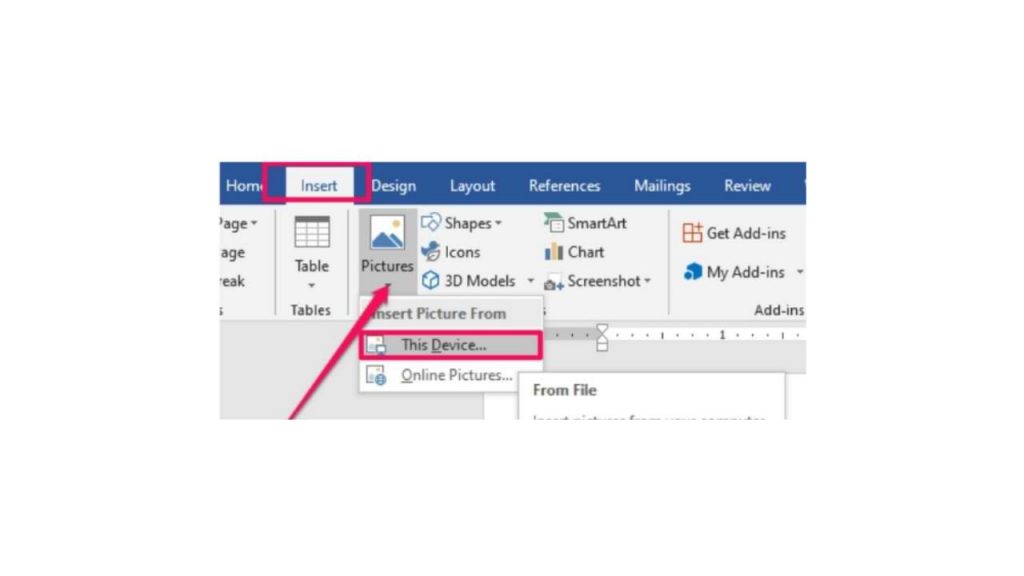
- Hover over the exact position of the word you want to add a signature to. Click Insert > Picture > insert the previous signature image file.
- After you insert the image, reduce the size again using the cursor for more precision.
- Double click on the image.
- On the Format menu, select the Color > Recolor > Black and White 50 per cent submenu.
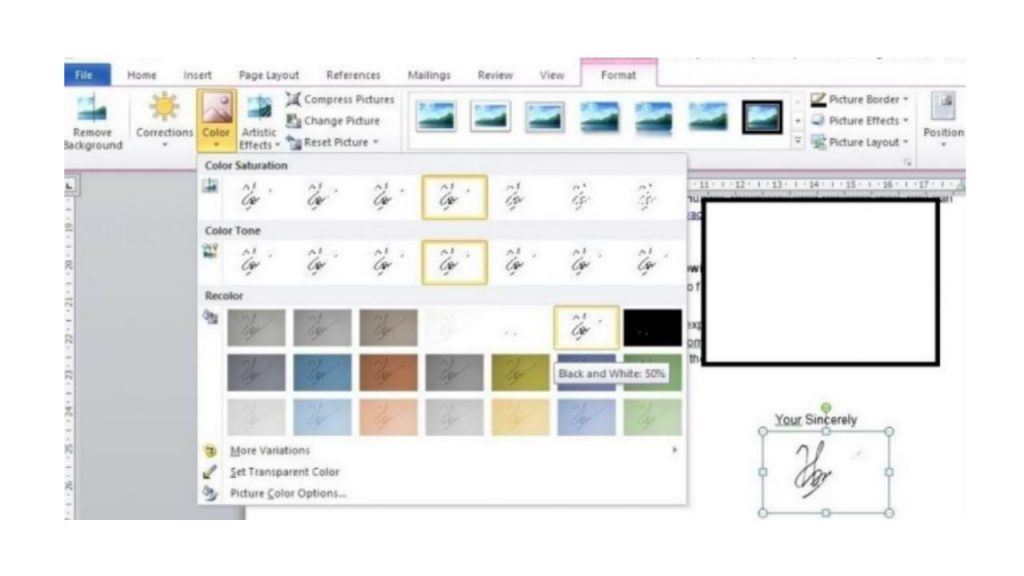
- if your signature is not clear, double click on the image, select menu Correction > Brightness 0 per cent (Normal) Contrast 40 per cent.
You can change the last two steps depending on the contrast and color saturation you want, guys. So you can at the same time adjust the thickness of your signature that has entered the word, so guys.
I also said what Guys, how easy it is to make a signature in Microsoft Word! The most important thing is to make sure your signature is clear enough, and the photos are of high enough quality. Obviously, so that later your signature looks good, it doesn’t break.
As most people would know, you can apply bold formatting in Word using Ctrl+b or the Bold icon on the Home table on the Ribbon.
But what if you want more? What if you have some specific text scattered throughout your document that you want to make bold in one action? This was the issue Colin faced. In a comment on one of my other blog posts, Colin asked if there was a way to apply bold a set of characters that all started with the same code, but had different numbers after that code (e.g. like product codes). In his example, he had a lot of instances of VA-001, VA-002, etc. with the last three digits being different each time. He’d tried the method I’d documented in my earlier post, but he could only bold part of the code, not all of it.
As with any find and replace, once you identify the pattern, it’s easy enough to test various ways of finding a match and then applying the change to it. I figured out two methods—both using wildcards. The first method assumes there are only ever three characters (not, 1, 2, 4, etc.) after the VA- part, while the second applies to any length of the ‘word’ after VA-.
For both methods, open the Find and Replace window (Ctrl+h), click More, then check the option for Use wildcards.
Method 1: Only three characters
- In the Find field, type: (VA-)(???)
- In the Replace with field, type: 12
- With your cursor still in the Replace with field, click Format, then Font, then select Bold. You should see Font: Bold directly below the Replace with field (see screenshot).
- Click Replace a few times to make sure the find/replace is doing what you expect it to. Once you are satisfied, you can click Replace All.
Notes:
- In the Find, the code is separated into two parts, both surrounded by parentheses—the VA- part, which is a constant in what Colin had, and three question marks (???). A single question mark represents any single character, so by typing three question marks, you’re asking Word to look for ANY three characters (letters and/or numbers) after the VA- part. If you only had two characters, then you’d type two question marks; if you had 4, then you’d type four, etc.
- In the Replace, you’re replacing what was found in both parts with itself. In other words, you’re not changing anything. What you are doing in the Replace, though, is specifying that what you find and replace with itself is now bold (step 3).

Method 2: Any number of characters
- In the Find field, type: (VA-)(*>)
- In the Replace with field, type: 12
- With your cursor still in the Replace with field, click Format, then Font, then select Bold. You should see Font: Bold directly below the Replace with field (see screenshot).
- Click Replace a few times to make sure the find/replace is doing what you expect it to. Once you are satisfied, you can click Replace All.
Notes:
- In the Find, the code is separated into two parts, both surrounded by parentheses—the VA- part, which is a constant in what Colin had, and an asterisk followed by a right chevron arrow. The asterisk represents any number of characters from one to infinity. Because a ‘character’ in Word could be a space, you don’t want it to find EVERY character after the VA- part—you’d get the whole document! So you add the > to tell Word to stop at the end of the ‘word’ it finds. In other words, it will stop at any character that typically follows a set of adjacent characters (a ‘word’), such as a space, period, comma, colon, semicolon, etc.
- In the Replace, you’re replacing what was found in both parts with itself. In other words, you’re not changing anything. What you are doing in the Replace, though, is specifying that what you find and replace with itself is now bold (step 3).

[Links lat checked September 2018]
 Please Note:
This article is written for users of the following Microsoft Word versions: 97, 2000, 2002, and 2003. If you are using a later version (Word 2007 or later), this tip may not work for you. For a version of this tip written specifically for later versions of Word, click here: Making Text Bold.
![]()
Written by Allen Wyatt (last updated April 15, 2021)
This tip applies to Word 97, 2000, 2002, and 2003
You probably already know that there are a number of ways you can make text bold in Word. One common way is to press Ctrl+B when you want to «turn on» the bold character attribute, type your word (or words), and then press Ctrl+B to turn it off.
Word provides another quick way to make text bold—using asterisks. This may sound strange, but is actually quite common in the on-line world. In plain text e-mail messages, people often use asterisks to *emphasize* words. If you type asterisks in this manner (directly next to a word or group of words, with no intervening spaces) in Word, the asterisks are automatically removed and the word(s) are shown in bold type.
You can try this yourself by typing *this is bold* (exactly as shown here, including spacing) within Word. When you type the second asterisk, both asterisks should disappear and the words «this is bold» are shown in bold type.
If this formatting shortcut doesn’t work for you, it is because of a setting in Word’s AutoFormat feature. Follow these steps:
- Choose AutoCorrect Options from the Tools menu. Word displays the AutoCorrect dialog box.
- Make sure the AutoFormat As You Type tab is displayed. (See Figure 1.)
- Make sure the *Bold* and _Italic_ with Real Formatting check box is selected.
- Click OK.
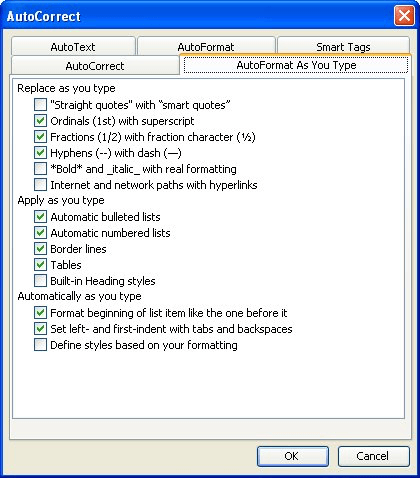
Figure 1. The AutoFormat As You Type tab of the AutoCorrect dialog box.
The shortcut should now work just fine.
WordTips is your source for cost-effective Microsoft Word training.
(Microsoft Word is the most popular word processing software in the world.)
This tip (636) applies to Microsoft Word 97, 2000, 2002, and 2003. You can find a version of this tip for the ribbon interface of Word (Word 2007 and later) here: Making Text Bold.
Author Bio
With more than 50 non-fiction books and numerous magazine articles to his credit, Allen Wyatt is an internationally recognized author. He is president of Sharon Parq Associates, a computer and publishing services company. Learn more about Allen…
MORE FROM ALLEN
Copying Worksheets in a Macro
Copying worksheets (one or many) is easy to do manually. What is not well known is that it is even easy to make the …
Discover More
Alt+Enter Stopped Working Correctly
What do you do if a keypress you know worked correctly before all of a sudden stops working as you expect? This tip …
Discover More
ExcelTips: Times and Dates
Excel is great at storing all types of data, including times and dates. ExcelTips: Times and Dates provides the …
Discover More
Learning Objectives
- Make text italic, bold, or underlined.
When formatting a document, you may need to emphasize or distinguish words. You can do this with bold, italics, underline, or all three.
To bold, italicize, or underline, select the text you want to change. Then, select the Bold, Italics, or Underline button in the Home tab as shown below.

You can also select the text, then use a shortcut:
| Bold | Ctrl+B (Command+B for Macs) |
| Italics | Ctrl+I (Command+I for Macs) |
| Underline | Ctrl+U (Command+U for Macs) |
Applying the formatting twice removes the formatting. For example, selecting bolded text and then clicking the Bold button will remove the bold formatting.
Practice Question
Practice Question
Continue With the Mobile App | Available on Google Play
[Attributions and Licenses]
One way to change the appearance of text in a document is by changing its font type. A font is a set of letters, numbers, and punctuation symbols designed around a shared appearance. A font will have variations for size and styles, such as bold and italics.
Change the Font
Changing a font itself will have the greatest effect on the appearance of text.
- Select the text you want to change.
- Click the Font list arrow on the Home tab.
- Select a new font from the list.
You can also click the Font list arrow on the Mini Toolbar that appears when text is selected.
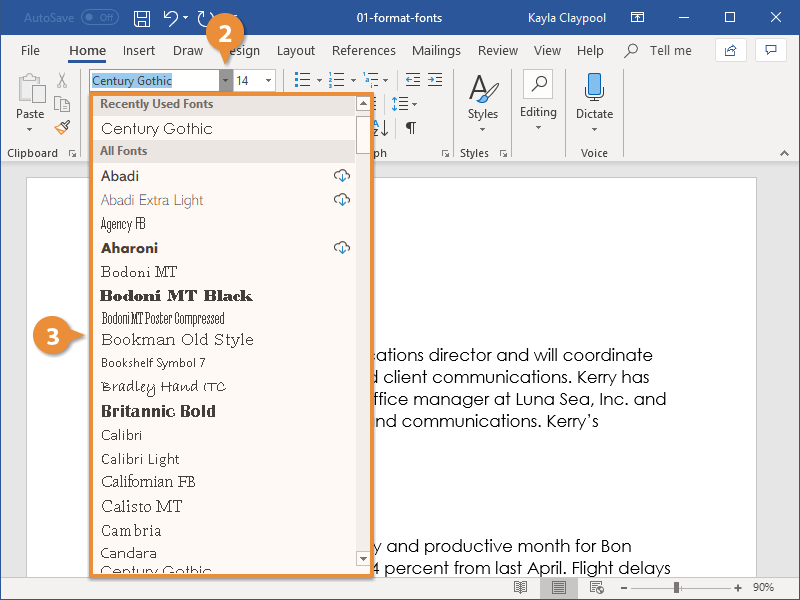
The text is now set in the selected font.
When changing fonts, be sure to choose the right font for the tone of your document. Don’t use casual script fonts in a professional document, and also avoid using too many fonts at once.
| Font Type | Examples | Description |
|---|---|---|
| Serif | Times New Roman, Garamond, Cambria, Georgia, Palatino | Serifs are small details at the ends of some letter strokes, meant to improve legibility. Suitable for both header and body text. |
| Sans Serif | Arial, Calibri, Helvetica, Verdana, Trebuchet MS | Sans serif fonts lack the small details at ends of letter strokes, leading to a plainer look. Suitable for both header and body text. |
| Script | Brush Script, Zapfino, Lucida Handwriting | These fonts are meant to mimic handwriting, either calligraphic or casual. Useful in very specific designs, but unsuitable for body text and most headers. |
| Monospace | Courier New, Consolas, American Typewriter | All letters and symbols use the exact same amount of space. Useful when displaying computer code, or when precise horizontal alignment between lines is important. |
Change the Font Size
Changing the font size helps differentiate between titles, headers, and body text.
- Select the text.
- Click the Font Size list arrow on the Home tab.
- Select a font size.
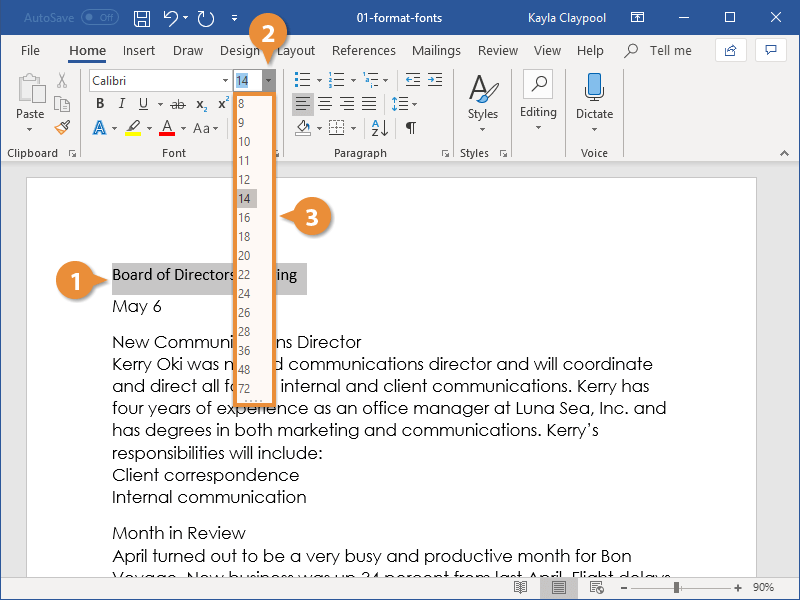
The font size changes.
Click the Increase Font Size or Decrease Font Size buttons to increase or decrease by one point at a time.
Font size is measured in points (pt) that are 1/72 of an inch. The larger the number of points, the larger the font.
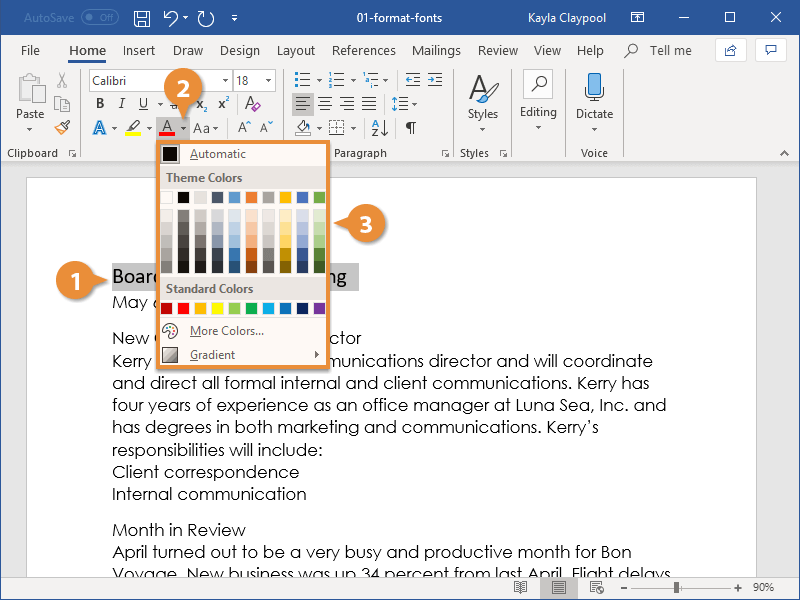
Change the Font Color
You may need to change font color to make text stand out, comply with brand standards, or add visual appeal.
- Select the text you want to change.
- Click the Font Color list arrow.
You can also click the Font Color list arrow on the Mini Toolbar.
- Select a new color.
If you don’t like any of the available theme colors, select More Colors to display the Colors dialog box.

Apply Bold, Italic, or an Underline
In addition to changing font type, size, and color, you can also enhance the text further by using other features in the Font group like bold, italic, or underline.
- Select the text you want to change.
- Select Bold, Italics, or Underline.
Shortcuts:
- To bold: Ctrl + B
- To italicize: Ctrl + I
- To underline: Ctrl + U
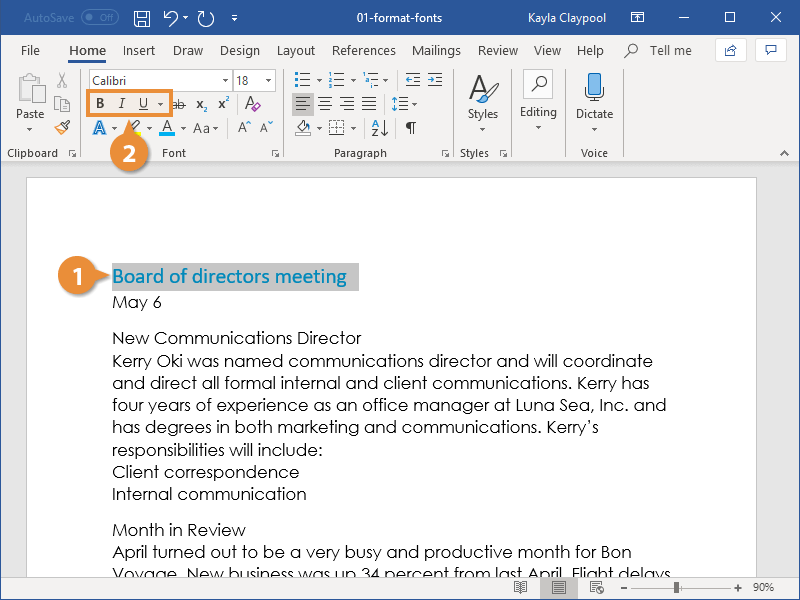
The effect is applied.
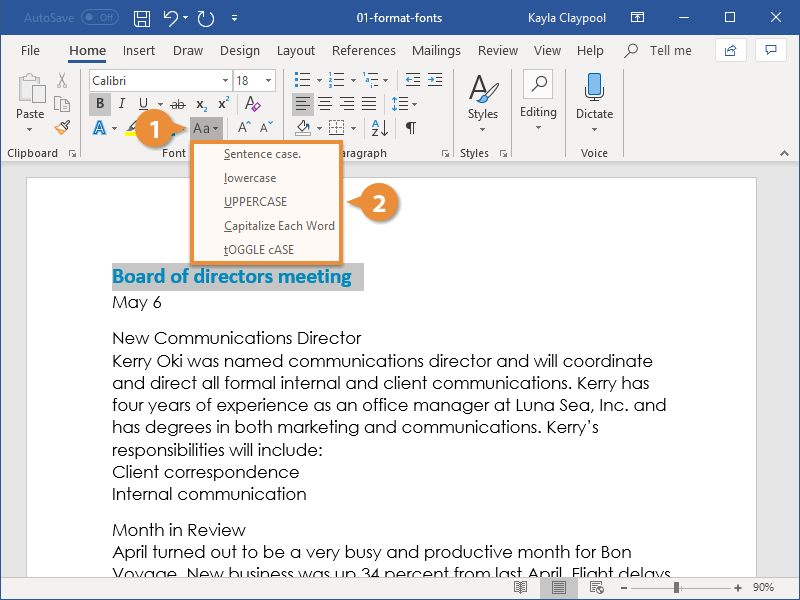
Change the Case
If you want to change the case of a block of text, you don’t need to retype the whole thing. You can easily change the case of selected text with the Change Case menu.
- With the text selected, click the Change Case button.
- Select a case option:
- Sentence case
- lowercase
- UPPERCASE
- Capitalize Each Word
- tOGGLE cASE
Clear Formatting
If you change your mind and want to remove all formatting from text, you can easily clear all formatting at once.
- With the text selected, click Clear All Formatting.

The extra formatting is removed, and the text is reset to the default style.

FREE Quick Reference
Click to Download
Free to distribute with our compliments; we hope you will consider our paid training.