
This lesson will go over how to apply with borders and shades in Word. In Microsoft Word, you can add a border to any or all of the four sides of selected text, paragraphs, and pages.
Furthermore, you can also change the color of the space taken up by the selected text, paragraphs, and pages. This chapter will show you how to add borders—left, right, top, or bottom, around text, paragraphs, or pages, as well as how to add different shades to them.
Table of contents
- What is Border and Shading in MS word
- Difference Between Border and Shading in MS Word
- How To Apply Border And Shading In MS Word
- How to Add Borders in Pages
- Summary
The borders and shading are options that can be used when we want some text or a paragraph to stand out in a Word document. This is also called the “First Impression.”
Moreover, in MS Word, we use borders and shading to make written text, paragraphs, etc. look good and attractive, as if they were jumping off the page.
Difference Between Border and Shading in MS Word
The difference between border and shading as the name suggests, the border gives the selected text or paragraph an outer or inner edge. Also it is a good alternative to font styles like bold, italic, and underline.
In addition, it draws a lot of attention quickly and doesn’t require any hard-core techniques. Moreover, borders are lines that you can put on any or all of a paragraph’s four sides.
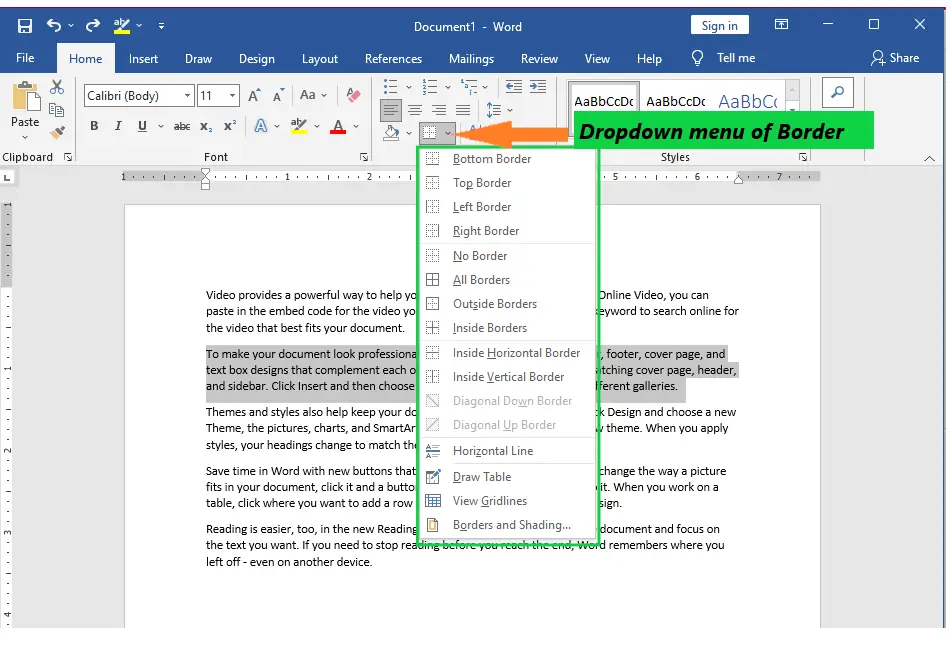
There are different kinds of borders in MS Word, which are:
- Bottom Border– At the bottom of the paragraph, there is a border.
- Top Border–The top of the paragraph has a border.
- Left Border–Left paragraph border.
- Right Border– Right side of the paragraph has a border.
- No Border– Gets rid of all the edges.
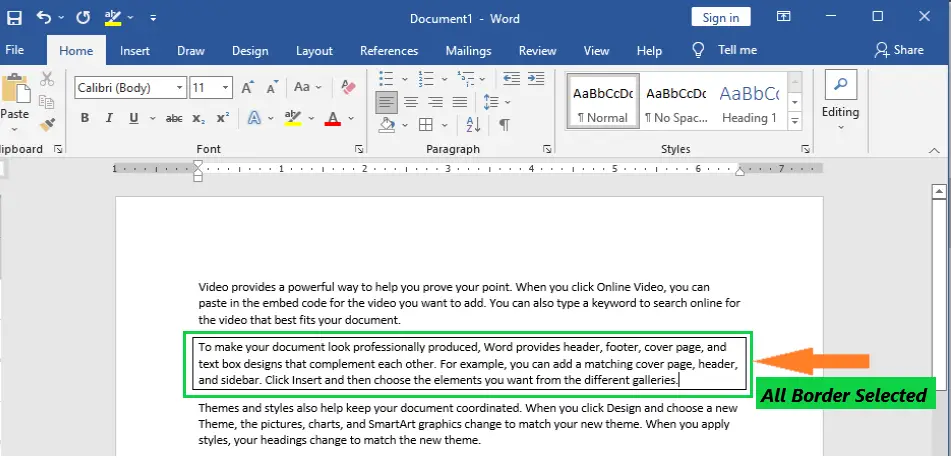
- All Borders– Paragraphs all have borders..
- Outside Borders– Outside the paragraph’s border.
- Inside Borders– Border within the paragraph
- Inside Horizontal Border– Paragraph has two horizontal borders.
- Inside Vertical Border– Paragraph has two vertical boundaries.
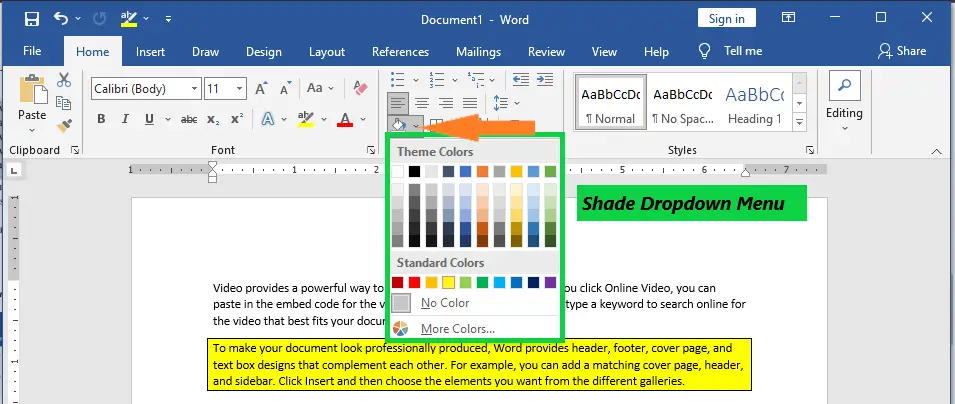
On the other hand, shading is the background color or design you use for a paragraph. When you shade words or paragraphs, the background color changes when you change the theme of the document. It’s not like highlighting text, which only lets you choose from a few colors and doesn’t change when you switch themes.
Finally, borders and shading are ways to improve the appearance of text, paragraphs, table cells, and frames.
How To Apply Border And Shading In MS Word
Here are the steps on how to apply border and shading in MS word document.
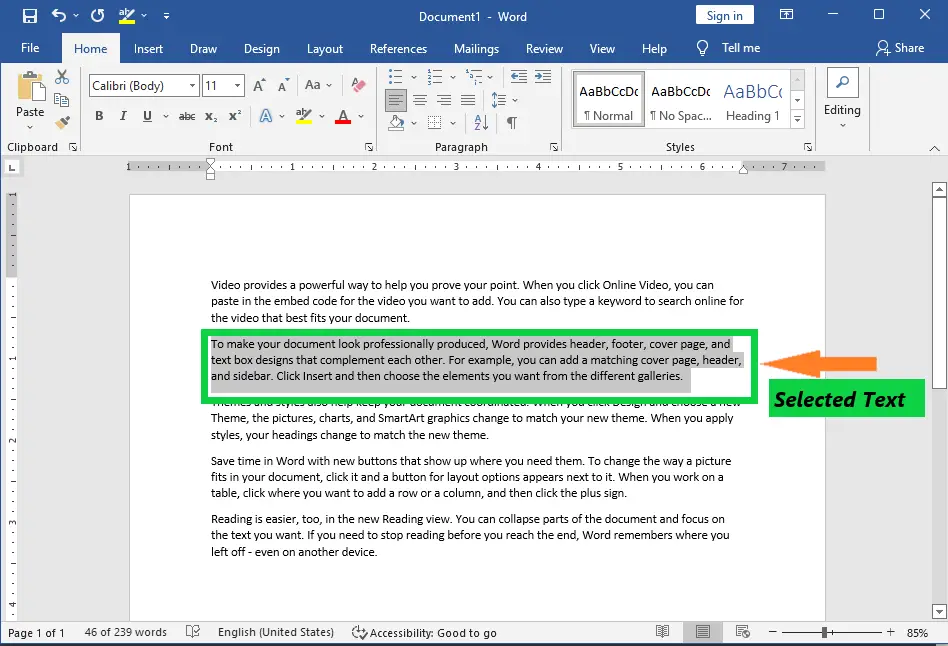
- Applying Border in Text/Paragraph
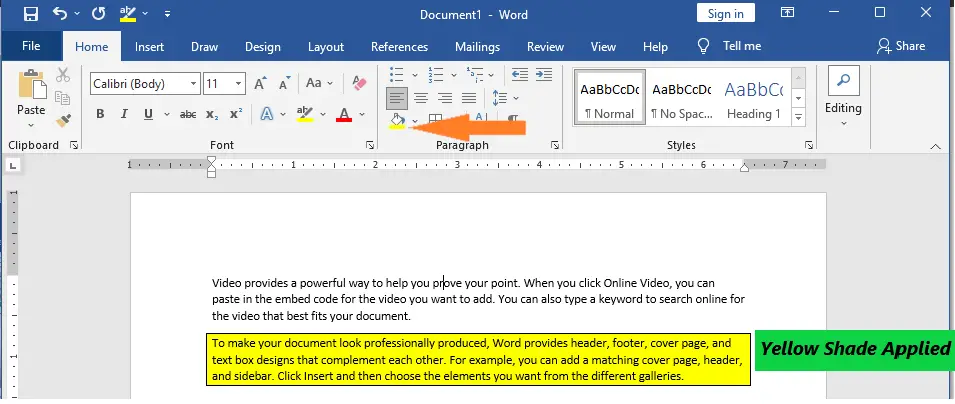
- Step 1. Select the text or paragraph to which you want to add a border.

- Step 2: Now, in the Paragraph menu on the Home bar, navigate to the Borders tab.

- Step 3: Choose your preferred border.

- Applying Shades in MS Word Document
- Step 1: Select the text to apply the Shading.
- Step 2: Now, go to the Shading tab in the Paragraph menu under the Home bar.

- Step 3: Select the Shading Color of your choice.
However, we can apply both at the same time (Border and Shading), thus making our paragraph more appealing.
How to Add Borders in Pages
By following the steps outlined below, you can add borders of your choice to documents pages.
Step 1 − Click the Border Button to see a list of border options. As shown in the image below, select the Border and Shading option at the bottom of the list of options.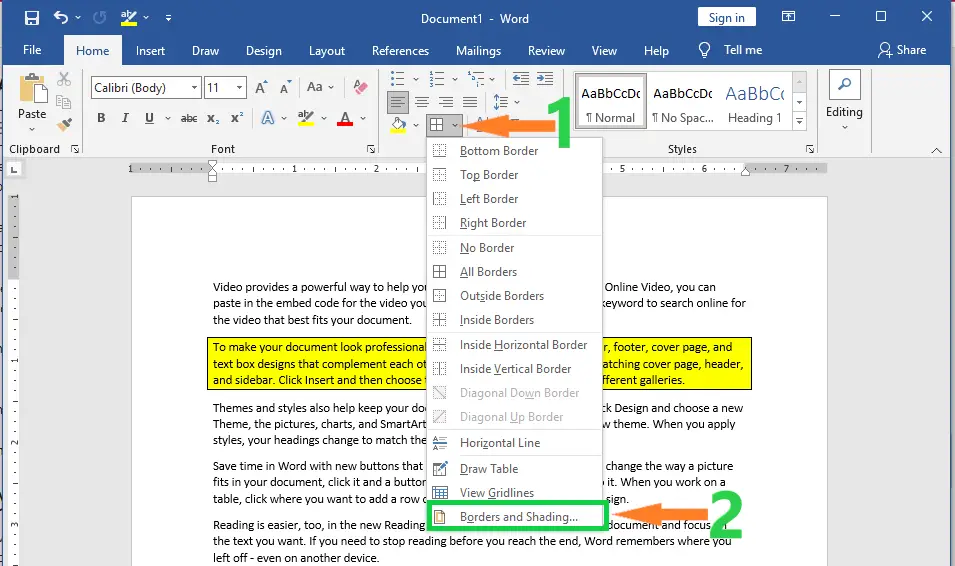
This will open the Border and Shading dialog box. This dialog box allows you to add borders and shading to selected text or page borders.
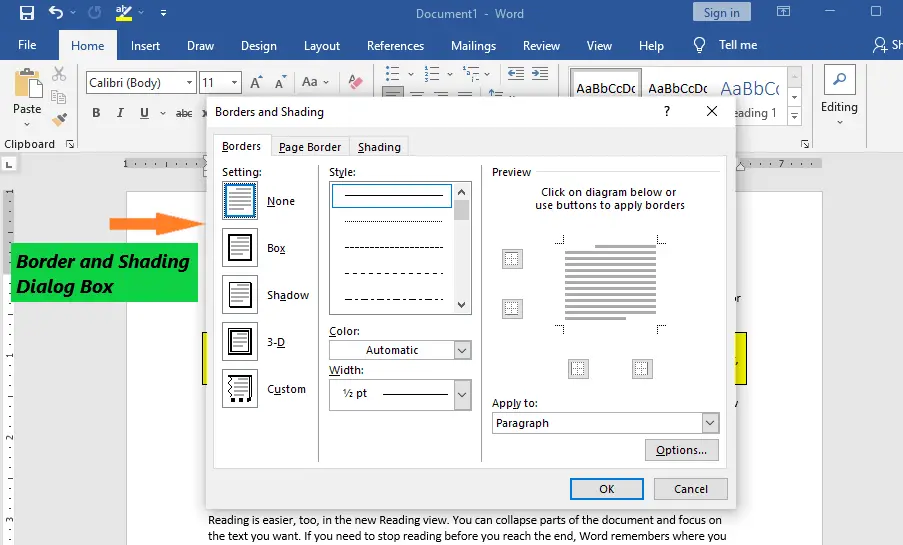
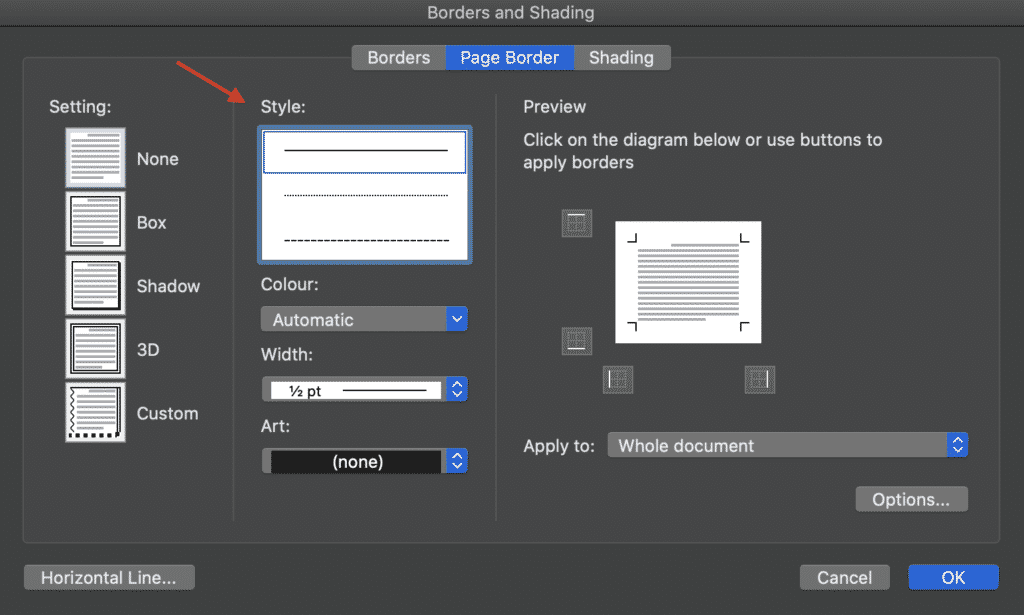
Step 2 − When you click the Page Border tab, a list of border settings, styles, and options will appear. You can choose whether this border should be applied to the whole document, just one page, or the first page.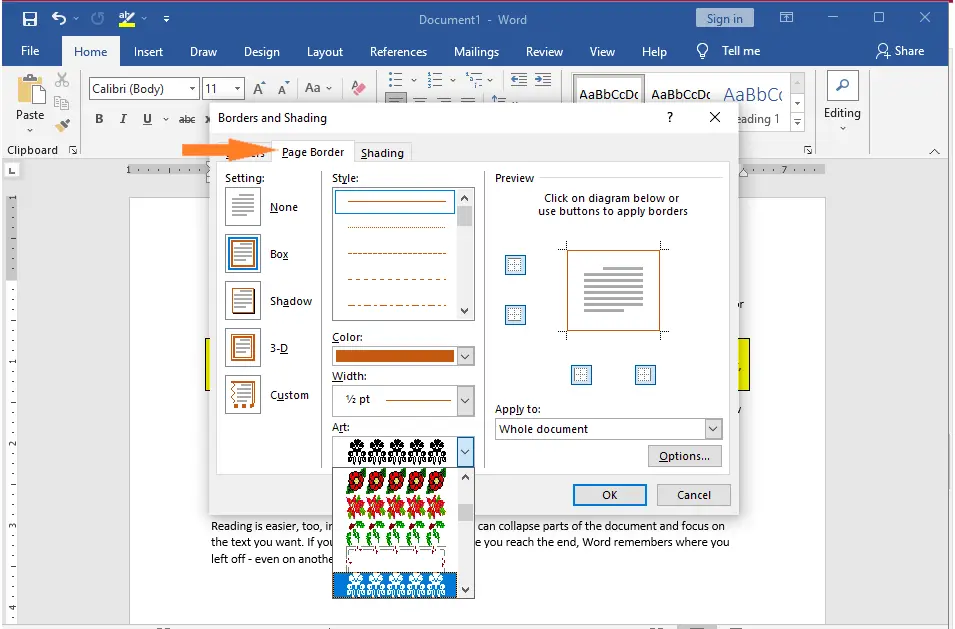
Step 3 − You can use the Preview section to disable or enable left, right, top or bottom borders of the page. Follow the instruction given in the preview section itself.
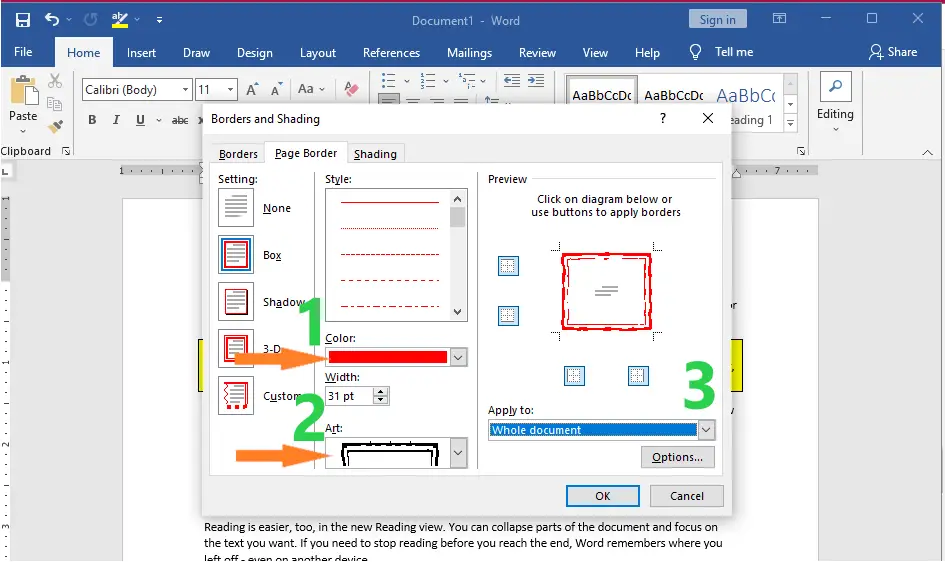
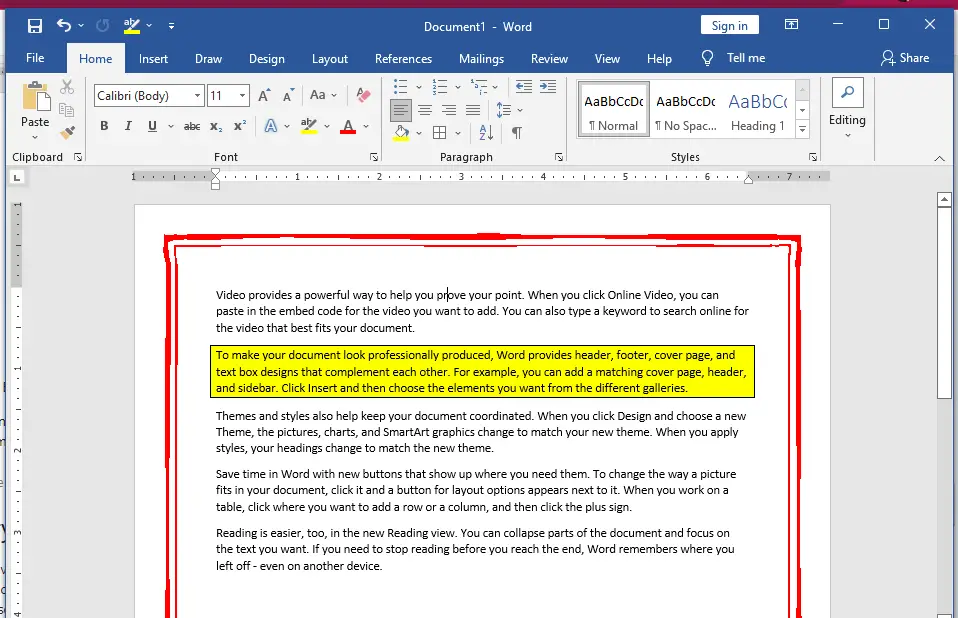
Step 4 − You can customize your border by setting its color, width by using different art available under the style section. You can have similar or even better borders as given below.
Summary
In summary, we’ve talked about how to apply border and shading in MS Word, as well as the different styles of border and shades in a document and what those terms mean. In addition, we know the available border and shades in Microsoft Word that makes our document presentable and creative.
We hope this tutorial helps you as you format your documents in MS Word.
PREVIOUS
NEXT
Text boxes in an MS Word document are a very useful feature. Text within a box acts as a highlight for the reader. Here, we will show you how to:
- Add a Text Box
- Remove a Text Box
- Customize a Text Box Border
- Change Border Color
- Create Dashed Border
- Change Border Thickness
Let us begin.
Step #1: Open the Word document.
Open the Word document where you want to add the text box.
Step #2: Add the Text Box
Position the cursor where you want the text box to appear.
In the top menu bar, click on the Insert tab to change the ribbon.

In the section Text, click on the Text Box icon to open a dialog box for Built-In text boxes.

Click on the text box you find suitable. We select the Simple Text Box.

Word adds the text box in the document.

Remove a Text Box
Step #1: Open the Word document.
Open the Word document that has at least one text box.
Step #2: Remove the text box
Click on the text box boundary to select it.

Press the Delete button on your keyboard.
Word will delete the text box from your document.
Customize a Text Box Border
Step #1: Open the Word document.
Open the Word document that has at least one text box.
Step #2: Customize the text box border
Click on the text box boundary to select it.

Right-click on the text box boundary to open a menu.
Click on Format AutoShape/Picture.

This opens a dialog box for Format Text Box.
Click on the Colors and Lines tab.

Change Border Color
Under Line, click on the down arrow on the right-hand side of Color:.

This opens a dialog box for Theme Colors and Standard Colors.
Click on the color of your choice.

The chosen color will appear against the Color: tab under Line.

Note: At this point, you can click on OK at the bottom of the dialog box to exit. Word will change the color of the box to your chosen color. Else, move to the next step to make more changes.
Create Dashed Border
In the Format Text Box dialog box, under Line, click on the down arrow on the right side of Dashed:.

This opens a choice for different dashed lines.
Select the most suitable dashed line.

The chosen dashed line will appear against the Dashed: tab under Line.

Note: At this point, you can click on OK at the bottom of the dialog box to exit. Word will make the changes to the text box as per your choices above. Else, move to the next step to make more changes.
Change Border Thickness
In the Format Text Box dialog box, under Line, click on the down arrow on the right side of Style:.

This opens a choice for lines of a different style.
Each line style has its weight in points on its left.
Select the line most suitable to you.

The chosen line style will appear against the Style: tab.
The weight of the chosen line style will appear against the Weight: tab under Style:.

The choice of line styles offers only a few discrete weights.
To change the line weight, select the number next to Weight:.
Change the number as you like.

Click on OK at the bottom of the Format Text Box dialog box to exit.
Word will make the changes to the text box according to all your choices.

Conclusion
Follow our step-by-step instructions to add or delete text boxes in your Word document. Beautify your text boxes with our instructions. We have shown you how to change the border color, style of the border line, and the thickness of the border.
Borders and shading are used in Word Documents when we want some text/paragraph to grab the attention of the viewers, making it the First Impression. In MS Word we can apply the Borders and Shading to the written text, paragraph, etc. to make them look good and appealing like they pop out of the page.
Applying Borders
The border as the name suggests provides an outer/inner lining on the selected text/paragraph. A Border is a good alternative to the Fonts Styles such as Bold, Italics, and Underline and grabs much attention quickly without hardcore techniques.
In MS Word there are multiple types of borders which are as follows:
- Bottom Border– Border at the bottom of the Paragraph.
- Top Border– Border at the top of the Paragraph.
- Left Border– Border on the left side of the Paragraph.
- Right Border– Border on the right side of the Paragraph.
- No Border– Removes all the borders.
- All Borders– Border on all sides of the Paragraph.
- Outside Borders– Border outside the Paragraph.
- Inside Borders– Border inside the Paragraph.
- Inside Horizontal Border– Horizontal borders on both sides inside the Paragraph.
- Inside Vertical Border– Vertical borders on both sides inside the Paragraph.
Steps to Apply:
Step 1: Select the text/Paragraph to apply Border.

Step 2: Now, go to the Borders tab in the Paragraph menu under the Home bar.

Step 3: Select the border of your choice.

Applying Shades
Another way of grabbing the attention of the viewers more likely is by using the Shading feature in the Word Document. It is similar to highlighting the text/Paragraph.
In MS Word there are multiple colors available in the Shading tab, which you can apply to your text or paragraph like: red, blue, black, etc.
Steps to Apply:
Step 1: Select the text to apply the Shading.

Step 2: Now, go to the Shading tab in the Paragraph menu under the Home bar.

Step 3: Select the Shading Color of your choice.

However, we can apply both at the same time (Border and Shading), thus making our paragraph more appealing.

alleycat
-
#1
can you have tables setup to automatically have bold header row and bold
border on the outside and thiner border within the table. and have these
settings automatically applied to new tables added within a document
Advertisements
Jezebel
-
#2
Depends on your version of Word. Table styles were introduced with W2000 or
2003. A table style enables you to specify some table properties, and
borders, fonts, etc, by row and column; and you can nominate a particular
table style as the default for new tables.
Advertisements
Suzanne S. Barnhill
-
#3
As Jezebel says, a table style seems to be what you’re looking for. In Word
2000, you are limited to selecting your favorite Table AutoFormat as the
default (for the current document or its template). Real table styles (which
are user customizable) were introduced in Word 2002; they can be saved in
documents or templates. They have certain drawbacks, however; see
http://www.shaunakelly.com/word/tablestyles/index.html.
Another approach is to save a formatted table as an AutoText entry. This can
be saved in a specific document template for use in documents based on that
template.
Want to reply to this thread or ask your own question?
You’ll need to choose a username for the site, which only take a couple of moments. After that, you can post your question and our members will help you out.
Ask a Question
![]()
Download Article
Learn how to insert a lined or art border in Microsoft Word documents on desktop
![]()
Download Article
- Adding a Page Border (Windows)
- Adding a Page Border (Mac)
- Adding a Text Border
- Q&A
|
|
|
Do you want to make an outside border in your Microsoft Word documents? You can easily add a solid or dotted border to an entire page or selected content. You can also use Microsoft Word’s included designs to create an artistic border for themed event flyers. This wikiHow will show you how to create a border around text, images, or pages in Microsoft Word using your Windows or Mac computer.
Things You Should Know
- To add a page border, click «Design» → «Page Borders». Select a border setting, style, and page application. Click «OK».
- To add a border around text or images, select the content. Click the «Home» tab and click the arrow next to the border icon. Click «Borders and Shading…»
- Select a border setting, style, and page application. Click «OK».
-
1
Open a project in Microsoft Word. This looks like a W on top of a blue square. Microsoft Word is available to install for Windows.[1]
- You must have a subscription to use Office 365.
- Use this method to add a lined border around a Microsoft Word document. This is different from changing the margins.
-
2
Click Design. This will be in the top toolbar, between Draw and Layout.
Advertisement
-

3
Click Page Borders. You can find this at the left side of the Design section, next to Page Color. It will have an icon of a page with a yellow border.
- A new window will open.
-
4
Click Page Border. This is the middle tab on the Borders and Shading window. You may already be on this tab.
-
5
Select a border setting. In the left-most column, click the border option that you want to use. Select from: None, Box, Shadow, 3-D, and Custom.
- If you want a simple border to go all the way around your page, select Box.
- To add a border with fun images, click the Art drop-down menu and select from Word’s art gallery. This border can be used for themed flyers for holidays and events.
-
6
Select a border style. In the «Style» column, scroll down until you find the border style you want to use, then click the style. Select from the various solid and dotted line styles.
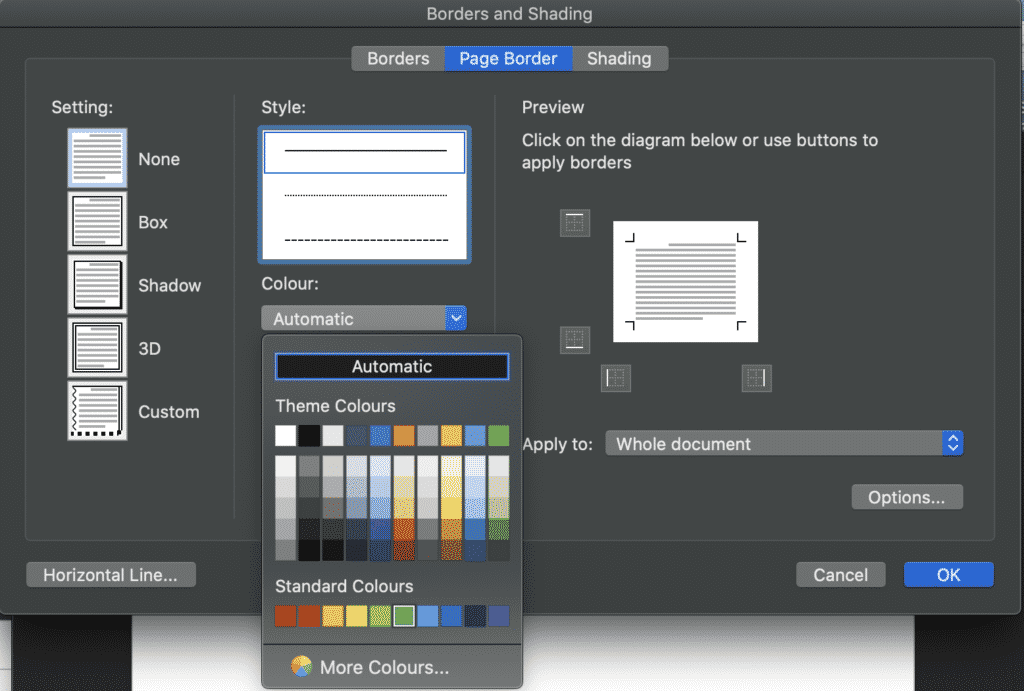
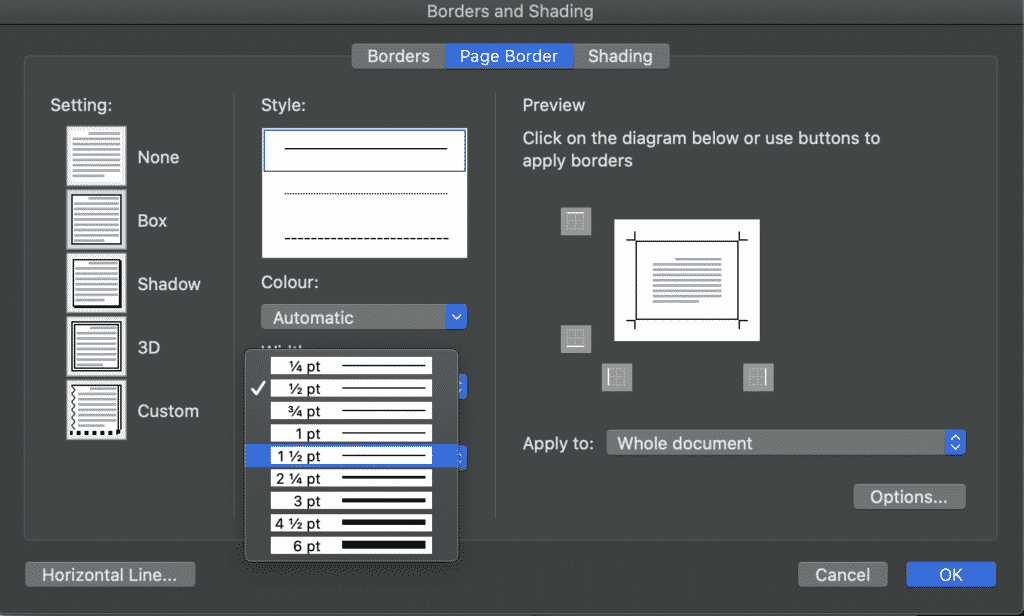
- If needed, you can also change the border’s color and width from the Color and Width drop-down menus, respectively.
-
7
Select pages to use. If you created a new section earlier in this method, click the «Apply to» drop-down box, then click the section to which you want to apply the border in the resulting drop-down menu.
- To apply the border to the first page of your section, click This section — first page only in the drop-down menu.
-
8
Click OK. It’s at the bottom of the page. This will apply the border to your document’s specified page(s).

Advertisement
-
1
Open a project in Microsoft Word. This looks like a W on top of a blue square. Microsoft Word is available to install for Mac.[2]
- You must have a subscription to use Office 365.
-
2
Click Design. This will be in the top toolbar, between Draw and Layout.
-
3
Click Page Borders. You can find this at the left side of the Design section, next to Page Color. It will have an icon of a page with a yellow border.
- The Borders and Shading window will open, set to the Page Border tab. If it isn’t already on the Page Border tab, click it now.
-
4
Select a border setting. In the left-most column, click the border option that you want to use. Select from: None, Box, Shadow, 3-D, and Custom.
- If you want a simple border to go all the way around your page, select Box.
- To add a border with fun images, click the Art drop-down menu and select from Word’s art gallery. This border can be used for themed flyers for holidays and events.
-
5
Select a border style. In the «Style» column, scroll down until you find the border style you want to use, then click the style. Select from the various solid and dotted line styles.
- If needed, you can also change the border’s color and width from the Color and Width drop-down menus, respectively.
-
6
Select pages to use. If you created a new section earlier in this method, click the «Apply to» drop-down box, then click the section to which you want to apply the border in the resulting drop-down menu.
- To apply the border to the first page of your section, click This section — first page only in the drop-down menu.
-
7
Click OK. This is the blue button. This will apply the border to your document’s specified page(s).
Advertisement
-
1
Open a project in Microsoft Word. This looks like a W on top of a blue square.
-
2
Click Home. This is in the top toolbar, between File and Insert.
-
3
Select content. Click and drag your mouse across the text or image(s) around which you want to place a border.
- This method will place a border around an entire selection of images and text together.
- If you want to place a border around a single image, double-click the image. Select a preset style from the Picture Styles section, or click Picture Border to set the color, weight, and design of the border.[3]
-
4
Click
next to the «Borders» button. The Borders button resembles a square divided into four smaller squares; you’ll find it in the «Paragraph» section of options in the toolbar, just right of the paint bucket icon. A drop-down menu will open.
- On a Mac, click the Format menu item at the top of the screen instead.
-
5
Click Borders and Shading…. It’s at the bottom of the drop-down menu. A new window will open.
- On a Mac, you’ll find this option in the middle of the Format drop-down menu.
-
6
Select a border setting. In the left-most column, click the border option that you want to use. Select from: None, Box, Shadow, 3-D, and Custom.
- If you want a simple border to go all the way around your text, select Box.
-
7
Select a border style. In the «Style» column, scroll down until you find the border style you want to use, then click the style. Select from the various solid and dotted line styles.
- If needed, you can also change the border’s color and width from the Color and Width drop-down menus, respectively.
- To add a border with images, click the Art drop-down menu and select a design.
-
8
Select pages to use. If you created a new section earlier in this method, click the «Apply to» drop-down box, then click the section to which you want to apply the border in the resulting drop-down menu.
- To apply the border to the first page of your section, click This section — first page only in the drop-down menu.
-
9
Click OK. This will apply the border to your document’s specified page(s).
- Be sure to save your document when you’re finished.
- You can also use Microsoft Word to create a booklet or another handout flyer.


Advertisement
Add New Question
-
Question
How can I place a border around a picture I’ve inserted into a document?

You do what is shown above, but instead, you click on the picture before you go through the steps.
-
Question
How do I put a border around a table in Microsoft Word?
Go into Format —> Borders and Shading. There you’ll find options for borders you can apply to the table.
-
Question
What three options can I set regarding a picture border?
The three option you can set are: small, medium and large.
Ask a Question
200 characters left
Include your email address to get a message when this question is answered.
Submit
Advertisement
Thanks for submitting a tip for review!
About This Article
Thanks to all authors for creating a page that has been read 971,313 times.
Is this article up to date?
Коллекция Borders и объекты Border показывают, как создать рамку в Word для заданного раздела, абзаца или текста в целом. В отличии от других объектов. Объекты Border предоставляют не общее количество рамок в документе, а только границы рамки, поясню…
Мы можем создать рамку в Word для заданного абзаца, тем самым получим доступ к коллекции Borders. Далее, нам нужно каждую границу рамки оформить в индивидуальный цвет, для этого, через метод Item(index) мы можем получить доступ к нужной границе данной рамки (верх, низ, правая или левая сторона), и уже потом, обработать ее в индивидуальном порядке.
Borders – как создать рамку в Word
Коллекция объектов Border, представляющих границы объекта Border. Мы можем как создать рамку в Word для заданного раздела, так и для абзаца или текста. Отсюда следует, что доступ к коллекции можно получить через свойство Borders, которое есть у следующих объектов:
Word Section – Создание рамки Word для заданного раздела.
Word Paragraph – Создание рамки Word для заданного абзаца.
Word Font, Range, Selection – В большинстве случает актуально использовать объект Font, так как он прямо говорит, что нужно применить рамку к тексту.
Свойства
Count — Возвращает количество объектов Border в коллекции Borders.
Enable – Свойство возвращает или устанавливает границы рамки в Word для заданного объекта. Может принимать логические значения true (установить рамку, заданную приложением по умолчанию), false (удалить рамку) или значения константы WdLineStyle.
DistanceFrom – Свойство возвращает или задает отступы для рамки. Применимо только для страниц! Значение константы WdBorderDistanceFrom:
- wdBorderDistanceFromPageEdge — 1 — С края страницы.
- wdBorderDistanceFromText — 0 — Начиная с текста.
DistanceFromBottom — Возвращает или задает отступ в пунктах между текстом и нижней границей рамки.
DistanceFromLeft — Возвращает или задает отступ в пунктах между текстом и левой границей рамки.
DistanceFromRight — Возвращает или задает отступ в пунктах между текстом и правой границей рамки Word.
DistanceFromTop — Возвращает или задает отступ в пунктах между текстом и верхней границей рамки.
Свойства EnableFirstPageInSection и EnableOtherPagesInSection всегда используются вместе, и, если одно свойство содержит значение true(false), то другое должно содержать противоположное значение, иначе, эффекта не будет.
EnableFirstPageInSection – Применить рамку только для первой страницы раздела. Возвращает или задает логические значения true или false. Только для страниц!
EnableOtherPagesInSection — Применить рамку для всех страниц раздела, кроме первой страницы. Возвращает или задает логические значения true или false. Только для страниц!
InsideColor и OutsideColor – Свойства возвращают или устанавливают 24 — битный цвет внутренних или внешних границ. Цвет можно задавать как с помощью функции RGB языка Visual Basic, так и с помощью значений константы wdColor. Как создать рамку в Word.
InsideColorIndex и OutsideColorIndex — Свойства возвращают или устанавливают цвет внутренних или внешних границ рамки в Word. Цвет можно задавать как с помощью функции RGB языка Visual Basic, так и с помощью значений константы WdColorIndex .
Свойства InsideLineStyle и OutsideLineStyle в большинстве случае должны использоваться вместе. Применять только свойство InsideLineStyle актуально тогда, если у нас выбрано несколько абзацев. Если мы применим данное свойство к одному абзацу, то возникнет ошибка.
InsideLineStyle и OutsideLineStyle – Свойства возвращают или устанавливают стиль внутренних или внешних границ для указанного объекта. Свойство может быть установлено в True, False или значение константы WdLineStyle. Как создать рамку в Word.
InsideLineWidth и OutsideLineWidth — Свойства возвращают или устанавливают ширину линии в пунктах для внутренней или внешней границы рамки. Свойство может быть установлено в True, False или значение константы WdLineWidth.
- wdLineWidth025pt — 2 — 0.25
- wdLineWidth050pt — 4 — 0.50
- wdLineWidth075pt — 6 — 0.75
- wdLineWidth100pt — 8 — 1.00
- wdLineWidth150pt — 12 — 1.50
- wdLineWidth225pt — 18 — 2.25
- wdLineWidth300pt — 24 — 3.00
- wdLineWidth450pt — 36 — 4.50
- wdLineWidth600pt — 48 — 6.00
Shadow – Возвращает или задает логическое значение, которое включает (true) или отключает (false) тени для рамки.
Методы
ApplyPageBordersToAllSections() — Применяет определенное ранее форматирование рамки в Word ко всем разделам документа.
Item(index) — Возвращает границу рамки для заданного диапазона или выделения. Параметр index содержит значение константы WdBorderType:
- wdBorderBottom — 3 — нижняя граница.
- wdBorderDiagonalDown — 7 — диагональная граница, начиная с верхнего — левого угла.
- wdBorderDiagonalUp — 8 — диагональная граница, начиная с нижнего — левого угла.
- wdBorderHorizontal — 5 — горизонтальные границы.
- wdBorderLeft — 2 – левая граница.
- wdBorderRight — 4 — правая граница.
- wdBorderTop — 1 — верхняя граница.
- wdBorderVertical — 6 — вертикальные границы
Border – как создать рамку в Word
Объект содержит только свойства
Свойства
Значения приведенных ниже константы смотрите в начале стать, в описании коллекции Borders.
ArtStyle — Возвращает или устанавливает графическое оформление рамки. Значение константы WdPageBorderArt. Только для страницы!
ArtWidth — Возвращает или задает ширину в пунктах для указанного графического оформления рамки в Word.
Color — Возвращает или устанавливает 24 — битный цвет рамки. Значение константы WdColor
ColorIndex — Возвращает или устанавливает цвет для указанной границы рамки. Значение константы WdColorIndex. Как создать рамку в Word.
Inside – Возвращает True, если внутренние границы могут быть применены к указанному объекту.
LineStyle — Возвращает или задает стиль линии границы. Значение константы WdLineStyle.
LineWidth — Возвращает или устанавливает ширину линии границы рамки в Word. Значение константы WdLineWidth.
Visible – Позволяет показать (true) или скрыть (false) рамку. Чтение и запись
Хорошо, теперь я приведу два примера кода на языке VBScript и JScript:
' ----------------------------------------------------------------------------
 ' Коллекция Borders и объект Border
 ' Создание рамки в Word для текста, абзаца и раздела
 ' Borders.vbs
 ' ----------------------------------------------------------------------------
 Option Explicit
dim oWord, oDoc, oSel, i, oPars, MyText, oRange
 dim oParsRange, oParsRangeFont
Set oWord = CreateObject("Word.Application")
 Set oDoc = oWord.Documents
 oDoc.Add()
 oWord.Visible = True
 Set oRange = oDoc(1).Range()
 Set oSel = oWord.Selection
MyText = "Как создать рамку в Word. "
For i=0 to 40
 oSel.TypeText MyText & MyText & MyText & MyText & MyText & MyText & MyText
 oSel.TypeParagraph
 Next
Set oPars = oRange.Paragraphs
'---------------------------------------------------------------------------------------
 ' Создаем рамку для первого абзаца и определяем отступы
 '---------------------------------------------------------------------------------------
 oPars(1).Borders.Enable = true
 oPars(1).Borders.DistanceFromBottom = 15
 oPars(1).Borders.DistanceFromLeft = 15
 oPars(1).Borders.DistanceFromRight = 15
 oPars(1).Borders.DistanceFromTop = 15
 '---------------------------------------------------------------------------------------
'---------------------------------------------------------------------------------------
 ' Создаем рамку для третьего абзаца
 ' определяем толщину и цвет границ
 '---------------------------------------------------------------------------------------
 oPars(3).Borders.Enable = true
 oPars(3).Borders(1).LineWidth = 18
 oPars(3).Borders(1).ColorIndex = 9
 oPars(3).Borders(2).LineWidth = 18
 oPars(3).Borders(2).ColorIndex = 10
 oPars(3).Borders(3).LineWidth = 18
 oPars(3).Borders(3).ColorIndex = 11
 oPars(3).Borders(4).LineWidth = 18
 oPars(3).Borders(4).ColorIndex = 12
 '---------------------------------------------------------------------------------------
'---------------------------------------------------------------------------------------
 ' Формируем ссылку на заданный диапазон
 ' Диапазон содержит выбор - от 5 по 10 абзацы
 ' Применяем форматирование к заданному выбору
 '---------------------------------------------------------------------------------------
 Set oParsRange = oDoc(1).Range(oDoc(1).Paragraphs(5).Range.Start, oDoc(1).Paragraphs(10).Range.End)
 oParsRange.Borders.InsideLineStyle = 22
 oParsRange.Borders.InsideLineWidth = 12
 oParsRange.Borders.OutsideLineStyle = 23
 oParsRange.Borders.OutsideLineWidth = 18
 '---------------------------------------------------------------------------------------
'---------------------------------------------------------------------------------------
 ' Применяем рамки к выбранному тексту
 '---------------------------------------------------------------------------------------
 Set oParsRangeFont = oDoc(1).Range(oDoc(1).Paragraphs(13).Range.Start, oDoc(1).Paragraphs(15).Range.End)                                                                                                                             ' как создать рамку в Word
 oParsRangeFont.Font.Borders.Enable = 20
'---------------------------------------------------------------------------------------
 ' Создаем рамку для всего раздела документа
 '---------------------------------------------------------------------------------------
 For i = 1 to oDoc(1).Sections(1).Borders.Count
 oDoc(1).Sections(1).Borders(i).LineStyle =19
 Next
 oDoc(1).Sections(1).Borders.ApplyPageBordersToAllSections
 '---------------------------------------------------------------------------------------
'---------------------------------------------------------------------------------------
 ' Определяем новый стиль границ рамки и их ширину
 '---------------------------------------------------------------------------------------
 oDoc(1).Sections(1).Borders(1).ArtStyle = 22
 oDoc(1).Sections(1).Borders(1).ArtWidth = 10
 '---------------------------------------------------------------------------------------
'---------------------------------------------------------------------------------------
 ' Применяем рамку только для певой страницы раздела
 '---------------------------------------------------------------------------------------
 oDoc(1).Sections(1).Borders.EnableFirstPageInSection = true
 oDoc(1).Sections(1).Borders.EnableOtherPagesInSection = false
 '---------------------------------------------------------------------------------------
// ----------------------------------------------------------------------------
 // Коллекция Borders и объект Border
 // Создание рамки в Word для текста, абзаца и раздела
 // Borders.js
 // ----------------------------------------------------------------------------
 var oWord, oDoc, oSel, i, oPars, MyText, j, oRange;
 var oParsRange, borderLoop, oParsRangeFont;
oWord = WScript.CreateObject("Word.Application");
 oDoc = oWord.Documents;
 oDoc.Add();
 oWord.Visible = true;
 oRange = oDoc(1).Range();
 oSel = oWord.Selection;
MyText = "Как создать рамку в Word. ";
for(i=0; i<=40; i++){
 oSel.TypeText(MyText + MyText + MyText + MyText);// + MyText + MyText + MyText);
 oSel.TypeParagraph();
 }
oPars = oRange.Paragraphs;

 //---------------------------------------------------------------------------------------
 // Создаем рамку для первого абзаца и определяем отступы
 //---------------------------------------------------------------------------------------
 oPars(1).Borders.Enable = true;
 oPars(1).Borders.DistanceFromBottom = 15;
 oPars(1).Borders.DistanceFromLeft = 15;
 oPars(1).Borders.DistanceFromRight = 15;
 oPars(1).Borders.DistanceFromTop = 15;
 //---------------------------------------------------------------------------------------
//---------------------------------------------------------------------------------------
 // Создаем рамку для третьего абзаца
 // определяем толщину и цвет границ
 //---------------------------------------------------------------------------------------
 oPars(3).Borders.Enable = true;
 oPars(3).Borders(1).LineWidth = 18;
 oPars(3).Borders(1).ColorIndex = 9;
 oPars(3).Borders(2).LineWidth = 18;
 oPars(3).Borders(2).ColorIndex = 10;
 oPars(3).Borders(3).LineWidth = 18;
 oPars(3).Borders(3).ColorIndex = 11;
 oPars(3).Borders(4).LineWidth = 18;
 oPars(3).Borders(4).ColorIndex = 12;
 //---------------------------------------------------------------------------------------
//---------------------------------------------------------------------------------------
 // Формируем ссылку на заданный диапазон
 // Диапазон содержит выбор - от 5 по 10 абзацы
 // Применяем форматирование к заданному выбору
 //---------------------------------------------------------------------------------------
 oParsRange = oDoc(1).Range(oDoc(1).Paragraphs(5).Range.Start, oDoc(1).Paragraphs(10).Range.End);
 oParsRange.Borders.InsideLineStyle = 22;
 oParsRange.Borders.InsideLineWidth = 12;
 oParsRange.Borders.OutsideLineStyle = 23;
 oParsRange.Borders.OutsideLineWidth = 18;
 //---------------------------------------------------------------------------------------
//---------------------------------------------------------------------------------------
 // Применяем рамки к выбранному тексту
 //---------------------------------------------------------------------------------------
 oParsRangeFont = oDoc(1).Range(oDoc(1).Paragraphs(13).Range.Start, oDoc(1).Paragraphs(15).Range.End);                                                                                                                             // как создать рамку в Word
 oParsRangeFont.Font.Borders.Enable = 20;
//---------------------------------------------------------------------------------------
 // Создаем рамку для всего раздела документа
 //---------------------------------------------------------------------------------------
 for(i = 1; i<=oDoc(1).Sections(1).Borders.Count; i++){
     oDoc(1).Sections(1).Borders(i).LineStyle =19;
 }
 oDoc(1).Sections(1).Borders.ApplyPageBordersToAllSections();
 //---------------------------------------------------------------------------------------
//---------------------------------------------------------------------------------------
 // Определяем новый стиль границ рамки и их ширину
 //---------------------------------------------------------------------------------------
 oDoc(1).Sections(1).Borders(1).ArtStyle = 22;
 oDoc(1).Sections(1).Borders(1).ArtWidth = 10;
 //---------------------------------------------------------------------------------------
//---------------------------------------------------------------------------------------
 // Применяем рамку только для певой страницы раздела
 //---------------------------------------------------------------------------------------
 oDoc(1).Sections(1).Borders.EnableFirstPageInSection = true;
 oDoc(1).Sections(1).Borders.EnableOtherPagesInSection = false;
 //---------------------------------------------------------------------------------------

Видим, что программный код получался довольно объемным, да и сама статья тоже не маленькая. Не буду вникать в описание сценариев, так как описание я дал в самих комментариях. Скажу лишь, что после запуска сценария будет создан документ с заданным текстом, некоторые абзацы и первая страница будут отформатированы — в виде различных рамок.
Changing the colour, width or style of your page border in Microsoft Word is a creative way to customise your document.
Microsoft offers hundreds of different border styles, including art works (pictures) that can be used to add flowers, stars, pumpkins, musical notes and more into your border.

The standard border style in Microsoft is a single black line.
The standard border width in Microsoft is 1/2pt.
Therefore, updating this may result in a more suitable border for your project, allowing your document to stand out.
In this post we will walk you through how to change the style and size of your border.
Changing the Style and Size of your Border in Word
- Open Microsoft Word
- Press the Design tab
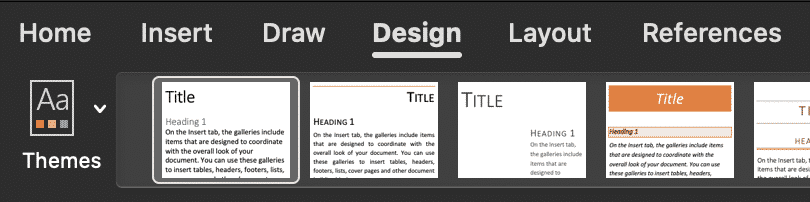
- Press Page Borders

- In the Border pop-out window, select the style of border you would update to
- Press the Art drop-down to insert a pictured border e.g. Christmas trees
- In the same Borders pop-out window, select the border colour you would like to update to.
- Finally, update the width of your border in the same pop-out window by pressing Width
- Press OK
Changing your border colour, style or artwork is a fun way to bring your Word Document to life.
You have now successfully customised your border.
Looking for a better way to Collaborate in Microsoft Word?
You’re not the only one!
If you are facing the frustrations that seem to come hand in hand with collaborating in Microsoft Word. Frustrations such as version control, tracking changes, merging documents, saving over old versions, missing edits…this list could go on forever but you know as well as we do that there has to be a better solution.
With technology making our lives so much easier, why hasn’t Microsoft clocked onto this yet and updated Word to never save over an existing file without asking, or to automatically track changes and keep a backup version of your old file – just in case you want to revert back to it later.
Well while we wait for Microsoft, i’d like to introduce you to a a new software that solves ALL of our collaboration issues…
Meet Simul Docs.

Simul Docs was built with collaboration in mind, they personally faced the same frustrations as you and I and decided to create a nifty, easy to use solution that integrates directly into your existing Microsoft Office.
Firstly, Simul Docs will automatically track every change you make to any document.

Simul knows you need them tracked and doesn’t expect you to remember to turn tracked changes, it’s automatic. You can focus on making the changes, while Simul Docs focuses on tracking them without you having to think about it.
Open the document, Simul will track all changes. Close the document and Simul will save it as a new version for you.

Simul also has your version control covered.
When a document is created Simul will automatically give this document a version number of 0.0.1. From there, every time the document is opened, edited and closed a new version will be created, named 0.0.2 followed by 0.0.3 and so on.
A versions list will appear on the left hand side of your document, making it easy for you to refer back to older versions at any time or track who in your team made edits where.

Once you are a Simul user, there are two ways you can use the Simul solutions with your existing or new Word Document.
Either edit your document directly in Simul’s user-friendly web page or download the document and edit in Word as you would if Simul wasn’t in the background making your life a whole lot easier.
All of Simul’s features will be working no matter where you decide to edit.
So Simul Docs is the solution you have been searching for, now it’s over to you to give it a try!
Updated: 05/16/2020 by

Microsoft Word gives you hundreds of page border options, allowing you to surround a page with a clean or fancy border, like a frame for a picture. You can also set a border to provide a shadow or 3D effect.
Add a border
- Open Microsoft Word.
- Click the Page Layout tab. In Word 2013 and 2016, click the Design tab instead.
- In the Page Background group, click the Page Borders option.
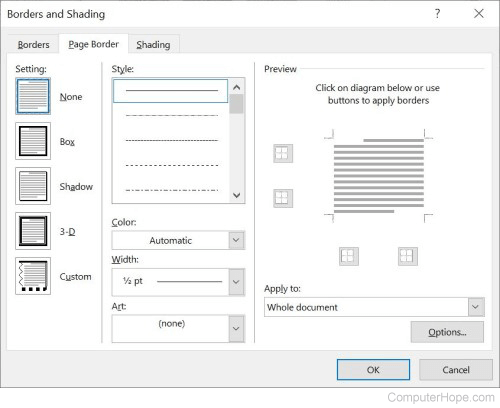
- In the Borders and Shading window (shown below), if not already selected, click the Page Border tab.
- Select Box if you want a square border around your page.
- Select the Style of border you want on the page, which can be solid, dotted, or dashed. Select the Color and Width of the border. If you want to select artwork to use as the border, click the down arrow for the Art drop-down menu. In the example below, we’re using the hearts art as a border.

Tip
By default, the borders are applied to the whole document, which means every page has the same border. Clicking the down arrow on Apply to gives you the option to select the first page only, selected page, all pages but the first page, and other options.
- Once you’ve selected all the border options you want to use in your document, click the OK button to apply the border.
Modify a border
- Open Microsoft Word.
- Click the Page Layout tab. In Word 2013 and 2016, click the Design tab instead.
- In the Page Background group, click the Page Borders option.
- In the Borders and Shading window (shown below), if not already selected, click the Page Border tab.
- Make the desired changes to the border that is currently set for the document or page. You can change the type of border in the Settings section, choosing from Box, Shadow, 3-D, or Custom. You can also change the style, color, and width of the order, and add or change art used in the border.
- When you have finished making the desired changes to the border, click the OK button to apply the changes.
Remove a border
- Open Microsoft Word.
- Click the Page Layout tab. In Word 2013 and 2016, click the Design tab instead.
- In the Page Background group, click the Page Borders option.
- In the Borders and Shading window (shown below), if not already selected, click the Page Border tab.
- Select None to remove any border on the page.
- Click the OK button to remove the border.