
-
README
-
Frameworks
-
Dependencies
-
Used By
-
Versions
This an assembly you can use for Word 2013/2016/2019 COM interop, generated and signed by Microsoft. This is entirely unsupported and there is no license since it is a repackaging of Office assemblies.
| Product | Versions |
|---|---|
| .NET |
net5.0 net5.0-windows net6.0 net6.0-android net6.0-ios net6.0-maccatalyst net6.0-macos net6.0-tvos net6.0-windows net7.0 net7.0-android net7.0-ios net7.0-maccatalyst net7.0-macos net7.0-tvos net7.0-windows |
| .NET Core |
netcoreapp2.0 netcoreapp2.1 netcoreapp2.2 netcoreapp3.0 netcoreapp3.1 |
| .NET Standard |
netstandard2.0 netstandard2.1 |
| .NET Framework |
net20 net35 net40 net403 net45 net451 net452 net46 net461 net462 net463 net47 net471 net472 net48 net481 |
| MonoAndroid | monoandroid |
| MonoMac | monomac |
| MonoTouch | monotouch |
| Tizen |
tizen40 tizen60 |
| Xamarin.iOS | xamarinios |
| Xamarin.Mac | xamarinmac |
| Xamarin.TVOS | xamarintvos |
| Xamarin.WatchOS | xamarinwatchos |
-
.NETFramework 2.0
- No dependencies.
-
.NETStandard 2.0
- No dependencies.
NuGet packages (28)
Showing the top 5 NuGet packages that depend on Microsoft.Office.Interop.Word:
| Package | Downloads |
|---|---|
|
fion.modelerp.core ModelErp |
112.3K |
|
MyLibery.dll Some useful function. |
16.4K |
|
WebForms.DocumentViewer WebFormsDocumentViewer is a simple custom control that lets you embed documents (PDF, Word, PowerPoint, Excel, RichTextFormat and Text) in your ASP.NET WebForms pages. |
9.6K |
|
BalaReva.Word.Activities This package contains the below Activities. |
8.9K |
|
Ns.Microsoft.Office.Interop.All Microsoft.Office.Interop.All 15.0.0.2 |
7.0K |
GitHub repositories (8)
Showing the top 5 popular GitHub repositories that depend on Microsoft.Office.Interop.Word:
| Repository | Stars |
|---|---|
|
greenshot/greenshot Greenshot for Windows — Report bugs & features go here: https://greenshot.atlassian.net or look for information on: |
3.3K |
|
Tichau/FileConverter File Converter is a very simple tool which allows you to convert and compress one or several file(s) using the context menu in windows explorer. |
2.6K |
|
saucepleez/taskt taskt (pronounced ‘tasked’ and formely sharpRPA) is free and open-source robotic process automation (rpa) built in C# powered by the .NET Framework |
802 |
|
telerik/xaml-sdk The XAML SDK is an easy-to-use infrastructure with 1000+ developer focused examples for most of the Telerik WPF and Silverlight controls. |
414 |
|
MicrosoftTranslator/DocumentTranslator-Legacy Microsoft Document Translator (Archive) — Replaced by the MicrosoftTranslator/DocumentTranslation project in this repository. |
400 |
“
Продолжаем работу над приложением и сегодня изучим способы его взаимодействия с Word. Разберем основные методы программной работы с документами такого типа и попробуем применить их на практике.
Для успешного освоения материала рекомендуем вам изучить следующие понятия:
DB (Database), БД. Организованная структура, предназначенная для хранения, изменения и обработки взаимосвязанной информации, преимущественно больших объемов
Windows Presentation Foundation. Аналог WinForms, система для построения клиентских приложений Windows с визуально привлекательными возможностями взаимодействия с пользователем, графическая (презентационная) подсистема в составе .NET Framework (начиная с версии 3.0), использующая язык XAML
Демонстрация работы с документами Word в WPF
На данном занятии будет реализована возможность экспорта данных из приложения для визуализации расходов пользователей в документ Word. Расходы каждого пользователя будут экспортироваться на отдельную страницу, названием которой будет ФИО пользователя. Расходы будут просуммированы по категориям и представлены в виде таблицы. Под таблицей будет размещена информация о максимальном и минимальном платежах данного пользователя. Основные шаги построения приложения:
- Подготовительный этап
- Реализация экспорта в документ Word
- Завершение оформления документа Word
1. Подключаем библиотеку для работы с Word


Важно
Для экспорта данных в Word используется библиотека InteropWord (Object Library), расположенная во вкладке COM
2. Добавляем кнопку экспорта

Важно
Экспорт данных в Word будет осуществляться с помощью кнопки «Экспорт в Word»
3. Подключаем пространство имен для работы с Word

Важно
Требуемое пространство имен подключается с помощью директивы using
Реализация экспорта в документ Word
1. Получаем список пользователей и категорий

Важно
Список пользователей и категорий выгружается из базы данных
2. Создаем новый документ Word

Важно
После создания экземпляра Word в приложение добавляется новый документ, с которым далее происходит работа
3. Создаем параграф для хранения названий страниц

Важно
Основной структурной единицей текста является параграф, представленный объектом Paragraph. Все абзацы объединяются в коллекцию Paragraphs, причем новые параграфы добавляются с помощью метода Add. Доступ к тексту предоставляет объект Range, являющийся свойством Paragraph, а текстовое содержание абзаца доступно через Range.Text. В данном случае для хранения ФИО каждого пользователя создается новый параграф
4. Добавляем названия страниц

Важно
В качестве названия выбирается имя пользователя, к которому применяется стиль «Title», после чего добавляется новый параграф для таблицы с платежами
5. Добавляем и форматируем таблицу для хранения информации о платежах

Важно
После создания параграфа для таблицы и получения его Range, добавляется таблица с указанием числа строк (по количеству категорий + 1) и столбцов. Последние две строчки касаются указания границ (внутренних и внешних) и выравнивания ячеек (по центру и по вертикали)
6. Добавляем названия колонок и их форматирование

Важно
Таблица состоит из трех колонок с названиями «Иконка», «Категория» и «Сумма расходов». Названия колонок выделяются жирным шрифтом и выравниваются по центру
7. Заполняем первую колонку таблицы

Важно
Положение ячейки заносится в переменную cellRange. Метод AddPicture() класса InlineShape позволяет добавить изображение в ячейку. Иконки категорий размещаются в новой папке Assets, основные шаги создания которой изображены на скриншоте
8. Форматируем первую колонку таблицы

Важно
Для первой колонки устанавливаются длина, ширина, а также горизонтальное выравнивание по центру
9. Заполняем вторую и третью колонки

Важно
Сумма платежей приводится к нужному формату с указанием единиц измерения (руб.) непосредственно в коде
Завершение оформления документа Word
1. Добавляем максимальную величину платежа

Важно
Для поиска максимального платежа сначала платежи сортируются по стоимости. В случае, если такой платеж найден, добавляется новый параграф. Получается диапазон и выводится текст с информацией о наименовании платежа, его стоимости и дате совершения. В заключение устанавливается стиль и цвет текста (красный)
2. Добавляем минимальную величину платежа

Важно
Аналогично среди всех платежей данного пользователя определяется наименьший платеж и отображается шрифтом зеленого цвета
3. Делаем заключительные шаги

Важно
По завершении работы с данными пользователя добавляется разрыв страницы. Далее, разрешается отображение таблицы по завершении экспорта. Наконец, документ сохраняется в формате .docx и .pdf

“
Вы познакомились с основными программными методами работы с документами Word в WPF. Теперь давайте перейдем от теории к практике!
Для закрепления полученных знаний пройдите тест
Выберите неверное утверждение относительно работы с документами Word:
Paragraph содержит все абзацы документа
Range предоставляет доступ к тексту абзаца
Обращение к ячейке начинается с указания номера строки
Range.Text и Paragraphs являются:
К сожалению, вы ответили неправильно
Прочитайте лекцию и посмотрите видео еще раз
Но можно лучше. Прочитайте лекцию и посмотрите видео еще раз
Вы отлично справились. Теперь можете ознакомиться с другими компетенциями
The C# programming language includes capabilities that make working with Microsoft Office API objects easier. With the advent of named and optional arguments, introduction of the dynamic type in .NET, and the ability to pass arguments to the reference parameters in COM methods, C# 4.0 quickly became the language of choice for working with COM and Interop objects.
This article talks about office interop objects in C# and how you can use them to interact with Microsoft Word and Microsoft Excel. Code examples are also provided to illustrate the concepts covered.
Prerequisites for working with Interop Objects
Visual Studio 2019 or Visual Studio 2022 must be installed on your computer to work with the code samples demonstrated in this C# tutorial. In this example, we will be using Visual Studio 2022. If you don’t have it installed in your computer, you can download it from here.
As of this writing, Visual Studio 2022 RC 2 has been released. You should also have Microsoft Office Excel 2007 or Microsoft Office Word 2007 (or their later versions) installed on your computer.
Read: Code Refactoring Tips for C#.
How to Create a New Console Application in Visual Studio
In this section we will examine how we can create a new console application project in Visual Studio 2022. Assuming Visual Studio 2022 is installed on your system, adhere to the steps given below to create a new Console Application project:
- Start the Visual Studio 2022 IDE.
- Click on “Create new project.”
- In the “Create new project” page, select C# in the language drop down list, Windows from the Platforms list and Console from the “Project types” list.
- Select Console App (.NET Framework) from the project templates displayed.
- Click Next.
- In the “Configure your new project” screen, specify the project’s name and the location where you would want the project to be created.
- Before you move on to the next screen, you can optionally select the “Place solution and project in the same directory” checkbox.
- Click Next.
- In the Additional Information screen, specify the Framework version you would like to use. We will use .NET Framework 4.8 in this example.
- Click Create to complete the process.
This will create a new .NET Framework Console application project in Visual Studio 2022. We will use this project in the sections that follow.
Install NuGet Packages
Install the following libraries from NuGet using the NuGet Package Manager or from the NuGet Package Manager Console:
Microsoft.Office.Interop.Word
Microsoft.Office.Interop.Excel
Read: Working with C# Math Operators.
How to Program Office Interop Objects in C#
In this section we will examine how to work with Office Interop objects and use them to connect to Microsoft Word and Excel and read/write data.
You must add the following using directives in your program for working with Word and Excel respectively when using Office interop objects:
using Microsoft.Office.Interop.Excel;
using Microsoft.Office.Interop.Word;
Working with Excel Interop Objects in C#
To begin, create a new Excel document named Test.xslx as a sample Excel file present in the root directory of the D:> drive. We will use this file in the following example.
You should create an instance of the Application class pertaining to the Microsoft.Office.Interop.Excel library for communicating with Excel. To do this, write the following C# code:
Application excelApplication = new Application();
The next step is to create an instance of the Workbook class to access a Workbook in Excel. You can create an instance of Workbook using the following code:
Workbook excelWorkBook = excel.Workbooks.Open(@"D:Test.xslx");
To read the name of the workbook, you can use the Name property of the workbook instance as shown in the code snippet given below:
string workbookName = excelWorkBook.Name;
The following code listing illustrates how you can display the value of the first cell of the first worksheet of the Excel document:
int worksheetcount = excelWorkBook.Worksheets.Count;
if (worksheetcount > 0) {
  Worksheet worksheet = (Worksheet) excelWorkBook.Worksheets[1];
  string worksheetName = worksheet.Name;
  var data = ((Range) worksheet.Cells[row, column]).Value;
  Console.WriteLine(data);
} else {
  Console.WriteLine("No worksheets available");
}
Here’s the complete code listing for your reference:
using Microsoft.Office.Interop.Excel;
using Microsoft.Office.Interop.Word;
using System;
using System.Runtime.InteropServices;

namespace OfficeInteropDemoApp
{
    class Program
    {
        static void Main(string[] args)
        {
            string filename = @"D:Test.xlsx";
            DisplayExcelCellValue(filename, 1, 1);
            Console.Read();
        }

        static void DisplayExcelCellValue(string filename,
        int row, int column)
        {
            Microsoft.Office.Interop.Excel.Application
            excelApplication = null;
            try
            {
                excelApplication = new
                Microsoft.Office.Interop.Excel.Application();
                Workbook excelWorkBook =
                excelApplication.Workbooks.Open(filename);
                string workbookName = excelWorkBook.Name;
                int worksheetcount = excelWorkBook.Worksheets.Count;

                if (worksheetcount > 0)
                {
                    Worksheet worksheet =
                   (Worksheet)excelWorkBook.Worksheets[1];
                    string firstworksheetname = worksheet.Name;
                    var data = ((Microsoft.Office.Interop.Excel.Range)
                    worksheet.Cells[row, column]).Value;
                    Console.WriteLine(data);
                }
                else
                {
                    Console.WriteLine("No worksheets available");
                }
            }
            catch (Exception ex)
            {
                Console.WriteLine(ex.Message);
            }
            finally
            {
                if (excelApplication != null)
                {
                    excelApplication.Quit();
                    Marshal.FinalReleaseComObject(excelApplication);
                }
            }
        }
    }
}
Refer to the code listing given above. Note, the finally block of the DisplayExcelCellValue method. The Quit method is called on the Excel application instance to stop the application. Finally, a call to Marshall.FinalReleaseComObject sets the reference counter of the Excel application instance to 0.
The following code listing illustrates how you can create a new Excel document using Office Interop in C#. Note how a new workbook has been created:
static void CreateExcelDocument()
{
	Microsoft.Office.Interop.Excel.Application excelApplication = null;

	try {
		excelApplication = new
            Microsoft.Office.Interop.Excel.Application();
		Workbook excelWorkBook = excelApplication.Workbooks.Add();
		Worksheet worksheet = (Worksheet) excelWorkBook.Worksheets[1];
		worksheet.Cells[1, 1] = "Product Id";
		worksheet.Cells[1, 2] = "Product Name";
		worksheet.Cells[2, 1] = "1";
		worksheet.Cells[2, 2] = "Lenovo Laptop";
		worksheet.Cells[3, 1] = "2";
		worksheet.Cells[3, 2] = "DELL Laptop";
		excelWorkBook.SaveAs(@"D:Test.xls");
	}
	catch(Exception ex) {
		Console.WriteLine(ex.Message);
	}
	finally {
		if (excelApplication != null) {
			excelApplication.Quit();
			Marshal.FinalReleaseComObject(excelApplication);
		}
	}
}
When you run this code, a new Excel document will be created at the path specified with the following content inside:
Read: Working with Strings in C#.
Working with Word Interop Objects in C#
To work with Microsoft Word, you would need to create an instance of Microsoft.Office.Interop.Word.Application. Like Excel, this instance would be used to communicate with a Word document.
Microsoft.Office.Interop.Word.Application wordApplication = new Microsoft.Office.Interop.Word.Application();
The next step is to create a document instance using the Documents property of the Microsoft.Office.Interop.Word.Application instance we just created, as shown in the C# code snippet given below:
wordApplication.Documents.Add();
Next, you can create a paragraph and add some text to it using the as shown in the code snippet shown below:
var paragraph = document.Paragraphs.Add();
paragraph.Range.Text = "This is a sample text to demonstrate how Interop works...";
Then you can save the Word document using this code:
wordApplication.ActiveDocument.SaveAs(@"D:Test.doc", WdSaveFormat.wdFormatDocument);
Here is the complete code listing showing how to work with Microsoft Word Interop Objects in C# for your reference:
using Microsoft.Office.Interop.Excel;
using Microsoft.Office.Interop.Word;
using System;
using System.Runtime.InteropServices;

namespace OfficeInteropDemoApp
{
    class Program
    {
        static void Main(string[] args)
        {
            string filename = @"D:Test.doc";
            CreateWordDocument(filename);
            Console.Read();
        }

        static void CreateWordDocument(string filename)
        {
            Microsoft.Office.Interop.Word.Application
            wordApplication = null;
            try
            {
                wordApplication = new
                Microsoft.Office.Interop.Word.Application();
                var document = wordApplication.Documents.Add();
                var paragraph = document.Paragraphs.Add();
                paragraph.Range.Text = "This is a sample text to
                demonstrate how Interop works...";
                wordApplication.ActiveDocument.SaveAs(filename,
                WdSaveFormat.wdFormatDocument);
                document.Close();

            }
            finally
            {
                if (wordApplication != null)
                {
                    wordApplication.Quit();
                    Marshal.FinalReleaseComObject(wordApplication);
                }
            }
        }
    }
}
To read a Word document and display each word of the document you can use the following C# code:
static void ReadWordDocument(string filename)
        {
            Microsoft.Office.Interop.Word.Application
            wordApplication = null;
            try
            {
                wordApplication = new
                Microsoft.Office.Interop.Word.Application();
                Document document =
                wordApplication.Documents.Open(filename);

                int count = document.Words.Count;
                for (int i = 1; i <= count; i++)
                {
                    string text = document.Words[i].Text;
                    Console.WriteLine(text);
                }
            }
            catch(Exception ex)
            {
                Console.Write(ex.Message);
            }
            finally
            {
                if (wordApplication != null)
                {
                    wordApplication.Quit();
                    Marshal.FinalReleaseComObject(wordApplication);
                }
            }
        }
Note how the Words property of the Word application instance has been used to retrieve the words contained in the document.
C# Interop Objects Tutorial
In this article we have examined how we can access Microsoft Office Interop objects using C#. Since there is still no support for working with Interop objects in .NET Core, we have created a .NET Framework Console Application in this example.
С выходом .NET5 дальнейшее развитие некоторых проектов оказалось под вопросом из-за сложности портирования. Если от небольших устаревших библиотек можно отказаться или найти им замену, то от зависимости Microsoft.Office.Interop.Word.dll очень сложно отказаться. Microsoft не планирует добавлять совместимость с .NET Core/5+, поэтому в этой статье мы рассмотрим, как создавать документы Word с помощью Open XML SDK.

Введение
Office Open XML, также известный как OpenXML или OOXML, представляет собой формат на основе XML для офисных документов, включая текстовые документы, электронные таблицы, презентации, а также диаграммы, фигуры и другой графический материал. В июне 2014 года Microsoft выпустила исходный код Open XML SDK на GitHub для работы с таким форматом.
У этой библиотеки есть серьёзные преимущества:
-
совместима с .NET 5+,
-
не требует установки Microsoft Office,
-
высокая скорость работы,
-
открытый исходный код.
Без минусов тоже не обошлось:
-
сложный API,
-
скудная документация.
Эти минусы определённо дополняют друг друга. Собственно, это и стало причиной создания этого материала.
А вот открытый исходный код является большим плюсом. Если бы код COM-библиотек был открыт, сообщество разработчиков помогло бы с портированием на .NET Core/5+. Кроме привлечения сторонних разработчиков, публичный код даёт каждому возможность находить и исправлять ошибки и уязвимости или хотя бы сообщать о них. Качество публичных библиотек очень важно для всех проектов, которые могут их использовать. Например, мы проводили небольшой аудит кода Open XML SDK при первом знакомстве с этой библиотекой.
Боль разработчиков Office
Для продуктов Office было разработано очень много софта сторонними разработчиками. Это плагины для Word, Excel, Outlook. Многие компании наделали себе удобных плагинов и генераторов отчётов в формате Word. А 3 июля 2021 года произошло страшное – все тикеты про поддержку .NET 5+ в VSTO / COM, разбросанные по разным ресурсам, были в одночасье закрыты с комментарием представителей Microsoft подобного рода:
…The VSTO/COM Add-Ins platform is very important to Microsoft, and we plan to continue to support it in Office with .NET Framework 4.8 as the last major version…VSTO/COM Add-Ins cannot be created with .NET Core and .NET 5+. This is because .NET Core/.NET 5+ cannot work together with .NET Framework in the same process and may lead to add-in load failures. Microsoft will not be updating VSTO or the COM Add-in platform to use .NET Core or .NET 5+…
По их информации, поддержка .NET 5+ не предвидится. Вот одна из таких дискуссий, которая ещё долго не прекращалась после этого объявления: «Please port Visual Studio Tools For Office (VSTO) to .NET 5/7, to enable VSTO add-in development in C# in .Net 5/7».
Если у разработчиков плагинов совсем всё плохо – им предложили перейти на Office JavaScript API (совсем другой язык, API не позволяет делать и малую часть того, что было), то для создания документов из C# кода можно попробовать перейти на библиотеку Open XML SDK (nuget).
Основы
Прежде чем приступить к разбору примеров, стоит понять, с чем вообще работают эти две библиотеки и в чём состоит разница их подходов.
Word документ — это набор запакованных xml-документов. Все элементы структурированы под тегами.
Например, параграф внутри документа будет выглядеть примерно вот так:
<w:p w:rsidR="007D2247" w:rsidRDefault="009A4B44"
         xmlns:w="http://schemas.openxmlformats.org/wordprocessingml/2006/main">
  <w:r>
    <w:t>тест</w:t>
  </w:r>
  <w:bookmarkStart w:name="_GoBack" w:id="0" />
  <w:bookmarkEnd w:id="0" />
</w:p>
Сборка Interop.Word немного абстрагируется от этой структуры и часто работает с некоторым участком – Range – документа. А Open XML SDK идёт по пути отражения внутренней структуры документа в самом коде. Параграфы <w:p>, участки текста <w:t> и всё остальное становятся объектами в самом коде. Если вы не создадите тело документа, параграф и других обязательных «родителей», то и добавлять текст будет некуда.
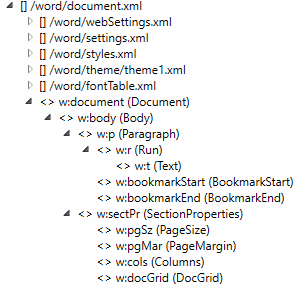
На скриншоте как раз изображена внутренняя структура основного файла для документа Word – document.xml. Этот файл содержит само наполнение документа.
Скриншот сделан в очень нужной для работы с Open XML утилите Open XML SDK 2.5 Productivity Tool. К моменту написания статьи эта утилита была удалена с сайта Microsoft, а в репозитории Open-XML-SDK добавлена ссылка на некий DocxToSource, который должен стать заменой устаревшего Productivity Tool. Однако эта замена всё ещё является прототипом, поэтому пока лучше постараться найти старый добрый Productivity Tool. Старая утилита позволяет просмотреть строение документа, познакомиться с автогенерированным кодом.

Также она позволяет сравнить два разных документа (и код для их создания, и их внутреннее строение).

Примеры
Для Interop.Word во всей статье примем такой псевдоним для удобства чтения:
using MicrosoftWord = Microsoft.Office.Interop.Word;Также для упрощения будем называть Open XML SDK просто Open XML.
Создание документа
Interop.Word:
MicrosoftWord.Application wordApp = new MicrosoftWord.Application();
MicrosoftWord.Document wordDoc = wordApp.Documents.Add();
MicrosoftWord.Range docRange = wordDoc.Range();
.... // тут при необходимости работаем с документом
wordDoc.SaveAs2(pathToDocFile);
wordApp.Quit();
Тут всё достаточно просто, но всё равно есть свои подводные камни. При работе с Interop мы взаимодействуем не просто с некоторым объектом в памяти, а с COM-объектом. Поэтому возникает необходимость завершать все процессы после окончания работы программы. Эта проблема не раз поднималась на Stack Overflow (1, 2), и ей предложено множество разных решений.
Есть решение с участием Marshal Class, являющимся частью InteropServices.
finally
{
  if (Marshal.IsComObject(wordDoc))
    try
    {
      Marshal.FinalReleaseComObject(wordDoc);
    }
    catch { throw; }

  if (Marshal.IsComObject(wordApp))
    try
    {
      Marshal.FinalReleaseComObject(wordApp);
    }
    catch { throw; }
}
Однако в таком случае можно упустить какие-нибудь процессы.
Есть более надёжный вариант с обращением к GC:
GC.Collect();
GC.WaitForPendingFinalizers();
Эти методы надо вызвать после того, как вся работа с COM-объектами будет завершена.
Если не завершить процессы, то при активном дебаге можно устроить себе такую ситуацию:

Но даже если в коде присутствует закрытие процессов после окончания работы, при прерывании программы вручную или её падении процесс останется запущенным. Такого недостатка нет при создании и работе с документом через Open XML.
Open XML:
using (WordprocessingDocument doc =
         WordprocessingDocument.Create(pathToDocFile,
                                       WordprocessingDocumentType.Document,
                                       true))
{
  MainDocumentPart mainPart = doc.AddMainDocumentPart();
  mainPart.Document = new Document();
  Body body = mainPart.Document.AppendChild(new Body());
  SectionProperties props = new SectionProperties();
  body.AppendChild(props);
}
Обратите внимание на добавление SectionProperties, они понадобятся нам позже.
Добавление параграфа
Interop.Word
public static void InsertWordText(MicrosoftWord.Document doc,
                                      string text)
{
  MicrosoftWord.Paragraph paragraph = doc.Paragraphs.Add(Missing.Value);
  paragraph.Range.Text = text;
  paragraph.Range.InsertParagraphAfter();
}
Текст также можно сделать жирным или курсивным через параметр Font:
paragraph.Range.Font.Bold = 1;
paragraph.Range.Font.Italic = 1;
Изменить размер шрифта можно через:
paragraph.Range.Font.Size = 14;Выравнивание текста выполняется через ParagraphFormat.Alignment:
paragraph.Range.ParagraphFormat.Alignment = MicrosoftWord.WdParagraphAlignment
                                                        .wdAlignParagraphCenter;
Open XML:
public static void AddText(WordprocessingDocument doc, string text)
{
  MainDocumentPart mainPart = doc.MainDocumentPart;
  Body body = mainPart.Document.Body;
  Paragraph paragraph = body.AppendChild(new Paragraph());

  Run run = paragraph.AppendChild(new Run());
  run.AppendChild(new Text(text));
  run.PrependChild(new RunProperties());
}
В случае с Open XML жирным или курсивным текст можно сделать через:
run.RunProperties.AddChild(new Bold());
run.RunProperties.AddChild(new Italic());
Изменение размера шрифта в этом случае немного неинтуитивно, но согласуется с общей логикой работы с Open XML:
run.RunProperties.AddChild(new FontSize(){ Val = "14"});Выравнивание текста:
paragraph.ParagraphProperties.AddChild(new Justification()
                                       {
                                         Val = JustificationValues.Center
                                       });
Важно перед этим не забыть добавить к параграфу свойства:
paragraph.AppendChild(new ParagraphProperties());Вставка заголовка
Предположим, что нам нужно вписать в документ заголовок. В случае Interop.Word нужно всего лишь небольшое дополнение к вставке текста, чтобы получить заголовок:
Interop.Word:
public static void InsertWordHeading1(MicrosoftWord.Document doc,
                                      string headingText)
{
  MicrosoftWord.Paragraph paragraph = doc.Paragraphs.Add(Missing.Value);
  paragraph.Range.Text = headingText;
  paragraph.Range.set_Style("Heading 1");
  paragraph.Range.InsertParagraphAfter();
}
В этом случае сначала задаём Range для записи нового текста и присваиваем ему стиль Heading 1.
Open XML:
public static void InsertWordHeading1(WordprocessingDocument doc,
                                      string headingText)
{
  MainDocumentPart mainPart = doc.MainDocumentPart;
  Paragraph para = mainPart.Document.Body.AppendChild(new Paragraph());
  Run run = para.AppendChild(new Run());
  run.AppendChild(new Text(headingText));
  para.ParagraphProperties = new ParagraphProperties(
                               new ParagraphStyleId() { Val = "Heading1" });
}
Тут, казалось бы, всё очень похоже. Аналогично добавляем параграф и в случае с Open XML организуем нужную иерархию объектов.
Однако на самом деле в случае с Open XML коварным оказывается добавление стиля. Interop.Word работает с реальным полноценным документом, как если бы вы запустили Word и нажали создать. А вот Open XML работает только с тем, что было создано. И если вы добавляете текст документу, созданному через Open XML, а не через Interop.Word, то в нём будут отсутствовать, например, стили. Соответственно, никакого стиля Heading1 в таком документе не будет. Его нужно сначала добавить.
Удобнее всего добавлять нужный стиль при создании документа. Есть два варианта: перенести стили из готового Word-документа или добавить эти стили вручную.
В первом случае в документе, из которого будет браться стиль, нужно обязательно применить искомый стиль. Сам перенос требует достаточно много кода, благо, в официальной документации есть мануал на эту тему.
Для второго варианта нам поможет Productivity Tool для Open XML, упоминавшийся ранее. Чтобы получить код, нужный для добавления желаемого стиля, создаём чистый документ Word, используем в нём нужный стиль и «скармливаем» этот документ утилите. Далее через использование кнопки Reflect Code на /word/styles.xml в структуре документа мы получим реализацию метода GeneratePartContent. В нём мы ищем реализацию нужного стиля и всё, что с ним связано, включая StyleParagraphProperties, StyleRunProperties и т.д.
Для стиля Heading 1 нужный нам автосгенерированный код будет выглядеть примерно так:
Style style2 = new Style() { Type = StyleValues.Paragraph,
                             StyleId = "Heading1" };
StyleName styleName2 = new StyleName(){ Val = "heading 1" };
....
style2.Append(styleRunProperties1);
Чтобы добавить перенесённый стиль к генерируемому документу, нужно создать набор стилей Styles и добавить стиль к набору. Далее к документу нужно добавить StyleDefinitionsPart и присвоить группу стилей. Выглядеть это будет вот так:
var styles = new Styles();
styles.Append(style2);
wordDocument.MainDocumentPart.AddNewPart<StyleDefinitionsPart>();
wordDocument.MainDocumentPart.StyleDefinitionsPart.Styles = styles;
У себя мы решили использовать вариант с шаблонным документом, чтобы в будущем при появлении необходимости в каком-либо стиле нужно было лишь использовать его в шаблоне и работать с ним в коде вместо того, чтобы каждый раз рыться в ProductivityTool и копировать себе полотна кода с объявлением нужного стиля.
Смена ориентации страницы
Для нашего отчёта нам нужна была именно ландшафтная ориентация страницы.
Interop.Word:
MicrosoftWord.Document wordDoc = wordApp.Documents.Add();
MicrosoftWord.Range docRange = wordDoc.Range();
docRange.PageSetup.Orientation = MicrosoftWord.WdOrientation
                                              .wdOrientLandscape;
У документа получаем нужный Range (страниц или всего документа) и задаём ландшафтную ориентацию.
Open XML:
var sectionProperties = mainPart.Document
                                .Body
                                .GetFirstChild<SectionProperties>();
sectionProperties.AddChild(new PageSize()
{
  Width = (UInt32Value)15840U,
  Height = (UInt32Value)12240U,
  Orient = PageOrientationValues.Landscape
});
C Open XML в этом случае всё не настолько абстрактно, как хотелось бы. Если вы инициализируете в PageSize только поле Orient, то ничего не изменится. Width и Height тоже нужно менять.
В дополнение к этому, ландшафтная ориентация обычно имеет другие размеры полей, поэтому, если у вас есть к ним требования, можно поправить их вот так:
sectionProperties.AddChild(new PageMargin()
{
  Top = 720,
  Right = Convert.ToUInt32(1440.0),
  Bottom = 360,
  Left = Convert.ToUInt32(1440.0),
  Header = (UInt32Value)450U,
  Footer = (UInt32Value)720U,
  Gutter = (UInt32Value)0U
});
Гиперссылки
Interop.Word:
public static void AddHyperlinkedText(MicrosoftWord.Document doc,
                                      string text,
                                      string url)
{
  MicrosoftWord.Range wrdRng = doc.Bookmarks
                                  .get_Item("\endofdoc")
                                  .Range;
  doc.Hyperlinks.Add(wrdRng, url, TextToDisplay: text);
}
Тут всё просто: как обычно, получаем нужный Range и добавляем гиперссылку. У метода Add много параметров, и можно сконструировать более сложную ссылку.
Open XML:
public static void AddHyperlinkedText(WordprocessingDocument doc,
                                      string text,
                                      string url)
{
  MainDocumentPart mainPart = doc.MainDocumentPart;
  Body body = mainPart.Document.Body;
  Paragraph paragraph = body.AppendChild(new Paragraph());

  var rel = mainPart.AddHyperlinkRelationship(new Uri(url), true);

  Hyperlink hyperlink = new Hyperlink(new Run(
                                    new RunProperties(
                                      new RunStyle
                                      {
                                        Val = "Hyperlink",
                                      },
                                      new Underline
                                      {
                                        Val = UnderlineValues.Single
                                      },
                                      new Color
                                      {
                                        ThemeColor = ThemeColorValues.Hyperlink
                                      }),
                                      new Text
                                      {
                                        Text = text
                                      }))
                    {
                      Id = rel.Id
                    };

  paragraph.AppendChild(hyperlink);
}
Из существенных отличий тут то, что url нужно сначала обернуть в Uri и создать связь url с гиперссылкой через AddHyperlinkRelationship. Потом при создании самой гиперссылки, нужно присвоить полю Id новой гиперссылки Id созданной ранее связи.
Картинки
Interop.Word:
public static void InsertWordPicture(MicrosoftWord.Document doc,
                                     string picturePath)
{
  MicrosoftWord.Range wrdRng = doc.Bookmarks.get_Item("\endofdoc")
                                            .Range;
  wrdRng.InlineShapes.AddPicture(picturePath);
}
Тут всё достаточно просто, а с Open XML всё оказалось крайне сложно.
Open XML:
Для добавления картинки необходимо соблюсти сложную иерархию объектов с определёнными параметрами. Хорошо, что есть документация на этот счёт. Поэтому пропустим код, требуемый для добавления картинки в этой статье. Разберём ещё один момент, который почему-то не упоминается в документации. Можете заметить, что в том коде нигде не передаётся размер картинки. Фиксируется её размер тут:
new DW.Extent() { Cx = 990000L, Cy = 792000L }и тут
new A.Extents() { Cx = 990000L, Cy = 792000L }Если использовать этот код, то вместо нормальной картинки, будет вставлено малюсенькое изображение. Его реальный размер никак не изменится, но при отображении оно будет отмасштабировано до таких размеров:

Дело в том, что масштаб отображения картинки здесь завязан на такую вещь, как EMU (English Metric Units).
Для того чтобы передавать методу добавления картинки привычные размеры в пикселях, потребуется следующее преобразование:
double englishMetricUnitsPerInch = 914400;
double pixelsPerInch = 96;
double englishMetricUnitsPerPixel = englishMetricUnitsPerInch / pixelsPerInch;

double emuWidth = width * englishMetricUnitsPerPixel;
double emuHeight = height * englishMetricUnitsPerPixel;
Тут мы получаем количество EMU на пиксель, приняв значение PPI за 96, и умножаем полученное значение на нужное количество пикселей для ширины и высоты. В итоге у наc есть нужная нам ширина и высота в EMU. Их мы и передаём как Cx и Cy для Extent и Extents:
Cx = (Int64Value)emuWidth, Cy = (Int64Value)emuHeightТаблицы
Interop.Word:
Генерация таблицы через Interop.Word достаточно прямолинейна. Разберём пример, как можно было бы вставить таблицу из квадратной матрицы строк.
public static void InsertWordTable(MicrosoftWord.Document doc,
                                   string[,] table)
{
  MicrosoftWord.Table oTable;
  MicrosoftWord.Range wrdRng = doc.Bookmarks
                                  .get_Item("\endofdoc")
                                  .Range;

  int rowCount = table.GetLength(0);
  int columnCount = table.GetLength(1);

  oTable = doc.Tables.Add(wrdRng,
                    rowCount,
                    columnCount,
                    DefaultTableBehavior: MicrosoftWord.WdDefaultTableBehavior
                                                       .wdWord9TableBehavior,
                    AutoFitBehavior: MicrosoftWord.WdAutoFitBehavior
                                                  .wdAutoFitWindow);

  for (int i = 0; i < rowCount; i++)
    for (int j = 0; j < columnCount; j++)
      oTable.Cell(i + 1, j + 1).Range.Text = table[i,j];
}
Параметры метода Add — DefaultTableBehavior и AutoFitBehavior — как видно из их названия, отвечают за поведение таблицы при необходимости изменения размера под содержимое ячеек. Им присваиваются значения перечислений WdDefaultTableBehavior и WdAutoFitBehavior соответственно. Сам метод Add создаёт в документе таблицу с нужными нам параметрами.
Стиль к таблице можно применить следующим образом:
oTable.set_Style("Grid Table 4 - Accent 1");Также для красивого выделения первого столбика, если он является заголовочным, можно присвоить true полю oTable.ApplyStyleFirstColumn.
Расстояние между параграфами текста контролируется через oTable.Range.ParagraphFormat.SpaceAfter. Для компактного отображения таблицы можно использовать
oTable.Range.ParagraphFormat.SpaceAfter = 0;Также можно устанавливать тип написания текста к строкам или колонкам:
oTable.Rows[1].Range.Font.Bold = 1;
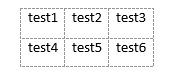
oTable.Column[1].Range.Font.Italic = 1;Используя эти возможности, можно получить вот такую таблицу:
![]()
Open XML:
public static void InsertWordTable(WordprocessingDocument doc,
                                   string[,] table)
{
  DocumentFormat.OpenXml.Wordprocessing.Table dTable =
    new DocumentFormat.OpenXml.Wordprocessing.Table();

  TableProperties props = new TableProperties();

  dTable.AppendChild<TableProperties>(props);

  for (int i = 0; i < table.GetLength(0); i++)
  {
    var tr = new TableRow();

    for (int j = 0; j < table.GetLength(1); j++)
    {
      var tc = new TableCell();
      tc.Append(new Paragraph(new Run(new Text(table[i, j]))));

      tc.Append(new TableCellProperties());

      tr.Append(tc);
    }
    dTable.Append(tr);
  }
  doc.MainDocumentPart.Document.Body.Append(dTable);
}
При создании таблицы с нуля с Open XML стоит помнить о том, что никаких ячеек или строк к моменту ввода данных не существует. Их нужно сначала создать, соблюдая внутреннюю иерархию.
Поэтому при проходе по матрице мы для каждой строки создаём TableRow, а потом для каждого элемента в строке создаём TableCell, куда добавляем новые Paragraph, Run и Text с соответствующим значением из матрицы. TableCellProperties лучше также добавить сразу, чем потом при дальнейшей работе с таблицей наткнуться на System.NullReferenceException при попытке добавить свойство ячейке.
Если мы не зададим в TableProperties ни стиля, ни Borders, то таблица будет выглядеть вот так
Границы таблицы формируются через TableBorders.
var borderValues = new EnumValue<BorderValues>(BorderValues.Single);
var tableBorders = new TableBorders(
                     new TopBorder { Val = borderValues, Size = 4 },
                     new BottomBorder {  Val = borderValues,  Size = 4 },
                     new LeftBorder { Val = borderValues, Size = 4 },
                     new RightBorder { Val = borderValues, Size = 4 },
                     new InsideHorizontalBorder { Val= borderValues, Size = 4 },
                     new InsideVerticalBorder { Val= borderValues, Size = 4 }));
Перечисление BorderValues здесь задаёт стиль границ.
TableBorders нужно добавить к TableProperties через
props.Append(tableBorders);Границы таблицы можно не задавать, если ей будет присвоен какой-нибудь стиль. Главное не забыть, что стиль сначала нужно добавить к документу.
Задаётся стиль достаточно просто:
TableStyle tableStyle = new TableStyle()
                        {
                          Val = "GridTable4-Accent5"
                        };
Его так же, как и границы, нужно добавить к TableProperties:
props.Append(tableStyle);Для того чтобы таблица заняла всю ширину страницы можно использовать TableWidth заданную следующим образом:
var tableWidth = new TableWidth()
                 {
                   Width = "5000",
                   Type = TableWidthUnitValues.Pct
                 };
Значение 5000 тут взято «не из воздуха». Тип единицы ширины здесь мы задаём TableWidthUnitValues.Pct – единицы ширины в одну пятидесятую процента страницы или 0,02%. В итоге пять тысяч Pct это 100% ширины страницы.
Этот параметр добавляется к TableProperties аналогичным образом:
props.Append(tableWidth);Важный момент: TableProperties должны быть добавлены к таблице до самих данных для того, чтобы они работали корректно. Их можно добавить и после других объектов, но тогда уже стоит использовать
dTable.PrependChild<TableProperties>(props);Раскраска таблиц
Для формирования нашего отчёта нам нужно было раскрасить ячейки в некоторых таблицах документа.
Interop.Word:
oTable.Cell(i, j).Range.Shading.BackgroundPatternColor = MicrosoftWord.WdColor
                                                                    .wdColorRed;
где oTable – это созданная нами ранее таблица, i и j — это индексы нужной ячейки. Присваиваемое значение – перечисление WdColor.
Open XML:
tc.Append(new TableCellProperties(
            new Shading { Fill = "FF0000" }));
где tc – это TableCell, с которой идёт работа. Полю Fill присваивается строка с Hex-значением цвета.
Разрыв страницы
В нашем случае отчёт генерируется последовательно, поэтому разрыв страницы нужно было вставить после последнего добавленного текста.
Interop.Word:
public static void InsertWordBreak(MicrosoftWord.Document doc)
{
  MicrosoftWord.Range wrdRng = doc.Bookmarks.get_Item("\endofdoc")
                                            .Range;
  wrdRng.InsertBreak();
}
Open XML:
public static void InsertWordBreak(WordprocessingDocument doc)
{
  MainDocumentPart mainPart = doc.MainDocumentPart;
  mainPart.Document.Body.InsertAfter(new Paragraph(
                                       new Run(
                                         new Break()
                                         {
                                           Type = BreakValues.Page
                                         })),
                                     mainPart.Document.Body.LastChild);
}
Тип разрыва меняется через перечисление BreakValues.
Footer/Header
Также нам нужны были футеры/хедеры в документе.
Interop.Word:
public static void InsertWordFooter(
  MicrosoftWord.Document doc,
  string headerText)
{
  MicrosoftWord.Range headerRange = doc.Sections
                                 .Last
                                 .Headers[MicrosoftWord.WdHeaderFooterIndex
                                                       .wdHeaderFooterPrimary]
                                 .Range;

  headerRange.Fields.Add(headerRange, MicrosoftWord.WdFieldType.wdFieldPage);
  headerRange.Text = headerText;
}
Через headerRange.Font можно поменять параметры текста, например размер, шрифт, цвет и т.д. А headerRange.ParagraphFormat.Alignment, как следует из названия, задаёт выравнивание текста. Это поле принимает значения WdParagraphAlignment.
Open XML:
Тут сложность состоит в том, что футер/хэдер сам по себе хранится в отдельном .xml файлике. Поэтому нам нужно связать хэдер/футер с содержанием документа через SectionProperties.
static void InsertWordHeader(HeaderPart part,
                             string headerText)
{
  MainDocumentPart mainPart = doc.MainDocumentPart;

  if (mainPart.HeaderParts.Any())
    return;

  HeaderPart headerPart = mainPart.AddNewPart<HeaderPart>();

  string headerPartId = mainPart.GetIdOfPart(headerPart);

  part.Header = new Header(
                  new Paragraph(
                    new ParagraphProperties(
                      new ParagraphStyleId() { Val = "Header" }),
                      new Run( new Text() { Text = headerText })));

  var sectionProperties = mainPart.Document
                                  .Body
                                  .GetFirstChild<SectionProperties>();
  sectionProperties.PrependChild<HeaderReference>(new HeaderReference()
                                                  {
                                                    Id = headerPartId
                                                  });
}
Если нужно, чтобы текст перезаписывался на новый при вызове метода добавления хедера, то вместо
if (mainPart.HeaderParts.Any())
  return;
можно использовать
mainDocumentPart.DeleteParts(mainDocumentPart.HeaderParts);Для футера нужно будет передать mainDocumentPart.FooterParts.
Заключение
Описанные методы работы с Open XML SDK можно собрать в библиотеку классов для внутреннего использования в компании, что мы и сделали. Создание Word документов стало даже удобнее, чем было с Word Interop API.
Здесь может возникнуть закономерный вопрос, есть ли готовые библиотеки на основе Open XML SDK для упрощённой работы с документами? Ответ – однозначно да. Но, к сожалению, поддержка таких библиотек быстро прекращается. Истории создания таких проектов все одинаковые: программисты начинают работать с Word, осознают неудобство существующей инфраструктуры, дорабатывают её — и некоторые библиотеки публикуются на GitHub. Даже если удастся найти относительно свежую версию подобной библиотеки, то, скорее всего, она была реализована под задачи конкретного проекта, и в вашем проекте всё равно будет неудобной в использовании. Плюс появится риск остаться с неподдерживаемой библиотекой.
Если хотите поделиться этой статьей с англоязычной аудиторией, то прошу использовать ссылку на перевод: Victoria Khanieva, Svyatoslav Razmyslov. Tutorial: how to port a project from Interop Word API to Open XML SDK.
| title | description | ms.custom | ms.date | ms.topic | dev_langs | helpviewer_keywords | author | ms.author | manager | ms.technology | ms.workload | |||||
|---|---|---|---|---|---|---|---|---|---|---|---|---|---|---|---|---|
|
Office primary interop assemblies |
Learn how to use the primary interop assembly (PIA) to gain access the features of a Microsoft Office application from an Office project. |
devdivchpfy22 |
12/23/2021 |
conceptual |
|
|
John-Hart |
johnhart |
jmartens |
office-development |
office |
Office primary interop assemblies
[!INCLUDE Visual Studio]
To use the features of a Microsoft Office application from an Office project, you must use the primary interop assembly (PIA) for the application. The PIA enables managed code to interact with a Microsoft Office application’s COM-based object model.
[!includeAdd-ins note]
When you create a new Office project, Visual Studio adds references to the PIAs that are required to build the project. In some scenarios, you might need to add references to other PIAs (for example, you can use a feature of Microsoft Office Word in a project for Microsoft Office Excel).
This article describes the following aspects of using the Microsoft Office PIAs in Office projects:
-
Separate primary interop assemblies to build and run projects
-
Use features of multiple Microsoft Office applications in a single project
-
Full list of primary interop assemblies for Microsoft Office applications
For more information about primary interop assemblies, see Primary interop assemblies.
Separate primary interop assemblies to build and run projects
Visual Studio uses different sets of the PIAs on the development computer. These different sets of assemblies are in the following locations:
-
A folder in the program files directory
This set of the assemblies is used when you write code and build projects. Visual Studio installs these assemblies automatically.
-
The global assembly cache
This set of the assemblies is used during some development tasks, such as when you run or debug projects. Visual Studio doesn’t install and register these assemblies; you need to do it yourself.
Primary interop assemblies in the program files directory
The PIAs are automatically added to a location in the file system, outside of the global assembly cache, while you install Visual Studio. When you create a new project, Visual Studio automatically adds references to these copies of the PIAs to your project. Visual Studio uses these copies of the PIAs, instead of the assemblies in the global assembly cache, to resolve type references when you develop and build your project.
When different versions of the PIAs are registered in the global assembly cache, you can face several development issues. The added copies of PIAs will help you to avoid such issues.
For Visual Studio 2017 and later, these copies of the PIAs are installed to following shared locations on the development computer:
-
%ProgramFiles%Microsoft Visual StudioSharedVisual Studio Tools for OfficePIA -
(or
%ProgramFiles(x86)%Microsoft Visual StudioSharedVisual Studio Tools for OfficePIAon 64-bit operating systems)
[!NOTE]
For older versions of Visual Studio, these PIAs will be installed to the Visual Studio Tools for OfficePIA folder under the%ProgramFiles%folder for that version of Visual Studio.
For Example:%ProgramFiles(x86)%Microsoft Visual Studio 14.0Visual Studio Tools for OfficePIA
Primary interop assemblies in the global assembly cache
To perform certain development tasks, the PIAs must be installed and registered in the global assembly cache on the development computer. Typically, the PIAs are installed automatically when you install Office on the development computer. For more information, see Configure a computer to develop Office solutions.
The Office PIAs aren’t required on end-user computers to run Office solutions. For more information, see Design and create Office solutions.
Use features of multiple Microsoft Office applications in a single project
Every Office project template in Visual Studio is designed to work with a single Microsoft Office application. To use features in multiple Microsoft Office applications, or to use features in an application or component that doesn’t have a project in Visual Studio, you must add a reference to the required PIAs.
In most cases, you should add references to the PIAs that are installed by Visual Studio under the %ProgramFiles(x86)%Microsoft Visual StudioSharedVisual Studio Tools for OfficePIA directory. These versions of the assemblies appear on the Framework tab of the Reference Manager dialog box. For more information, see How to: Target Office applications through primary interop assemblies.
If you’ve installed and registered the PIAs in the global assembly cache, these versions of the assemblies appear on the COM tab of the Reference Manager dialog box. Avoid adding references to these versions of the assemblies, because there are some development issues that can occur when you use them. For example, if you’ve registered different versions of the PIAs in the global assembly cache, your project will automatically bind to the version of the assembly that was registered last, even if you specify a different version of the assembly on the COM tab of the Reference Manager dialog box.
[!NOTE]
Some assemblies are added to a project automatically when an assembly that references them is added. For example, references to theOffice.dllandMicrosoft.Vbe.Interop.dllassemblies are added automatically when you add a reference to the Word, Excel, Outlook, Microsoft Forms, or Graph assemblies.
Primary interop assemblies for Microsoft Office applications
The following table lists the primary interop assemblies that are available for [!INCLUDEOffice_16_short], [!INCLUDEOffice_15_short] and [!INCLUDEoffice14_long].
| Office application or component | Primary interop assembly name |
|---|---|
| Microsoft Access 14.0 Object Library
Microsoft Access 15.0 Object Library |
Microsoft.Office.Interop.Access.dll |
| Microsoft Office 14.0 Access Database Engine Object Library
Microsoft Office 15.0 Access Database Engine Object Library |
Microsoft.Office.Interop.Access.Dao.dll |
| Microsoft Excel 14.0 Object Library
Microsoft Excel 15.0 Object Library |
Microsoft.Office.Interop.Excel.dll |
| Microsoft Graph 14.0 Object Library (used by PowerPoint, Access, and Word for graphs)
Microsoft Graph 15.0 Object Library |
Microsoft.Office.Interop.Graph.dll |
| Microsoft InfoPath 2.0 Type Library (for InfoPath 2007 only) | Microsoft.Office.Interop.InfoPath.dll |
| Microsoft InfoPath XML Interop Assembly (for InfoPath 2007 only) | Microsoft.Office.Interop.InfoPath.Xml.dll |
| Microsoft Office 14.0 Object Library (Office shared functionality)
Microsoft Office 15.0 Object Library (Office shared functionality) |
office.dll |
| Microsoft Office Outlook View Control (can be used in Web pages and applications to access your Inbox) | Microsoft.Office.Interop.OutlookViewCtl.dll |
| Microsoft Outlook 14.0 Object Library
Microsoft Outlook 15.0 Object Library |
Microsoft.Office.Interop.Outlook.dll |
| Microsoft PowerPoint 14.0 Object Library
Microsoft PowerPoint 15.0 Object Library |
Microsoft.Office.Interop.PowerPoint.dll |
| Microsoft Project 14.0 Object Library
Microsoft Project 15.0 Object Library |
Microsoft.Office.Interop.MSProject.dll |
| Microsoft Publisher 14.0 Object Library
Microsoft Publisher 15.0 Object Library |
Microsoft.Office.Interop.Publisher.dll |
| Microsoft SharePoint Designer 14.0 Web Object Reference Library | Microsoft.Office.Interop.SharePointDesigner.dll |
| Microsoft SharePoint Designer 14.0 Page Object Reference Library | Microsoft.Office.Interop.SharePointDesignerPage.dll |
| Microsoft Smart Tags 2.0 Type Library Note: Smart tags are deprecated in [!INCLUDEExcel_14_short] and [!INCLUDEWord_14_short]. | Microsoft.Office.Interop.SmartTag.dll |
| Microsoft Visio 14.0 Type Library
Microsoft Visio 15.0 Type Library |
Microsoft.Office.Interop.Visio.dll |
| Microsoft Visio 14.0 Save As Web Type Library
Microsoft Visio 15.0 Save As Web Type Library |
Microsoft.Office.Interop.Visio.SaveAsWeb.dll |
| Microsoft Visio 14.0 Drawing Control Type Library
Microsoft Visio 15.0 Drawing Control Type Library |
Microsoft.Office.Interop.VisOcx.dll |
| Microsoft Word 14.0 Object Library
Microsoft Word 15.0 Object Library |
Microsoft.Office.Interop.Word.dll |
| Microsoft Visual Basic for Applications Extensibility 5.3 | Microsoft.Vbe.Interop.dll |
Binding redirect assemblies
When you install and register the Office PIAs in the global assembly cache (either with Office or by installing the redistributable package for the PIAs), the binding redirect assemblies are also installed only in the global assembly cache. These assemblies ensure that the correct version of the primary interop assemblies is loaded at run time.
For example, when a solution that references a [!INCLUDEoffice14_long] assembly runs on a computer that has the [!INCLUDEOffice_15_short] version of the same primary interop assembly, the binding redirect assembly instructs the [!INCLUDEdnprdnshort] runtime to load the [!INCLUDEOffice_15_short] version of the primary interop assembly.
For more information, see How to: Enable and disable automatic binding redirection.
See also
- How to: Target Office applications through primary interop assemblies
- Excel object model overview
- InfoPath solutions
- Outlook object model overview
- PowerPoint solutions
- Project solutions
- Visio object model overview
- Word object model overview
- General reference (Office development in Visual Studio)
Table of Contents
- Introducing Interop.Word
- Working with the Document
- Find and Replace Text
- Find and replace Bookmarks
- Convert a DOC / DOCX file to PDF
- Export a DOC / DOCX file into a PDF
- From a Byte Array
If you’re working with ASP.NET C# and you need to open, edit or otherwise access a Microsoft Word DOC or DOCX file, you can easily do that using the Microsoft.Office.Interop.Word library package. This post explains how to do so: you might find it useful in case you need to perform such task or whenever you want to read some insights regarding the process.
Introducing Interop.Word
To access the namespace from your ASP.NET project you have two main choices:
- Install the official Microsoft Office primary interop assemblies (PIAs) package on your machine by downloading and executing the runtime installer, then manually add a Reference to the Microsoft.Office.Interop.Word.dll file.
- Install the appropriate NuGet package within Visual Studio using the Package Manager Console.
Needless to say, you should really go for the second option, but we’ll leave that to you.
Working with the Document
As soon as you have the namespace available, you can do the following:
|
// NS alias to avoid writing the required namespace all the time using word = Microsoft.Office.Interop.Word; // […] Application app = new word.Application(); Document doc = app.Documents.Open(filePath); |
Once you have the app and the doc objects you can perform a lot of editing task, such as:
Find and Replace Text
|
1 2 3 4 5 6 7 8 9 10 11 12 13 14 15 16 17 18 19 20 21 22 23 24 |
var textToFind = «any source text»; var textToReplace = «any replacement text»; var matchCase = true; var matchWholeWord = true; var matchWildcards = false; var matchSoundsLike = false; var matchAllWordForms = false; var forward = true; var wrap = 1; var format = false; var replace = 2; app.Selection.Find.Execute( textToFind, matchCase, matchWholeWord, matchWildcards, matchSoundsLike, matchAllWordForms, forward, wrap, format, textToReplace, replace); |
Find and replace Bookmarks
|
var bookmarkName = «anyName»; var bookmarkNewValue = «anyValue»; if (doc.Bookmarks.Exists(bookmarkName)) { doc.Bookmarks[bookmarkName].Select(); app.Selection.TypeText(bookmarkNewValue); } |
Convert a DOC / DOCX file to PDF
Surprisingly enough, we can even do that with an one-liner thanks to the native «Save As PDF…» feature introduced with Office 2010.
|
doc.SaveAs2(«path-to-pdf-file.pdf», word.WdSaveFormat.wdFormatPDF); |
Export a DOC / DOCX file into a PDF
This one is almost identical to the previous one in terms of results.
|
doc.ExportAsFixedFormat(tmpFile, WdExportFormat.wdExportFormatPDF); |
… and so on.
For additional info regarding word-to-pdf conversion, you can also read this dedicated post: otherwise, keep reading.
What if you have the DOC or DOCX file stored outside the FileSystem, such as in blob-format within a Database? If that’s the case you need to use a temporary file, because most Office Interop methods do not support working with byte arrays, streams and so on.
Here’s a decent workaround you can use:
|
// byte[] fileBytes = getFileBytesFromDB(); var tmpFile = Path.GetTempFileName(); File.WriteAllBytes(tmpFile, fileBytes); Application app = new word.Application(); Document doc = app.Documents.Open(filePath); // .. do your stuff here … doc.Close(); app.Quit(); byte[] newFileBytes = File.ReadAllBytes(tmpFile); File.Delete(tmpFile); |
You might notice that we used the
Close()
method in order to close (and thus save) the file. In case you wan’t to save your changes to the DOC / DOCX file you opened, you need to explicitly say it by adding the
WdSaveOptions.wdDoNotSaveChanges
object parameter in the following way:
|
doc.Close(word.WdSaveOptions.wdDoNotSaveChanges); |
IMPORTANT: Do not underestimate the call to
app.Quit()
! If you don’t do that, the MS Word instance will be left open on your server (see this thread on StackOverflow for more info on that issue). If you want to be sure to avoid such dreadful scenario entirely you should strengthen the given implementation adding a try/catch fallback strategy such as the follow:
|
Application app = null; Document doc = null; try { app = new word.Application(); doc = Document doc = app.Documents.Open(filePath); // .. do your stuff here … doc.Close(); app.Quit(); } catch (Exception e) { if (doc != null) doc.Close(); if (app != null) app.Quit(); } |
Unfortunately these objects don’t implement IDisposable, otherwise it would’ve been even easier.
That’s pretty much it: happy coding!

- Remove From My Forums
-
Question
-
I have read a lot way to solve this problem, but still can’t find it.
My pc is win10 & visual studio 2017.
I can find it in the C:Windowsassembly. Does it means I have installed?
Answers
-
Did you install the Visual Studio Tools for Office?

— Wayne
-
Marked as answer by
Chien-Wei
Thursday, September 13, 2018 4:18 AM
-
Marked as answer by
All replies
-
Hi,
.net 4.0 or later version added reference, if it is not 4.0 or above, there may not be this, you can download a Microsoft.Office.Interop.Word.dll by yourself.
In your project, right-click on «References» and select «Add» .
Imports Microsoft.Office.Interop.Word
Best Regards,
Alex
MSDN Community Support Please remember to click «Mark as Answer» the responses that resolved your issue, and to click «Unmark as Answer» if not. This can be beneficial to other community members reading this thread. If you have any
compliments or complaints to MSDN Support, feel free to contact MSDNFSF@microsoft.com.-
Marked as answer by
Chien-Wei
Wednesday, September 12, 2018 11:50 AM -
Unmarked as answer by
Chien-Wei
Wednesday, September 12, 2018 11:50 AM
-
Marked as answer by
-
With VS 2015, Office 2016, I add the Object Library :
-
There are times when an assembly will not show up and you need to browse for them. Browse under were the bold parts reflect which version of Office is installed.
C:Program Files (x86)Microsoft Visual Studio 14.0Visual Studio Tools for OfficePIAOffice15.
You can also add them to «Custom Component Set» in Object Browser (the default hot key is F2). Once added select that library and press the button where the arrow is indicating.
I this for all the ones shown as I use them often.
Please remember to mark the replies as answers if they help and unmark them if they provide no help, this will help others who are looking for solutions to the same or similar problem. Contact via my Twitter (Karen Payne) or Facebook (Karen Payne) via
my MSDN profile but will not answer coding question on either.
VB Forums — moderator

-
HI,Alex-Li-MSFT
I check my project is .net4.5.2 , but I can’t find the microsoft.office.interop.word in the VS assemblies.
Is it any possible that my office is o365 cause the problem?
Thanks for your reply.
-
Edited by
Chien-Wei
Wednesday, September 12, 2018 11:51 AM
-
Edited by
-
Hi, Casorix31
I have add this com already, but there are some code error.
I try to add a table in the document,but error shows tables are not the member of document.
I search this problem and they tell me I need to add microsoft.office.interop.word first.
Thanks for your reply.
-
Edited by
Chien-Wei
Wednesday, September 12, 2018 11:52 AM
-
Edited by
-
Did you install the Visual Studio Tools for Office?
— Wayne
-
Marked as answer by
Chien-Wei
Thursday, September 13, 2018 4:18 AM
-
Marked as answer by
-
Hi, WayneAKing
Thanks for your help, I finally find it.
-
Hi,
I am glad you have got your solution, we appreciated you shared us your solution and mark it as an answer.
Best Regards,
Alex
MSDN Community Support Please remember to click «Mark as Answer» the responses that resolved your issue, and to click «Unmark as Answer» if not. This can be beneficial to other community members reading this thread. If you have any
compliments or complaints to MSDN Support, feel free to contact MSDNFSF@microsoft.com.

