

React component to highlight words within a larger body of text.
Check out a demo here.
Usage
To use it, just provide it with an array of search terms and a body of text to highlight.
Try this example in Code Sandbox.
import React from "react";
import { createRoot } from "react-dom/client";
import Highlighter from "react-highlight-words";

const root = createRoot(document.getElementById("root"));
root.render(
  <Highlighter
    highlightClassName="YourHighlightClass"
    searchWords={["and", "or", "the"]}
    autoEscape={true}
    textToHighlight="The dog is chasing the cat. Or perhaps they're just playing?"
  />
);
And the Highlighter will mark all occurrences of search terms within the text:

Props
| Property | Type | Required? | Description |
|---|---|---|---|
activeClassName |
String | The class name to be applied to an active match. Use along with activeIndex |
|
activeIndex |
Number | Specify the match index that should be actively highlighted. Use along with activeClassName |
|
activeStyle |
Object | The inline style to be applied to an active match. Use along with activeIndex |
|
autoEscape |
Boolean | Escape characters in searchWords which are meaningful in regular expressions |
|
className |
String | CSS class name applied to the outer/wrapper <span> |
|
caseSensitive |
Boolean | Search should be case sensitive; defaults to false |
|
findChunks |
Function | Use a custom function to search for matching chunks. This makes it possible to use arbitrary logic when looking for matches. See the default findChunks function in highlight-words-core for signature. Have a look at the custom findChunks example on how to use it. |
|
highlightClassName |
String or Object | CSS class name applied to highlighted text or object mapping search term matches to class names. | |
highlightStyle |
Object | Inline styles applied to highlighted text | |
highlightTag |
Node or String | Type of tag to wrap around highlighted matches. Defaults to mark but can also be a React component (class or functional) |
|
sanitize |
Function | Process each search word and text to highlight before comparing (eg remove accents); signature (text: string): string |
|
searchWords |
Array<String | RegExp> | ✓ | Array of search words. String search terms are automatically cast to RegExps unless autoEscape is true. |
textToHighlight |
String | ✓ | Text to highlight matches in |
unhighlightClassName |
String | CSS class name applied to unhighlighted text | |
unhighlightStyle |
Object | Inline styles applied to unhighlighted text | |
unhighlightTag |
Node or String | Type of tag applied to unhighlighted parts. Defaults to span but can also be a React component (class or functional) |
|
| * | any | Any other props (such as title or data-*) are applied to the outer/wrapper <span> |
Custom highlight tag
By default, this component uses an HTML Mark Text element (<mark>) to wrap matched text, but you can inject a custom
tag using the highlightTag property. This tag should be a React component that accepts the following properties:
| Property | Type | Description |
|---|---|---|
children |
String | Text to be highlighted |
highlightIndex |
Number | Index of matched text |
For example:
const Highlight = ({ children, highlightIndex }) => (
  <strong className="highlighted-text">{children}</strong>
);
Installation
yarn add react-highlight-words
npm i react-highlight-words
License
MIT License — fork, modify and use however you want.
Create Word Documents With React – redocx
redocx is a library which lets you create word documents with React. It provides a set of components which renders your declarative views and components to word documents.
Installation:
npm install –save react redocx
Preview:

Download Details:
Author: nitin42
Live Demo: View The Demo
Download Link: Download The Source Code
Official Website: https://github.com/nitin42/redocx
License: MIT
Related Posts
Whether you’re building a content management system, a blog platform, or any other application requiring users to create and format text, a rich text editor can be an essential component. In 2023, there are many text editor options available, but it can be challenging to know which one to choose.
In this article, we’ll look at some of the best text editors for React, discussing their features, pros, and cons, to help you make an informed decision about which one to use for your next project. Before we dive into what the best React editor is, let’s look at what a rich text editor is and the difference between HTML text editors and rich text editors.
Jump ahead:
- The difference between HTML text editors and rich text editors
- Draft.js
- TinyMCE
- Quill
- CKEditor 5
- ProseMirror
Prerequisites
This article assumes the reader has a working knowledge of React. You don’t have to be an expert, but you need to be able to understand React code.
The difference between HTML text editors and rich text editors
HTML text editors and rich text editors are both tools used to create web content, but they work in different ways and are designed for different purposes. HTML text editors are designed for developers and web designers who need to write and edit code in HTML, the core language used to create web pages.
These editors provide a plain text interface where users can write and edit code directly. Examples of HTML text editors include Sublime Text, Atom, VS Code, and Notepad++. They allow developers to write and edit code with features such as syntax highlighting, code folding, and auto-completion. They are best suited for those who are already familiar with HTML, CSS, and JavaScript.
On the other hand, rich text editors, are designed for content creators who may not have experience with coding. These editors provide a more user-friendly interface for formatting text, similar to a Word or Doc processor. They may also support the use of other languages, such as CSS and JavaScript. Rich text editors typically produce HTML code, but hide the underlying code from the user, allowing them to focus on the visual formatting of the text.
Think of a popular blogging platform like WordPress or Hashnode. The interface where you write your content for your blog, that’s a rich text editor.
Now let’s dive into the best rich text editors for React in no particular order.
Draft.js
Draft.js is one of the best editors out there in the market. Actively maintained by Meta, Draft.js is an open source JavaScript framework React library for building rich text editors.
Draft.js provides a set of APIs for creating and manipulating content in a structured way and allows developers to build custom text editors that can handle a variety of formatting options, such as bold and italic text, lists, undo/redo, code blocks, links, media, etc.
Draft.js is built on top of Facebook’s React library and can be integrated with other tools and frameworks, such as Redux.
Pros
- Easy to integrate with other React-based tools and frameworks
- Draft.js is open source and actively maintained by Facebook, which means that it is well-supported and has a large and active community of developers
- Designed to handle large amounts of text and can handle complex use cases such as collaborative editingExplore 5 of the top rich text editors for React, including TinyMCE and ProseMirror, and compare them based on learning curve, plugins, mobile support, and more
Cons
- Steep learning curve
- Requires a significant amount of development effort to create a custom text editor with all the desired features
- No official mobile support
- Browser plugins like spellcheck may break the editor
Here’s a demo of Draft.js in use.
TinyMCE

TinyMCE is by far the best rich text editor for React in 2023. It provides a user-friendly interface that resembles a standard Word processor, and it can be easily integrated into any web application.
TinyMCE has a wide range of features, including text formatting options like bold, italic, underline, the ability to insert and edit images, tables, and lists, different fonts, support for undo and redo actions, and much more.
The best part of TinyMCE is that it supports plugins, which can be used to add functionality to the editor, such as spell-checking and file management. All of its core features are free, too.
Pros
- Easy to use and integrate
- Customizable with a wide range of plugins and add-ons
- Cross-browser compatible
- Lightweight and fast
- Support for many languages
- Mobile support
Cons
- Some users may find the default user interface to be basic or outdated
- May require additional configuration to meet specific project requirements
Here’s a demo of TinyMCE in use.
Quill

The third editor on our list is Quill. Quill is a popular open source rich text editor that’s used by small companies and Fortune 500 companies alike. That’s because Quill has a very simple UI that allows users to easily format text and add rich media content, and Quill also provides a wide range of formatting options including text color, font size, and alignment.
Quill is highly customizable, allowing users to add their own modules and formats. The best part is that it has a built-in spell checker and is lightweight and easy to implement. Quill is widely used in web development for creating online editors and commenting systems. However, some users may find it lacking in advanced features and it may require some technical knowledge to customize.
Pros
- Great UI for editing and formatting text
- Long range of formatting options
- Highly customizable, allowing users to add their own modules and formats
- Built-in spell checker
- Lightweight and easy to deploy
- Cross-platform compatibility
Cons
- Lacks some advanced features that other editors have
- There are some limitations to the undo-redo functionality
Here’s a link to a demo of Quill in use.
CKEditor 5
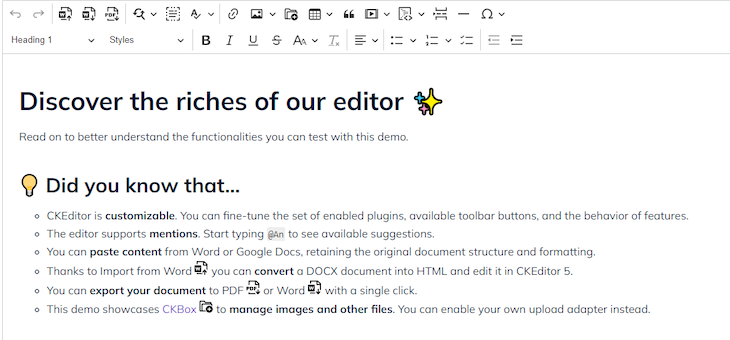
CKEditor 5 is built on a modular architecture and provides a set of features and tools for creating and editing content in a user-friendly way. It’s best known for its flexibility and customization capabilities that allow developers to create custom builds of the editor that include only the features and tools that are needed for their specific use case. This keeps the editor lightweight and fast, while still providing all the functionality needed for creating and editing content.
CKEditor 5 also includes a variety of built-in features and provides support for a wide range of formatting options, including text styles, lists, tables, and media embeds. It also supports collaborative editing, allowing multiple users to work on the same document at the same time.
Pros
- Great accessibility for screen readers and supports keyboard shortcuts
- Can be integrated into multiple frameworks and technologies
- Highly customizable
- Has great UI
- Has a wide range of features
- Provides collaborative editing
Cons
- CKEditor 5 is a relatively large and complex library, which may cause performance issues for your React application
- It requires heavy effort to extend its functionality
Here’s a link to a demo of CKEditor 5 in use.
ProseMirror
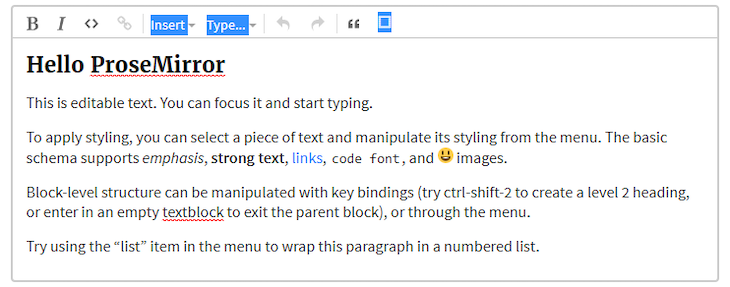
Last but not least is ProseMirror. ProseMirror is popular for its structured document model. Unlike traditional text editors, which represent a document as a flat string of text, ProseMirror uses a more complex data structure to represent a document. This allows for more efficient updates and manipulation of the content, making it suitable for use in large-scale projects.
ProseMirror provides a wide range of text formatting options, including bold, italic, and underline, as well as lists, links, and images. It also allows developers to add custom text formatting options by creating their own schema, and because it’s built on modular architecture, it allows for easy integration with other tools and libraries.
ProseMirror also has a plugin system that allows developers to add new functionality to the editor without modifying the core code. Some of the popular plugins include table editing, collaborative editing, and Markdown parsing.
Pros
- Highly customizable, allowing developers to easily create unique and tailored editing experiences
- ProseMirror is built with performance in mind, using a structured document model, which allows for efficient updates and manipulation of the content
- ProseMirror supports a wide range of text formatting options, including bold, italic, and underline, as well as lists, links, and images
- ProseMirror is open source and actively maintained, so it receives regular updates and improvements
Cons
- ProseMirror is a relatively low-level library and requires a significant amount of work to build a fully-featured rich text editor
- ProseMirror is not tightly integrated with React. While it can be used with React, it requires additional setup and may not offer as seamless an integration as a library specifically designed for React
- ProseMirror requires a deeper understanding of the underlying functionality to make use of it
Here’s a link to a demo of ProseMirror in use.
Conclusion
If you’re looking for a rich text editor to use in your React project in 2023, the five editors we featured in this article should be your go-to options. Among them, TinyMCE is my preferred choice, mostly because of the wide range of plugins it accepts and how well it performs. Overall, it just tops the rest of them.
More great articles from LogRocket:
- Don’t miss a moment with The Replay, a curated newsletter from LogRocket
- Learn how LogRocket’s Galileo cuts through the noise to proactively resolve issues in your app
- Use React’s useEffect to optimize your application’s performance
- Switch between multiple versions of Node
- Discover how to animate your React app with AnimXYZ
- Explore Tauri, a new framework for building binaries
- Compare NestJS vs. Express.js
I hope this article was helpful to you, and I hope it helped you pick a good rich text editor for your next React project. See you in the next one!
Cut through the noise of traditional React error reporting with LogRocket
LogRocket
is a React analytics solution that shields you from the hundreds of false-positive errors alerts to just a few truly important items. LogRocket tells you the most impactful bugs and UX issues actually impacting users in your React applications.


LogRocket
automatically aggregates client side errors, React error boundaries, Redux state, slow component load times, JS exceptions, frontend performance metrics, and user interactions. Then LogRocket uses machine learning to notify you of the most impactful problems affecting the most users and provides the context you need to fix it.
Focus on the React bugs that matter —
try LogRocket today.


“Every once in a while, a new technology, an old problem and a big idea turn into an innovation.”
– Dean Kamen, Inventor of Segway
With the ever-changing work environment requirements, there is a constant need for innovation and extending functionality of our daily use applications to enhance productivity and assure a product’s survival in today’s world. Microsoft Office is one such market-leading application platform which also allows users to extend the functionality of its product suite in a similar fashion with the help of add-ins.
Ever wondered if there was a possibility to have an in-built language translator or may be an auto-document assembly tool in Microsoft Word or if a Microsoft Excel sheet could become intelligent enough to devise formulae based on the data by itself. With the use of Office add-ins, all of this is a possibility now. Surprisingly a lot of people are still unaware of the Microsoft Office Store and the sheer number of add-ins it offers both in free as well as paid domains. Office add-ins nowadays can do almost anything a webpage can do inside a browser and as a result continue to grow in complexity day by day. Through this blog, I will attempt to simplify one of the methodologies for building an add-in for an Office app with ReactJS.
The Microsoft Office JavaScript APIs are available through the office.js library and they enable users to create web apps that interact with the object models in Office host applications. Office.js acts as a script loader which loads the object models that are applicable to the Office application that is running the add-in. Office add-ins run inside the Office application and can interact with the contents of the Office document using the rich JavaScript API.

Under the hood, an Office add-in is just a web app that can be hosted anywhere including Office for Windows, Office Online, Office for Mac, and Office for iOS. Using the manifest.xml file, we can tell Office application the location of our web app and how we want it to appear. The Office application will then take care of hosting it within Office.
The benefits of using Office JS while building add-ins include:
-
Apps for Office are particularly well suited for creating web mashups using Office as a surface to expose the existing web functionality.
-
Apps for Office work seamlessly with the desktop Office application as well as online application. Cross-platform support is also present due to which, Office add-ins run in Office for Windows, Mac, iOS, and Office Online.
-
Apps for Office use html/java-script which supports highly interactive UI using CSS and JavaScript and allows the users to do tons of customizations for a different client while maintaining the integrity of the core functions.
-
In most cases, an Office add-in can read from or write to the host application. For example, if the user types “Hello World” in a document using Microsoft Word and clicks on your app’s button, the app has the capability to read that text and replace it with the Spanish equivalent ‘Hola Mundo’. Due to this, the user can export data from external sources or third-party apps and work with it.
-
Hosting and distribution of add-ins developed using JavaScript API is easy using office store and Appsource. Office store manages complete licensing process and cycle. You can make your solution available to a broader audience by submitting it to AppSource.
-
Centralized deployment and distribution can be done using the Office add-ins and admins can deploy Office add-ins centrally across an organization.
We can build an Office add-in using a Visual Studio Editor or any other editor easily but configuring the web app in ReactJS specifically using the Visual Studio Editor or any other editor with Yeoman generator can be very cumbersome due to the complex configurations involved as both these methodologies result into the generation of manifest and app files which are heavily customized and not friendly with ReactJS.
To generate and configure our app with ReactJS in a better and faster way, we can use the following steps:
Prerequisites:
We need to have the following packages on our workstation
- Node js — v6.11.0
- npm — v5.8.0
- Create-react-app — v1.4.0
Step 1: Setting up the Project
The Create React App is a tool used for building React applications. It saves the time consumed for setting up and configuration and sets up the packages needed for starting the React project using a single command thus simplifying the entire process.
To create a react application using create-react-app, simply run the below command:
create-react-app my-word-addin
Step 2: Add office.js reference in public/index.html
The Office JavaScript API enables users to build their own applications (web) which interact with the object models in Office host applications. These applications refer the office.js library which acts as a script loader. The library, in turn, loads the object models that are required by the Office application to run the add-in. There are two ways to install the Office.js library.
a) Install Office.js using a CDN link :
<script src="https://appsforoffice.microsoft.com/lib/1/hosted/office.js"></script>
b) Install Office.js using the NPM package :
npm install @microsoft/office-js —save
Once installed, the Office.js script reference can be used as
<script src="node_modules@microsoftoffice-jsdistoffice.js"></script>
Step 3: Add the following code snippet into the Index.js to initialize the Office JS
Now that you have installed/added reference of office.js as suggested in step 2, you need to initialize/load the office.js library in order to be able to work with office object model.
const Office = window.Office;

Office.initialize = () => {
  ReactDOM.render(
     ,
    document.getElementById('root'));
};
Step 4: We can either download the default manifest file (.xml) from the Office JS site or build it as per the custom requirements (pre-initialized add-in, tasks pane logo and so on..)
A sample manifest file as per a set of custom requirements will look like the one shown below:
<?xml version="1.0" encoding="utf-8"?>
<OfficeApp xmlns="http://schemas.microsoft.com/office/appforoffice/1.1"
   xmlns:xsi="http://www.w3.org/2001/XMLSchema-instance"
   xsi:type="TaskPaneApp">
   <Id>77f14ss-636e-3462-b38c-76b8a9afeb70</Id>
   <Version>1.0.0.0</Version>
   <ProviderName>Abacus Inc.</ProviderName>
   <DefaultLocale>en-US</DefaultLocale>
   <DisplayName DefaultValue="abacus-docs" />
   <Description DefaultValue="The Abacus App for Word enables you to work with matter related documents inside Word"/>
   <Hosts>
   	<Host Name="Document" />
   </Hosts>
   <DefaultSettings>
   	<SourceLocation DefaultValue="https://localhost:3000/index.html"/>
   </DefaultSettings>
   <Permissions>ReadWriteDocument</Permissions>
</OfficeApp>
With that, you are all set to go. You should now be able to develop your Office add-in using ReactJS and Office JavaScript APIs effortlessly. To test the add-in, you can deploy it using any of the methodologies listed below:
Sideloading As part of your development process, to test your add-in running on Windows, Office Online, iPad, or Mac.
Centralized Deployment In a cloud or hybrid deployment, to distribute your add-in to users in your organization by using the Office 365 admin center.
SharePoint catalog In an on-premises environment, to distribute your add-in to users in your organization.
AppSource To be able to distribute your add-in publicly to users.
With Yeoman generator, you have to stick with questionnaire wizard which may lead to common configuration issues. With the above mentioned easy steps you can build an Office add-in using ReactJS which can save yourself from all this hassle.
Topics:
Product & Test engineering,
OfficeJs,
Office add-ins,
ReactJS
Two years ago, I started to learn and use React. And today I’m still using it at my day job as a Software Developer and in my own side projects.
During that time I’ve come across a lot of «typical» issues. So I searched around and found some best practices that I’ve integrated into my workflow, and I’ve come up with things that have made my life or my team members’ lives easier.
I also faced challenges along the way that I didn’t solve in the best way at the time, and I want to approach them in a better way in the future.
That’s the reason I wrote this guide. I think of it like a collection of tips I’d have given myself two years ago when I started out.
Table of contents:
- Three Major Challenges React Developers Face
- Learn The Building Blocks of React
- Learn How to Build Clean, Performant and Maintainable React Components
- Tips to Help You Write Better React Code – The Cherries on Top
- Final Words
First and foremost, you’ll get to know the three major challenges every React developer has to face. This is important because when you are aware of potential challenges, you’ll understand the reasons behind these best practices in a deeper way. Having this mindset from the beginning also helps you when designing your components or organizing your project.
After that first important step, I’ll introduce you to the three best practices. They’re a mixture of theoretical and practical tips with code examples. I try to minimize hello world problems and come up with code I’ve seen in the real world.
Three Major Challenges React Developers Face

During my two years of using React on a daily basis, I’ve recognized three major challenges that React developers face when building their apps. Ignoring these challenges might bring hard times that harm the growth of your app.
So keep these challenges in mind when orchestrating your app, as it’ll save you time and energy.
⚙️ Maintainability
This goes hand in hand with reusability. At the beginning when the application and the components are very lightweight, they’re easy to maintain. But once the requirements start growing, components tend to become very complex and therefore less maintainable.
I’ve often seen a component that has many different cases, each representing a different outcome. The JSX is flooded with conditional renderings (ternary operators and simple && operators), classnames are applied conditionally, or the component uses a huge switch statement. There are many possible prop and state values, each responsible for a different outcome.
There’s nothing wrong with those techniques in and of themselves, in my opinion. But I think everyone should develop a feeling for when a component starts to become less maintainable and when these techniques become overused. We’ll learn how to control this better later on in the article.
The problem (and I’ve been guilty of this as well) is that the more complexity and different outcomes a component has (polymorphism), the more difficult it becomes to maintain.
To be honest, the root cause is often laziness, not enough experience, or time pressure to refactor a component properly in order to make it more maintainable and cleaner.
Another key factor I’ve seen is no or little testing. I know, testing is not a type of work many developers love, but it can really help you on the long run. Testing itself won’t be a major topic in this post, so keep your eyes open for another blog post of mine about it.
🧠 Solid Understanding of React
Another root cause for problems React devs have is a poor basic understanding of how React works under the hood. I’ve been there, too.
I’ve seen many people jumping too fast into intermediate or advanced concepts without having a solid foundation. But this isn’t only particular to React. It’s a general problem in programming.
Not having a solid understanding of React can also cause issues for you as a developer. I remember having headaches when I wanted to use different component lifecycles but didn’t know how to actually use them. So I had to take a few steps back and go deeper into that topic.
Because I think it’s one of the most important things, I’ve dedicated a whole chapter to it in this blog post below.
📈 Scalability
This challenge goes hand in hand with maintainability. It is not only specific to React, but applies generally in software.
I’ve learned that crafting excellent software is not only about UX, clean code patterns, or clever architecture, for example. For me, the quality of a software also rises or falls with its ability to scale.
To me, many things come into play that increase the scalability of software. You’ll learn my most important tips in this article.
I think when you keep maintainability and scalability in mind when orchestrating your components and organizing your project structure, you’ll less likely end up with a mess of source code that needs major refactoring.
How to Learn React
Alright, now let’s dive deeper into some best practices for learning React.
Learn the Building Blocks of React

As we discussed briefly above, manifesting the building blocks is not only relevant to learning React, but to other technologies or programming languages as well. You can’t build a skyscraper on a sandy foundation and expect it to be solid.
This might seem obvious to many of you, but I’ve seen developers who jumped into the intermediate or advanced concepts of React without really understanding the basics.
This also true for Javascript in general. I’m a huge believer that learning React doesn’t make sense if you don’t have a solid foundation in Vanilla Javascript.
So, if that sounds familiar to you and you’re thinking about learning React but not feeling very comfortable with Vanilla Javascript already, spend some more time on strengthening Javascript first. It will save you a lot of headaches and time in the future.
Here’s a helpful guide to the top JavaScript concepts you need to know before diving into React if you want to review.
But knowing the basics alone is not enough for me. It’s kind of mandatory to know how React works under the hood. If you want to become a good React developer (which I assume you do, because you’re reading this article), you have to know the tool you’re using. This is beneficial for you as a developer and for your clients as well.
On the one hand it can save you a lot of time debugging your application. On the other hand it makes you more efficient because you don’t have to take some steps back to re-learn the basics again and again. You basically know what you’re talking about.
Of course, you can’t know it all and you shouldn’t stress yourself out on that topic. You’ll learn more and more as you go through practical problems and build more projects. But with a good solid knowledge you are equipped well from the beginning.
Okey, that makes sense. But you might be wondering what exactly you need to know in order to have a solid foundation in React?
As a bare minimum, you should understand all the topics inside the Main Concepts Chapter inside the official React Docs.
Another chapter you should be very familiar with is the one on Hooks because they’ve become a convention and are used everywhere, especially in third party React packages.
Of course there are some you might use more often like useState and useEffect, but understanding the other ones like useMemo, useCallback or useRef is also essential.
There’s also another chapter called Advanced Guides that I wouldn’t consider to be mandatory at the beginning, but I’d highly recommend that you grasp those concepts during your React journey.
As always, it’s often easier to understand advanced topics when you already have some practical experience. But the more of those things you understand early on, the better.
Of course you shouldn’t limit yourself to just only following the React docs. Working through an online course that covers those building blocks, watching tutorials or reading other blog posts is also part of building a solid foundation. So, test what works best for you.
If I had to choose the most important concepts to know at a bare minimum, I’d suggest these:
- what is «state»?
- ups and downs of class and functional components
- what are component re-renderings and how do they work?
- how to trigger re-renderings
- different component lifecycles and how to interact with them
- Virtual DOM
- Benefits of CSR (Client Side Rendering) and SSR (Server Side Rendering) in general and in React
- Controlled vs. Uncontrolled Components
- State Lifting
- at least one global state management technology (Context API, Redux/Toolkit, Recoil)
- Component Patterns (especially how to choose the right pattern)
Learn How to Build Clean, Performant and Maintainable React Components

I know – this is the dream of every programmer (or at least I hope it is). And for me, this ability separates a good programmer from a great programmer. The fun part is that it’s never really completed because there’s always something to learn and to improve.
Following these best practices won’t only make it easier for you, but also for your teammates. I’ve seen development teams who created a style guide where they defined important cornerstones about how they’re writing code. Very smart idea if you’d ask me.
Some of them were:
- use functional components (like arrow-functions)
- don’t use inline-styles
- maintain a proper import structure (third-party imports first —> internal imports below)
- format your code before committing
And so on.
Of course you can get very detailed about it. This depends on your team. I personally don’t like very detailed style guides because I think you should have some type of freedom as a skilled developer and shouldn’t be restricted too much.
But a style guide in general is a good way to outline and keep up best practices and makes sure your team is on the same page regarding some important areas. I think this increases teamwork and output tremendously.
Let’s take a look what those best practices actually are to create components that are clean, performant, and maintainable. Make yourself comfortable, grab something to take a notes with, and enjoy!
📁 Create a good folder-structure
Organizing your files and folders inside your React application is mandatory for maintainability and scalability.
A good folder structure depends on the size of your application and your team. So there’s no general answer to that. Especially because this is a highly opinionated topic and depends also on personal preferences.
But over the time, some best practices for different sizes of an application have evolved.
This great blog post goes through five different application sizes and introduces good ideas of how to organize your files and folders. Having this in mind when planning or starting your application can make a huge difference on the long run.
Don’t over-engineer it, but try your best maintain a proper structure that is best suited for your current application and your team size.
👇 Maintain a structured import order
If you’ve already got some experience in React, you might have seen files that are bloated with a lot of import statements. They might also be mixed up with external imports from third-party packages and internal imports like other components, util functions, styles and many more.
Real World Example (cut):
import React, { useState, useEffect, useCallback } from "react";
import Typography from "@material-ui/core/Typography";
import Divider from "@material-ui/core/Divider";
import Title from "../components/Title";
import Navigation from "../components/Navigation";
import DialogActions from "@material-ui/core/DialogActions"
import { getServiceURL } from '../../utils/getServiceURL";
import Grid from "@material-ui/core/Grid";
import Paragraph from "../components/Paragprah";
import { sectionTitleEnum } from "../../constants";
import { useSelector, useDispatch } from "react-redux";
import Box from "@material-ui/core/Box";
import axios from 'axios';
import { DatePicker } from "@material-ui/pickers";
import { Formik } from "formik";
import CustomButton from "../components/CustomButton";
...You probably recognize the deal here. It’s difficult to distinguish what are all the third-party and the local (internal) imports. They are not grouped and seem to be all over the place.
Better Version:
import React, { useState, useEffect, useCallback } from "react";
import { useSelector, useDispatch } from "react-redux";
import { Formik } from "formik";
import axios from 'axios';
import Typography from "@material-ui/core/Typography";
import Divider from "@material-ui/core/Divider";
import Box from "@material-ui/core/Box";
import DialogActions from "@material-ui/core/DialogActions";
import Grid from "@material-ui/core/Grid";
import { DatePicker } from "@material-ui/pickers";

import { getServiceURL } from '../../utils/getServiceURL";
import { sectionTitleEnum } from "../../constants";
import CustomButton from "../components/CustomButton";
import Title from "../components/Title";
import Navigation from "../components/Navigation";
import Paragraph from "../components/Paragraph";
...
The structure is clearer and it’s very easy to distinguish where the external and internal imports are. Of course you can optimize it more if you are using more named imports (if that’s possible!  ). That allows you to import all the components that are coming from material-ui all on one line.
I’ve seen other developers who like to split the import structure up in three different parts:
Built-In (like ‘react’) —> External (third-party node modules) —> Internal.
You can manage it every time by yourself or let a linter do the job. Here’s a great article about how to configure your linter for your React app to maintain a proper import structure.
📔 Learn different component patterns
To ensure you don’t end up with unmaintainable and unscalable spaghetti code, learning different component patterns is essential as you become more experienced in React.
But this is not all. Knowing the different patterns is a good foundation. But the most important aspect about it is that you know when to use which pattern for your problem.
Every pattern serves a certain purpose. For example the compound component pattern avoids unnecessary prop-drilling of many component levels. So, the next time you begin to do pass props through five component levels to finally reach the component that is interested in the props, you start to orchestrate the components differently.
One quick side note here about props-drilling, because I’ve had many discussions about it in the past. There’re many opinions out there as to whether it’s bad or not. As for me, I like to try to think about a different way / pattern if I start to pass props through more than two component levels.
This fact makes you more efficient as a developer and makes the components you write more maintainable or scalable. Having those patterns in your toolkit makes you also stand out from other React developers. I highly encourage you to do your own research, but this Udemy course helped me very much.
🔒Use a linter and follow its rules
A linter doesn’t only help you in terms of maintaining a distinguishable import order of your dependencies. It helps you write better code in general.
When you’re using create-react-app, there’s already ESLint configured, but you can also set it up completely on your own or extend the rules of a pre-configured ruleset.
A linter basically observes the JavaScript code you’re writing and reminds you of errors you’d more likely catch when executing the code. It took a while for me to really value the use of a linter, but today I can’t imagine working without it.
Having the linter is one thing, but following its rules is another. Of course you can disable it. Either for a specific line of code or for the whole file itself. There may be cases where this makes sense, but from my experience they’re pretty rare.
Another great benefit is that you can also adjust style checking. This is especially helpful for teams. Once you agreed upon certain conventions of how you write your code and how it should be formatted, you can easily combine ESLint with something like JSPrettify.
🧪 Test your code
I know, testing is likely not your favorite task as a developer. I used to be like that. At the beginning it seemed to be an unnecessary and disturbing task. This might be true for the short run. But in the long run – and when the application grows – it is vital.
For me, testing has become a practice that ensures I’m doing my job more professionally and delivering higher quality software.
Basically there’s nothing wrong with manual testing by a human and that shouldn’t be avoided completely. But imagine you’re integrating a new feature and want to make sure that nothing is broken. This can be a time consuming task and is prone to human error.
During the time you’re writing tests you’re already in the thinking process of how to organize your code in order to pass this test. For me this is always helpful because I recognize what pitfalls might arise and that I have to keep an eye on them.
You’re not directly jumping into writing your code either (which I wouldn’t recommend at all), but you’re thinking first about the goal.
For example «What should that particular component do? What important edge cases might arise that I have to test? Can I make the component more pure that it only serves one purpose? …»
Having a vision for the code you’re about to write also helps you to maintain a sharp focus on serving that vision.
Tests can also serve as a kind of documentation, because for a new developer who is new to the codebase it can be very helpful to understand the different parts of the software and how they’re expected to work.
So, don’t avoid testing because it seems to be extra work. The reality is that it can save you extra work in the future when you set it up properly.
Take a look at the «Testing» chapter inside the React Docs, go through a few tutorials on testing in React, and just start writing your first small TDD application or implement tests into an app you’re currently working on.
🧰 Integrate Typescript (or at least use default props and prop types)
I remember my first React project as a software developer where our team received a project that was already basically written by another company. Then we had to build the client’s project upon it, and Typescript had already been integrated.
Up to that point, my teammates and I hadn’t had much experience in TypeScript since we all came from a vanilla JavaScript background.
After a few weeks of working with that project, we felt that TypeScript wasn’t a benefit, but more an obstacle that blocked us in our workflow. We also weren’t really using the benefits of it because we defined everything with type any to suppress the Typescript warnings.
That led us to the decision to remove TypeScript from the project and to work on our known terrain with vanilla JavaScript. This went well at first, but the more complex our project became, the more type errors emerged. So we doubted our decision a lot of getting completely rid of TypeScript. But those things can happen and gave us valuable experiences for the future.
This circumstance led me to give TypeScript another chance, and I learned it in my spare time. After building some side projects with it, I can’t imagine a life without it anymore.
Using TypeScript has many upsides like static type checking, better code completion in your IDE (intellisense), improved developer experience, and catching type errors while you write the code – just to name a few.
On the other hand it can have some challenges of course, because if you’re not coming from a background with strongly typed languages (like Java or C#) it might be harder at the beginning to grasp it.
But I can say that it’s really worth it to learn and to integrate it. Here’s a nice article that can help you out of getting an overview of the ups and downs using Typescript in React applications. And here’s a tutorial on how to code your React apps in TypeScript.
There may be reasons you don’t want to use TypeScript inside your React application. That’s fine. But at a bare minimum I’d recommend that you use prop-types and default-props for your components to ensure you don’t mess up your props.
💎 Use lazy-loading / code splitting
If you’ve spent some time in the JavaScript and React universe, you’ve most likely stumbled across bundling. For those of you who are hearing this term for the first time, let’s see what the official React docs say:
Most React apps will have their files “bundled” using tools like Webpack, Rollup or Browserify. Bundling is the process of following imported files and merging them into a single file: a “bundle”. This bundle can then be included on a webpage to load an entire app at once.
Basically this is a great technique, but with the growth of your app comes a challenge. Your bundle starts growing as well. Especially when you’re using big third-party libraries like three.js.
The pitfall is that this bundle needs to be always loaded completely, even when the user needs only a fraction of the code. This leads to performance issues because it can take an unnecessarily long time to load up your app.
To avoid this, there’s a technique called code splitting where you split up your bundle into the pieces of the code your user needs. This is supported by the most common bundlers like Webpack, Rollup, and Browserify. The great benefit of it is that you can create multiple bundles and load them dynamically.
Splitting up your bundle helps you to lazy load only the things that are needed by the user.
To illustrate this, imagine you’re going into a grocery store and just want to grab some bananas, apples, and bread. In that case you aren’t buying the whole range of the store and then grab your bananas, apples and bread out of it. You’re just interested in a fraction of the range. So why would you buy everything? It would take way longer and is of course more expensive.
I think it’s important to be aware of the potential challenges that can arise as your app grows, and that there are certain techniques at hand to get rid of those issues. For further reading checkout the React docs.
According to the React docs,
Hooks allow us to reuse stateful logic without changing our component hierarchy.
Basically they’re a better solution to the techniques that were used before in combination with class components. If you’ve been coding for a while, you might remember the use of Higher Order Components or render props.
Whenever you find yourself in a situation where you have to reuse the same stateful logic that is already used in another functional component, that’s a great time to create a custom hook. Inside it you encapsulate the logic and just have to call the hook as a function inside your components.
Let’s take a look at a quick example where we need to update our UI according to the screen size and want to keep track of the current window size when resizing the browser window manually.
const ScreenDimensions = () => {
  const [windowSize, setWindowSize] = useState({
    width: undefined,
    height: undefined,
  });

  useEffect(() => {
    function handleResize() {
      setWindowSize({
        width: window.innerWidth,
        height: window.innerHeight,
      });
    }
    window.addEventListener('resize', handleResize);
    handleResize();
    return () => window.removeEventListener('resize', handleResize);
  }, []);

  return (
  	<>
    	<p>Current screen width: {windowSize.width}</p>
        <p>Current screen height: {windowSize.height}</p>
    </>
  )
}As you can see, the solution is pretty straightforward and there’s nothing wrong with defining it like this.
Now comes the tricky part. Imagine we’d like to use the exact logic in another component, where we’ll render a different UI (one for smartphones and one for desktops) based on the current screen size.
Of course we could just copy the logic, paste it in and we’re done. But this is not a good practice, as you might know from the DRY principle.
If we’d like to adjust our logic, we have to do it in both components. And when we paste our logic in even more components, it becomes less maintainable and more error prone.
So, what would you normally do in a vanilla JavaScript project? You’d most likely define a function that encapsulates the logic and can be used in many different places. That’s exactly what we’ll achieve with hooks. They are nothing more than JavaScript functions but with some React specialities because they’re using React hooks.
Let’s see how our custom hook would look:
const useWindowSize = () => {
  const [windowSize, setWindowSize] = useState({
    width: undefined,
    height: undefined,
  });

  useEffect(() => {
    function handleResize() {
      setWindowSize({
        width: window.innerWidth,
        height: window.innerHeight,
      });
    }
    window.addEventListener('resize', handleResize);
    handleResize();
    return () => window.removeEventListener('resize', handleResize);
  }, []);

  return windowSize;
}
Now let’s simply call it inside our ScreenDimensions component:
const ScreenDimensions = () => {
  const windowSize = useWindowSize()

  return (
  	<>
    	<p>Current screen width: {windowSize.width}</p>
        <p>Current screen height: {windowSize.height}</p>
    </>
  )
}
This enables us to just call the custom hook in any other component and save the return value (which is the current window size) in a variable that we can use inside the component.
const ResponsiveView = () => {
  const windowSize = useWindowSize()

  return (
  	<>
    	{windowSize.width <= 960 ? (
          <SmartphoneView />
        ) : (
          <DesktopView />
        )}
    </>
  )
}
🖥️ Handle errors effectively
Handling errors effectively is often overlooked and underestimated by many developers. Like many other best practices this seems to be an afterthought at the beginning. You want to make the code work and don’t want to «waste» time thinking much about errors.
But once you’ve become more experienced and have been in nasty situations where better error handling could have saved you a lot of energy (and valuable time of course), you realize that it’s mandatory in the long run to have a solid error handling inside your application. Especially when the application is deployed to production.
But what exactly does error handling mean in the React world? There are some different parts that play a role. One is to catch errors, another one to handle the UI accordingly, and the last one to log them properly.
React Error Boundary
This is a custom class component that is used as a wrapper of your entire application. Of course you can wrap the ErrorBoundary component also around components that are deeper in the component tree to render a more specific UI, for example. Basically it’s also a best practice to wrap the ErrorBoundary around a component that is error prone.
With the lifecycle method componentDidCatch() you’re able to catch errors during the rendering phase or any other lifecycles of the child components. So when an error arises during that phase, it bubbles up and gets caught by the ErrorBoundary component.
If you’re using a logging service (which I also highly recommend), this is a great place to connect to it.
The static function getDerivedStateFromError() is called during the render phase and is used to update the state of your ErrorBoundary Component. Based on your state, you can conditionally render an error UI.
class ErrorBoundary extends React.Component {
  constructor(props) {
    super(props);
    this.state = { hasError: false };
  }

  static getDerivedStateFromError(error) {
    return { hasError: true };
  }

  componentDidCatch(error, errorInfo) {
    //log the error to an error reporting service
    errorService.log({ error, errorInfo });
  }

  render() {
    if (this.state.hasError) {
      return <h1>Oops, something went wrong.</h1>;
    }
    return this.props.children;
  }
}
The big drawback of this approach is that it doesn’t handle errors in asynchronous callbacks, on server-side-rendering, or in event-handlers because they’re outside the boundary.
Use try-catch to handle errors beyond boundaries
This technique is effective to catch errors that might occur inside asynchronous callbacks. Let’s imagine we’re fetching a user’s profile data from an API and want to display it inside a Profile Component.
const UserProfile = ({ userId }) => {
	const [isLoading, setIsLoading] = useState(true)
	const [profileData, setProfileData] = useState({})

    useEffect(() => {
    	// Separate function to make of use of async
        const getUserDataAsync = async () => {
        	try {
            	// Fetch user data from API
            	const userData = await axios.get(`/users/${userId}`)
                // Throw error if user data is falsy (will be caught by catch)
                if (!userData) {
                	throw new Error("No user data found")
                }
                // If user data is truthy update state
                setProfileData(userData.profile)
            } catch(error) {
            	// Log any caught error in the logging service
            	errorService.log({ error })
                // Update state
                setProfileData(null)
            } finally {
            	// Reset loading state in any case
                setIsLoading(false)
            }
        }

        getUserDataAsync()
    }, [])

    if (isLoading) {
    	return <div>Loading ...</div>
    }

    if (!profileData) {
    	return <ErrorUI />
    }

    return (
    	<div>
        	...User Profile
        </div>
    )
}
When the component gets mounted, it starts a GET request to our API to receive the user data for the corresponding userId that we’ll get from the props.
Using try-catch helps us catch any error that might occur during that API call. For example this could be a 404 or a 500 response from the API.
Once an error gets caught, we’re inside the catch block and receive the error as a parameter. Now we’re able to log it in our logging service and update the state accordingly to display a custom error UI.
Use the react-error-boundary library (personal recommendation)
This library basically melts those two techniques from above together. It simplifies error handling in React and overcomes the limitations of the ErrorBoundary component we’ve seen above.
import { ErrorBoundary } from 'react-error-boundary'

const ErrorComponent = ({ error, resetErrorBoundary }) => {

  return (
    <div role="alert">
      <p>Something went wrong:</p>
      <pre>{error.message}</pre>
    </div>
  )
}

const App = () => {
  const logError = (error, errorInfo) => {
  	errorService.log({ error, errorInfo })
  }


  return (
    <ErrorBoundary
       FallbackComponent={ErrorComponent}
       onError={logError}
    >
       <MyErrorProneComponent />
    </ErrorBoundary>
  );
}
The library exports a component that is made up of the ErrorBoundary functionality we already know and adds some nuances to it. It allows you to pass a FallbackComponent as a prop that should be rendered once an error got caught.
It also exposes a prop onError which provides a callback function when an error arises. It’s great for using it to log the error to a logging service.
There are some other props that are quite useful. If you’d like to know more, feel free to checkout the docs.
This library also provides a hook called useErrorHandler() that is meant to catch any errors that are outside the boundaries like event-handlers, in asynchronous code and in server-side-rendering.
Logging errors
Catching and handling errors effectively is one part, logging them properly is another. Once you’ve set up your error handling inside your application, you need to log them persistently.
The most frequently used way is the good old console.log. This might be good during development when you want a quick log, but once your application is deployed to production it becomes useless. This is because you only see the error inside the user’s browser, which is not effective at all.
When logging errors in production, you as the developer want to see the errors in one dedicated place in order to fix them.
For that reason we need a logging service created by our own or a third-party one.
When using third-party logging services my personal recommendations is definitely Sentry. So I highly encourage you to check it out.
☝️ Keep your key prop unique across your whole app
When mapping over an Array to render its data, you always have to define a key property for each element. A common practice I’ve seen and used myself as well is to use simply the index of each element as the key prop.
Using the key prop is important because it helps React to identify the exact element that has changed, is added or is removed. Imagine the state of your component changes and the UI needs to be re-rendered with the new state. React needs to figure out the differences between the previous UI and new UI in order to update it.
«What elements are added/removed or have changed?»
Therefore the key prop has to be unique. Using the index of the current element makes sure that it is only unique in this particular map function.
It could look like this, if we’d pretend to show a score history of a football team from the current season:
const SeasonScores = ({ seasonScoresData }) => {

    return (
    	<>
        	<h3>Our scores in this season:<h3>
        	{seasonScoresData.map((score, index) => (
    			<div key={index}>
        			<p>{score.oponennt}</p>
        			<p>{score.value}</p>
        		</div>
    		))}
        </>
    )
}
While this is only unique inside this map function here, this could lead to potential issues. It’s pretty common to have more than one map function inside your React application or even in one component.
Let’s assume we’ve got another map-function in our component to display the current roster:
const SeasonScores = ({ seasonScoresData, currentRoster }) => {

    return (
    	<>
        	<h3>Our scores in this season:<h3>
        	{seasonScoresData.map((score, index) => (
    			<div key={index}>
        			<p>{score.oponennt}</p>
        			<p>{score.value}</p>
        		</div>
    		))}
            </br>
			<h3>Our current roster:<h3>
        	{currentRoster.map((player, index) => (
            	<div key={index}>
                	<p>{player.name}</p>
                    <p>{player.position}</p>
                    <p>{player.jerseyNumber}</p>
                    <p>{player.totalGoals}</p>
                </div>
    		))}
        </>
    )
}
Now we end up in the situation where we used many keys twice inside our component. Let’s assume we got 14 elements inside seasonScoresData and 30 in currentRoaster. We have used the numbers 0-13 two times as a key prop. Now we’re not serving the purpose anymore to have unique key props.
This could lead to potential problems because React might only re-render only one item and omit the other one. Or it can lead to inefficiencies with updating the UI tree. Check out the recommended blog post at the end of this tip to get a more in depth example.
To avoid this unwanted behavior, make sure to always use unique keys across your whole application. Ideally each item in the Array has got its own unique id that you can use. But this isn’t always the case, so you can use an external library like uuidv4 for generating unique id’s.
With that in mind and with the assumption that every item in both Arrays has an id property, the component would look like this:
const SeasonScores = ({ seasonScoresData, currentRoster }) => {

    return (
    	<>
        	<h3>Our scores in this season:<h3>
        	{seasonScoresData.map((score, index) => (
    			<div key={score.id}>
        			<p>{score.oponennt}</p>
        			<p>{score.value}</p>
        		</div>
    		))}
            </br>
			<h3>Our current roster:<h3>
        	{currentRoster.map((player, index) => (
            	<div key={player.id}>
                	<p>{player.name}</p>
                    <p>{player.position}</p>
                    <p>{player.jerseyNumber}</p>
                    <p>{player.totalGoals}</p>
                </div>
    		))}
        </>
    )
}
If you want to go into more depth, feel free to check out this great post about that topic.
Tips to Help You Write Better React Code – The Cherries on Top

I’d like to compare this guide to the process of building a house. The first part, Learn the Building Blocks of React, is the solid foundation you build your application on. The second one, How to Build Clean, Performant and Maintainable React Components, is for building the walls.
This section is basically the roof that comes on top to complete the house. That’s the reason I’d like to call it Cherries on Top. These tips here are more granular.
Most of these practices are more optional than those before, but can make a difference if you use them properly.
🪄 Implement the useReducer hook earlier
Probably one of the most frequently used hooks in React is useState. I’ve created and seen components over the time that have got a lot of different states. So it’s natural that they become flooded with a lot of useState hooks.
const CustomersMap = () => {
  const [isDataLoading, setIsDataLoading] = useState(false)
  const [customersData, setCustomersData] = useState([])
  const [hasError, setHasError] = useState(false)
  const [isHovered, setIsHovered] = useState(false)
  const [hasMapLoaded, setHasMapLoaded] = useState(false)
  const [mapData, setMapData] = useState({})
  const [formData, setFormData] = useState({})
  const [isBtnDisabled, setIsBtnDisabled] = useState(false)

  ...

  return ( ... )
}
Having a lot of different useState hooks is always a great sign that the size and therefore the complexity of your component is growing.
If you can create some smaller sub components where you can transfer some state and JSX in, then this is a great way to go. So you’re cleaning up your useState hooks and your JSX in one step.
In our example above, we could put the last two states into a separate component that handles all state and JSX that has to do with a form.
But there are scenarios where this doesn’t make sense, and you have to keep those many different states inside one component. To increase the legibility of your component, there is the useReducer hook.
The official React docs say this about it:
useReduceris usually preferable touseStatewhen you have complex state logic that involves multiple sub-values or when the next state depends on the previous one. useReducer also lets you optimize performance for components that trigger deep updates because you can pass dispatch down instead of callbacks.
With that in mind, the component would like this when using useReducer:
// INITIAL STATE
const initialState = {
  isDataLoading: false,
  customerData: [],
  hasError: false,
  isHovered: false,
  hasMapLoaded: false,
  mapData: {},
  formdata: {},
  isBtnDisabled: false
}

// REDUCER
const reducer = (state, action) => {
  switch (action.type) {
    case 'POPULATE_CUSTOMER_DATA':
      return {
        ...state,
        customerData: action.payload
      }
    case 'LOAD_MAP':
      return {
        ...state,
        hasMapLoaded: true
      }
    ...
    ...
    ...
    default: {
      return state
    }
  }
}

// COMPONENT
const CustomersMap = () => {
  const [state, dispatch] = useReducer(reducer, initialState)

  ...

  return ( ... )
}
The component itself looks cleaner and comes along with some great benefits as you can see inside the docs. If you’re used to Redux, the concept of a reducer and how it is built isn’t new to you.
My personal rule is to implement the useReducer hook if my component exceeds four useState hooks, or if the state itself is more complex than just a boolean, for example. It might be an object for a form with some deeper levels inside.
🔌 Use shorthand for boolean props
Often there are scenarios where you pass boolean props to a component. I’ve seen a lot of developers doing it like this:
<RegistrationForm hasPadding={true} withError={true} />But you don’t need to do it necessarily like this because the occasion of the prop itself is either truthy (if the prop is passed) or falsy (if the prop is missing).
A cleaner approach would be:
<RegistrationForm hasPadding withError />👎 Avoid curly braces for string props
A similar use case like we’ve seen in the tip before is using string props:
<Paragraph variant={"h5"} heading={"A new book"} />You don’t need the curly braces in that case because you’re allowed to directly use strings inside your props. When you want to attach a className to a JSX Element you’re most likely using it also directly as a string.
When you’d like use a JavaScript expression different from a string, you need to use the curly braces. For example if you want to use a number or an object. This is also true for template strings (don’t get caught up like I did many times, haha).
With plain strings, like in the example, it would look like this:
<Paragraph variant="h5" heading="A new book" />🧹 Erase non-html attributes when spreading props
Let’s take a look at a quick example:
const MainTitle = ({ isBold, children, ...restProps }) => {

  return (
    <h1
      style={{ fontWeight: isBold ? 600 : 400 }}
      {...restProps}
    >
      {children}
    </h1>
  )
}
We’ve just created a component that will render a h1 tag, extracted some props, and spread out all other potential props on the h1 tag. So far, so good.
Now, we’re able to use it in other components and can trigger manually if the h1 should be bold or not:
// WITH BOLD TITLE
const IndexPage = () => {

  return (
    <>
      <MainTitle isBold>
        Welcome to our new site!
      </MainTitle>
      ...
    </>
  )
}
// WITHOUT BOLD TITLE
const AboutPage = () => {
return (
<>
<MainTitle>
Some quick lines about us!
</MainTitle>
...
</>
)
}Up to now, everything works perfectly without any errors or warnings. The interesting part starts now when we’re using other props that are directly spread onto the h1 tag.
When you’re using valid HTML attributes like id or a class, everything works without any error (remember —> «className» will become «class»):
const IndexPage = () => {

  return (
    <>
      <MainTitle isBold id="index-main-title" className="align-left">
        Welcome to our new site!
      </MainTitle>
      ...
    </>
  )
}
So all props above will be added as an attribute to the h1 because we’re using {…restProps} on it. No matter what, props we are adding and NOT extracting will be added to the h1 tag.
This is great for many use cases but can be a problem at the same time:
// Page Component
const IndexPage = () => {

  return (
    <>
      <MainTitle isBold hasPadding>
        Welcome to our new site!
      </MainTitle>
      ...
    </>
  )
}

// MainTitle Component
const MainTitle = ({ isBold, children, ...restProps }) => {

  return (
    <h1
      style={{
        fontWeight: isBold ? 600 : 400,
        padding: restProps.hasPadding ? 16 : 0
      }}
      {...restProps}
    >
      {children}
    </h1>
  )
}
In the code above we were adding a new prop called hasPadding to the MainTitle component, that is optional. Inside the component we are not extracting it from the props and call it via restProps.hasPadding.
The code works, but when you open your browser you’ll receive a warning that hasPadding is a non-HTML attribute you’re trying to apply on the h1 tag. This is because of {...restProps} on the h1 tag and not extracting hasPadding like isBold for example.
To avoid this, always extract all non-HTML attributes from the props first, to make sure that there are only valid HTML attributes in restProps that you’re spreading onto a JSX element.
In our example it would look like this:
// Page Component
const IndexPage = () => {

  return (
    <>
      <MainTitle isBold hasPadding>
        Welcome to our new site!
      </MainTitle>
      ...
    </>
  )
}

// MainTitle Component
const MainTitle = ({ isBold, children, hasPadding, ...restProps }) => {

  return (
    <h1
      style={{
        fontWeight: isBold ? 600 : 400,
        padding: hasPadding ? 16 : 0
      }}
      {...restProps}
    >
      {children}
    </h1>
  )
}
Many of those warnings can unnecessary flood your browser’s console, which can be very nasty. Especially when you’re debugging.
To get more information about this topic and some other ways to solve this, check out this part of the React docs.
🔥 Use snippet extensions
In Visual Studio Code, for example, there are certain extensions available that increase your productivity a lot. One type of these extensions are snippet extensions.
The great benefit about them is that you don’t have to write all that boilerplate code again. Imagine you’re building many new components and have to type it all out again and again:
import React from 'react'

const GoogleMap = () => {

}

export default GoogleMap
With these snippets you just have to type rafce, for example, hit tab and you have the same boilerplate code. It is a real time saver and makes development faster.
But use them with caution! I wouldn’t recommend using snippets to all developers. In my opinion, beginners shouldn’t use any snippets and should type the boilerplate out by hand. When you’re doing that, you’ll get muscle memory which manifests the stuff you learn.
If you have done it so often that you can type it out in your sleep and it becomes boring, that’s the right time to use snippets.
Here are my recommendations:


❌ Write a fragment when a div is not needed
A React component can only render one single HTML tag at its root. So if you’d like to render two adjacent elements, you’ll get the famous error called Adjacent JSX elements must be wrapped in an enclosing tag.
const InfoText = () => {

  // Will throw an error
  return (
    <h1>Welcome!</h1>
    <p>This our new page, we're glad you're are here!</p>
  )
}
So, what can you do? You just wrap the rendered output into a fragment, which satisfies React and doesn’t render an extra HTML element in the browser.
const InfoText = () => {

  return (
  	<>
      <h1>Welcome!</h1>
      <p>This our new page, we're glad you're are here!</p>
    </>
  )
}
Of course you could have solved this with a div tag as well. But using div after div will create something I like to call div hell in the browser where you got many deep nested div tags without any sense.
So whenever you have to use a wrapper tag in React but don’t necessarily need an HTML tag, then simply use a fragment.
👈 Integrate self closing tags when no children are needed
From my experience, this tip right here is often overlooked, but could make your code so much cleaner with little effort.
In React you’ve got the opportunity to pass children elements to a component, which are then available to the component via its children property. Those components are often called composite components.
In that case you have to use an opening tag and a closing tag of course:
<NavigationBar>
  <p>Home</p>
  <p>About</p>
  <p>Projects</p>
  <p>Contact</p>
</NavigationBar>
But when there are no children needed, there isn’t any sense in using an opening and closing tag, right?
<NavigationBar></NavigationBar>Instead of doing this, I recommend that you just use the component as a self closing element like the input tag in HTML, that doesn’t take children as well.
<NavigationBar />Looks much cleaner right away, doesn’t it?
✅ Follow common naming conventions
The sense behind naming conventions is to more easily recognize what type of element you’re dealing with and to have something in your code that is common in the community.
From my standpoint, there are two major naming conventions involved in React and JavaScript that you should follow:
Use PascalCase in components, interfaces, or type aliases
// React component
const LeftGridPanel = () => {
  ...
}

// Typescript interface
interface AdminUser {
  name: string;
  id: number;
  email: string;
}

// Typescript Type Alias
type TodoList = {
	todos: string[];
    id: number;
    name: string;
}
Use camelCase for JavaScript data types like variables, arrays, objects, functions, and so on
const getLastDigit = () => { ... }

const userTypes = [ ... ]
Naming React components in PascalCase is especially important. Because when you’ve got a linter configured for React, but you named the component in camelCase and you’re using hooks inside it, you’ll get a warning message all the time that hooks are only allowed in components. That’s because the linter recognizes a React components if it’s written in PascalCase or not.
This can be nasty, but is fixed quickly with sticking to the established naming conventions.
🧨 Sanitize your code to prevent XSS Attacks
Maybe you’ve found yourself in a scenario where you have to use the property dangerouslySetInnerHTML on an element in React. Basically it’s React’s equivalent to innerHTML you might know from Javascript.
So using it, you can set HTML directly from React.
Let’s consider the following example, where we’d like to render an HTML string inside a div. The string could come from a rich text editor where it’s already formatted HTML.
const Markup = () => {
  const htmlString = "<p>This is set via dangerouslySetInnerHTML</p>"

  return (
    <div dangerouslySetInnerHTML={{ __html: htmlString }} />
  )
}
The term dangerously is chosen with intention. Using this property can open you up to a cross-site-scripting (XSS) attack. So it’s mandatory that the code that gets set is sanitized first.
A great library is dompurify that can help you out with this.
Final words
Wow, that was fun right? I tried my best to let everything out that got piled up over the past in my head. My motivation behind this guide is to share my experience with you so you can avoid some harder times during your React learning and development.
Of course there might be best practices you consider more important that I’ve missed here. That’s great. I’d love to hear what you’d like to add to this guide.
Remember, it’s always all about adapting what’s useful for you. So, don’t take it all for granted and think about what might be helpful in your situation. Then you can just add it to your own stack of best practices.
You can also follow my developer journey and get many more useful insights about the life of a developer on my Instagram Profile. I’m always there to help you and happy about every feedback I can get. So, feel free to reach out.
Learn to code for free. freeCodeCamp’s open source curriculum has helped more than 40,000 people get jobs as developers. Get started