
Here’s eight better but simple table formatting options not available from Microsoft Word’s Table Style gallery.
Word’s Table Style gallery is a tempting selection of table formats but it doesn’t show you all the options to make your table look good. Some of these variations are right there on the ribbon, others are buried a bit deeper.
All the Office galleries have a problem. They are too easy and greatly overused. Tweaking a Word table style makes your document look different.
The Table Style options are just to the left of the Table Style gallery on the Table | Design ribbon.

Select the options you want and the gallery thumbnails will change to show an example.
Column banding
There are plenty of row banding (alternate shading of rows) in the gallery but default to the column banding choice so it’s not used as often.

You can turn on both row and column banding though the result isn’t usually very helpful.

Last row / column formatting
The other choices on the Table Style options are formatting the last row or column. This will highlight summary or totals.

Vertical Centering
As well as Left, Center and Right formatting there are also vertical options to position items ‘up and down’ within a cell. Choose from Top (default), Bottom or our favorite, Middle.
Look at the data cells in this example where the numbers are at the top of each cell, out of alignment with the row headings.

On the Table | Layout tab there are nine cell layout options to choose from. The middle row has the middle / vertical center options with left, center or right alignment.

Which gives you a nicer look like this:

The middle option is especially good when there’s an extra-large cell (e.g. comments ) which is out of proportion with the rest of the row.

Cell lines
Most of the Table Styles have white lines between cells (top table) but you can change that to another color or the background color (bottom table):

To change that, select the rows or entire table then choose Inside Borders and a Pen Color.

You can also change the border style to a thicker or double line.
Table Width
A default Word table takes up 100% of the page width but that’s not always needed.
Quickly reduce the table width by dragging the table handle at bottom right.
For a more precise adjustment go to Table Properties and change the Preferred Width to either a fixed width or a percentage of the page width.

Table Position
Also on the Table Properties are options to position the table on the left, center or right of the page.

Autofit
Most likely the column widths won’t match the contents since the defaults are equal widths for each column.
Right-click on the table and choose Autofit to see some options.

The problem with autofit contents is that you’ll end up with varying widths for common columns. In this example each autofitted column is a different width due to large variations in the cell values.

More likely you’ll want all the data columns (not label or comments) to have the same width. Do that by selecting the columns then setting a fixed width from the Table Layout Tab or click on the icon to the right of the width field which will autofit by making all the columns the same width within the entire width selected (called ‘Distribute Columns’).

Fonts
The Table Style gallery doesn’t change the font of any cell content.
Consider changing the row/column headings to match the font of document headings. The data cells can use the Normal or regular text font.
 Tables are a staple of many business documents – from management accounts to a marketing plan or an activity update. And most people know how to create a table in Word.
What you may not know is how easily you can take your tables from basic (and boring) to impressive and eye-catching.
Transform your tables
Tables in published journals usually look far superior to those in the average business document.
But it is perfectly possible to transform Word’s default tables into ones that are every bit as impressive as those produced by the big publishers. And in doing so, you can really lift your documents, to make them much more engaging.
You can do this without stepping outside of Word. And – here’s the best bit – you don’t need a degree in graphic design or to be a Microsoft Office ninja to do so. Far from it.
Watch the video to see how you can transform your tables, step by step:
This post is taken from a lesson in our online-training programme Emphasis 360, which improves your writing in practical, bite-sized weekly lessons. You can find out more about Emphasis 360 and preview more lessons for free here.
Image credit: Your Design / Shutterstock

Author: Rob Ashton

Rob Ashton (our founder) posts mainly about writing and the brain – a topic he’s been researching for seven years. His personal website includes a free course based on his work.
Comments
Are you struggling to get your message across? When your Microsoft Word project contains information, try presenting it in the form of a Word table. Learn how to make tables in Word quickly with a template.


A table is a kind of chart that organizes and presents data in rows and columns. It makes information easier to grasp, understand, and analyze at a glance, compared to explaining the same data through plain text.
Microsoft Word gives you various ways to insert or create a table. And you’ve got granular control over the formatting, layout, and appearance of Microsoft Word tables. Table charts are useful in different types of Word projects, whether for personal, educational, or business use.
This article will show you how to make a table in Word using a template. Then edit and format it to change its appearance.
(Note: The screenshots and instructions that follow are made using Microsoft Word for Mac version 16.4. If you’re using a different version of Word, then the interface and steps may be different.)
How to Make & Edit MS Word Tables (Video)
In this video, you’ll learn how to quickly make tables in Mircosoft Word. Find out how to start with a premium template. Quickly customize it to make an attractive, professional MS Word table you can use and reuse.
To learn even more about MS Word tables and about templates than can be used for tables, study the step-by-step tutorial below:
How to Make Basic Tables in Word
Let’s start by learning how to make a basic table in Microsoft Word:
1. Insert a Table
You can create a basic Microsoft Word table in one of two ways:
Method 1. The Insert Tab
Click on the Insert tab, then click the Table button on the ribbon.


The Insert Table panel appears. Drag the cursor over the squares to specify the number of columns and rows you want to create. Click to apply.


Method 2. The Insert Menu
Go to Insert > Table….


The Insert Table panel opens. Specify the number of columns and rows you need. (You can always add or remove columns and rows later.)


Also select the Autofit Behavior you want the table to have. You’ve got several options:
- Initial column width. The default setting is Auto, which divides the entire width of your page window across the number of columns in the table. Or, you can specify a different column width.
- AutoFit to contents. Resizes the column width based on the width of the content inside the column.
- AutoFit to window. Distributes the columns equally across the entire width of the page window.
- Set as default for new tables. Check this option if you want the settings to be applied globally to all new tables you create.
When you’re happy with the options you’ve selected, click OK.


2. Draw a Table
Or, you can draw a table in MS Word. This is a useful feature if you want to create an irregular or more complicated table with columns and/or rows of varying widths.
To draw a table, click Insert > Table > Draw Table.


With your mouse or trackpad, click and drag the cursor to start drawing your table. You can begin by drawing the outermost boundary of the table first.


Then, click and drag the cursor to create columns and rows inside the table. When you’re done, click anywhere outside the table.


Here’s an example of an “irregular” table you can draw using this feature.


If you make a mistake, click Layout > Eraser to erase a line from the table.


Click and drag the eraser along the line you wish to erase. The line that’ll be erased appears as a thick, red line. Release the mouse or trackpad to erase.


Click outside the table when you’re done.
3. Convert Text to Tables and Vice Versa
Another way to create a table is by converting text into a table. This means you can take non-tabular data from a CSV or plain TXT file and convert them into a table.
First, copy and paste the non-tabular data into your Word document.


With the text selected, go to Insert > Table > Convert Text to Table….


The Convert Text to Table panel opens. Specify the settings you wish to use. Click OK.


The text is then converted into a table.


You can also do the opposite, which is to convert a table into text.
Select the cells or entire table you want to convert. Next, click on the Layout tab then click the Convert Table to Text icon.


The Convert Table to Text panel opens. This is where you’ll decide how you want to separate text that’s currently in different columns. When you’ve made a selection, click OK.


For this example, I chose to separate text with commas. This is what the converted table looks like.


4. Advanced: How to Insert a Table from Excel
If you’ve already created a table in Excel, you can embed it into your Word document.
Open the Excel file. Click and drag the mouse to select the table.


Go back to your Word document. Go to Edit > Paste Special ….


In the Paste Special panel, select Microsoft Excel Binary Worksheet Object, then click OK.


This embeds the Excel table into Word. It’s still an Excel table, which means you can’t edit or format the table in MS Word. You’ve got to do so in Excel.


Double-click anywhere in the table to launch the source file in Excel. When you make any changes to the table in Excel, the table embedded in your Word project automatically updates to reflect those changes.
Now you know how to make a table in MS Word using various options.
How to Edit Tables
At any time after creating your table, you can edit and customize it to look the way you want it to. Here are some steps for editing tables in Microsoft Word:
1. Add a Column or Row
To add a row or column, click inside a table cell. Right-click on the mouse, then click Insert.


Select one of the following:
- Columns to the Left. Adds a column to the left of the current column
- Columns to the Right. Adds a column to the right of the current column
- Rows Above. Adds a row above the current row
- Rows Below. Adds a row below the current row
- Cells … Inserts a cell and shifts the rest of the cells either to the right or down from where the cursor is
- Table … Inserts a table inside the current cell
Or, with the cursor in one of the cells, you can click on the Layout tab.


Then choose of the following buttons on the ribbon:
- Insert Above. Inserts a row above the current cell
- Insert Below. Inserts a row below the current cell
- Insert Columns to the Left. Inserts a column to the left of the current cell
- Insert Columns to the Right. Inserts a column to the right of the current cell
Finally, you can add a new row when you’ve reached the last cell in the last row of your table. Simply press tab and a new row appears.
2. Delete a Column or Row
To delete a cell, column, row, or table, click on the Layout tab > Delete.


Select one of the options that appear:
- Delete Cells …
- Delete Columns
- Delete Rows
- Delete Table
You can use the same steps to edit a table you’ve drawn. Or, you can use the Layout tab to add or delete rows and columns.


Merge Cells
Sometimes you may want to merge cells to present information more clearly. To merge cells, click and drag the cursor to select the cells you wish to merge.


On the Layout tab, click on the Merge Cells button.


Or, after selecting the cells to be merged, right-click on your mouse, then click Merge Cells.


Now the cells have been merged into one.


Split Cells
After merging cells, you can always split them again into separate cells.
Place the cursor in the merged cell, then click Layout > Split Cells.


Or, right-click on your mouse, then click Split Cells….


Either way, the Split Cells panel pops up. Specify the number of columns and rows you want to split the cell into. Click OK.


Split Table
You may decide that it makes more sense to split up a table into two separate tables. Microsoft Word lets you do that easily, too.
In this example, I want to split the table right above the Accessories cell. And so, I’ll place the cursor in that cell. Next, click on the Layout tab, then click the Split Table button.


Now, we’ve got two separate tables.


Table Formatting
When you first create a table, it looks plain and boring. But Microsoft Word has many features so you can format tables to look exactly the way you want them. Here are some common ways to format tables:
1. Table Styles
The easiest way to format a table is by using one of the pre-formatted table styles. Put the cursor in any cell in the table. Click on the Table Design tab. Next, click on the arrow to expand the Table Styles group.


Click on a style you want to use and it’s applied immediately.


You can change any style you’ve selected. Again, click on Table Design, expand the Table Style group, then click Modify Style.


The Modify Style panel opens. Make the selections you want, then click OK.


2. Use Your Own Formatting
The Table Design tab gives you control over the appearance of every aspect of your table. Click on the Table Design tab and any of the appropriate buttons on the ribbon.


Resize a Table
You can also resize your table. Click on any cell to select the table, then click and drag one of the corners to resize it.


Or, you can use the Layout tab to resize individual cells, specific rows or columns, or the entire table. Select the columns or rows you wish to resize. Specify the height and/or width you wish to apply.


You can also adjust column width by hand by using the Table Ruler. Click inside a column you want to change. Then, drag the sliders in the Table Ruler to set to desired width.


Text Wrapping
If you want text to flow around the table, you can do so by changing its text wrapping.
Click in any cell to select the table. Click Table > Table Properties….


In the Table Properties panel and under Text Wrapping, click Around > OK.


Now the text flows around the table.


Take note that the Table Properties panel allows you to format other qualities of the table, including:
- Size
- Alignment
- Positioning
- Borders and Shading
On the other tabs, you can change:
- Column, Row, and Cell Size
- Allow row to break across pages
- Repeat as header row at the top of each page
- Cell Vertical Alignment
- Alt Text (Title and Description) — more information about the table, to help people with vision or cognitive impairment who may not see the table
Find Great Styles for Microsoft Word
You don’t have to start from scratch to create an impressive and effective Word document — even if you don’t have design skills. You can find great styles by using a template for Word.


One great source for great Microsoft Word templates and professional graphics is Envato Elements. For one low monthly subscription, you get unlimited downloads of templates, graphics, fonts, and other creative tools you need for your project. It’s a terrific option if you create plenty of materials.
For single projects, GraphicRiver is an outstanding source for templates for Word. This marketplace gives you access to thousands of creative elements on a pay-per-use basis.
Learn More
Microsoft Word has many robust features to help you realize the vision you’ve got for your document. But with power comes complexity. That’s why it’s a good idea to learn how to use Microsoft Word.
These articles will help you get started:
Visualize Your Data with Microsoft Word Tables
Make your information clearer and easier to understand by learning how to make a table in Microsoft Word. Tables organize data into rows and columns, which makes them easier to grasp at a glance. Follow the steps in this article to create, format, and customize tables in Word.
You can also use a premium Word template to get a premium design created by designers. Get Word templates from Envato Elements, if you want unlimited downloads of templates, graphics, and other creative tools you need — all for one flat monthly fee.
Or, get premium templates for Word from GraphicRiver if you prefer to pay for each use of an item. Both sources give you access to thousands of design elements created by professionals, so you can save time, energy, and effort while creating an outstanding Word document.
Did you find this post useful?

Marketing & Communications Professional and Lifelong Learner/Canada
Lexi Rodrigo is a marketing and communications professional, copywriter, and course creator who helps remarkable brands and people get seen, heard, and known. Writing for the web since 2008, she has over 100+ blog posts published on Envato Tuts, Acadium, Mirasee, Vero, Copyblogger, FreelanceFolder, Business2Community, and others.
Lexi has supported multimillion-dollar companies and nonprofits in various marketing and communication roles. She has driven results like tripling the organic search traffic of a blog in three months and generating over $65 million in revenues, donations, and sponsorships.
She has a Bachelor of Arts degree in communications. She is also the co-author of «Blog Post Ideas: 21 Proven Ways to Create Compelling Content and Kiss Writer’s Block Goodbye.» When she’s not reading or writing, Lexi bakes bread, grows food, and takes long walks.
Unlike PowerPoint, Microsoft Word has a utlity to create custom Word table styles. You might think this makes life a lot easier, but you would be wrong. The Word utility has quirks and bugs, and Word tables don’t work the same way as PowerPoint’s. To get a Word table style to work closer to the way it should, you may have to hack the OOXML. Here’s how to get the best possible results.
Start with a similar table style
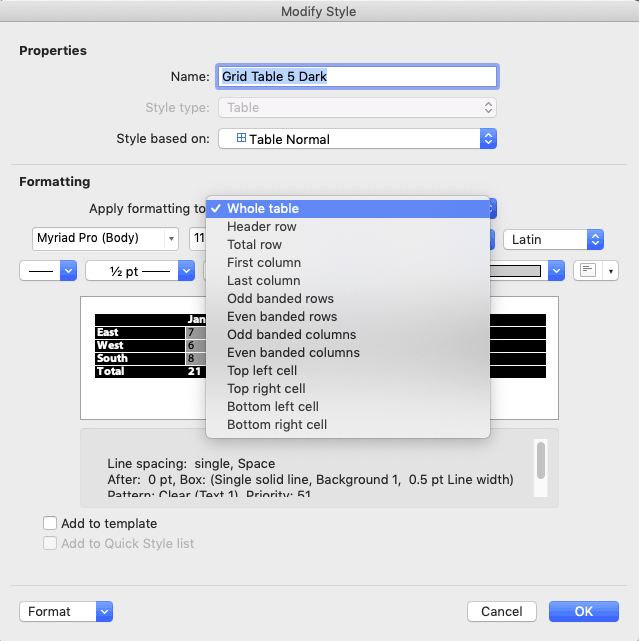
The first step in creating a custom table style is to insert a table, so the Table Design tab appears. By default, a new table will use the Table Grid style, which is very plain. If your final table style requires design options like a distinctive first column or a total Row, Table Grid is a poor place to start. It doesn’t include any of those options, and adding them back in is difficult. Switch the style to a Microsoft default that already has similar features. Next, expand the table style gallery dropdown again and select New Table Style at the bottom. This ensures that your table style will appear in a new Custom row right at the top of the styles gallery. By contrast, starting with Modify Table Style lumps your style in with all the Microsoft defaults.
Base the new style on the chosen one
When you choose Table Design>Table Styles>New Table Style, Word sets the Style based on dropdown to Table Normal, not the style you chose. If you originally chose Grid Table 5 Dark, then set Style based on to the same style name. (Current versions of Word for Mac have a display bug whereby choosing a different table style does not update the preview in the dialog. Choose the style, OK out, then choose Modify Table Style to see a corrected preview.)
Word Table Style Quirks
There are some oddities about Word table styles, and a few bugs. One oddity is that table text is based on the Normal style in relationship to Word’s Default Text settings. If Normal has been set to any color other than Automatic, applying different text colors to different table parts will have no effect. The text will remain the color set for Normal. You then have to apply new paragrpah styles to the table parts after creating the table.
Another weird result of the dependency on Normal is that Word expects to have the default line spacing for your version of Word. As I write, Word 365’s default Normal style has a Line spacing of Multiple at 1.08 with Space After of 8 points. In a table style, this gets automatically reinterpreted as Single with 0 before and after. Centered vertical spacing then works as expected. If you change the Normal line spacing to a larger or smaller value, text that is nominally vertically centered will actually sit higher or lower in the cell. If you add 12pt after, the table text will jump from being vertically centered to having 12 pt after, a huge difference. Microsoft doesn’t publish any of this information. Surprise!
This is one of the reasons why Word experts recommend that Normal style should stay as is and not be actually used in a document unless the default formatting matches the needs of the design. Better to format all text as Body Text style and give that style the custom color and line spacing.
But what if you’re given a template that already has a non-standard Normal, and the client asks for a table style? All is not lost. Table styles can still work as designed if you are using Word for Windows (sorry, Mac people). The trick here is to set the document text defaults to the same values as the revised Normal style. (Thanks to MVP Stefan Blom for this tip.) Here’s how to do this:
- With the document or template open in Word, click on the Styles pane dialog opener below the Quick Styles gallery, or press Alt + Ctrl + Shift + s at the same time. The Style pane opens.
- Click on the Manage Style button at the bottom.
- Select the Set Defaults tab.
- Set the defaults to the same values as Normal style: same font, size, color and paragraph settings. OK out.
You’ll know you got it right when you insert a table in the new style and it automatically has the correct styling for header row, first column and the other table style options. It is no longer necessary to apply text styles to the table, you can simply turn the Table Design>Table Style Options on and off to affect the related table area.
Word Table Style Bugs
Lousy User Interface Design
In the table style dialog, color dropdowns remain set at the color last chosen, even if that was for a different table part. The dropdown should update to the color currently in use for the table part that has been selected. This is just common-sense UI design.
The interface for setting border styles is pretty bad. It’s almost impossible to set one color for vertical borders and a different one for horizontal borders. All borders switch to the last selected color. But we can fix this with an OOXML hack (see below).
Defective Override Capabilities
Subsequent parts can’t always override the XML of earlier parts. As an example, set the Whole table to have internal vertical rules. Then set the first column to have no rule on the right. This should make the vertical rule separating the first column from the second column disappear, but it doesn’t. The rule has to be manually removed after the table is created.
Non-Functional OOXML Tags
The Paragraph Properties (w:pPr) element for each table part has a pStyle attribute that is supposed to set the paragraph style for that part. It does nothing. As mentioned above, the style is always derived from Normal style.
Format the Word table style options in order.
Start by formatting the Whole table section with the defaults for cell in the middle of the preview. Most of the time, this will include the font size and color, and the table background color and any rules that are to appear if banded rows are turned off. If you can’t get the formatting you need from the few controls on the dialog, click on the Format dropdown to find detailed access to Table Properties, Borders and Shading, Banding, Font and Paragraph attributes. Under Windows, you’ll also see a Text Effects choice, which is of dubious value in a table.
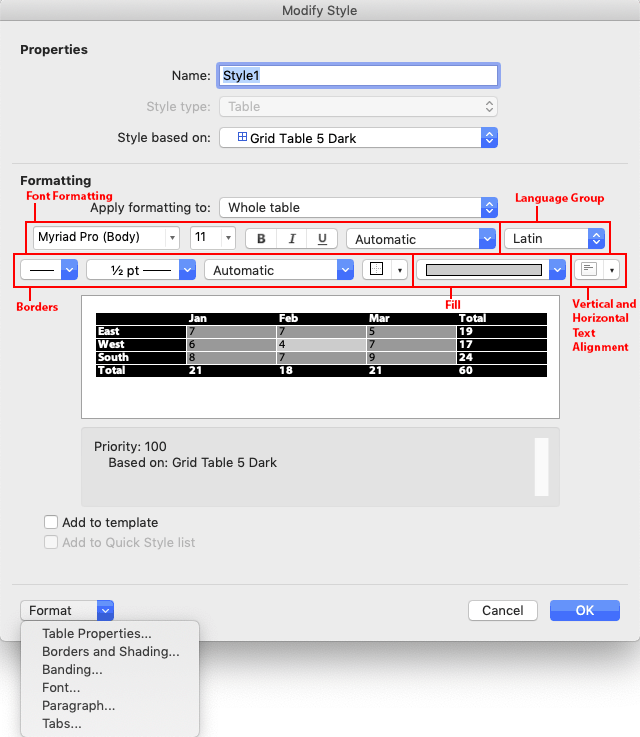
Then move on to Header Row formatting, the next item on the Apply formatting to dropdown. Format each item on that dropdown until you have set all the properties you need. After you get all formatting set, apply the custom style to the sample table you created at the beginning. Then use Modify Table Style for any tweaks required.
Word Table Style Hacks
Default style formatting is hardcoded in Word. So the styles that get stored in a Word file are only styles that have been modified or newly created in the document. All of the style exceptions and new style definitions are stored in the word/styles.xml part. Here’s the OOXML for a full table style. First, the section that formats the whole table. Pr stands for Property. tbl is Table, tc is Table Cell, p is Paragraph and r is Run (any length of text less that a paragraph).
<w:style w:type="table" w:customStyle="1" w:styleId="SampleTableStyle">
  <w:name w:val="Sample Table Style"/>
  <w:basedOn w:val="GridTable3"/>
  <w:uiPriority w:val="99"/>
  <w:rsid w:val="00264468"/>
  <w:rPr>
    <w:color w:val="282828" w:themeColor="text1"/>
    <w:sz w:val="18"/>
    <w:szCs w:val="20"/>
    <w:lang w:val="en-US"/>
  </w:rPr>
  <w:tblPr>
    <w:tblBorders>
      <w:top w:val="none" w:sz="0" w:space="0" w:color="auto"/>
      <w:left w:val="none" w:sz="0" w:space="0" w:color="auto"/>
      <w:bottom w:val="none" w:sz="0" w:space="0" w:color="auto"/>
      <w:right w:val="none" w:sz="0" w:space="0" w:color="auto"/>
      <w:insideH w:val="single" w:sz="6" w:space="0" w:color="BFBFBF"/>
      <w:insideV w:val="single" w:sz="6" w:space="0" w:color="282828"/>
    </w:tblBorders>
  </w:tblPr>
  <w:tcPr>
    <w:vAlign w:val="center"/>
  </w:tcPr>
(Above) The w:rPr section sets the default text while w:tblPr sets the borders. This table is transparent when all design options are turned off, so there is no fill. Note the entries for w:insideH and w:insideV. I had to hack this XML to get different colors for the inside horizontal and inside vertical borders.
(Below) Next is the formatting for the header row. w:rPr sets the text as bold and white, while w:tcPr sets the cell borders to nothing and the fill to Accent 2.
  <w:tblStylePr w:type="firstRow">
    <w:pPr>
      <w:jc w:val="left"/>
    </w:pPr>
    <w:rPr>
      <w:b/>
      <w:color w:val="FFFFFF" w:themeColor="background1"/>
    </w:rPr>
    <w:tblPr/>
    <w:tcPr>
      <w:tcBorders>
        <w:top w:val="nil"/>
        <w:left w:val="nil"/>
        <w:bottom w:val="nil"/>
        <w:right w:val="nil"/>
        <w:insideH w:val="nil"/>
        <w:insideV w:val="nil"/>
      </w:tcBorders>
      <w:shd w:val="clear" w:color="auto" w:fill="346577" w:themeFill="accent2"/>
    </w:tcPr>
  </w:tblStylePr>
  <w:tblStylePr w:type="lastRow">
    <w:pPr>
      <w:jc w:val="left"/>
    </w:pPr>
    <w:rPr>
      <w:b/>
    </w:rPr>
    <w:tblPr/>
    <w:tcPr>
      <w:tcBorders>
        <w:left w:val="nil"/>
        <w:bottom w:val="nil"/>
        <w:right w:val="nil"/>
        <w:insideH w:val="nil"/>
        <w:insideV w:val="nil"/>
      </w:tcBorders>
      <w:shd w:val="clear" w:color="auto" w:fill="auto"/>
    </w:tcPr>
  </w:tblStylePr>
(Above) The previous section formats the Total Row, removing the borders. There’s another hack here: the w:shd illustrates how to set the fill as No Color, with both w:color and w:fill set to auto.
(Below) Next up is the First Column formatting. w:pPr sets the text flush right, w:rPr makes it bold and w:tcPr removes the borders and keeps the fill No Color. Oddly, while w:insideH successfully overrides the internal horizontal rules set in the Whole Table section, neither w:right nor w:insideV are able to remove the internal vertical rule to the right of the column. This works as expected in a PowerPoint table style, but is broken in Word.
  <w:tblStylePr w:type="firstCol">
    <w:pPr>
      <w:jc w:val="right"/>
    </w:pPr>
    <w:rPr>
      <w:b/>
    </w:rPr>
    <w:tblPr/>
    <w:tcPr>
      <w:tcBorders>
        <w:top w:val="nil"/>
        <w:left w:val="nil"/>
        <w:bottom w:val="nil"/>
        <w:right w:val="nil"/>
        <w:insideH w:val="nil"/>
        <w:insideV w:val="nil"/>
      </w:tcBorders>
      <w:shd w:val="clear" w:color="auto" w:fill="auto"/>
    </w:tcPr>
  </w:tblStylePr>
  <w:tblStylePr w:type="lastCol">
    <w:rPr>
      <w:b/>
    </w:rPr>
    <w:tblPr/>
    <w:tcPr>
      <w:tcBorders>
        <w:top w:val="nil"/>
        <w:left w:val="nil"/>
        <w:bottom w:val="nil"/>
        <w:right w:val="nil"/>
        <w:insideH w:val="nil"/>
        <w:insideV w:val="nil"/>
      </w:tcBorders>
      <w:shd w:val="clear" w:color="auto" w:fill="auto"/>
    </w:tcPr>
  </w:tblStylePr>
(Above) The right-most table column is formatted with no borders and no fill.
(Below) If your design includes banded columns, the table style will include a section like this. There is just a definition for odd columns: even columns would be formatted with the defaults from the Whole Table section. If the First Column option is turned off, odd columns start at the left-most column. If First Column is turned on, all columns shift and the column just to the right of the first column takes on odd column formatting.
  <w:tblStylePr w:type="band1Vert">
    <w:tblPr/>
    <w:tcPr>
      <w:shd w:val="clear" w:color="auto" w:fill="D4D4D4" w:themeFill="text1" w:themeFillTint="33"/>
    </w:tcPr>
  </w:tblStylePr>
  <w:tblStylePr w:type="band1Horz">
    <w:tblPr/>
    <w:tcPr>
      <w:tcBorders>
        <w:left w:val="nil"/>
        <w:right w:val="nil"/>
        <w:insideH w:val="nil"/>
        <w:insideV w:val="single" w:sz="6" w:space="0" w:color="282828" w:themeColor="text1"/>
      </w:tcBorders>
      <w:shd w:val="clear" w:color="auto" w:fill="F2F2F2" w:themeFill="background1" w:themeFillShade="F2"/>
    </w:tcPr>
  </w:tblStylePr>
(Above) Odd Row and (Below) Even Row formatting.
  <w:tblStylePr w:type="band2Horz">
    <w:tblPr/>
    <w:tcPr>
      <w:tcBorders>
        <w:left w:val="nil"/>
        <w:right w:val="nil"/>
        <w:insideH w:val="nil"/>
        <w:insideV w:val="single" w:sz="6" w:space="0" w:color="282828" w:themeColor="text1"/>
      </w:tcBorders>
      <w:shd w:val="clear" w:color="auto" w:fill="D9D9D9" w:themeFill="background1" w:themeFillShade="D9"/>
    </w:tcPr>
  </w:tblStylePr>
(Below) Formatting for the 4 corner cells. These are only activated when both options that affect the cell are turned on. As an example, if the table has both a Header Row and a First Column, then the nwCell formatting is turned on. In the formatting for nwCell below, the text becomes flush right when both options are used.
  <w:tblStylePr w:type="neCell">
    <w:pPr>
      <w:wordWrap/>
      <w:jc w:val="left"/>
    </w:pPr>
    <w:tblPr/>
    <w:tcPr>
      <w:tcBorders>
        <w:bottom w:val="nil"/>
      </w:tcBorders>
    </w:tcPr>
  </w:tblStylePr>
  <w:tblStylePr w:type="nwCell">
    <w:pPr>
      <w:wordWrap/>
      <w:jc w:val="right"/>
    </w:pPr>
    <w:tblPr/>
    <w:tcPr>
      <w:tcBorders>
        <w:bottom w:val="nil"/>
      </w:tcBorders>
    </w:tcPr>
  </w:tblStylePr>
  <w:tblStylePr w:type="seCell">
    <w:tblPr/>
    <w:tcPr>
      <w:tcBorders>
        <w:top w:val="nil"/>
      </w:tcBorders>
      <w:shd w:val="clear" w:color="auto" w:fill="auto"/>
    </w:tcPr>
  </w:tblStylePr>
  <w:tblStylePr w:type="swCell">
    <w:tblPr/>
    <w:tcPr>
      <w:tcBorders>
        <w:top w:val="nil"/>
      </w:tcBorders>
      <w:shd w:val="clear" w:color="auto" w:fill="auto"/>
    </w:tcPr>
  </w:tblStylePr>
</w:style>
If you base your Word table styles on a table other than Table Normal, that table style will be included in styles.xml. If that table style includes formatting that you don’t want to included in your table style, then delete the section in the style it’s based on. As an example, this style was based on Grid Table 3, which includes a last column and a total row. To remove all last column and total row formatting from your style, delete the corresponding XML sections in both your custom style and in the style on which it’s based. You’ll know when you’re succesful when turning the Last Column and Total Row Design Options on and off in Word has no visual effect on a sample table.
Too complicated? Shoot me a message and we’ll create custom Word table styles for your document or template.
Note: This article is also available as a download.
By
default, inserting a table into a Word document gets you a grid. Which is fine.
At least Word isn’t second-guessing you and applying its own format or foisting
some overbearing wizard on you. And if you’re after structure rather than
design, that grid is all you need. But when you want to move beyond utility and
create an attractive element on the page, you need to know a few formatting
tricks.
Word
comes well supplied with features for jazzing up tables–maybe too many, in
fact, empowering users to produce some fairly hideous results. Other users
steer clear of table formatting completely after a few failed attempts to put a
border where they want it or change a column width without disrupting the table
dimensions. Here are a few simple techniques that will enable your users to quickly
improve the appearance of their tables without going overboard or wasting time
with confusing options.
#1: Align the
table on the page
Even
if you keep the table formatting simple, its placement can make or break the
overall page layout. The simplest positioning trick involves horizontal
alignment: left, center, or right. And the easiest way to manipulate the
alignment is to select the table (Table | Select | Table) and click the
appropriate button (Align Left, Center, Align Right) on the Formatting toolbar,
just as you would do to align regular text. Or use the keyboard shortcuts:
[Ctrl]L, [Ctrl]E, [Ctrl]R. (The Table Properties dialog box offers the same
options, but this way is quicker.) The key here is to make sure the whole table
is selected. If only certain cells are selected, these options will apply to
the text inside those cells rather than to the table.
#2: Wrap text
around the table
In
the old days, you had to put a table inside a frame to have text wrap around
it. The process is much easier now: Choose Print Layout from the View menu and
click on the table to display its move handle. Then, click on the handle and
drag the table wherever you want it on the page. This type of layout, like the
one shown in Figure A, can make the
page more interesting and less linear in design. It can also save on space.
|
Figure A |
 |
#3: Add space
around the table
Once
you’ve dragged a table to a good spot on the page (“good” means the
table isn’t throwing things off balance by hanging awkwardly into a margin,
sitting too high or low, or creating any funky line breaks in the text), you
can polish it up by adding some space around it. A little breathing room will
enhance readability and reduce that crowded look.
Click
within the table and go to Table | Table Properties. In the Table tab, you’ll
see that the Around option is selected under Alignment. Click Positioning to
access the options shown in Figure B.
Word is already providing a little space to the left and right of the table (0.13″),
but you can increase or decrease that amount if you want. You can also use the
Top and Bottom options to add space above and below your table.
|
Figure B |
 |
#4 Add space
within the table
In
addition to providing space around the table perimeter, it’s a good idea to add
some space within the cells. Nothing looks more slapdash than text crammed into
a table, which is what you get unless you tweak it a little bit. You have a
couple of methods to choose from here.
The
first approach is to manually format the text within the cell. Start by
clicking within the paragraph you want to format (or selecting multiple
paragraphs) and choosing Format | Paragraph. In the Paragraph dialog box, set
the desired right and left margins (which will add space on each side of the
text within the cell). Then, specify a Space Before and Space After setting.
Even 2 or 3 points will improve the appearance of the table text. The advantage
of adding space this way is that you can do it selectively, so you have
granular control over text positioning in the table.
The
second method is to build the extra internal space into the table
itself–probably quicker, but your specifications will apply to all the text in
the table. Click within the table and choose Table | Properties. In the Table
tab, click Options to open the dialog box shown in Figure C. Now, just enter the desired measurements in the Default
Cell Margins fields.
|
Figure C |
 |
#5: Add space
between cells
Another
technique to explore is cell spacing. It’s certainly not an essential step for
creating an attractive table, but it creates an eye-catching effect, especially
if you combine it with shading features. To add cell spacing, click in the
table and go back to the Table Options dialog box (Table | Properties |Table
tab | Options). Click Allow Spacing Between Cells and then enter the amount of
space you want. We’re getting into trial-and-error territory now, and you’ll
need to experiment to see what works best. But here are a couple of possibilities.
Figure D has cell spacing set to 0.04″.
And Figure E has similar
specifications along with shading (blue shading applied to the entire table,
with light yellow shading applied to the table rows).
|
Figure D |
 |
|
Figure E |
 |
#6: Turn off
gridlines to see where your actual borders are
One
thing that’s initially confusing is the difference between the table gridlines
(which are a mere visual guide; they don’t print) and borders. Working with
gridlines turned on is helpful as you build and format a table, but to see what
you’ve produced, choose Hide Gridlines from the Table menu. (You can turn
gridlines back on via the Show Gridlines command.) For instance, in Figure F, we removed all the borders
from a table and then selectively applied a border to the bottom of the two
cells representing signature lines. Turning off gridlines (Figure G) shows whether those borders are formatted properly for
the job they’re supposed to do.
|
Figure F |
 |
|
Figure G |
 |
#7: Turn text
sideways
So
far, we haven’t used the Tables And Borders toolbar, but it offers quick access
to some useful options, and we’re going to use it now. To display it, just
right-click on any visible toolbar and select Tables And Borders from the list
of toolbar choices.
The
sideways text technique isn’t appropriate for all situations, but it’s handy to
know about it. Sometimes, you might just want to produce an effect like the one
in Figure H–a slightly
unconventional way to incorporate labels into a table. Other times, you might
have column headings that are a little too unwieldy to run horizontally, so a
good solution is to turn them sideways, as in Figure I.
|
Figure H |
 |
|
Figure I |
 |
To
rotate your text, select the cell(s) that contain it and click the Change Text
Direction button on the Tables And Borders toolbar twice. The first click will
rotate the text to the right, which isn’t so great for readability. The second
click will rotate it so that it runs from bottom to top, like in the figures.
#8: Manually apply
shading and borders
If
you want to add a little color or definition to a table, shading and borders
are the way to go. The trick is to make sure you’re applying them to the right
table components. Although the Tables And Borders toolbar offers a palette of
border placement options and lets you “draw” borders of various
formats, the Borders And Shading dialog box is probably a little less confusing
to use. For applying shading, the Tables And Borders toolbar works okay, but
the Borders And Shading dialog box offers more options, so that’s what we’ll
use here.
To
demonstrate the process, let’s say you want to add a border to the top and bottom
of a row and apply a light yellow fill color. Start by selecting the row and
going to Format | Borders And Shading. In the Borders tab, you’ll see a little image
of a table cell with a border on all sides. (This is assuming you haven’t
changed any border settings; by default, Word tables are formatted with a grid
border.) Since you selected a group of cells (a row, actually), Word will set
the Apply To dropdown list to Cell (meaning all the cells in the selection).
This is what we want, but bear in mind that you can change this to apply to
text or to the entire table.
To
create the border, click on the left, middle, and right sides of the image to remove those segments, leaving just the
top and bottom borders in place. Figure J
shows how this will look. You can make selections from the Style, Color,
and Width list boxes if you want. If you do, you’ll need to click on the table
cell image to apply those selections to the desired sides. To add color, click
the Shading tab and click in the light yellow square in the palette of options
under Fill.
|
Figure J |
 |
#9: Find your
favorite Table AutoFormat styles (and tweak them, if necessary)
Word
offers 45 AutoFormat styles–prefab sets of formatting that automatically apply
various text and table effects. To see what’s available, click in your table
and choose Table | AutoFormat (or click the corresponding button on the Tables
And Borders toolbar, since we have it displayed now). Word will open the dialog
box shown in Figure K. You can spin
through the selections and try them out, see what you like. One of the options
is Table Normal, which is handy for those occasions when you want to strip all
the formatting from a table (like if you get a little carried away with various
embellishments and you’re embarrassed to even look at them).
|
Figure K |
 |
It’s
important to note that when you apply an AutoFormat style to a table, its specifications
will override any formatting you applied to the table yourself. For example, if
you set cell margins to add space around the text in the table, you’ll lose
that if you apply Table AutoFormat because that formatting isn’t part of those
prefab styles. So apply the AutoFormat style first and then set your cell margins.
The
AutoFormat choices are handy, and you may just want to use them as is. But you
also have a great deal of control over modifying them. For one thing, you’ll
notice the Apply Special Formats To options at the bottom of the dialog box. If
you like everything about a particular style but you want to leave the top row
alone, deselect Heading Rows. You may also want to use a style as a starting
point and then click Modify. You can do just about anything you want here–it’s
like modifying a character or paragraph style, only the choices are table-specific.
One
final note about Table AutoFormat: If there’s a style you want to use all the
time, you can select it and click Default. Word will let you set it as the
default style for the current document or for the current template.
# 10: Create a
custom table style for instant formatting
You
can use Table AutoFormat to create your own set of attributes and save them as
a user-defined style. You can then apply the style whenever you want to create
that particular effect. To build a style, open the Table AutoFormat dialog box
and click New. Enter a name for the style and choose the existing style that
you want to base your new style on. (Word defaults to Table Normal, which is
unformatted, in case you want to start with a blank slate.) Make the formatting
selections you want for the style. If you want the style to be available to
other documents based on the current template, click Add To Template.
Otherwise, the style will belong to the current document only. Click OK and
then click Close.
To
apply the style, click in a table and open the Table AutoFormat dialog box. Choose
User-Defined Table Styles from the Category dropdown list box to display your
custom style(s) as shown in Figure L.
Select the style and click Apply.
|
Figure L |
 |