
Contents
- 1 How do you do line of best fit?
- 2 How do I make a best fit line in Word?
- 3 Do lines of best fit have to start at 0?
- 4 Does a line of best fit have to be straight?
- 5 How do you add a best fit line in Excel?
- 6 How do you add a best fit curve in Excel?
- 7 What two things make a best fit line?
- 8 What does the best fit line tell you?
- 9 Why should a line of best fit not be drawn?
- 10 How do you explain a trend line?
- 11 Can you draw a curve for a line of best fit?
- 12 How do I create a clustered pivot chart?
- 13 How do you add a line of best fit on Excel 365?
- 14 How do you use the Logest function?
How do you do line of best fit?
A line of best fit can be roughly determined using an eyeball method by drawing a straight line on a scatter plot so that the number of points above the line and below the line is about equal (and the line passes through as many points as possible).
How do I make a best fit line in Word?
Plotting A Best Fit Line
- Be sure you are on the worksheet which contains the chart you wish to work with.
- Move the mouse cursor to any data point and press the left mouse button.
- From within the “Trendline” window, click on the box with the type of fit you want (e.g., Linear).
Do lines of best fit have to start at 0?
Not necessarily. The line of best fit tries its best to remain at a same distance from all points as much as possible. If by starting from (0,0) it does that, then it will start from there. Otherwise, it can start from anywhere else as required.
Does a line of best fit have to be straight?
A line of best fit may be a straight line or a curve depending on how the points are arranged on the Scatter Graph.
How do you add a best fit line in Excel?
Excel trendline equation. Trendline equation is a formula that mathematically describes the line that best fits the data points. The equations are different for different trendline types, though in every equation Excel uses the least squares method to find the best fit for a line though data points.
How do you add a best fit curve in Excel?
Add best fit line/curve and formula in Excel 2007 and 2010
- Select the original experiment data in Excel, and then click the Scatter > Scatter on the Insert tab.
- Select the new added scatter chart, and then click the Trendline > More Trendline Options on the Layout tab.
What two things make a best fit line?
A line of best fit is a straight line drawn through the maximum number of points on a scatter plot balancing about an equal number of points above and below the line.
What does the best fit line tell you?
The line of best fit , also called a trendline or a linear regression, is a straight line that best illustrates the overall picture of what the collected data is showing. It helps us to see if there is a relationship or correlation between the two factors being studied.
Why should a line of best fit not be drawn?
A line of best fit can only be drawn if there is strong positive or negative correlation. The line of best fit does not have to go through the origin. The line of best fit shows the trend, but it is only approximate and any readings taken from it will be estimations.
How do you explain a trend line?
A trendline is a line drawn over pivot highs or under pivot lows to show the prevailing direction of price. Trendlines are a visual representation of support and resistance in any time frame. They show direction and speed of price, and also describe patterns during periods of price contraction.
Can you draw a curve for a line of best fit?
With quadratic and cubic data, we draw a curve of best fit. Curve of Best Fit: a curve the best approximates the trend on a scatter plot. If the data appears to be quadratic, we perform a quadratic regression to get the equation for the curve of best fit. If it appears to be cubic, then we perform a cubic regression.
How do I create a clustered pivot chart?
Create a Pivot Chart
- Select any cell in the pivot table.
- On the Excel Ribbon, click the Insert Tab.
- In the Charts group, click Column, then click Clustered Column.
- A column chart is inserted on the worksheet, and it is selected — there are handles showing along the chart’s borders.
How do you add a line of best fit on Excel 365?
Add a trendline
- Select a chart.
- Select the + to the top right of the chart.
- Select Trendline. Note: Excel displays the Trendline option only if you select a chart that has more than one data series without selecting a data series.
- In the Add Trendline dialog box, select any data series options you want, and click OK.
How do you use the Logest function?
Here are the steps for this function:
- With the data entered, select a five-row-by-two-column array of cells for LOGEST ‘s results.
- From the Statistical Functions menu, select LOGEST to open the Function Arguments dialog box for LOGEST .
- In the Function Arguments dialog box, type the appropriate values for the arguments.
Explore paragraph dialog box options
There are general, indentation, and spacing options available in the Paragraph dialog box options. At the bottom of the dialog box, you can see a Preview of how the options will look before you apply them.
|
General |
|
|---|---|
|
Alignment |
Choose Left to align text to the left with a ragged right edge (or use the keyboard shortcut, Ctrl+L). |
|
Choose Center to center text with a ragged left and right edge (Ctrl+E). |
|
|
Choose Right to align text to the right with a ragged left edge (Ctrl+R). |
|
|
Choose Justify to align text both left and right, adding space between words (Ctrl+J). |
|
|
Outline level |
The level at which the paragraph appears in Outline view. |
|
Choose Collapsed by default if you want the document to open with headings collapsed by default. See Collapse or expand parts of a document to learn more. |
|
Indentation |
|
|---|---|
|
Left |
Indents the paragraph on the left by the amount you choose. |
|
Right |
Indents the paragraph on the right by the amount you choose. |
|
Special |
Choose First line > By to indent the first line of a paragraph. To quickly create a first line indent using the ruler, see Create a first line indent. |
|
Choose Hanging > By to create a hanging indent. To quickly create a hanging indent using the ruler, see Create a hanging indent. |
|
|
Mirror indents |
When you choose this, Left and Right become Inside and Outside. This is for book style printing. |
|
Spacing |
|
|---|---|
|
Before |
Adjusts the amount of space before a paragraph. |
|
After |
Adjusts the amount of space after a paragraph. |
|
Line spacing |
Choose Single to single-space text. To quickly single space your entire document, see Single space lines in a document. |
|
Choose 1.5 lines to space text one-and-one-half times that of single spacing. |
|
|
Choose Double to double-space text. To quickly double space your entire document, see Double space lines in a document. |
|
|
Choose At least > At to set the minimum amount of spacing needed to fit the largest font or graphic on the line. |
|
|
Choose Exactly > At to set fixed line spacing, expressed in points. For example, if the text is in 10-point font, you can specify 12 points as the line spacing. |
|
|
Choose Multiple > At to set line spacing as a multiple expressed in numbers greater than 1. For example, setting line spacing to 1.15 will increase the space by 15 percent, and setting line spacing to 3 increases the space by 300 percent (triple spacing). |
|
|
Don’t add |
Choose Don’t add space between paragraphs when you don’t want extra space between paragraphs. |
If you want to save the settings you chose as your default, select Set as Default.
Paragraph dialog box options
Choose from these options in the Paragraph dialog box. At the bottom of the dialog box, the Preview box shows you how the options look before you apply them.
|
General |
|
|---|---|
|
Alignment |
Select Left to align text to the left with a ragged right edge (or use the keyboard shortcut, |
|
Select Centered to center text with a ragged left and right edge ( |
|
|
Select Right to align text to the right with a ragged left edge ( |
|
|
Select Justified to align text both left and right, adding space between words ( |
|
|
Outline level |
Select the level at which the paragraph appears in Outline view. |
 + L).
+ L).|
Indentation |
|
|---|---|
|
Left |
Moves in the left side of the paragraph by the amount you choose. |
|
Right |
Moves in the right side of the paragraph by the amount you choose. |
|
Special |
Select First line to indent the first line of a paragraph, and then specify the size of the indent in By. |
|
Select Hanging to create a hanging indent, and then specify the size of the indent in By. |
|
|
Automatically adjust |
When you select Automatically adjust right indent when document grid is defined, the right indent is automatically adjusted for the paragraph when a document grid is defined. |
|
Spacing |
|
|---|---|
|
Before |
Adjusts the amount of space before a paragraph. |
|
After |
Adjusts the amount of space after a paragraph. |
|
Line spacing |
Select Single to single-space text. |
|
Select 1.5 lines to space text one-and-one-half times that of single spacing. |
|
|
Select Double to double-space text. |
|
|
Select At least > At to set the minimum amount of spacing needed to fit the largest font or graphic on the line. |
|
|
Select Exactly > At to set fixed line spacing, expressed in points. For example, if the text is in 10-point font, you can specify 12 points as the line spacing. |
|
|
Select Multiple > At to set line spacing as a multiple expressed in numbers greater than 1. For example, setting line spacing to 1.15 will increase the space by 15 percent, and setting line spacing to 3 increases the space by 300 percent (triple spacing). |
|
|
Don’t add |
Select Don’t add space between paragraphs of the same style when you want to exclude some paragraphs, such as paragraphs in a bulleted list, from the spacing set by Before and After. |
|
Snap to |
Select Snap to grid when document grid is defined to more easily align text with the document grid. |
Lesson 9: Line and Paragraph Spacing
/en/word/indents-and-tabs/content/
Introduction
As you design your document and make formatting decisions, you will need to consider line and paragraph spacing. You can increase spacing to improve readability and reduce it to fit more text on the page.
Optional: Download our practice document.
Watch the video below to learn how to adjust line and paragraph spacing in your document.
Line spacing
Line spacing is the space between each line in a paragraph. Word allows you to customize the line spacing to be single spaced (one line high), double spaced (two lines high), or any other amount you want. The default spacing in Word is 1.08 lines, which is slightly larger than single spaced.
In the images below, you can compare different types of line spacing. From left to right, these images show default line spacing, single spacing, and double spacing.

Line spacing is also known as leading (pronounced to rhyme with wedding).
To format line spacing:
- Select the text you want to format.

- On the Home tab, click the Line and Paragraph Spacing command, then select the desired line spacing.

- The line spacing will change in the document.


Adjusting line spacing
Your line spacing options aren’t limited to the ones in the Line and Paragraph Spacing menu. To adjust spacing with more precision, select Line Spacing Options from the menu to access the Paragraph dialog box. You’ll then have a few additional options you can use to customize spacing.
- Exactly: When you choose this option, the line spacing is measured in points, just like font size. For example, if you’re using 12-point text, you could use 15-point spacing.
- At least: Like the the Exactly option, this lets you choose how many points of spacing you want. However, if you have different sizes of text on the same line, the spacing will expand to fit the larger text.
- Multiple: This option lets you type the number of lines of spacing you want. For example, choosing Multiple and changing the spacing to 1.2 will make the text slightly more spread out than single-spaced text. If you want the lines to be closer together, you can choose a smaller value, like 0.9.


Paragraph spacing
Just as you can format spacing between lines in your document, you can adjust spacing before and after paragraphs. This is useful for separating paragraphs, headings, and subheadings.
To format paragraph spacing:
In our example, we’ll increase the space before each paragraph to separate them a bit more. This will make it a little easier to read.
- Select the paragraph or paragraphs you want to format.

- On the Home tab, click the Line and Paragraph Spacing command. Click Add Space Before Paragraph or Remove Space After Paragraph from the drop-down menu. In our example, we’ll select Add Space Before Paragraph.

- The paragraph spacing will change in the document.


From the drop-down menu, you can also select Line Spacing Options to open the Paragraph dialog box. From here, you can control how much space there is before and after the paragraph.

You can use Word’s convenient Set as Default feature to save all of the formatting changes you’ve made and automatically apply them to new documents. To learn how to do this, read our article on Changing Your Default Settings in Word.
Challenge!
- Open our practice document.
- Select the the date and the address block. This starts with April 13, 2016, and ends with Trenton, NJ 08601.
- Change the spacing before the paragraph to 12 pt and the spacing after the paragraph to 30 pt.
- Select the body of the letter. This starts with I am exceedingly and ends with your consideration.
- Change the line spacing to 1.15.
- When you’re finished, your page should look like this:


/en/word/lists/content/
Want to improve the readability of your text or fit more text in your Word document? Changing line spacing can help with that.
There are various ways you can change the line spacing of your Word document. This article is going to show you step by step how to change line spacing in Word.
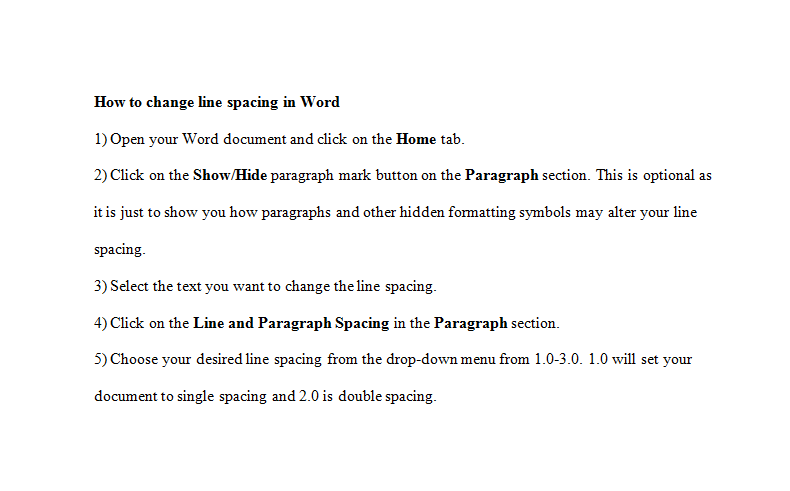
How to Change Line Spacing in Word
1. Open your Word document and click on the Home tab.

2. Click on the Show/Hide paragraph mark button on the Paragraph section. This is optional, as it is just to show you how paragraphs and other hidden formatting symbols may alter your line spacing.
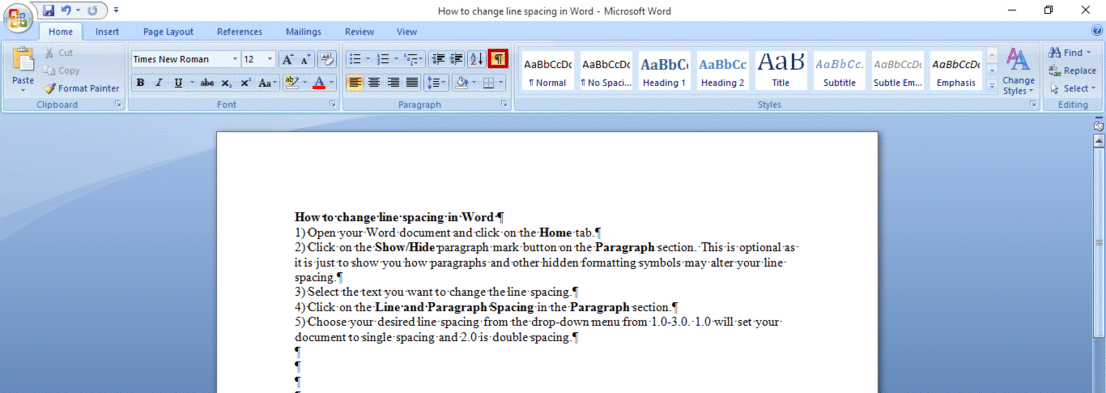
3. Select the text you want to change the line spacing.
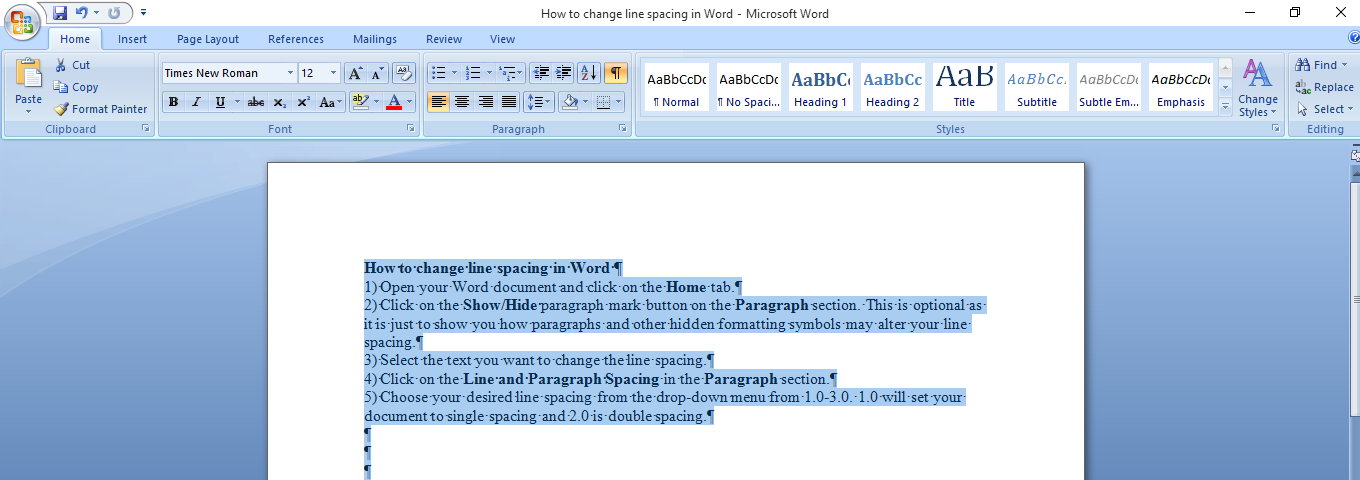
4. Click on the Line and Paragraph Spacing in the Paragraph section.
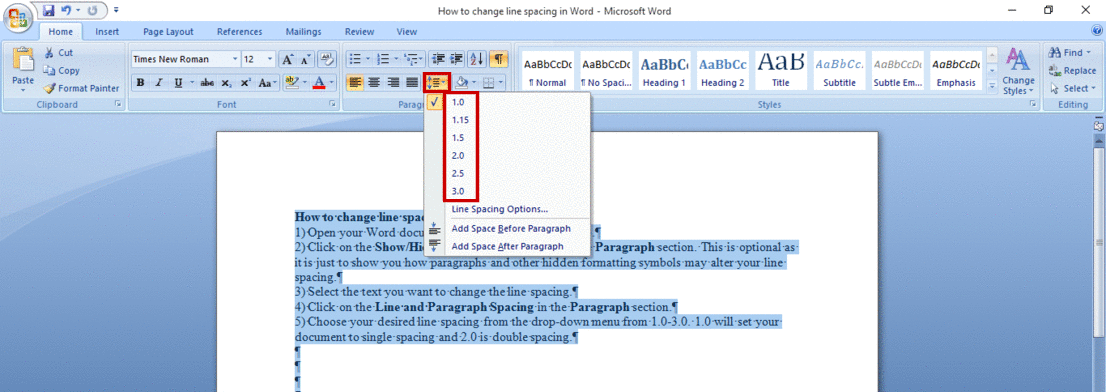
5. Choose your desired line spacing from the drop-down menu from 1.0-3.0. Here, 1.0 will set your document to single spacing and 2.0 is double-spacing.
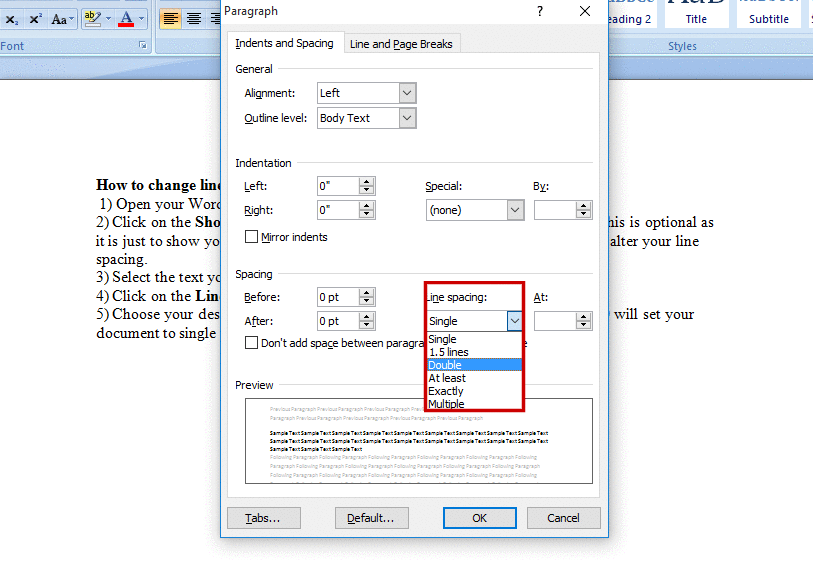
How to Change Line Spacing in Word From the Paragraph Dialog Box
1. You can change line spacing in Word using the Paragraph Dialog Box. The process is the same as above, however when you get to step 4, click on the Paragraph Dialog Box.
![]()
2. The Paragraph Dialog Box will pop up. Click on to Line spacing and choose your desired line spacing. Click OK to set the change in line spacing.
How to Double Space in Word From the Page Layout Tab
To use this method:
- Open Microsoft Word.
- Click on the Page Layout tab.
- Go to the Paragraph section. Click on the down-facing arrow in the bottom right corner, which will pop the Paragraph dialog box.
- Click on the Indents and Spacing tab.
- In the Spacing segment, look for the Line Spacing box and click on it.
- Then click on Double from the list box.
- Click OK to set the double-spacing, and that will also exit the dialog box.
Line Spacing in Word
One of the easiest ways to improve the readability of your Word document is by changing the line spacing. With the above steps, you can do that and have a readable document.

There are several ways to adjust line spacing in Microsoft Word. Today’s tutorial explains the basic method using the ribbon and a more advanced method using the Paragraph dialog box.
See the Quick Tip at the bottom of this tutorial to learn how to single-space an entire document from the Paragraph dialog box.
This tutorial is available as a YouTube video showing all the steps in real time.
Watch more than 150 other document software tutorials on my YouTube channel.
The images below are from Word for Microsoft 365.The steps are the same in Word 2021, Word 2019, and Word 2016, and similar for Word 2013 and Word 2010. However, your interface may look slightly different in those older versions of the software.
Basic Method: Adjust Line Spacing from the Ribbon
- Select the Home tab in the ribbon.

- (Optional Step) Select the Show/Hide button in the Paragraph group to show paragraph break symbols and other formatting that may affect line spacing.

- Select the text with the line spacing that needs to be changed.

- Select the Line and Paragraph Spacing button in the Paragraph group.

- Select an option from the drop-down menu:
A. Numbers 1.0 through 3.0 add space between lines.
B. Add Space Before Paragraph adds space before paragraphs but not before the lines within them.
C. Remove Space After Paragraph removes space after paragraphs but not after the lines within them.
These three options are based on your current font size with 1.0 being the equivalent of single-spacing.

Your changes will be applied immediately.

Note that you can apply the individual line spacing (the numbers 1.0 through 3.0) and the paragraph spacing to the same text to further customize your results.
- (Optional Step) Select the Show/Hide button again to hide paragraph symbols and other formatting (see figure 2).
Now, let’s move on to an advanced method offering additional spacing options.
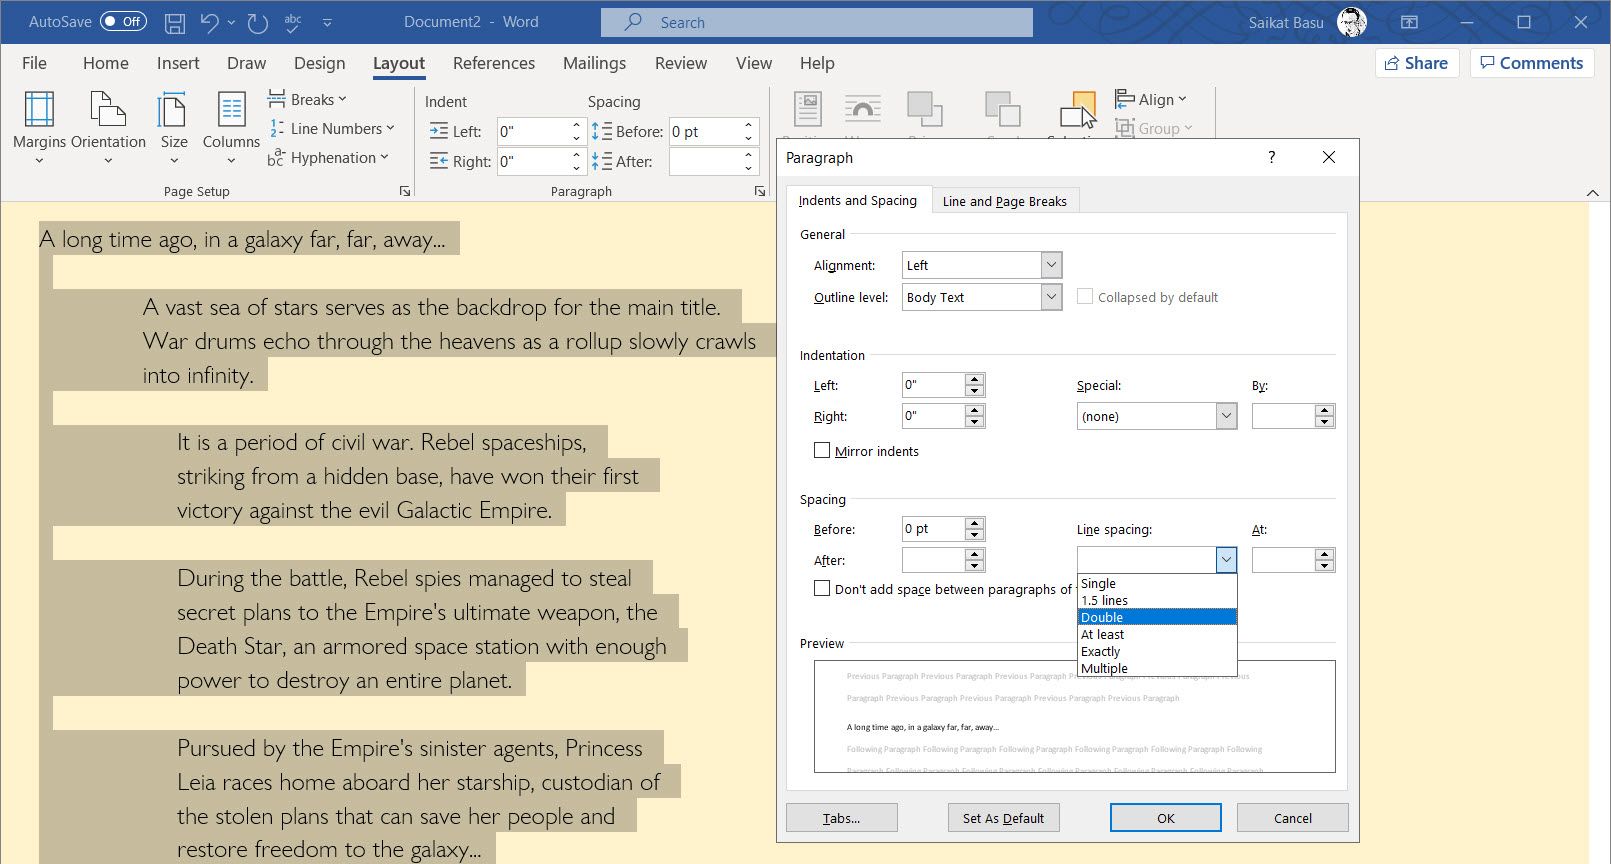
Advanced Method: Adjust Line Spacing from the Paragraph Dialog Box
- Select the Home tab in the ribbon (see figure 1).
- (Optional Step) Select the Show/Hide button in the Paragraph group to show paragraph break symbols and other formatting that may affect line spacing (see figure 2).
- Select the text with the line spacing that needs to be changed (see figure 3).
Pro Tip: PC users can press Ctrl + A to select the entire document if all the line spacing needs to be changed. However, this includes items you may not want to alter, including headings, tables, table titles, figure captions, tables of contents, footnotes, endnotes, and reference lists.
- Select the dialog box launcher in the Paragraph group.

- Make changes in the Spacing section of the Paragraph dialog box:
A. The Before and After boxes represent the spaces before and after paragraphs measured in points with one point being 1/72 of an inch tall. Use the increment arrows to choose a whole number or enter a number with a decimal (e.g., 2.75) directly into the box.
B. The Line spacing drop-down menu offers six options:
1. Single—Creates single-spacing based on your current font size.
2. 1.5 Lines—Creates a space and a half as large as your current font size.
3. Double—Creates double-spacing based on your current font size.
4. At Least—Determines the minimum amount of space between lines based on the number of points entered in the At box.
5. Exactly—Creates space between lines based on the number of points entered in the At box.
6. Multiple—Creates spacing multiplied by the number entered in the At box. For example, if you enter four in the At box, your spacing will be four times as large as your current single-spacing.
C. Don’t add space between paragraphs of the same style—For many users, this will remove spaces between all paragraphs because general documents commonly have only one paragraph style.

Note that the Preview box updates as you make adjustments in the Spacing section.
- Select the OK button to close the Paragraph dialog box.

- (Optional Step) Select the Show/Hide button again to hide paragraph symbols and other formatting (see figure 2).
Quick Tip: Single-Space an Entire Document from the Paragraph Dialog Box
- Select the Home tab in the ribbon (see figure 1).
- Select the entire document. (PC users can press Ctrl + A.)
- Select the dialog box launcher in the Paragraph group (see figure 7).
- Enter 0 in the Before box in the Paragraph dialog box (see figure 8).
- Enter 0 in the After box in the Paragraph dialog box (see figure 8).
- Select Single in the Line spacing drop-down menu (see figure 8).
- Select the OK button (see figure 9).
Related Resources
How to Adjust Letter Spacing in Microsoft Word (PC & Mac)
How to Adjust the Space between Words in Microsoft Word
How to Adjust Page Margins in Microsoft Word
Updated June 25, 2022