Making edits to pictures can be simpler with applications like Microsoft Paint or Photoshop.
But these tools can feel like an unnecessary added stop when you want to do something that seems like it should be easy.
One such edit involves placing text on a picture.
Our tutorial below will show you how to put a picture behind text in a Word document.
How to Put an Image Behind Text in a Word Document
- Open the document.
- Click the Page Layout tab.
- Select the Watermark button.
- Click Custom Watermark.
- Choose Picture watermark and click Select Picture.
- Click the Scale dropdown menu and choose a size.
- Select Apply, then OK.
Our guide continues below with more information on putting a picture behind text in Word, including pictures of these steps.
Are you trying to write in small capital letters? Our apply small caps effect in Word article can show you where to find that option.
Some of the more creative and less-rigidly formatted documents that you will create in Microsoft Word could involve the combination of various types of media and document objects.
For example, you may need to know how to put a picture behind text when your document image needs some editing and you don’t want to use something like Photoshop or Microsoft Paint.
You can customize most of the elements of your Microsoft Word 2010 documents, including the background of the document.
Many people assume that they can only add text and images to their document as the actual body of that document, but you can also configure the background of the document. For instance, you can put an image behind text in Microsoft Word 2010 to set it as the background for whatever you are writing.
You can configure some of the settings for the image that is behind your text, allowing you to make it more transparent so that the top-level text is still able to be read. Continue reading to learn more about putting an image behind text in Word 2010.
If you also use Google Apps, then you may want to check our guide on how to put a picture on Google so that you can use it in those apps as well.
How to Insert a Background Image in Word 2010 (Guide with Pictures)
Whatever your reasoning might be for wanting to put an image behind your document text in Word 2010, it can create an interesting effect for the document. Whether you are using this background image like a watermark or because you think it improves the visual appearance of the document, the process for putting the image behind your text can be followed below.
Step 1: Open the Word 2010 document in which you want to insert the image behind your text.
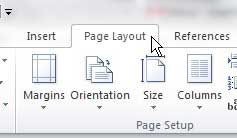
Step 2: Click the Page Layout tab at the top of the window.
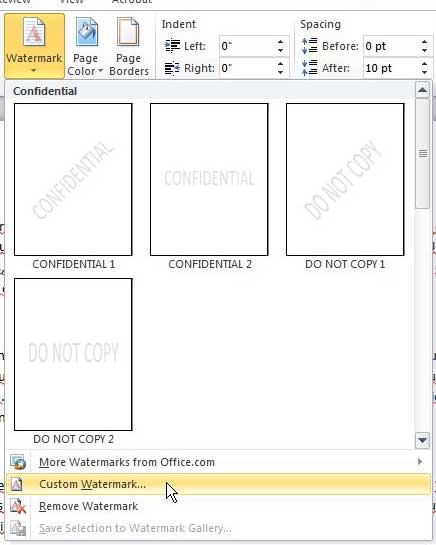
Step 3: Click the Watermark drop-down menu in the Page Background section of the ribbon at the top of the window, then click the Custom Watermark option.
Step 4: Select the Picture Watermark option at the top of the window, then click the Select Picture button to choose the image that you want to put behind your text in Word 2010.
You will be able to select the image from your computer, so it’s easiest to already have the picture saved to a folder on your computer that you can find easily.
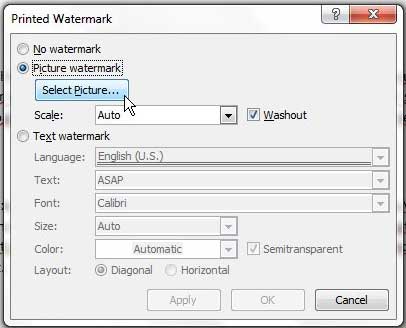
Step 5: Click the drop-down menu to the right of Scale, then choose the size that you want the background image to be.
Step 6: Check or uncheck the box to the left of Washout if you want to make the image more transparent, which will help to make your overlaying text easier to read.
Step 7: When you have finished configuring the options for the image behind your text in Word 2010, click the OK button at the bottom of the window. Note that you can click the Apply button at the bottom of the window at any time to see how your changes will look in the document.
Our guide continues below with more information on working with text and image layers in Microsoft Word, such as if you only want to include a picture behind text on one page in your document.
How Do I Adjust Text Wrapping on the Page Layout Tab in My Word Document?
Some non-traditional layout options in a document will involve learning how to wrap text. This option is found on the Layout tab, in the Arrange group of the ribbon. It is also one of the picture tools located on the Format Shape tab that appears when you select your picture.
When you select the picture, Word displays the Wrap Text button, allowing you to click it. The options you will find on the dropdown menu include:
- In line with text
- Square
- Tight
- Through
- Top and Bottom
- Behind Text
- In front of text
You can also click the More Layout Options button at the bottom of the menu, which is going to open a Layout dialog box. This provides additional text wrapping options.
More Information on How to Put a Picture Behind Text in Word 2010
One other way that you can accomplish this task is to add a picture to your document, then place a text box on top of the picture.
You will need to add the picture, then insert a text box from the Insert menu. You can then click on the border of the text box to select the entire object, then click the arrow to the right of Bring Forward and choose the Bring in Front of Text option. This will move the picture behind the text so that you can achieve the desired effect.
The background color of a text box in Microsoft Word is going to have a white background by default.
You can switch this to a different color, or remove it entirely, by clicking inside the text box, selecting the Shape Format tab at the top of the window, then clicking Shape Fill and choosing a color there.
The No Fill option will remove the background entirely so that you can see the picture through the text box.
In newer versions of Microsoft Word, the Watermark option is found on the Design tab, in the Page Background section of the ribbon.
Any watermark that you add to your document is going to appear on each page of your document. If you only want to place an image behind text on one of your pages then you should utilize the picture and text box configuration that we mentioned earlier in this section.
Matthew Burleigh has been writing tech tutorials since 2008. His writing has appeared on dozens of different websites and been read over 50 million times.
After receiving his Bachelor’s and Master’s degrees in Computer Science he spent several years working in IT management for small businesses. However, he now works full time writing content online and creating websites.
His main writing topics include iPhones, Microsoft Office, Google Apps, Android, and Photoshop, but he has also written about many other tech topics as well.
Read his full bio here.
Word’s Position and Wrap Text features help arrange images and text on the page. Position features automatically place the object at the location of your choice on the page (see how to position figures in Word for more details). Text Wrap features determine how text wraps around an image or other objects on the page, depending on the chosen option.
Wrap Text features work for figures in a Word document (see text wrapping for tables). Figures in Word mean any visual objects except tables and equations. So, using the same Wrap Text features can be used for images, ClipArt objects, charts, text boxes, diagrams, and SmartArt objects.
Change text wrapping
By default, Word inserts (see examples below):
- Pictures (images and photos), charts in line with the text.
- Text boxes, shapes in front of the text.
- WordArt objects behind the text.
To change the way how text should wrap the object, select it, then do one of the following:
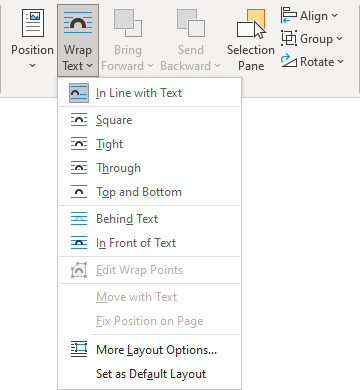
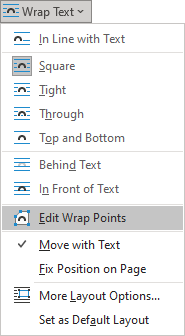
- On the Picture Format (Shape Format, Graphics Format) tab, in the Arrange group, click the Wrap Text button:
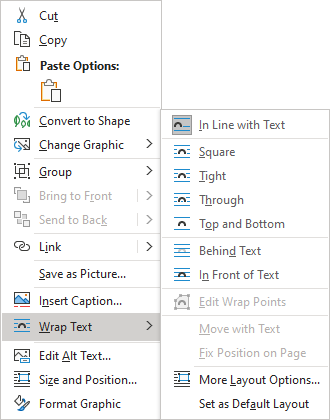
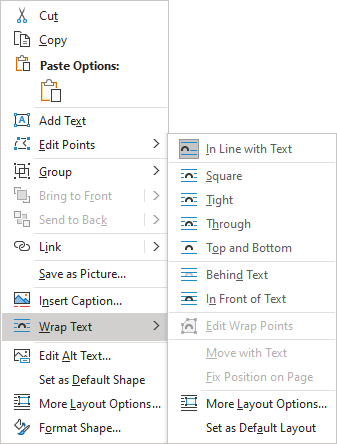
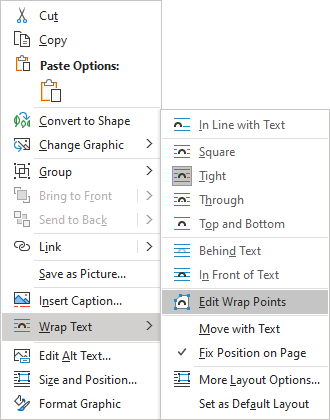
- Right-click on the object, then choose Wrap Text in the popup menu:
or
- Click the Layout Options button that appears next to the selected figure:
From the Wrap Text list, choose the option you prefer:
- In Line with Text places an object in a paragraph on the same line as the surrounding text. The text does not wrap around it.
- Square wraps the text around the picture or shape on all sides at right angles (a square pattern) as if it is rectangular. The text fills the remaining rectangular region.
This option is the most common form of text wrapping.
- Tight wraps the text around the edges of the figure. The text follows the shape.
This option is most useful for larger images covering most of the page width.
- Through wraps the text around the picture or shape edges, including any white gaps. If there is no white space in the image or shape, text wrapping works the same as Tight.
This option is an advanced setting because you pull or drag image and shape points in and out of their original borders:
See how to edit hyphenation points.
- Top and Bottom wraps the text above and below the figure to keep the image on its line. There is no text on either side of it.
- Behind Text places the figure behind, or underneath, any existing text. The text does not wrap around it.
The picture looks like a watermark or background image.
Note: Use the Selection pane when working with objects behind the text.
- In Front of Text places the object on top of the text. The text is not wrapped, so some of it may be blocked depending on the figure’s transparency.
Note: Figures that use the Square, Tight, Through, Top and Bottom, Behind Text, or In Front of Text wrapping style are all considered floating.
Position a figure to a paragraph or page
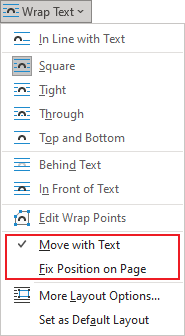
Also, Word offers two options for all wrapping styles except In line with Text (for floating figures):
or
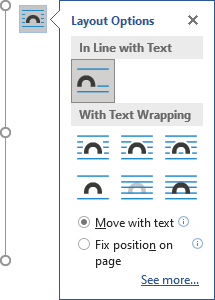
- Move with Text moves the figure along with the surrounding text.
If a figure is positioned inside the paragraph, and you delete or add any content before the paragraph, the figure moves with the paragraph. See more about Positioning a picture, text box, or shape on the page.
- Fix Position on Page keeps the figure at the same place on the page when text is added or removed.
If the paragraph where the figure is located (that paragraph contains anchor) moves to the next page, the figure moves and keeps its position relative to the page.
Note: The same options you can find in the Layout dialog box, on the Position tab, in the Options section:

Checking the Move object with text check box is equivalent to the Move with Text option from the Wrap Text dropdown list. Unchecking the Move object with text check box is equivalent to the Fix Position on Page option.
Wrap text on both sides, or one side only
To change additional options, choose More Layout Options… from the Wrap Text dropdown list or the See more… link in the Layout Options menu.
In the Layout dialog box, on the Text Wrapping tab:

- In the Wrapping style group, choose any style exact In line with text (see above).
- In the Wrap text group (available for the Square, Tight, and Thought wrapping styles), choose any of the additional options:
- Both sides wraps text around either side of the image or shape:
- Left only wraps text around only the left side of the image or shape:
- Right only wraps text around only the right side of the image or shape:
- Largest only wraps text on the side of the image or shape with the larger distance from the margin.
- Both sides wraps text around either side of the image or shape:
Change the distance between text and object
To change the distance between text and the visual object, open the Layout dialog box by one of the following methods:
- On the Picture Format (Shape Format, Graphics Format) tab, in the Arrange group, click the Wrap Text button, then select More Layout Options…
- Right-click on the object, click the Wrap Text list, then select More Layout Options… in the popup menu.
- Click the See more… link in the Layout Options menu.
In the Layout dialog box, on the Text Wrapping tab, in the Distance from text section, enter custom values for the distance between the text and the picture independently for:
- Top and Bottom (available for the Square, Tight, Thought, and Top and Bottom wrapping styles),
- Left and Right (available for the Square, Tight, and Thought wrapping styles).
For example, with the 0.3-inch distance on all sides:

Edit hyphenation points
To use the Tight or Through options effectively, you may need to adjust the wrapping points for the image or shape. To edit wrap points, select the object, then activate the Edit Wrap Points view by one of the following methods:
- Picture Format (Shape Format, Graphics Format) tab, in the Arrange group, click the Wrap Text button. Then choose Edit Wrap Points from the Wrap Text dropdown list:
- Right-click on the object and select Wrap Text -> Edit Wrap Points in the popup menu:
In the Edit Wrap Points view, drag the red lines to adjust where the text wraps:

Note: There is no way to add points. You can move existing wrap points however you want.
Be careful! After changing a text wrapping option or copy-pasting the picture, Word lost the changes of Wrap Points.
Moving Images Behind Text
- Select the image.
- Choose the Order option from the Draw menu on the Drawing toolbar. Word displays a submenu.
- Choose Send Behind Text from the submenu. The image should move behind the text.
Contents
- 1 How do I make an image go behind text in Word?
- 2 How do I put a logo behind my text messages?
- 3 How do you put shapes behind text in Word?
- 4 How do you put a background image behind text in HTML?
- 5 Can a picture be placed behind the text?
- 6 How do I insert a picture in Word without moving text?
- 7 How do I add text wraps?
- 8 How do I put text under an image in HTML?
- 9 How do I display text under an image in HTML?
- 10 How do I put text over an image in HTML?
- 11 What is a text wrapping?
- 12 What are the text wrapping options?
- 13 What is wrap text around image?
- 14 How do I insert a photo into a Word document without it being embedded?
- 15 How do I put a picture in front of text?
- 16 How do I insert a picture in Word without resizing?
- 17 Where is the text wrapping in Word?
- 18 How is a picture placed when text wrapping is top and bottom?
- 19 How do I wrap text around a text box in Word?
- 20 How do I put text under text in HTML?
How do I make an image go behind text in Word?
Make sure the Home tab of the ribbon is displayed. Click the Select tool (in the Editing group) and then choose Select Objects. Click on the graphic you want to select, without regard to any text that may be covering it.
How do I put a logo behind my text messages?
How to Put an Image Behind Text in Word 2010
- Open the document.
- Click the Page Layout tab.
- Select the Watermark button.
- Click Custom Watermark.
- Choose Picture watermark and click Select Picture.
- Click the Scale dropdown menu and choose a size.
- Select Apply, then OK.
How do you put shapes behind text in Word?
In the Arrange group, click the down-arrow next to the Send to Back tool (Word 2007 or Word 2010) or the down-arrow next to Send Backward tool (Word 2013 or a later version). Word displays a series of options. Choose Send Behind Text from the submenu. The image should move behind the text.
How do you put a background image behind text in HTML?
CSS Code: The CSS property is used to set the image as background in the text. The background-image property is used to set an image as background. The -webkit-text-fill-color property is used to give the text a transparent color, the background image will show through the text, thus completing the clipping effect.
Can a picture be placed behind the text?
When you’re satisfied with its position and size, click on the little “Layout Options” icon to the right of your image (Word 2013 and 2016). If you are using Word 2010, click on the “Page Layout” tab and then click on the “Wrap Text” option. 7.Here, you should choose “Behind Text” option.
How do I insert a picture in Word without moving text?
To insert an image into Word without moving any text is to set the image’s default wrapping to no wrapping before entering it into the document.
- Click the location in your document where you want to insert a picture.
- On the Insert tab, click Pictures.
- Select the option you want to use for inserting pictures.
How do I add text wraps?
Wrap text around a picture or drawing object
- Select the picture or object.
- Select Format and then under Arrange, select Wrap Text.
- Choose the wrapping option that you want to apply.
How do I put text under an image in HTML?
To have a HTML image caption below the picture, place the <figcaption> element after the <img> .
How do I display text under an image in HTML?
- If you want to be sure the text is centered, you can change the css to: .img-with-text { text-align: center; }
- If you would float the div itself to the left or right you do not need to set the width and the content is still centered.
How do I put text over an image in HTML?
Chapter Summary
- Use the HTML <img> element to define an image.
- Use the HTML src attribute to define the URL of the image.
- Use the HTML alt attribute to define an alternate text for an image, if it cannot be displayed.
What is a text wrapping?
Text wrap is a feature supported by many word processors that enables you to surround a picture or diagram with text. The text wraps around the graphic. Text wrap in HTML is most fequently used to describe wrapping of text around an image in the HTML code.
What are the text wrapping options?
What are the Text Wrapping Options?
- Square, Tight, and Through: These three options are all variations on the same thing.
- Top and Bottom: This option keeps the text above and below the object, but not to its sides.
- Behind Text and In Front Of Text: These two options don’t affect the text at all.
What is wrap text around image?
Wrapping a text means adjusting/wrapping text around an image. In HTML, we can either align the image on the right side of the text, or to the left, or to the center. 1jaiz4 and 13 more users found this answer helpful.
How do I insert a photo into a Word document without it being embedded?
Luckily, there’s a simple workaround. In the Insert Picture dialog box, click the down arrow next to the Insert button, and then click either “Link to File” or “Insert and Link”.
How do I put a picture in front of text?
Open Layout Options
- Select a picture.
- Select the Layout Options icon.
- Choose the layout options you want: To bring your picture in front of the text and set it so it stays at a certain spot on the page, select In Front of Text (under With Text Wrapping), and then select Fix position on page.
How do I insert a picture in Word without resizing?
CTRL+Arrow key(s). and have the ability to move it around. text-area from the drawing options and then insert a picture into it. EXACTLY its original size.
Where is the text wrapping in Word?
To wrap text around an image:
- Select the image you want to wrap text around. The Format tab will appear on the right side of the Ribbon.
- On the Format tab, click the Wrap Text command in the Arrange group, then select the desired text wrapping option.
- The text will wrap around the image.
How is a picture placed when text wrapping is top and bottom?
Text Wrap Options
- Square—Text wraps around the image in a square shape.
- Tight/Through—Text wraps around image, regardless of what shape the image is.
- Top and Bottom—Text stops when it hits the top of the image and continues at the bottom of the image; no text is to the left or right of the image.
How do I wrap text around a text box in Word?
Wrapping Text Around a Text Box or Frame
- Right-click on the text box. Word displays a Context menu.
- Choose Format Text Box from the Context menu.
- Click on the Layout tab (in Word 97 click on the Wrapping tab).
- Select a method of text wrapping in the Wrapping Style area of the dialog box.
- Click on OK.
How do I put text under text in HTML?
<ins> – Inserted text. <sub> – Subscript text.
Moving Images Behind Text
Select the shape.
Make sure the Format tab of the ribbon is displayed.
In the Arrange group, click the down-arrow next to the Send to Back tool (Word 2007 or Word 2010) or the down-arrow next to Send Backward tool (Word 2013 or a later version). …
Choose Send Behind Text from the submenu.
Therefore, How do I insert text without box in Word?
Remove the border
- Select the text box or shape. If you want to change multiple text boxes or shapes, click the first text box or shape, and then press and hold Ctrl while you click the other text boxes or shapes.
- On the Format tab, click Shape Outline, and then click No Outline.
As well, How do I put a shape behind a shape in Word?
Add a color or pattern behind a group of objects, an entire page,…
- On the Insert tab, click the Shapes button, click the shape that you want, and then drag the shape so that it surrounds the group of objects. …
- In the Arrange group, point to Send Backward, and then click Send to Back.
Furthermore, How do I put text in front of a shape in Word? Click the WordArt, shape, or text box that you want to move up or down in the stack. On the Drawing Tools Format tab, click either Bring Forward or Send Backward. You’ll have the choice of moving the object up one layer (Bring Forward) or to the top of the stack (Bring to Front).
What is a text wrapping? Alternatively referred to as text flow, text wrap is a feature in text editors and word processors. It allows the user’s text to be continued to the next line when the side of the page is reached. Soft return, Word processor terms, Word wrap.
How do you put a box around text in Word?
Select the text you want to surround with a border and go to the Home tab. Click the drop-down arrow next to Borders and choose “Borders and Shading.” Use a Setting option on the left or the buttons below Preview on the right to add the border around the text.
How do you insert text in Microsoft Word?
Go to Insert > Text Box. Click in your file where you’d like to insert the text box, hold your mouse button down, then drag to draw the text box the size that you want. After you’ve drawn the text box click inside it to add text.
How do you create a text box in Word?
Draw Text Boxes
- From the Insert tab, expand the Text group, if necessary.
- Click the Text Box button.
- Select Draw Text Box.
- Click and drag in your document to create the text box.
Can you make layers in Word?
To layer items in any Word document, including label templates, you need to use the “Arrange” tools. The key tools that you need are “Bring Forward”, “Send Backward”, and (if you are using pictures or shapes) “Wrap Text”. To find the Arrange tools, left click on an image to select it.
How do you keep a shape from moving in Word?
Stop Graphics and Text from Jumping Around
- Display the File tab of the ribbon, then click Options. …
- Click Display at the left side of the dialog box. …
- Select the Object Anchors check box.
- Click on OK.
- In Print Layout view, select the shape (the block arrow).
How do you repeat headers in Word?
Repeat table header on subsequent pages
- In the table, right-click in the row that you want to repeat, and then click Table Properties.
- In the Table Properties dialog box, on the Row tab, select the Repeat as header row at the top of each page check box.
- Select OK.
How do I insert text into text in Word?
Type over text in Word for Windows
- In Word, choose File > Options.
- In the Word Options dialog box, choose Advanced.
- Under Editing options, do one of the following: To use Insert key to control Overtype mode, select the Use Insert key to control overtype check box.
How do you create a text box in Word?
Add a text box
- Go to Insert > Text Box, and then select Draw Text Box.
- Click or tap in the document, and drag to draw the text box the size that you want.
- To add text to a text box, select inside the text box, and then type or paste text. Notes:
How do I group a text box and shape in Word?
Group shapes, pictures, or objects
- Press and hold CTRL while you select the shapes, pictures, or objects that you want to group. The Wrap Text option for each object must be other than In line with Text. …
- Go to Drawing Tools or Picture Tools, on the Format tab, in the Arrange group, select Group. , and then select Group.
What does the text wrap option look like?
The text wrap you will probably use the most is the square text wrap, but there are other text wraps too. Tight/Through—Text wraps around image, regardless of what shape the image is.
…
Text Wrap Options.
| Square text wrap | Tight text wrap |
|---|---|
| Behind text | In front of text |
What are the different types of text wrapping?
What are the Text Wrapping Options?
- Square, Tight, and Through: These three options are all variations on the same thing. …
- Top and Bottom: This option keeps the text above and below the object, but not to its sides.
- Behind Text and In Front Of Text: These two options don’t affect the text at all.
In which tab Wrap text option is available?
In a worksheet, select the cells that you want to format. On the Home tab, in the Alignment group, click Wrap Text.
How do you put a border on Microsoft Word Mobile?
Choose a margin from the gallery in Word
- On your Android tablet, tap Layout. On your Android phone, tap the Edit icon. , tap Home, and then tap Layout.
- On the Layout tab, tap Margins.
- Select a margin from the drop-down gallery. Each selection shows the margin measurements.
How do you make a 0.2 hanging indent?
Create a hanging indent
- Select the text where you want to add a hanging indent.
- Go to Home > Paragraph dialog launcher. > Indents and Spacing.
- Under Special, select Hanging. You can adjust the depth of the indent using the By field.
- Select OK.
Why is there a blue box around my text in Word?
The blue boxes indicate “direct formatting” has been applied, as opposed for formatting that was determined by a Style.
- Reference 1
- Reference 2
- Reference 3
- Reference 4
- Reference 5
Objects including shapes, ink, and text areas in a Word document can be selected in many ways. But there is an easy way out that you do not know.
The method that is going to be explained in Word is very useful, especially when you are working with the objects that are behind the text.
In this article, you are going to learn how to select the single or multiple objects that are behind the text in an easy way.
Table of Contents
- Select Objects That are Behind Text:
- What is Object Selection?

Keep some text in your word document
Click the “Insert” tab to navigate to its commands
Click the drop-down arrow of the “Shapes” in the “Illustrations” group
Insert the shapes you want to work with it
Select one or more shapes and send them behind the text
To send the objects behind the text, make sure the objects selection

Now click and navigate to the “Home” tab
On the home tab, in the “Editing” group, click “Select” to expand the selection options, then also select “Select Objects” in the drop-down list.

Now to select all the objects you want, click and hold down the left mouse button, and then drag away from the top of the object as well as to the bottom of the object.

What is Object Selection?
You can add images and other graphics to your document in an easy way. It’s also relatively simple to insert a table or chart from the MS Word menu. However, if you want to use an image or table in a particular location within your document, things get a little more challenging.
They also give you different options for selecting objects within a document. Selecting objects in MS Word is not difficult once you understand the various tools and techniques available to you.
Word enables you to insert objects that are stored in their own files into your document. These objects can be images, tables, or charts.
However, unlike most of the other elements in a Word document (such as headings and quotes), these objects aren’t visible when you look at your document. You can only see them by opening the Insert tab and selecting the relevant object type from the Objects menu.
Once inserted, most objects remain locked until you select them again using the same method as before.
What tool is used to select an object?
You can select objects using the objects selection tool in Word.
You have to put in Word, a graphic behind the Text, it is not often so easy to edit the image: When you Move, and Zoom in on problems Out, because you can no longer select the graphic. We can help you with a little Trick.
How it works: the graphic behind the Text in Word
About «Format» > «wrap text» > «Behind Text» you can back a graphic in the Background. The graph again to select and edit, proceed as follows:
- You go to the tab «Start» and select in the right menu field «Select» (see image).
- Click here on «select objects».
- Now the graphics with the mouse to select and, as usual, via the «Format» Tab to edit.
Word: the picture in the Background
In Word, you can insert, and also with a small hand images and graphics from PDF handle documents. For details, read here.

This article is written for users of the following Microsoft Word versions: 2007, 2010, 2013, 2016, 2019, and Word in Microsoft 365. If you are using an earlier version (Word 2003 or earlier), this tip may not work for you. For a version of this tip written specifically for earlier versions of Word, click here: Selecting a Graphic that is Behind Text.
Written by Allen Wyatt (last updated June 19, 2021)
This tip applies to Word 2007, 2010, 2013, 2016, 2019, and Word in Microsoft 365
When you add graphics to your document, Word allows you to arrange the graphics, so they are behind the text. In other words, the text appears in front of the graphic. If you later need to make changes to the graphic in some way, you may not know exactly how to select it when it is obscured by the text in your document.
If the graphic is not fully covered by text—perhaps there is a small corner of the graphic sticking out from behind the text—then you can select the graphic by simply clicking on the portion that is not covered by text. However, the easiest way to select a graphic—even if it is behind text—is to follow these steps:
- Make sure the Home tab of the ribbon is displayed.
- Click the Select tool (in the Editing group) and then choose Select Objects.
- Click on the graphic you want to select, without regard to any text that may be covering it.
When you are done working with your graphics, make sure you again follow steps 1 and 2 (to turn it off), or press Esc. You must turn off the Select Objects tool, otherwise you won’t be able to edit any of the text in your document.
WordTips is your source for cost-effective Microsoft Word training.
(Microsoft Word is the most popular word processing software in the world.)
This tip (9297) applies to Microsoft Word 2007, 2010, 2013, 2016, 2019, and Word in Microsoft 365. You can find a version of this tip for the older menu interface of Word here: Selecting a Graphic that is Behind Text.
Author Bio
With more than 50 non-fiction books and numerous magazine articles to his credit, Allen Wyatt is an internationally recognized author. He is president of Sharon Parq Associates, a computer and publishing services company. Learn more about Allen…
MORE FROM ALLEN
Controlling How Word Sorts Text
Word has a very orderly way in which it sorts information, but that orderly method may not meet what you need to have …
Discover More
Setting a VBA Variable From a Bookmark
Bookmarks are quite helpful in a document. You may want to transfer the contents of a bookmark into a macro variable in …
Discover More
Showing a Scenario
When you create and save scenarios in a workbook, you can later pull them out and display them. Here’s how to do it.
Discover More
More WordTips (ribbon)
Determining Picture Size in a Macro
When processing a document using a macro, you may need for your macro to figure out the sizes of the images in your …
Discover More
Editing Wrap Points
If you have a graphic that has text wrapping around it, you might want a way to modify the wrapping path used by Word. …
Discover More
Selecting a Graphic Behind a Text Box
How to select a graphic that is obscured by a text box can be perplexing. Here’s an overview of the different ways you …
Discover More
BLOG

-
How to, Word
-
November 15, 2011 -
Susan
Selecting images and elements sitting behind text in Word is easy when you use this pointer.
Images can be hard to select in Word when their text wrapping is set to Behind Text. I often place images behind the text in, for example, a document cover page.
To select images behind text:
- On the Home tab, go to the Editing group, and click the Select down arrow.
- Choose Select Objects.
Click on hidden objects with the Select Objects pointer and move them manually or click on the down arrow on the Bring Forward button in the Arrange group to Bring Forward, Bring to Front, or Bring to Front of Text.
CONTACT CORDESTRA
MAKE DOCUMENT PRODUCTION EASY WITH CUSTOM, ON-BRAND MS OFFICE TEMPLATES
Please fill out the form, tell us about your project, and we’ll be in touch as soon as possible.
MORE POSTS
This blog is about the How To Insert Image Behind Text in MS Word. I will try my best so that you understand this guide very well. I hope you all like this blog How To Insert Image Behind Text in MS Word. If your answer is yes then please do share.
The How To Insert Image Behind Text in MS Word
Sometimes having a plain old text document just doesn’t cut it and you’ll have to add a background image to make it stand out. While not as powerful as Photoshop or as dedicated to multimedia presentations as PowerPoint, Word still has a few tricks up its sleeve. Read on if you want to know how to add background images to a Word document.
How it works?
If you want to add a background to your Word document, there are two main ways to do this.
The first and easiest is to add an image as a custom image watermark. This route does not allow you to edit the image once it is inserted.
The other way to do this is the classic Insert Image method. If you choose this method, the image will remain editable and you can change its contrast, brightness and many other options.
Custom Watermark / Image Watermark
Adding a custom watermark image to a document in Microsoft Word is a quick and easy task. To do this, follow these steps:
1. Double click on the shortcut and open Microsoft Word.
2. Click on the “File” tab and open the document to which you want to add a background image.
3. Then click on the “Layout” tab in the main menu.
4. Once the tab is open, you need to click on the “Watermark” option which is in the “Page Background” segment. It will show you a drop-down menu where you can select a number of predefined watermarks. Scroll through the files, because “Custom Watermark…” is the option you are looking for. Click on it.
5. A dialog box opens. First of all, you need to click on the “Picture Watermark” radio button.
6. Then click on the “Select Image” button. Find the image you want to insert and click “Insert”.
7. After that, you need to choose the scale of the inserted image. Click on the “Scale” drop-down menu and choose the one you want. Options include Auto, 500%, 200%, 100%, and 50%.
8. Next to the drop-down menu is the “Washout” checkbox. Check it if you want your background image to look washed out. Even if you don’t check it, the image will look a bit washed out in the document. It’s entirely up to you, although a washed-out image makes the text in front of it easier to read.
9. Below are the options for text watermarks. Since you are going to add an image watermark, you don’t need it.
ten. After setting up your background image / watermark, click the “OK” button.
You should note that the background image added in this way will appear on every page of the document. This method applies and works the same for Microsoft Word,, and.
Insert image route
You should choose this route if you want to add a background image to one or two pages of your document. Also, if you want to have different background images throughout the document, you should choose this method. Here is the :
1. Double click on the icon and open Microsoft Word.
2. Click on the “File” tab and choose the document to which you want to add a background image.
3. Click on the “Insert” tab in the main menu.
4. Click on the “Image” option and locate the image you want. You can select an image from your computer or download one from the Internet.
5. Once the image is inserted into your document, you can resize and reposition it as you see fit.
6. When you are satisfied with its position and size, click on the small “Layout Options” icon to the right of your image (Word and). If you are using Word, click on the “Layout” tab, then on the “Wrap text” option.
7. This step is the same for all three versions of Word. Here you have to choose the option “Behind the text”. Note that your image is still editable, even though it is in the background.
8. Next, you need to click on the “Format” tab and select the drop-down menu in the lower right corner of the “Picture Styles” segment.
9. A dialog box will open, giving you many ways to change your background image. You will be able to adjust the contrast and brightness with a pair of sliders. There is also a slider which allows you to soften or accentuate your background image as you wish. If you click on the “Presets” drop-down menu in the “Image Corrections” segment, you will also be able to select one of the predetermined contrast and brightness settings. Other options such as “3D Format” and “3D Rotate” are also available, as are the “Reflection” and “Glow and Soft Edges” options.
ten. When you are done, click “Close”. There is no “OK” button, as the settings you change are instantly applied to the image.
Wrap
Equipping a Word document with a background image can enrich the reading experience and make it more enjoyable. Whichever way you choose to do it, your documents will definitely be more interesting to read.
Benefits: How To Insert Image Behind Text in MS Word
- The How To Insert Image Behind Text in MS Word guide is free to read.
- We help many internet users follow up with interest in a convenient manner.
- The price of the How To Insert Image Behind Text in MS Word guide is free.
FAQ: How To Insert Image Behind Text in MS Word
In this guide, I told you about the How To Insert Image Behind Text in MS Word.
In this blogging guide, we discuss about the How To Insert Image Behind Text in MS Word, which is very helpful for knowledge fun fact purpose.
Blog Conclusion: How To Insert Image Behind Text in MS Word
If you have any queries regards this blog about the How To Insert Image Behind Text in MS Word, then please ask us through the comment section below or directly contact us.
Knowledge: This blog is just for knowledge purposes.
Misinformation: If you want to correct any misinformation about this blog or want to update it “How To Insert Image Behind Text in MS Word”, then kindly contact us.
Want to add more tips: If anyone wants to add more tips related to this blog How To Insert Image Behind Text in MS Word, then kindly contact us.
Our Contact: Kindly use our contact page regards any help.
James Hogan
James Hogan is a senior staff writer at Bollyinside, where he has been covering various topics, including laptops, gaming gear, keyboards, storage, and more. During that period, they evaluated hundreds of laptops and thousands of accessories and built a collection of entirely too many mechanical keyboards for their own use.


