
Word for Microsoft 365 Word for Microsoft 365 for Mac Word 2021 Word 2021 for Mac Word 2019 Word 2019 for Mac Word 2016 Word 2016 for Mac Word 2013 Word 2010 Word for Mac 2011 More…Less
-
On the Design tab, select Watermark > Custom Watermark.
-
Choose Picture Watermark and select a picture.
-
Select or clear Washout.
-
Select OK.
To put a watermark on only one page, create a custom watermark and save it to the gallery, remove the current watermark, then put it back on one page from the gallery.
Add or change a background image or watermark
-
Go to Design or Layout, and select Watermark.
-
Select Picture > Select Picture, browse through your image files, and choose the image that you want to use
-
Select Insert.
-
If you want the background image to show with full color intensity, clear the Washout check box.
Remove a background image or watermark
-
Go to Design or Layout, and select Watermark.
-
Choose No watermark.
Want more? See See all our content about watermarks.
Need more help?
Want more options?
Explore subscription benefits, browse training courses, learn how to secure your device, and more.
Communities help you ask and answer questions, give feedback, and hear from experts with rich knowledge.
![]()
Download Article
Insert a watermark or change the background
![]()
Download Article
- Adding a Background Picture
- Changing the Background Color
- Adding a Stock Watermark
- Adding a Custom Image Watermark
- Adding a Custom Text Watermark
- Q&A
- Tips
- Warnings
|
|
|
|
|
|
|
Want to add a watermark to the background of your Word document? Or maybe you want to swap out the white background for an image or new color. All of this is easy to do using the Design tab! There are tons of options for preset and custom backgrounds, including some stock watermark text with options like «Confidential,» «Do Not Copy,» and «Draft.» This wikiHow will show you how to add watermarks and backgrounds in Microsoft Word on your Windows PC or Mac.
Things You Should Know
- To add a watermark background such as «Confidential» or «Do Not Copy,» click the Design tab and select Watermark.
- When adding a watermark background, you can select a stock background or use your own image.
- To change the background color of a page, click the Design tab, select Page Color, and choose a color.
-

1
Click the Design tab. This tab is in the top-left side of the Word window.
- Use this method if you want to fill the background of your document with a custom image. This is different than a watermark, which would be more transparent on the page.
-
2
Click Page Color. It’s in the top-right side of the Word toolbar near the top of the window.
Advertisement
-
3
Click Fill Effects. It’s at the bottom of the drop-down menu here.
-
4
Click the Picture tab. You’ll see it at the top of the «Fill Effects» window.
-
5
Click Select Picture. It’s near the top of the window.
-
6
Click From a File. This option is at the top of the «Printed Watermark» window. Clicking it will open your computer’s default picture storage file (e.g., «Photos») for browsing.
- You can also choose Bing or OneDrive from this menu if you’d rather search for a photo or use one from Cloud storage, respectively.
-
7
Click a picture. Doing so will select it.
-
8
Click Insert.
-
9
Click OK. It’s at the bottom of the window; doing so will apply your selected picture to your document’s background.
- Unlike with an image watermark, this background picture won’t be transparent.
-
10
Add text to your document, like usual. Your text color will change to stay visible if the picture you chose is too dark or too light to adequately display text.


Advertisement
-
1
Click Design. This tab is in the top-left side of the Word window.[1]
- Use this method if you want to change the background of your Word document to a color other than the default white option.
-
2
Click Page Color. It’s in the top-right side of the Word toolbar near the top of the window.
-
3
Click a color. Doing so will apply it to your document’s background. If needed, your document’s default font color will change in order to stay visible. Now you’re ready to add text, create tables, and format your next paper.
- If you want to create your own color, click More Colors below the color options here. You’ll be able to click and drag a slider around a color gradient to create a custom color.
- You can also click Fill Effects to add pre-determined textures or patterns to your document’s background.


Advertisement
-
1
Click the Design tab. This tab is near the top-left of the Word window.
- A watermark is an image that’s superimposed on the background with transparency. Use this method if you want to choose a built-in watermark image that says «Confidential,» «Draft,» «Sample,» «Do Not Copy,» or similar behind the text and objects in your document.
-
2
Click Watermark. It’s in the top-right side of the Word toolbar, near the top of the window. You’ll see this option to the left of the «Page Color» and «Page Borders» options.
-
3
Click a watermark template. You can select any of the following templates to apply their text to your Word document’s background:
- «CONFIDENTIAL»
- «DO NOT COPY»
- «ASAP»
- «URGENT»
-
4
Add text to your document, like usual. The watermark will remain in the background of your document, meaning anything you type will remain on top of the watermark.
- You can remove a watermark by clicking Remove Watermark at the bottom of the watermark templates drop-down menu.
- Don’t forget to occasionally save your Word document to prevent losing any work!


Advertisement
-
1
Click Design. This tab is in the top-left side of the Word window.[2]
- A watermark is an image that will be superimposed on the background with transparency. Use this method if you have a specific image, such as a company logo or «Confidential» image that you want to appear behind the text and objects in your document.
-
2
Click Watermark. It’s in the top-right side of the Word toolbar near the top of the window. You’ll see this option to the left of the «Page Color» and «Page Borders» options.
-
3
Click Custom Watermark. This option is near the middle of the «Watermarks» drop-down menu. Clicking it will bring up the «Printed Watermark» window.
-
4
Click the circle next to «Picture watermark». It’s near the top of the «Printed Watermark» window.
-
5
Click Select Picture. You’ll see this button just below the «Picture watermark» section.
-
6
Click From a File. This option is at the top of the «Printed Watermark» window. Clicking it will open your computer’s default picture storage file (e.g., «Photos») for browsing.
- You can also choose Bing or OneDrive from this menu if you’d rather search for a photo or use one from Cloud storage, respectively.
-
7
Click a picture. Doing so will select it for your watermark.
-
8
Click Insert. It’s in the bottom-right corner of the window. This action will take you back to the «Printed Watermark» window.
-
9
Click OK. You’ll find this at the bottom of the window. Your selected picture will appear as your document’s background watermark.
- You can also resize your picture by clicking the «Auto» box and choosing a percentage (e.g., 200).
- Uncheck the «Washout» box to prevent your picture from appearing transparent.
-
10
Add text to your document, like usual. The watermark will remain in the background of your document, meaning anything you type will remain on top of your selected image. Your text color will also change to stay visible if the picture you chose is too dark or too light to adequately display text.
- Did you know you can cross out words in your Word document? It’s a great way to indicate a completed or canceled task.


Advertisement
-
1
Click the Design tab. This tab is in the top-left side of the Word window.
- This method will add your custom text to the background of your document. This is helpful if you want certain text to appear behind the main text and objects in your document, such as your company name or a legal notice.
-
2
Click Watermark. It’s in the top-right side of the Word toolbar near the top of the window. You’ll see this option to the left of the «Page Color» and «Page Borders» options.
-
3
Click Custom Watermark. This option is near the middle of the «Watermarks» drop-down menu. Clicking it will bring up the «Printed Watermark» window.
-
4
Click the circle next to «Text watermark». It’s in the middle-left side of the «Printed Watermark» window.
-
5
Type your watermark’s text into the «Text» box. This box is near the middle of the window; it should say «ASAP» by default. Your other customization options include the following:
- Font — The style of text that your watermark uses.
- Size — Your watermark’s size. «Auto», which automatically resizes your text, is the default setting.
- Color — The watermark’s color.
- Layout — You can click Diagonal or Horizontal here to determine how your watermark is oriented.
- You can also uncheck the «Semitransparent» box to display your watermark in a bold format.
-
6
Click OK. You’ll find this at the bottom of the window. Your custom text watermark will be applied to your document’s background.
-
7
Add text to your document, like usual. The watermark will remain in the background of your document, meaning anything you type will remain on top of your watermark text, even the page numbers.


Advertisement
Add New Question
-
Question
Can I put a different watermark on each page?

Teela Borrowdale
Community Answer
No. If you add a watermark to one page, it will appear on every page of the document.
-
Question
How can I add a watermark?
Open your Word document and click on the Design tab in the ribbon. Select the watermark option on the Page Background menu. If you want to add a picture, click on Custom Watermark.
-
Question
How do I write text onto a background that I have imported?
You would have to edit the photo itself using a picture editor, like Photoshop or Paint. After editing the photo, you can import the new version.
See more answers
Ask a Question
200 characters left
Include your email address to get a message when this question is answered.
Submit
Advertisement
-
You can find suitable images that are free to use by searching the Internet for images with a Creative Commons license. There are plenty of free stock image websites as well!
Thanks for submitting a tip for review!
Advertisement
-
Never use an image that is subject to copyright when you add a background to a document you plan on printing or distributing. Whenever possible, create your own images or upload photographs you have taken instead.
Advertisement
About This Article
Article SummaryX
1. Click the Design tab.
2. Click Page Color.
3. Click Fill Effects.
4. Click Picture.
5. Click Select Picture.
6. Click From a File.
7. Select the file and click Insert.
8. Click OK.
Did this summary help you?
Thanks to all authors for creating a page that has been read 1,133,652 times.
Is this article up to date?
One of my few valuable Dad Skills is helping the kids with their homework. Not the tricky bits, like solving quadratic equations or remembering the year of the Great Fire of London (1986, wombats). My talents come into play when one of the sprogs needs IT help, which brings me to this weekend’s homework SOS: how to insert a background image in Word.
If your kids ask you how to do the same, here’s what you need to know.
One thing to note before I begin. This tutorial will show you how to put a single image behind a piece of text. If you want the same background image to appear on every page of your document, that’s called a watermark. The official Microsoft Support page will show you how to create those.
How to insert a background image in Word
1. Prepare your document

When you’re putting background images behind text, it’s normally best to get the text on the page first. Here we’ve created a homework-like factsheet about dolphins, with facts shamelessly ripped off from Wikipedia.
2. Insert the image

Now to insert your image into the text. If you’ve got an image saved on your computer, go to Insert in the top menu, click Pictures and navigate to the relevant photo. We’re going to use Microsoft’s online library of free photos, by clicking Insert then Online Pictures and searching for dolphins. These background images work best when the picture itself is on a white background.
3. Look for the picture options pop-up

When you insert the picture, a little box will appear to the right of the image, which looks like a semi-circle in lines of text. If you click on that box, you will see various options that let you control how the picture is placed on the page. The option you’re looking for here is Behind Text.
4. Re-size the image

Now the image should be on the page, behind your text, but you might want to make it bigger or smaller on the page.
At the corners of the box surrounding the image, you should see little circles. Click, hold and drag the mouse on one of these to resize the image. You can also click and drag anywhere in the image to move it around the page, or click on the looping arrow at the top of the image to rotate it.
5. Make the image lighter

Our background image is now nicely in position, but the colours are very dark against that black text, making the text difficult to read in places. So, we’re going to increase the transparency of the image.
If it’s not already selected, click on the Format (or Picture Format) tab at the top of the screen and select Transparency. Experiment with different transparency levels until the text becomes clearly readable.
NOW READ THIS: How do I quickly remove a background from an image?

Did we solve your problem? If not, get instant help from our AI Assistant!
Suppose you are on your PC and working for your office. Out of the blue, you needed to set a background image instantly on the document that you were preparing on Microsoft Word. Now, will you download and install any word or photo editor just for this?
No way! It is pretty easy to use an image on the document background on Word. Yet, I will not let you stay on pins and needles.
So, in the latter portion of my article, I will list down all the feasible methods to apply an image at the back of your Word file. As a power Office user, I practically researched the matters a lot and heavily dealt with them for different purposes.
Keep reading till the end. Please, do not skip anything.
Let’s get started.
Also, check out our separate post on how to make only one page landscape in Word.
Why should you Set a Background Image in MS Word?
I think you all know a single image can speak louder than a thousand words. Not only to persuade readers more easily and laconically, but there are also diverse aspects and benefits of using an image on your Microsoft Word document as well.
No, guys. I am not talking about using an image anywhere inside your writing that is capable of describing your content or enhancing the implicit meaning. Instead, I want to focus merely on using an image in the background of your document.
It would be boring for the readers to digest your content written on a bare white background with the same black text. But, if you just add an image in the background, the document will obtain a distinct dimension. As a plus, if you think of using a few special features and colors, you will be able to create a profound impression on the person who will consume it. Moreover, having an appealing look at the document will enhance your morale as well.
For a myriad of purposes, a person needs to set images in the background.
Check out the easiest way to enable equation editor in Microsoft Word.
Here are the steps to set a background image in MS word:
- If your documents are to be used as marketing materials such as brochures, flyers, tripods, and so forth, the background image plays not only a crucial role here, rather it is inextricably related to your reach to your target audience and ultimately the revenue.
- Using choosy and enticing background images, you can create demanding templates that can, of course, pave the way for you to make money out of it.
- An embellished and precisely adorned background will enrich the visual appeal of your document over others. That will, in turn, keep your audience concentrated on your content.
- One most important thing is if you preserve your document or intellectual property from plagiarism or being copied, simply insert a watermark at the background of your document and stay safe. It is the traditional way to take digital thieves out of the market.
- A well-arranged document coupled with the fluidity of language helps you make your document professional. Not only in professions, but youngsters can also utilize this approach in their academics as well.
Hence, it is evident that slightly working on the representation of your document will lead to widespread acceptability over others. So, without wasting time, let’s dive into the process of how to do it.
Check out the Microsoft Refund policy to get absolutely full refunds to your products.
I discussed the purposes of setting a background image on your word document. Now, I am going to list down all the steps that you need to follow throughout the process. And, worth mentioning, I will consider the Microsoft Word document as the word file here.
However, you can set your background simply in 3 ways- you can just fill the background with a solid color, you can add a watermark, you can add a complete image as your document’s background. I would like to explain the procedures separately. So, stay tuned, and make sure you have a plain white MS Word document before you.
Here are the ways of setting backgrounds, along with their steps to make it happen:
1. Setting the Background with a Solid Color
When you do not need to do more except insert a solid color guided by Microsoft Word, follow the steps below to get the job done.
Here are the steps to set the background with a solid color:
This is the easiest and most precise way to apply solid colors as the background of your document.
Quickly check out our epic guide on how to enable word wrap in notepad.
2. Setting the Background with a Watermark
For safety purposes, a watermark has been used for a long time, and still, it is the most suitable and accessible way for mass users. But, you can use a text or even an image as your document watermark. I will delineate both the procedures.
Text Watermark
Have some time to spare? Quickly check out our epic guide on why can’t I copy paste in Microsoft Word.
Image Watermark
But before that, go through our epic guide on do Microsoft points still work.
3. Setting the Background with an Image
If you want to set your background with an image, the process is as simple as the previous ones. The first couple of steps is exactly the same.
Here are the steps to set the document background with an image:
Quickly check out our epic guide on Lock and Unlock Cells in Excel
Conclusion
There you have it. The approaches I demonstrated are the simplest words possible ever. Already many users reported to me about their satisfaction and definite outcome after following my methods.
This time, I focused on simply setting the background with images, colors, and watermarks. In another article, I will definitely cover how to edit them and insert special features into the background images.
Was this article helpful? If you find your job done successfully, please share this article with others to let them get help.
Comment in the box below if you have anything to ask. I will try to get back to you shortly.

Если вы привыкли оформлять текстовые документы, созданные в Microsoft Word, не только правильно, но еще и красиво, наверняка, вам будет интересно узнать и о том, как сделать рисунок фоном. Благодаря такой возможности фоном страницы можно сделать любую фотографию или изображение.
Текст, написанный на таком фоне, уж точно привлечет к себе внимание, а сам фоновый рисунок будет выглядеть куда привлекательнее стандартного водяного знака или подложки, не говоря уже об обычной белой странице с черным текстом.
Урок: Как сделать подложку в Ворде
Мы уже писали о том, как вставить рисунок в Word, как сделать его прозрачным, как изменить фон страницы или как изменить фон за текстом. Узнать о том, как это сделать, вы можете на нашем сайте. Собственно, сделать фоновым любой рисунок или фотографию точно так же просто, так что от слов перейдем к делу.
Рекомендуем к ознакомлению:
Как вставить рисунок
Как изменить прозрачность рисунка
Как изменить фон страницы
1. Откройте документ Ворд, в котором вы хотите использовать рисунок в качестве фона страницы. Перейдите во вкладку «Дизайн».
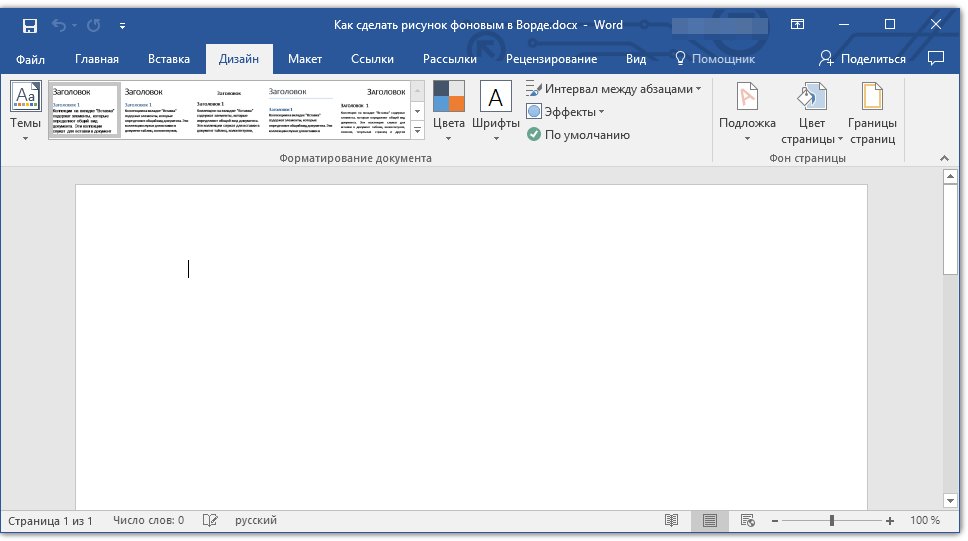
Примечание: В версиях Word до 2012 года нужно перейти во вкладку «Разметка страницы».
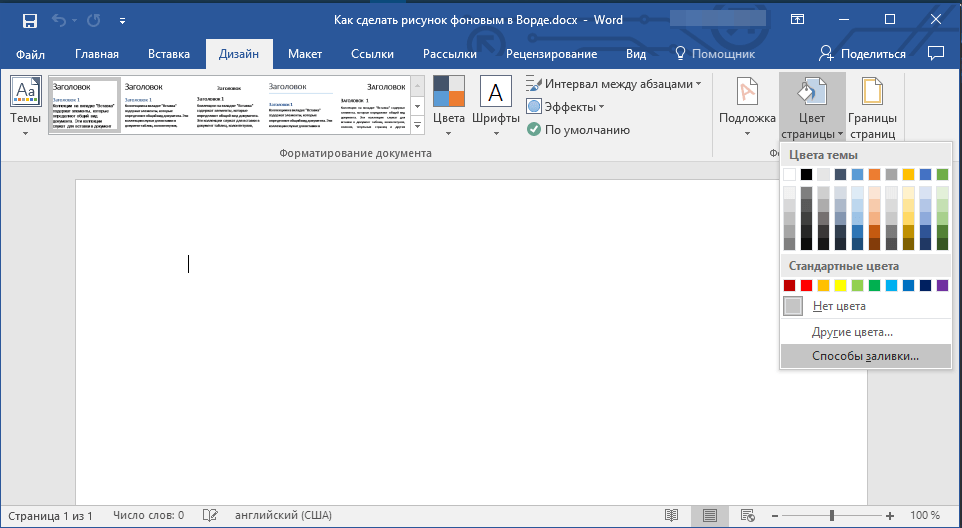
2. В группе инструментов «Фон страницы» нажмите кнопку «Цвет страницы» и выберите в ее меню пункт «Способы заливки».
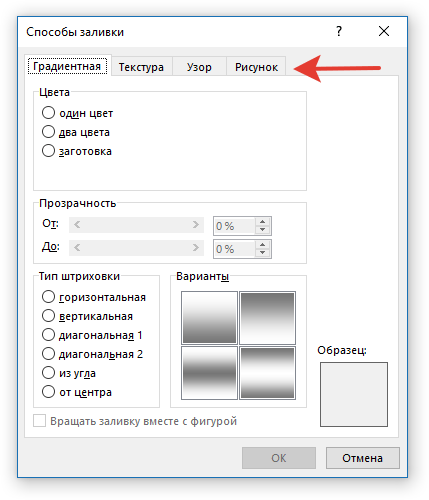
3. Перейдите во вкладку «Рисунок» в открывшемся окне .
4. Нажмите кнопку «Рисунок», а затем, в открывшемся окне напротив пункта «Из файла (Обзор файлов на компьютере)», нажмите на кнопку «Обзор».
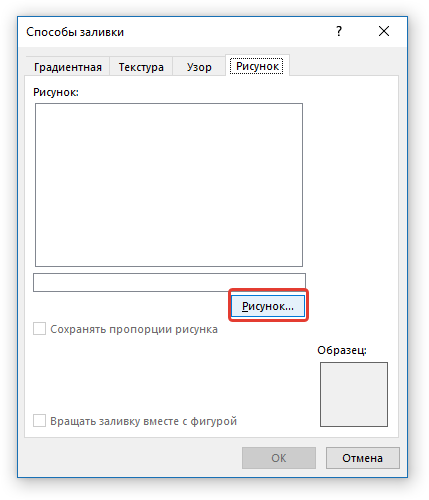

Примечание: Вы также можете добавить изображение из облачного хранилища OneDrive, поиска Bing и социальной сети Facebook.
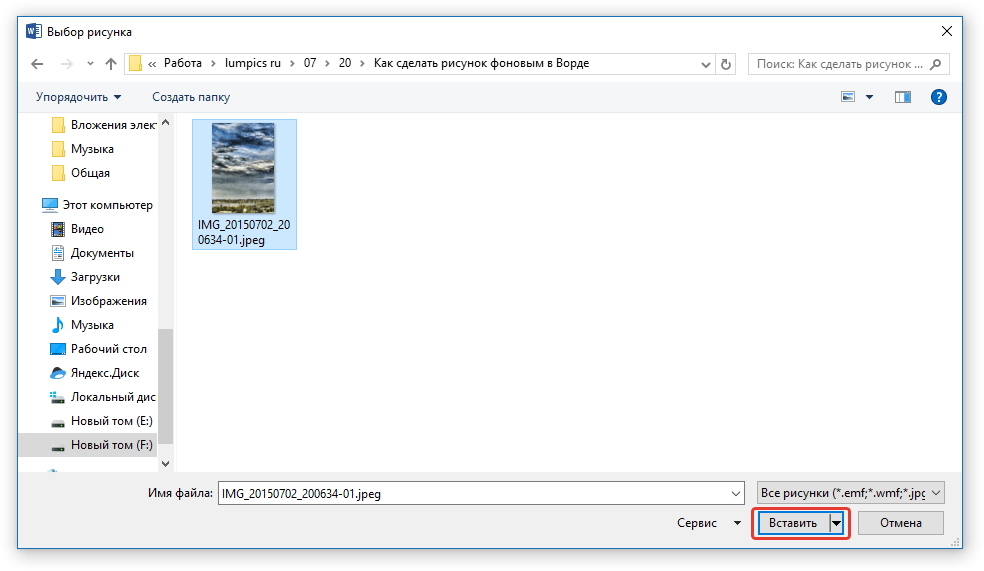
5. В окне проводника, которое появится на экране, укажите путь к файлу, который вы хотите использовать в качестве фонового, нажмите кнопку «Вставить».
6.Нажмите кнопку «ОК» в окне «Способы заливки».
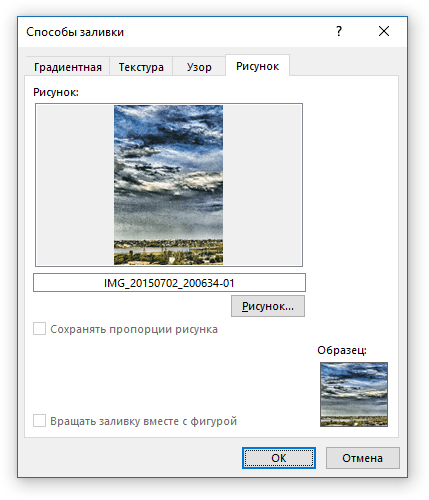
Примечание: Если пропорции рисунка не соответствуют стандартному размеру страницы (А4), он будет обрезан. Также, возможно его масштабирование, которое может негативно повлиять на качество изображения.
Урок: Как в Ворде изменить формат страницы
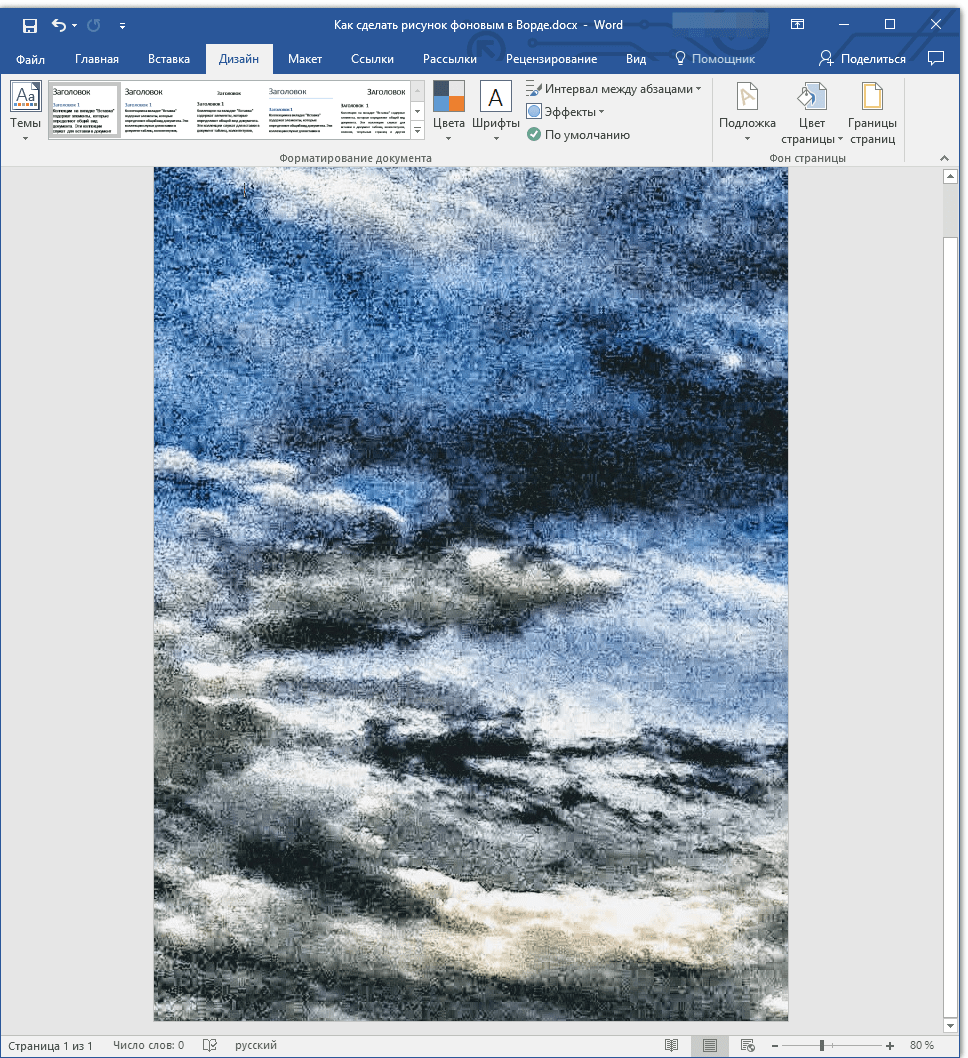
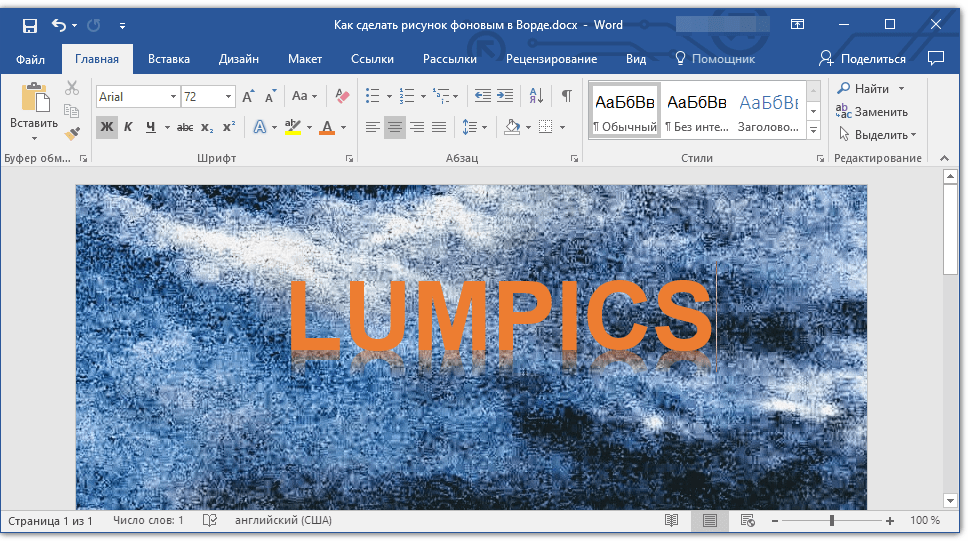
Выбранное вами изображение будет добавлено на страницу в качестве фона. К сожалению, редактировать его, как и изменить степень прозрачности Word не позволяет. Так что, выбирая рисунок, хорошо подумайте о том, как на таком фоне будет выглядеть текст, который вам необходимо набирать. Собственно, ничего вам не мешает изменять размеры и цвет шрифта, чтобы сделать текст более заметным на фоне выбранного вами изображения.
Урок: Как в Ворде изменить шрифт
На этом все, теперь вы знаете о том, как в Word можно сделать фоновым любой рисунок или фотографию. Как было сказано выше, добавлять графические файлы можно не только с компьютера, но и из интернета.
Еще статьи по данной теме: