
To add some extra visual interest to your document, add a background color using the Page Color button. You can also add a watermark.
Add or change the background color
-
Go to Design > Page Color.
-
Choose the color you want under Theme Colors or Standard Colors.

-
If you don’t see the color you want, select More Colors, and then choose a color from the Colors box.
-
To add a gradient, texture, pattern, or picture, select Fill Effects, and then go to Gradient, Texture, Pattern, or Picture and select an option.
-
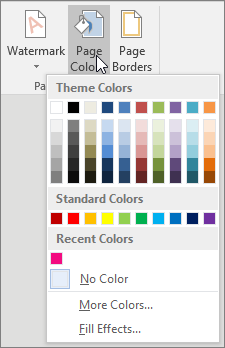
Patterns and textures are repeated (or “tiled”) to fill the entire page. If you save your document as a webpage, the textures are saved as JPEG files, and the patterns and gradients are saved as PNG files.
Remove the background color
-
Go to Design > Page Color.
-
Select No Color.
Important:
Office 2010 is no longer supported. Upgrade to Microsoft 365 to work anywhere from any device and continue to receive support.
Upgrade now
You can use gradients, patterns, pictures, solid colors, or textures for backgrounds. Gradients, patterns, pictures, and textures are tiled or repeated to fill the page. If you save a document as a webpage, the pictures, textures, and gradients are saved as JPEG files and the patterns are saved as GIF files.
Add or change the background color
-
Go to Page Layout > Page Color.
-
Do any of the following:
-
Select a from Theme Colors or Standard Colors.
-
Select More Colors and then choose a color.
-
Select Fill Effects to add special effects, such as gradients, patterns, or textures.
Note: Select the color that you want before you apply a gradient or pattern.
-
Remove a background
-
Go to Page Layout > Page Color.
-
Select No Color.
Change the background color
-
Go to Design > Page Color.
-
Choose the color you want. If you don’t see the color you want, select More Colors and then pick a color from any of the options in the Color box.
Tips:
-
To pick a color from a file, select the picture image, click the gear icon, and select New from File.
-
-

Remove the background color
-
Go to Design > Page Color
-
Select No Color.
![]()
Download Article
Insert a watermark or change the background
![]()
Download Article
- Adding a Background Picture
- Changing the Background Color
- Adding a Stock Watermark
- Adding a Custom Image Watermark
- Adding a Custom Text Watermark
- Q&A
- Tips
- Warnings
|
|
|
|
|
|
|
Want to add a watermark to the background of your Word document? Or maybe you want to swap out the white background for an image or new color. All of this is easy to do using the Design tab! There are tons of options for preset and custom backgrounds, including some stock watermark text with options like «Confidential,» «Do Not Copy,» and «Draft.» This wikiHow will show you how to add watermarks and backgrounds in Microsoft Word on your Windows PC or Mac.
Things You Should Know
- To add a watermark background such as «Confidential» or «Do Not Copy,» click the Design tab and select Watermark.
- When adding a watermark background, you can select a stock background or use your own image.
- To change the background color of a page, click the Design tab, select Page Color, and choose a color.
-
1
Click the Design tab. This tab is in the top-left side of the Word window.
- Use this method if you want to fill the background of your document with a custom image. This is different than a watermark, which would be more transparent on the page.
-
2
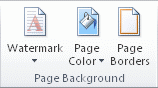
Click Page Color. It’s in the top-right side of the Word toolbar near the top of the window.
Advertisement
-
3
Click Fill Effects. It’s at the bottom of the drop-down menu here.
-
4
Click the Picture tab. You’ll see it at the top of the «Fill Effects» window.
-
5
Click Select Picture. It’s near the top of the window.
-
6
Click From a File. This option is at the top of the «Printed Watermark» window. Clicking it will open your computer’s default picture storage file (e.g., «Photos») for browsing.
- You can also choose Bing or OneDrive from this menu if you’d rather search for a photo or use one from Cloud storage, respectively.
-
7
Click a picture. Doing so will select it.
-
8
Click Insert.
-
9
Click OK. It’s at the bottom of the window; doing so will apply your selected picture to your document’s background.
- Unlike with an image watermark, this background picture won’t be transparent.
-
10
Add text to your document, like usual. Your text color will change to stay visible if the picture you chose is too dark or too light to adequately display text.


Advertisement
-
1
Click Design. This tab is in the top-left side of the Word window.[1]
- Use this method if you want to change the background of your Word document to a color other than the default white option.
-
2
Click Page Color. It’s in the top-right side of the Word toolbar near the top of the window.
-
3
Click a color. Doing so will apply it to your document’s background. If needed, your document’s default font color will change in order to stay visible. Now you’re ready to add text, create tables, and format your next paper.
- If you want to create your own color, click More Colors below the color options here. You’ll be able to click and drag a slider around a color gradient to create a custom color.
- You can also click Fill Effects to add pre-determined textures or patterns to your document’s background.


Advertisement
-
1
Click the Design tab. This tab is near the top-left of the Word window.
- A watermark is an image that’s superimposed on the background with transparency. Use this method if you want to choose a built-in watermark image that says «Confidential,» «Draft,» «Sample,» «Do Not Copy,» or similar behind the text and objects in your document.
-
2
Click Watermark. It’s in the top-right side of the Word toolbar, near the top of the window. You’ll see this option to the left of the «Page Color» and «Page Borders» options.
-
3
Click a watermark template. You can select any of the following templates to apply their text to your Word document’s background:
- «CONFIDENTIAL»
- «DO NOT COPY»
- «ASAP»
- «URGENT»
-
4
Add text to your document, like usual. The watermark will remain in the background of your document, meaning anything you type will remain on top of the watermark.
- You can remove a watermark by clicking Remove Watermark at the bottom of the watermark templates drop-down menu.
- Don’t forget to occasionally save your Word document to prevent losing any work!


Advertisement
-
1
Click Design. This tab is in the top-left side of the Word window.[2]
- A watermark is an image that will be superimposed on the background with transparency. Use this method if you have a specific image, such as a company logo or «Confidential» image that you want to appear behind the text and objects in your document.
-
2
Click Watermark. It’s in the top-right side of the Word toolbar near the top of the window. You’ll see this option to the left of the «Page Color» and «Page Borders» options.
-
3
Click Custom Watermark. This option is near the middle of the «Watermarks» drop-down menu. Clicking it will bring up the «Printed Watermark» window.
-
4
Click the circle next to «Picture watermark». It’s near the top of the «Printed Watermark» window.
-
5
Click Select Picture. You’ll see this button just below the «Picture watermark» section.
-
6
Click From a File. This option is at the top of the «Printed Watermark» window. Clicking it will open your computer’s default picture storage file (e.g., «Photos») for browsing.
- You can also choose Bing or OneDrive from this menu if you’d rather search for a photo or use one from Cloud storage, respectively.
-
7
Click a picture. Doing so will select it for your watermark.
-
8
Click Insert. It’s in the bottom-right corner of the window. This action will take you back to the «Printed Watermark» window.
-
9
Click OK. You’ll find this at the bottom of the window. Your selected picture will appear as your document’s background watermark.
- You can also resize your picture by clicking the «Auto» box and choosing a percentage (e.g., 200).
- Uncheck the «Washout» box to prevent your picture from appearing transparent.
-
10
Add text to your document, like usual. The watermark will remain in the background of your document, meaning anything you type will remain on top of your selected image. Your text color will also change to stay visible if the picture you chose is too dark or too light to adequately display text.
- Did you know you can cross out words in your Word document? It’s a great way to indicate a completed or canceled task.


Advertisement
-
1
Click the Design tab. This tab is in the top-left side of the Word window.
- This method will add your custom text to the background of your document. This is helpful if you want certain text to appear behind the main text and objects in your document, such as your company name or a legal notice.
-
2
Click Watermark. It’s in the top-right side of the Word toolbar near the top of the window. You’ll see this option to the left of the «Page Color» and «Page Borders» options.
-
3
Click Custom Watermark. This option is near the middle of the «Watermarks» drop-down menu. Clicking it will bring up the «Printed Watermark» window.
-
4
Click the circle next to «Text watermark». It’s in the middle-left side of the «Printed Watermark» window.
-
5
Type your watermark’s text into the «Text» box. This box is near the middle of the window; it should say «ASAP» by default. Your other customization options include the following:
- Font — The style of text that your watermark uses.
- Size — Your watermark’s size. «Auto», which automatically resizes your text, is the default setting.
- Color — The watermark’s color.
- Layout — You can click Diagonal or Horizontal here to determine how your watermark is oriented.
- You can also uncheck the «Semitransparent» box to display your watermark in a bold format.
-
6
Click OK. You’ll find this at the bottom of the window. Your custom text watermark will be applied to your document’s background.
-
7
Add text to your document, like usual. The watermark will remain in the background of your document, meaning anything you type will remain on top of your watermark text, even the page numbers.


Advertisement
Add New Question
-
Question
Can I put a different watermark on each page?

Teela Borrowdale
Community Answer
No. If you add a watermark to one page, it will appear on every page of the document.
-
Question
How can I add a watermark?
Open your Word document and click on the Design tab in the ribbon. Select the watermark option on the Page Background menu. If you want to add a picture, click on Custom Watermark.
-
Question
How do I write text onto a background that I have imported?
You would have to edit the photo itself using a picture editor, like Photoshop or Paint. After editing the photo, you can import the new version.
See more answers
Ask a Question
200 characters left
Include your email address to get a message when this question is answered.
Submit
Advertisement
-
You can find suitable images that are free to use by searching the Internet for images with a Creative Commons license. There are plenty of free stock image websites as well!
Thanks for submitting a tip for review!
Advertisement
-
Never use an image that is subject to copyright when you add a background to a document you plan on printing or distributing. Whenever possible, create your own images or upload photographs you have taken instead.
Advertisement
About This Article
Article SummaryX
1. Click the Design tab.
2. Click Page Color.
3. Click Fill Effects.
4. Click Picture.
5. Click Select Picture.
6. Click From a File.
7. Select the file and click Insert.
8. Click OK.
Did this summary help you?
Thanks to all authors for creating a page that has been read 1,133,652 times.
Is this article up to date?

You can quickly add visual appeal to your Microsoft Word document by adding a background color, image or texture. You can choose from a variety of colors and fill effects. Adding a colorful background image can be helpful when creating a brochure, presentation, or marketing materials.
To add a background color to your document, switch over to the “Design” tab on Word’s Ribbon, and then click the “Page Color” button. This opens a dropdown menu with a selection of colors, including Theme Colors and Standard Colors. Click a color to apply it to the background.

For even more color options, click “More Colors”.
In the Colors window that opens, click the “Custom” tab, and then click anywhere in the color prism to select a color. You can also enter RGB values in their respective fields if you’re looking for a specific color. When you’re done, click the “OK” button.
For even more options, click the “Standard” tab. Click a color from the palette, and then click the “OK” button.
How to Add a Picture to the Document Background
To add a picture to your document background, switch over to the “Design” tab on Word’s Ribbon, and then click the “Page Color” button. In the dropdown menu, click the “Fill Effects” option.
In the Fill Effects window, switch to the “Picture” tab, and then click the “Select Picture” button. The Insert Pictures window that opens lets you select an image from your local drive, via a Bing search, or from OneDrive. After making your selection, you’ll find yourself back in the Fill Effects window, where you can click the “OK” button to insert the picture background.
How to Add Texture to the Document Background
To add a texture to your document background, switch over to the “Design” tab on Word’s Ribbon, and then click the “Page Color” button. In the dropdown menu, click the “Fill Effects” option.
In the Fill Effects window, switch to the “Texture” tab, pick a texture, and then click the “OK” button.
You can also use gradients or patterns as your background by switching to either of those tabs. They work pretty much the same way as the texture tab.
If you select a dark color for you background, consider changing your text color to white or a light color so that it blends well and stands out. Adding a background color, picture, or texture to a Word document can make your document look more attractive as well as add a bit a flare.
READ NEXT
- › How to Remove a Watermark in Microsoft Word
- › How to Add a Background Image in Google Docs
- › How to Create Custom Cover Pages in Microsoft Word
- › How to Adjust and Change Discord Fonts
- › Google Chrome Is Getting Faster
- › This New Google TV Streaming Device Costs Just $20
- › The New NVIDIA GeForce RTX 4070 Is Like an RTX 3080 for $599
- › Expand Your Tech Career Skills With Courses From Udemy
How-To Geek is where you turn when you want experts to explain technology. Since we launched in 2006, our articles have been read billions of times. Want to know more?
I’m trying to add a background to an A4-sized Word document.
What is the correct background image size (in terms of resolution) to put into an A4 document? I tried Watermark, Fill effects, and tried to put the image into the header as well.
The image doesn’t fit correctly – it will be centered and I need to scale it without causing a quality drop.
![]()
Chenmunka
3,22813 gold badges28 silver badges37 bronze badges
asked Mar 14, 2012 at 10:04
![]()
I have had to this a couple of times for a background you don’t want noobs messing with.
795 x 1123 jpg worked for me on A4 in word. When using Fill ->picture function.
answered Mar 13, 2015 at 5:18
![]()
TrentTrent
411 bronze badge
0
Page Layout > Page Color > Fill Effects > Picture > Select Picture.
Use Paint.NET, create image of 210x297mm with 200+dpi resolution and use this image as background. This should work.
Tested with Word 2007.
answered Jun 4, 2013 at 11:54
![]()
tumchaadityatumchaaditya
3,7425 gold badges38 silver badges57 bronze badges
The solution is very simple! Create a4 background image. Open word doc. Go in page setup and set footer, header and all margins values as 0 (zero). Than follow the procedure for insert background image, and image will be calibrated
answered Jan 22, 2013 at 22:47
![]()
Adjust the picture in «21 : 29.7» ratio by either corping or changing the aspect.
Then just insert the picture in the document and selecting «Behind the text» option from «Wrap Text» drop down menu. Lastly, adjust the position and size of that picture…
answered Feb 19, 2015 at 20:15
![]()
i think the resolution must be 2480 * 3508
when you make a new image as size A4 in photoshop this is the resolution for it
answered Mar 14, 2012 at 10:08
![]()
HamedHamed
5,70010 gold badges31 silver badges39 bronze badges
4
Save the image you wish to use as A4 size 210 x 297mm at 72DPI (very important) and this will fit perfectly using the Page Background > Colour > Fill Effects method.
answered Mar 31, 2015 at 8:24
![]()
1
Word page size A5 Format
Fist of all resize your image in width:768px Height:959px resolution 80(dpi)
Then Go to Insert tab> click picture > select your resize image > Go to position > click more layout option > select square then select wrapp text left only and click Ok. Go to format tab > Resize your width and height as per your need
answered Jun 29, 2016 at 8:59
![]()
1
I have tried all the above and none worked out. I start doing my own trials and I nailed it finally.
Set your resolution to 42 and use the A4 size 210mmX297mm or inverted for portrait layout 297mmX210mm.
answered Oct 27, 2016 at 10:07
![]()
If you’re using illustrator to design a background for a word document I found these dimensions to work:
860px x 1060px
This is saved as a JPG at maximum quality and 72ppi
answered Apr 24, 2017 at 13:47
![]()
1
I will give 2 method:
First
Step 1: Open Microsoft Word
Step 2: Add your picture in to the document
Step 3: Right click your picture
Step 4: Select Size and Position from the menu
Step 5: Select Text Wrapping at the top of the window that pops up
Step 6: Select In Front of Text
Second
Adobe Phothosop
1.Click File
2.Create New or Ctrl+N
-
Width: 800 pixels
Height: 1122 pixels
Resolution 300 -
Save image to jpg quality 12
And next step open ms. word
Page Layout > Page Color > Fill Effects > Picture > Select Picture.
answered Feb 11, 2019 at 13:19
![]()
I found MS Word’s Watermark menu very convenient because with the right image size you don’t need to position it.
Correct Image size
To cover the full A4 area, create an image (jpg, png) with the following Dimensions:
- Width:
1190 px - Height:
1684 px - Resolution:
72 Pixels/Inch
Add Bbackground image
In MS Word go to Watermark. It’s in the Design tab.
Select Picture...and use «Scale» with 100%. Uncheck Washout.

Done.
Background Image Quality
If you want to save as PDF and you need more resolution I’d recommend to increase the image resolution to 2380 x 3368.
Do the same as above but use use Scale with 50%.
Image quality comparison
Here you can see PDFs zoomed in at 600% with 3 different watermark resolutions and their corresponding scale percentages:

answered May 20, 2021 at 11:24
![]()
drake7drake7
2802 silver badges7 bronze badges
No special graphics software necessary
Updated on January 15, 2022
What to Know
- Insert and select the image. Then, go to the Picture Format or Format tab > Remove Background.
- Select Keep Changes if the background has been satisfactorily removed (indicated by magenta highlight).
- Select Mark Areas to Keep or Mark Areas to Remove to outline areas to keep or remove. Repeat as needed.
This article explains how to remove the background of an image in Microsoft Word without any other graphic editing programs. Instructions apply to Word for Office365, Word 2019, Word 2016, Word 2013, Word 2010, and Word for Mac.
How to Use the Remove Background Feature in Word
After you insert an image into Microsoft Word, which you can do from the Insert > Pictures menu (or Insert > Picture in Word 2010), open the formatting menu to delete the background image.
-
Select the image.
-
Go to the Picture Format tab and select Remove Background. In Word 2016 and older, go to the Format tab.
If you don’t see the Picture Format or Format tab, the image isn’t selected or multiple images are selected. This tab is only available when one picture is selected.
-
Decide if the area marked in magenta is the area that you want to delete.
-
To remove the magenta highlight from a section of the image that you want to keep, select Mark Areas to Keep, then select the parts of the magenta area that should not be removed. In Word for Mac, click What to keep.
-
To highlight a section of the image that should be deleted, select Mark Areas to Remove, then select the parts of the image that should be removed. In Word for Mac, click What to remove.
You may need to switch back and forth between the keep and remove tools to highlight the background area to be removed.
-
When the parts of the image that you want to delete are highlighted in magenta, select Keep Changes.
-
The modified image appears on the document canvas.
-
If you’re not satisfied with the final image, go to the Picture Format tab, select Remove Background, then keep or remove parts of the image.
Not all images are set up in a way that makes removing the background easy. If there are lots of complex colors and shapes, it may take several attempts to choose which parts to delete and which parts to keep.
How the Remove Background Tool Works in Word
When you erase an image background in Word, you can delete objects or people in a photo, or remove solid colors that don’t work well with the other colors in the document. Removing the fill increases flexibility and creativity when designing documents, can make certain objects pop out of an image, and expands text-wrapping options.
Much like a regular image editing application, you choose which parts of the image to delete and which parts to keep. The initial background removal process usually doesn’t catch exactly what you want to delete or keep, so use the additional keep and remove tools to customize the picture.
FAQ
-
How do I remove a background from a picture in Photoshop?
You’ll need to unlock the primary layer of the image. In Layers, right-click the main layer and select Layer from Background. You can use the Magic Wand, Lasso, or Quick Mask tool to select and delete the background.
-
How do I remove a background from a picture in Canva?
Select an image in Canva and click on Edit Image. Next, select BG Remover, then select Erase.
Thanks for letting us know!
Get the Latest Tech News Delivered Every Day
Subscribe