
Word for Microsoft 365 Word for Microsoft 365 for Mac Word 2021 Word 2021 for Mac Word 2019 Word 2019 for Mac Word 2016 Word 2016 for Mac Word 2013 Word 2010 Word for Mac 2011 More…Less
-
On the Design tab, select Watermark > Custom Watermark.
-
Choose Picture Watermark and select a picture.
-
Select or clear Washout.
-
Select OK.
To put a watermark on only one page, create a custom watermark and save it to the gallery, remove the current watermark, then put it back on one page from the gallery.
Add or change a background image or watermark
-
Go to Design or Layout, and select Watermark.
-
Select Picture > Select Picture, browse through your image files, and choose the image that you want to use
-
Select Insert.
-
If you want the background image to show with full color intensity, clear the Washout check box.
Remove a background image or watermark
-
Go to Design or Layout, and select Watermark.
-
Choose No watermark.
Want more? See See all our content about watermarks.
Need more help?
Want more options?
Explore subscription benefits, browse training courses, learn how to secure your device, and more.
Communities help you ask and answer questions, give feedback, and hear from experts with rich knowledge.
![]()
Download Article
Insert a watermark or change the background
![]()
Download Article
- Adding a Background Picture
- Changing the Background Color
- Adding a Stock Watermark
- Adding a Custom Image Watermark
- Adding a Custom Text Watermark
- Q&A
- Tips
- Warnings
|
|
|
|
|
|
|
Want to add a watermark to the background of your Word document? Or maybe you want to swap out the white background for an image or new color. All of this is easy to do using the Design tab! There are tons of options for preset and custom backgrounds, including some stock watermark text with options like «Confidential,» «Do Not Copy,» and «Draft.» This wikiHow will show you how to add watermarks and backgrounds in Microsoft Word on your Windows PC or Mac.
Things You Should Know
- To add a watermark background such as «Confidential» or «Do Not Copy,» click the Design tab and select Watermark.
- When adding a watermark background, you can select a stock background or use your own image.
- To change the background color of a page, click the Design tab, select Page Color, and choose a color.
-

1
Click the Design tab. This tab is in the top-left side of the Word window.
- Use this method if you want to fill the background of your document with a custom image. This is different than a watermark, which would be more transparent on the page.
-
2
Click Page Color. It’s in the top-right side of the Word toolbar near the top of the window.
Advertisement
-
3
Click Fill Effects. It’s at the bottom of the drop-down menu here.
-
4
Click the Picture tab. You’ll see it at the top of the «Fill Effects» window.
-
5
Click Select Picture. It’s near the top of the window.
-
6
Click From a File. This option is at the top of the «Printed Watermark» window. Clicking it will open your computer’s default picture storage file (e.g., «Photos») for browsing.
- You can also choose Bing or OneDrive from this menu if you’d rather search for a photo or use one from Cloud storage, respectively.
-
7
Click a picture. Doing so will select it.
-
8
Click Insert.
-
9
Click OK. It’s at the bottom of the window; doing so will apply your selected picture to your document’s background.
- Unlike with an image watermark, this background picture won’t be transparent.
-
10
Add text to your document, like usual. Your text color will change to stay visible if the picture you chose is too dark or too light to adequately display text.


Advertisement
-
1
Click Design. This tab is in the top-left side of the Word window.[1]
- Use this method if you want to change the background of your Word document to a color other than the default white option.
-
2
Click Page Color. It’s in the top-right side of the Word toolbar near the top of the window.
-
3
Click a color. Doing so will apply it to your document’s background. If needed, your document’s default font color will change in order to stay visible. Now you’re ready to add text, create tables, and format your next paper.
- If you want to create your own color, click More Colors below the color options here. You’ll be able to click and drag a slider around a color gradient to create a custom color.
- You can also click Fill Effects to add pre-determined textures or patterns to your document’s background.


Advertisement
-
1
Click the Design tab. This tab is near the top-left of the Word window.
- A watermark is an image that’s superimposed on the background with transparency. Use this method if you want to choose a built-in watermark image that says «Confidential,» «Draft,» «Sample,» «Do Not Copy,» or similar behind the text and objects in your document.
-
2
Click Watermark. It’s in the top-right side of the Word toolbar, near the top of the window. You’ll see this option to the left of the «Page Color» and «Page Borders» options.
-
3
Click a watermark template. You can select any of the following templates to apply their text to your Word document’s background:
- «CONFIDENTIAL»
- «DO NOT COPY»
- «ASAP»
- «URGENT»
-
4
Add text to your document, like usual. The watermark will remain in the background of your document, meaning anything you type will remain on top of the watermark.
- You can remove a watermark by clicking Remove Watermark at the bottom of the watermark templates drop-down menu.
- Don’t forget to occasionally save your Word document to prevent losing any work!


Advertisement
-
1
Click Design. This tab is in the top-left side of the Word window.[2]
- A watermark is an image that will be superimposed on the background with transparency. Use this method if you have a specific image, such as a company logo or «Confidential» image that you want to appear behind the text and objects in your document.
-
2
Click Watermark. It’s in the top-right side of the Word toolbar near the top of the window. You’ll see this option to the left of the «Page Color» and «Page Borders» options.
-
3
Click Custom Watermark. This option is near the middle of the «Watermarks» drop-down menu. Clicking it will bring up the «Printed Watermark» window.
-
4
Click the circle next to «Picture watermark». It’s near the top of the «Printed Watermark» window.
-
5
Click Select Picture. You’ll see this button just below the «Picture watermark» section.
-
6
Click From a File. This option is at the top of the «Printed Watermark» window. Clicking it will open your computer’s default picture storage file (e.g., «Photos») for browsing.
- You can also choose Bing or OneDrive from this menu if you’d rather search for a photo or use one from Cloud storage, respectively.
-
7
Click a picture. Doing so will select it for your watermark.
-
8
Click Insert. It’s in the bottom-right corner of the window. This action will take you back to the «Printed Watermark» window.
-
9
Click OK. You’ll find this at the bottom of the window. Your selected picture will appear as your document’s background watermark.
- You can also resize your picture by clicking the «Auto» box and choosing a percentage (e.g., 200).
- Uncheck the «Washout» box to prevent your picture from appearing transparent.
-
10
Add text to your document, like usual. The watermark will remain in the background of your document, meaning anything you type will remain on top of your selected image. Your text color will also change to stay visible if the picture you chose is too dark or too light to adequately display text.
- Did you know you can cross out words in your Word document? It’s a great way to indicate a completed or canceled task.


Advertisement
-
1
Click the Design tab. This tab is in the top-left side of the Word window.
- This method will add your custom text to the background of your document. This is helpful if you want certain text to appear behind the main text and objects in your document, such as your company name or a legal notice.
-
2
Click Watermark. It’s in the top-right side of the Word toolbar near the top of the window. You’ll see this option to the left of the «Page Color» and «Page Borders» options.
-
3
Click Custom Watermark. This option is near the middle of the «Watermarks» drop-down menu. Clicking it will bring up the «Printed Watermark» window.
-
4
Click the circle next to «Text watermark». It’s in the middle-left side of the «Printed Watermark» window.
-
5
Type your watermark’s text into the «Text» box. This box is near the middle of the window; it should say «ASAP» by default. Your other customization options include the following:
- Font — The style of text that your watermark uses.
- Size — Your watermark’s size. «Auto», which automatically resizes your text, is the default setting.
- Color — The watermark’s color.
- Layout — You can click Diagonal or Horizontal here to determine how your watermark is oriented.
- You can also uncheck the «Semitransparent» box to display your watermark in a bold format.
-
6
Click OK. You’ll find this at the bottom of the window. Your custom text watermark will be applied to your document’s background.
-
7
Add text to your document, like usual. The watermark will remain in the background of your document, meaning anything you type will remain on top of your watermark text, even the page numbers.


Advertisement
Add New Question
-
Question
Can I put a different watermark on each page?

Teela Borrowdale
Community Answer
No. If you add a watermark to one page, it will appear on every page of the document.
-
Question
How can I add a watermark?
Open your Word document and click on the Design tab in the ribbon. Select the watermark option on the Page Background menu. If you want to add a picture, click on Custom Watermark.
-
Question
How do I write text onto a background that I have imported?
You would have to edit the photo itself using a picture editor, like Photoshop or Paint. After editing the photo, you can import the new version.
See more answers
Ask a Question
200 characters left
Include your email address to get a message when this question is answered.
Submit
Advertisement
-
You can find suitable images that are free to use by searching the Internet for images with a Creative Commons license. There are plenty of free stock image websites as well!
Thanks for submitting a tip for review!
Advertisement
-
Never use an image that is subject to copyright when you add a background to a document you plan on printing or distributing. Whenever possible, create your own images or upload photographs you have taken instead.
Advertisement
About This Article
Article SummaryX
1. Click the Design tab.
2. Click Page Color.
3. Click Fill Effects.
4. Click Picture.
5. Click Select Picture.
6. Click From a File.
7. Select the file and click Insert.
8. Click OK.
Did this summary help you?
Thanks to all authors for creating a page that has been read 1,133,652 times.
Is this article up to date?
Посмотреть видео про backgrounds for word documents
Просмотрите 20 244 стоковых иллюстраций и векторной графики на тему «backgrounds for word documents», доступных на условиях роялти-фри, или начните поиск других стоковых изображений и векторных файлов.
Сортировать по:
Наиболее популярные

You can quickly add visual appeal to your Microsoft Word document by adding a background color, image or texture. You can choose from a variety of colors and fill effects. Adding a colorful background image can be helpful when creating a brochure, presentation, or marketing materials.
To add a background color to your document, switch over to the “Design” tab on Word’s Ribbon, and then click the “Page Color” button. This opens a dropdown menu with a selection of colors, including Theme Colors and Standard Colors. Click a color to apply it to the background.

For even more color options, click “More Colors”.
In the Colors window that opens, click the “Custom” tab, and then click anywhere in the color prism to select a color. You can also enter RGB values in their respective fields if you’re looking for a specific color. When you’re done, click the “OK” button.
For even more options, click the “Standard” tab. Click a color from the palette, and then click the “OK” button.
How to Add a Picture to the Document Background
To add a picture to your document background, switch over to the “Design” tab on Word’s Ribbon, and then click the “Page Color” button. In the dropdown menu, click the “Fill Effects” option.
In the Fill Effects window, switch to the “Picture” tab, and then click the “Select Picture” button. The Insert Pictures window that opens lets you select an image from your local drive, via a Bing search, or from OneDrive. After making your selection, you’ll find yourself back in the Fill Effects window, where you can click the “OK” button to insert the picture background.
How to Add Texture to the Document Background
To add a texture to your document background, switch over to the “Design” tab on Word’s Ribbon, and then click the “Page Color” button. In the dropdown menu, click the “Fill Effects” option.
In the Fill Effects window, switch to the “Texture” tab, pick a texture, and then click the “OK” button.
You can also use gradients or patterns as your background by switching to either of those tabs. They work pretty much the same way as the texture tab.
If you select a dark color for you background, consider changing your text color to white or a light color so that it blends well and stands out. Adding a background color, picture, or texture to a Word document can make your document look more attractive as well as add a bit a flare.
READ NEXT
- › How to Remove a Watermark in Microsoft Word
- › How to Add a Background Image in Google Docs
- › How to Create Custom Cover Pages in Microsoft Word
- › Expand Your Tech Career Skills With Courses From Udemy
- › This New Google TV Streaming Device Costs Just $20
- › How to Adjust and Change Discord Fonts
- › BLUETTI Slashed Hundreds off Its Best Power Stations for Easter Sale
- › The New NVIDIA GeForce RTX 4070 Is Like an RTX 3080 for $599
How-To Geek is where you turn when you want experts to explain technology. Since we launched in 2006, our articles have been read billions of times. Want to know more?
Содержание
- Изменение фона документа Ворд
- Вариант 1: Изменение цвета страницы
- Вариант 2: Изменение фона за текстом
- Печать документов с измененным фоном
- Заключение
- Вопросы и ответы

Иногда к текстовому документу MS Word требуется добавить какой-нибудь фон, чтобы сделать его более ярким, запоминающимся. Чаще всего это используется при создании веб-документов, но и с обычным текстовым файлом можно проделать то же самое.
Изменение фона документа Ворд
Отдельно стоит отметить, что сделать фон в Ворде можно несколькими способами, и в любом из случаев внешний вид документа визуально будет отличаться. Расскажем подробнее о каждом из них.
Урок: Как сделать подложку в MS Word
Вариант 1: Изменение цвета страницы
Данный метод позволяет сделать страницу в Ворде цветной и для этого вовсе не обязательно, чтобы на ней уже содержался текст. Все необходимое можно напечатать или добавить позже.
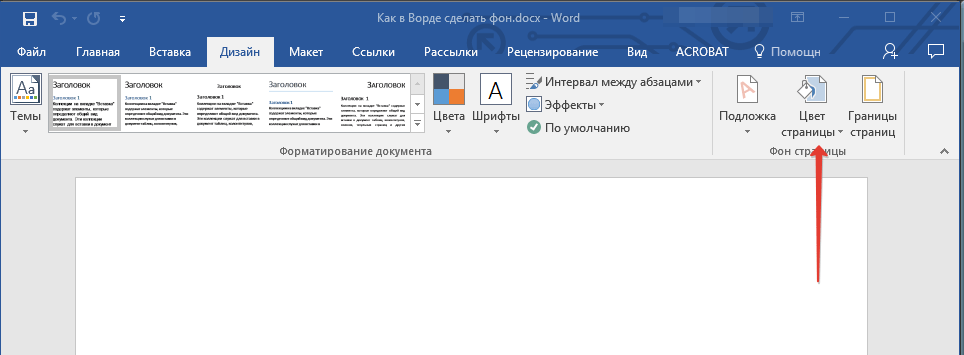
- Перейдите во вкладку «Дизайн» («Разметка страницы» в Word 2010 и предшествующих ему версиях; в Word 2003 необходимые для этих целей инструменты находятся во вкладке «Формат»), нажмите там на кнопку «Цвет страницы», расположенную в группе «Фон страницы».
- Выберите подходящий цвет для страницы.

Примечание: Если стандартные цвета вас не устраивают, вы можете подобрать любой другой из цветовой гаммы, выбрав пункт «Другие цвета».
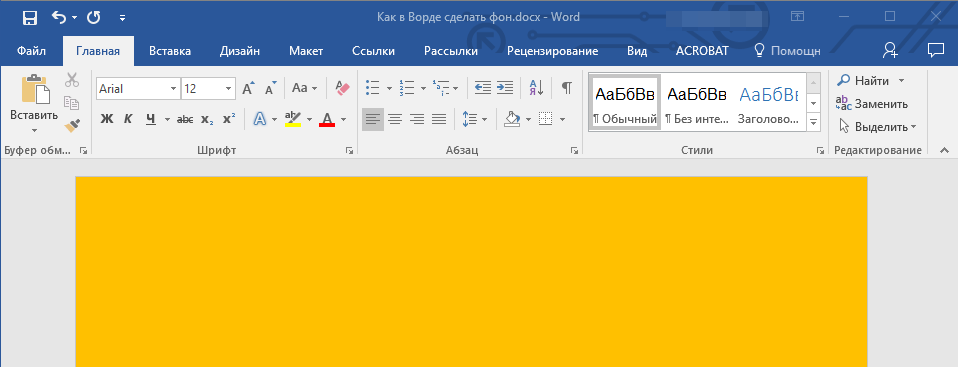
- Цвет страницы изменится.
Примечание: В последних версиях Microsoft Word 2016, а также в Office 365 вместо вкладки «Дизайн» необходимо выбирать «Конструктор» — она просто сменила имя.

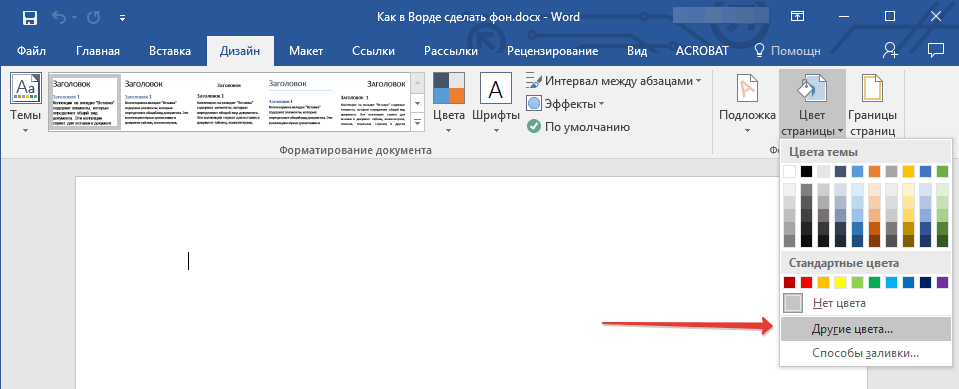
Помимо обычного, «цветного» фона, вы также можете использовать в качестве фона страницы другие способы заливки.
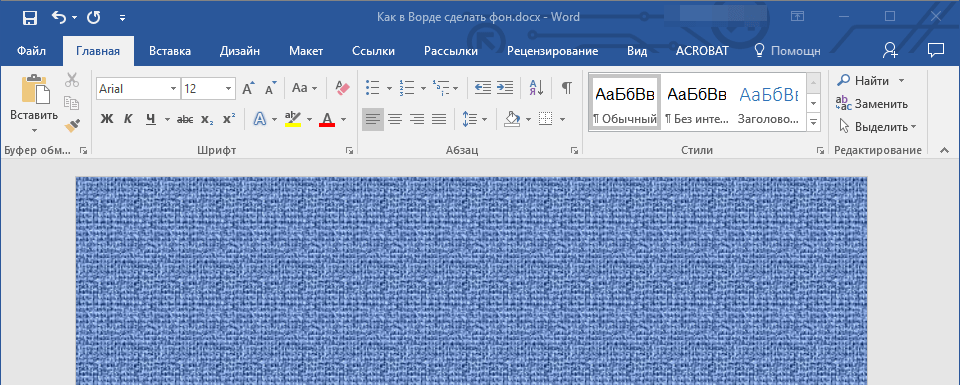
- Нажмите на кнопку «Цвет страницы» (вкладка «Дизайн», группа «Фон страницы») и выберите пункт «Другие способы заливки».
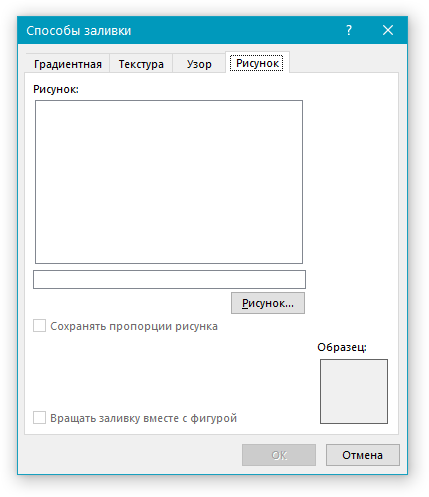
- Переключаясь между вкладками, выберите тип заливки страницы, который вы хотите использовать в качестве фона:

- Фон страницы изменится в соответствии выбранному вами типу заливки.
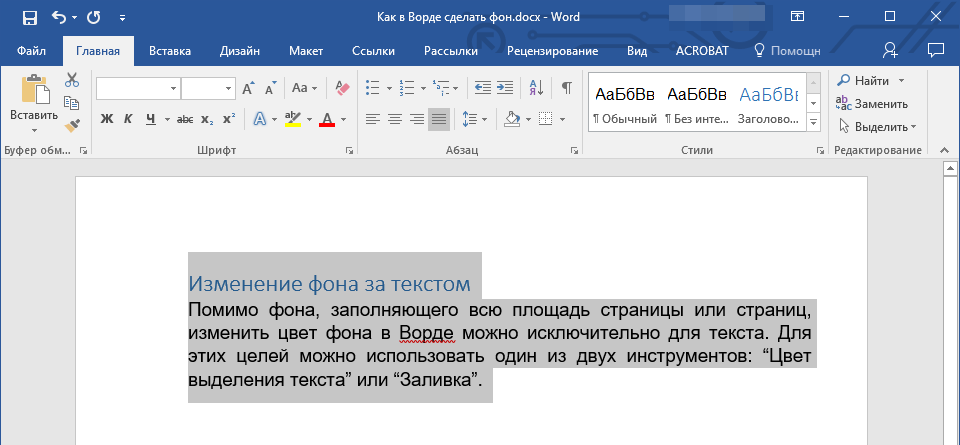
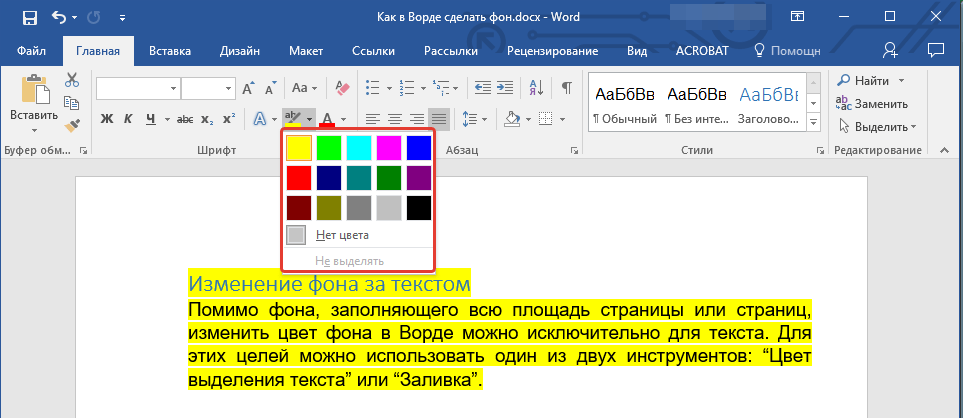
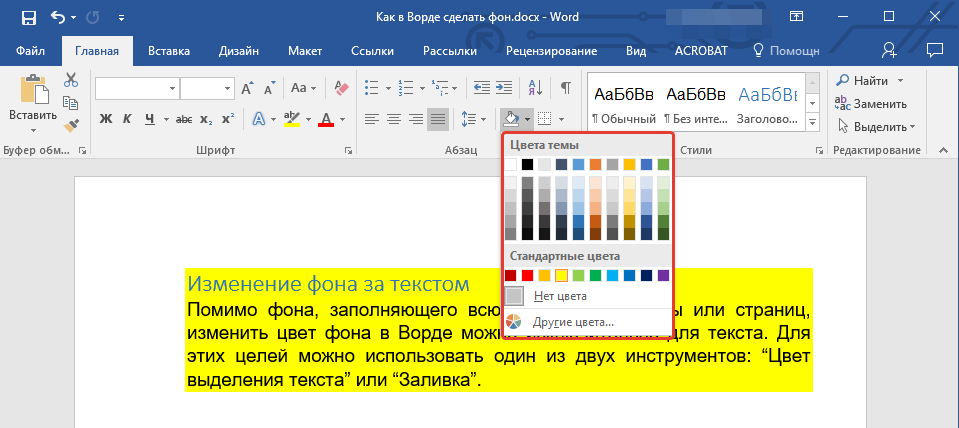
Вариант 2: Изменение фона за текстом
Помимо фона, заполняющего всю площадь страницы или страниц, изменить цвет фона в Ворде можно исключительно для текста. Для этих целей можно использовать один из двух инструментов: «Цвет выделения текста» или «Заливка», найти которые можно во вкладке «Главная» (ранее «Разметка страницы» или «Формат», в зависимости от используемой версии программы).

В первом случае текст будет залит выбранным вами цветом, но расстояние между строк останется белым, а сам фон будет начинаться и заканчиваться там же, где и текст. Во втором — фрагмент текста или весь текст будет залит сплошным прямоугольным блоком, который будет покрывать занятую текстом площадь, но заканчиваться/начинаться в конце/начале строки. Заливка любым из этих способов не распространяется на поля документа.
- Выделите с помощью мышки фрагмент текста, фон которого вы желаете изменить. Используйте клавиши «CTRL+A» для выделения всего текста.
- Выполните одно из следующих действий:
- Нажмите кнопку «Цвет выделения текста», расположенную в группе «Шрифт», и выберите подходящий цвет;
- Нажмите кнопку «Заливка» (группа «Абзац») и выберите необходимый цвет заливки.


По скриншотам вы можете увидеть, чем эти методы изменения фона отличаются друг от друга.
Урок: Как в Word убрать фон за текстом
Печать документов с измененным фоном
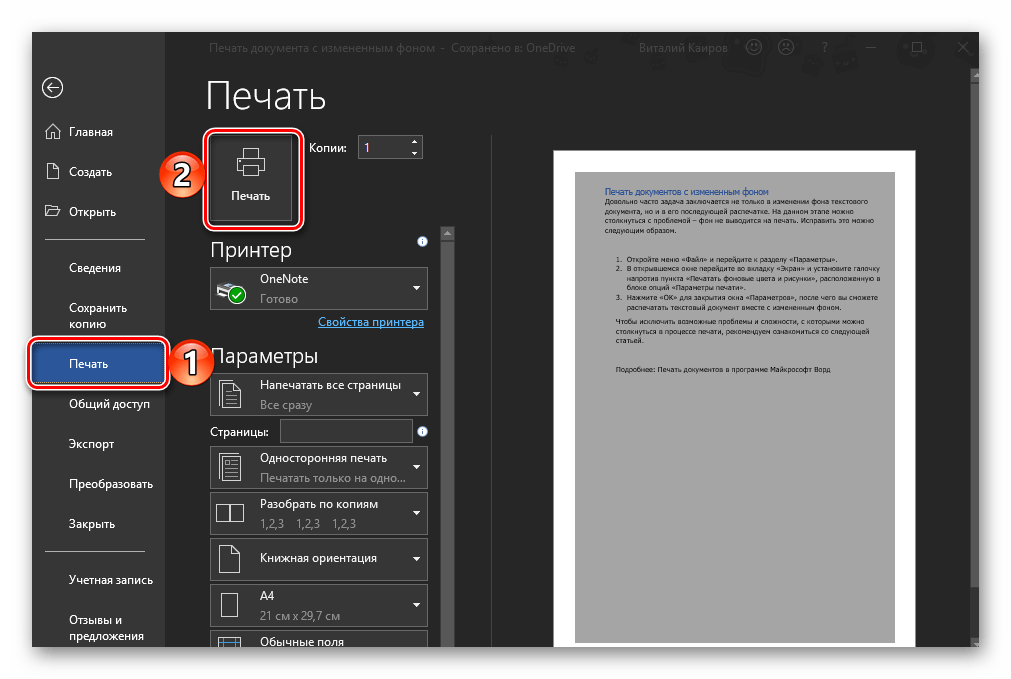
Довольно часто задача заключается не только в изменении фона текстового документа, но и в его последующей распечатке. На данном этапе можно столкнуться с проблемой – фон не выводится на печать. Исправить это можно следующим образом.
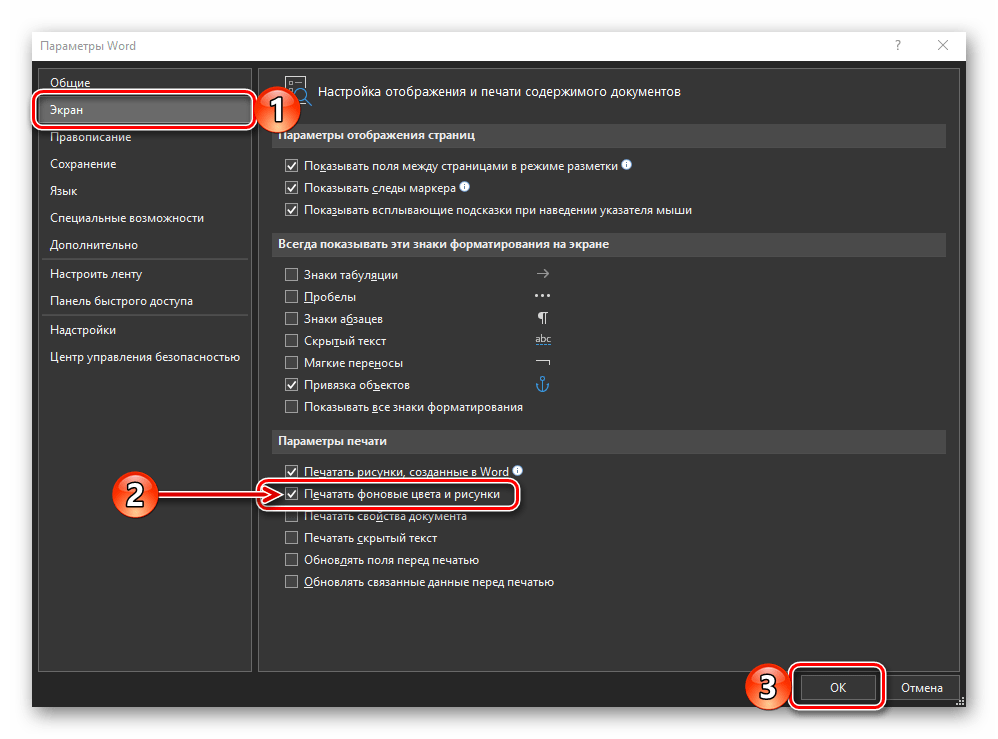
- Откройте меню «Файл» и перейдите к разделу «Параметры».
- В открывшемся окне выберите вкладку «Экран» и установите галочку напротив пункта «Печатать фоновые цвета и рисунки», расположенную в блоке опций «Параметры печати».
- Нажмите «ОК» для закрытия окна «Параметров», после чего вы сможете распечатать текстовый документ вместе с измененным фоном.

Чтобы исключить возможные проблемы и сложности, с которыми можно столкнуться в процессе печати, рекомендуем ознакомиться со следующей статьей.
Подробнее: Печать документов в программе Майкрософт Ворд
Заключение
На этом все, теперь вы знаете, как сделать фон в документе Ворд, а также знаете о том, что представляют собой инструменты “Заливка” и “Цвет выделения фона”. Ознакомившись с этой статьей, вы точно сможете сделать документы, с которыми работаете, более яркими, привлекательными и запоминающимися.
Еще статьи по данной теме: