
-
На вкладке «Дизайн» выберите «Подметка > настраиваемая подметка».
-
Выберите «Рисунок» и выберите рисунок.
-
Выберите или очищайте «Подошву».
-
Нажмите кнопку ОК.
Чтобы поместить подложку только на одну страницу, создайте ее и сохраните в коллекции, удалите текущую, а затем снова поместите на одну страницу из коллекции.
Добавление или изменение фонового изображения или подложки
-
Перейдите в «Конструктор»или «Макет»и выберите «Подметка».
-
Выберите >«Выбор рисунка»,просмотрите файлы изображений и выберите нужное изображение.
-
Нажмите Вставка.
-
Если рисунок должен отображаться в полном цвете, снимите флажок Подложка.
Удаление фонового изображения или подложки
-
Перейдите в «Конструктор»или «Макет»и выберите «Подметка».
-
Выберите параметр Без водяного знака.

Если вы привыкли оформлять текстовые документы, созданные в Microsoft Word, не только правильно, но еще и красиво, наверняка, вам будет интересно узнать и о том, как сделать рисунок фоном. Благодаря такой возможности фоном страницы можно сделать любую фотографию или изображение.
Текст, написанный на таком фоне, уж точно привлечет к себе внимание, а сам фоновый рисунок будет выглядеть куда привлекательнее стандартного водяного знака или подложки, не говоря уже об обычной белой странице с черным текстом.
Урок: Как сделать подложку в Ворде
Мы уже писали о том, как вставить рисунок в Word, как сделать его прозрачным, как изменить фон страницы или как изменить фон за текстом. Узнать о том, как это сделать, вы можете на нашем сайте. Собственно, сделать фоновым любой рисунок или фотографию точно так же просто, так что от слов перейдем к делу.
Рекомендуем к ознакомлению:
Как вставить рисунок
Как изменить прозрачность рисунка
Как изменить фон страницы
1. Откройте документ Ворд, в котором вы хотите использовать рисунок в качестве фона страницы. Перейдите во вкладку «Дизайн».
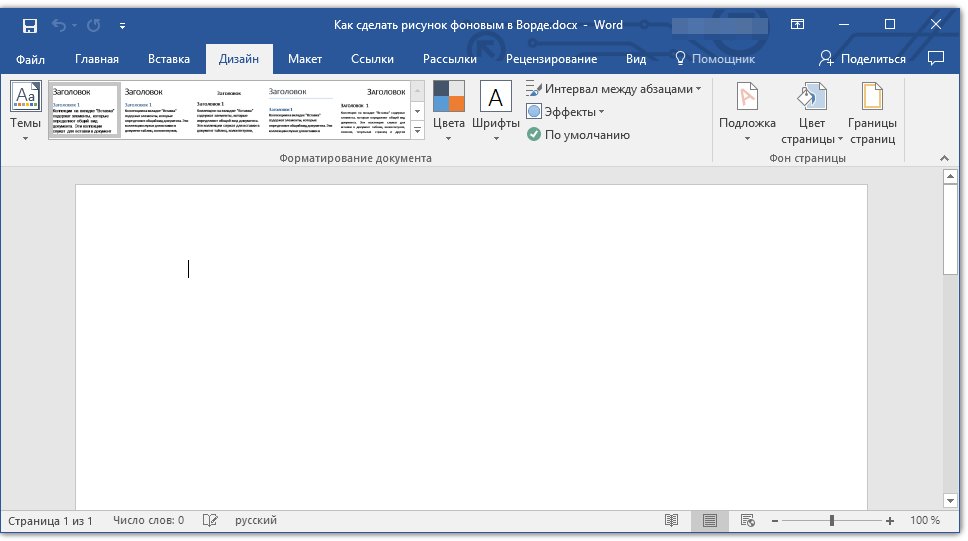
Примечание: В версиях Word до 2012 года нужно перейти во вкладку «Разметка страницы».
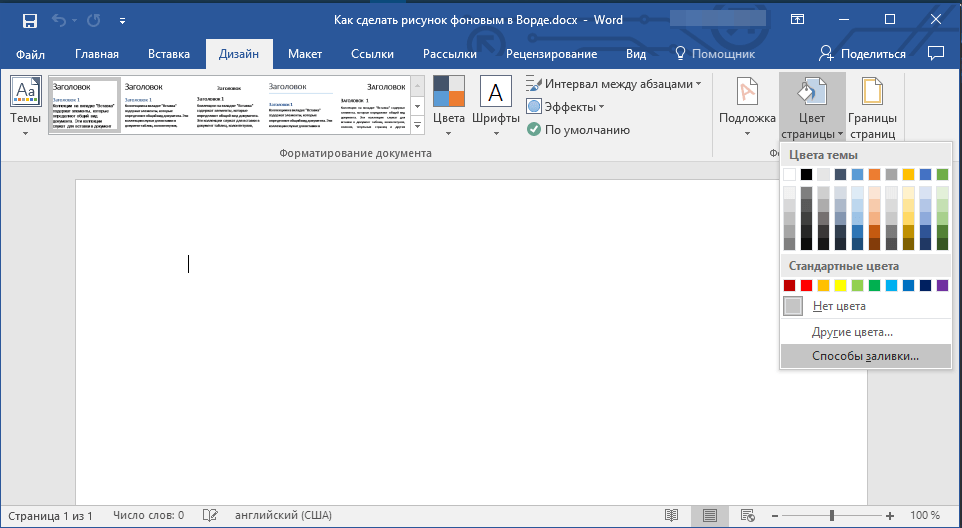
2. В группе инструментов «Фон страницы» нажмите кнопку «Цвет страницы» и выберите в ее меню пункт «Способы заливки».
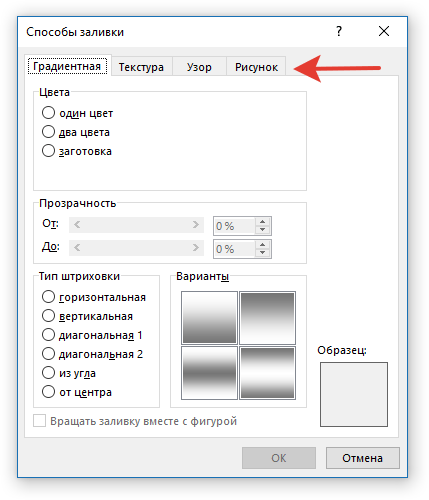
3. Перейдите во вкладку «Рисунок» в открывшемся окне .
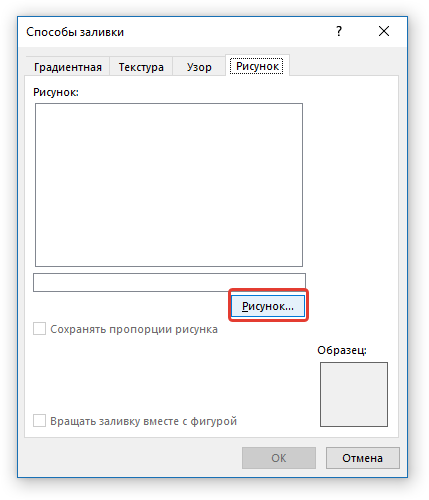
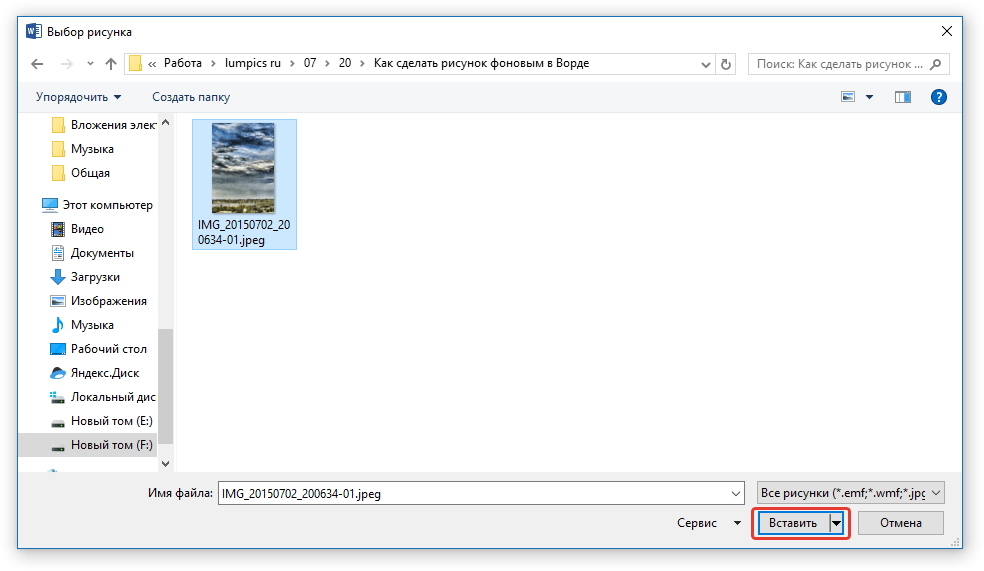
4. Нажмите кнопку «Рисунок», а затем, в открывшемся окне напротив пункта «Из файла (Обзор файлов на компьютере)», нажмите на кнопку «Обзор».

Примечание: Вы также можете добавить изображение из облачного хранилища OneDrive, поиска Bing и социальной сети Facebook.
5. В окне проводника, которое появится на экране, укажите путь к файлу, который вы хотите использовать в качестве фонового, нажмите кнопку «Вставить».
6.Нажмите кнопку «ОК» в окне «Способы заливки».
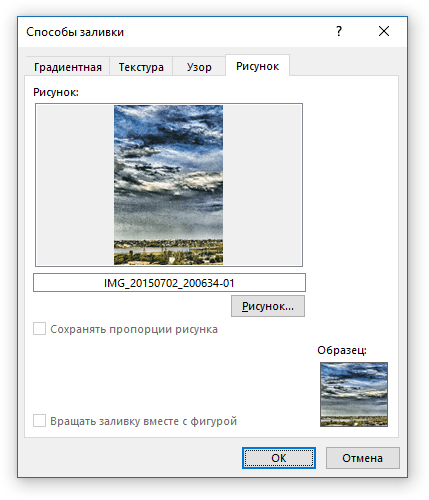
Примечание: Если пропорции рисунка не соответствуют стандартному размеру страницы (А4), он будет обрезан. Также, возможно его масштабирование, которое может негативно повлиять на качество изображения.
Урок: Как в Ворде изменить формат страницы
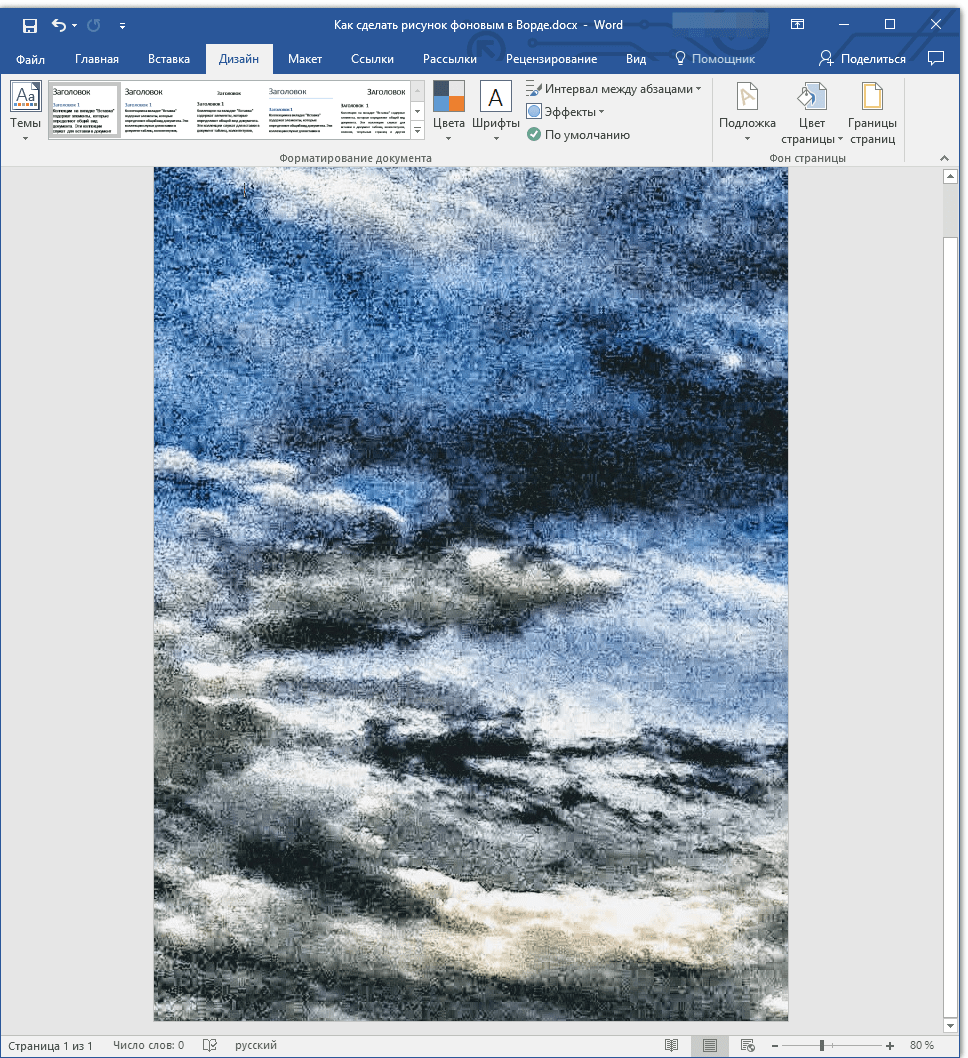
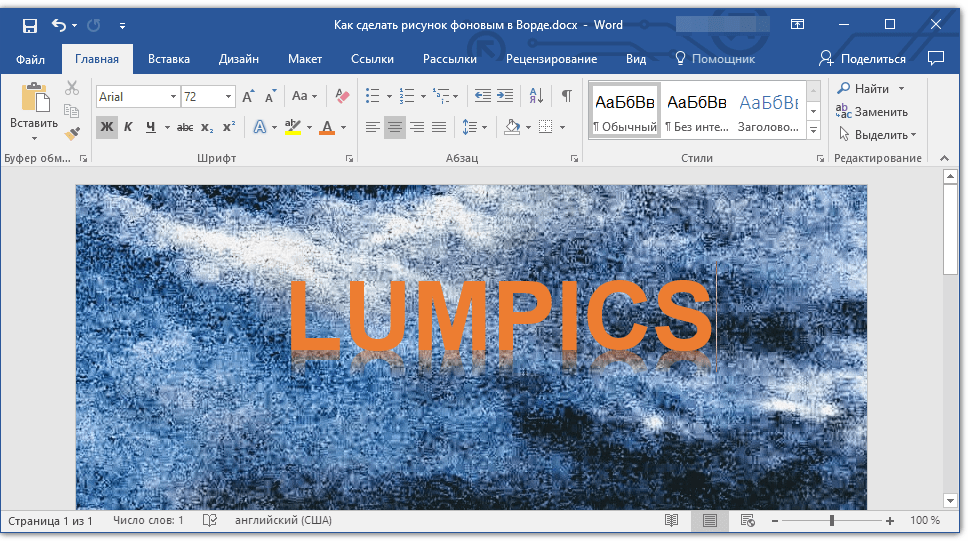
Выбранное вами изображение будет добавлено на страницу в качестве фона. К сожалению, редактировать его, как и изменить степень прозрачности Word не позволяет. Так что, выбирая рисунок, хорошо подумайте о том, как на таком фоне будет выглядеть текст, который вам необходимо набирать. Собственно, ничего вам не мешает изменять размеры и цвет шрифта, чтобы сделать текст более заметным на фоне выбранного вами изображения.
Урок: Как в Ворде изменить шрифт
На этом все, теперь вы знаете о том, как в Word можно сделать фоновым любой рисунок или фотографию. Как было сказано выше, добавлять графические файлы можно не только с компьютера, но и из интернета.
Еще статьи по данной теме:
Помогла ли Вам статья?
![]()
Download Article
Insert a watermark or change the background
![]()
Download Article
- Adding a Background Picture
- Changing the Background Color
- Adding a Stock Watermark
- Adding a Custom Image Watermark
- Adding a Custom Text Watermark
- Q&A
- Tips
- Warnings
|
|
|
|
|
|
|
Want to add a watermark to the background of your Word document? Or maybe you want to swap out the white background for an image or new color. All of this is easy to do using the Design tab! There are tons of options for preset and custom backgrounds, including some stock watermark text with options like «Confidential,» «Do Not Copy,» and «Draft.» This wikiHow will show you how to add watermarks and backgrounds in Microsoft Word on your Windows PC or Mac.
Things You Should Know
- To add a watermark background such as «Confidential» or «Do Not Copy,» click the Design tab and select Watermark.
- When adding a watermark background, you can select a stock background or use your own image.
- To change the background color of a page, click the Design tab, select Page Color, and choose a color.
-

1
Click the Design tab. This tab is in the top-left side of the Word window.
- Use this method if you want to fill the background of your document with a custom image. This is different than a watermark, which would be more transparent on the page.
-
2
Click Page Color. It’s in the top-right side of the Word toolbar near the top of the window.
Advertisement
-
3
Click Fill Effects. It’s at the bottom of the drop-down menu here.
-
4
Click the Picture tab. You’ll see it at the top of the «Fill Effects» window.
-
5
Click Select Picture. It’s near the top of the window.
-
6
Click From a File. This option is at the top of the «Printed Watermark» window. Clicking it will open your computer’s default picture storage file (e.g., «Photos») for browsing.
- You can also choose Bing or OneDrive from this menu if you’d rather search for a photo or use one from Cloud storage, respectively.
-
7
Click a picture. Doing so will select it.
-
8
Click Insert.
-
9
Click OK. It’s at the bottom of the window; doing so will apply your selected picture to your document’s background.
- Unlike with an image watermark, this background picture won’t be transparent.
-
10
Add text to your document, like usual. Your text color will change to stay visible if the picture you chose is too dark or too light to adequately display text.


Advertisement
-
1
Click Design. This tab is in the top-left side of the Word window.[1]
- Use this method if you want to change the background of your Word document to a color other than the default white option.
-
2
Click Page Color. It’s in the top-right side of the Word toolbar near the top of the window.
-
3
Click a color. Doing so will apply it to your document’s background. If needed, your document’s default font color will change in order to stay visible. Now you’re ready to add text, create tables, and format your next paper.
- If you want to create your own color, click More Colors below the color options here. You’ll be able to click and drag a slider around a color gradient to create a custom color.
- You can also click Fill Effects to add pre-determined textures or patterns to your document’s background.


Advertisement
-
1
Click the Design tab. This tab is near the top-left of the Word window.
- A watermark is an image that’s superimposed on the background with transparency. Use this method if you want to choose a built-in watermark image that says «Confidential,» «Draft,» «Sample,» «Do Not Copy,» or similar behind the text and objects in your document.
-
2
Click Watermark. It’s in the top-right side of the Word toolbar, near the top of the window. You’ll see this option to the left of the «Page Color» and «Page Borders» options.
-
3
Click a watermark template. You can select any of the following templates to apply their text to your Word document’s background:
- «CONFIDENTIAL»
- «DO NOT COPY»
- «ASAP»
- «URGENT»
-
4
Add text to your document, like usual. The watermark will remain in the background of your document, meaning anything you type will remain on top of the watermark.
- You can remove a watermark by clicking Remove Watermark at the bottom of the watermark templates drop-down menu.
- Don’t forget to occasionally save your Word document to prevent losing any work!


Advertisement
-
1
Click Design. This tab is in the top-left side of the Word window.[2]
- A watermark is an image that will be superimposed on the background with transparency. Use this method if you have a specific image, such as a company logo or «Confidential» image that you want to appear behind the text and objects in your document.
-
2
Click Watermark. It’s in the top-right side of the Word toolbar near the top of the window. You’ll see this option to the left of the «Page Color» and «Page Borders» options.
-
3
Click Custom Watermark. This option is near the middle of the «Watermarks» drop-down menu. Clicking it will bring up the «Printed Watermark» window.
-
4
Click the circle next to «Picture watermark». It’s near the top of the «Printed Watermark» window.
-
5
Click Select Picture. You’ll see this button just below the «Picture watermark» section.
-
6
Click From a File. This option is at the top of the «Printed Watermark» window. Clicking it will open your computer’s default picture storage file (e.g., «Photos») for browsing.
- You can also choose Bing or OneDrive from this menu if you’d rather search for a photo or use one from Cloud storage, respectively.
-
7
Click a picture. Doing so will select it for your watermark.
-
8
Click Insert. It’s in the bottom-right corner of the window. This action will take you back to the «Printed Watermark» window.
-
9
Click OK. You’ll find this at the bottom of the window. Your selected picture will appear as your document’s background watermark.
- You can also resize your picture by clicking the «Auto» box and choosing a percentage (e.g., 200).
- Uncheck the «Washout» box to prevent your picture from appearing transparent.
-
10
Add text to your document, like usual. The watermark will remain in the background of your document, meaning anything you type will remain on top of your selected image. Your text color will also change to stay visible if the picture you chose is too dark or too light to adequately display text.
- Did you know you can cross out words in your Word document? It’s a great way to indicate a completed or canceled task.


Advertisement
-
1
Click the Design tab. This tab is in the top-left side of the Word window.
- This method will add your custom text to the background of your document. This is helpful if you want certain text to appear behind the main text and objects in your document, such as your company name or a legal notice.
-
2
Click Watermark. It’s in the top-right side of the Word toolbar near the top of the window. You’ll see this option to the left of the «Page Color» and «Page Borders» options.
-
3
Click Custom Watermark. This option is near the middle of the «Watermarks» drop-down menu. Clicking it will bring up the «Printed Watermark» window.
-
4
Click the circle next to «Text watermark». It’s in the middle-left side of the «Printed Watermark» window.
-
5
Type your watermark’s text into the «Text» box. This box is near the middle of the window; it should say «ASAP» by default. Your other customization options include the following:
- Font — The style of text that your watermark uses.
- Size — Your watermark’s size. «Auto», which automatically resizes your text, is the default setting.
- Color — The watermark’s color.
- Layout — You can click Diagonal or Horizontal here to determine how your watermark is oriented.
- You can also uncheck the «Semitransparent» box to display your watermark in a bold format.
-
6
Click OK. You’ll find this at the bottom of the window. Your custom text watermark will be applied to your document’s background.
-
7
Add text to your document, like usual. The watermark will remain in the background of your document, meaning anything you type will remain on top of your watermark text, even the page numbers.


Advertisement
Add New Question
-
Question
Can I put a different watermark on each page?

Teela Borrowdale
Community Answer
No. If you add a watermark to one page, it will appear on every page of the document.
-
Question
How can I add a watermark?
Open your Word document and click on the Design tab in the ribbon. Select the watermark option on the Page Background menu. If you want to add a picture, click on Custom Watermark.
-
Question
How do I write text onto a background that I have imported?
You would have to edit the photo itself using a picture editor, like Photoshop or Paint. After editing the photo, you can import the new version.
See more answers
Ask a Question
200 characters left
Include your email address to get a message when this question is answered.
Submit
Advertisement
-
You can find suitable images that are free to use by searching the Internet for images with a Creative Commons license. There are plenty of free stock image websites as well!
Thanks for submitting a tip for review!
Advertisement
-
Never use an image that is subject to copyright when you add a background to a document you plan on printing or distributing. Whenever possible, create your own images or upload photographs you have taken instead.
Advertisement
About This Article
Article SummaryX
1. Click the Design tab.
2. Click Page Color.
3. Click Fill Effects.
4. Click Picture.
5. Click Select Picture.
6. Click From a File.
7. Select the file and click Insert.
8. Click OK.
Did this summary help you?
Thanks to all authors for creating a page that has been read 1,133,652 times.
Is this article up to date?

You can quickly add visual appeal to your Microsoft Word document by adding a background color, image or texture. You can choose from a variety of colors and fill effects. Adding a colorful background image can be helpful when creating a brochure, presentation, or marketing materials.
To add a background color to your document, switch over to the “Design” tab on Word’s Ribbon, and then click the “Page Color” button. This opens a dropdown menu with a selection of colors, including Theme Colors and Standard Colors. Click a color to apply it to the background.

For even more color options, click “More Colors”.
In the Colors window that opens, click the “Custom” tab, and then click anywhere in the color prism to select a color. You can also enter RGB values in their respective fields if you’re looking for a specific color. When you’re done, click the “OK” button.
For even more options, click the “Standard” tab. Click a color from the palette, and then click the “OK” button.
How to Add a Picture to the Document Background
To add a picture to your document background, switch over to the “Design” tab on Word’s Ribbon, and then click the “Page Color” button. In the dropdown menu, click the “Fill Effects” option.
In the Fill Effects window, switch to the “Picture” tab, and then click the “Select Picture” button. The Insert Pictures window that opens lets you select an image from your local drive, via a Bing search, or from OneDrive. After making your selection, you’ll find yourself back in the Fill Effects window, where you can click the “OK” button to insert the picture background.
How to Add Texture to the Document Background
To add a texture to your document background, switch over to the “Design” tab on Word’s Ribbon, and then click the “Page Color” button. In the dropdown menu, click the “Fill Effects” option.
In the Fill Effects window, switch to the “Texture” tab, pick a texture, and then click the “OK” button.
You can also use gradients or patterns as your background by switching to either of those tabs. They work pretty much the same way as the texture tab.
If you select a dark color for you background, consider changing your text color to white or a light color so that it blends well and stands out. Adding a background color, picture, or texture to a Word document can make your document look more attractive as well as add a bit a flare.
READ NEXT
- › How to Remove a Watermark in Microsoft Word
- › How to Add a Background Image in Google Docs
- › How to Create Custom Cover Pages in Microsoft Word
- › Expand Your Tech Career Skills With Courses From Udemy
- › This New Google TV Streaming Device Costs Just $20
- › How to Adjust and Change Discord Fonts
- › BLUETTI Slashed Hundreds off Its Best Power Stations for Easter Sale
- › The New NVIDIA GeForce RTX 4070 Is Like an RTX 3080 for $599
How-To Geek is where you turn when you want experts to explain technology. Since we launched in 2006, our articles have been read billions of times. Want to know more?
i Jupiterimages/Comstock/Getty Images
The initial view of a Word document upon opening the software may be somewhat bleak, just a white virtual sheet of paper. Through a variety of ways, you can add a background image to a Word document to accompany your proposals, letters, marketing materials or latest bursts of creativity. Word offers a way to quickly automate the process to ensure you get a perfect fit, or you can opt to add images in manually.
Background Basics
Microsoft Word documents aren’t just for single paper-sized documents. You may find yourself compiling items such as catalogs, magazines, programs and books, all of which may benefit from background images that make your pages go from white to just right. With full-color imagery such as photographs or line sketches and other artwork, having background images in Word can make your text stand out or simply stand on its own as a form of your expression and communication.
Process
Once you’ve selected the image for your background, click the “Page Layout” tab on the Word workspace. Click the “Page Color” button on the ribbon, then choose “Fill Effects.” Click the “Picture” tab, then click “Select Picture” to find your background image. Double-click the file name, then click the “OK” button. This closes the “Fill Effects” window and returns you to the Word document with the background image in place.
Alternate Route
Another way to add a background image to a Word document gives you far more control over the image’s placement and appearance but requires more tinkering around on your part. Instead of using the “Page Layout” tab to instantly insert the image, click the “Insert” tab, then click “Picture.” Browse to the image to add and double-click it. This puts the picture in the Word document, but not in the background. Click the picture and hold down the “Shift” key, which keeps the picture in its original dimensions when you resize it. Click one of the picture’s corners and drag it in to shrink it, such as if your picture is larger than the Word page. It’s more difficult to enlarge a picture, as you run the risk of pixilating it or warping the image. Now that the picture is on the page, click the pink “Picture Tools” tab to open the formatting ribbon. Here, you can alter the image such as fading it or changing it to lighter colors so your text will appear more easy to read. The image is still obscuring the text below. Right-click the image and select “Send to Back” and now your customized image is truly a background image.
Considerations
The main considerations when adding a background to a Word document are visibility and distortion. If your Word document has text or any other elements on the page, they may become obscured when you add a background image, especially if that graphic is dark like a photograph. Word offers ways to combat this by using the washout or fade sliders on the background dialog boxes and you may have to experiment to get the document exactly right. Distortion is also a potential pitfall. While the background image doesn’t need to fit the page exactly, something that is much smaller may look distorted when Word sizes it to fit the page. It may appear stretched out, pixilated or fuzzy. Depending on how you plan to print your Word document, bleeds may also be an issue. A bleed is where the colors of the background image run right up to the edge of the page, like in a magazine or book cover. The majority of traditional home or office printers cannot print bleeds. You’ll always get a white border around the margin edges. A professional printer can print these kinds of bleeds for you.
Disclaimer
The information in this article applies to Microsoft Word 2010. Earlier or later versions of this software may present several differences and variations.
References
Writer Bio
Fionia LeChat is a technical writer whose major skill sets include the MS Office Suite (Word, PowerPoint, Excel, Publisher), Photoshop, Paint, desktop publishing, design and graphics. LeChat has a Master of Science in technical writing, a Master of Arts in public relations and communications and a Bachelor of Arts in writing/English.