
Содержание
- Autoit excel range read
- Excel Range
- Contents
- Active cell
- Current Region
- Empty Cells
- Entire Row / Entire Column
- Last Cell
- Used Range
- RangeRead from active Excel cell
- Recommended Posts
- Create an account or sign in to comment
- Create an account
- Sign in
- Recently Browsing 0 members
- Similar Content
- Excel UDF
- Contents
- Features
- Concepts
- Range
- Cell reference
- Examples
- Filter
- Date and Time
- Features not covered by the UDF
- Format a range
- Alignment
- Background
- Borders
- Height/Width
- Number, Date/Time Format
- Freeze panes
- Script breaking changes after AutoIt version 3.3.10.2
- General
- Function -/_Excel_Open
- Function _ExcelFontSetProperties/-
- Function _ExcelHorizontalAlignSet/-
- Function _ExcelSheetActivate/-
- Function _ExcelSheetNameGet/-
- Function _ExcelSheetNameSet/-
- Compare example scripts
- Miscellaneous
- Transpose limits
- Script crashes
- _Excel_RangeWrite writes no data
- Check if workbook is password protected
Autoit excel range read
Получает в массив значения диапазона ячеек активного листа открытой рабочей книги Excel
#include
_ExcelReadArray ( $oExcel , $iStartRow , $iStartColumn , $iNumCells [, $iDirection = 0 [, $iIndexBase = 0 ]])
| $oExcel | Ссылка на COM-объект «Excel.Application» полученная ранее вызванными _ExcelBookOpen () , _ExcelBookNew () , или _ExcelBookAttach () |
| $iStartRow | Целевая строка |
| $iStartColumn | Целевой столбец |
| $iNumCells | Количество обрабатываемых ячеек |
| $iDirection | [необязательный] Флаг, определяющий направление обработки ячеек относительно целевой (0=горизонтально(вправо), 1=вертикально(вниз)) |
| $iIndexBase | [необязательный] Нижняя граница индексов создаваемого массива (Option Base) = 0 или 1 |
| Успех: | Возвращает массив, содержащий полученные значения |
| Ошибка: | Возвращает «0» , Устанавливает значение флага ошибки @error : |
| @error : | 0 — Скрипт завершил работу без ошибок |
| 1 — Ошибка OLE/COM ( $oExcel ), возможно указанный объект не существует | |
| 2 — Значение параметра не является числом, или недопустимо | |
| 3 — Недопустимое значение параметра ( $iNumCells ) | |
| 4 — Недопустимое значение параметра ( $iDirection ) | |
| @extended : | 0 — Ошибка в значении строки ( $iStartRow ) |
| 1 — Ошибка в значении столбца ( $iStartColumn ) |
Внимание. документы разных форматов MS Office имеют различные ограничения по количеству столбцов и строк:
*.xls (формат xlExcel8, стандартный для MS Office 2003,97,95) имеет ограничения в 255 столбцов 65 535 строк
*.xlsx,*.xlsb,*.xlsm (XML-форматы MS Office 2007-2010) имеют ограничения в 16 384 столбца и 1 048 576 строк
; ***************************************************
; Пример 1 — Получает в массивы $aArray1 и $aArray2 значения диапазона ячеек активного листа открытой рабочей книги Excel
; ***************************************************
Local $oExcel = _ExcelBookNew () ; Создаем новую рабочую книгу
For $i = 1 To 5
_ExcelWriteCell ( $oExcel , $i , $i , 1 ) ; Записываем данные в ячейки с вертикальным смещением равным нарастанию счетчика — числа от 1 до 5
Next
For $i = 1 To 5
_ExcelWriteCell ( $oExcel , Asc ( $i ), 1 , $i + 2 ) ; Записываем данные в ячейки с горизонтальным смещением равным нарастанию счетчика + 2, значение задается функцией Asc (возвращает ASCII код символа.)
Next
$aArray1 = _ExcelReadArray ( $oExcel , 1 , 1 , 5 , 1 ) ; Этот метод при указанных параметрах, получает значения 5 ячеек в массив смещаясь вертикально(вниз) относительно целевых координат: строка=1,столбец=1
$aArray2 = _ExcelReadArray ( $oExcel , 1 , 3 , 5 ) ; Этот метод при указанных параметрах, получает значения 5 ячеек в массив смещаясь горизонтально(вправо) относительно целевых координат: строка=1,столбец=3
_ArrayDisplay ( $aArray2 , «$aArray2. » ) ; Отображаем значения массива в окне сообщений
_ArrayDisplay ( $aArray1 , «$aArray1. » ) ; Отображаем значения массива в окне сообщений
Источник
Excel Range
On this page you will find some special ranges and how to define them in AutoIt.
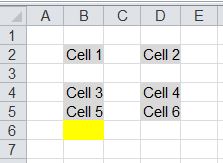
As input file I will use the following Excel workbook. All cells which have a value now or had a value before (means: all cells which had been touched by the user or a script) are displayed in grey. 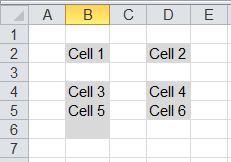
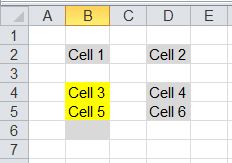
All examples show cells of the selected range in yellow.
Contents
Active cell
The currently selected cell.
Current Region
The current region is a range bounded by any combination of blank rows and blank columns.
Note that cell B6 is not part of the region. The cell has been touched before but now is blank and hence bounds the region.
Empty Cells
Returns a range object including all empty cells in the specified range.
![]()
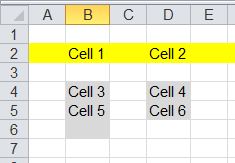
Entire Row / Entire Column
Returns a range object including the entire row(s) of the specified range.
Use method «EntireColumn» to select the columns of the specified range.
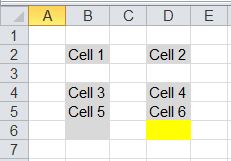
Last Cell
Returns a range object including the last used cell (bottom right) in the used range.
External Link: Excel Ranges: Finding the Last Cell in a Range
Returns a range object including the last used cell in column «B».
NB: If the script moved up to row 1 you need to check if the cell is really the last used cell or just the top of the range.
Used Range
Returns a range object including all cells which have a value now or had a value before (means: all cells which had been touched by the user or a script).
Note that the range in the following example does not contain row 1 and column 1!

Returns the address of the upper left cell of the used range. In this examle: B2
This lines extend the used range to start with cell A1.
Источник
RangeRead from active Excel cell
Recommended Posts
You need to be a member in order to leave a comment
Create an account
Sign up for a new account in our community. It’s easy!
Sign in
Already have an account? Sign in here.
Recently Browsing 0 members
No registered users viewing this page.
Similar Content

Hi Fellow Automators,
Long time listener, first time caller. I’ve resisted posting on the forums as long as possible for fear of public lynching, but I’m stuck and could really use some help.
Note: If this is the wrong side of the forum for this topic, I apologize.
I’ve built a GUI and script to make our lab data collection easier. The app has a number of input boxes and a ‘record’ button. The user fills out the input boxes with various notes and then presses ‘record’, which in turn presses ‘record’ on two other, separate apps simultaneously, pulls those recordings together into one folder, and then takes the text from the input boxes and adds it in a new row at the bottom of an existing .xlsx spreadsheet. Everything works great, except that every time I open the app to start collecting data for the day, the ‘headers’ for the $aArray are added to a new row and then the text is added below it. Now, if I don’t close the app between collections, subsequent ‘recordings’ are added to the spreadsheet as expected. If I close the app and open it, the ‘first’ recording of the day adds the headers to a new row. I don’t need new ‘header’ info because I’ve already got that in row 1 of the spreadsheet.
If someone could tell me where I’m !#$%ing up, I would greatly appreciate it.
#RequireAdmin #include #include #include #include #include #include
(If translated with a translator, it may be written a little awkwardly. I would be grateful if you could understand my situation)
As mentioned in the title, the icon file, which was applied well when compiled with exe, does not apply when compiled with a3x, and is displayed as the default autoit icon.
I specified the icon file at the top, but why can’t it be applied? Is there any way to compile with a3x including icons?
I understand that deleting the tray item changes the controlID, but I don’t know in what way it does, and therefore how I can fix it to be able to achieve what I want it to. I appreciate any help or guidance with this problem.
To clarify, what I’m ultimately trying to do is create a ‘while’ loop with switch case functions that can exist without necessarily being linked to a tray item, so that I can add and delete them at liberty using the script’s functions, without having to differentiate switch case functions with if functions (if $aTray[x] exists, then use this set of switch case functions, etc.).
Please, I am in pain. Water come school me again pls
Источник
Excel UDF
The Excel UDF offers functions to control and manipulate Microsoft Excel workbooks.
This page describes the Excel UDF that comes with AutoIt 3.3.12.0 or later.
Contents
Features
New versions of Microsoft Office have been released since the last changes were made to the Excel UDF. The new extensions (e.g. xlsx) were not (fully) supported, new functions were missing etc. The current version of the Excel UDF lifts this limitations.
- Works with as many instances of Excel as you like — not just one
- Works with any Workbook — not just the active one
- Works with any Worksheet — not just the active one
- Only does what you tell it to do — no implicit «actions»
- Only one function to read from a cell or a range
- Only one function to write a string, a 1D or 2D array to a cell or a range
- Support for every file format Excel supports
- Speed enhancements when transferring data from/to an Excel sheet (20 — 100 times faster)
Concepts
The Areas collection contains one Range object for each discrete, contiguous range of cells within the selection.
Range
A Range is a rectangular block made of one or more cells that Excel treats as a unit. The functions of the UDF mainly work with ranges. A range — unlike a selection — is not visible on the screen.
Examples how to define special ranges can be found here.
Cell reference
The UDF only supports the A1 form (example: «B7») to reference cells. The R1C1 form (example «R7C2») is not supported. But the UDF provides functions to translate a cell reference between this two forms.
You can reference cells by name as well.
Examples
- Single cell: «B7»
- Multiple cells: «A1:B7»
- Row(s): «2» or «3:5»
- Column(s): «B» or «D:F»
- Name: «TestRange»
Filter
The Excel Autofilter allows you to view specific rows in an Excel spreadsheet, while hiding the other rows in the worksheet based on various criteria.
Details and example scripts how to work with filters can be found here.
Date and Time
Excel stores date and time as a number representing the number of days since 1900-Jan-0, plus a fractional portion of a 24 hour day: ddddd.tttttt .
This is called serial date-time.
When you enter a time without a date value (e.g. 15:00) the date portion is a zero. This indicates that there is no date associated with the time and does not automatically put in the current date.
The integer portion of the number represents the number of days since 1900-Jan-0. For example, the date 19-Jan-2000 is stored as 36,544.
Actually, this number is one greater than the actual number of days. Why can be found here.
The fractional portion of the number represents the fractional portion of a 24 hour day. For example, 6:00 AM is stored as 0.25,
Example script (written by AutoBert) to convert serial date-time to a readable format:
Features not covered by the UDF
The UDF only covers basic user needs. Single line functions (like switching to another sheet) or functions with too many parameters (like formatting a cell or range) are not covered by this UDF. You need to use the Excel COM yourself.
I will give a few examples here. The rest can be found on MSDN.
Format a range
Alignment
Background
Sets the background to yellow:
Borders
Bold etc.
True if the font is bold. Read/write.
This works similar for Italic, Strikethrough, Subscript, Superscript and Underline.
Color, ColorIndex
Color: Returns or sets the primary color of the object. Use the RGB calculation below to create a color value.
ColorIndex: Returns or sets a variant value that represents the color of the font. The color is specified as an index value into the current color palette.
| Object | Color |
|---|---|
| Border | The color of the border. |
| Borders | The color of all four borders of a range. If they’re not all the same color, Color returns 0 (zero). |
| Font | The color of the font. |
| Interior | The cell shading color or the drawing object fill color. |
| Tab | The color of the tab. |
Returns or sets a variant value that represents the name of the font.
Returns or sets the size of the font specified in units of points.
Underline
Returns or sets the type of underline applied to the font. Can be one of the XlUnderlineStyle constants xlUnderlineStyleNone, xlUnderlineStyleSingle, xlUnderlineStyleDouble, xlUnderlineStyleSingleAccounting or xlUnderlineStyleDoubleAccounting. Read/write.
Height/Width
| Property | Description |
|---|---|
| ColumnWidth | Returns or sets the width of all columns in the specified range. If columns in the range have different widths, this property returns null. |
One unit of column width is equal to the width of one character in the Normal style. For proportional fonts, the width of the character 0 (zero) is used.
RowHeight Returns or sets the height of all rows in the specified range, measured in points. Returns null if the rows in the specified range aren’t all the same height.
| Method | Description |
|---|---|
| AutoFit | Changes the width of the columns in the range or the height of the rows in the range to achieve the best fit. |
Number, Date/Time Format
Returns or sets a variant value that represents the format code for the object.
This property returns Null if all cells in the specified range don’t have the same number format.
The format code is the same string as the Format Codes option in the Format Cells dialog box. The Format function uses different format code strings than do the NumberFormat and NumberFormatLocal properties.
A number format consists of up to 4 items, separated by semicolons. Each of the items is an individual number format. The first by default applies to positive numbers, the second to negative numbers, the third to zeros, and the fourth to text.
A very good description of format codes for numbers, date/time etc. can be found here.
| Format code | Description | |||||||||||||||||||||||||||||||||||||||||||||||||||||||||||||||||||||||||||||||
|---|---|---|---|---|---|---|---|---|---|---|---|---|---|---|---|---|---|---|---|---|---|---|---|---|---|---|---|---|---|---|---|---|---|---|---|---|---|---|---|---|---|---|---|---|---|---|---|---|---|---|---|---|---|---|---|---|---|---|---|---|---|---|---|---|---|---|---|---|---|---|---|---|---|---|---|---|---|---|---|---|
| @ | Format as string | |||||||||||||||||||||||||||||||||||||||||||||||||||||||||||||||||||||||||||||||
| General | Default format | |||||||||||||||||||||||||||||||||||||||||||||||||||||||||||||||||||||||||||||||
| 0000 | Format number with 4 digits, add leading zeroes where needed | |||||||||||||||||||||||||||||||||||||||||||||||||||||||||||||||||||||||||||||||
| [Blue]$#,##0;[Red]$#,##0;$#,##0 | Format positive numbers in blue, negative in red and 0 in default color (black). The numbers are prefixed with the dollar sign and a thousands separator is inserted. The numbers are displayed as integers.
Available colors are [Black], [Blue], [Cyan], [Green], [Magenta], [Red], [White], and [Yellow]. |
|||||||||||||||||||||||||||||||||||||||||||||||||||||||||||||||||||||||||||||||
[Blue][>=3000]$#,##0;[Red][ = 3000 in blue, values Format a window
Freeze panesFreezes the first column and first row: Script breaking changes after AutoIt version 3.3.10.2New versions of Microsoft Office have been released since the last changes were made to the Excel UDF. New file types and new functions needed to be supported, hence the UDF was complete rewritten. Some functions/parameters have been removed or renamed, new functions/parameters have been added. A detailed list of changes can be found here. GeneralAll function names have been changed from _Excel* to _Excel_*. @extended no longer contains the number of the invalid parameter. The code returned in @error tells exactly what went wrong. The following list shows the old/new function/parameter name (a «-» is shown if the function/parameter has been removed) and some example scripts how to mimic the behaviour of the «old» UDF. If there is no entry for a removed function/parameter then there is no need for this functionality. Function -/_Excel_OpenIt’s mandatory now to call function _Excel_Open before any other function (except _Excel_BookAttach). This function didn’t exist in the old UDF. @extended is set if Excel was already running. Function _ExcelFontSetProperties/-There are so many formatting functions in Excel that they can’t be covered by a few functions. The function only contained a single line of code. So it was removed. Use the code examples above to format a range. Function _ExcelHorizontalAlignSet/-There are so many formatting functions in Excel that they can’t be covered by a few functions. The function only contained a single line of code. So it was removed. Use the code examples above to format a range. Function _ExcelSheetActivate/-The function only contained a single line of code. So it was removed. Replace the function with the following code: Function _ExcelSheetNameGet/-The function only contained a single line of code. So it was removed. Replace the function with one of the following lines of code: Function _ExcelSheetNameSet/-The function only contained a single line of code. So it was removed. Replace the function with one of the following lines of code: Compare example scriptsIn this section I will show how some selected example scripts taken from AutoIt 3.3.8.1 should look like with the new Excel UDF.
|
-
#1
:stars: При использовании этой функции отправляет в массив максимум ячеек.
все что смог выяснить, так это то, что если файл xls (любой версии) то массив получается длинной 65536, а если xlsx то 1048576 :stars: :stars: при том, что на самом деле сколько в столбце не пустых ячеек не имеет значение. (пробовал файлы и парой десятков ячеек и 10000 ячеек — результат одинаков).
ячейки пустые, т.е. никаких формул в них нет и не было.
единственное что нашел на форуме, это идею удалять пустыне ячейки… но при каждом запуске скрипта удалять более миллиона ячеек это перебор.
win7-64, exel 2010, autoit 3.3.7 (обновил до 3.3.14 — результат такойже, только теперь еще и русский текст в скрипте заменяет на вопросы)
может опция где есть?
-
#2
Вы указали какие именно ячейки надо отправить в массив?
#include <Excel.au3>
Local $oExcel = _Excel_Open()
Local $oWorkbook = _Excel_BookOpen($oExcel, @ScriptDir & "tst.xlsx")
Local $sResult = _Excel_RangeRead($oWorkbook, Default, "A1:A15") ;берем 1й столбец с 1 по 15 строки
For $i in $sResult
	ConsoleWrite($i & @CRLF)
Next-
#3
Количество используемых строк заранее не определено.
по этому использую такой формат:
Local $aArray = _Excel_RangeRead($oWorkbook, 1, "A:B")который вроде как подразумевает, что будут взяты только не пустой диапазон.
Дело в том, что старые версии функций работы с экселем все делали правильно, и лишнего не брали.
но она более не доступна 
можно сократить объем строк до количества больше которого не должно быть при любых раскладах, типа 20000. но это тоже черт знает что…
-
#4
Предварительно вычислить последнюю не пустую ячейку в столбце:
#include <Excel.au3>
Global Const $xlUp = -4162
Local $oExcel = _Excel_Open()
Local $oWorkbook = _Excel_BookOpen($oExcel, @ScriptDir & "tst.xlsx")

With $oWorkbook.ActiveSheet
    $countRow = .Cells(.Rows.Count, "A").End($xlUp).row
EndWith

Local $sResult = _Excel_RangeRead($oWorkbook, Default, "A1:A" & $countRow)

For $i in $sResult
    ConsoleWrite($i & @CRLF)
Next-
#5
вот по тому же пути мысли пошли, только нашел видимо более толстый вариант:
Local Const $xlUp = -4162
With $oWorkbook.ActiveSheet ; process active sheet
	$oRangeLast = .UsedRange.SpecialCells($xlCellTypeLastCell) ; get a Range that contains the last used cells
	$iRowCount = .Range(.Cells(1, 1), .Cells($oRangeLast.Row, $oRangeLast.Column)).Rows.Count ; get the the row count for the range starting in row/column 1 and ending at the last used row/column
	$iLastCell = .Cells($iRowCount + 1, "B").End($xlUp).Row ; start in the row following the last used row and move up to the first used cell in column "B" and grab this row number
	ConsoleWrite("Last used cell in column B: " & $iLastCell & @CRLF)
EndWith
(это просто для справки, вдруг кому пригодится)
но проблемы это не решило.
что такой вариант, что
Local $aArray = _Excel_RangeRead($oWorkbook, 2 )что
Local $aArray = _Excel_RangeRead($oWorkbook, 2, Default )что
Local $aArray = _Excel_RangeRead($oWorkbook, 2, "A1:B9241" )(в данный момент там 9241 строка)
выдает ошибку: 5 и расширенную: -2147352571
Добавлено:
Сообщение автоматически объединено: 31 Июл 2018
причем это происходит при количестве строк больше 4000 (я прыгал по 1000 и на 4241 уже была эта же ошибка) :stars: :stars:
-
#6
Хм… странно у меня работает (при условии, что 2й лист существует в книге):
#include <Excel.au3>
#include <Array.au3>
Global Const $xlUp = -4162
Local $oExcel = _Excel_Open()
Local $oWorkbook = _Excel_BookOpen($oExcel, @ScriptDir & "tst.xlsx")
With $oWorkbook.ActiveSheet
    $countRow = .Cells(.Rows.Count, "A").End($xlUp).row
EndWith

Local $sResult = _Excel_RangeRead($oWorkbook, 2, "A1:B" & $countRow)

_ArrayDisplay($sResult)-
#7
нашел беду 
при встречи с первой ячейкой в которой 256 символов или больше вываливается эта ошибка.
Причем в Excel.au3 упоминается об ограничение на количество ячеек в зависимости от версии экселя, но нет ничего про размер ячейки.
Пока идея только одна: сначала выяснять кол-во строк, затем по всем проходить с проверкой на длинну, и если есть более длинные создавать еще один столбец, куда переносить излишки.  шняга какаято…
Добавлено:
Сообщение автоматически объединено: 31 Июл 2018
 да… но ведь когда я использовал комбинацию
Local $aArray = _Excel_RangeRead($oWorkbook, 2, "A:B" )— все прекрасно считывалось без ошибок…
Добавлено:
Сообщение автоматически объединено: 31 Июл 2018
но с обилием пустых ячеек
Добавлено:
Сообщение автоматически объединено: 31 Июл 2018
а вот и еще дополнение в моих изысканиях:
Local $aArray = _Excel_RangeRead($oWorkbook, 2, "A3520" )в этой ячейке строка длинной более 255 символов.
функция возвращает пустую строку, при этом выполнение завершается без ошибки. вот такой облом.
т.е. вариант решения задачи только такой: считывать все столбцы в формате А:В, а затем зная количество не пустых строк/столбцев делать новый массив через
уже без пустых строк.
есть еще идеи?
-
#8
Ну раз уж все равно влезли в .Cells(.Rows.Count, «A»).End($xlUp).row то вариант переписать на vba.
-
#9
c vba — не знаком.
интуитивно понимаю что означают некоторые конструкции, но сам создавать их не умею.
-
#10
Потестил в 256+ символов, ячейка не пустая.
#include <Excel.au3>
#include <Array.au3>

Global Const $xlUp = -4162
Local $oExcel = _Excel_Open()
Local $oWorkbook = _Excel_BookOpen($oExcel, @ScriptDir & "tst.xlsx")
With $oWorkbook.ActiveSheet
    .Worksheets(2).Select
	$countRow = .Cells(.Rows.Count, "A").End($xlUp).row ;подсчитываем vba кол-во строк
	$arr = .Range(.Cells(1, 1), .Cells($countRow, 2)).Value2 ;формируем массив в vba
EndWith

_ArrayDisplay($arr)-
#11
 эту конструкцию попробую осознать.
вопрос финальный: а как через vba считать конкретную ячейку?
правильно ли догадываюсь?
где значение будет взято из 5го столбца и 3й строки
-
#12
$CelText = .Cells(5, 3) ;сама ячейка пятой строки, третий столбец

$CelText = .Cells(5, 3).Value ;значение, содержащееся в ячейке

With $oWorkbook.ActiveSheet ;берем открытый Excel и работаем с активным листом
    .Worksheets(2).Select ;переключаемся на лист 2, если данные на 2м листе
    $countRow = .Cells(.Rows.Count, "A").End($xlUp).row ;подсчитываем кол-во не пустых строк в столбце А
    $arr = .Range(.Cells(1, 1), .Cells($countRow, 2)).Value2 ;берем все ячейки от А1 (Cells(1,1)) до Bx, где x = номер последней непустой строки в столбце А
; с массивом можем работать напрямую из AutoIt
EndWithОсновной сценарий, показывающий основные принципы создания / открытия, записи и сохранения электронной таблицы Excel. Использование функций библиотеки AutoIt Excel.
; Include definitions of the User Excel functions
#include <Excel.au3>

; Include Message Box codes for the error messages
#include <MsgBoxConstants.au3>

; Constants
$xlforce   = True            ; True = force new instance, False = use existing
$xlkeybrd  = True            ; True = allow keys,           False = block keys
$xlscreen  = True            ; True = live screen,          False = suppressed
$xlvisible = True            ; True = visible,                False = invisible

; Variables
$book  = 0                    ; The workbook
$excel = 0                    ; The instance of Excel
$range = 0                    ; Range object within a sheet

; Create an instance of Excel and attach this script to it
; Use the constants defined above to control visibility of the Excel window
$excel = _Excel_Open($xlvisible, False, $xlvisible, $xlkeybrd, $xlforce)
If ($excel = 0) Then HandleError("Excel creation failed ")

; Create a new workbook with one worksheet within the opened instance
$book = _Excel_BookNew($excel, 1)
If ($book = 0) Then HandleError("Workbook creation failed ")

; Example write to a single cell in the current sheet - writes 42 to cell B2
$range = _Excel_RangeWrite($book, Default, 42, "B2")
If ($range = 0) Then HandleError("Write cell failed ")

; Example write to a block in the current sheet - writes to cells D4:E5
Local $xy[2][2] = [[1, 2], [3, 4]]
$range = _Excel_RangeWrite($book, Default, $xy, "D4:E5")
If ($range = 0) Then HandleError("Write cell failed ")

; Save the created workbook - without a given path this will go to the temporary
; directory.  The argument 'TRUE' forces an overwrite of any existing file
$err = _Excel_BookSaveAs($book, "test.xlsx", $xlWorkbookDefault, True)
If ($err = 0) Then HandleError("Workbook save failed ")

; Close the workbook.  The argument 'TRUE' will save any changes
$err = _Excel_BookClose($book, True)
If ($err = 0) Then HandleError("Workbook close failed ")

; Close the created instance of Excel
;     First argument 'TRUE' saves changes to any open worksheets
;    Second argument 'FALSE' prevents closure if the instance was not new at _Excel_Open()
$err = _Excel_Close($excel, True, False)
If ($err = 0) Then HandleError("Excel close failed ")

Exit                                    ; End of script


; Error handler function - very simple, just aborts
Func HandleError($message)
   MsgBox($MB_SYSTEMMODAL + $MB_ICONERROR, "Excel Test", $message & @error, 5)
   Exit
EndFunc
I am not much good with Excel, but I encounter it a lot as data source. AutoIt is not too shabby for fast for-the-task programs that handle arrays.
So I had looked into automated way to read data from Excel sheet into AutoIt array.
Native way
AutoIt has bundled UDF for work with Excel. It is very easy to use and gets work done in just a few lines of code. Reading sheet of data into array would be like:
#include <Excel.au3>
$oExcel = _ExcelBookOpen("fileName.xls")
_ExcelSheetActivate($oExcel,"sheetName")
$result=_ExcelReadSheetToArray($oExcel)
_ExcelBookClose($oExcel)
Open book, open sheet, get data. Straightforward but in reality it can be very slow. For sheets with tens of thousands rows it can take well over minute (or few).
Workaround
I had tried to work around it and turns out simply copying sheet into clipboard and processing from there into array takes much less time (at the price of writing some code).
It is broken into several functions.
Func _StringCount($string, $substring)
Local $i, $count = 0
For $i = 1 To StringLen($string)
If StringMid($string, $i, StringLen($substring)) = $substring Then
	$count = $count + 1
EndIf
Next
Return $count
EndFunc
This one I had simply looked up on AutoIt forums. It counts number of string occurrences in another string. Used later to determine number columns by counting delimiter (TAB) that Excel inserts into table when it is copied to clipboard.
Func ExcelSheetToClip($excel, $sheet)
_ExcelSheetActivate($excel, $sheet)
ClipPut("")
Send("^{HOME}^a^c")
Do
	Sleep(100)
Until ClipGet()
Return ClipGet()
EndFunc
Function automates getting sheet into clipboard. Takes Excel object and sheet name for parameters and then:
- switches to sheet;
- clears clipboard (I had Excel throwing up occasional error otherwise);
- sends series of hotkeys:
- Ctrl+Home to go on first cell and clear selection;
- Ctrl+A to select all, Excel will ignore whitespace;
- Ctrl+C to copy it;
- waits for data to properly get in clipboard;
- returns that data.
Func String2DSplit($string,$rowDelimiter=@CRLF,$columnDelimiter="	")
$lines = StringSplit(StringStripWS($string, 3), $rowDelimiter, 1)
$columnsNum = _StringCount($lines[1], $columnDelimiter) + 1
Dim $result[$lines[0]][$columnsNum] = [[0]]
For $i = 1 To $lines[0]
	$columns = StringSplit($lines[$i], $columnDelimiter)
	For $j = 1 To $columns[0]
		$result[$i - 1][$j - 1] = $columns[$j]
	Next
Next
Return $result
EndFunc
This one I had also picked up from forums, but reworked. It turns giant string into actual two-dimensional array:
- splits string into array of lines;
- counts number of delimiter occurrence in first line to determine number of columns;
- defines empty array with dimension equal to amount of lines and columns;
- loops through each line, splits it into values and fills large array;
- returns array when done.
And just a simple wrapper function to bring two main pieces together:
Func ReadSheet($excel, $sheet)
	Return String2DSplit(ExcelSheetToClip($excel, $sheet))
EndFunc
Required some additional code and plenty of polish, but resulting usage is hardly complicated:
#include <Excel.au3>
$oExcel = _ExcelBookOpen("fileName.xls")
$result = ReadSheet($oExcel, "sheetName")
_ExcelBookClose($oExcel)
And about 50-60 times faster for sheets I tried it on.
Overall
Using native Windows paths is often more convenient and bulletproof. But for specific cases bit of specialized code can give program excellent speed boost.
Script https://www.rarst.net/script/excelclip.au3
PS method also turned out useful to get data out of spoiled file Excel file (overflowing with weird embedded objects for some reason).
Related Posts
- ProjectEuler.net – training ground for programmers
- Check character codes with AutoIt
- Simple plain text to HTML conversion in AutoIt
- Browser memory benchmark (plus lies and damn lies)
- Checking and logging server uptime with AutoIt

Выкидываю программку которая позволяет сделать выборку условию «Заполнено» или «Незаполнено» ячейка 5го столбика и поместить данные всей строчки в отдельный xls файл.
+ Добавка к реестрам создает пункт в контекстном меню мышки.
код —
#include <Excel.au3>
#include <Array.au3>
HotKeySet(«{Esc}», «eExit»)
Func eExit()
Exit 0
EndFunc
Opt(«TrayIconDebug», 1)
Opt(«WinTitleMatchMode», 2)
;путь к файлу
;~ $sFile = @ScriptDir & «KALDE ОПТ 2012-03-05.xls»
;получаем путь файла из командной строки
If $CmdLine[0] = 0 Then Exit
$sFile = $CmdLine[1]
;открываем в скрытом режиме
$fVisible = 0
;только для чтения
$fReadOnly = true
;открыть книгу
Local $oExcel = _ExcelBookOpen($sFile, $fVisible, $fReadOnly)
;Номер последней строчки
$max_row = $oExcel.ActiveSheet.UsedRange.Rows.Count
;Прочитать колонку ячеек
Local $aArray1 = _ExcelReadArray($oExcel, 1, 5, $max_row, 1, 1)
;~ _ArrayDisplay($aArray1, «Vertical»)
;столбец
$column = 5
;строка
$row = 1
;ПОИСКОВАЯ ЯЧЕЙКА
$search_cell = $oExcel.Activesheet.Cells($row, $column).Value
;~ $search_cell = _ExcelReadcell($row, $column)
;запись положительного результата поиска
Local $write_row_num[$max_row +1]
;последняя запись положительного результата
$last_row_num = 1
;ПОИСК
Do
if $search_cell <> «» and $search_cell <> » —-» then
;запись положительного результата поиска
$write_row_num[$last_row_num] = $row
;переход к следущей ячейке для записи результата
$last_row_num = $last_row_num + 1
EndIf
;переход к следующей ячейке для поиска в столбце
$row = $row + 1
$search_cell = $oExcel.Activesheet.Cells($row, $column).Value
until $row = $max_row +1
;~ _ArrayDisplay($write_row_num, «Пустые»)
;путь к файлу2
$sFile2 = @ScriptDir & «Print.xls»
;открываем в скрытом режиме файл2
$fVisible = 1
;только для чтения файл2
$fReadOnly = True
;открыть книгу 2
Local $oExcel2 = _ExcelBookOpen($sFile2, $fVisible, $fReadOnly)
;номер цикла
$num_loop = 1
do
;выделяем копируем строку книги1
$oExcel.ActiveSheet.Range(«A»&$write_row_num[$num_loop],»F»&$write_row_num[$num_loop]).Select
$oExcel.Selection.Copy
;выделяем вставляем строку в книгу2
$oExcel2.ActiveSheet.Range(«A»&$num_loop+2,»F»&$nu m_loop+2).Select
$oExcel2.ActiveSheet.Paste
;переходим к следущей строке цикла
$num_loop = $num_loop +1
;делаем до того как строка цикла будет равна последней записи заполненых ячеек
until $num_loop = _ArrayMaxIndex($write_row_num, 1)
;ширина колонки заказа
$zakaz_dl = » .»
_ExcelWriteCell($oExcel2, $zakaz_dl, 1, 5)
;выставляем формат и ширину заказа
$oExcel2.Columns(‘A:F’ ).EntireColumn.AutoFit
$oExcel2.Columns(‘A:F’ ).EntireColumn.Select
$oExcel2.Selection.Interior.ColorIndex = 0
;удаляем ненужные колонки
_ExcelColumnDelete($oExcel2, 1, 1)
_ExcelColumnDelete($oExcel2, 2, 1)
_ExcelColumnDelete($oExcel2, 4, 1)
;вписываем заказ от
$zakaz_ot = _ExcelReadCell($oExcel, 14, 1)
_ExcelWriteCell($oExcel2, $zakaz_ot, 3, 1)
;вписываем поле заметок
$zametki = _ExcelReadCell($oExcel, 1, 7)
_ExcelWriteCell($oExcel2, $zametki, 2, 1)
;вписываем дату печати
$data = @MDAY&».»&@MON&».»&@YEAR&» в»&@HOUR&»:»&@MIN
_ExcelWriteCell($oExcel2, $data, 2, 2)
;вписываем название файла
dim $name_file = StringSplit(StringReplace($sFile, «», @LF), @LF)
$name_file_short = «файл: «&$name_file[$name_file[_ArrayMaxIndex($name_file, 1)]]
_ExcelWriteCell($oExcel2, $name_file_short, 1, 1)
;убираем жирный шрифт
_ExcelFontSetProperties($oExcel2, 1, 1, $num_loop+1, 3, False, False, False)
;~ MsgBox(4096, «Test», $name_file[$name_file[_ArrayMaxIndex($name_file, 1)]] )
;~ _ArrayDisplay($name_file, «Пустые»)
_ExcelBookClose($oExcel)