
Время на прочтение
3 мин
Количество просмотров 43K
Уже не первый год я встречаю на профильных форумах мнение, что VBA для AutoCAD отмирает, и AutoDesk не будет его включать в следующих релизах в дистрибутив, и вообще, истинные падаваны пользуются lisp, C# и прочим, но только не VBA.
Я инженер-проектировщик ОВиК, не программист. И не хочу, да и некогда, вникать в серьезное программирование. Чаще всего появляется ситуация, что нужно как-то автоматизировать рутину здесь и сейчас. На помощь приходит простой язык VBA.
Далее я покажу, как можно без особых забот сделать самому то, за что серьезные ребята берут не плохие денежки. А именно перенос данных из Excel в AutoCAD и обратно. Заинтересованных прошу под кат.
Программировать будем на стороне Excel — мне так проще. Для подключения нужно войти в режим разработчика: Alt+F8 Либо можно открыть вкладку «разработчик» из настроек ленты.
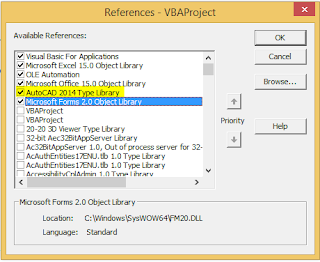
В окне разработчика VBA входим в верхнее меню: Tools/References. В этом окне нужно поставить галочку на вашей версии AutoCAD
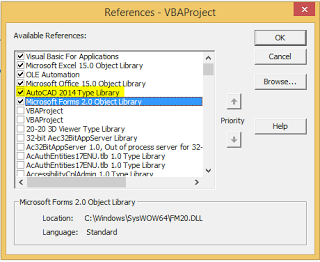
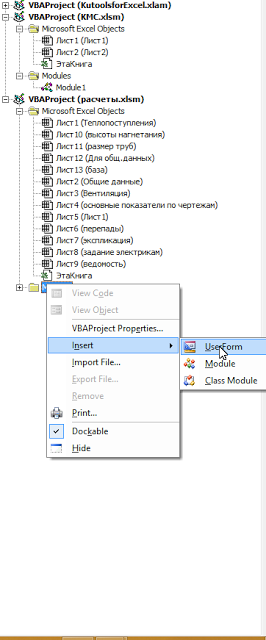
В моем случае это AutoCAD 2014 Type Library. Далее нужно в левом окне создать в вашей книге модуль, как на скриншоте (Module)
И в модуль вставляем нижеприведенный код:
Sub DrawMLeader() 'рисуем выноску

    Dim acadApp As AcadApplication
    Dim acadDoc As AcadDocument

    Application.DisplayAlerts = False 'чтобы отключить ненужные сообщения

    'Проверяем открыт Автокад или нет

    On Error Resume Next
    Set acadApp = GetObject(, "AutoCAD.Application")
    On Error GoTo 0

    'Если Автокад не открыт, создаем новый экземпляр и делаем его видимым
    If acadApp Is Nothing Then
        Set acadApp = New AcadApplication
        acadApp.Visible = True
    End If

    'Проверяем активный документ
    On Error Resume Next
    Set acadDoc = acadApp.ActiveDocument
    On Error GoTo 0

    'Если активных нет - создаем новый документ
    If acadDoc Is Nothing Then
        Set acadDoc = acadApp.Documents.Add
        acadApp.Visible = True
    End If

Dim AML As AcadMLeader
Dim xx As Long
Dim ss As String

ActiveCell.Cells.Activate 'активируем ячейку в экселе
ss = ActiveCell.Cells.Value 'заносим данные из ячейки в переменную

Dim points(0 To 5) As Double 'массив точек для вставки выноски

 Dim startPnt As Variant, endPnt As Variant
  Dim prompt1 As String, prompt2 As String
  prompt1 = vbCrLf & "Начало выноски: "
  prompt2 = vbCrLf & "Конец выноски: "
  startPnt = acadDoc.Utility.GetPoint(, prompt1) 'запрашиваем у пользователя первую точку выноски
  endPnt = acadDoc.Utility.GetPoint(startPnt, prompt2) 'запрашиваем у пользователя вторую точку выноски

'заполняем массив точек для MLeader
    points(0) = startPnt(0)
    points(1) = startPnt(1)
    points(2) = 0

    points(3) = endPnt(0)
    points(4) = endPnt(1)
    points(5) = 0

Set AML = acadDoc.ModelSpace.AddMLeader(points, xx) 'вставляем примитив в автокад и заполняем ниже его свойства
AML.TextString = ss
AML.ArrowheadType = acArrowNone
'если нужна другая высота текста - эту позицию меняем тут, или в настройках Mleader в AutoCAD
AML.TextHeight = 250
AML.TextLeftAttachmentType = acAttachmentBottomOfTopLine
AML.TextRightAttachmentType = acAttachmentBottomOfTopLine
AML.LandingGap = 2

Dim entHandle As String

entHandle = AML.Handle 'получаем хэндл выноски, чтобы вставить его в соседнюю ячейку, чтобы в дальнейшем можно было обновить данные в выноске прямо из эксель

ActiveCell.Offset(0, 1).Value = entHandle

acadDoc.Application.Update
'меняю цвет ячейки, откуда получил текст, чтобы было понятно, что текст обработан.

ActiveCell.Cells.Interior.ColorIndex = 6
End Sub
Аналогичным способом можно создавать блоки с атрибутами, в которые можно вставлять текст из ячеек.
Нужно внести в верхний код изменения вроде:
Dim blockObj As Object 'обозвали блок

'вставили блок, маркер воздухообмена - это имя вашего блока, который должен быть уже в чертеже:
'можно сделать так, чтобы блок вставлялся автоматически из чертежа-донора, но я на это уже не заморачивался

Set blockObj = acadDoc.ModelSpace.InsertBlock(startPnt, "Маркер воздухообмена", 1, 1, 1, 0, [])

'заполняем атрибуты, можно сделать по-умнее, но мне лень было разбираться, я сделал по рабоче-крестьянски (работает и ладно)

Dim varAttributes As Variant
    varAttributes = blockObj.GetAttributes
    varAttributes(0).TextString = ss1 'приток
    varAttributes(1).TextString = ss2 'вытяжка
    varAttributes(2).TextString = ss 'описание помещения

Dim entHandle As String 'тут я получаю хэндл нашего блока и пишу его в соседнюю ячейку, для того, чтобы можно было при изменении текста в Excel обновить просто блок в AutoCAD.

entHandle = blockObj.Handle
ActiveCell.Offset(0, 3).Value = entHandle
Код обновления текста по хэндлу — написан ниже: ‘получаем хэндл из ячейки, в которую мы записали кодом выше.
entHandle = ActiveCell.Offset(0, 3).Value ‘получили наш блок по хэндлу
Set blockObj = acadDoc.HandleToObject(entHandle)
А дальше делаем всё то же самое, что и выше.
Для того, чтобы немного разъяснить как это работает вживую — записал видео:
Как видите, кода минимум, однако на больших объектах мне экономит по несколько часов работы. И снижается риск ошибки. Т.к. обычно это выглядит следующим образом у проектировщиков — открываются два окна на разных экранах, и или вручную, или через буфер обмена начинается заполнение выносок или блоков на чертеже.
Опять же чем хорош VBA — что он всегда под рукой  Excel-то основной инструмент у инженера.
Содержание
- Автоматизация рутинных операций между Excel и AutoCAD при помощи VBA
- Exchange between AutoCAD and Excel (ActiveX Controls) (AutoCAD VBA)
- Saving Line Data to an Excel Spreadsheet
- Analysis
- Drawing an AutoCAD Line from Excel
- Analysis
- frfly
- on following a code that brings satisfaction
- Excel VBA – > Autocad Basics
Автоматизация рутинных операций между Excel и AutoCAD при помощи VBA
Уже не первый год я встречаю на профильных форумах мнение, что VBA для AutoCAD отмирает, и AutoDesk не будет его включать в следующих релизах в дистрибутив, и вообще, истинные падаваны пользуются lisp, C# и прочим, но только не VBA.
Я инженер-проектировщик ОВиК, не программист. И не хочу, да и некогда, вникать в серьезное программирование. Чаще всего появляется ситуация, что нужно как-то автоматизировать рутину здесь и сейчас. На помощь приходит простой язык VBA.
Далее я покажу, как можно без особых забот сделать самому то, за что серьезные ребята берут не плохие денежки. А именно перенос данных из Excel в AutoCAD и обратно. Заинтересованных прошу под кат.
Программировать будем на стороне Excel — мне так проще. Для подключения нужно войти в режим разработчика: Alt+F8 Либо можно открыть вкладку «разработчик» из настроек ленты.
В окне разработчика VBA входим в верхнее меню: Tools/References. В этом окне нужно поставить галочку на вашей версии AutoCAD
В моем случае это AutoCAD 2014 Type Library. Далее нужно в левом окне создать в вашей книге модуль, как на скриншоте (Module)
И в модуль вставляем нижеприведенный код:
Аналогичным способом можно создавать блоки с атрибутами, в которые можно вставлять текст из ячеек.
Нужно внести в верхний код изменения вроде:
Код обновления текста по хэндлу — написан ниже: ‘получаем хэндл из ячейки, в которую мы записали кодом выше.
entHandle = ActiveCell.Offset(0, 3).Value ‘получили наш блок по хэндлу
Set blockObj = acadDoc.HandleToObject(entHandle)
А дальше делаем всё то же самое, что и выше.
Для того, чтобы немного разъяснить как это работает вживую — записал видео:
Как видите, кода минимум, однако на больших объектах мне экономит по несколько часов работы. И снижается риск ошибки. Т.к. обычно это выглядит следующим образом у проектировщиков — открываются два окна на разных экранах, и или вручную, или через буфер обмена начинается заполнение выносок или блоков на чертеже.
Опять же чем хорош VBA — что он всегда под рукой 🙂 Excel-то основной инструмент у инженера.
Источник
Exchange between AutoCAD and Excel (ActiveX Controls) (AutoCAD VBA)
AutoCAD can send data to Excel, and Excel can send data to AutoCAD. Exercise 16.1 takes you through the steps required to build your ActiveX controls to achieve this.
Listing 16.1 is written in AutoCAD VBA code and uses variables defined as object types available from the Excel object model.
Listing 16.2 is written in Excel VBA. It should look familiar to you, since some things do not change at all between applications. For example, take a look at the call to the MsgBox function and the CreateObject function. Listing 16.1 uses the CreateObject function to return the object representing the open Excel application; and Listing 16.2 uses the CreateObject function to return the object representing the AutoCAD application. Both listings use the objects, properties, and methods associated with the application object returned by CreateObject.
Saving Line Data to an Excel Spreadsheet
To send data from your AutoCAD application to Excel, you call the CreateObject function from a macro run in the AutoCAD window, and that will open Excel. To make the object representing the Excel application accessible from AutoCAD, you must set up a reference to Excel. You’ll do this in the first step of Exercise 16.1.
Exercise 16.1: Saving a Line to Excel
1. From the AutoCAD VB Editor, choose Tools ^ References. The References dialog box appears, containing a list of available references. Select the object library for the version of Microsoft Excel you are using, and click OK. The objects from the Excel Object Library are now accessible from your AutoCAD application.
2. Enter the AutoCADLineToExcel macro (Listing 16.1) into the Code window for ThisDrawing, and run the macro.
3. Open the AutoCAD window and follow the prompts in the command line to enter the two points for the line.
4. Open an Excel workbook. Sheet1 appears, with the row and column headings in bold, and the coordinates of the two points selected in the second and third rows (Figure 16.3).

Figure 16.3 Result of running the AutoCADLineToExcel macro (Listing 16.1)
5. Deselect the Excel object library in the References dialog box, to free up the memory it required.
Object libraries use a lot of memory. Always remember to deselect any object libraries that you no longer require from the References dialog box.
Listing 16.1: AutoCADLineToExcel Macro

Analysis
• Line 1 starts the AutoCADLineToExcel macro,which creates a new Excel workbook. It enters row and column headings, along with the coordinates of the line specified interactively by the user.
• Lines 3 and 4 declare the ExcelApplication and ExcelWorksheet variables as being capable of referencing the Excel.Application and Excel.Worksheet objects.
• Line 5 declares the Point3D variable as Variant so that it can be assigned a three-element array in a single statement.
• Line 6 calls the CreateObject method that creates and returns a reference to an object exposed to the Excel application,and sets up ExcelApplication as a reference to the object.
• Line 7 makes the Excel application visible.
• Line 8 uses the Add method to create a new workbook in the Excel application.
• Line 9 sets ExcelWorksheet up as a reference to the object representing Sheet1 of the new workbook.
• Line 10 assigns the text for the first row heading to the cell at row 1/column 1 ofSheet1.The Cells collection is accessed like a two-dimensional array,with the row number appearing first followed by the column number. The Value property is assigned the textual or numerical data that is to appear at the cell— in this case, Line.
• Lines 11 and 12 assign Start and Finish to the cells in the first column of the second and third rows.
• Line 13 uses the Range property to return an object representing the range of cells specified in the argument A1:A3, which represents the first three cells in column A. Then the Bold property of the Font property of this returned object is set to True, so that the row labels appear in bold text.
• Lines 14 through 16 assign headings to columns B, C, and D in the first row.
• Line 17 sets the Bold property of the Font property of the object representing the B1:D1 range of cells to True, so that the B, C, and D column headings appear in bold text.
• Line 18 calls the GetPoint method of the Utility object, to prompt the user to select a point in the Model Space for the start of the line.
• Lines 19 through 21 assign the Value properties of the cells in the B, C, and D columns of the second row, to the x-, y-, and z-coordinates of the point selected by the user.
• Lines 22 through 25 perform the same operations as Lines 18 through 21 for the end of the line. The coordinates are placed in the third row of the worksheet.
• Line 26 ends the AutoCADLineToExcel macro.
Now that you can send data from your AutoCAD application to Excel, the next step is to send data from your Excel application to AutoCAD.
Drawing an AutoCAD Line from Excel
In the preceding section, the data defining the endpoints for a line were written to an Excel spreadsheet. At some stage in the future, you will need to read that data back into your AutoCAD application so that you can draw the same line. The following steps show you how to create the DrawAutoCADLine macro shown in Listing 16.2, which does just that.
Exercise 16.2: Drawing the Line from Excel to AutoCAD
1. Open Excel, and choose Tools ^ Macro ^ Visual Basic Editor. The Visual Basic Editor window appears, with the Excel icon in the first position of the toolbar, rather than the AutoCAD icon—that’s the only difference from the AutoCAD Visual Basic Editor window.
2. From the Excel VB Editor, choose Tools ^ References. The References dialog box appears, containing a list of available references, just as it did using the same menu command in AutoCAD. Select your version of AutoCAD’s object model, and click OK. The objects from the AutoCAD Object Library are now accessible from your Excel application.
3. Return to the Excel window and enter the data shown in Figure 16.4 into Sheet1. These coordinates define the line that will be drawn in the AutoCAD window.
4. In the Excel VBE Project Explorer, open the Code window for ThisWorkbook. Enter the DrawAutoCADLine macro (Listing 16.2).

Figure 16.4 Excel spreadsheet containing the definition of a line
5. After the macro is in place, choose Run ^ Run Sub/UserForm to run it. A line is drawn in the AutoCAD window.
6. Remember to deselect the AutoCAD object library again, freeing up the memory it required.
Listing 16.2: DrawAutoCADLine Macro

Analysis
• Line 1 starts the DrawAutoCADLine macro,which runs in Excel and draws a line in the AutoCAD window.
• Line 3 declares the AutoCADApplication variable as being capable of referring to the AutoCAD Application object.
• Lines 4 and 5 declare the arrays that will hold the two endpoints defining the line.
• Line 6 calls the CreateObject method that creates and returns a reference to an object exposed to the AutoCAD application object and sets up the AutoCADApplication variable as a reference to the object.
• Lines 7 through 10 assign the coordinate values in the spreadsheet to the StartLine and EndLine arrays.
• Line 11 creates a new line based on the StartLine and Endline array values and draws it in the AutoCAD Model tab.
• Line 12 ends the DrawAutoCADLine macro.
Источник
frfly
on following a code that brings satisfaction
Excel VBA – > Autocad Basics
Microsoft “deprecated” VBA and then Autodesk made the VBA module not a part of their massive install, convincing just about everybody it was no longer a viable platform to write any code. I am not going to write code for other people if i have to go sit at their computer and download and install a 100 mb file and do it on every release of autocad. But two things happened. Microsoft recanted. There must be a million people worldwide who code VBA excel. And it was never necessary to download the VBA module for autocad to run VBA code anyway. The download is just the code editor. The VBA objects are there. The code editor in excel works fine and in fact better because excel can hold data such as parameters, bills of material and cut-lists. For a few years now I have been making it a point not to download the autocad VBA module just to make sure other people could run my programs without adding anything.
To begin writing your Autocad VBA code in excel – start excel. Most of the time you have to add the developer tab to the ribbon. That is done with the File tab, Options, Customize Ribbon. Add the Developer tab. Start the Visual Basic editor. When you save an excel file with visual basic code, save it with XLSM file extension. In the visual basic editor, important first step, you must add a reference for excel to see autocad programming objects. This is under Tools, References. Look for Autocad Type Library. Move it up in the list as high as it will go.

now you need a standard module to connect to autocad. insert a module, add two public variables at the top.
Public acadApp As AcadApplication
Public acadDoc As AcadDocument
start your sub procedure by typing
sub connect_acad()
and hit return
generally you will want to start autocad yourself the way you always do. if autocad is running the vba code to obtain a reference to it is
Set acadApp = GetObject(, «AutoCAD.Application»)
notice we use our global variable. type this in to your sub procedure. I find this works fine but most online help shows it with a version dependent string like this.
Set acadApp = GetObject(, «AutoCAD.Application.22»)
22 is the version that autocad is using to designate version 2018
to demystify this, what is GetObject, why is there a comma, where does this come from, open up the Object Browser. you can double click the word GetObject, right click, and pick Definition. if you dont find it that way, search the VBA library, top box, for GetObject –
The Object Browser shows its parent, VBA.Interaction and it shows the parameter list PathName comma Class. Right click on GetObject in the Object Browser and click Help to open MS online help.


If Autocad is not running, GetObject will return an error. The code to start autocad in VBA is CreateObject or New AcadApplication. They both work for me, just as the version independent and dependent string both seem to work equally well.
We need to handle the error, then deal with either autocad running or not. Autodesk has the logic and a file to do it here.
edit february 2020 – autodesk vba help links are broken here and in google search, try this.
if that is broke, the page is labeled
About Converting the VBA Code to VB (VBA/ActiveX)
this file is also in the Autodesk AutoCAD 2018: ActiveX Developer’s Guide, or whatever year you have, which is file acad_aag.chm somewhere in your autocad installation. find that and also acadauto.chm and copy them where you want them.
First we have to add the essential statement
acadApp.Visible = True
otherwise we will not see any autocad.
Autodesk has the commands and logic but not the best form. We have to make some improvements. The code to start autocad needs to be in its own sub procedure with the code to reference the active drawing. We want to call connect_acad once and we want to obtain a global variable for the active drawing.
When autocad opens, it probably opens to a blank drawing, or maybe its already open to a drawing, but we have to get that drawing into a VBA object. Generally I want it to be a blank drawing because I am going to use it. The connect_acad sub procedure will not run until we want it to, so it just gets the activedocument which is a property of AcadApplication. Those are our two global variables, the application and the active drawing, and active drawing is the main one we use.
Put connect_acad in your module as a stand-alone. Anytime you want to write a program in excel vba to draw or interact with autocad, the first thing in the program is
at that point you have a global variable AcadDoc that you use for all of autocad’s vba objects.
here is the full acad_connect
in bricscad, try these (i dont have bricscad loaded currently but these worked a couple releases back)
Set acadApp = GetObject(, «BricscadApp.AcadApplication»)
Set acadApp = New AcadApplication
using autodesk’s example to draw a single line would be modified like this. I made no other changes except adding Connect_Acad and changing Thisdrawing to AcadDoc.
Dim lineObj As AcadLine
Dim startPoint(0 To 2) As Double
Dim endPoint(0 To 2) As Double
startPoint(0) = 1
startPoint(1) = 1
startPoint(2) = 0
endPoint(0) = 5
endPoint(1) = 5
endPoint(2) = 0
Источник

Introduction
About three weeks ago I received an email request from Mohammed. He asked me if it is possible to send AutoCAD commands directly from Excel. To cut a long story short, the answer is yes and the proposed solution is based on the SendCommand method of AutoCAD, which sends a command string from a VB or VBA application to the document to be processed. If the drawing specified isn’t active, it will be made active. This method processes any AutoCAD command-line function, including LISP expressions. So, based on AutoCAD VBA help, the structure of the SendCommand method is given below:
object.SendCommand(Command)
Object: (AutoCAD) Document. The object this method applies to.
Command: String; input-only. The command to send to the document.
Note that the sample workbook that you will find in the Downloads section works only with valid AutoCAD commands (obviously). Moreover, unlike the typical AutoCAD behavior, you must first select an object and then apply any modifications to it. So, for example, if you want to move a polyline, you must first send the select command and then the move; the opposite will NOT work!
VBA code for sending AutoCAD commands from Excel
A large portion of the code is used to initialize the AutoCAD object, as well as the active/new drawing. The code consists of two loops; the first one concatenates the contents of every column into a single string, whereas the second one sends the concatenated string to AutoCAD via the SendCommand method. One tricky part here was the usage of carriage-return character (vbCr) on Select and Select All (AI_SELALL) commands, which allows the objects to remain selected after the loop moves to the next command (which will make the object editing). However, the latter is not required for the newest version of AutoCAD (2015 – version 20).
Option Explicit

'Declaring the API Sleep subroutine.
#If VBA7 And Win64 Then
    'For 64 bit Excel.
    Public Declare PtrSafe Sub Sleep Lib "kernel32" (ByVal dwMilliseconds As Long)
#Else
    'For 32 bit Excel.
    Public Declare Sub Sleep Lib "kernel32.dll" (ByVal dwMilliseconds As Long)
#End If

Sub SendAutoCADCommands()

    '------------------------------------------------------------------------------------------------------------------------------
    'The macro sends the commands that exist in the sheet named "Send AutoCAD Commands" to the opened or to a new AutoCAD drawing.
    'It uses the AutoCAD SendCommand method to send the user commands. Note that it works only for VALID AutoCAD commands!
    'Moreover, unlike the typical AutoCAD behavior, you must first select an object and then apply any modifications to it.
    'So, if you want to move an object, first send the select command and then the move; the opposite will NOT work!!!

    'The code uses late binding, so no reference to external AutoCAD (type) library is required.
    'It goes without saying that AutoCAD, as well as VBA in AutoCAD, must be installed at your computer before running this code.

    'Written By:    Christos Samaras
    'Date:          15/10/2014
    'Last Update:   15/12/2014
    'E-mail:        [email protected]
    'Site:          http://www.myengineeringworld.net
    '------------------------------------------------------------------------------------------------------------------------------

    'Declaring the necessary variables.
    Dim acadApp     As Object
    Dim acadDoc     As Object
    Dim acadCmd     As String
    Dim sht         As Worksheet
    Dim LastRow     As Long
    Dim LastColumn  As Integer
    Dim i           As Long
    Dim j           As Integer

    'Set the sheet name that contains the commands.
    Set sht = ThisWorkbook.Sheets("Send AutoCAD Commands")

    'Activate the Send AutoCAD Commands sheet and find the last row.
    With sht
        .Activate
        LastRow = .Cells(.Rows.Count, "C").End(xlUp).Row
    End With

    'Check if there is at least one command to send.
    If LastRow < 13 Then
        MsgBox "There are no commands to send!", vbCritical, "No Commands Error"
        sht.Range("C13").Select
        Exit Sub
    End If

    'Check if AutoCAD application is open. If it is not opened create a new instance and make it visible.
    On Error Resume Next
    Set acadApp = GetObject(, "AutoCAD.Application")
    If acadApp Is Nothing Then
        Set acadApp = CreateObject("AutoCAD.Application")
        acadApp.Visible = True
    End If

    'Check (again) if there is an AutoCAD object.
    If acadApp Is Nothing Then
        MsgBox "Sorry, it was impossible to start AutoCAD!", vbCritical, "AutoCAD Error"
        Exit Sub
    End If

    'Maximize AutoCAD window.
    acadApp.WindowState = 3 '3 = acMax  in early binding
    On Error GoTo 0

    'If there is no active drawing create a new one.
    On Error Resume Next
    Set acadDoc = acadApp.ActiveDocument
    If acadDoc Is Nothing Then
        Set acadDoc = acadApp.Documents.Add
    End If
    On Error GoTo 0

    'Check if the active space is paper space and change it to model space.
    If acadDoc.ActiveSpace = 0 Then '0 = acPaperSpace in early binding
        acadDoc.ActiveSpace = 1     '1 = acModelSpace in early binding
    End If

    With sht

        'Loop through all the rows of the sheet that contain commands.
        For i = 13 To LastRow

            'Find the last column.
            LastColumn = .Cells(i, .Columns.Count).End(xlToLeft).Column

            'Check if there is at least on command in each row.
            If LastColumn > 2 Then

                'Create a string that incorporates all the commands that exist in each row.
                acadCmd = ""
                For j = 3 To LastColumn
                    If Not IsEmpty(.Cells(i, j).Value) Then
                        acadCmd = acadCmd & .Cells(i, j).Value & vbCr
                    End If
                Next j

                'Check AutoCAD version.
                If Val(acadApp.Version) < 20 Then
                    'Prior to AutoCAD 2015, in Select and Select All commands (AI_SELALL) the carriage-return
                    'character 'vbCr' is used, since another command should be applied in the selected items.
                    'In all other commands the Enter character 'Chr$(27)' is used in order to denote that the command finished.
                    If InStr(1, acadCmd, "SELECT", vbTextCompare) > 0 Or InStr(1, acadCmd, "AI_SELALL", vbTextCompare) Then
                       acadDoc.SendCommand acadCmd & vbCr
                    Else
                       acadDoc.SendCommand acadCmd & Chr$(27)
                    End If
                Else
                    'In the newest version of AutoCAD (2015) the carriage-return
                    'character 'vbCr' is applied in all commands.
                    acadDoc.SendCommand acadCmd & vbCr
                End If

            End If

            'Pause a few milliseconds  before proceed to the next command. The next line is probably optional.
            'However, I suggest to not remove it in order to give AutoCAD the necessary time to execute the command.
            Sleep 20

        Next i

    End With

    'Inform the user about the process.
    MsgBox "The user commands were successfully sent to AutoCAD!", vbInformation, "Done"

End Sub
Note that if you have AutoCAD 2010 or a newer version, you will have to download and install the VBA module, otherwise the code will probably fail.
- AutoCAD 2010 VBA module 32-bit
- AutoCAD 2010 VBA module 64-bit
- AutoCAD 2011 VBA module 32-bit
- AutoCAD 2011 VBA module 64-bit
- AutoCAD 2012 VBA module 32-bit
- AutoCAD 2012 VBA module 64-bit
- AutoCAD 2013 VBA module 32-bit
- AutoCAD 2013 VBA module 64-bit
- AutoCAD 2014 VBA module 32-bit
- AutoCAD 2014 VBA module 64-bit
- AutoCAD 2015 VBA module 32-bit
- AutoCAD 2015 VBA module 64-bit
All links were copied from Autodesk‘s website.
Warnings and suggestions
- Note that the use of SendCommand is NOT a panacea! It’s probably just a hack that sometimes has to be used because Autodesk hasn’t given a complete VBA object model. As Autodesk suggests, “you should never use this method to issue a command for which there is an ActiveX method available”; to add text, for example, use the AddText method.
- This method is generally synchronous. However, if the command sent with this method requires any user interaction (such as picking a point on the screen) then this method will continue as soon as the user input begins (i.e. MTEXT, TEXT, etc.).
- Please bear in mind that the particular code was NOT tested for every AutoCAD command that can be executed via the command line and probably will NOT work for every command. However, tests for some of the most “popular” ones showed that it works without a problem (check the demonstration video for example). You just have to write the command sequence in Excel very carefully.
- When you select an object, try to create a selection rectangle that will include that object. This means that the selection rectangle – its coordinates – should be larger than the object dimensions.
- The coordinates should be given in the format x,y for 2D and x,y,z for 3D objects; i.e. 0,100 and 200,200,100.
- The “angular” coordinates should be given in the x<y for 2D and in x<y<z format for 3D; i.e. 0<45 and 100<45<90.
- Note that the cells in the sample workbook are formatted as text, in order to avoid problems when the user enters decimal coordinates and the decimal symbol in his/her Windows settings (in Region and Language option at Control Panel) is set to be the comma (“,”) and not the dot (“.”). Tip: AutoCAD uses a dot/point for decimal separator as a standard for displaying and entering decimal numbers. However, Dimensions are the exception to this rule, but, you can set their decimal separator by using the DIMDSEP command.
- Probably the best way to use the sample workbook is to try to replicate every step that you follow when you are using AutoCAD. So, try to not forget command arguments or leave commands unfinished. Needless to say that some experimentation is required in order to get the expected result, but I think it is worth the time.
Demonstration video
The short video below demonstrates the result of the above VBA code (31 AutoCAD commands were used); the blog name will be drawn into a new AutoCAD document using lines, polylines as well as AutoCAD objects.
Downloads

The file can be opened with Excel 2007 or newer. Please enable macros before using it.
Read also
Insert Blocks In AutoCAD Using Excel & VBA
Drawing Points In AutoCAD Using Excel & VBA
Add Text In AutoCAD Using Excel & VBA
Drawing Circles In AutoCAD Using Excel & VBA
Page last modified: October 1, 2021

Hi, I am Christos, a Mechanical Engineer by profession (Ph.D.) and a Software Developer by obsession (10+ years of experience)! I founded this site back in 2011 intending to provide solutions to various engineering and programming problems.
Add Content Block
AutoCAD can send data to Excel, and Excel can send data to AutoCAD. Exercise 16.1 takes you through the steps required to build your ActiveX controls to achieve this.
Listing 16.1 is written in AutoCAD VBA code and uses variables defined as object types available from the Excel object model.
Listing 16.2 is written in Excel VBA. It should look familiar to you, since some things do not change at all between applications. For example, take a look at the call to the MsgBox function and the CreateObject function. Listing 16.1 uses the CreateObject function to return the object representing the open Excel application; and Listing 16.2 uses the CreateObject function to return the object representing the AutoCAD application. Both listings use the objects, properties, and methods associated with the application object returned by CreateObject.
Saving Line Data to an Excel Spreadsheet
To send data from your AutoCAD application to Excel, you call the CreateObject function from a macro run in the AutoCAD window, and that will open Excel. To make the object representing the Excel application accessible from AutoCAD, you must set up a reference to Excel. You’ll do this in the first step of Exercise 16.1.
Exercise 16.1: Saving a Line to Excel
1. From the AutoCAD VB Editor, choose Tools ^ References. The References dialog box appears, containing a list of available references. Select the object library for the version of Microsoft Excel you are using, and click OK. The objects from the Excel Object Library are now accessible from your AutoCAD application.
2. Enter the AutoCADLineToExcel macro (Listing 16.1) into the Code window for ThisDrawing, and run the macro.
3. Open the AutoCAD window and follow the prompts in the command line to enter the two points for the line.
4. Open an Excel workbook. Sheet1 appears, with the row and column headings in bold, and the coordinates of the two points selected in the second and third rows (Figure 16.3).
Figure 16.3 Result of running the AutoCADLineToExcel macro (Listing 16.1)
5. Deselect the Excel object library in the References dialog box, to free up the memory it required.
Object libraries use a lot of memory. Always remember to deselect any object libraries that you no longer require from the References dialog box.
Listing 16.1: AutoCADLineToExcel Macro
Analysis
• Line 1 starts the AutoCADLineToExcel macro,which creates a new Excel workbook. It enters row and column headings, along with the coordinates of the line specified interactively by the user.
• Lines 3 and 4 declare the ExcelApplication and ExcelWorksheet variables as being capable of referencing the Excel.Application and Excel.Worksheet objects.
• Line 5 declares the Point3D variable as Variant so that it can be assigned a three-element array in a single statement.
• Line 6 calls the CreateObject method that creates and returns a reference to an object exposed to the Excel application,and sets up ExcelApplication as a reference to the object.
• Line 7 makes the Excel application visible.
• Line 8 uses the Add method to create a new workbook in the Excel application.
• Line 9 sets ExcelWorksheet up as a reference to the object representing Sheet1 of the new workbook.
• Line 10 assigns the text for the first row heading to the cell at row 1/column 1 ofSheet1.The Cells collection is accessed like a two-dimensional array,with the row number appearing first followed by the column number. The Value property is assigned the textual or numerical data that is to appear at the cell— in this case, Line.
• Lines 11 and 12 assign Start and Finish to the cells in the first column of the second and third rows.
• Line 13 uses the Range property to return an object representing the range of cells specified in the argument A1:A3, which represents the first three cells in column A. Then the Bold property of the Font property of this returned object is set to True, so that the row labels appear in bold text.
• Lines 14 through 16 assign headings to columns B, C, and D in the first row.
• Line 17 sets the Bold property of the Font property of the object representing the B1:D1 range of cells to True, so that the B, C, and D column headings appear in bold text.
• Line 18 calls the GetPoint method of the Utility object, to prompt the user to select a point in the Model Space for the start of the line.
• Lines 19 through 21 assign the Value properties of the cells in the B, C, and D columns of the second row, to the x-, y-, and z-coordinates of the point selected by the user.
• Lines 22 through 25 perform the same operations as Lines 18 through 21 for the end of the line. The coordinates are placed in the third row of the worksheet.
• Line 26 ends the AutoCADLineToExcel macro.
Now that you can send data from your AutoCAD application to Excel, the next step is to send data from your Excel application to AutoCAD.
Drawing an AutoCAD Line from Excel
In the preceding section, the data defining the endpoints for a line were written to an Excel spreadsheet. At some stage in the future, you will need to read that data back into your AutoCAD application so that you can draw the same line. The following steps show you how to create the DrawAutoCADLine macro shown in Listing 16.2, which does just that.
Exercise 16.2: Drawing the Line from Excel to AutoCAD
1. Open Excel, and choose Tools ^ Macro ^ Visual Basic Editor. The Visual Basic Editor window appears, with the Excel icon in the first position of the toolbar, rather than the AutoCAD icon—that’s the only difference from the AutoCAD Visual Basic Editor window.
2. From the Excel VB Editor, choose Tools ^ References. The References dialog box appears, containing a list of available references, just as it did using the same menu command in AutoCAD. Select your version of AutoCAD’s object model, and click OK. The objects from the AutoCAD Object Library are now accessible from your Excel application.
3. Return to the Excel window and enter the data shown in Figure 16.4 into Sheet1. These coordinates define the line that will be drawn in the AutoCAD window.
4. In the Excel VBE Project Explorer, open the Code window for ThisWorkbook. Enter the DrawAutoCADLine macro (Listing 16.2).
Figure 16.4 Excel spreadsheet containing the definition of a line
5. After the macro is in place, choose Run ^ Run Sub/UserForm to run it. A line is drawn in the AutoCAD window.
6. Remember to deselect the AutoCAD object library again, freeing up the memory it required.
Listing 16.2: DrawAutoCADLine Macro
Analysis
• Line 1 starts the DrawAutoCADLine macro,which runs in Excel and draws a line in the AutoCAD window.
• Line 3 declares the AutoCADApplication variable as being capable of referring to the AutoCAD Application object.
• Lines 4 and 5 declare the arrays that will hold the two endpoints defining the line.
• Line 6 calls the CreateObject method that creates and returns a reference to an object exposed to the AutoCAD application object and sets up the AutoCADApplication variable as a reference to the object.
• Lines 7 through 10 assign the coordinate values in the spreadsheet to the StartLine and EndLine arrays.
• Line 11 creates a new line based on the StartLine and Endline array values and draws it in the AutoCAD Model tab.
• Line 12 ends the DrawAutoCADLine macro.
Рисовать примитивы в AutoCAD из Excel проще простого.
Для этого нужны примитивные знания VBA — чтобы можно было поправить ниже приведенный код.
Я «не настоящий сварщик» — сделал как умею, поэтому возможно, что и кривовато получилось — но, главное, что работает.
Для подключения нужно войти в режим разработчика: Alt+F8 Либо можно открыть вкладку «разработчик» из настроек ленты.
В окне разработчика VBA входим в верхнее меню: Tools/References
В этом окне нужно поставить галочку на вашей версии AutoCAD
В моем случае это AutoCAD 2014 Type Library
Далее нужно в левом окне создать в вашей книге модуль, как на скриншоте (Module)

И в модуль вставляем нижеприведенный код
Sub DrawMLeader() 'рисуем выноску

    Dim acadApp As AcadApplication
    Dim acadDoc As AcadDocument
    Application.DisplayAlerts = False


    'Check if AutoCAD is open.
    On Error Resume Next
    Set acadApp = GetObject(, "AutoCAD.Application")
    On Error GoTo 0

    'If AutoCAD is not opened create a new instance and make it visible.
    If acadApp Is Nothing Then
        Set acadApp = New AcadApplication
        acadApp.Visible = True
    End If

    'Check if there is an active drawing.
    On Error Resume Next
    Set acadDoc = acadApp.ActiveDocument
    On Error GoTo 0

    'No active drawing found. Create a new one.
    If acadDoc Is Nothing Then
        Set acadDoc = acadApp.Documents.Add
        acadApp.Visible = True
    End If

   Dim AML As AcadMLeader
Dim xx As Long
Dim ss As String

ActiveCell.Cells.Activate
ss = ActiveCell.Cells.Value

Dim points(0 To 5) As Double

Dim startPnt As Variant, endPnt As Variant
  Dim prompt1 As String, prompt2 As String
  prompt1 = vbCrLf & "Начало выноски: "
  prompt2 = vbCrLf & "Конец выноски: "
  startPnt = acadDoc.Utility.GetPoint(, prompt1)
  endPnt = acadDoc.Utility.GetPoint(startPnt, prompt2)


'заполняем массив точек для MLeader
points(0) = startPnt(0)
    points(1) = startPnt(1)
    points(2) = 0

    points(3) = endPnt(0)
    points(4) = endPnt(1)
    points(5) = 0


Set AML = acadDoc.ModelSpace.AddMLeader(points, xx)
AML.TextString = ss
AML.ArrowheadType = acArrowNone
'если нужна другая высота текста - эту позицию меняем тут, или в настройках Mleader в AutoCAD AML.TextHeight = 250 AML.TextLeftAttachmentType = acAttachmentBottomOfTopLine AML.TextRightAttachmentType = acAttachmentBottomOfTopLine AML.LandingGap = 2 Dim entHandle As String entHandle = AML.Handle ActiveCell.Offset(0, 1).Value = entHandle acadDoc.Application.Update'меняю цвет ячейки, откуда получил текст, чтобы было понятно, что текст обработан.ActiveCell.Cells.Interior.ColorIndex = 6
End SubАналогичным способом можно создавать блоки с атрибутами, в которые можно вставлять текст из ячеек.
Нужно внести в верхний код изменения вроде:
Dim blockObj As Object 'обозвали блок'вставили блок, маркер воздухообмена - это имя вашего блока, который должен быть уже в чертеже:Set blockObj = acadDoc.ModelSpace.InsertBlock(startPnt, "Маркер воздухообмена", 1, 1, 1, 0, [])
'заполняем атрибуты, можно сделать по-умнее, но мне лень было разбираться, я сделал по рабоче-крестьянски (работает и ладно)Dim varAttributes As Variant
varAttributes = blockObj.GetAttributes
varAttributes(0).TextString = ss1 'приток
varAttributes(1).TextString = ss2 'вытяжка
varAttributes(2).TextString = ss 'описание помещенияDim entHandle As String 'тут я получаю хэндл нашего блока и пишу его в соседнюю ячейку, для того, чтобы можно было при изменении текста в Excel обновить просто блок в AutoCAD. entHandle = blockObj.Handle ActiveCell.Offset(0, 3).Value = entHandleКод обновления текста по хэндлу — написан ниже: ‘получаем хэндл из ячейки, в которую мы записали кодом выше entHandle = ActiveCell.Offset(0, 3).Value
'получили наш блок по хэндлу Set blockObj = acadDoc.HandleToObject(entHandle)И дальше так же как и в коде выше - заполняем атрибуты в блоке<
Небольшое видео, для иллюстрации того, что происходит на экране
UPD
Эта статья опубликована на хабреUPD2
Для работающих на одномониторных станциях не удобно, что фокус не передается в окно автокада автоматически, для этого нужно внести следующие изменения в код:
В начале, где мы только подключились к AutoCADOn Error Resume Next Set acadApp = GetObject(, "AutoCAD.Application") acadApp.WindowState = 3 AppActivate acadApp.Caption 'фокус передаем в AutoCADПосле того, как мы обработали в AutoCAD нужно переключиться в Excel — делаем это следующим образом:
acadDoc.Application.Update acadApp.WindowState = 2 DoEvents AppActivate Application.Caption 'передаем фокус окну Excel Application.Windows.Item(1).Activate ActiveCell.Cells.Interior.ColorIndex = 6UPD3
Добавил файлы Excel и файл с блоком расхода воздуха AutoCAD для примера
Блок воздухообмена AutoCAD
Файл Excel