
Word for Microsoft 365 Outlook for Microsoft 365 Word 2021 Outlook 2021 Word 2019 Outlook 2019 Word 2016 Outlook 2016 Word 2013 Outlook 2013 Word 2010 Outlook 2010 Word 2007 Outlook 2007 More…Less
You can add horizontal lines, sometimes called horizontal rules, to a document or email message to help separate sections of text and add visual appeal.
By default, Word and Outlook have a three-character shortcuts that inserts a full-width horizontal rule in your document or message. The appearance of that rule—thinner, thicker, double-line, dotted, wavy—depends on which shortcut you use, as illustrated in the image below.
If this automatic line feature doesn’t suit you, you can turn off this feature in Word or turn it off in Outlook.
If you want to draw a line for illustration purposes, see Draw a line in Word or Outlook instead.
Insert a horizontal line by typing a few characters
The fastest way to add a horizontal line or rule is to use the AutoFormat feature. When you type certain characters three times in their own paragraph and then press Enter, those characters instantly become a full-width horizontal line.
-
Place the cursor where you want to insert the horizontal line.
-
Type three of the characters illustrated below, and then press Enter.

The line is inserted for the full width of the page. When inserted into a column, the line is inserted to match the width of the column. To add text above the line, put your cursor where you want the text and begin typing.
Format the horizontal line after you create it
The shortcut described above creates an empty paragraph with a bottom border. You can change the look of that border line by using the Borders options:
-
In Word, on the Home tab of the ribbon, select the down arrow next to
Borders.In Outlook, on the Format Text tab of the ribbon, select the down arrow next to
Borders. -
At the bottom of the menu, select Borders and Shading.
-
In the dialog, you can change the line’s style (solid, dotted, wavy, double, and so on), color, or width as you see fit.
-
When you’re done formatting the line, select OK. Then, on the ribbon, select the
Borders button to apply your changes.
 Borders.
 Borders button to apply your changes.
 Word: Turn off the automatic line feature
To prevent Word or Outlook from automatically inserting a horizontal line when you type the three shortcut characters, do the following:
-
On the ribbon, select File > Options.
-
In the dialog box, select Proofing > AutoCorrect Options > AutoFormat As You Type.
-
Clear the Border Lines option.
-
Select OK.
Outlook: Turn off the automatic line feature
-
On the ribbon, select File > Options.
-
In the dialog box, select the Mail tab, then select Editor Options.
-
On the Proofing tab, select AutoCorrect Options > AutoFormat As You Type.
-
Under Apply as you type, clear the Border Lines option.
-
Select OK.
Want to draw a line?
See Draw a line in Word or Outlook.
See Also
Add a border to some text
Draw shapes
Need more help?
 Please Note:
This article is written for users of the following Microsoft Word versions: 2007, 2010, 2013, and 2016. If you are using an earlier version (Word 2003 or earlier), this tip may not work for you. For a version of this tip written specifically for earlier versions of Word, click here: Adding Automatic Lines.
![]()
Written by Allen Wyatt (last updated June 17, 2017)
This tip applies to Word 2007, 2010, 2013, and 2016
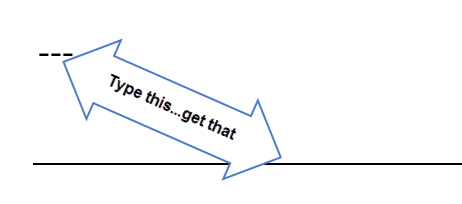
Word includes a sometimes-helpful little feature that allows you to add lines in your documents, without removing your fingers from the keyboard. All you need to do is start at the left margin of a new line, type at least three characters, and then press Enter. The result is a line based on the characters you typed. You can use the following characters:
- Type three dashes and you get a single line.
- Type thee underlines and you get a bold single line.
- Type three equal signs and you get a double line.
- Type three asterisks and you get a heavy dotted line.
You can actually type more than three of each character, if you desire. Word doesn’t care that much—the only requirement is that there is at least three of them, and they begin at the left margin. What Word does is to add a border of the specified type to the bottom of the paragraph. If you want to later delete the line, the only way to do so is to remove the paragraph, or choose Borders and Shading from the Format menu.
If you can’t automatically add lines on your system, follow these steps:
- Display the Word Options dialog box. (In Word 2007 click the Office button and then click Word Options. In Word 2010 and later versions display the File tab of the ribbon and then click Options.)
- At the left of the dialog box click Proofing.
- Click AutoCorrect Options. Word displays the AutoCorrect dialog box.
- Make sure the AutoFormat As You Type tab is selected. (See Figure 1.)
- Make sure the Border Lines check box is checked.
- Click on OK to close the AutoCorrect dialog box.
- Click on Cancel to close the Word Options dialog box.
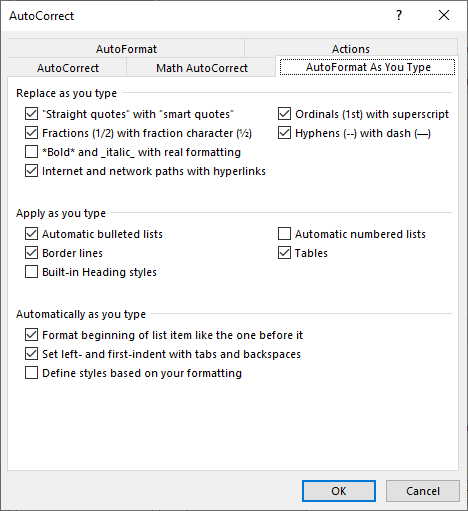
Figure 1. The AutoFormat As You Type tab of the AutoCorrect dialog box.
WordTips is your source for cost-effective Microsoft Word training.
(Microsoft Word is the most popular word processing software in the world.)
This tip (6095) applies to Microsoft Word 2007, 2010, 2013, and 2016. You can find a version of this tip for the older menu interface of Word here: Adding Automatic Lines.
Author Bio
With more than 50 non-fiction books and numerous magazine articles to his credit, Allen Wyatt is an internationally recognized author. He is president of Sharon Parq Associates, a computer and publishing services company. Learn more about Allen…
MORE FROM ALLEN
Quickly Removing a Toolbar Button
Want to get rid of a toolbar button? There’s no need to drag open the menus and dialog boxes; just use the shortcut …
Discover More
Understanding the If … End If Structure
One of the most basic of programming structures is the conditional structure: If … End If. This tip explains how this …
Discover More
Non-PivotTable Slicers and Timelines
When working with a PivotTable, slicers and timelines can make short work of large data sets. This tip looks at all the …
Discover More
More WordTips (ribbon)
AutoFormat Won’t Convert a Right Arrow
Word can automatically convert different sequences of text characters into single-character symbols. It might appear that …
Discover More
Changing AutoFormatting Rules
The AutoFormat feature of Word can be configured to make changes to a variety of conditions in your document. Here’s how …
Discover More
After Pressing Enter, Text Becomes a Heading
Word provides several built-in tools that can affect how what you type is formatted. One of those tools can even change …
Discover More
Word has a set of AutoFormat shortcuts that make horizontal lines, here’s how they work, how to change them, color the lines and how to stop lines when they get out of control.
Line shortcuts
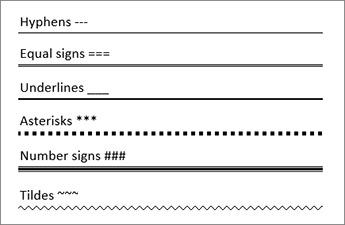
There are six horizontal line shortcuts. For each one type the same character three times at the start of a new line then press Enter.
For example, press the dash key three times on a new line, then enter.
Dashes give you a horizontal line
Underscores give you a bold horizontal line
Equals gives you a double horizontal line

And there’s more …
The three above are the best known but there are others.
Asterisk makes a dotted line
Tilde makes a wavy line
Pound/Hash makes a triple line
Tooltip controls
Whenever you automatically make a line, a small tooltip appears with some options.

Undo Border Line – changes back to the characters you typed. The usual undo shortcut, Ctrl + Z, will do the same thing.
Stop Automatically Creating Border Lines – will turn off the AutoFormat | Border Lines option entirely.
Control AutoFormat Options … goes to the settings for AutoFormat as you type.
Autoformat Options
The automatic lines and all other AutoFormat options are controlled from Options | Proofing | AutoCorrect options | AutoFormat As You Type:

Border lines can be turned on/off from there. There are no options to select just some character/line combinations – it’s all or nothing.
Under the hood
Word isn’t making the lines by adding a lot more characters across the page. That’s where confusion can begin if you’re trying to stop the lines appearing.
It’s converting your dash/underscore/equals etc. into a paragraph border. Specifically, a bottom border line on the paragraph.
For example, here’s how an automatic double horizontal line appears in Paragraph | Borders and Shading
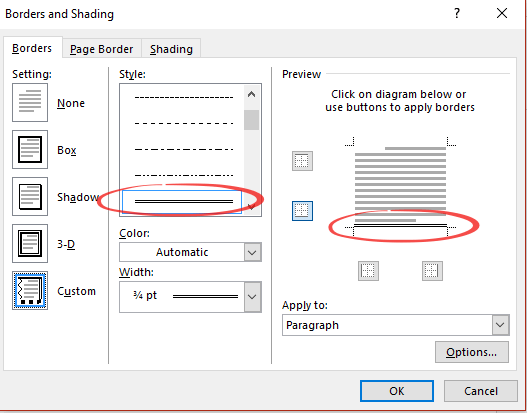
It’s just the double line style applied to the bottom line of the paragraph. Strictly, at the bottom of group of paragraphs with the same formatting. Knowing that detail is useful when you’re fixing the extra lines that start appearing.
Color
The automatic lines are always black (actually ‘Automatic’). Word doesn’t pick up the color of the three characters nor the paragraph as you might expect.
To change the line color, select the line then go to Home | Paragraph | Borders | Borders and Shading. Select the color you want from the pull-down list and then click on the borders you want the color change to apply.

Other lines
You’re not limited to the lines that Microsoft provides via AutoCorrect. You can add your own or change the look of a line added with AutoCorrect.
Select the line then go to Home | Paragraph | Borders | Borders and Shading. That opens up the many options you have:
Styles: there are over 20 line styles to choose from.
Color: as mentioned above, the full Word color range is available.
Width: thin, medium or thick – take your pick from ¼ point to 6pt.
Top, bottom, left, right – click in the preview box to choose which lines to show and the style of each one.
Whatever you choose, remember to click on the line/s in the preview box to apply the look you want.
For consistency, you can have a horizontal line as part of a paragraph style. For example, a line above or below a heading.
Unwanted horizontal lines
A common problem with the automatic lines is extra lines appearing where you don’t want them.
It happens when you add paragraphs immediately above the horizontal line. Each of those paragraphs inherits the same (bottom border) formatting that Word made for the horizontal line.
You won’t see a line under each paragraph because Word groups together paras with the same formatting. Only the last paragraph of a group will have a bottom border line.
The problem usually rises because people try to fix the extra lines by selecting just the paragraphs showing horizontal line and change the formatting.
That doesn’t change the ‘bottom border’ formatting for other lines that have the setting. So it seems like extra lines keep popping up without reason!

The solution is to make sure you select all the affected paragraphs – not just the ones with horizontal lines.
Choose a paragraph and look carefully at the Home | Paragraph | Borders icon. That icon changes according to the current border settings. In this, enlarged, example you can see the bottom line is solid.

To change the border setting, pull-down the borders list and choose ‘No Border’.

To stop the creeping lines in the first place, get into the habit of not adding extra paragraphs from the horizontal line itself. Instead, go to the paragraph ABOVE the horizontal line and add new paras from there.
Five ways to add vertical lines in Word
Six Word tricks to reduce space between lines
Multi-Line Picture Borders in Word or PowerPoint
Create your own I ♥ Love…. Signs in Word

Word automatically formats items like quotes, bulleted and numbered lists, and horizontal lines. When you type at least three dashes, underscores, or equal signs in a paragraph by themselves and press “Enter”, the characters are automatically converted to a single, thick single, or double horizontal line, respectively.
This feature can be a timesaver, except when you want the actual characters in your document and not have Word convert them into a horizontal line that extends the width of your document. There are a few methods for either undoing or removing the horizontal line or preventing Word from automatically creating it.
The first method is to press “Ctrl + Z” right after typing the characters and pressing “Enter” to undo the automatic creation of the horizontal line. The line is removed and your characters remain.
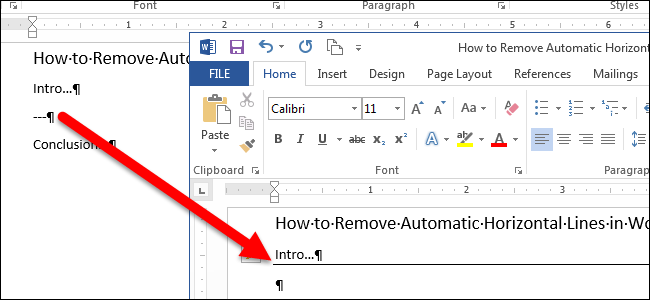
However, undoing the creation of the line every time may not be practical. You can remove the line later, but you should understand how Word adds the horizontal line. When you press “Enter” at the end of the characters that Word replaces with the line, Word removes the characters and adds a bottom border to the paragraph just above the one where you typed the characters.
To remove the line, place the cursor in the paragraph just above where the line was added. Make sure the “Home” tab is active. If not, click the “Home” tab on the ribbon.

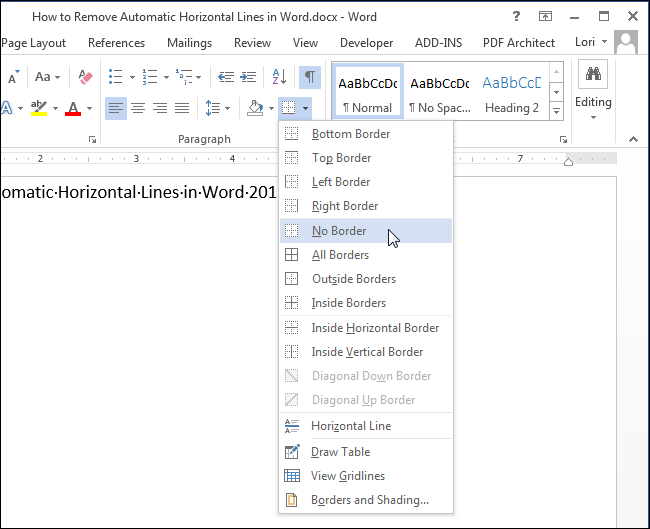
In the “Paragraph” section of the “Home” tab, click the down arrow on the right side of the “Borders” button and select “No Border” from the drop-down menu. This removes the line from below the paragraph in which you placed the cursor.
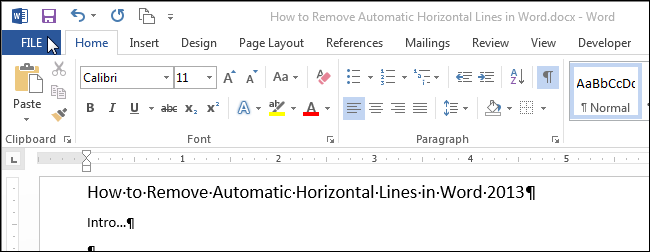
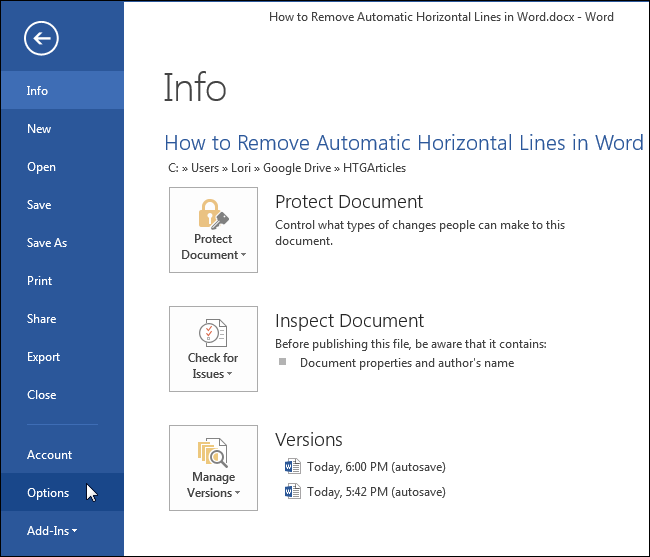
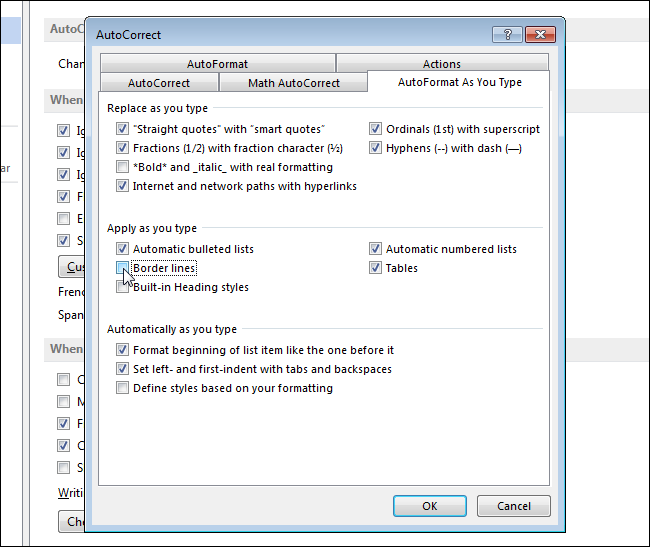
If you don’t want to have to undo the creation of an automatic horizontal line every time it happens, you can prevent it from happening by turning off this feature. To do so, click the “File” tab.
On the backstage screen, click “Options” in the list of items on the left.
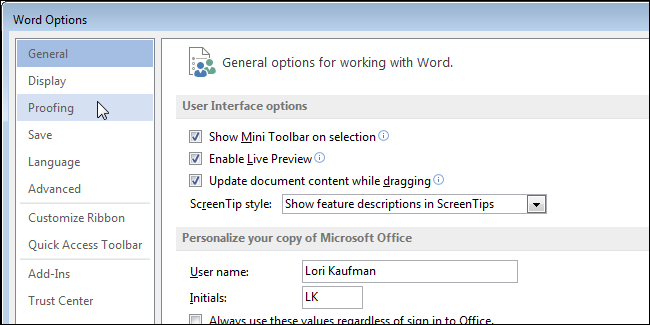
On the “Word Options” dialog box, click “Proofing” in the list of items on the left.
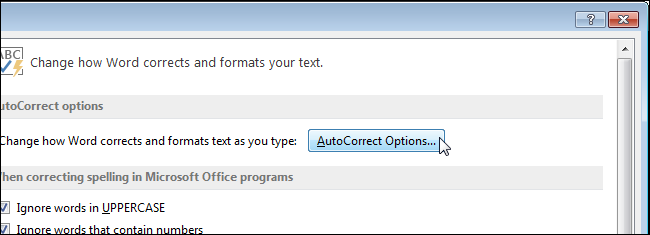
In the “AutoCorrect options” section, click the “AutoCorrect Options” button.
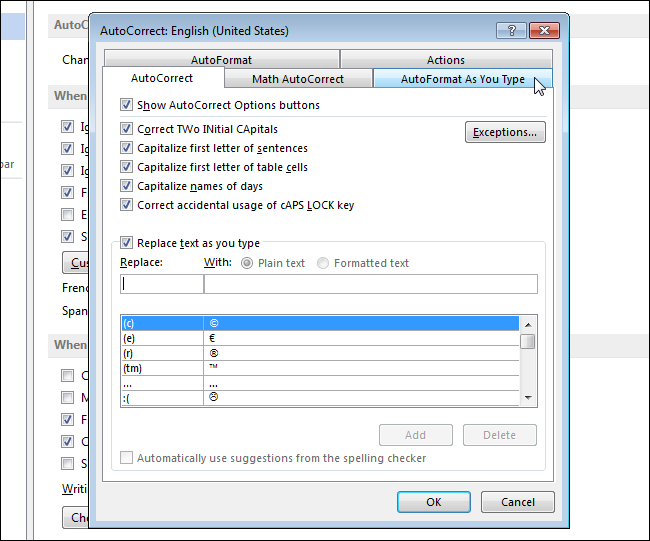
The “AutoCorrect” dialog box displays. Click the “AutoFormat As You Type” tab.
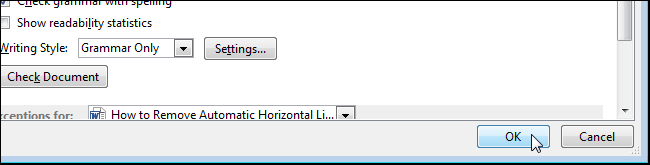
In the “Apply as you type” section, select the “Border lines” check box so there is NO check mark in the box. Click “OK” to accept the change and close the “AutoCorrect” dialog box.
You are returned to the “Word Options” dialog box. Click “OK” to close it.
Now, when you type three or more dashes, underscores, or equal signs in a paragraph by themselves and press “Enter”, the characters remain unchanged.
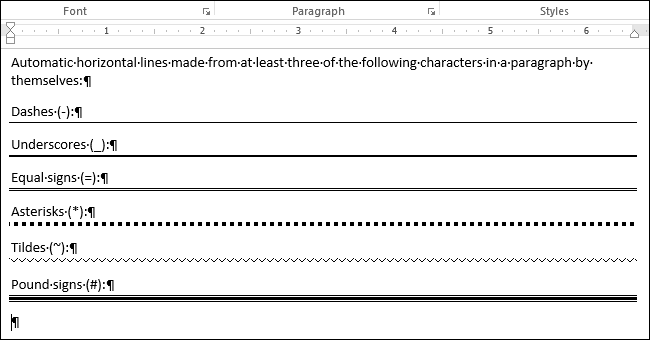
In addition to creating horizontal lines from dashes, underscores, and equal signs, Word also creates automatic horizontal lines from at least three asterisks (*), tildes (~), and pound signs (#). The following image displays the different types of horizontal lines Word automatically creates.
If you want to allow Word to automatically insert horizontal lines again, simply turn on the “Border lines” option (a check mark should display in the check box).
READ NEXT
- › How to Remove Empty Lines from a Word Document
- › How to Add a Dotted Line in a Microsoft Word Document
- › Expand Your Tech Career Skills With Courses From Udemy
- › Google Chrome Is Getting Faster
- › Mozilla Wants Your Feature Suggestions for Thunderbird
- › How to Adjust and Change Discord Fonts
- › The New NVIDIA GeForce RTX 4070 Is Like an RTX 3080 for $599
- › BLUETTI Slashed Hundreds off Its Best Power Stations for Easter Sale
How-To Geek is where you turn when you want experts to explain technology. Since we launched in 2006, our articles have been read billions of times. Want to know more?
Word автоматически форматирует такие элементы, как кавычки, маркированные и нумерованные списки и горизонтальные линии. Если Вы вводите подряд три или более символов тире, подчёркивания или знаков равенства в отдельном абзаце и затем нажимаете Enter, то эти символы автоматически заменяются одинарной, толстой одинарной или двойной горизонтальной линией соответственно.
В большинстве случаев это помогает сэкономить время, но только не в той ситуации, когда эти символы действительно нужны в документе, и Вы не хотите, чтобы Word превращал их в горизонтальную линию во всю ширину страницы. Можно поступить по-разному: отменить это действие, удалить горизонтальную линию или не дать Word автоматически создать её.
Воспользуйтесь сочетание клавиш Ctrl+Z сразу после того, как ввели последовательность символов и нажали Enter. Так автоматическое создание горизонтальной линии будет отменено. Линия исчезнет и на странице снова появятся введённые Вами символы.
Однако, делать такую отмену каждый раз, когда вставляется горизонтальная линия, не совсем практично. Линию можно удалить позже, но давайте сначала разберёмся, как Word создаёт горизонтальную линию. Когда Вы нажимаете Enter после введённой последовательности символов, Word удаляет эти символы и добавляет нижнюю границу к абзацу, как раз под ним.
Чтобы удалить эту границу, поместите курсор в абзац непосредственно над линией. Откройте вкладку Главная (Home) на Ленте меню.
В разделе Абзац (Paragraph) нажмите стрелку вниз справа от кнопки Границы (Borders) и в выпадающем меню выберите Нет границы (No Border). Так будет удалена линия под абзацем, в котором находится курсор.
Если Вы не хотите каждый раз отменять автоматическое создание горизонтальной линии, то можете просто отключить этот параметр. Для этого откройте вкладку Файл (File).
В меню слева нажмите Параметры (Options).
В левой части диалогового окна Параметры Word (Word Options) нажмите Правописание (Proofing).
В группе Параметры автозамены (AutoCorrect options) нажмите кнопку с одноименным названием.
Откроется диалоговое окно Автозамена (AutoCorrect). Перейдите на вкладку Автоформат при вводе (AutoFormat As You Type).
В группе параметров Применять при вводе (Apply as you type) уберите галочку в строке Линии границ (Border lines). Нажмите ОК, чтобы сохранить изменения и закрыть диалоговое окно Автозамена (AutoCorrect).
Вы вернетесь к диалоговому окну Параметры Word (Word Options). Нажмите ОК, чтобы закрыть его.
Теперь, когда Вы введёте три или более символов тире, подчёркивания или знаков равенства в отдельном абзаце и нажмёте Enter, все останется без изменений.
Кроме символов тире, подчёркивания и знаков равенства, Word также автоматически создаёт горизонтальные линии из трёх или более звёздочек (*), тильд (~) и решёток (#). На картинке ниже показаны различные горизонтальные линии, которые автоматически вставляются в Word.
Если Вы захотите, чтобы Word снова автоматически вставлял горизонтальные линии, просто поставьте галочку для параметра Линии границ (Border lines).
Оцените качество статьи. Нам важно ваше мнение: