
Microsoft Word 2003 includes a feature called «AutoText,» which stores phrases and sentences you often type. When you begin typing a stored phrase, Word activates the AutoComplete feature, also known as AutoFill, and inserts the entire phrase. This feature was removed from later versions of Word, suggesting that Microsoft had second thoughts about its usefulness; but it can save time when you are typing certain long phrases of text. For example, you probably type your company’s name frequently – add an AutoText entry and then Word will insert the company name after you type its first four letters.
-
Type the text you want AutoComplete to insert. For example, type «Ironfoundersson Inc.»
-
Highlight the text.
-
Click «Insert» in the Word menu bar. Select «AutoText» and click «New.»
-
Click «OK» to add the text.
-
Check the box labeled «Show AutoComplete Suggestions.» Click «OK.»
-
Type «Iron» anywhere in your document. Text appears, suggesting that you want to type «Ironfoundersson Inc.»
-
Press «Enter» to insert «Ironfoundersson Inc.» into your Word document.
Creating an autofill template in Microsoft Word is a great way to make your work easier and faster, especially if you have to fill out the same forms several times. To create one, go into Settings > AutoFill options > Manage Your Templates. From there you can choose which form templates are associated with each document type (e.g., contracts will be displayed for any contract documents). Once that’s done, click on a template name and edit it according to your needs!.
To create an autofill template in Word, first open the “Insert” tab and then click on “Autofill.” From there, click on “New Template,” which is located at the bottom of the screen. Then type in a name for your new template. Next, go to the “Settings” tab and choose a language from the drop-down menu. Lastly, you will need to select a font that suits your needs. Read more in detail here: how to make a fillable pdf in word.

VIDEO
As a result, how can I auto-fill a field in Word?
Fill-in fields are easy to create and utilize.
- Set the insertion point to the location where you wish the user’s entered text to display.
- Select Insert Field from the drop-down menu.
- Choose Fill-in from the list of field names.
- Enter the wording you wish to see to ask the user for input in the Field Properties Prompt box.
- Enter default text if desired.
- Click the OK button.
The issue then becomes, what is the AutoComplete feature? Autocomplete not only delivers useful search suggestions, but it also saves time. NOTE: In Android and iOS, the boxes that show word suggestions as you write are similar to autocomplete, but they’re used for more general tasks like messaging and document writing.
What’s more, how can I make an autofill form?
Autofill in Google Chrome: How to Set It Up
- In the upper-right corner of the browser, click the Chrome button.
- Select your preferences.
- Scroll to the bottom of the page and choose Show Advanced Settings.
- Continue scrolling until you find Passwords and Forms.
- Select Manage Autofill Settings from the drop-down menu.
- Click the Add New Street Address button to enter your contact details.
How do you make a fillable form out of a Word document?
From a Word Document, create a Fillable PDF Form
- Go to File -> Print, make sure “Adobe PDF” is selected as your printer, and then click the Print button.
- Word will prompt you to save the PDF file you’re working on.
- Acrobat will prompt you with a few questions.
- Make sure “Use the current document” is chosen on the following screen, then click Next.
Answers to Related Questions
In Word, how do you make fill-in-the-blank lines?
Then, hit the Spacebar to insert a gap before the blank line starts. Go to the Ribbon > Home > Paragraph group on the toolbar. Click the downward pointing arrow to open the dialog box for the paragraph settings. Click the Tabs button at the bottom of the dialog box.
What is an autofill computer, exactly?
Autofill is a feature in certain computer applications or programs, usually those with forms, that automatically prefills a field. Most of the time, like in Internet Explorer and Google Toolbar, the entries are determined by the name of the form field, so that street names are not entered in a last name field and vice versa.
In Word 2010, how do you autofill numbers?
How to Number Table Columns Automatically in Word 2010
- Microsoft Word 2010 is available for download.
- Toggle the ‘Insert’ ribbon open.
- Select ‘Table’ and then the table’s size.
- Each column should be labeled.
- Place your cursor in the field where the numbering will begin.
- Click the ‘Numbering’ button on the ‘Home’ ribbon (or select an alternate numbering style)
What is the best way to make a template?
Create a template using an existing template or document as a starting point.
- Then, under the File tab, choose New.
- Click New from existing under Available templates.
- Click Create New after selecting a template or document that is comparable to the one you wish to create.
I don’t have Acrobat, so how can I make a fillable PDF?
Using ApowerPDF to Create a Fillable PDF
- ApowerPDF is now open.
- Select Create.
- Choose the option for a blank document.
- Select the Forms tab from the drop-down menu.
- Add the fields you need to the forms – double-click on them to alter their look, name, and layout.
- When you’re done, go to File and then Save.
In Word, how do you make a questionnaire?
How to Make a Word Questionnaire
- Make “Developer tools” accessible in the first stage.
- Step 2: On the main ribbon, choose the Developer tab.
- Step 3: On the next line, enter your date of birth and then press the tab key on your keyboard.
- Step 4: The last showcase piece is a drop-down menu.
In Word 2010, how do you make a template?
In Word 2010, create a template.
- To access the Backstage, go to the File tab and choose Backstage.
- In the left side, choose Save As.
- Type a name for your document in the Save As dialog, such as “Business Letter,” “Personal Letter,” or “Appraisal Report.”
- Choose Word Template from the “Save as type” selection (. dotx).
What’s the best way to turn a PDF into a fillable form?
Automatically convert an existing PDF to a fillable form
- Step 1: Open the PDF document. You may use PDFelement to open a pre-existing PDF form or a pre-existing form template.
- Step 2: Automatically recognize form fields.
- Step 3: Complete the form and save it.
In Word, how do you change a drop-down list?
Users can only choose from the options in a drop-down list.
- Click the Combo Box Content Control or Drop-Down List Content Control in the Developer tab’s Controls group.
- Select the content control, then click Properties in the Controls group on the Developer tab.
What role does a template play in the creation of a document?
Answer: A template is a sort of document that, when opened, makes a duplicate of itself. A business plan, for example, is a typical document produced in Word. You may choose a template with predetermined page layout, fonts, margins, and styles instead of constructing the structure of the business plan from scratch.
What exactly do you mean when you say “template”?
A template is a shape, mold, or pattern that is used to guide the creation of anything. Some instances are as follows: When used to create a straight line, a ruler acts as a template. A template is a document that has the standard opening and closing portions filled in and can be copied and then filled up with the variable parts.
In Word 2016, how can I insert a GREY text field?
In the main program menu Ribbon, choose the “Insert” tab. Click “Text Box,” then “Draw Text Box” in the “Text” tools category. Drag the placeholders at the corners and edges of the box object to resize the text box to your desired size.
In order to create an autofill document in word, you have to go into the “Options” tab. From there, select “Autofill Options.” In this window, you can select which types of information you want to auto-fill for your document. Reference: how to create an autofill document in word.
Looking for a way to repeat text in Ms Word? This simple guide is for you! Microsoft Word is a great word processing tool. In everyday life, computer users are much familiar with creating letters, documents and presentations. For a simple word processing, Ms Word would be a best choice to work with.
For simple and static documents, users don’t usually include dynamically populated text. They are used to with simply typing the documents statically. But at times there may be a lot of information needs to be auto-populated in a document. Ms Word 2019 has built-in feature to repeat or auto populate certain text throughout the document.
Repeat text in Ms Word with document property fields
To keep it simple, lets see a readily-available option in Word for repeating certain text. Start with a blank Microsoft Word document, go to the “Insert” tab on the Ribbon. Now click on the “Quick Parts” option available in the “Text” group at the right side. Then hover over the “Document Property” option at the bottom. There, you will find 15 predefined properties such as “author”, “abstract”, “category” etc. See the Figure 1 below:
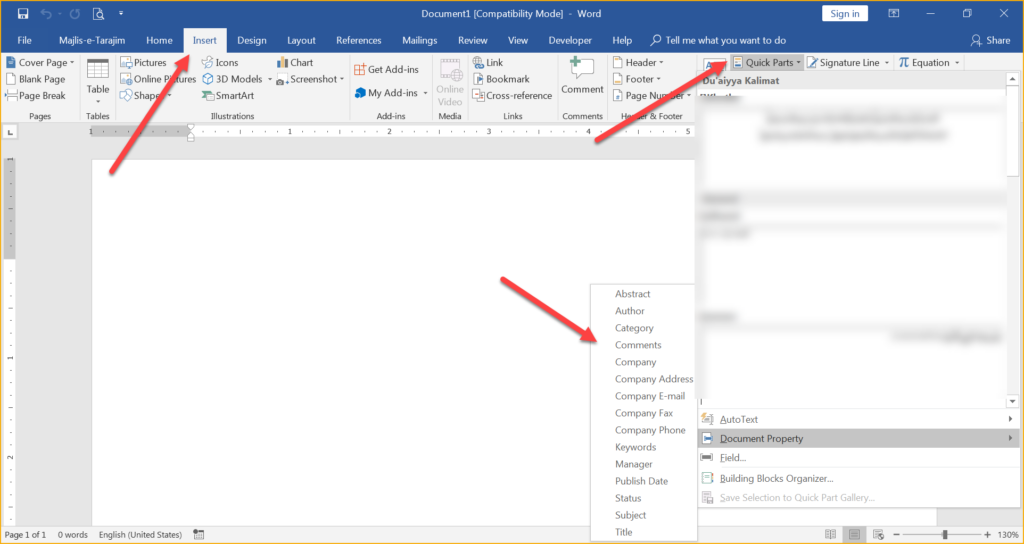
At first, these properties look simple but in reality these are very useful instead. You can then click on any property you want to insert in your document. After inserting any property, change its value i.e. change the text as per your needs. Then copy/paste the same fields wherever you want to repeat the same text in the document.
Every time you change the text of any property, the same text will then be auto-populated throughout the document.
What’s next?
There are other methods available too to repeat text in Ms Word. Though this is a most robust, dynamic and readily available option. Other methods will be discussed in the next post. A short screen cast is given below to highlight the whole procedure. Check it and I hope it helps. Share your thoughts in comments below, thank you 🙂
Applies to Ms Word 2007 & later.
If you create a table in Word and want to fill the cells with numbered list, could you do it automatically? It’s quite simple actually.
1. Select the cells you want to autofill.

2. Click Home – Numbering. Choose a number format here and you can see the result.


3. If you are unsatisfied with the existing formats, select the number list you just added and click Define New Number Format in Numbering.


4. You can adjust the style and format of the number list here.

5. In my case I delete the dot after numbers and hit OK to implement it.

6. The number list in cells has already changed according to my need.

Copyright Statement: Regarding all of the posts by this website, any copy or use shall get the written permission or authorization from Myofficetricks.
Every organization whether big or small — creates, and distributes
documents. The creation of documents by manual entry of data into document
templates is slow, expensive, and error-prone. Let’s take an example of
contract creation. Whenever we create a new contract, we fill in the same details
multiple times in the template. We are always
extra cautious while entering this data. We check it a couple of times
before sending it to the customer, just to make sure that no mandatory field is
left blank.
The pain of document creation compounds with an increase in the number of pages
and the dynamic fields. Larger the document, the larger the
pain of find-replace each dynamic field. Moreover, repeat entry for the same
fields leads to huge
productivity loss and frustration.
The elegant way to overcome this problem is to have a fillable form and
populate dynamic fields through this form. Users fill form fields and
generate documents from these entries. In a recent study, it is observed
that filling word documents through forms improves productivity by >80% and reduces
manual errors to near zero.
Using these forms for customer/vendor/partner onboarding provides a better user experience, and
reduces cycle times.
Create Fillable Word Form
Problems in Creation and Limitations
After acknowledging the pain and the solution, the next step is to know how to create a
fillable form in word. Microsoft word, through its developer ribbon, allows
users to create a fillable form in the word document itself. If you search
in Google, you will find lots of blogs explaining how to create fillable
forms in word. Most of them are well written with elaborate descriptions,
screenshots, examples, etc.
Problem solved? No way! Scroll down to any
of these blog comments. You will see readers screaming &
complaining about how hard and frustrating to create a fillable form in
MSWord. Almost all the comments are from geeks aka technical
guys. Now, you can imagine how hard it is for a business user. The complexity
of form creation multiplies if you have to dynamically populate the table,
images, etc. in your document template.
Apart from complexity, this approach is completely ineffective for enterprises.
-
In an event where you want your respondents to fill the form remotely,
you can’t be sure about the form’s behavior. Based on the user’s device and
Microsoft office version, your form might display/work differently from
what you anticipated. - Templates undergo changes. Every time a template changes, you have to change the code.
- Difficult to enforce security policies. Many Enterprises have strict rules on the usage
of word add-ons, and macros.
The ideal system should
- Auto-generate forms from existing Microsoft Word templates.
- Allow both external and internal users to fill the forms to generate documents. While
internal users can log into the system through single sign-on (SSO) to fill the form within the system,
external users should be able to access it through a secure URL. - Allows partial pre-population of the form. Let’s say you have customer data in your CRM.
You can pre-populate some of the form fields with it and ask the customer to fill the rest.
This would greatly reduce the time and efforts and create a better user experience. - Supports saving partially filled documents as drafts.
Collecting generated documents and systematically arranging them is another
challenge. Receiving by mail and placing those email attachments in your local machine/cloud
storage is an enormous effort. If all these documents are
automatically saved to a designated location, collection and maintenance become
easy.
Here comes EDocGen.
Why use EDocGen for web form creation
EDocGen is the fastest and simplest way to generate a fillable form in
Microsoft Word. It’s an ideal system that addresses all the above requirements. It
simplifies form generation, form filling, and
automatically places all generated documents at a single location.
simplifies form generation:
The system generates a fillable form with dynamic fields from an existing template. Thus from a large
template with 100s of dynamic fields, you can instantly create a web form. Either user can fill the forms
inside the system or access them through secure URLs.
You can create help text for each field and customize the form for your audience.
- You can set a filed type as mandatory/optional. A user can’t generate a document
without filling in mandatory fields. - You can choose the field properties-Text/Number/Date/Email.
- The system supports various types including drop-down menus, checkboxes, file uploads, etc.
Accordingly, while filling the form, the field checks come into play.
Save drafts:
Save the partially filled document as a draft and update it multiple times whenever
more information is available. Publish it, once all the data is
entered. This is particularly useful for proposal, contract
documents preparation.
You can also populate Excel/JSON/XML data into the template to create partially filled-in forms.
Then you can share these forms with all your users. It reduces the data filling.
For example, you can populate your CRM data to create multiple onboarding forms and then
share them for customer onboarding.
Support for a wide range of dynamic fields:
The system supports the dynamic population of images, E-Sign, tables, content blocks, etc. in the
document.
Users can also upload supporting documents. They get embedded into the generated document.
Easy handling:
All generated documents would be placed in the ‘Output’ folder. You can sync
the files to Google Drive/Email /download them to your local machine.
Download Data:
The user filled-in dynamic data can be downloaded in an Excel sheet for further processing or analytics.
EDocGen is built for business users to remove pain in
creating a fillable form in MSWord. You can use it to create a fillable form in all the latest
versions of the office including Word 2010, Word 2013, Word 2016, Word 2019, and Office 365.
Apart from Word documents, you can also generate PDF documents from fillable forms.
Through REST API, you can create your own form and link it to the template for PDF or Word document creation.