
Создание автоматического содержания в MS Word

Текстовый редактор Microsoft Office Word имеет значительно больший функционал, чем об этом знает большинство пользователей. Возьмем на рассмотрение создание содержания какого-либо текста. Это долгое и нудное прописывание заголовков, тем, потом необходимо все это собирать воедино в самом содержании и подогнать их под определенную нумерацию страниц. Плюс ко всему, требуется выставить это так, чтобы оно все шло по нужной линии в определенном шрифте. Согласитесь, что это все не делается так быстро и без нервов. Поэтому создатели Ворда позаботились о нас и разработали функцию «Автосодержание».
Создаем автоматическое содержание в Microsoft Office Word
Подготовка текста
С помощью функции «Автосодержание» вся работа с содержанием ограничивается несколькими шагами. Работу по созданию автоматического содержания нужно начинать после того, как ваш текст будет полностью готов. Первым делом потребуется пронумеровать страницы. Содержание строится по номерам страниц, поэтому без этого никак не обойтись.
Урок: Как пронумеровать страницы в Microsoft Word
Формирование содержания
Есть пронумерованные страницы с текстом, есть заголовки, темы и параграфы. Итак, перейдем непосредственно к подготовке автоматического содержания. Для начала переходим во вкладку «Главная» в левом верхнем углу и в ней находим поле с заголовками.

Если вы наведете мышкой на любой из заголовков, выделенный вами текст тут же примет другую форму, которую позже можно будет поменять. Нумерация заголовков предназначена для того, чтобы построить разные уровни ваших тем в тексте.

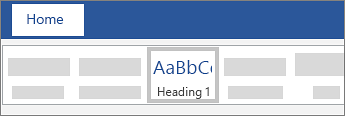
Теперь спускаемся к тексту и начинаем выделять все главные заголовки, применяя к ним соответствующий стиль с помощью нажатия на кнопку «Заголовок 1». И такое нужно проделать с каждым основным заголовком. Следующим шагом будет выделение в тексте подзаголовков и параграфов, если они присутствуют у вас в документе. Так же, как и в предыдущем абзаце выделяем только уже по старшинству. Всем подзаголовкам применяем стиль «Заголовок 2» нажимая на соответствующую кнопку и если же в них присутствуют еще какие подразделы, то выделяем их левой кнопкой мыши и жмем на кнопку «Заголовок 3».

Настройка формата заголовков в тексте
После разметки вашего текста вы можете настроить внешний вид заголовков следующим образом — нажмите на маленькую кнопочку в виде стрелочки под панелью заголовков. Следом в появившемся меню выбираете нужную вам позицию, нажмите на «Изменить» и дальше настраивайте так, как необходимо для оформления вашей работы. После выбора шрифта и его размера, все выбранные вами темы переведутся в выбранный формат.

Применение функции «Автосодержание»
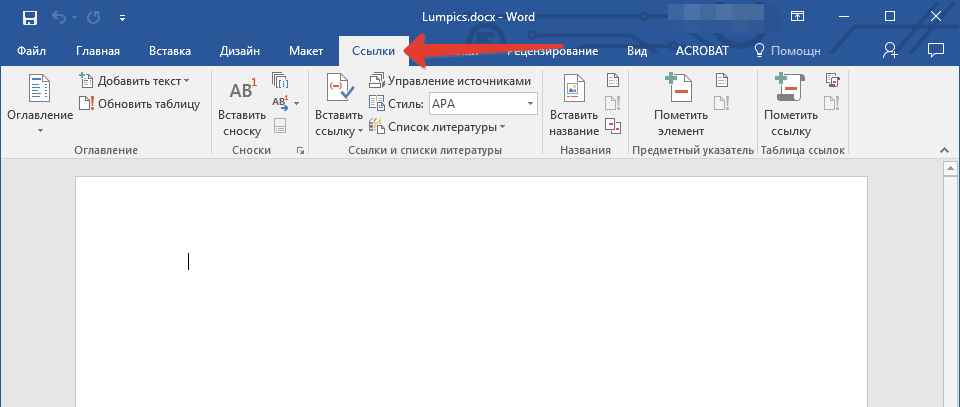
Настало время построить содержание. Для этого переходите во вкладку «Ссылки», в открывшейся строке нажимаем на самую первую кнопку «Оглавление».

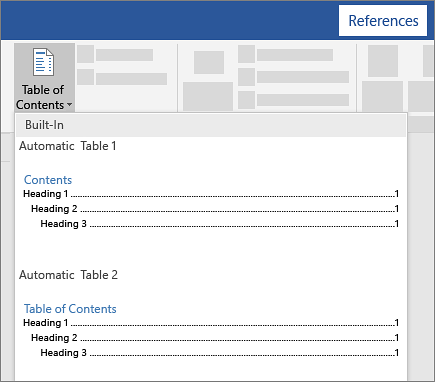
В меню «Оглавление» нажимаете на нужный стиль автоматического содержания и оно тут же появляется в вашем документе.

При правильном распределении всех заголовков должно появиться примерно такое содержание:

Настройка формата содержания
Для того, чтобы подогнать размер и формат текста, абзац, интервалы и другое, вам нужно будет удалить построенное содержание и вновь перейти во вкладку «Оглавление». Вместо выбора автосодержания вам необходимо будет нажать на «Настраиваемое оглавление».

В появившемся окне «Оглавление» нажимаем на кнопку «Изменить». Следом откроется окошко поменьше, где вам остается выбрать нужный заголовок и с помощью кнопки «Изменить» в новом окне настроить все по своим параметрам.

После выставления требуемых для оформления вашей работы параметров содержания жмем в каждом окне на «ОК», выбираем снова нужное автоматическое содержание и оно формируется в документе с вашими настройками.

На этом составление содержания в вашем тексте заканчивается. Теперь вам не придется тратить свое время на долгое копирование, выделение заголовков и построение вручную автосодержания.
Отблагодари меня, поделись ссылкой с друзьями в социальных сетях:
Читайте также
Оставить комментарий ВКонтакте
Insert a table of contents
A table of contents in Word is based on the headings in your document.

Create the table of contents
-
Put your cursor where you want to add the table of contents.
-
Go to References > Table of Contents. and choose an automatic style.

-
If you make changes to your document that affect the table of contents, update the table of contents by right-clicking the table of contents and choosing Update Field.
To update your table of contents manually, see Update a table of contents.
If you have missing entries
Missing entries often happen because headings aren’t formatted as headings.
-
For each heading that you want in the table of contents, select the heading text.
-
Go to Home > Styles, and then choose Heading 1.
-
Update your table of contents.
To update your table of contents manually, see Update a table of contents.
Create the table of contents
Word uses the headings in your document to build an automatic table of contents that can be updated when you change the heading text, sequence, or level.
-
Click where you want to insert the table of contents – usually near the beginning of a document.
-
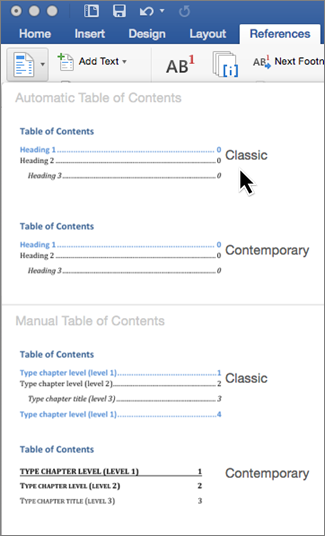
Click References > Table of Contents and then choose an Automatic Table of Contents style from the list.
Note: If you use a Manual Table of Contents style, Word won’t use your headings to create a table of contents and won’t be able to update it automatically. Instead, Word will use placeholder text to create the look of a table of contents so you can manually type each entry into the table of contents. To update your manual table of contents, see Update a table of contents.
If you want to Format or customize your table of contents, you can. For example, you can change the font, the number of heading levels, and whether to show dotted lines between entries and page numbers.
If you have missing entries
Missing entries often happen because headings aren’t formatted as headings.
-
For each heading that you want in the table of contents, select the heading text.
-
Go to Home > Styles, and then choose Heading 1.
-
Update your table of contents.
To update your table of contents manually, see Update a table of contents.
Word uses the headings in your document to build an automatic table of contents that can be updated when you change the heading text, sequence, or level.
-
Click where you want to insert the table of contents—usually near the beginning of the document.
-
On the toolbar ribbon, select References.
-
Near the left end, select Insert Table of Contents. (Or select Table of Contents > Insert Table of Contents.
The table of contents is inserted, showing the headings and page numbering in your document.
If you make changes to your document that affect the table of contents, you can update it by right-clicking the table and selecting Update Table of Contents.
Get the learning guide
For a hands-on guide that steps you through the process of creating a table of contents, download our Table of Contents tutorial. Or, in desktop Word, go to File > New, and search for table of contents.
See Also
Update a table of contents
Need more help?

В MS Word можно выполнять различные задачи, и далеко не всегда работа в этой программе ограничивается банальным набором или редактированием текста. Так, выполняя в Ворде научно-техническую работу, набирая реферат, диплом или курсовую, делая и оформляя доклад, сложно обойтись без того, что принято называть расчетно-пояснительной запиской (РПЗ). Сама же РПЗ обязательно должна включать оглавления (содержание).
Зачастую, студенты, как и работники тех или иных организаций, сначала оформляют основной текст расчетно-пояснительной записки, добавляя в него основные разделы, подразделы, графическое сопровождение и многое другое. Закончив эту работу, они переходят непосредственно к оформлению содержания созданного проекта. Пользователи, не знающие всех возможностей Microsoft Word, для таких целей начинают выписывать в столбик поочередно названия каждого из разделов, указывают соответствующие им страницы, перепроверяют то, что получилось в результате, нередко что-то корректируя по ходу, и только потом отдают готовый документ преподавателю или начальнику.
Такой подход к оформлению содержания в Ворде хорошо работает лишь с документами небольшого объема, коими могут быть лабораторные или типовые расчеты. Если же документ — это курсовая или дипломная работа, научная диссертация и тому подобное, то соответствующий ему РПЗ будет состоять из нескольких десятков основных разделов и еще большего количества подразделов. Следовательно, оформление содержания столь объемного файла вручную займет довольно много времени, параллельно затратив нервы и силы. Благо, сделать содержание в Word можно и автоматически.
Создание автоматического содержания (оглавления) в Ворде
Самое верное решение — начинать создание любого обширного, большого по объему документа именно с создания содержания. Даже в случае, если у вас еще не написано ни одной строчки текста, потратив всего 5 минут на предварительную настройку MS Word, вы сэкономите себе значительно больше времени и нервов в дальнейшем, направив все усилия и старания исключительно на работу.
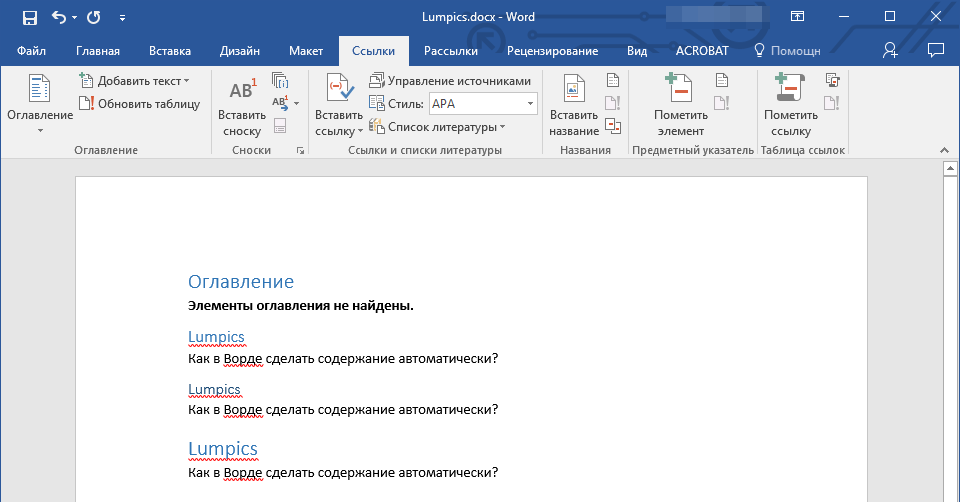
1. Открыв Ворд, перейдите на вкладку «Ссылки», расположенную на панели инструментов вверху.
2. Кликните на пункт «Оглавление» (первый слева) и создайте «Автособираемое оглавление».
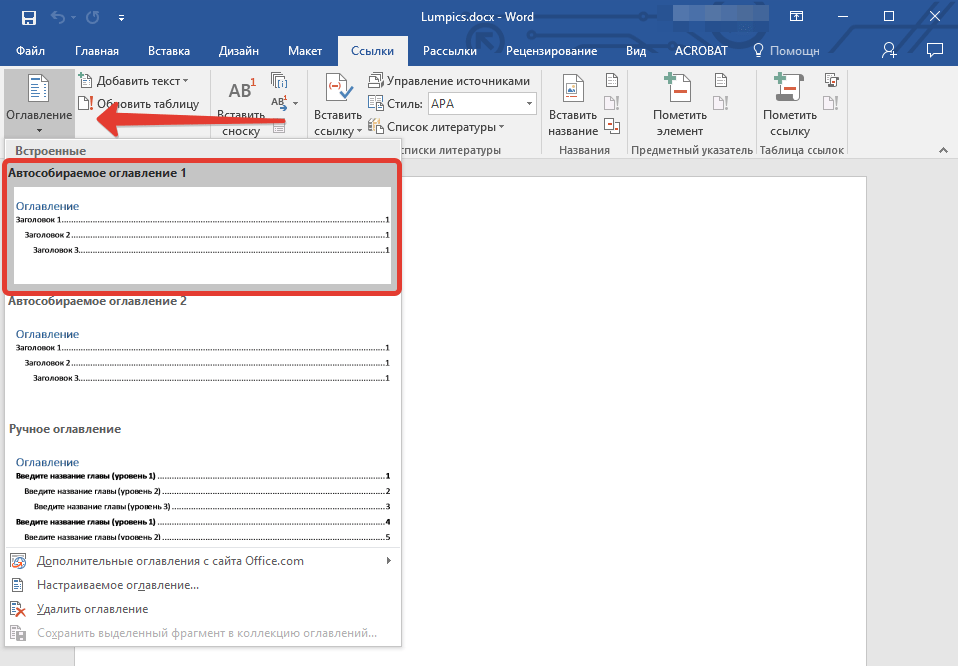
3. Перед вами появится сообщение о том, что элементы оглавления отсутствуют, что, собственно, не удивительно, ведь вы открыли пустой файл.
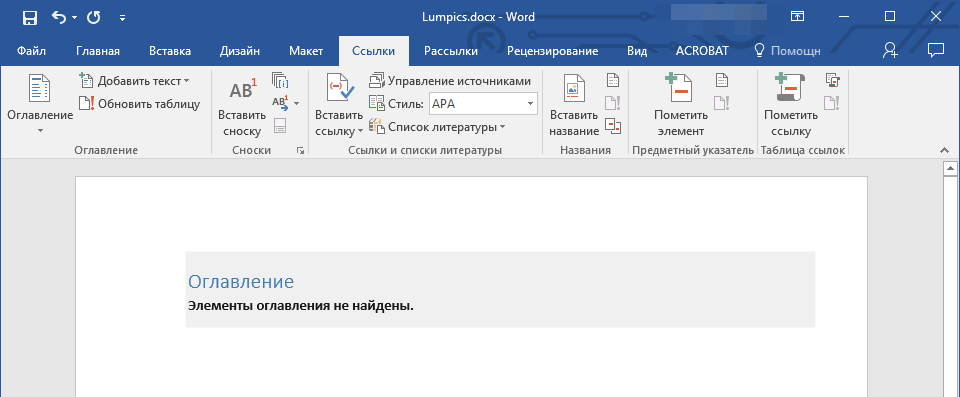
Примечание: Дальнейшую «разметку» содержания вы можете делать по ходу набора текста (что более удобно) или по завершению работы (займет заметно больше времени).
Первый автоматический пункт содержания (пустой), который перед вами появился — это и есть ключевое оглавление, под шапкой которого и будут собираться все остальные пункты работы. Желая добавить новый заголовок или подзаголовок, просто установите курсор мышки на нужном месте и кликните по пункту «Добавить текст», расположенному на верхней панели.
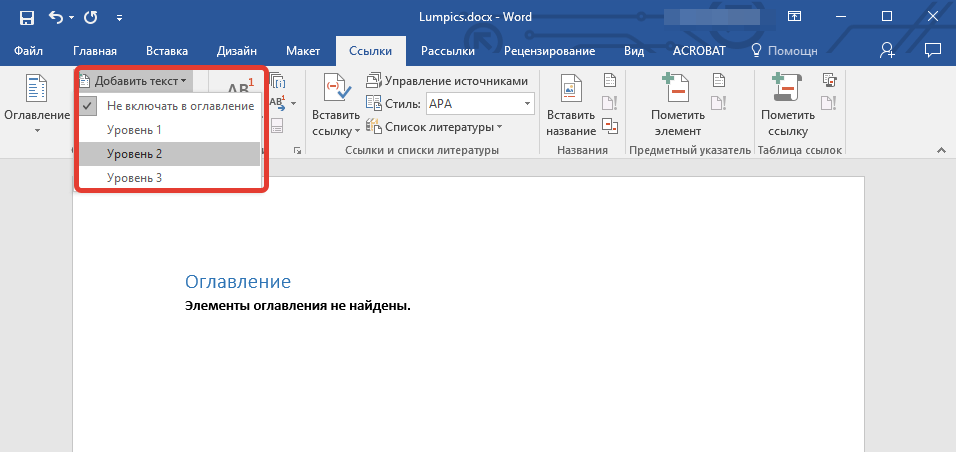
Примечание: Вполне логично, что вы можете создавать не только заголовки меньшего уровня, но и основные. Кликните по месту, где вы хотите его разместить, разверните пункт «Добавить текст» на панели управления и выберите «Уровень 1»

Выберете желаемый уровень заголовка: чем больше цифра, тем «глубже» будет этот заголовок.
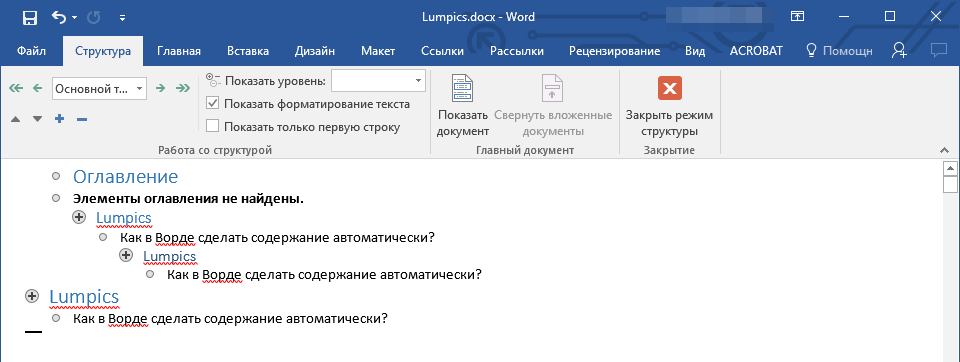
Чтобы просмотреть содержание документа, а также для быстрой навигации по его содержанию (созданному вами), необходимо перейти во вкладку «Вид» и выбрать режим отображение «Структура».
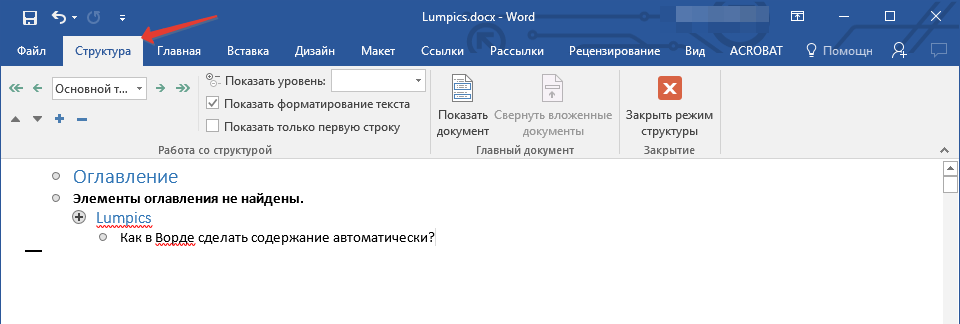
Весь ваш документ разбит на пункты (заголовки, подзаголовки, текст), каждый из которых имеет свой уровень, предварительно указываемый вами. Отсюда между этими пунктами можно быстро и удобно переключаться.
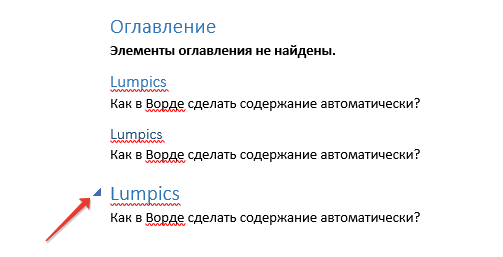
В начале каждого заголовка есть небольшой синий треугольничек, кликнув по которому, вы можете скрыть (свернуть) весь текст, который относится к этому заголовку.
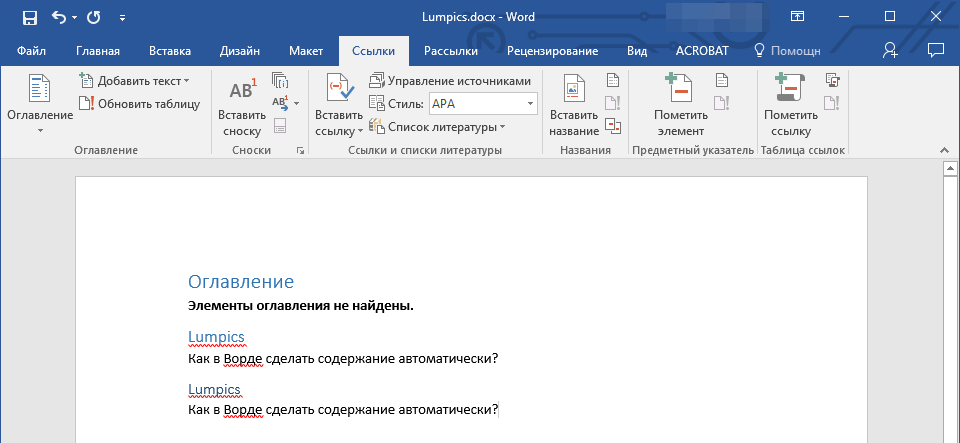
По ходу написания вами текста созданное в самом начале «Автособираемое оглавление» будет изменяться. В нем будут отображаться не только создаваемые вами заголовки и подзаголовки, но и номера страниц, на которых они начинаются, уровень заголовка тоже будет отображаться визуально.
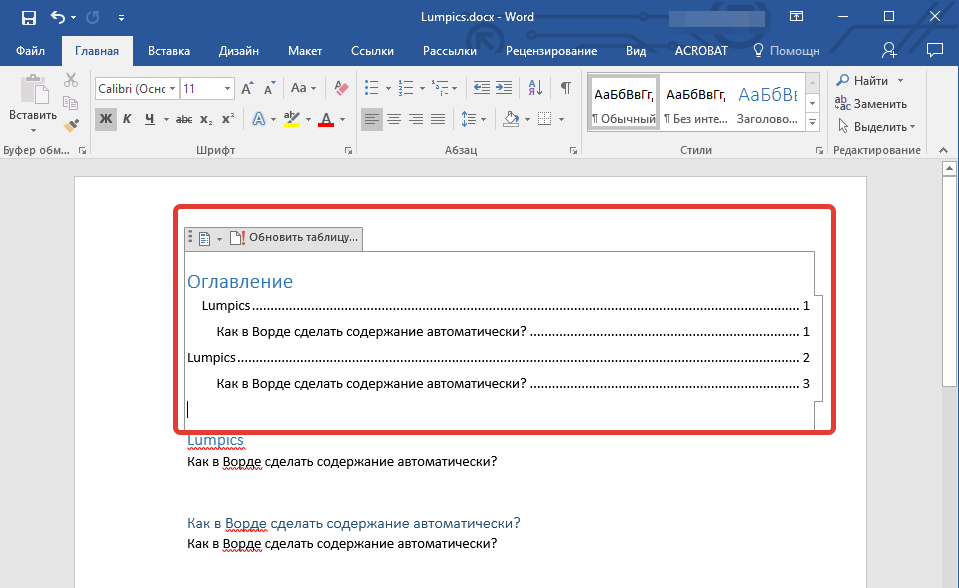
Это и есть столь необходимое для каждой объемной работы автосодержание, сделать которое в Ворде очень просто. Именно содержание будет находиться в начале вашего документа, как это и требуется для РПЗ.
Автоматически сформированное оглавление (содержание) всегда хорошо выровнено и корректно отформатировано. Собственно, внешний вид заголовков, подзаголовков, как и всего текста всегда можно изменить. Делается это точно так же, как с размером и шрифтом любого другого текста в MS Word.
По ходу выполнения работы автоматическое содержание будет дополняться и расширяться, в нем будут проставляться новые заголовки и номера страниц, а из раздела «Структура» вы всегда сможете получить доступ к необходимой части своей работы, обратиться к нужной главе, вместо того, чтобы пролистывать документ вручную. Стоит отметить, что особенно удобной работа с документом с автосодержанием становится после его экспорта в PDF-файл.
Урок: Как конвертировать PDF в Word
На этом все, теперь вы знаете, как создать автоматическое содержание в Ворде. Стоит отметить, что данная инструкция применима ко всем версиям продукта от Майкрософт, то есть, таким образом можно сделать автоматическое оглавление в ворде 2003, 2007, 2010, 2013, 2016 и любых других версиях этого компонента офисного пакета. Теперь вы знаете немного больше и сможете работать более продуктивно.
How to insert an automatic table of contents in Microsoft Word? An automatic table of contents adds direct links from the rows of the table of contents to the different sections of the document. That is, to all the headings and subheadings in your Word document. Tables of contents are available for Word documents (with a .doc or .docx file extension).
This makes the document more readable and readers can quickly access the part they are interested in. Indeed, the title in the table of contents becomes a shortcut and clicking on it jumps to the document part selected.
The method is similar for all versions of Word 2007, 2010, 2013, 2016 and Office 365. It is possible to buy Microsoft Office Word on the official website through an Office 365 subscription for example.
Insert an automatic table of contents in Word and customize it
Nothing could be simpler, just two steps!
- From the Reference tab, open the Table of contents menu
- Choose a style for the table: Automatic table 1 or Automatic table 2 for example.

That’s it, your automatic table of contents is created.
Note: These 2 steps to create an automatic table of contents with Word also work with Word 2007, Word 2010, Word 2013 and Word 2016! And most of the versions available.
Important options to customize a table of contents in Word
The most important and time-consuming part of creating an automatic table of contents is customising it. You need to think about assigning the right text level beforehand.
The levels available range from “Level 1” to “Level 9” for titles and subtitles. The “Body Text” option identifies the basic text of your Word file. These different levels define the hierarchy of display of headings and subheadings in the table of contents you have just created.
It is important to consider the following options to customise an automatic Word table of contents and adapt it to the needs of the readers:
- Displaying page numbers is a must.
- Changing the continuation characters is a personal choice but very much appreciated, as the dots make the table of contents more readable.
- Enabling hyperlinks above the page numbers allows direct access to the target content by Ctrl + Clicking on the link created.
- Align the page numbers to the right, personally I find them more readable that way.
- Customise the style of the lines to go even further. This option is not essential, but if you are a perfectionist, then why not?
We have seen how to create and customise an automatic table of contents in Word. The quality of the documents is largely linked to the quality of the presentation and the ease of reading.
After all, effectiveness is the ultimate goal at work, isn’t it?
Check out this tip on how to delete a horizontal line from a Word document.

I’d love to see Microsoft Word’s table of contents feature lose a bit of its mystery. A lot of people never use it because it intimidates them, or they think they don’t have time to learn.
The good news is, it’s easy to use when the user’s needs fit Word’s default expectations. You style the headings appropriately; click a few buttons, and you have a table of contents. Throw in a monkey wrench or two, and the casual user is stymied. The good news is that most wrenches can be accommodated once you understand how the apparatus works, and that’s not as difficult or time-consuming as you might think. In this article, I’m going to deal with a simple monkey wrench, and show you just how far a little knowledge can go.
LEARN MORE: Microsoft 365 for business
I’m using Microsoft 365, but you can use earlier versions. You can work with your own document or download the demonstration .docx file. This article isn’t appropriate for the browser edition.
The problem with Word’s table of contents
If you’ve used the table of contents feature before, you know that Word uses the built-in header styles to generate a table of contents. It’s automatic, and all you have to do is apply the headings: Word does all the work behind the scenes. All is right with the world until you require something beyond automated mode, which can switch you into head-scratching mode.
Now, let’s consider a simple request that Word, at first, doesn’t seem to handle. Suppose you have several headings throughout a document. You used Heading 1 to style each heading. When you run the table of contents, Word includes every heading from every section—that’s what you’d expect. However, that isn’t what you need; you want only the first heading in each section to be included. Before we try to accomplish the seemingly impossible, let’s review the easy stuff.
Use automated table of contents feature
Let’s work through the automated feature in case you’re not familiar with how it works. Even if you are, reviewing this feature is a good start. The simple document in Figure A comprises two sections. Each section has a few headings styled with Heading 1. (I enabled Show/Hide so you can see the section break.)
Figure A

If you’re working from scratch, and you don’t know how to insert a section break, here’s how:
- Position the cursor where you want to insert the break.
- Click the Layout tab.
- From the Breaks option (in the Page Setup group), choose one of the section break options. I used Continuous in order to keep everything on the same page (keeping things simple).
Now, let’s illustrate how the automated feature works using our simple document:
- Position the cursor where you want the table of contents—usually near the beginning of the document.
- Click the Reference table.
- From the Table of Contents dropdown (in the Table of Contents group), choose the first built-in thumbnail, Automatic Table 1 (Figure B).
The new table of contents is at the top of the page, as shown in Figure C. At this point, you would probably create a page break between the table of contents and the document, but we’re not going to do so for this simple demonstration.
Figure B
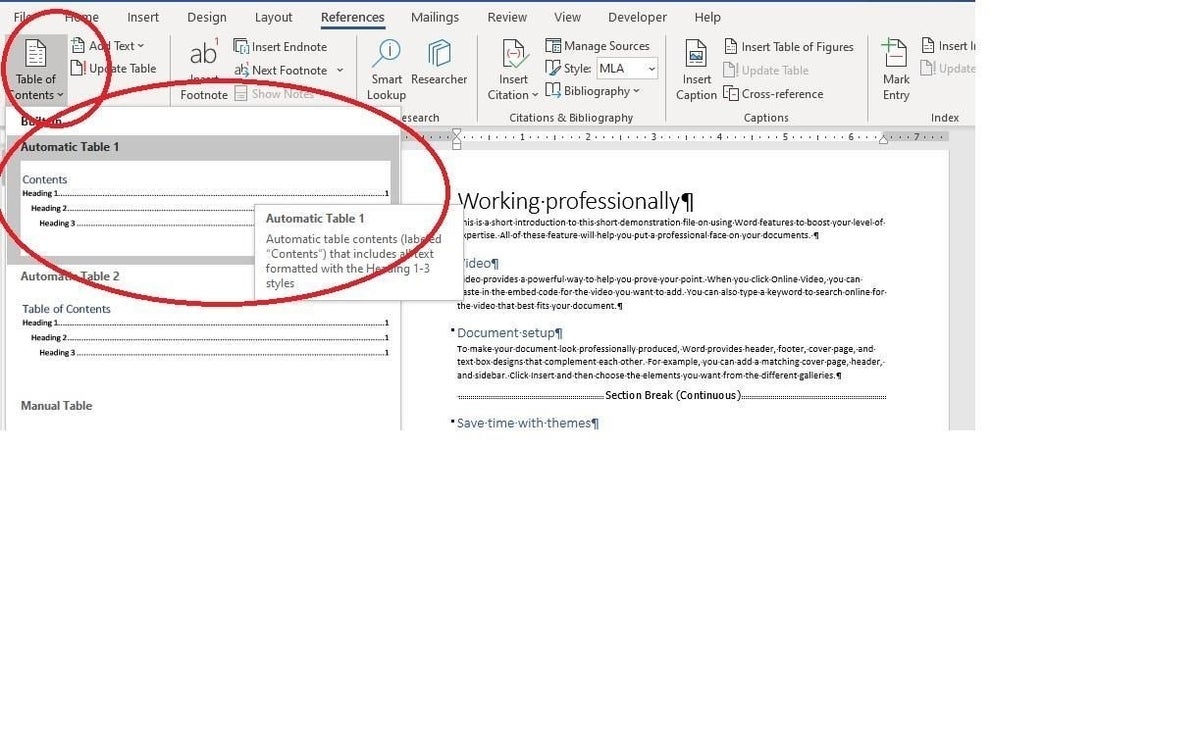
Figure C

Using the automated feature, all you had to do was apply built-in heading styles, in this case, Heading 1, and choose a predefined table of contents. I recommend using the automated feature when you can. Now, let’s move on to a more complicated requirement.
Accommodate the monkey wrench
When you insert the table of contents, Word uses all text styled with one of the built-in heading styles. In this case, we kept things simple and used only one heading level, Heading 1.
However, would you be surprised to learn that the automated feature can easily handle our monkey wrench? The key is understanding the relationship between the built-in styles and the feature itself.
In our case, we only want to include the first Heading 1 heading in the table of contents. The solution is a simple style trick. We’ll use direct formatting to create a style that’s the same as Heading 1. When formatting the document, use Heading 1 only for the first heading in each section. Use the custom style for all the rest. Both styles will be identical in the formatting they apply; only the names will be different.
When Word looks for headings to include in the table of contents, it will find only the one Heading 1-styled heading at the beginning of each section. It will ignore the rest (in each section) even though they look identical.
The demonstration file already contains H1 Custom. However, I recommend you go through the motions of creating it yourself as follows:
- Remove the formatting from a heading that you don’t want to include—change it to Normal.
- Apply the following format directly (it’s the same as Heading 1):
Font: Calibri Light (Heading)
Size: 16
Color: Accent 1 (Blue, Accent 1, Darker 25%); it’s in the fifth row from the left, and the fourth row down.
Spacing: Before 12, After 0 - With the directly formatted heading selected, open the Styles pane (if necessary) by clicking the Styles group’s dialog launcher.
- At the bottom, click the New Style option (Figure D).
- In the resulting dialog, enter the style name, H1 Custom.
- From the Style for following paragraph dropdown, choose Normal (Figure E). Don’t base the new style on Heading 1.
- Click OK. (If you’re working with the demonstration file, Word won’t let you create a new style using the same name, so don’t worry when you see the warning.)
Figure D

Figure E

After creating the new style, you can use the Format Painter or the Styles Pane to reformat the remaining headers. All of the headers will look the same, but as you browse through them, you will see that only the first is Heading 1 and the remaining headers in each section are H1 Custom.
SEE: How to add an automated signature to a Microsoft Word document (TechRepublic)
If it feels like you’ve worked hard, that’s OK. Once you’re more familiar with styles beyond applying, you’ll feel differently. You will think differently, and the solutions will come easier to you. It’s difficult to work blindly—not understanding exactly why you’re doing what you’re doing.
The moment of truth
Let’s recap a bit. You created a custom style that looks like Heading 1 and named it H1 Custom. Then, you applied the custom style to the headings you don’t want in the table of contents. Now it’s time to see if it worked!
Return to the original table of contents and click Update Table. When prompted, select Update the Entire Table, and click OK. Figure F shows the updated table of contents; it shows only two Heading 1 headers.
Figure F

If you’re wondering why we needed the section break, the truth is, we didn’t. Its only real purpose is to show that they’re not an encumbrance. Word will include all the Heading 1 headings, whether they’re in different sections or not, but adding the section break makes the rule a bit more realistic.