
To see the Author property for a document or workbook, click File > Info, and then look for Author under Related People on the right.
Change the author name for new documents, presentations, and workbooks
Important: This procedure changes the related settings for all Office apps, regardless of which app you are using when you change them.
-
Click File > Options.
-
Under Personalize your copy of Microsoft Office, type a new name in the User name box.
-
Make sure the Always use these values regardless of sign-in to Office check box is selected.
Change the author name only in an existing document, presentation or workbook
-
Click File, and then look for Author under Related People on the right.
-
Right-click the author name, and then click Edit Property.
-
Type a new name in the Edit person dialog box.
Note: Changing the Author property in the properties pane of an existing document has no effect on the User name setting in the Word Options, PowerPoint Options, or Excel Options dialog box.
Important:
Office 2007 is no longer supported. Upgrade to Microsoft 365 to work anywhere from any device and continue to receive support.
Upgrade now
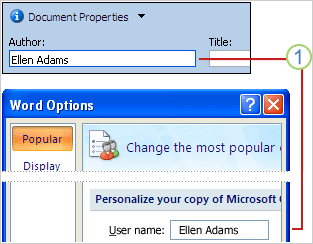
1 In new documents, the name that appears as the Author property (visible in the Document Information Panel) comes from the User name box in the Word Options dialog box.
To see the Author property for a document, click the Microsoft Office Button  , point to Prepare, and then click Properties.
Change the author name for new documents
-
Click the Microsoft Office Button
 , and then click Word Options.
 -
Click Popular.
-
Under Personalize your copy of Office, type a new name in the User name box.
Change the author name in an existing document only
-
Click the Microsoft Office Button
, point to Prepare, and then click Properties. -
In the Document Information Panel, type the author name in the Author box.
Note: Changing the Author property in the Document Information Panel of an existing document has no effect on the User name setting in the Word Options dialog box.
When you create a document in Microsoft Word, PowerPoint, or Excel, the user name you entered on File > Options > General tab is automatically added as the author name. In most cases, you want this. But what if you don’t? What if the author name is the name of the person who created the template you’re using? Or is the original creator of the document you’re modifying who left the organisation long ago? What if you want to remove that name altogether and add your own name (or some other name) as the author?
(NOTE: Be careful when changing the author name that you don’t break any copyright laws—these laws vary from country to country, but essentially, the author of a document is likely the copyright owner of that document, except perhaps in cases of ‘work for hire’ where the organisation owns the copyright. If in doubt, speak to a lawyer or the organisation’s Legal Department.)
This information applies from Word for Windows 2010 and later.
How to delete an author name in an Office document (Word, PowerPoint, or Excel)
- Open the document.
NOTE: If you want to change the author name in a template, right-click on the template, and select Open to open the template. Do not double-click the template to open it as it will only open a document based on the template, not the template itself. - Go to File > Info.
- Right click on the author’s name.
- Select Remove Person.
How to add an author name in an Office document (Word, PowerPoint, Excel)
- Open the document.
- Go to File > Info.
- Click Add an author.
- Type in the new name, or click the book icon to select it from your Contacts list.
How to change your name for future Office documents (Word, PowerPoint, Excel)
- Open a document.
- Go to the File > Options > General tab.
- Change your name in the User name field.
- Optional: Change your initials too.
- Click OK.
- Close the document.
- Check that the new name is applied to a new document—create a new blank document (not based on a template), then check the User name property under File > Options > General tab, and that it’s used as the author name when you go to File > Info.
 Please Note:
This article is written for users of the following Microsoft Word versions: 2007, 2010, 2013, 2016, 2019, and Word in Microsoft 365. If you are using an earlier version (Word 2003 or earlier), this tip may not work for you. For a version of this tip written specifically for earlier versions of Word, click here: Inserting the Author Name.
![]()
Written by Allen Wyatt (last updated July 24, 2021)
This tip applies to Word 2007, 2010, 2013, 2016, 2019, and Word in Microsoft 365
It is possible in Word to keep track of quite a bit of summary information for a document. One of the pieces you can track is the author of a document. This originally is set to be the same as the Word user name, but you can change the author name at any time. Word allows you to insert the author’s name directly in your document, and have it updated automatically if you should ever change the author’s name. This is done by following these steps:
- Position the insertion point where you want the author name inserted.
- Display the Insert tab of the ribbon.
- Click the Quick Parts tool (in the Text group) and then choose Field. Word displays the Field dialog box.
- From the Categories list select the Document Information category. (See Figure 1.)
- Select Author from the Field Names list.
- Click on OK.
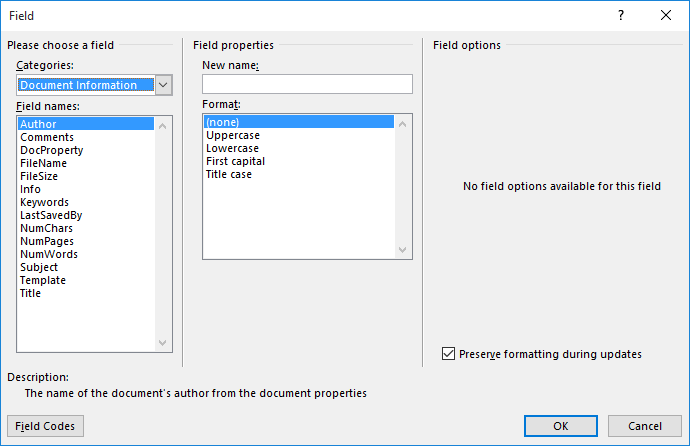
Figure 1. The Field dialog box.
WordTips is your source for cost-effective Microsoft Word training.
(Microsoft Word is the most popular word processing software in the world.)
This tip (9136) applies to Microsoft Word 2007, 2010, 2013, 2016, 2019, and Word in Microsoft 365. You can find a version of this tip for the older menu interface of Word here: Inserting the Author Name.
Author Bio
With more than 50 non-fiction books and numerous magazine articles to his credit, Allen Wyatt is an internationally recognized author. He is president of Sharon Parq Associates, a computer and publishing services company. Learn more about Allen…
MORE FROM ALLEN
Testing if a Workbook is Open
Your macros can easily open and manipulate other Excel workbooks. If a workbook you are trying to use is already in use …
Discover More
Shortcut for Viewing Formulas
If you need to switch between viewing formulas and viewing the results of those formulas, you’ll love the keyboard …
Discover More
MRU Files Won’t Display
Excel provides a quick way to access the workbooks you’ve most recently worked on. This tip addresses how to display a …
Discover More

Do More in Less Time! Are you ready to harness the full power of Word 2013 to create professional documents? In this comprehensive guide you’ll learn the skills and techniques for efficiently building the documents you need for your professional and your personal life. Check out Word 2013 In Depth today!
More WordTips (ribbon)
Displaying Blanks when Summing to Zero
If you use fields to sum the information in your table columns, you might want to display a blank when the sum is zero. …
Discover More
Using TC Fields for Notes
The TC field is normally used in constructing manual Tables of Contents. The way the field works, however, makes it a …
Discover More
Inserting Page Number Cross-References
Want to insert a dynamic cross-reference to a particular page number? It’s easy to do following the steps in this tip.
Discover More
Subscribe
FREE SERVICE: Get tips like this every week in WordTips, a free productivity newsletter. Enter your address and click «Subscribe.»
View most recent newsletter.
Videos
Links and Sharing
- Blog>
- Office>
- How to Change Author Name in Word 2016 Document
Normally, the default author name of a created Word document is the username of Windows you’ve currently logged in. Sometimes you may need to change the author of a Word document to another one. Now this page will show how to change author name in Word 2016 document.
- Option 1: through the Properties dialog
- Option 2: through Word Options dialog
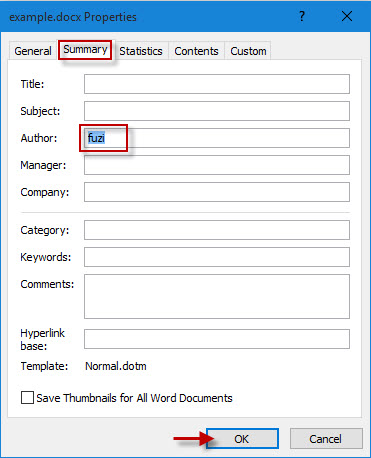
Option 1: Change author name in Word 2016 through the Properties dialog
Step 1: Open your Word document.
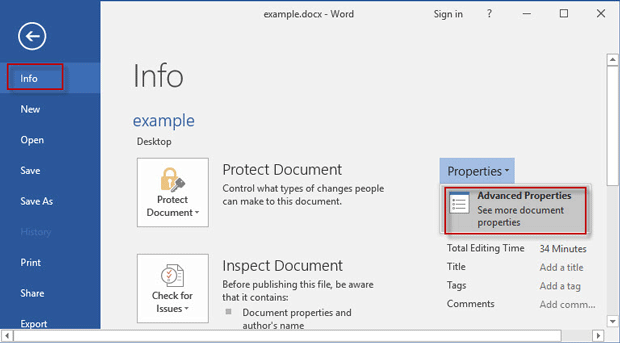
Step 2: Click the File tab to go to the backstage view. Select the Info tab on the left-side pane. Then on the right side, click on Properties and click Advanced Properties.
Step 3: After the Properties dialog opens, select the Summary tab. Then in the Author box delete the original author name and type a new author name, and click OK to save the changes.
Option 2: Change author name in Word 2016 through Word Options dialog
Step 1: Open your Word document.
Step 2: Click the File tab to go to the backstage view.
Step 3: Click the Options.
Step 4: After the Word Options dialog opens, select the General tab. Locate the “Personalize your copy of Microsoft Office” section, change the username to the name you want, and click OK.
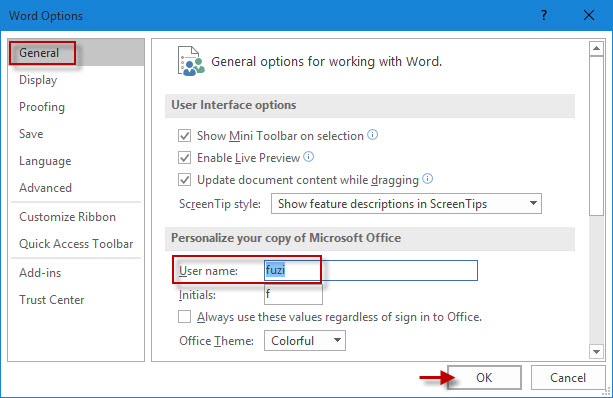
Then the author name of your created Word documents in Office 2016 should be the new name.
In this article, we will show you 4 ways to delete or change the author names for comments in your Word document.
Now and then, we’d like to insert comments to Word documents as to make revisions. As you may notice, there is the author or user name in every comment made in a document to display who the reviser is. However, there are times when we rather have the name deleted or changed out of certain reasons.
- First, if we are using a computer of someone else, then the name on this computer cannot be yours. Thus, you will need to change the user name.
- Second, due to privacy consideration, you want only your comments but not you name to go public. At this time, you probably want to remove your own name or any information indicating who you are.
- Third, you just change your name! This situation doesn’t happen a lot but it does sometimes. Consequently, you user name on your computer should be altered, too.
No matter what your case is, it shall do you no harm to learn ways to delete or change personal information on computer or digital documents, especially in an age when privacy breaches happen all the time.
2 Methods to Delete the Author Names for Comments
At first, there are 2 solutions for you to delete the author name.
Method 1: Remove Personal Information
For Example, this is our sample:
- Firstly, open the document and click “File”, then “Info”.
- Next, click “Check for Issues” icon.
- On the drop-down list, click “Inspect Document”.

- In “Document Inspector” dialog box, ensure the “Document Properties and Personal Information” box is checked.
- Then click “Inspect”.

- Soon, there will be a notice saying certain document information is found. You should only click the “Remove All” button in “Document Properties and Personal Information” part.
- Click “Close” lastly.

- Now save the document and you shall see all Author names are replaces by letter “A”.


After applying this method, all comments you create neither in this document or others in the future will automatically take the author name of “A”. In other words, it’s a once for all solution.
In case you need to stop it, you should take the bellowing steps:
- Open Word and click “File” tab, then “Options” to open the “Word Options” dialog box.
- Click “Trust Center” first.
- Then click the “Trust Center Settings” on the right-sown corner to open the “Trust Center” dialog box.
- Next, clear the “Remove personal information from file properties on save” box.
- Lastly, click “OK” in both dialog boxes.


Method 2: Use VBA Codes
Now there is the VBA way to handle the case. For future reference, it’s only a one-time trick for a single document each time so there is no need to worry about affecting other document settings. You certainly don’t have to undo the modification.
- To begin with, press “Alt+ F11” to open the VBA editor.

- Next, paste the following codes there and click “Run”.

Sub DeleteAllAuthorNamesInComments()
  Dim objComment As Comment

  ' Delete all author names in comments
  For Each objComment In ActiveDocument.Comments
    objComment.Author = ""
    objComment.Initial = ""
  Next objComment
End Sub

2 Methods to Change Author Names for Comments
Sometimes, instead of deleting author names, we prefer to change them.
Method 1: Edit User Name
- First and foremost, click “Review” tab.
- Then click “Track Change” in “Tracking” group.
- Next, click “Change User Name”.

- Now the “Word Options” dialog box will pop up. Make sure the “General” tab is displayed. Then change the user name and initials.
- Finally, click “OK”.


Notes:
- This change will affect all future documents.
- For the comments made before the change, they keep the original names.
Method 2: Use Codes to Change Author Names
- Similarly, press “Alt+ F11” to open VBA editor.
- Only this time you should paste these codes and click “Run”:
Sub ChangeAllAuthorNamesInComments()
  Dim objComment As Comment

  ' Change all author names in comments
  For Each objComment In ActiveDocument.Comments
    objComment.Author = "Test Name"
    objComment.Initial = "TN"
  Next objComment
End Sub
Notes:
- In codes “objComment.Author = “Test Name””, the “Test Name” refers to the name to be displayed when cursor hovers over the comment. You can change it as you like.
- In codes “objComment.Initial = “TN””, the “TN” refers to the initials of “Test Name”, which you should set according to the name you choose on last code line.
Avoid Your Word File Loss
With Word, we easily accomplish multiple tasks in every day work. And after days and years’ use, Word can go wrong, resulting in the catastrophic loss of files. More often than not, the built-in feature is not enough. So, a Word file damage fix tool can be a huge help.
Author Introduction:
Vera Chen is a data recovery expert in DataNumen, Inc., which is the world leader in data recovery technologies, including Excel file damage recovery and pdf repair software products. For more information visit www.datanumen.com