
If you’re using Vista AND you keep your Author-it Data files separate from the Author-it Program Files, you should never see the error below and so can ignore the rest of this post.
However, if you have your Author-it ..DataTemplates.. or Publishing folder on your C:Program Files.. drive in Vista, you may get a message that you can’t publish to Word because the file is full, write-protected etc.
The reason you get the error is that Vista’s security prevents you from writing to C:Program Files. My understanding is that you get the error message because Author-it wants to create the RTF in the ..DataTemplates.. folder first, before creating the Word document in the Publishing folder.
How to prevent it? Well, you have a couple of options:
- Move your ..Data.. and ..Publishing.. folders out of C:Program Files.. to a less secure location. You’ll probably have to reassign your paths in Author-it if you do that.
- Assign Write permissions to the user (go to the Program Files folder, drill down to the Author-it Templates [and/or Publishing] folder, right-click on it and select Properties, go to the Security tab, select Users, click Edit, then select the Full Control check box in the Allow column).
Author-it is the only tool you need to deliver beautiful documentation and advanced eLearning courses to anyone, anywhere, on any device.
Good tool, I want more people to use it
“Love it. I’ve loved it for years. Superb tools with forgivable compromises. We use the Cloud version for a globally distributed team. We have authors in the US, UK, Germany and India so far… I love the way you can throw yourself in as a team, be productive immediately, and tidy up using the tools as you evolve your solution”
Richard P.
Executive Sponsor in Semiconductors
Great content management
“Author-It is superior when it comes to managing large amounts of complex, single-sourced content. It easily handles variations to content, and the UI is intuitive. I know that whatever content-management challenges that come up, Author-It will handle them. The support I receive from the Service Desk is second-to-none. They get back to you quickly, and genuinely care about your question or issue”
Jody W.
Documentation Specialist, Mid-Market
A great CCMS to make managing all my content much easier
“No more searching for files or images, quick finds through locate option. No more endless debates about why old recently updated content came back in other manuals due to copy/paste”
Source: G2, Arnold S, Small-Business, May 2020)
Author-it provides modern component authoringsolutions without the hassles.
Author-it is a true and complete Component Content Management System (CCMS) for the creation, management, localization, and publishing of a wide variety of information products.
Single sourcing is the core of Author-it, and with loads of functionality like multi-channel publishing, variant management, review and approval workflows and authoring assistance. We offer a collaborative cloud-based authoring solution capable of dealing with the needs of any organization, from SMBs to Enterprise.
![]()
![]()
![]()
Policy Management
Technical Documentation
Training & eLearning
Why component authoring?
Authoring, collaboration, reuse and publishingright at your fingertips.
Long gone are the days of time wasted on locating and updating multiple documents stored in silos. With Author-it, any object – be it a word, phrase, or paragraph – can easily be changed in one place and pushed out to multiple publishing outputs simultaneously. No more copy and paste!


Structured and unstructured authoring for teams
Keep your content consistent, accurate and on-brand with structured authoring in our easy-to-use interface, while SMEs and other collaborators can easily contribute in an unstructured environment, eliminating the need for XML or DITA, and keeping things running smoothly for the entire team.


Did you know?
On average, 20 hours a week is wasted on inefficiencies in documentation processes by not having a true CCMS for content reuse, management, and workflows.
Author-it’s unique platform takes the complexity out of the equation by working with reusable components, so you take back those 20 hours and do something nice for yourself. You deserve it.
Author-it solutions
Choose the solution that’s right for you.
Technical documentation
(“Tech pubs”)
Author-it is the ultimate component authoring solution for technical documentation professionals who want to create engaging content without complexity.
LEARN MORE
Training and
eLearning
Solve your corporate Learning and Development challenges with Author-it’s interactive, adaptive HTML5 eLearning and microlearning solutions.
LEARN MORE
Policy management and compliance
Document comprehensive policies and procedures with Author-it’s powerful compliance solutions.
LEARN MORE
Pharma solutions
(Docuvera)
Looking for structured content management solutions for Pharma? Check out Docuvera, our sister solution at ASC, for information on MedInfo, Clinical, Regulatory Labeling and more. *For medical device content solutions visit our technical documentation page.
LEARN MORE
![]()
Subscribe to our newsletter
Find out about major releases, upcoming events, and industry related news and information.
SIGN UP
![]()
![]()
“I like Author-it because it’s a clever tool, and I like the speedy customer support. I don’t like telling people what to do, so would never say to anyone, ‘You must use this tool,’ but I would certainly say, ‘Have a look at Author-it’.”
Catherine C.
Renishaw PLC
We use cookies on our website to give you the most relevant experience by remembering your preferences and repeat visits. By clicking “Accept”, you consent to the use of ALL the cookies.
It’s a while since I’ve written about anything to do with my work, but I thought how I’ve worked towards creating ebooks might make an interesting post. I’ve pondered over this problem for a long time and while it is relatively easy to create an ebook using Calibre, it is difficult to automate it and get the formatting right. My criteria for this project are:
- Create a reasonably well formatted ebook from an Author-it output.
- It has to be done automatically from publishing profile in Author-it with no manual intervention.
- I have to be able to publish from any book within Author-it i.e. once set up a book a publish to Word, PDF, or help is also publishable to eBook.
- I should be able to set the actual eBook format, i.e. epub, mobi, etc within Author-it.
- There had to be no cost involved (barring my time in setting it up).
Calibre is a free tool that allows you to create eBooks in a variety of formats. Author-it is a component content management system that allows you to store and publish content in various formats but not eBook.
After a bit of experimentation I decided that the the best format from Author-it would have to be a Word document converted on the fly by a macro to a filtered *.htm format. The main reason for doing this step was due to the fact that when I converted a Word doc directly all the numbering was screwed. I could have published straight to html but I found that there were just too many things wrong with the initial output, and while using CSS to correct the output may have worked going via the Word route made sense (at least it did to me).
The macro code I used to covert the Word doc to htm is shown below:
Sub SaveAsHTM()
Dim FileName As String
FileName = ActiveDocument.Name
FileName = Mid(FileName, 1, InStrRev(FileName, ".") - 1)
FileName = ActiveDocument.Path & "" & FileName & ".htm"
ActiveDocument.SaveAs2 FileName, FileFormat:= _
wdFormatFilteredHTML, LockComments:=False, Password:="", AddToRecentFiles _
:=True, WritePassword:="", ReadOnlyRecommended:=False, EmbedTrueTypeFonts _
:=False, SaveNativePictureFormat:=False, SaveFormsData:=False, _
SaveAsAOCELetter:=False, CompatibilityMode:=0
ActiveWindow.View.Type = wdWebView
End Sub
However, I had another problem, when I publish normally to Word I run an adjust table macro that aligns and sets the width of all the tables. This caused a problem in the htm format as the width was now set as absolute and when converted to eBook the tables would go off the edge of page. This was easily fixed by disabling the macro in the after publish macro in the Word template, but this also meant, as I still wanted to run it for normal outputs, I had to change all my other Publishing Profiles which run the after publish macro, to run the adjust-table macro on its own. Once I’d done this the output looked much better.
There were still problems, I don’t think an eBook needs a mini TOC at the beginning of each chapter so I removed these with another two macros that removed the Word styles for the document. The code for one is shown here:
Sub DeleteMiniTOCItem()
Selection.Find.ClearFormatting
Selection.Find.Style = ActiveDocument.Styles("MiniTOCItem")
Selection.Find.Replacement.ClearFormatting
With Selection.Find
.Text = ""
.Replacement.Text = ""
.Forward = True
.Wrap = wdFindContinue
.Format = True
.MatchCase = False
.MatchWholeWord = False
.MatchWildcards = False
.MatchSoundsLike = False
 .MatchAllWordForms = False

 End With
Selection.Find.Execute Replace:=wdReplaceAll

End Sub
The next problem I had was running all this automatically. Luckily you can run Calibre from the command line and from Author-it you can run batch files from a publishing profile and also pass in arguments. There are many commands I could have used with Calibre and I have used only a few here, I suspect with more time there is a lot more I could do.
It took me a while to work out the syntax for Calibre, but it turned out it was quite simple and I’m just stupid. So the batch file that runs looks something like this:
ebook-convert "C:UsersdavidjDocumentsAITPublishingebooknumero interactive Classifier Trainer Guidenumero interactive Classifier Trainer Guide.htm" "C:UsersdavidjDocumentsAITPublishingebooknumero interactive Classifier Trainer Guidenumero interactive Classifier Trainer Guide.epub" --enable-heuristics --disable-markup-chapter-headings --page-breaks-before /
But with the arguments that Author-it can pass into it much simpler:
ebook-convert %1 %2 --enable-heuristics --disable-markup-chapter-headings --page-breaks-before /
- %1 = “<SYS_PUBLISH_FOLDER><ni> <Guides>.htm”
- %2 = “<SYS_PUBLISH_FOLDER><ni> <Guides>.<epubextension>”
If you know Author-it you will know how flexible it can be, you’ll know that with the system variable and my own defined variables I have complete control of what I publish from Author-it, down to the type of ebook I produce. Currently I am only interested in epub and mobi file formats but if at some future date I want to create other formats I can just add them to my <epubextension> variable.
The output I’m getting now is OK, or it looks OK in the Calibre ebook reader. A screen shot is shown below.

Sample ebook
I need to check it on a few devices to get a better idea of what it looks like. I’m not happy with the main TOC as it has page numbers as does the index. I can exclude the index easily enough through the publishing profile but I think the TOC is still needed so I need to devise a way of either regenerating it through Calibre (which I think you can do) or modifying it in some other way. There are a few minor indentation issues but I should be able to sort those out relatively easily.
In general I’m satisfied with what I am getting, now once I have finished writing or editing a book I have a new publishing option, available as a single click with no further manual intervention.
I thought I was done with these, but I hadn’t yet romped with Flare’s idea of design for HTML 5 output.
That was the sound of my forehead repeatedly mashing my keyboard. Because when they came up with the idea of how tech writers were going to control the design and appearance of their HTML output in Flare, somebody was so far out to lunch that not even the ants could find them.
The primary reason that I moved away from Authorit was that its HTML was ludicrously bad, and it was incapable of giving up the iFrames. Now, I’m not «death to iFrames», like some on the internet, but they’re not mobile-friendly, and mobile is where we’re going, so an option that doesn’t involve them would be good, thanks, and while you’re at it, HTML generation that isn’t twenty years old would be spiffy.
But Author-it at least assumed you probably knew better exactly how you wanted things to look than they did. The HTML output was basic, but it was also very flexible because it was almost entirely not done in Author-it: you created an HTML file with all the images and layout that you wanted, and then you added some specific <aitdata> tags that Author-it’s publishing script would pick up and replace with the topic contents, et voila.
Flare, on the other hand, has these things called ‘Skins’. Skins are proprietary scripts—meaning they’re compiled and not editable—that generate an html template that is used to construct the pages. The scripts control where everything is, right down to where your search box is located, or what’s happening in your header field. This would be alright, if the edit-Skin UI actually allowed you to edit all components of it, and didn’t make huge whopping assumptions about what you wanted. For example, things that I should be able to do easily that I can’t do without hacking around:
- Move the searchbox from the top of the screen to within the toolbar, or anywhere else.
- Have more than one image in the banner at the top of the screen.
- Have anything other than an image in the banner at the top of the screen. No text for you.
There are many more. So many aspects of the layout and styling that are bizarrely hidden from any kind of editing, because when they wrote the scripts, someone just assumed that people wouldn’t need to want to change it. And that’s not even getting to the mess it makes of its only-partially-editable CSS file every time you change anything. Ugh.
Bad developer. No cookie.
I do have options, but they’re not pretty. There is a place I can inject custom scripts into the toolbar, and I can write a script to take the existing output and fix it the way I want it, but that’s rather like hiring a guy to stand next to everyone who’s reading your book and nip in with the commas and periods just before they’re needed, because your printer couldn’t get a handle on this punctuation thing. And, in my opinion, about as ludicrous.
If it weren’t for Flare’s translation management, I would really be regretting switching across from Author-it. There are just so many bugs, so much unecessary complexity, so many weird assumptions and limitations, and frankly I could write a parser to fix Author-it’s bad HTML (and even have Author-it run it for me as a post-processing command, all by itself.) Flare looks cool, and it’s certainly cheaper, but in my opinion it’s yet to prove itself an equal to the behemoth that is Author-it.
For many course designers, publishing and deploying the course is the easy part. Much trickier to control is what happens after that. How can you maintain current and accurate documentation that can be shared with learners, subject matter experts, legal archive records, and other project stakeholders? There are all sorts of reasons why you might want to print out a paper version of your course to address this challenge, but how exactly do you do this?
One approach is to grab screenshots of each slide of your course with a tool such as SnagIt, Evernote (my go-to), or even just the print screen button on your keyboard. However, this latter option would not be the first on my list of recommendations. The tediousness of grabbing one screenshot for every interaction/slide within an online course is daunting.
The easiest method—and the one I recommend—is built right into Articulate Storyline: the publish to Word function. I’ve got some helpful tips for making your printed slides look great using this feature. Let’s take a look.
Printing Your Slides in Storyline
The first thing you need to do is start with the publish screen. Click Publish to bring up the publish window options:
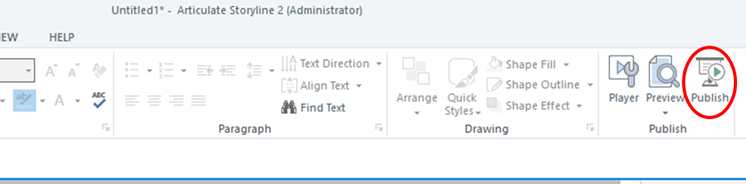
Once you click Publish, here’s what you need to do:
- Select the Word tab (see the screenshot below). Enter a title for your project. The saved name of your Storyline file will appear as the default title, or you can change it here before publishing.
- Choose where you want to save the file. You’ll want to add a check in the Show Layers box. This will ensure that every layer you have added to slides throughout your course will also be included in the published version.
- Add a check to the Show Notes box if you’ve added notes to slides within your file and if you want these to be included in the end result.
I also prefer to choose Screenshot Size: Large. I find when the slides print out they fill the pages better and, more important, are easier to read. However, when you choose this method you may need to make some adjustments to your page margins to get more than one slide to fit on a page.

Adjusting Your Microsoft Word File
When I print out my slides, I often make a few adjustments to make the file look great. Usually I change the margins, resize and edit the footer, and, depending on the project, I may remove the slide titles.These steps must all be done manually within Word, but the process is quick.
Here’s what the finished product looks like, with these settings and tweaks:
- Screenshot Size: Large
- Two slides per page
- Margins, footer, titles adjusted

Ordering Your Slides
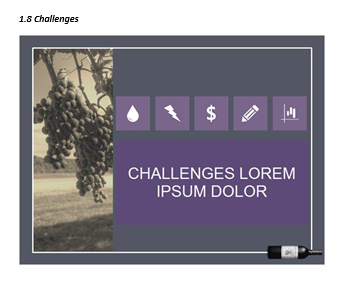
One other note you will have to consider when printing to Word is that the slides will print out in the sequence in which they are numbered in your Storyline file. If your course branches around to various slides, you might have a course laid out like this:

If you were to walk through this course start to finish you would visit the slides in this order: 1.1, 1.3, 1.4, 1.8, 1.2, 1.5, 1.6, 1.7 (in fact, 4, 8, 2, and 5 could be visited in any order). When you print this course out to Word, it will print in numerical sequence 1.1, 1.2, 1.3, 1.4 …
This means that if you want a true representation on paper of how someone might walk through your course online, you may have to move slides around within the Word document as well in order to place them in the sequence in which they are visited.
Printing Your Interactions
If you have a custom-built interaction, you may want to follow this tip. Adding states to objects is a fantastic way to speed up development time. However, when you publish to Word, you won’t see the various states for these objects printed out.

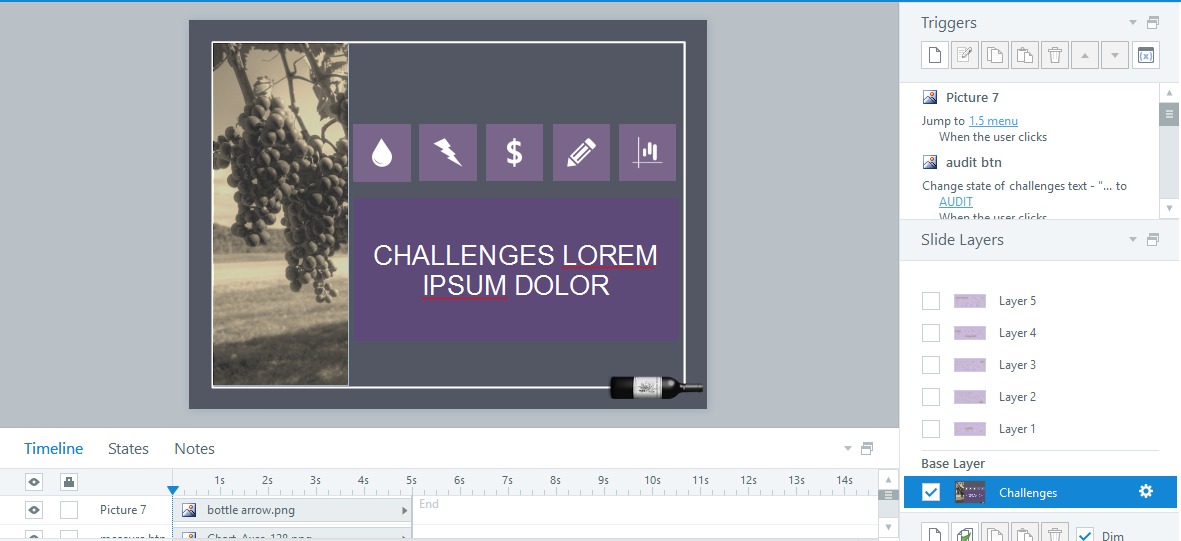
As you can see in the screenshot, the large rectangle on this slide has six different states, each revealed depending on which button is selected. This same slide prints out to Word like this:
If I use layers instead of states to create the same effect (adjusting triggers accordingly), I end up with a slide that looks like this, with one layer for each “change” to the main text box.
When I then publish to Word and select Show Slide Layers, the resulting Word file will print out with this slide looking like this:
Screenshot Size Large (two slides per page, margins/footer adjusted, slide layers checked).

Now each “state” of the text box is published to the Word document because they are no longer states but individual layers.
I might not design with this method for every course, but for those I know will eventually require a hard copy, this individual layer method can solve many problems with publishing as well as editing copy with SMEs.
Tip: If you happen to use the built-in interactions from Articulate Engage ’13, each step of the interaction will print out individually along with the slides of your .story file, and each step will be labelled accordingly (e.g., tab 1, tab 2, etc.). If you are using an earlier version of Engage, you will need to capture screenshots of each element of the interaction, as only the first screen of the interaction will print.
Interested in more detailed instructions on how to move from states to layers, and how to ensure that your layers then print seamlessly? Please take a look at this quick video.
Got Tips to Share?
I hope you found these tips helpful! If you have questions or comments, feel free to share them below. And if you’ve got your own Storyline tips, we’d love it if you shared those in the comments, too!