
Создание нового экземпляра приложения Word из кода VBA Excel или подключение к открытому для работы с документами. Функции CreateObject и GetObject.
Работа с Word из кода VBA Excel
Часть 1. Управление приложением Word
[Часть 1] [Часть 2] [Часть 3] [Часть 4] [Часть 5] [Часть 6]
Создание объекта Word.Application
Экземпляр приложения Word необходим для того, чтобы с его помощью создавать новые документы или открывать существующие для редактирования из кода VBA Excel.
Создать новый экземпляр объекта Word.Application можно при помощи раннего или позднего связывания, используя при позднем связывании функцию CreateObject. Подключиться к открытому экземпляру приложения Word можно только при помощи позднего связывания, используя функцию GetObject.
Раннее связывание приложения Word
Создание нового экземпляра Word.Application и присвоение ссылки на него переменной myWord:
|
‘Создание экземпляра приложения Word ‘с ранней привязкой одной строкой Dim myWord As New Word.Application ‘Создание экземпляра приложения Word ‘с ранней привязкой двумя строками Dim myWord As Word.Application Set myWord = New Word.Application |
Для раннего связывания переменной с объектом Word.Application необходимо подключить в редакторе VBA Excel ссылку на библиотеку Microsoft Word Object Library, если она не подключена. Подключается ссылка в окне «References VBAproject», перейти в которое можно через главное меню редактора: Tools–>References…

Раннее связывание позволяет при написании кода использовать лист подсказок для выбора и вставки свойств и методов привязанных объектов (Auto List Members). Если проект VBA Excel создается на заказ, то, после его завершения, раннее связывание следует заменить на позднее, так как на компьютере пользователя может не оказаться нужной библиотеки, и код работать не будет.
Позднее связывание приложения Word
Создание нового экземпляра Word.Application с помощью функции CreateObject и присвоение ссылки на него переменной myWord:
|
Dim myWord As Object Set myWord = CreateObject(«Word.Application») |
Присвоение переменной myWord ссылки на открытый экземпляр приложения Word с помощью функции GetObject:
|
Dim myWord As Object Set myWord = GetObject(, «Word.Application») |
Если открытого приложения Word нет, выполнение функции GetObject приведет к ошибке. Чтобы ее избежать, следует предусмотреть создание нового экземпляра Word.Application с помощью функции CreateObject, если открытое приложение не будет найдено (смотрите пример 3).
В программы VBA Excel, работающие с Word, следует включать обработчик ошибок.
Закрытие объекта Word.Application
Новый экземпляр приложения Word открывается в фоновом режиме. Если необходимо его отобразить на экране перед завершением программы, используйте следующий код:
|
‘отображаем приложение Word myWord.Visible = True ‘освобождаем переменную от ссылки Set myWord = Nothing |
Если перед завершением процедуры VBA Excel необходимо приложение Word закрыть, используйте метод Quit:
|
‘закрываем приложение Word myWord.Quit ‘освобождаем переменную от ссылки Set myWord = Nothing |
Если переменная не содержит ссылку на приложение (myWord = Nothing), метод Quit возвратит ошибку. Чтобы этого не произошло, перед применением метода Quit необходимо проверить наличие ссылки в переменной myWord (смотрите пример 3).
Пример 1
Создаем новый экземпляр объекта Word.Application с ранним связыванием и отображаем его на экране:
|
Sub Primer1() Dim myWord As New Word.Application ‘———- ‘блок операторов для создания, открытия ‘и редактирования документов Word ‘———- myWord.Visible = True Set myWord = Nothing End Sub |
Запустите код примера 1 на выполнение. Вы увидите появившийся на панели задач ярлык приложения Word. Перейдите на него и закройте приложение вручную.
Пример 2
Создаем новый экземпляр объекта Word.Application с поздним связыванием, отображаем его на экране, останавливаем программу и наблюдаем закрытие приложения методом Quit:
|
Sub Primer2() Dim myWord As Object Set myWord = CreateObject(«Word.Application») ‘———- ‘блок операторов для создания, открытия ‘и редактирования документов Word ‘———- myWord.Visible = True MsgBox «Остановка программы» myWord.Quit Set myWord = Nothing End Sub |
Запустите код примера 2 на выполнение. Закройте информационное окно MsgBox и смотрите, как исчезнет с панели задач ярлык приложения Word, созданного перед остановкой кода.
Пример 3
Пытаемся создать ссылку на открытый экземпляр приложения Word с помощью функции GetObject, а если открытого экземпляра нет, создаем новый с помощью функции CreateObject:
|
1 2 3 4 5 6 7 8 9 10 11 12 13 14 15 16 17 18 19 20 21 22 23 24 |
Sub Primer3() Dim myWord As Object On Error Resume Next Set myWord = GetObject(, «Word.Application») If myWord Is Nothing Then Set myWord = CreateObject(«Word.Application») End If On Error GoTo Instr ‘———- ‘блок операторов для создания, открытия ‘и редактирования документов Word ‘———- myWord.Visible = True Set myWord = Nothing Exit Sub Instr: If Err.Description <> «» Then MsgBox «Произошла ошибка: « & Err.Description End If If Not myWord Is Nothing Then myWord.Quit Set myWord = Nothing End If End Sub |
Строка On Error Resume Next передаст управление следующему оператору, если открытого экземпляра программы Word не существует, и выполнение функции GetObject приведет к ошибке. В этом случае будет создан новый экземпляр Word.Application с помощью функции CreateObject.
В код добавлен обработчик ошибок On Error GoTo Instr, который поможет корректно завершить программу при возникновении ошибки. А также он позволит во время тестирования не наплодить большое количество ненужных экземпляров приложения Word. Проверяйте их наличие по Диспетчеру задач (Ctrl+Shift+Esc) и удаляйте лишние.
Строка Exit Sub завершит процедуру, если она прошла без ошибок. В случае возникновения ошибки, будет выполнен код после метки Instr:.

Уважаемые программисты. Хотел бы разобраться что к чему.
Есть программка (то есть макрос) на VBA, формирующая отчетики в Word из Excel. Я ее делаю на 2003 версии офиса. Программка будет стоять и может даже носться с одного комьютера на другой и мне нужна уверенная ее работа на версиях Excel 2003 и выше.
Проблема следующая: если открыть .xls-файл с программой на Excel 2007 или 2010 в References прописываются новые библиотеки. Если после этого открываем снова на 2003 версии вылезает вот такая дрянь: MISSING:Microsoft Word 12.0(зависит от версии где открывали) Object Library — во вложении картинка. С этим понятно начинаются разные веселые глюки — например функцию Str() он у меня не признает.
Но тут еще все понятно конечно — Excel просто прописал ту библиотеку которая поновее. Как с этой бедой бороться мне ясно — убираем галочку где MISSING и ставим напротив аналогичной библиотеки. Все работает
А теперь вопрос: Как избежать автоматического прописывания более поздних версий библиотек в References? (извините если сказал глупость)
Один вариант я знаю: установить пароль на проект — тогда Эксель без моего разрешения не будет самоуправствовать. Чего еще можно придумать? А то надоела эта билиберда — на работе отредактируешь макрос, а дома каждый раз приходится лезть в эти References.
- Remove From My Forums
-
Question
-
I’m experiencing problems when trying to add a reference to the MS Word library using the code string below. I found the code in one of your forums (https://social.msdn.microsoft.com/Forums/office/en-US/46655823-3bb9-4a93-864a-6531a573551b/set-reference-to-library-in-vba?forum=exceldev),
but it doesn’t seem to work. Also, I have double checked the file path to ensure that it is correct.I would appreciate if you could provide me with guidance on how to resolve this issue.
Regards
Daniel
Sub LabelMerge()
On Error Resume Next
Application.VBE.ActiveVBProject.References.AddFromFile «C:Program FilesMicrosoft OfficeOffice15MSWORD.OLB»Dim oWord As Word.Application
Dim oDoc As Word.Document
Dim sPath As String
Dim i As Integer
Dim oHeader As Range— Rest of code —
Формулировка задачи:
Уважаемые программисты. Хотел бы разобраться что к чему.
Есть программка (то есть макрос) на VBA, формирующая отчетики в Word из Excel. Я ее делаю на 2003 версии офиса. Программка будет стоять и может даже носться с одного комьютера на другой и мне нужна уверенная ее работа на версиях Excel 2003 и выше.
Проблема следующая: если открыть .xls-файл с программой на Excel 2007 или 2010 в References прописываются новые библиотеки. Если после этого открываем снова на 2003 версии вылезает вот такая дрянь: MISSING:Microsoft Word 12.0(зависит от версии где открывали) Object Library — во вложении картинка. С этим понятно начинаются разные веселые глюки — например функцию Str() он у меня не признает.
Но тут еще все понятно конечно — Excel просто прописал ту библиотеку которая поновее. Как с этой бедой бороться мне ясно — убираем галочку где MISSING и ставим напротив аналогичной библиотеки. Все работает
А теперь вопрос:
Как избежать автоматического прописывания более поздних версий библиотек в References?
(извините если сказал глупость)
Один вариант я знаю: установить пароль на проект — тогда Эксель без моего разрешения не будет самоуправствовать. Чего еще можно придумать? А то надоела эта билиберда — на работе отредактируешь макрос, а дома каждый раз приходится лезть в эти References.
Код к задаче: «References и автоматическое подключение библиотек на поздних версиях MS Office»
textual
Dim WordApp As New Word.Application 'раннее связывание - требуется Reference
'-------------------------------
Dim WordApp As Object
Set WordApp = CreateObject("Word.Application") 'позднее связывание - не требуется Reference
Полезно ли:
14 голосов , оценка 4.143 из 5
Using Excel VBA to create Microsoft Word documents
In these examples, we generate Microsoft Word Documents with various formatting features using
the Microsoft Excel VBA scripting language. These techniques can have many useful applications.
For instance if you have a list of data like a price or product list in Excel that you want to present
in a formatted Word Document, these techniques can prove useful.
In these examples, we assume the reader has at least basic knowledge of VBA, so we will not
go over basics of creating and running scripts. This code has been tested on Microsoft Word and Excel
2007. Some changes may be required for other versions of Word and Excel.
Writing to Word
Inserting a Table of Contents
Inserting Tabs
Inserting Tables
Inserting Bullet List
more on Inserting Tables
Multiple Features
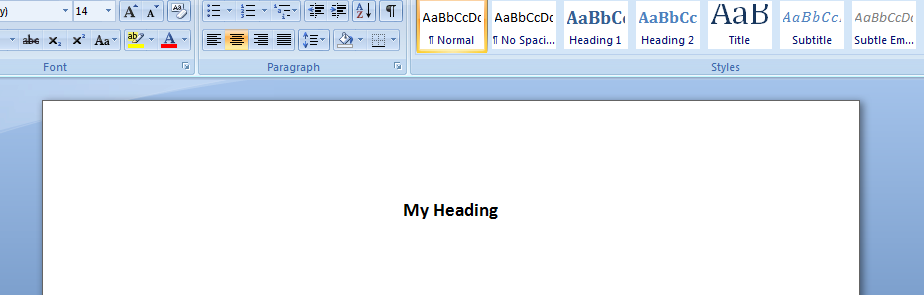
Function that demonstrates VBA writing to a Microsoft Word document
The following code illustrates the use of VBA Word.Application object and related properties.
In this example, we create a new Word Document add some text.
    'In Tools > References, add reference to "Microsoft Word XX.X Object Library" before running.

    'Early Binding
    Dim wdApp As Word.Application
    Set wdApp = New Word.Application

    'Alternatively, we can use Late Binding
    'Dim wdApp As Object
    'Set wdApp = CreateObject("word.Application")

    With wdApp
        .Visible = True
        .Activate
        .Documents.Add

        With .Selection
            .ParagraphFormat.Alignment = wdAlignParagraphCenter
            .Font.Bold = True
            .Font.Name = "arial"
            .Font.Size = 14
            .TypeText ("My Heading")
            .TypeParagraph
        End With
    End With
Some VBA Vocabulary
ParagraphFormat
Represents all the formatting for a paragraph.
output in MS Word:
Inserting a Table of Contents into Word Document using Excel VBA
In this example, we generate a Table of Contents into a Word Document using Excel VBA
Sub sAddTableOfContents()

    Dim wdApp As Word.Application
    Set wdApp = New Word.Application

    'Alternatively, we can use Late Binding
    'Dim wdApp As Object
    'Set wdApp = CreateObject("word.Application")

    Dim wdDoc As Word.Document
    Set wdDoc = wdApp.Documents.Add

    ' Note we define a Word.range, as the default range wouled be an Excel range!
    Dim myWordRange As Word.range
    Dim Counter As Integer

    wdApp.Visible = True
    wdApp.Activate

    'Insert Some Headers
    With wdApp
        For Counter = 1 To 5
            .Selection.TypeParagraph
            .Selection.Style = "Heading 1"
            .Selection.TypeText "A Heading Level 1"
            .Selection.TypeParagraph
            .Selection.TypeText "Some details"
        Next
    End With

    ' We want to put table of contents at the top of the page
	Set myWordRange = wdApp.ActiveDocument.range(0, 0)

    wdApp.ActiveDocument.TablesOfContents.Add _
     range:=myWordRange, _
     UseFields:=False, _
     UseHeadingStyles:=True, _
     LowerHeadingLevel:=3, _
     UpperHeadingLevel:=1

End Sub
Some VBA Vocabulary
ActiveDocument.TablesOfContents.Add
The TablesOfContents property to return the TablesOfContents collection.
Use the Add method to add a table of contents to a document.
Some TablesOfContents Parameters
Range The range where you want the table of contents to appear. The table of contents replaces the range, if the range isn’t collapsed.
UseHeadingStyles True to use built-in heading styles to create the table of contents. The default value is True.
UpperHeadingLevel The starting heading level for the table of contents. Corresponds to the starting value used with the o switch for a Table of Contents (TOC) field. The default value is 1.
LowerHeadingLevel The ending heading level for the table of contents. Corresponds to the ending value used with the o switch for a Table of Contents (TOC) field. The default value is 9.
output Word Table in MS Word:
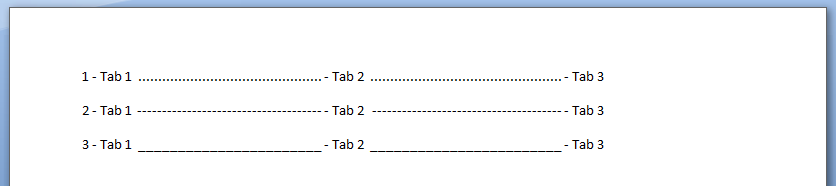
Write Microsoft Word Tabs
A function that writes tabbed content to a Microsoft Word Document. Note in each iteration, we change the
value of the leader character (characters that are inserted in the otherwise blank area created by the tab).
Public Sub sWriteMicrosoftTabs()

    'In Tools > References, add reference to "Microsoft Word XX.X Object Library" before running.

    'Early Binding
    Dim wdApp As Word.Application
    Set wdApp = New Word.Application

    'Alternatively, we can use Late Binding
    'Dim wdApp As Object
    'Set wdApp = CreateObject("word.Application")

    With wdApp
        .Visible = True
        .Activate
        .Documents.Add

        For Counter = 1 To 3
            .Selection.TypeText Text:=Counter & " - Tab 1 "

            ' position to 2.5 inches
            .Selection.Paragraphs.TabStops.Add Position:=Application.InchesToPoints(2.5), _
                Leader:=Counter, Alignment:=wdAlignTabLeft

            .Selection.TypeText Text:=vbTab & " - Tab 2 "

            ' position to 5 inches
            .Selection.Paragraphs.TabStops.Add Position:=Application.InchesToPoints(5), _
                Leader:=Counter, Alignment:=wdAlignTabLeft

            .Selection.TypeText Text:=vbTab & " - Tab 3 "

            .Selection.TypeParagraph
        Next Counter

    End With
End Sub
Some VBA Vocabulary
.TabStops.Add Use the TabStops property to return the TabStops collection. In the example above,
nprogram adds a tab stop positioned at 0, 2.5 and 5 inches.
output in MS Word:
Write Microsoft Word Tables
In this example, we generate a Microsoft Table using Excel VBA
Sub sWriteMSWordTable ()

    'In Tools > References, add reference to "Microsoft Word XX.X Object Library" before running.

    'Early Binding
    Dim wdApp As Word.Application
    Set wdApp = New Word.Application

    'Alternatively, we can use Late Binding
    'Dim wdApp As Object
    'Set wdApp = CreateObject("word.Application")

    With wdApp
        .Visible = True
        .Activate
        .Documents.Add

        With .Selection

            .Tables.Add _
                    Range:=wdApp.Selection.Range, _
                    NumRows:=1, NumColumns:=3, _
                    DefaultTableBehavior:=wdWord9TableBehavior, _
                    AutoFitBehavior:=wdAutoFitContent

            For counter = 1 To 12
                .TypeText Text:="Cell " & counter
                If counter <> 12 Then
                    .MoveRight Unit:=wdCell
                End If
            Next

        End With

    End With

End Sub
Some VBA vocabulary
Table.AddTable object that represents a new, blank table added to a document.
Table.Add properties
Range The range where you want the table to appear. The table replaces the range, if the range isn’t collapsed.
NumRows The number of rows you want to include in the table.
NumColumns The number of columns you want to include in the table.
DefaultTableBehavior Sets a value that specifies whether Microsoft Word automatically resizes cells in tables to fit the cells� contents (AutoFit). Can be either of the following constants: wdWord8TableBehavior (AutoFit disabled) or wdWord9TableBehavior (AutoFit enabled). The default constant is wdWord8TableBehavior.
AutoFitBehavior Sets the AutoFit rules for how Word sizes tables. Can be one of the WdAutoFitBehavior constants.
output in MS Word:

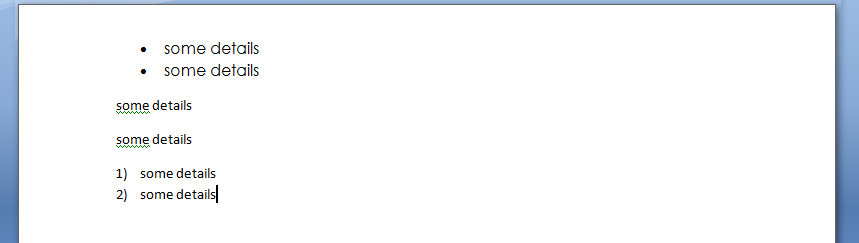
Write Microsoft Word bullet list
In this example, we write with bullet list and outline numbers with Excel VBA
    'In Tools > References, add reference to "Microsoft Word XX.X Object Library" before running.

    'Early Binding
    Dim wdApp As Word.Application
    Set wdApp = New Word.Application

    'Alternatively, we can use Late Binding
    'Dim wdApp As Object
    'Set wdApp = CreateObject("word.Application")

    With wdApp
        .Visible = True
        .Activate
        .Documents.Add
        ' turn on bullets
        .ListGalleries(wdBulletGallery).ListTemplates(1).Name = ""
        .Selection.Range.ListFormat.ApplyListTemplate ListTemplate:=.ListGalleries(wdBulletGallery).ListTemplates(1), _
            continuepreviouslist:=False, applyto:=wdListApplyToWholeList, defaultlistbehavior:=wdWord9ListBehavior

        With .Selection
            .ParagraphFormat.Alignment = wdAlignParagraphLeft
            .Font.Bold = False
            .Font.Name = "Century Gothic"
            .Font.Size = 12
            .TypeText ("some details")
            .TypeParagraph
            .TypeText ("some details")
            .TypeParagraph
        End With

        ' turn off bullets
        .Selection.Range.ListFormat.RemoveNumbers wdBulletGallery

        With .Selection
            .ParagraphFormat.Alignment = wdAlignParagraphLeft
            .TypeText ("some details")
            .TypeParagraph
            .TypeText ("some details")
            .TypeParagraph

        End With

        ' turn on outline numbers
        .ListGalleries(wdOutlineNumberGallery).ListTemplates(1).Name = ""
        .Selection.Range.ListFormat.ApplyListTemplate ListTemplate:=.ListGalleries(wdOutlineNumberGallery).ListTemplates(1), _
            continuepreviouslist:=False, applyto:=wdListApplyToWholeList, defaultlistbehavior:=wdWord9ListBehavior

        With .Selection
            .ParagraphFormat.Alignment = wdAlignParagraphLeft
            .TypeText ("some details")
            .TypeParagraph
            .TypeText ("some details")

        End With

    End With
output in MS Word:
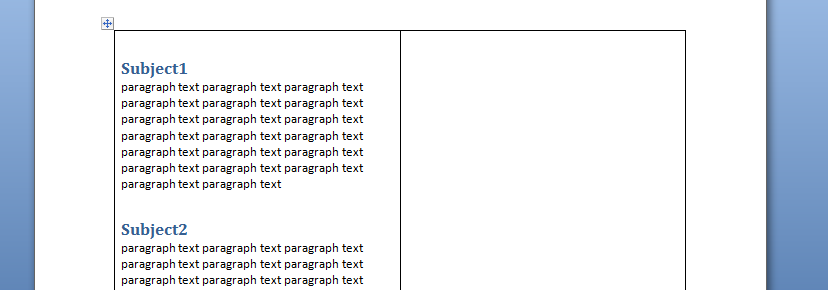
Another example of Writing Tables to Microsoft Word
In this example we will create a word document with 20 paragraphs. Each paragraph will have a header with a header style element
   'In Tools > References, add reference to "Microsoft Word XX.X Object Library" before running.
    Dim wdApp As Word.Application
    Dim wdDoc As Word.Document

    Set wdApp = New Word.Application
    wdApp.Visible = True


    Dim x As Integer
    Dim y As Integer

    wdApp.Visible = True
    wdApp.Activate
    wdApp.Documents.Add

    wdApp.ActiveDocument.Tables.Add Range:=wdApp.Selection.Range, NumRows:=2, NumColumns:= _
        2, DefaultTableBehavior:=wdWord9TableBehavior, AutoFitBehavior:= _
        wdAutoFitFixed

    With wdApp.Selection.Tables(1)
        If .Style <> "Table Grid" Then
            .Style = "Table Grid"
        End If
        .ApplyStyleHeadingRows = True
        .ApplyStyleLastRow = False
        .ApplyStyleFirstColumn = True
        .ApplyStyleLastColumn = False
        .ApplyStyleRowBands = True
        .ApplyStyleColumnBands = False
    End With

    With wdApp.Selection

        For x = 1 To 2
            ' set style name
            .Style = "Heading 1"
            .TypeText "Subject" & x
            .TypeParagraph
            .Style = "No Spacing"
            For y = 1 To 20
                .TypeText "paragraph text "
            Next y
            .TypeParagraph
        Next x

        ' new paragraph
        .TypeParagraph

        ' toggle bold on
        .Font.Bold = wdToggle
        .TypeText Text:="show some text in bold"
        .TypeParagraph

        'toggle bold off
        .Font.Bold = wdToggle
        .TypeText "show some text in regular front weight"
        .TypeParagraph


    End With
Some VBA vocabulary
TypeText
Inserts specified text at the beginning of the current selection. The selection is turned into an insertion point at the end of the inserted text.
If Options.ReplaceSelection = True then the original selection will be replaced. This behaves exactly the same as typing some text at the keyboard.
TypeParagraph
Insert a new blank paragraph. The selection is turned into an insertion point after the inserted paragraph mark. If Options.ReplaceSelection = True then the original selection will be replaced. This behaves exactly the same as pressing the Enter key.
output in MS Word:
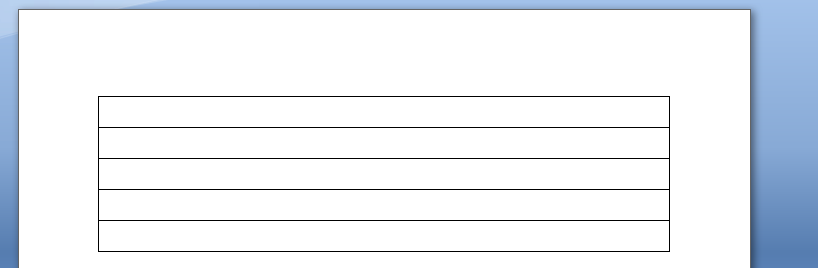
Generating a Word table with VBA
	'In Tools > References, add reference to "Microsoft Word XX.X Object Library" before running.

	Dim wdApp As Word.Application
	Dim wdDoc As Word.Document
	Dim r As Integer

	Set wdApp = CreateObject("Word.Application")
	wdApp.Visible = True

	Set wdDoc = wdApp.Documents.Add
	wdApp.Activate

	Dim wdTbl As Word.Table
	Set wdTbl = wdDoc.Tables.Add(Range:=wdDoc.Range, NumRows:=5, NumColumns:=1)

	With wdTbl

		.Borders(wdBorderTop).LineStyle = wdLineStyleSingle
		.Borders(wdBorderLeft).LineStyle = wdLineStyleSingle
		.Borders(wdBorderBottom).LineStyle = wdLineStyleSingle
		.Borders(wdBorderRight).LineStyle = wdLineStyleSingle
		.Borders(wdBorderHorizontal).LineStyle = wdLineStyleSingle
		.Borders(wdBorderVertical).LineStyle = wdLineStyleSingle

		For r = 1 To 5
			.Cell(r, 1).Range.Text = ActiveSheet.Cells(r, 1).Value
		Next r
	End With
output in MS Word:
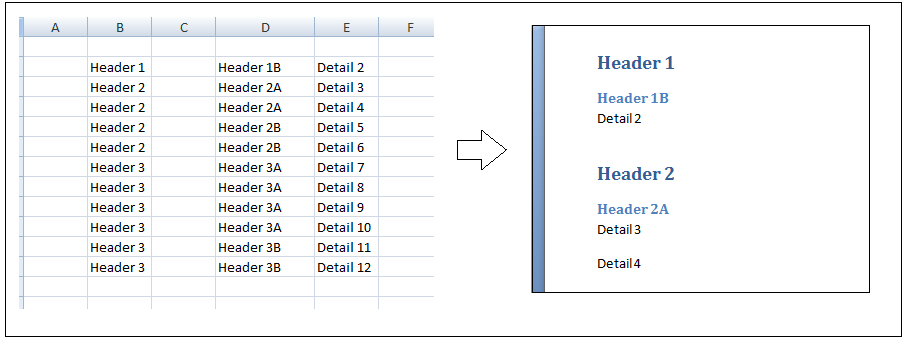
Option Explicit
Dim wdApp As Word.Application

Sub extractToWord()

   'In Tools > References, add reference to "Microsoft Word 12 Object Library" before running.

    Dim lastCell
    Dim rng As Range
    Dim row As Range
    Dim cell As Range
    Dim arrayOfColumns
    arrayOfColumns = Array("", "", "", "", "", "", "", "", "", "", "", "", "", "", "")
    Dim thisRow As Range
    Dim thisCell As Range
    Dim myStyle As String

    ' get last cell in column B
    lastCell = getLastCell()

    Set rng = Range("B2:H" & lastCell)

    'iterate through rows
    For Each thisRow In rng.Rows

        'iterate through cells in row row
        For Each thisCell In thisRow.Cells

            If thisCell.Value = arrayOfColumns(thisCell.Column) Or thisCell.Value = "" Then
            ' do nothing
                ''frWriteLine thisCell.Value, "Normal"
                ''frWriteLine arrayOfColumns(thisCell.Column), "Normal"
                  If thisCell.Value = arrayOfColumns(thisCell.Column) Or thisCell.Value = "" Then
                  End If

            Else
                myStyle = "Normal"
                Select Case thisCell.Column
                    Case 2
                        myStyle = "Heading 1"
                    Case 3
                        myStyle = "Heading 2"
                    Case 4
                        myStyle = "Heading 3"
                    Case Is > 5
                        myStyle = "Normal"

                End Select

                frWriteLine thisCell.Value, myStyle
            End If

        arrayOfColumns(thisCell.Column) = thisCell.Value

      Next thisCell
    Next thisRow

End Sub

Public Function getLastCell() As Integer

    Dim lastRowNumber As Long
    Dim lastRowString As String
    Dim lastRowAddress As String

    With ActiveSheet
        getLastCell = .Cells(.Rows.Count, 2).End(xlUp).row
    End With

End Function

Public Function frWriteLine(someData As Variant, myStyle As String)

    If wdApp Is Nothing Then

        Set wdApp = New Word.Application
        With wdApp
            .Visible = True
            .Activate
            .Documents.Add
        End With

    End If

    With wdApp

        With .Selection
            .ParagraphFormat.Alignment = wdAlignParagraphCenter
            .Style = myStyle
            .TypeText (someData)
            .TypeParagraph
        End With
    End With

End Function
output in MS Word:
Использование Word в приложениях на Visual Basic 6 открывает широчайшие возможности для создания профессионально оформленных документов (например отчетов). Это часто необходимо при работе в фирме или на предприятии для обеспечения документооборота. Основным преимуществом использования Wordа в этом случае является то, что практически на всех компьютерах, используемых в фирмах и на предприятиях установлены Windows и пакет Microsoft Office. Поэтому подготовленные документы Word не требуют каких-либо дополнительных усилий для их просмотра, печати и редактирования. Единственное что нужно помнить, это то что работа через автоматизацию OLE (связывание и внедрение объектов) на деле оказывается довольно медленной технологией, хотя и очень полезной.
Чтобы использовать объекты Word в Visual Basic , необходимо инсталлировать сам Word. После этого вы получаете в своё распоряжение библиотеку Microsoft Word Object Library, которую нужно подключить к текущему проекту через диалоговое окно «Разработать»>>»Ссылки» (References) и указать Microsoft Word 9.0 Object Library (для Word 2000).
Два самых важных объекта Word это Word.Application и Word.Document. Они обеспечивают доступ к экземпляру приложения и документам Word.
Поэтому в раздел Generals «Общее» формы введите следующий код для объявления объектных переменных приложения Word и документа Word.
Dim WordApp As Word.Application '  экземпляр приложения
Dim DocWord As Word.Document'  экземпляр документа
Чтобы создать новый экземпляр Word, введите такой код кнопки;
Private Sub Комманда1_Click()

'создаём  новый экземпляр Word-a
Set WordApp = New Word.Application

'определяем видимость Word-a по True - видимый,
'по False - не видимый (работает только ядро)
WordApp.Visible = True

'создаём новый документ в Word-e
Set DocWord = WordApp.Documents.Add

'// если нужно открыть имеющийся документ, то пишем такой код
'Set DocWord = WordApp.Documents.Open("C:DDD.doc")

'активируем его
DocWord.Activate

End Sub
Для форматирования печатной области документа используйте данный код:
(вообще-то Word использует для всех размеров своих элементов пункты, поэтому для использования других единиц измерения, необходимо использовать встроенные функции форматирования.)
Например:
- CentimetersToPoints(Х.ХХ) — переводит сантиметры в пункты.
- MillimetersToPoints(X.XX) — переводит миллиметры в пункты
Private Sub Комманда2_Click()

'отступ слева "2,0 сантиметра"
DocWord.Application.Selection.PageSetup.LeftMargin = CentimetersToPoints(2)

'отступ справа "1,5 сантиметра"
DocWord.Application.Selection.PageSetup.RightMargin = CentimetersToPoints(1.5)

'отступ сверху "3,5 сантиметра"
DocWord.Application.Selection.PageSetup.TopMargin = CentimetersToPoints(3.5)

'отступ снизу "4,45 сантиметра"
DocWord.Application.Selection.PageSetup.BottomMargin = CentimetersToPoints(4.45)

End Sub
Небольшое отступление.
Для того чтобы в своём приложении не писать постоянно одно и тоже имя объекта, можно использовать оператор With.
Например код находящейся выше можно переписать так:
With DocWord.Application.Selection.PageSetup
.LeftMargin = CentimetersToPoints(2)
.RightMargin = CentimetersToPoints(1.5)
.TopMargin = CentimetersToPoints(3.5)
.BottomMargin = CentimetersToPoints(4.45)
End With
Если вам необходимо создать документ Word с нестандартным размером листа, то используйте данный код:
With DocWord.Application.Selection.PageSetup
.PageWidth = CentimetersToPoints(20)    'ширина листа (20 см)
.PageHeight = CentimetersToPoints(25)   'высота листа (25 см)
End With
Данный код меняет ориентацию страницы (практически меняет местами значения ширины и высоты листа):
DocWord.Application.Selection.PageSetup.Orientation = wdOrientLandscape
- wdOrientLandscape — альбомная ориентация ( число 1)
- wdOrientPortrait — книжная ориентация ( число 0)
Для сохранения документа под новым именем и в определенное место
используйте данный код код:
'сохраняем документ как
DocWord.SaveAs "c:DDD.doc"
После такого сохранения вы можете про ходу работы с документом сохранять его.
'сохраняем документ
DocWord.Save
Или проверить, были ли сохранены внесенные изменения свойством Saved и если изменения не были сохранены — сохранить их;
If DocWord.Saved=False Then DocWord.Save
Завершив работу с документом, вы можете закрыть сам документ методом Close и сам Word методом Quit.
'закрываем документ (без запроса на сохранение)
DocWord.Close True

'закрываем Word (без запроса на сохранение)
WordApp.Quit True

'уничтожаем обьект - документ
Set DocWord = Nothing

'уничтожаем обьект - Word
Set WordApp = Nothing
Если в методах Close и Quit не использовать необязательный параметр True то Word запросит согласие пользователя (если документ не был перед этим сохранён) на закрытие документа.
Если вам необходимо оставить Word открытым, просто не используйте методы Close и Quit.
Если вам необходимо поставить пароль на документ, то используйте код:
DocWord.Protect wdAllowOnlyComments, , "123456789"
Пример программы можно скачать здесь.
Getting a Reference to the Word Application Object
Once the proper references are set, you can declare an object variable of type Application:
Dim Wrd As Word.Application
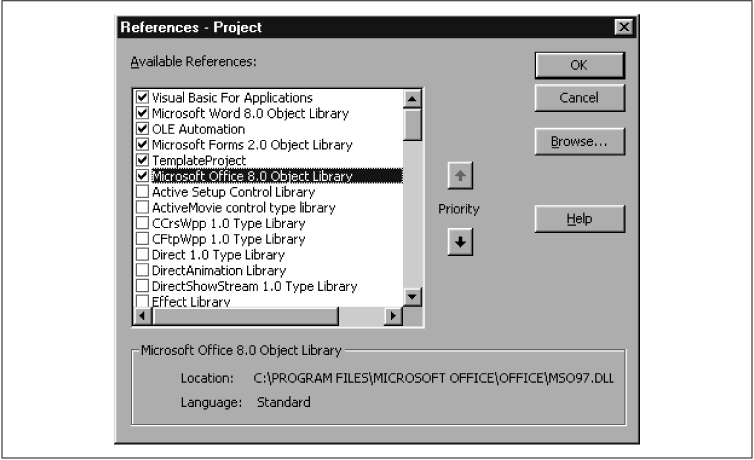
Figure A-1. The References dialog box
which the Automation client will understand, because it can now check the server’s object library. Note that you need to qualify the object name, since other object models have an Application object as well.
Next, you can start the Word Automation server, create a Word Application object, and get a reference to that object. This is done in the following line:
Set Wrd = New Word.Application
At this point, you have complete access to Word’s object model. It is important to note, however, that the previous line starts the Word Automation server, but does not start Word’s graphical user interface, so Word will be running invisibly. To make Word visible, you just set its Visible property to True:
Wrd.Visible = True
You can now program as though you were within the Word VBA IDE. For instance, the following code creates a new document, adds some content to it, and saves the document:
	Dim doc as Word.Document
	Set doc = Wrd.Documents.Add
	doc.Content = "To be or not to be"
	doc.Save
Note that the Word server will not terminate by itself, even if the
Wrd variable is destroyed. If you have made Word visible, then you can close it programmatically, as well as from the user interface in the usual …
Referencing Word and other applications in Excel VBA
Part three of a four-part series of blogs
Even if you’re writing Visual Basic macros within Excel, there’s nothing to stop you inserting text into Word documents, manipulating PowerPoint slides or sending Outlook emails. This blog explains how to reference other applications, and write macros in Excel to link to other Microsoft Office software
- Creating References to Other Applications in VBA
- Using Tools References to Create a Reference to Word
- Using VBA to Link Applications (this blog)
- Using Bookmarks to Fill in a Word Document from Excel
This blog is part of a complete Excel VBA tutorial. You can also learn to program in VBA on one of our VBA macros courses.
Posted by
Andy Brown
on 05 December 2011
You need a minimum screen resolution of about 700 pixels width to see our blogs. This is because they contain diagrams and tables which would not be viewable easily on a mobile phone or small laptop. Please use a larger tablet, notebook or desktop computer, or change your screen resolution settings.
To get our program to work, we first need to create a reference to a new
instance of Word, then use this to create a document. Finally, we need to
loop over our cells typing the values of each into this new Word document.
Creating a New Instance of Word
The first thing to do is to create a reference to a new Word application in
memory. We’ll store this reference in a variable. You can do this in
one of two ways. The first way is easier to understand:
Dim WordApp As Word.Application
Set WordApp = New Word.Application
However, the second way is easier to write:
Dim WordApp As New Word.Application
So which is better? The short answer is the second one, I think,
because it’s simpler — but it does have implications. What follows is
a fairly technical summary of what these are.
Using the NEW Keyword — Pros and Cons
Consider the following line of code:
Dim WordApp As New Word.Application
This does not set the variable to a reference to Word, it just means that the variable will be set to a reference to Word the first time that it is used.
There are two small disadvantages to this:
- There is a slight overhead as the variable is checked to see
if WordApp is Nothing every
time it is used; - Consequently you can never explicitly test if WordApp
is Nothing because the instant you do, the variable is instantiated.
IMHO you don’t need to worry about this, but at the owlery we try not to
gloss over things!
Making an Application Visible
The next thing to do is to make sure that you can see the copy of Word:
You might be wondering why this is necessary. When you create a copy of
an application in VBA, it isn’t automatically visible. Had you missed out
this line, you would have had to press ALT + CTRL
+ DEL to list out running processes to close it
down:

Select the running copy of MS Word — called WINWORD.EXE
— and end the process.
Note that the copy of Word you’ve created programmatically will
NOT show up in the Applications
tab of this dialog box.
Writing Code within the «Foreign» Application
Once you have created a copy of Word within memory, you can run commands
within this. Here is what our full macro could look like:
Sub ListJugglersInWord()
Dim WordApp As New Word.Application
WordApp.Visible = True
Dim doc As Word.Document
Set doc = WordApp.Documents.Add
Dim JugglerRange As Range
Dim JugglerCell As Range
Set JugglerRange = Range( _
Range(«A1»), Range(«A1»).End(xlDown))
For Each JugglerCell In JugglerRange
WordApp.Selection.TypeText JugglerCell.Value
WordApp.Selection.TypeParagraph
Next JugglerCell
MsgBox «You should now see your jugglers in Word!»
End Sub
The commands to type information into Word are:
WordApp.Selection.TypeText JugglerCell.Value
WordApp.Selection.TypeParagraph
It is vital that you include the WordApp object at the start
of every Word VBA command, as explained below.
The Importance of Including the Application Prefix
Supposing that you had missed out the WordApp object from
the 2 lines shown above, to get:
Selection.TypeText JugglerCell.Value
Selection.TypeParagraph
This will not compile or run — here’s why. When Excel sees the word
Selection, it tries to find this in its list of referenced
object libraries:

Excel will start from the top and work its way down in order. It will find the word
Selection within the Excel object library before it finds it within the Word one, and so assume that this is a built-in Excel object.
Because Excel is above Word in the list of references, the compiler will assume
that Selection refers to the currently selected cells in Excel,
and complain loudly that you can not apply the TypeText method
to an Excel range:

The error message you will get if you try to run the macro without
prefixing the Word Selection object.
In theory you could change the order of the references to put Word above
Excel, but apart from being terrible practice — after all, you’re coding within
Excel — this isn’t actually possible (you get an error message if you try to
demote Excel in the references list).
Now we’ve got all of the theory out of the way, let’s look at a worked
example of how to get an Excel workbook to fill in a Word form.
This blog has 0 threads
Add post