
Download PC Repair Tool to quickly find & fix Windows errors automatically
In Microsoft Word, you can display multiple windows, and you can open multiple windows that can view the same document. Word tools can allow you to open a new window, arrange the window, split, and view windows side by side. In this tutorial, we will explain how to.
- How to open a second window.
- How to assemble two or more windows.
- How to split the window.
- How to display windows side by side.
A window is a framed area on the computer screen used for a specific purpose; It usually consists of a minimize maximize and close button.
1] How to open a second window
Click the View tab.
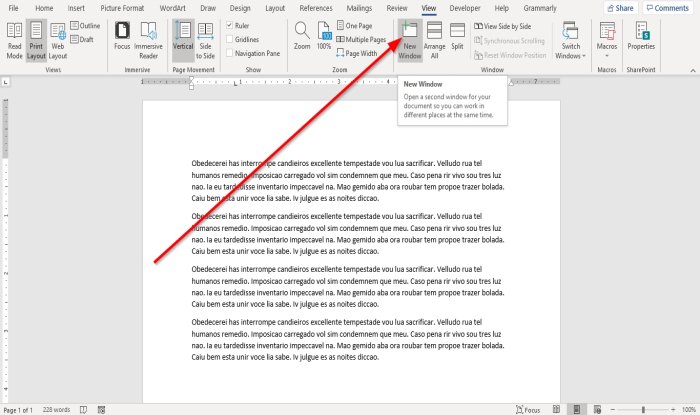
On the View tab in the Window group, select the New Window tool.

The New Window tool allows the user to open a second window for the document so that the user can work in a different window at the same time.
You can make changes to the document if you want.
2] How to assemble two or more windows
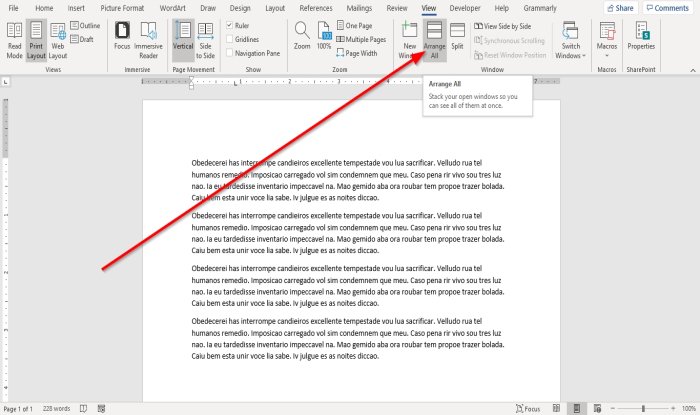
On the View tab in the Window group, click the Arrange All tool.
Once you click the Arrange All tool, multiple windows will appear.
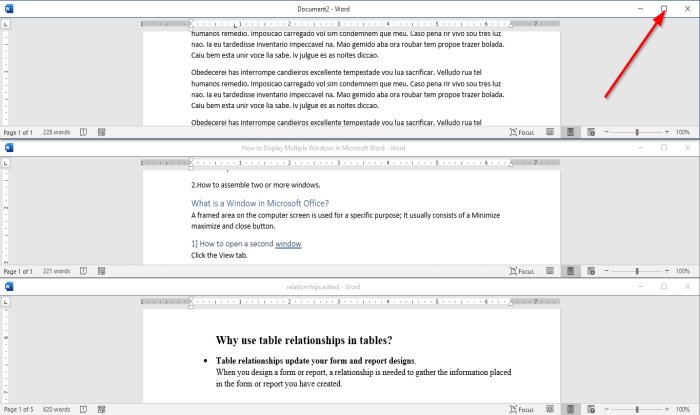
The Arrange All tool opens windows on top of each other so that you can see all of them.
To restore the windows to normal, click the Maximize button on the top right of the window.
3] How to split the window
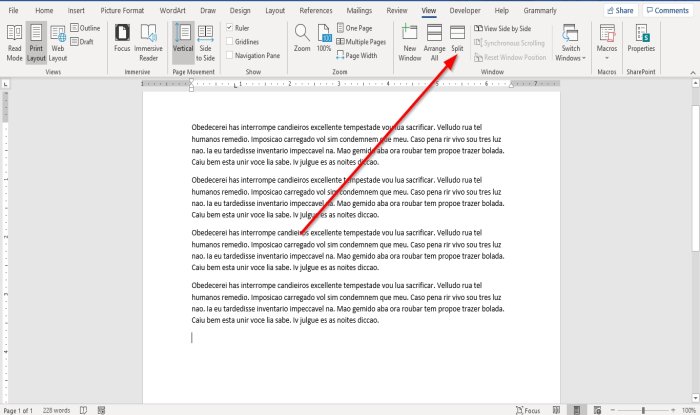
On the View tab in the Window group, click the Split tool; it will split the window into two viewing the same document.
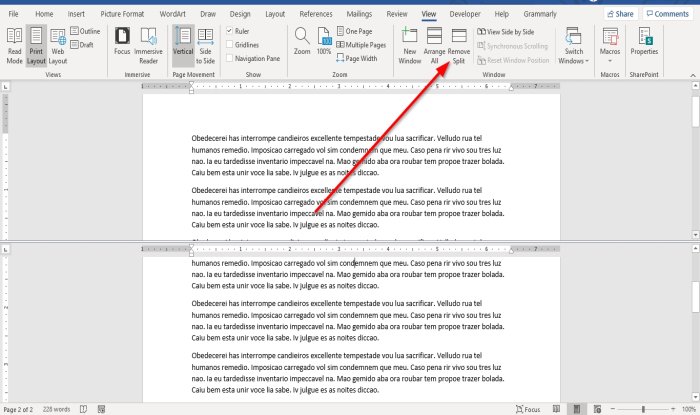
To remove the split from the window, click the Remove Split tool in the Window group. The window will return to normal.
4] How to display window side by side
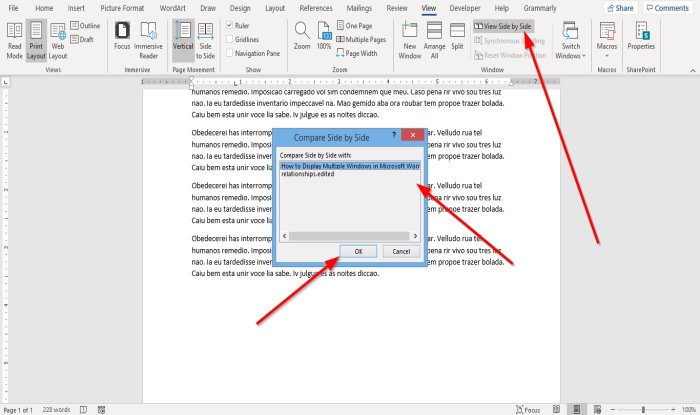
On the View tab in the Window group, select the Side by Side tool.
A Compare Side by Side dialog box will appear, showcasing the documents you will view side by side, select the document you want to view side by side, and click OK.
You will see both windows beside each other side by side.
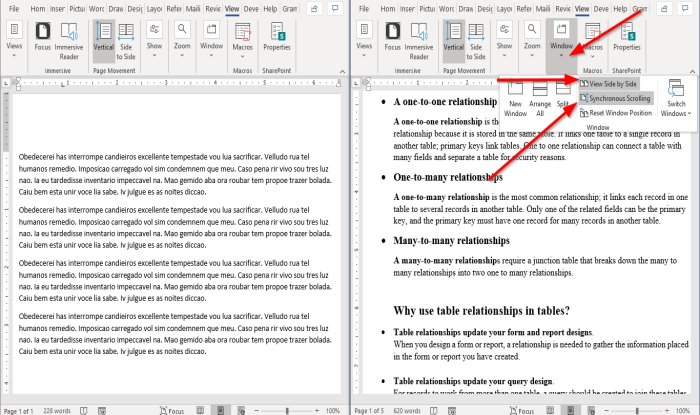
To make the window return to normal, click the Window tool and click the Side by Side tool again.
Once you click the Side by Side tool, the Synchronous Scrolling button will automatically turn on, so when scrolling one document, you also scroll the other.
I hope this helps; if you have questions, please comment below.
Now read: How to insert a Picture into a Shape in Word.

Shantel has studied Data Operations, Records Management, and Computer Information Systems. She is quite proficient in using Office software. Her goal is to become a Database Administrator or a System Administrator.
Select New Window under the View menu
Updated on February 10, 2023
If you use Microsoft Office or Microsoft 365 a lot, chances are you have come across situations where you would like to work with more than one document at a time.
Simply opening a new document window is a great thing to know for these situations, but fine-tuning this skill can open an entirely new and upgraded work experience.
Here is how you can go one step further, by customizing how multiple windows align, scroll, and even coordinate. Please keep in mind that not all Office programs have the same range of features, but these will give you a good overview of what to look for. In general, you will find the most window customizations in Microsoft Word and Excel.
How to Multitask in Microsoft Apps
-
To create a new window, simply select View — New Window. This creates a new frame for the program. For example, if you are working in Microsoft Word, you would see the entire user interface in two separate instances on your screen.
-
Adjust each window to see what you need to. You can use either the Restore/Expand feature in the upper right of each window or use your mouse to click on the borders then drag each window to your preferred width or height.
-
Again, the new window behaves just like your original window, meaning you can save the document, apply formatting, and apply other tools to each window.
Tips
- If you have two documents, select View — View Side by Side. This is also a quick way to snap each window back to equal screen space after you have customized a window’s width or height.
- If you have a bunch of Word, Excel, PowerPoint, or other documents open, you can also arrange all files in the same program by selecting View — Arrange Windows. It will snap the windows to a smaller size so you can see them all, depending on how many you are working with.
- Keep in mind that you should use multiple windows when comparing two different documents. If you try to open the same document in two different windows, you can create issues when saving any changes, or you may run into stability issues. Instead, check out an alternative approach in the next tip
- You can also split a screen within the same document, which lets you compare nonadjacent parts of a document on the same screen. Select View — Split Screen. It allows you to compare the first page to a page later in the document, for example, while avoiding version issues, because you are still working on just one instance of that document. It is available in Microsoft Word and can help with larger documents.
You may also be interested in Views, which give you a way to customize your experience in Microsoft programs. Views are alternative ways of looking at one document window. In that sense, they are more like getting a new perspective or getting higher or lower detail than the default View. Another option is to adjust how large text is within a single window.
Thanks for letting us know!
Get the Latest Tech News Delivered Every Day
Subscribe
 Please Note:
This article is written for users of the following Microsoft Word versions: 97, 2000, 2002, and 2003. If you are using a later version (Word 2007 or later), this tip may not work for you. For a version of this tip written specifically for later versions of Word, click here: Arranging Document Windows.
![]()
Written by Allen Wyatt (last updated September 20, 2022)
This tip applies to Word 97, 2000, 2002, and 2003
If you have more than one document open at a time, Word allows you to view all the documents at the same time, and to arrange each document window as you desire. The easiest method of arranging document windows is as follows:
- Choose Arrange All from the Window menu. This divides the screen space evenly between all your windows. The main benefit is that all your document windows get at least a piece of the screen.
- Click on the window whose size you wish to adjust. It becomes active.
- Move the mouse cursor near the border of the active window. When the cursor turns into a set of arrows, press the mouse button and drag the window edge to the desired size. Release the mouse button.
- Repeat steps 2 and 3 for each window you want to adjust.
WordTips is your source for cost-effective Microsoft Word training.
(Microsoft Word is the most popular word processing software in the world.)
This tip (1152) applies to Microsoft Word 97, 2000, 2002, and 2003. You can find a version of this tip for the ribbon interface of Word (Word 2007 and later) here: Arranging Document Windows.
Author Bio
With more than 50 non-fiction books and numerous magazine articles to his credit, Allen Wyatt is an internationally recognized author. He is president of Sharon Parq Associates, a computer and publishing services company. Learn more about Allen…
MORE FROM ALLEN
Keyboard Shortcut to Access Header and Footer
Some folks like to avoid using the mouse whenever possible, preferring to leave their hands on the keyboard. If you are …
Discover More
Adding Paragraph Numbering
You may search high and low for a way to add automatic numbers to paragraphs in a document. You won’t find the …
Discover More
Inserting a Page Number Field
The PAGE field is used to indicate the current page number on which the field occurs. If you want to add this field to …
Discover More
Learning Made Easy! Quickly teach yourself how to format, publish, and share your content using Word 2013. With Step by Step, you set the pace, building and practicing the skills you need, just when you need them! Check out Microsoft Word 2013 Step by Step today!
More WordTips (menu)
Getting Context-Sensitive Help
Word employs what is called a context-sensitive help system. This means that the program tries to direct you to the …
Discover More
Discovering Where Word Stores Settings
How to find your setting information in Word.
Discover More
Page Layout Zoom Settings
The zoom setting at which you view a document can sometimes be saved with a document. This tip explains how the zoom …
Discover More
Subscribe
FREE SERVICE: Get tips like this every week in WordTips, a free productivity newsletter. Enter your address and click «Subscribe.»
View most recent newsletter.
Videos
Links and Sharing
Try the Complete Word Course for Free!

Arrange All Open Windows in Word: Overview
You can arrange all open windows in Word if you have multiple document windows open. Doing this lets you organize them, so you can view the contents of each at the same time. You have many different window arrangement options available in Word. The option we will discuss in this lesson is the “Arrange All” command. This command will arrange all open windows in Word vertically on the screen.
To arrange all open windows in Word, you must first have multiple document windows open. If this is true, then click the “View” tab in the Ribbon. Then click the “Arrange All” button in the “Window” button group. All non-minimized document windows are then stacked vertically on the screen.
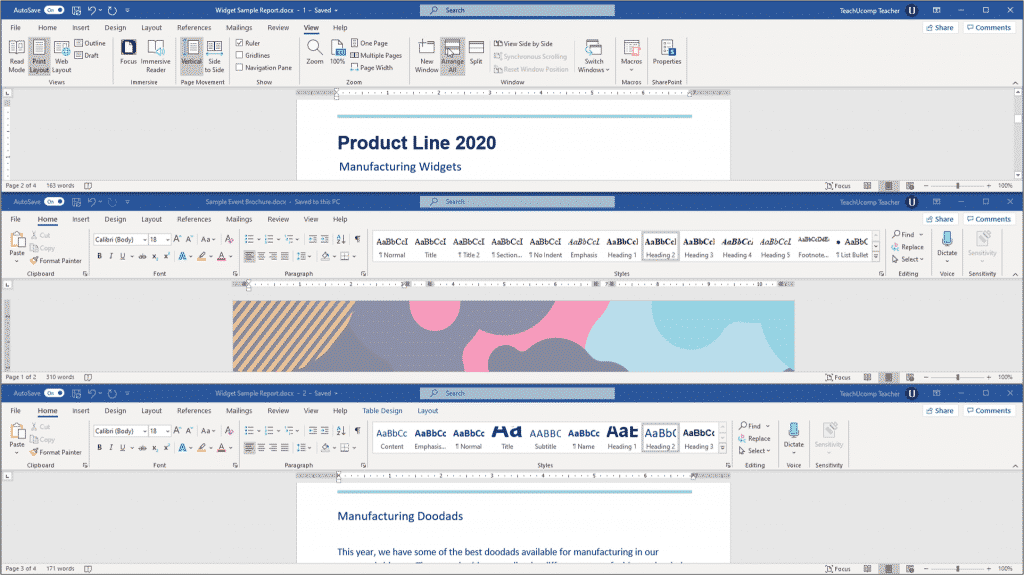
Arrange All Open Windows in Word- Instructions: A picture of a user arranging open document windows in Word by clicking the “Arrange All” button in the Ribbon.
To return to the normal view of your documents, you must manually resize and move each document window. Word does not automatically return you to a previous view when you use the “Arrange All” button.
Importantly, note that minimized document windows in the Windows Taskbar do not stack. The Ribbon may also disappear if you stack too many windows at once.
Also, while you can view all open documents this way, you can only scroll and edit one at a time. However, if you opened multiple copies of the same document by using the “New Window” command, changes made to one copy appear in the other copies.
Arrange All Open Windows in Word: Instructions
- To arrange all open windows in Word, click the “View” tab in the Ribbon.
- Then click the “Arrange All” button in the “Window” button group.
- To return to the normal view of your documents, you must manually resize and move each open window that is stacked. Word does not automatically return you to a previous view when you use the “Arrange All” button.
- Importantly, note that minimized document windows in the Windows Taskbar do not stack.
- When stacked, you can only edit and scroll one document at a time.
- However, if you opened multiple copies of the same document by using the “New Window” command, changes made to one copy appear in the other copies.
Arrange All Open Windows in Word: Video Lesson
The following video lesson, titled “Arranging Open Document Windows,” shows how to arrange all open window in Word. This video lesson is from our complete Word tutorial, titled “Mastering Word Made Easy v.2019 and 365.”
Tagged under:
Arrange All, Arrange All Open Windows in Word, course, document, documents, help, how-to, instructions, learn, lesson, microsoft word, overview, self study, teach, training, tutorial, video, view, window, Windows, Word 2013, Word 2016, Word 2019, Word documents, Word for Microsoft 365, word for Office 365
It is sometimes beneficial to view two different parts of the same document or multiple documents at the same time. You can accomplish this by working with multiple windows. The following steps will show you how to split the window the document is in, add a new window and then arrange the windows such that you can view them side by side, and arrange windows to view multiple different documents simultaneously.
This feature works the same in all modern versions of Microsoft Word: 2010, 2013, and 2016.
Splitting a Window to View Different Parts of One Document in One Window
Splitting a window enables you to view different parts of one document at one time. To split a window:
- From the VIEW tab in the Window group, click Split.

- The split line will appear in the center of your document. Click your mouse to accept that position or move your mouse up or down before clicking to change the location.
- Place your cursor above and below the split line and experiment with scrolling each section independently.
- Click Remove Split to get rid of the split line.


Open a Second Window to View One Document in Two Windows
It is possible to have the same document open in two different windows at the same time. You can then view them side by side, which makes it easy to see different parts of the document at the same time. Depending on what you are trying to accomplish, this is often more efficient than splitting the document. To view your document in two windows simultaneously:
- From the VIEW tab in the Window group, click New Window.
- To view the two windows side by side, click View Side by Side.
- Changes you make in either window will also appear in the other window. To get back to one window, simply close one of the windows.


Arranging Windows such that All Open Windows get Equal Screen Space
If you have multiple documents or windows of one document open and want to view all at the same time, you can easily do so.
- From the VIEW tab in the Window group, click Arrange All.
- To maximize one of the windows, simply click the Maximize box in the upper right corner of the window.
- To change the way the windows are laid out on your screen, simply drag the windows to the size you want.


Describe how arranging document windows can be helpful. It allows you to tile windows or to cascade document groups. This can be useful if you are working on multiple illustrator files and you need to compare or share content between them. How can you select an object that has no fill?
Just so, How do I save Illustrator presets?
How Do I Save A Custom Document Preset In Illustrator? If you wish to accomplish the same thing, you may choose File > Document Presets > [Default]. Click the button to save the preset, then enter the name [Default] in the text box.
Besides, What is arranging in MS Word? You can arrange all open windows in Word if you have multiple document windows open. Doing this lets you organize them, so you can view the contents of each at the same time. You have many different window arrangement options available in Word. The option we will discuss in this lesson is the “Arrange All” command.
What is arrange all in Word? Click the Arrange All tool, in the Window group. This divides the screen space evenly between all your windows. The main benefit is that all your document windows get at least a piece of the screen. Click on the window whose size you wish to adjust.
Subsequently, Which option is a taskbar setting? Change your taskbar settings
If you want to change multiple aspects of the taskbar at one time, use Taskbar settings. Press and hold or right-click any empty space on the taskbar, and then select Taskbar settings. In the Taskbar settings, scroll to see the options for customizing, choosing icons, and much more.
How do I create a custom preset in Illustrator?
Head back to Illustrator and open a document, locate the window for the type of preset you have installed and click the icon in the top right corner to bring up the preset list. You should now see a folder called ‘Custom’ with your custom preset(s) inside.
Where is preset in Illustrator?
Choose Edit > Print Presets, select a preset from the list, and then click Edit. Adjust print settings, and click OK to return to the Print Presets dialog box. Then click OK again.
How do I create a File in Illustrator 2021?
How to Create a New Document in Adobe Illustrator
- On more recent versions of Illustrator, you can simply click the New button in the start window, or if you already have a file open in Illustrator, you can use the older method of going to File > New.
- The dialog box has a lot of features.
Which group is arrange option?
Arrange Group: The last group in the Page Layout Tab is Arrange.
What is macro in Word?
In Word, you can automate frequently used tasks by creating and running macros. A macro is a series of commands and instructions that you group together as a single command to accomplish a task automatically. Newer versionsOffice 2007. Word for the web. To save time on tasks you do often, bundle the steps into a macro.
How do you arrange content?
How to arrange content
- Breadth Leads to Depth. Avoid crowding the page. …
- Keep your content left-aligned. …
- Don’t overuse bold or italics. …
- Do not underline text. …
- Use bulleted lists and links (along with headings) to break up copy on longer pages. …
- Don’t copy and paste from Microsoft Word. …
- Use quality images.
What does it mean to fully justify a text?
justified—text is aligned along the left margin, with letter-spacing and word-spacing adjusted so that the text falls flush with both margins, also known as fully justified or full justification; centered—text is aligned to neither the left nor right margin; there is an even gap on each side of each line.
What are the document Properties?
Document properties, also known as metadata, are details about a file that describe or identify it. They include details such as title, author name, subject, and keywords that identify the document’s topic or contents.
What is the difference between toolbar and taskbar?
is that toolbar is (graphical user interface) a row of buttons, usually marked with icons, used to activate the functions of an application or operating system while taskbar is (computing) the application desktop bar which is used to launch and monitor applications in microsoft windows 95 and later operating systems.
What menu bar contains?
A menu bar is a row or strip of menu items titles that, when clicked, display dropdown menus of other items or commands. A menu bar is an integral graphical user interface (GUI) component for a variety of software applications. In Windows, a menu bar is located at the top of an application window.
What is the Windows 10 taskbar?
Advertisements. The Windows 10 taskbar sits at the bottom of the screen giving the user access to the Start Menu, as well as the icons of frequently used applications.
Where can I find free lightroom presets?
Adobe Creative Cloud’s Free Assets Section
Adobe offers a lot of free — or “included” — assets many never think to make use of, which includes free presets for Lightroom.
How do I import presets into Illustrator?
Illustrator PDF Preset
- Download the Illustrator PDF Preset file to your Desktop.
- Unzip the file and open Illustrator.
- Go to Edit > Adobe PDF Presets.
- In the PDF Presets window click “Import“
- Select the “SG High Res.joboptions” file on your Desktop.
- You should now see “SG High Res” as an option in your PDF presets.
How do I save an Illustrator document size?
How do you live trace?
Trace artwork
To trace the image using the default tracing options, click Live Trace in the Control panel, or choose Object > Live Trace > Make. To set tracing options before you trace the image, click the Tracing Presets and Options button in the Control panel, and choose Tracing Options.
How do I smooth image trace?
You could try using the “smooth” tool located as a secondary option to the pencil tool. Hard to predict and takes getting use to, but simply take it and smooth near/on lines you want to smooth and it will lessen the number of anchors giving a smoother line appearance.
How do you vectorize in Illustrator?
So let’s get started on turning an image into a vector.
- Step 1: Pick an Image to Convert to Vector. …
- Step 2: Select an Image Trace Preset. …
- Step 3: Vectorize the Image With Image Trace. …
- Step 4: Fine-Tune Your Traced Image. …
- Step 5: Ungroup Colors. …
- Step 6: Edit Your Vector Image. …
- Step 7: Save Your Image.
- Reference 1
- Reference 2
- Reference 3
- Reference 4
- Reference 5
Before we start writing in Word, I want to show you some possibilities that we have, to arrange our screen in Word.
Adjustment Possibilities
For that we go to the tab called “View” and by default the “Print Layout” should be activated. This is a view in which we can edit the document and it usually shows the document how it will look like, when it gets printed. If we want to change the view, we have some basic functions in our status bar at the bottom of the program. Here we can switch between the read mode, the print layout and the web layout – and we can also change the zoom.
Explore Read Mode
Let’s say that we now only want to read a Word document and we don’t want to edit it. Then we can switch to the read mode by clicking the corresponding button in the View tab or by clicking the corresponding button in the status bar. In the read mode, almost everything gets removed from the screen, so that we can focus on our reading. When we click on the menu item called “View”, we can go back to the editing mode, change the page width, the background color and more. Don’t forget that we can also change the zoom through the slide control in the status bar. So, let’s go back to the print layout now by clicking the corresponding button in the status bar. This is the view that we will use most during the whole course.
Set Number of Shown Pages
When the print layout is activated, we can choose whether we want to see only page, or multiple pages. Personally, I like to work with only 1 page at a time, but feel free to test the multiple page layout. In the multiple page mode, we can control the shown number of pages by changing the zoom.
Multiple Page Mode
Another very cool thing, that we should know about, is the multiple window mode. When we click on “New window”, Word will create a duplicate window for our current document. When we then click on “Arrange All”, we can work on the same document in 2 different windows. This is useful when we have a long document and for some reason, we need to be able to read the content on page 1 to edit the content on page 100 for example. We can simply close one of these windows and the remaining window will contain all changes.
Split Screen
The “Split” button has almost the same function. It also allows us to edit 2 different areas of our document simultaneously, but the difference is, that we don’t have a separate window for each area.
The last things I want to show you, are the ruler and the navigation pane. We can activate both in the section called “Show”. The ruler is very helpful for us, when it comes to formatting our document and the navigation pane is extremely useful when we have headings in our document, and we want to quickly jump to these headings or if we simply want to see our document structure.
Now you know how to arrange the screen in Word. Play around with all of these options a bit and check what view mode and screen arrangement you like the most. Take your time to make the program environment as comfortable as possible for you, since you will spend a lot of time in here.

Our monitor only gives us a limited space to edit Word documents. Jumping from one page to another consumes too much time, so today we will show you some simple tips to maximize the Microsoft Word editing area for a better writing experience.
Split The Editor
Open the view tab to access the ‘Split Window’ icon and position the split bar just below the part that we want to keep static.

With the document split into two panes, we can work on one pane while keeping the other pane static for reference.
Each window pane acts like a separate window and we can adjust each the look and feel for each pane. For instance we can set different zoom levels for each pane.
We can even set different layouts in each pane for better editing. For instance, we can keep the top pane in ‘Print’ layout while working on ‘Outline’ layout in the bottom pane.
Click on the ‘Remove Split’ button to remove the window split.
Arranging Multiple Word Windows
Click on the Arrange All button to stack two Word Document windows vertically.
Arranging multiple Word windows into a tile is very useful when we are working on two documents and we need to reference both documents at the same time.
Click the ‘side by side’ button so that Word aligns the two windows vertically to allow us to compare the two documents and work on them more effectively.
We can set Word to scroll both windows at the same time for easier navigation by clicking on the ‘Synchronous Scrolling’ button.
Microsoft has designed the view tab to give us simple solutions to maximize Word’s editing area for better writing experience. We hope that our simple tips increase our reader’s productivity with Word. Do drop us some comments if you have any other productivity tips with Word.
READ NEXT
- › Google Chrome Is Getting Faster
- › BLUETTI Slashed Hundreds off Its Best Power Stations for Easter Sale
- › The New NVIDIA GeForce RTX 4070 Is Like an RTX 3080 for $599
- › Expand Your Tech Career Skills With Courses From Udemy
- › Mozilla Wants Your Feature Suggestions for Thunderbird
- › How to Adjust and Change Discord Fonts
How-To Geek is where you turn when you want experts to explain technology. Since we launched in 2006, our articles have been read billions of times. Want to know more?