
April 2023 Community Newsletter
Welcome to our April 2023 Community Newsletter, where we’ll be highlighting the latest news, releases, upcoming events, and the great work of our members inside the Biz Apps communities. You can subscribe to the News & Announcements and stay up to date with the latest news from our ever-growing membership network who quickly discover that «Community is bigger on the inside».
LATEST NEWS
Microsoft Business Applications Launch Event — On Demand
Sign up below for an in-depth look into the latest updates from across Microsoft #PowerPlatform and #Dynamics365. Find out about new features, capabilities, and best practices for connecting data to deliver exceptional customer experiences, collaborating using AI-powered analytics, and driving productivity with automation. Guest speakers include Charles Lamanna, Emily He, Georg Glantschnig, Julie Strauss, Jeff Comstock, Lori Lamkin, Mike Morton, Ray Smith, and Walter Sun.
Watch Now: Business Applications Launch Event
Power Platform Connections — Episode Nine
Episode Nine of #PowerPlatform Connections premieres today at 12pm PST, as David Warner II and Hugo Bernier chat to Principal Program Manager Vesa Juvonen, alongside the great work of Troy Taylor, Geetha Sivasailam, Michael Megel, Nathalie Leenders, Ritesh Ranjan Choubey, Clay Wesener, Tristan DEHOVE, Dian Taylor, and Cat Schneider.
Click the link below to subscribe and get notified, with David and Hugo LIVE in the YouTube chat from 12pm PST. And remember to use the hashtag #PowerPlatformConnects on social to have your work featured on the show!
App in a Day — Free Workshop
Looking for a way to build a solution to quickly meet your business needs? Register below for a FREE «App in a Day» workshop to find out how to create custom business applications without writing code!
Microsoft Power Platform In a Day workshops
UPCOMING EVENTS
Directions Asia
Find out more about Directions 4 Partners Asia 2023, which will be taking place in Bangkok on 27-28th April 2023, featuring key speakers Mike Morton, Jannik Bausager and Dmitry Chadayev.
This event is for SMB focused Dynamics partners and their employees to receive product knowledge about Business Central, Power Platform and #DynamicsSales, and to be inspired and motivated by best practices, expert knowledge and innovative ideas.
If you want to meet industry experts, gain an advantage in the SMB-market, and acquire new knowledge about #MicrosoftDynamics Business Central, click the link below to buy your ticket today!
Click here to Register
Iberian Tech Summit
Come take a look at the Iberian Technology Summit which will be held at the Real Marina Hotel & Spa in Olhão, Portugal, between 28-30th April 2023.
The Iberian Technology Summit is the first of its kind with a clear goal to achieve — cross the borders of peninsula and help to empower the community of professionals, workers and businesses to grow stronger together.
Congrats to Kaila Bloomfield, Adam B., Ana Inés Urrutia de Souza and the team for putting together this great event. Click below to find out more details.
Click here to Register
Power Platform Conference 2023
We are so excited to see you for the Microsoft Power Platform Conference in Las Vegas October 3-5th, 2023! But first, let’s take a look back at some fun moments and the best community in tech from MPPC 2022 in Orlando Florida.
Featuring guest speakers such as Heather Cook, Julie Strauss, Nirav Shah, Ryan Cunningham, Sangya Singh, Stephen Siciliano, Hugo Bernier and many more, click the link below to register for the 2023 #MPPC23 today!
www.powerplatformconf.com
COMMUNITY HIGHLIGHTS
Check out our top Super and Community Users reaching new levels! These hardworking members are posting, answering questions, kudos, and providing top solutions in their communities.
Power Apps:
Super Users: @BCBuizer , @WarrenBelz,
Community Users: @mmollet, @Amik, @RJM07
Power Automate:
Super Users: @Expiscornovus , @grantjenkins, @abm
Community Users: @Nived_Nambiar
Power Virtual Agents:
Super Users: @Expiscornovus, @Pstork1,
Community Users: @nikviz, @DaniBaeyens
Power Pages:
Super Users: @ragavanrajan
Community Users: @OOlashyn, @gospa, @Fubar
LATEST PRODUCT BLOG ARTICLES
Power Apps Community Blog
Power Automate Community Blog
Power Virtual Agents Community Blog
Power Pages Community Blog
Check out ‘Using the Community’ for more helpful tips and information:
Power Apps, Power Automate, Power Virtual Agents, Power Pages
Hi Team,
I am new to Workflow development. It would be great if someone will help.
Please help in designing document approval Workflow using SharePoint Designer 2013.
My requirement is as below.
User will upload a document in document library.
Then will trigger an email (start workflow) and send email to say 10 users.
So now stages of workflow are as follows:-
If all 10 people approve the document, status of document will be Approved.
If out of 10, 2 people reject, status of document will be Pending.
Now User will get email saying that these 2 users have rejected the document. (I want the names of these 2 people in email).
Again user will modify the document and again resend (trigger workflow) to only these 2 people and not 10 people.
When these 2 approve, status will be complete.
Please let me know how to achieve this functionality using SharePoint Designer only. (No customization allowed).
Please help.
Thanks & regards,
Manish
Contents
Subscribe to our blog
A document approval process is crucial for streamlining your operations and bring order to your creative workflow. Learn how to create one in this article.
Have you ever had a project derailed because a key deliverable wasn’t approved on time?
I’m sure you have.
Getting documents approved in a structured, timely fashion is one of the more understated challenges in project management. You might have everything lined up perfectly, but if a key stakeholder doesn’t give the ‘okay’ on schedule, things can go downhill quickly.
To add to your problems, “quality” is inherently subjective in nature. Designer A might approve a design in a heartbeat, but Designer B might dump it in the trash. The end result is wild inconsistencies in what gets approved and what gets rejected.
This is why developing a document approval process is crucial for every agency. Subjective quality criteria and ad-hoc approval can work fine for small agencies, but any business that wants to scale will want to standardize the how, when, who, and what of the approval process.
That’s exactly what we’ll tackle in this article. I’ll show you why creating a document approval process is important and how to go about creating one.

What is a Document Approval Process (and Why You Need One)?
If you’re working in an agency — creative, marketing, or development — you’re invariably dealing with work that needs to meet some quality standards. Your code needs to be up to scratch, designs needs to meet brand guidelines, and marketing collateral has to match up to campaign requirements.
Meeting these quality standards means that any deliverable usually goes through multiple rounds of approval before it can go live. Some work might get rejected outright, some sent back for revisions, and some might actually be approved.
All this back and forth is an operational nightmare. At any point, you, the project manager, might be tracking dozens of documents stuck in the approval workflow. You have to keep tabs on who to follow-up with and when to do it.
And if that’s not all, you also have to make sure that the approvers actually follow quality guidelines, not just their individual biases.
The solution to all these problems?
A document approval process.
A document approval process is exactly what it sounds like: a workflow that defines the steps necessary to approve different types of documents and deliverables — copy, designs, code, etc.
Essentially, it maps the path a document takes as it goes from the first draft to the final product.
Keep in mind that the word “document” here is a catch-all term for anything that needs to get approved. It includes everything from a piece of code to entire apps, and from a landing page copy to a complete UI/UX flow.
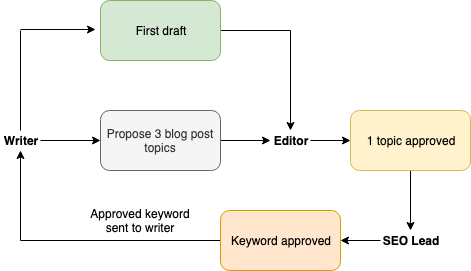
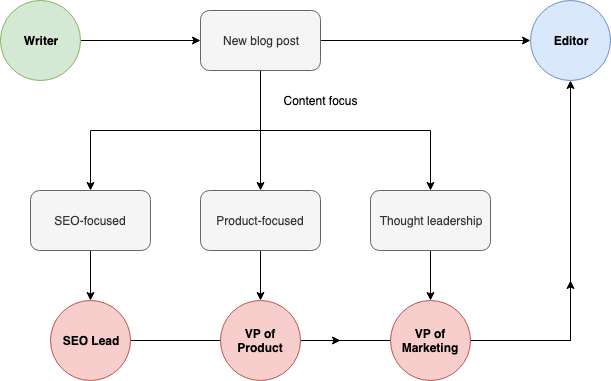
For instance, you might have the following process to create a blog post:
- A writer proposes three different topics for a blog post
- The editor approves one topic but requests a new SEO-friendly headline
- The writer sends a new headline, which is approved by the SEO lead
- The writer writes the article, but the editor requests some revisions
- The editor approves the first draft and sends it to the content marketing lead
- The content marketing lead requests some revisions to meet campaign goals
…and that’s just a part of it. Depending on the complexity of the deliverable, you might have dozens of rounds of revisions and approvals.
A document approval process maps all these steps.
There are two parts to this process:
- A workflow that defines who to get in touch with for approval at different stages of the document’s journey
- A set of guidelines that define what each approver must look for to ensure quality standards are met
In the above example, an SEO lead might want a minimum of 1,000 searches/month for the blog’s keyword before approving it. These would constitute the SEO’s guidelines in the document approval process.
Put together, this process brings much needed clarity and control to the entire document journey. It not only tells you exactly what you have to do to create a finished product; it also ensures that your output meets certain quality standards.
Why a Document Approval Process Matters
There are plenty of reasons to have a document approval process in place (and we’ll look at them below).
But the biggest one is also the most important one: it’s just how things are done.
You’ll rarely, if ever, find a large agency that doesn’t follow some sort of internal process for approving documents. Whatever the pros and cons (not that I can think of any cons), it’s standard practice.
“Because everyone does it” isn’t a convincing argument, of course. So let’s look at some of the tangible reasons for creating a document approval process:
- Standardization: Following a uniform process ensures consistency in operations across teams, projects, and managers.
- Improve efficiency: A fixed approval process gives everyone a definite blueprint of what to do at each stage of the document workflow. The result is less confusion, faster turnaround, and more time savings.
- Data collection: By following a uniform process, you can collect data on how long each document takes to get approved at each stage. This can help you spot bottlenecks in the workflow. It also improves scheduling since you can use collected data to evaluate how long a document will actually take to go live from the first draft.
- Automate follow-up: Manual follow-up can get overwhelming, especially when you’re dealing with dozens of concurrent approvals. By following an approval process, you can automate follow-up based on fixed intervals (“first follow-up in 3 days, second in 5 days, etc.”).
- Improve accountability: A document approval process helps you track changes and approvals at each stage. This not only helps you keep a record of revisions, but also improves accountability.
- Improve transparency: Since everyone is forced to work within the same criteria, there is less subjective decision making and top-down control
Finally, a document approval process makes it easy for new employees to slot into their roles. If a project manager departs, she doesn’t take away all her best practices and processes with her. Instead, a new manager can fit right in by following your already established processes.
Since we’re all about scalability here at Workamajig, we see this as a massive win.
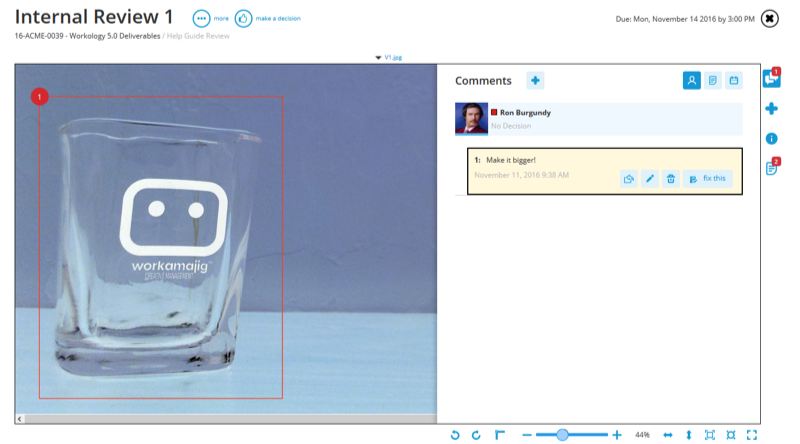
Workamajig lets you create online proofs, track approvals/changes, and hold conversations right from your PM tool
However, one question remains: how exactly do you create a streamlined document approval process? What are some of the pitfalls you should look out for?
We’ll look at some answers in the next section.

How to Create a Streamlined Approval Process
The document approval process you create for your agency will depend a great deal on the size and maturity of your organization.
That said, all successful approval processes have a few things in common:
1. Make sure you have all the basic elements
Regardless of the scale and scope of your approval process, it should have at least the following elements:
- A way to submit work for approval. Ideally, you should also give the submitter a receipt that they put in the work on time.
- A way to assign submitted work to different approvers. This should be done by someone other than the submitter (such as the project manager).
- A way to set deadlines and permission levels for different approvers. For instance, you might want to give one approver the right to change documents, while another should have read-only rights.
These make up the core of any document approval process — submitting and assigning work with fixed deadlines.
Beyond this, think of adding the following to your workflow:
- Automatic alerts, notifications, and follow-ups. This should be a high priority since it can save a ton of manual effort.
- An activity log so you can track when work passed through each stage in the approval workflow.
- Project management or task management integration. This way, you can turn edit requests directly into tasks.
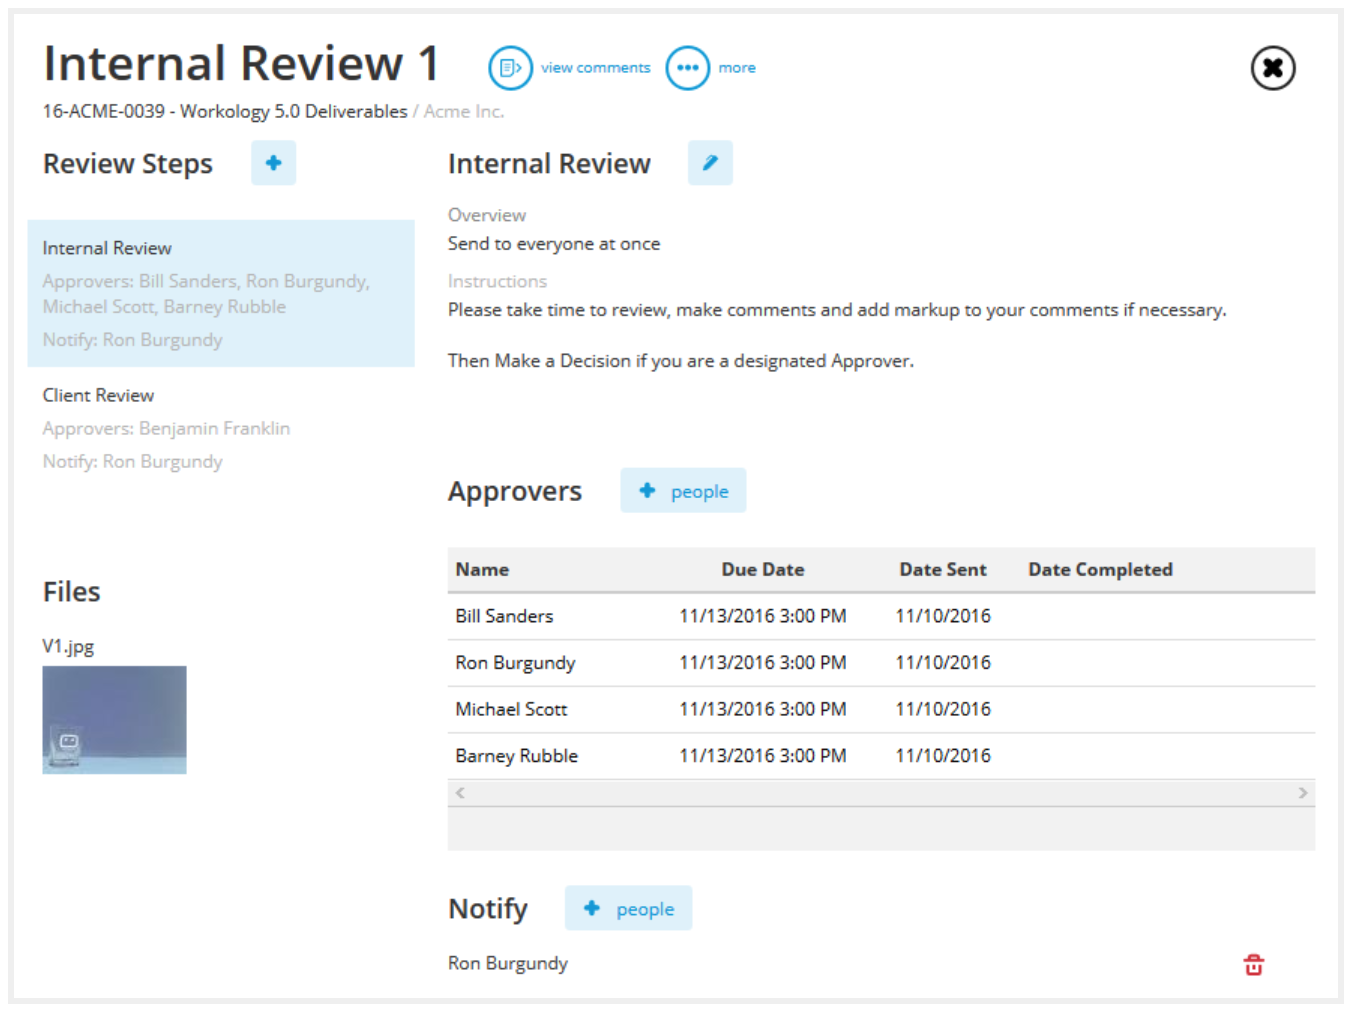
For example, each deliverable in Workamajig can have its own internal review process. You can control the list of approvers to notifications and guidelines.
2. Ask the right questions
The above elements describe the functional parts of an approval process. Put them together and you’ll have the ingredients to get a basic workflow up and running.
For a truly effective approval process, however, you will need to zero in on the details.
Start by asking some fundamental questions about your process:
- Submission: What platform should submitters use to send in their submissions? What format should the documents be in? Do they get a receipt for submission, or is an admin-controlled activity log enough? What details should they include in their original submission to aid the approval process?
- Documentation: What supporting documentation, if any, should submitters include? What documentation should approvers consult before approving/rejecting a document? What are the quality guidelines for each submission-type for a) the agency, b) the project, and c) the deliverable?
- Storage and access: Where will you store submissions and supporting documentation? How will you grant people access to them?
- Permissions: Who gets permission to view submitted documentation? Do approvers get editing privileges as well, or is that limited to submitters? If an approver changes something, does the original submitter need to be notified?
- Communication: How will submitters, approvers, and intermediaries (such as editors or managers) communicate? Will communication go through an intermediary (common when dealing with clients)? How will you track this communication?
- Acceptance/Rejection: What happens if a submission is approved? What happens if it is rejected? Are there a criteria for automatic approval (say, if there is no response for X number of days)?
- Templates: Do you have pre-made templates for sending approval/rejection emails? If you’re using automation, how will you plug-in data from the submission (such as date, title) into the template?
You’ll find that there are few “right” answers to these questions. Much will depend on the maturity of your organization and how much you’re willing to spend on developing your approval process.
A small agency, for instance, might find that managing approvals via email is more than enough to keep everything on track.
A larger agency, on the other hand, might prefer using a creative project management tool like Workamajig with built-in approval workflows.
3. Separate your internal and client-focused approval processes
In an agency setting, you’ll invariably encounter two types of approvals:
- Internal approvals where someone from within the agency needs to okay a deliverable before it is sent to the client.
- External approval where a client approves a deliverable or suggests changes to it.
While you can certainly use the same document approval process for both these activities, you’ll get better mileage by separating the two.
Why?
Because client approval is as much about offering good service as it is about getting a document approved. Offering suggestions, asking for revisions, following up on requests — so much of the client-agency interaction revolves around the approval process.
A well-designed process will go a long way towards making clients feel valued and comfortable.
Another reason to separate internal and client-focused approval processes is to limit scope creep. A client might request a revision that goes beyond the project’s scope. If you don’t manage it well, such revisions can easily derail the project.
For your client-focused approval process, focus on the following:
- A clean and effective communication interface, including a way to have conversations about each revision.
- A way to integrate change requests to handle out of scope revisions.
- A way to follow-up with clients on an automated basis for approving revisions.
4. Focus on user workflows
Every approval process, regardless of how it is designed, essentially has four types of users:
- Submitters who send in documents to be approved
- Approvers, i.e. people who approve or reject submitted work
- Intermediaries such editors, etc. who act as a go-between approvers and submitters
- Managers who oversee the entire approval process
A well-designed document approval process should focus on these users, not the documents alone.
Think of how each of these three users will interact with the approval process. Try to place yourself in their shoes and map their experience. Ask yourself: What should these users see? How much information should they get access to?
For instance, a submitter, once he’s sent in some work, can be kept updated about the status of the document with regular notifications. These notifications can help her be prepared for any revisions. A green signal that the work has been approved at first draft can also be a big morale booster, particularly in creative industries.
Similarly, an approver should have a way of knowing how many documents are in her queue. This can help approvers manage their own time and energy. Say, if there are 10 upcoming requests with close deadlines, they can spread out the work over two days instead of one.
As for intermediaries, think of how much do you want them to have control over the document process. Do you even need them? And if you do, what interactions do you want them to control? If a client goes through a project manager to request a revision, what value does it really add?
Finally, you have project managers to oversee the entire process. In a streamlined process, PMs should only have to dive in to fix problems; the approval process can be self-sustaining. Give project managers a bird’s eye view of all the current and pending approvals so they know where the hold up is.
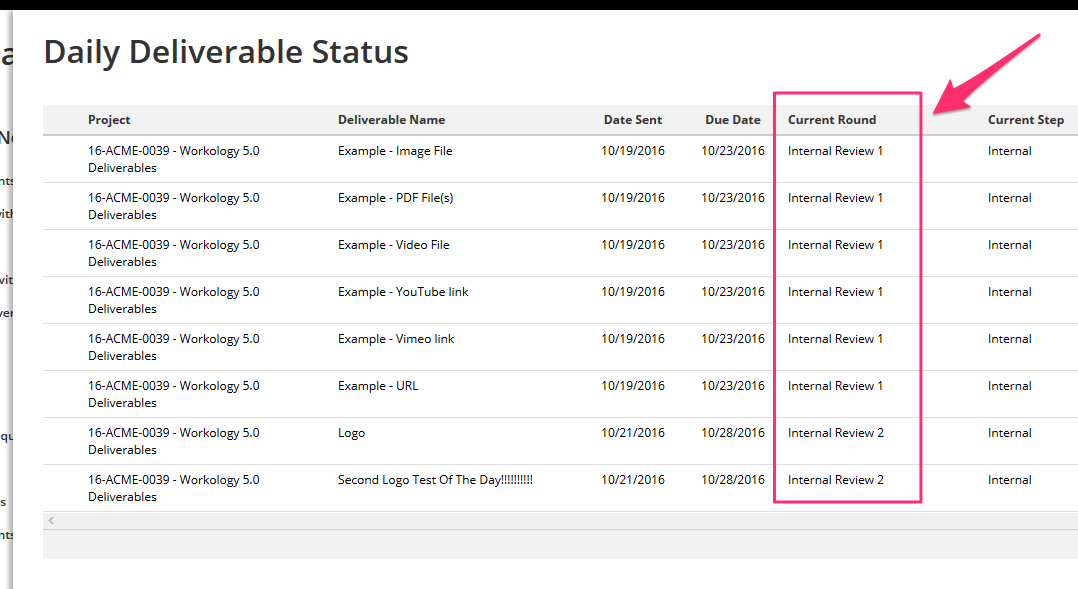
Workamajig shows you the status of each project and its associated deliverables along with their current approval stage.
These are important questions to answer, especially if you want to create an approval process that can scale with your agency.
5. Think in terms of conditional logic
In an ideal world, a creative will create a design, get it approved by the project lead, and send it to the client who will accept it at first go.
In this version of project management heaven, your document approval process can be entirely linear.
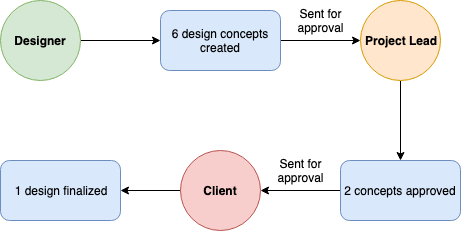
But we all know that the real world is rarely that straightforward. A creative will create half a dozen designs, of which only two might be approved by the project lead. The client might not like either of the two options which will send everyone back to the drawing board.
In this real world, document approval processes are a lot more complicated.
A basic non-linear workflow based on if-then statements
To tackle this real-world scenario, you have to think in terms of conditional logic — a fancier word for “if-then logic”.
Say, instead of a simple statement like “send blog post to the editor for approval”, you might have the following conditional logic:
- If blog post is SEO-oriented, then send it to SEO lead for approval
- If blog post is thought leadership focused, send it to VP of Marketing for feedback
- If blog post is product focused, send it to VP of Product for feedback
- Else send blog post to blog editor for approval
In this case, you have different approval flows based on the content of the document. The blog post will go to the editor first only if it doesn’t fit the first three factors.
Try to use conditional logic in all your document approval processes. Think about who should get access to each document, at what stage, and under what conditions.
This will make it much easier to automate your processes. It will also make it easier for anyone else to slot into the PM role — a key ingredient for scalability.
Over to You
A document approval process is crucial for any agency that wants to scale its operations. The more refined this process is, the more visibility and control you have over your work.
For more control, stronger compliance, and better communication, try a management system like Workamajig. Workamajig’s agency-focused features help you manage the entire approval process right from your project management dashboard.
Get a free demo by clicking the link below.
Whether in large organizations or small, documents act as an essential pillar enabling smooth execution of day-to-day business processes. This places even more emphasis on creating perfect winning documents, which can be achieved effortlessly through an electronic document management system.
Business documents are sent to internal teams for reviews and approvals before sharing them externally for final sign-offs.
Businesses use Revv – a complete document management software – to automate document approval workflows, save valuable time and resources, and boost productivity.
Cloud-based document management system, Revv, enables users to create rules, nominate approvers, and obtain approval/rejection on documents through ‘send for internal approval’ feature.
| What is a document approval workflow system? |
| Why are document management systems ‘the solution’ to automating approval workflows? |
| Who needs to automate the document approval workflow? |
| Revolutionize document approval workflows with Revv – The all-in-one document management software |
| Benefits of Revv’s seamless document approval process |
| Step-by-Step process to automate and streamline the document approval workflow through Revv |
| Connect the dots: Go beyond document approval – Embrace document automation with Revv’s unparalleled features |
| Pricing of Revv – Cherry on the cake |
| It’s time to take actions |
| Frequently asked questions |
Let’s first decipher what workflows are.
Workflows are the rules that trigger a set of actions when a particular condition is met in documents.
So, what is a document approval workflow?
Whether internal or external, all documents are sensitive documents filled with information that circles around your business. While some documents don’t need the lens of scrutiny, some documents capture critical information that needs to be validated by internal teams before sending them to the recipients.
Therefore, an approval workflow specifies the rules on how a file should travel and what stops it should make before reaching the destination.
Here’s an example of an approval workflow –
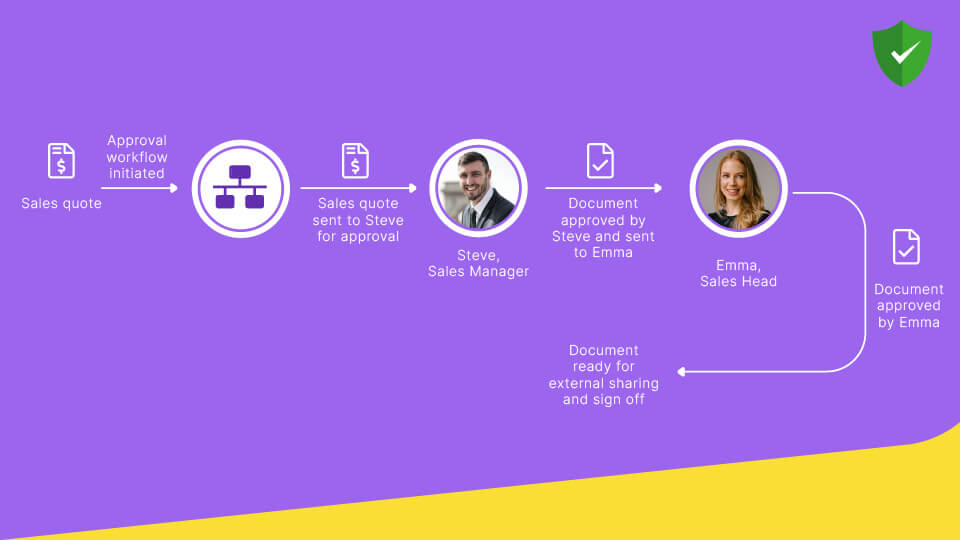
Mr. Steve, sales manager at XYZ company, wants to ensure that if any of his sales associates offer a ‘yearly’ billing period instead of ‘monthly’ in the sales quote, such documents should be sent to him automatically for his approval.
Also, he wants his sales head’s (Miss Emma) approval on these documents. But, he wants the quote to be sent to Miss Emma only after he has approved them.
Now, let us understand what a document approval workflow system is.
A document approval workflow system streamlines and enhances business operations. It automatically routes electronic documents to the respective approvers and provides insights on approvers’ actions and pending tasks.
Why are document management systems ‘the solution’ to automating approval workflows?
First, what is a document management system (DMS)? What is the purpose of a document management system?
Document management systems are cloud-based software that builds a paper-free workplace. It protects organizations from the horrors of haywire, painful, and error-prone document management. The software helps create, organize, digitize, store, and manage files and protects them with a built-in security system.
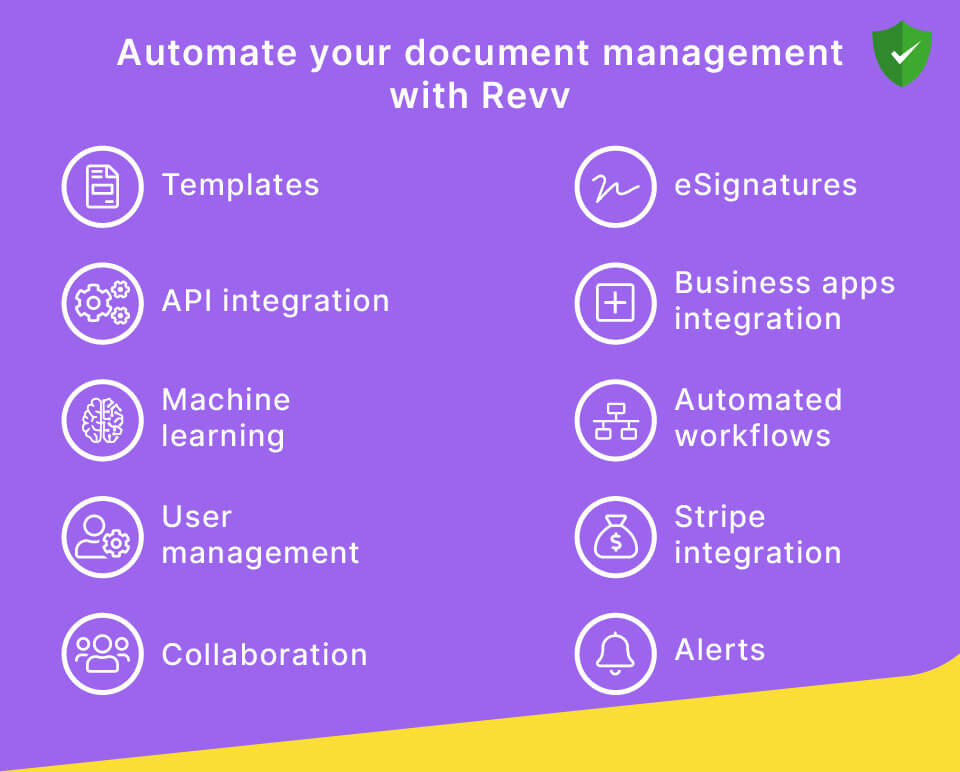
The document management system features list includes – customizable templates, e-signature, no-code workflow automation, collaboration, business platforms integration, API integration, notifications, real-time tracking, version control, access control, information management, data and records management, and file type conversion – along with an added layer of security.
Next, why do you need a DMS for approval workflow automation?
Automating document approval workflow is the tip of the iceberg when it comes to document management. To bring efficiency into the system, businesses also need to fasten the pre- and post-process of document approval.
For example –
- Is the document drafted professionally?
- What’s happening to it post-internal approval?
- Is it sent to customers for eSignature or soft signs?
- Is it signed?
- Where is it stuck?
…and so on.
An integrated document management system is equipped with workflow tools, business apps integration, machine learning, drafting, storing, and tracking capabilities. It puts a stop to NIGO (Not-in-Good-Order) issues and makes the whole document process automated, intuitive, and faster.
Let’s consider the same document workflow example explained above to explain an automation process.

- A sales quote is automatically created in a DMS when a new lead is added to CRM
- Sales quote edited in DMS as per the requirement and sent for internal approval
- File sent for eSignatures in DMS post internal approval
- Once eSigned, a notification on the same gets delivered to a chat channel in slack
Who needs to automate the document approval workflow?
Processing documents is an ingrained part of every department in an organization – sales, purchase, human resources, marketing, finance, customer support, legal, etc.
The documents in each business function flow through various approvals depending upon the set rules.
If the approval process is driven by paper documents or via emailing of web-based documents like Microsoft Office Word or PDF –
- Tracking each document manually in the approval chain becomes difficult and time-consuming
- The sender has to go through non-ending email threads to check approvers’ feedback and whether the document is approved or rejected
- This all further increases the turnaround time and delays the sharing of files with the final recipients
Therefore, every business needs a document management system to automate these approval workflows. It liberates them from error-prone and time-consuming manual methods and focuses their strengths on more fruitful work.
Revolutionize document approval workflows with Revv – The all-in-one document management software
Revv is an easy-to-use and advanced document management software system. Its user-friendly features redefine the approval process, enhance daily operations, increase productivity, and ensure that nothing slips through the cracks.
How to configure approval workflows in documents with Revv?
1. Template level
Business departments in an organization deal with multiple documents on a daily basis. There is some information that remains common in these documents, while some fields need customization.
Also, depending on the criticality of the information, some fields might require approvals.
Revv’s document management solution expedites this process through its form-based templates.
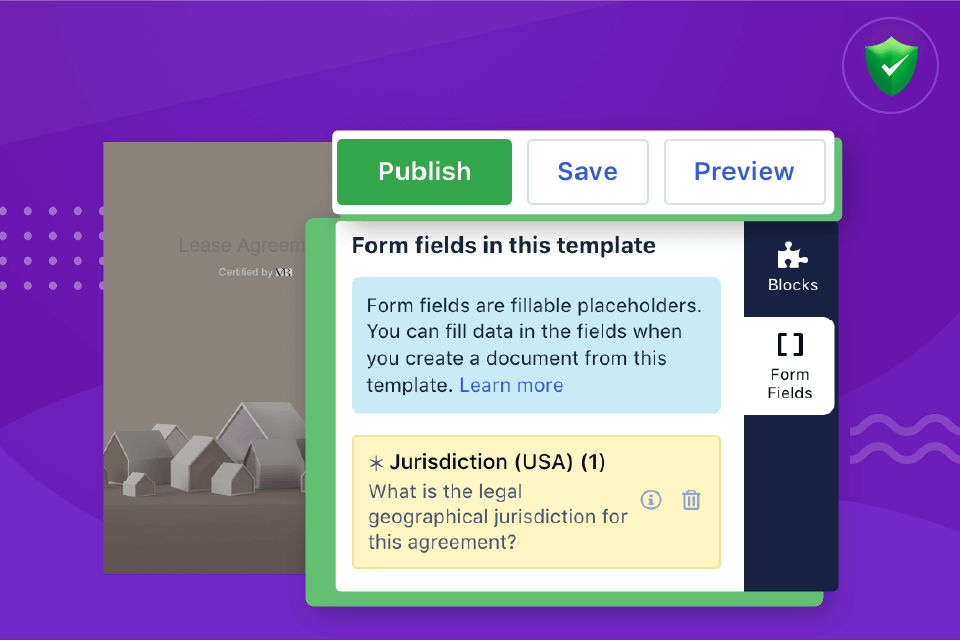
a) Form fields level – Form fields are fillable placeholders in a document.
The information that you fill in these fields gets automatically updated in the corresponding fields throughout the document, and reduces the repetitive processes of redoing the work.
It helps to draft a document without any hassle in just three steps – pick a template, create a doc, and fill the form fields to complete it.
For example, the sales team in an organization sends out sales proposals to prospective clients. Some information is kept standardized for every sales proposal, while some need customization like packages, billing period, company name, company address, etc.
The fields that need to be updated every time can be created as form fields in the sales proposal template.
Next, create an approval process for fields that demand scrutiny from colleagues or seniors before sending them externally. For example, a workflow can be created for all sales proposals where the billing period is more than two months.
Upon trigger, such approval requests get routed to the list of approvers provided in the workflow settings.
Note – The proposals that don’t require approval get automatically approved.
b) Clause or text level – Create multiple options for clauses and use them in documents as and when you require them. For example, you can have three clause options for three different pricing terms. If any particular selected clause demands a review, users can configure workflows based on text or clause level in the template.
2. Quote level
Revv rescues sales teams from chaotic and inefficient email approvals on sales quotes.
In Revv, you can specify criteria at the product or price level and select the approvers. For example, an automated approval workflow can be created when the sales team increases quantity beyond a threshold or gives more discount than allocated in the quote.
Benefits of Revv’s seamless document approval process
Revv is an all-in-one suite that streamlines and puts the right document management system in place. Its advanced approval workflow features enable smooth and effortless management of documents.
Enable sequential or parallel approval workflows – Revv enables users to specify the order in which documents need to be approved.
In a sequential approval system, a file moves to the next approver only when approval is received from the previous approver.
In parallel approval, a file is delivered to all the approvers altogether.
Standardized processes – It saves businesses from the chaotic loop of follow-ups over emails. It automates the approval workflow based on rules and criteria on documents and standardizes the entire process across business functions and teams in an organization.
Quick actions – The ‘Check and send for internal approval’ feature facilitates responding to a document by clicking on the ‘approve’ or ‘reject’ button. The internal approvers can also leave their comments/reasons for their decisions in the feedback box.
Set precise triggers and automate your document approval workflows with this option.
If you want your document to be reviewed by someone outside your organization, opt for the ‘Send by email’ option provided. The sender can set the recipient permission to view or edit the document.
Document status tracking – Revv’s workflow tracking mechanism provides insights on actions performed on a document, where the approval is stuck, and by whom. Clear visibility of every step helps to identify the hurdles and take necessary measures.
Faster – Approval automation speeds-up the entire process and leaves no space for confusion. It also informs approvers to act on tasks through email notifications.
Real-time notification system – Revv sends email notifications to both sender and recipients of the action that needs to be taken on the document. For example, the sender gets notified when documents are sent to recipients, when the recipient opens them, and completes the assigned task. While, the recipient will gets email alerts on what document has been sent by whom, and what action he/she has to complete.
Easily accessible – Revv provides easy accessibility of files, be it from a desktop or mobile device. This means, with an internet connection, decisions on documents can be taken immediately from anywhere.
Highly secure – Revv ensures safety and security on all documents with the latest industry standards.
Step-by-Step process to automate and streamline the document approval workflow through Revv
In this blog, we will create and implement an internal approval workflow on documents for form fields. Similarly, workflow processes can be created for clauses and quotations.
Follow the below instructions and learn to create and manage your document approval workflow process in Revv:
Step 1 – How to add form fields in a template?
1. Go to the ‘Templates’ section.
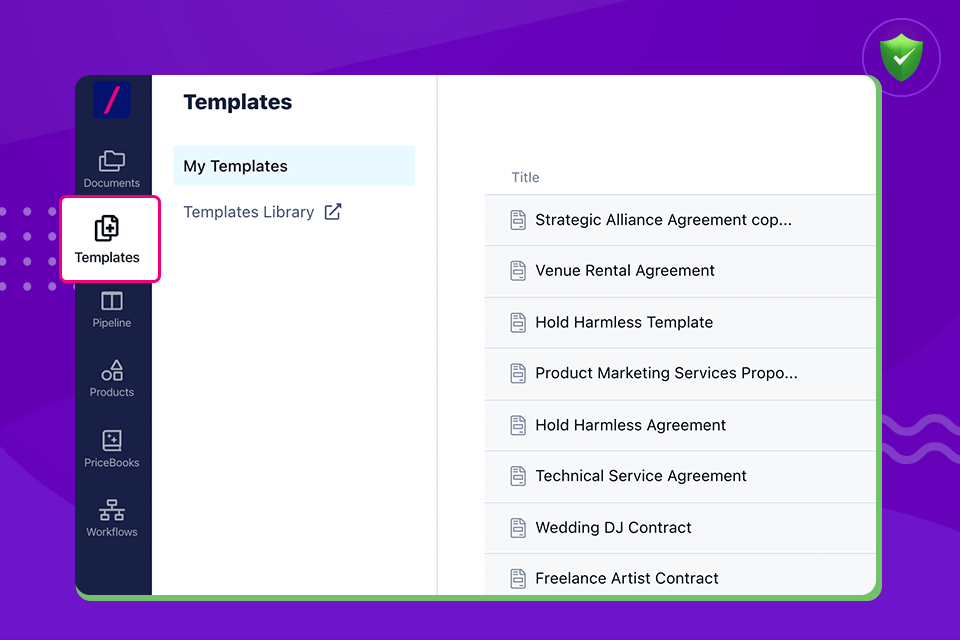
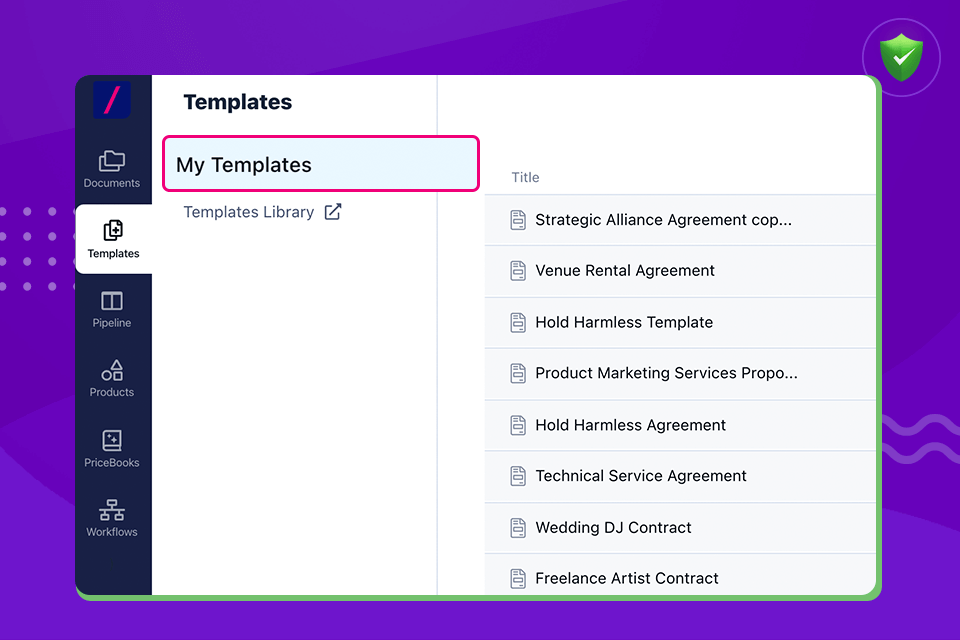
2. Choose a template from ‘My Templates.’
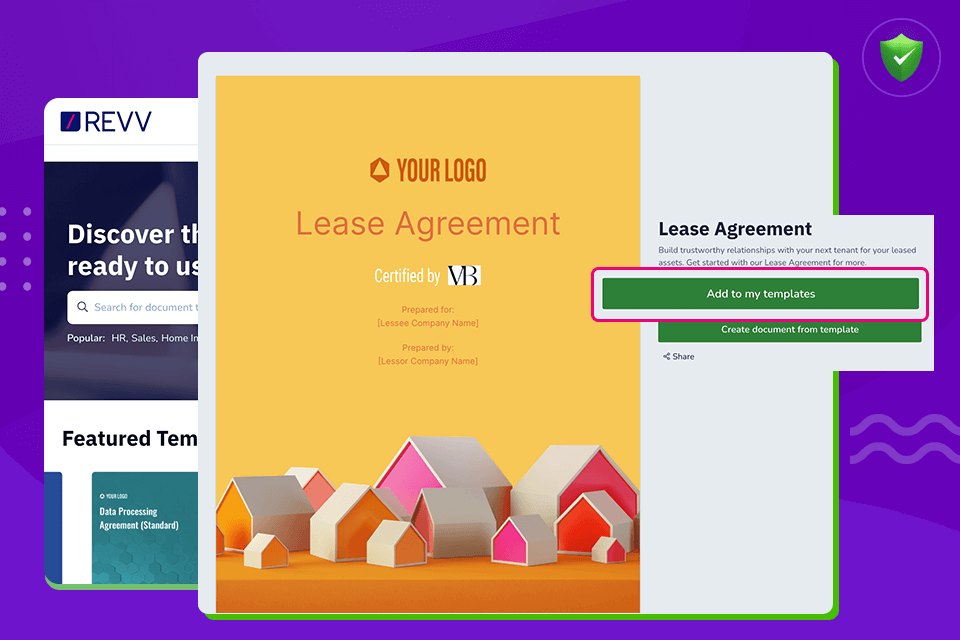
3. You can also import a template from Revv’s 1000+ templates. Add it to the ‘My Templates’ section in Revv.
4. Click on the template.
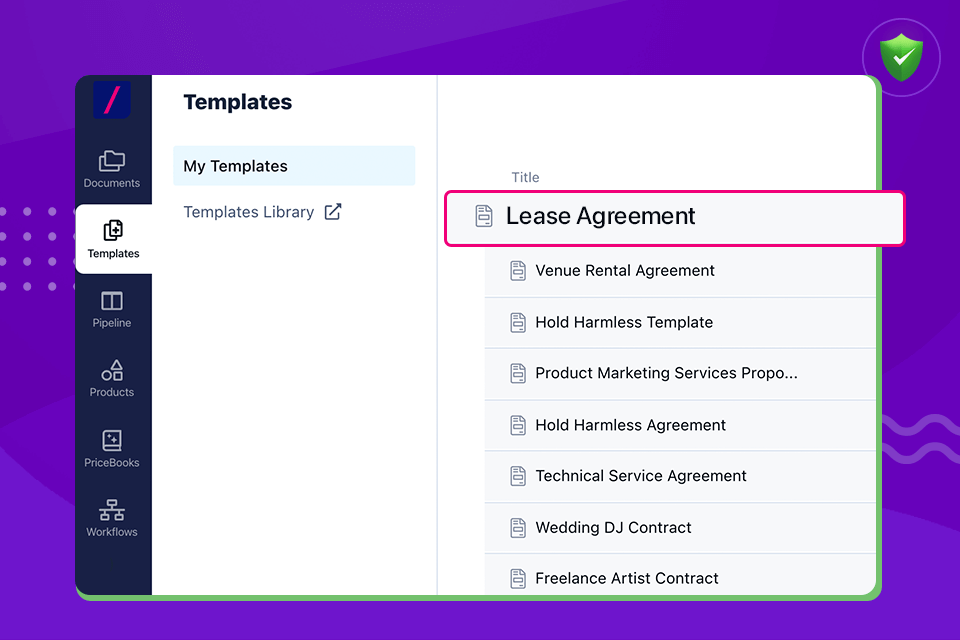
5. To make any changes in a template, ensure that it is in ‘Template Draft’ mode and not in ‘Published’ mode. If it is in ‘Published’ mode, then click on the ‘Edit’ button on the page and change it.
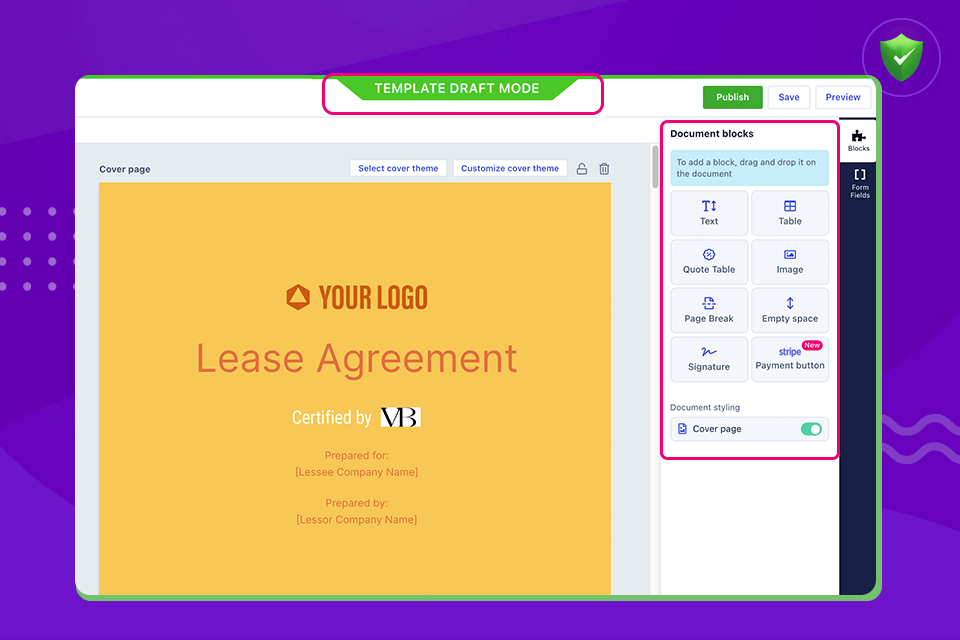
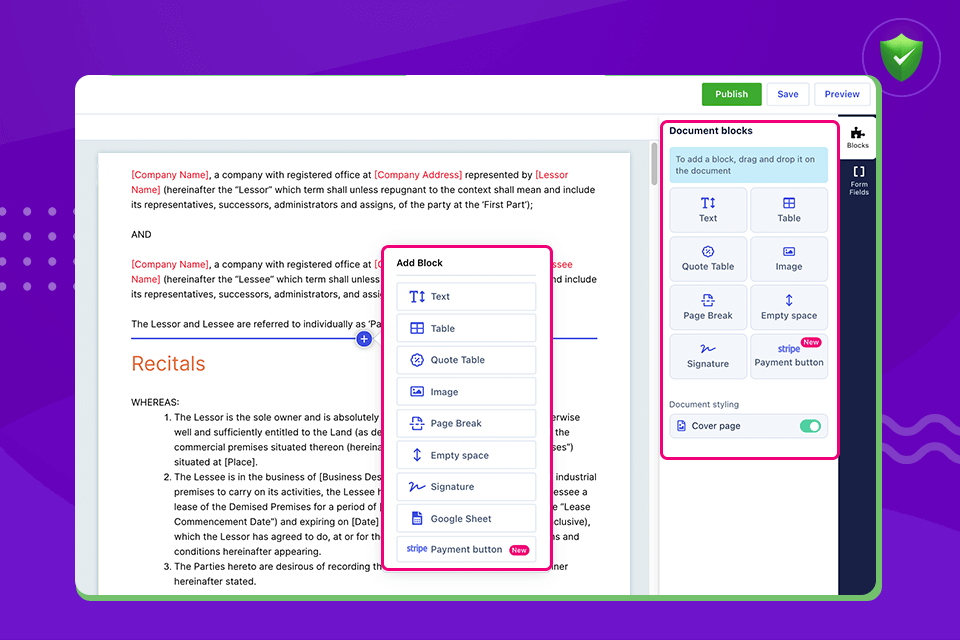
6. Edit and complete the template. Customize it using Revv’s rich drag-and-drop editor, add more blocks to the template, and edit them based on your requirement. Another way to do this is by clicking on the plus (+) icon, selecting the required block, and editing it.
7. Select the text you want to customize.
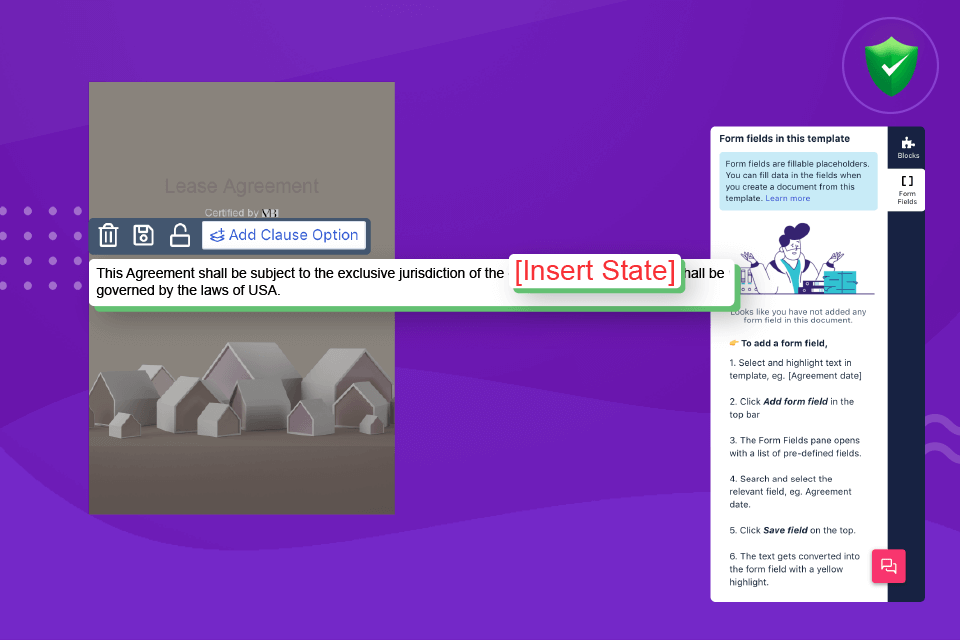
8. Click on the ‘Add Form Field’ button.
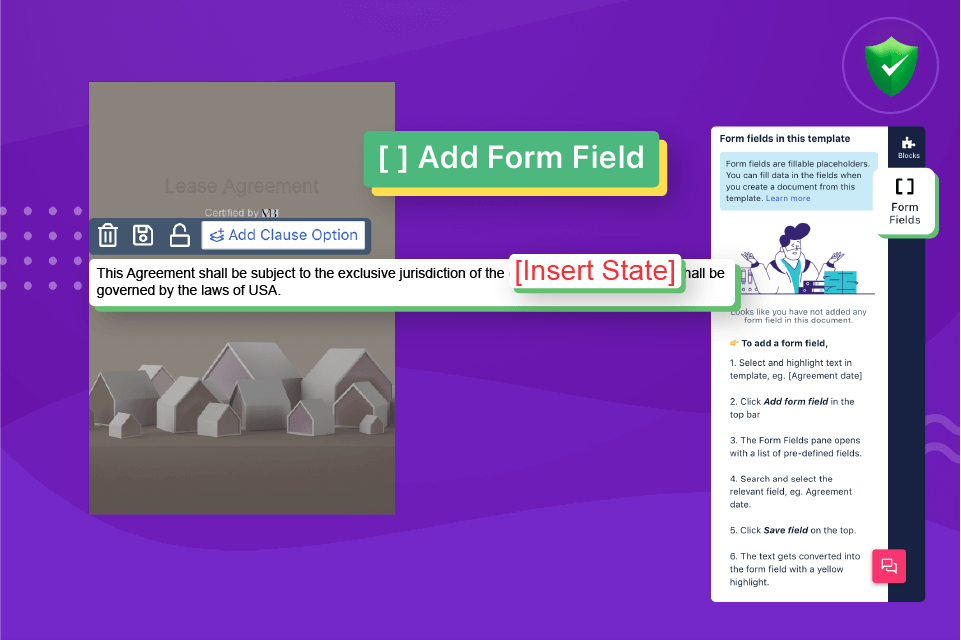
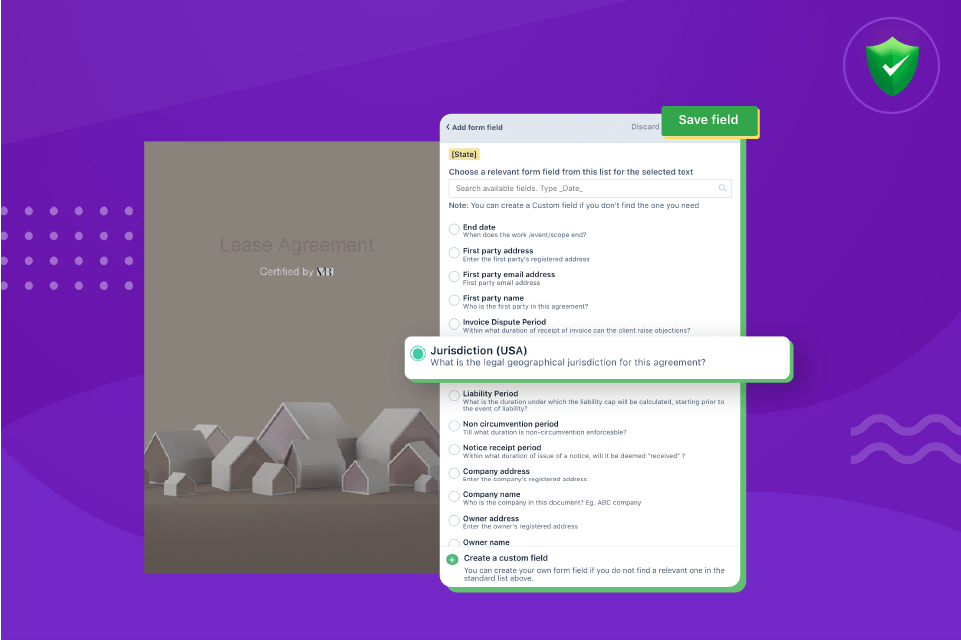
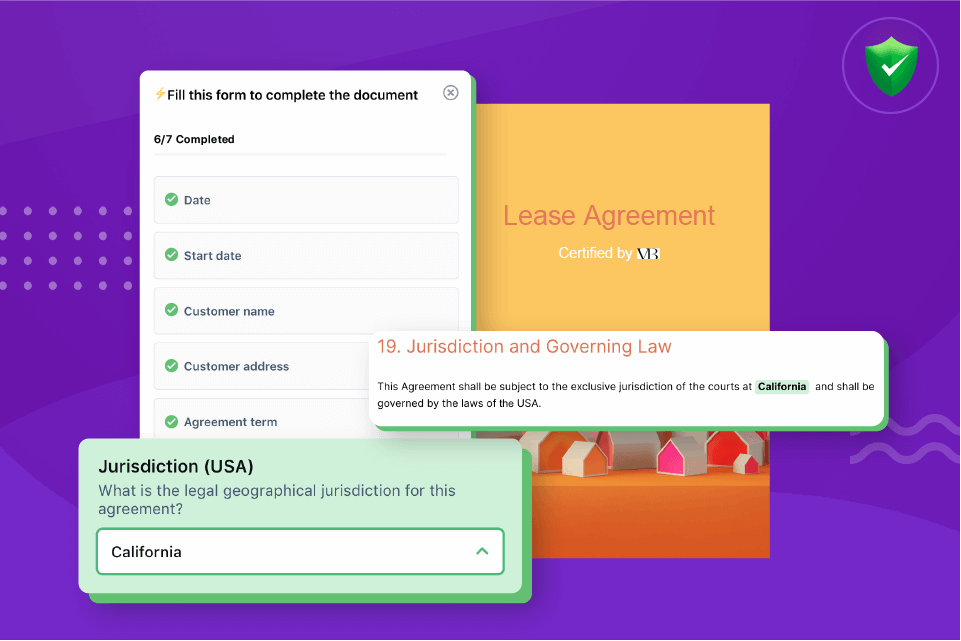
9. Choose a relevant form field and save it. For example (in the below image), the ‘State’ field in ‘Jurisdiction and Governing Law’ section is linked to ‘Jurisdiction (USA)’ form field.
Step 2 – How to create and implement an approval workflow for form fields?
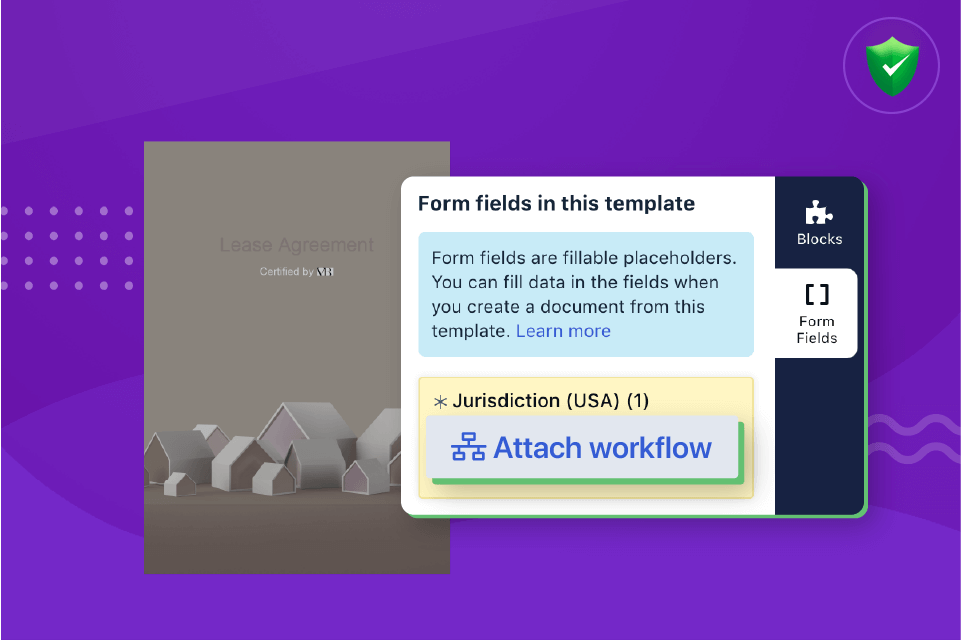
1. Go to the form fields pane, hover over the created field, and click on ‘Attach Workflow.’
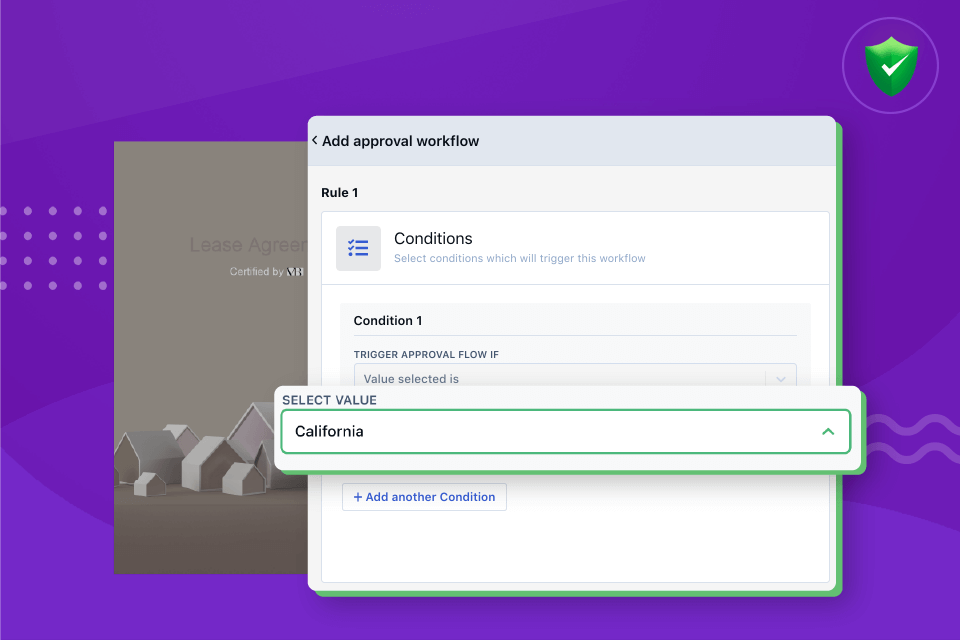
2. Let us create a workflow. For example, route an agreement for approval if the jurisdiction falls under ‘California.’
To do that, first, let us create a condition and select the value as ‘California.’
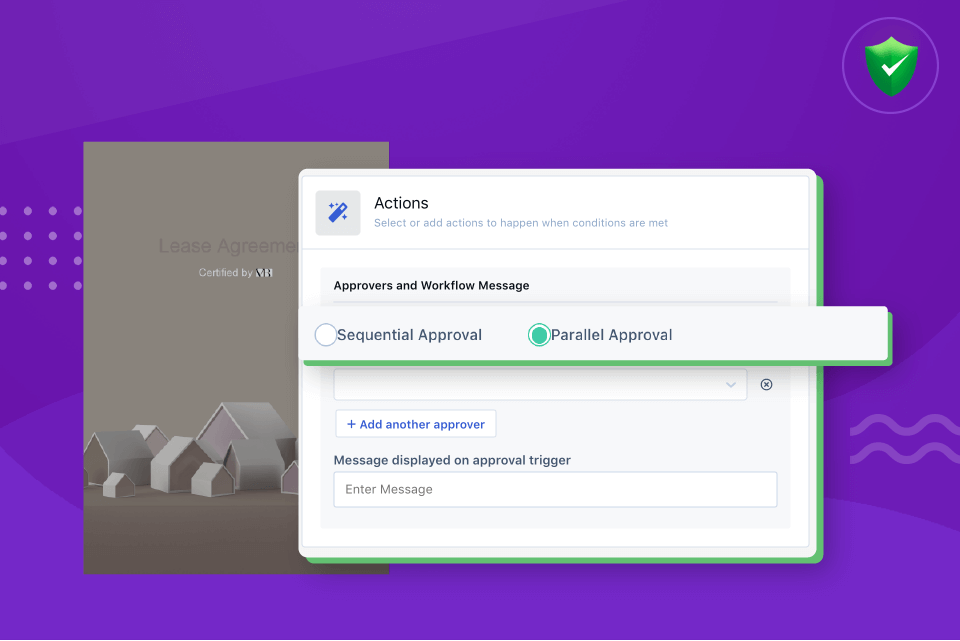
3. Next, we will choose the actions that will get activated for those conditions.
Choose between sequential and parallel approval.
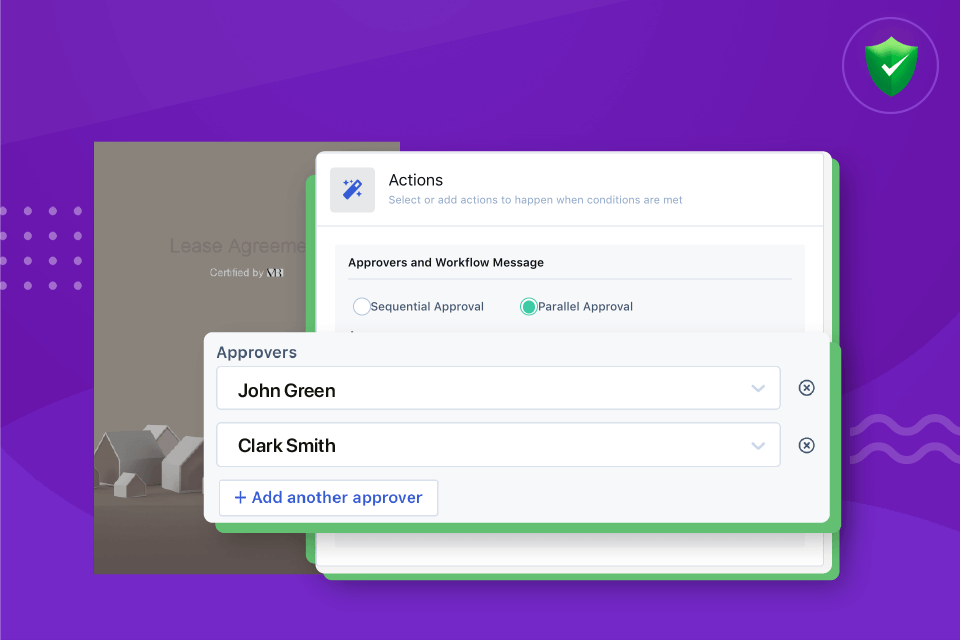
4. Add approvers to the list. You can also create a group of approvers in Revv. For example, corporate team, legal team, sales team, finance team, etc.
While creating an approval workflow, you can select a user or a group to respond to approval requests. Learn how to create user groups.
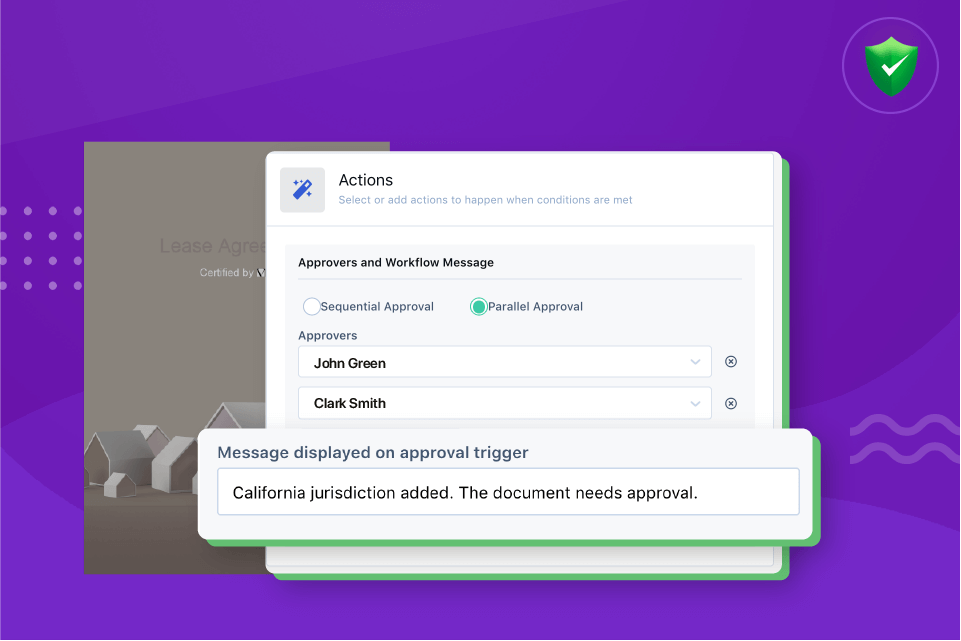
5. Write a message that gets displayed when the workflow is triggered.
6. Click on ‘Save’ button. The workflow is now created and will be triggered whenever this condition is added.
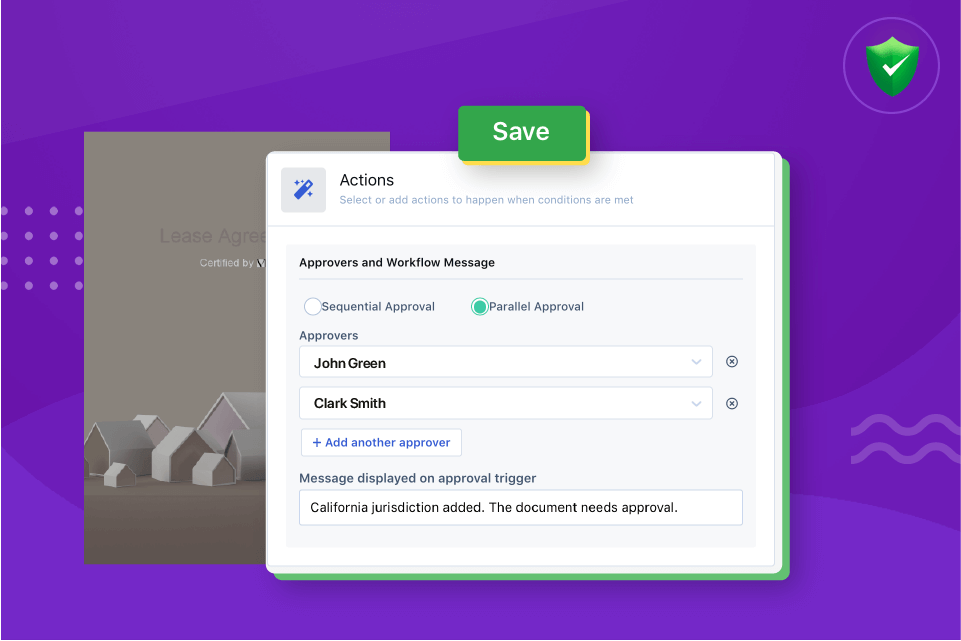
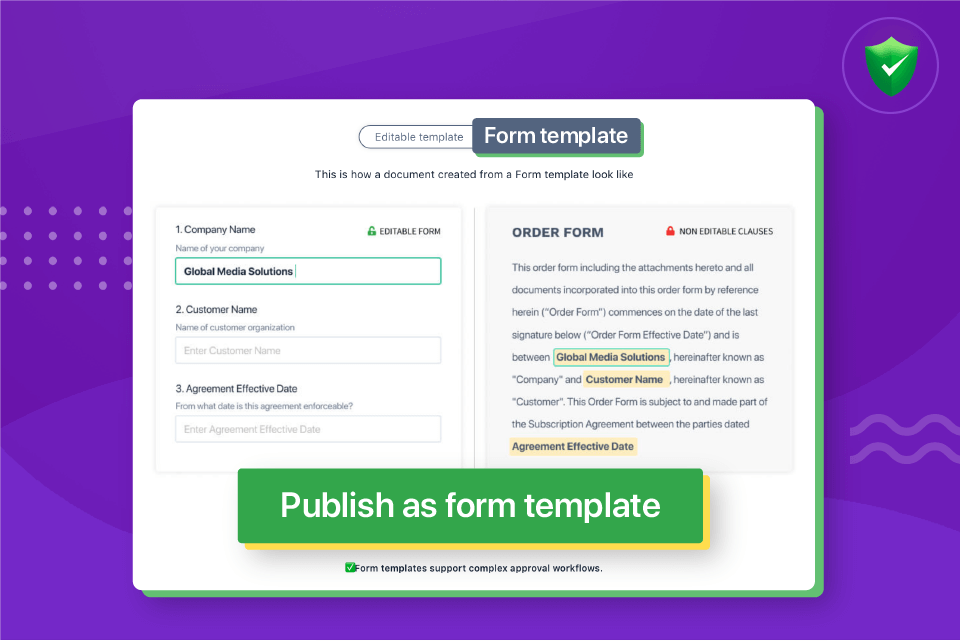
7. Click on ‘Publish’ button when the template is complete and ready.
8. Select ‘Form template’ tab, and click on ‘Publish as form template’ button.
Step 3 – How does ‘Send for internal approval’ process works in Revv?
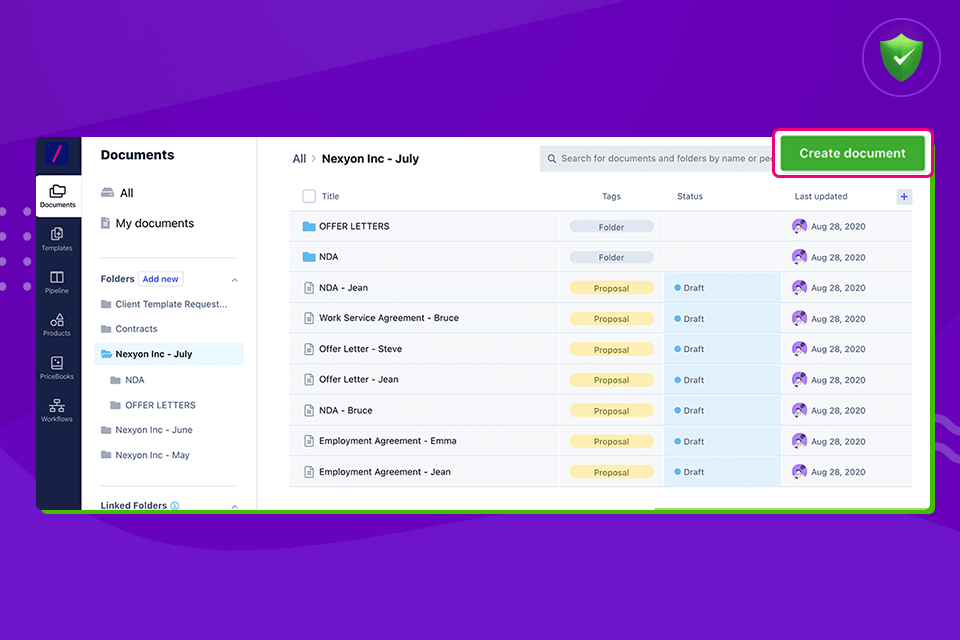
1. Go to the ‘Documents’ section in Revv. Click on the ‘Create document’ button.
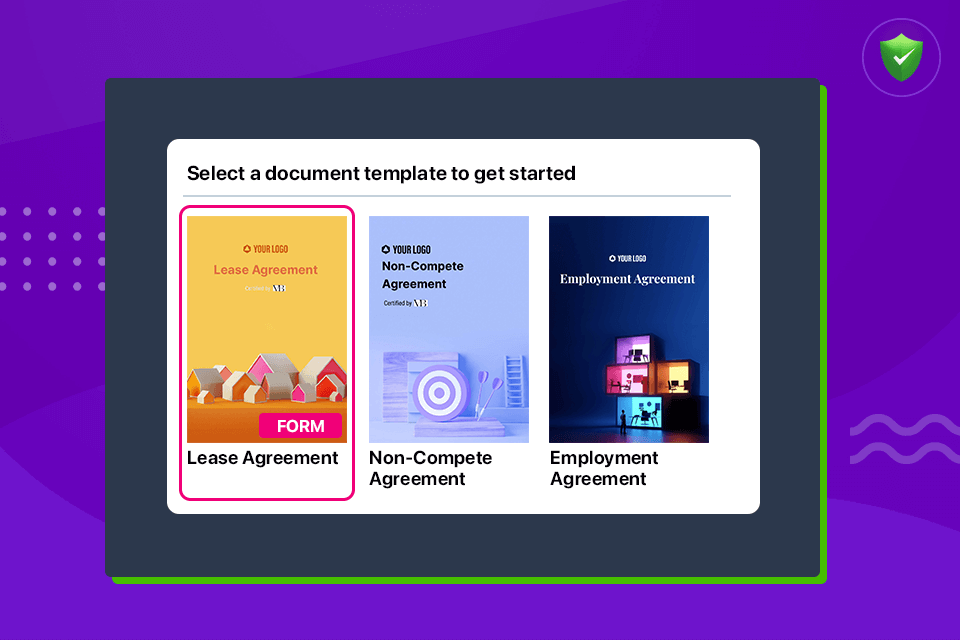
2. Select a template. Here let us select the lease agreement template that we have tailored in the above steps.
3. You can view all the form fields that are included in the template.
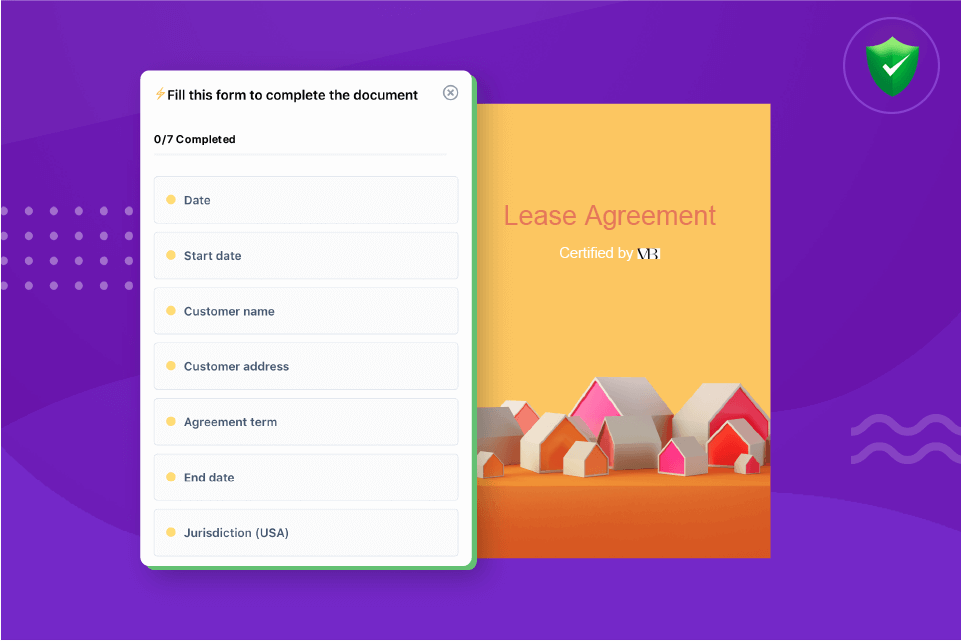
4. Fill in the form fields. Details entered in the form fields are automatically updated in the relevant fields of the document.
5. When done, click on ‘Send’ button and select ‘Send for internal approval’ from the drop-down.
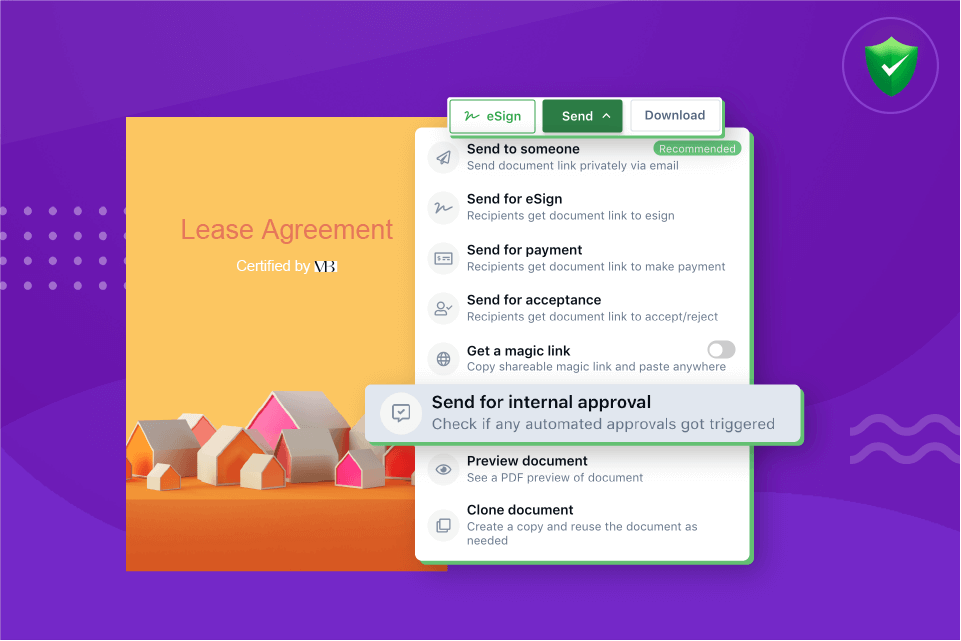
6. Documents associated with workflows can’t be sent directly to recipients without internal review. By default, such documents will be first routed for internal approvals. Later, once approved, the file can be sent to the final recipients for eSignature or acceptance.
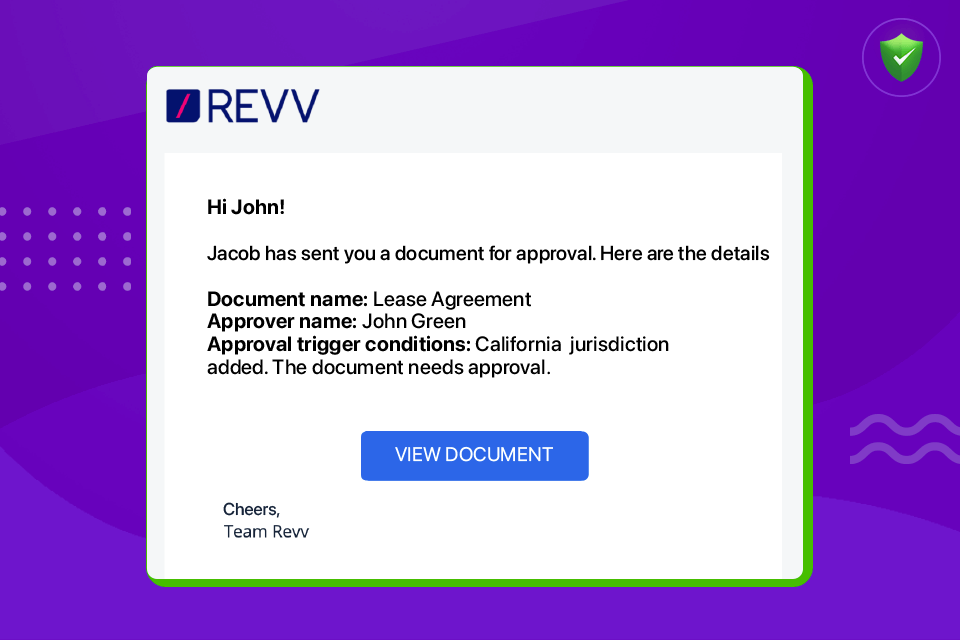
As you can see in the below image, California is the selected value in the jurisdiction field. Since it is associated with a workflow, a message pops-up with a list of designated approvers and a comment box. Add a comment citing the reason for approval and send it for internal review.
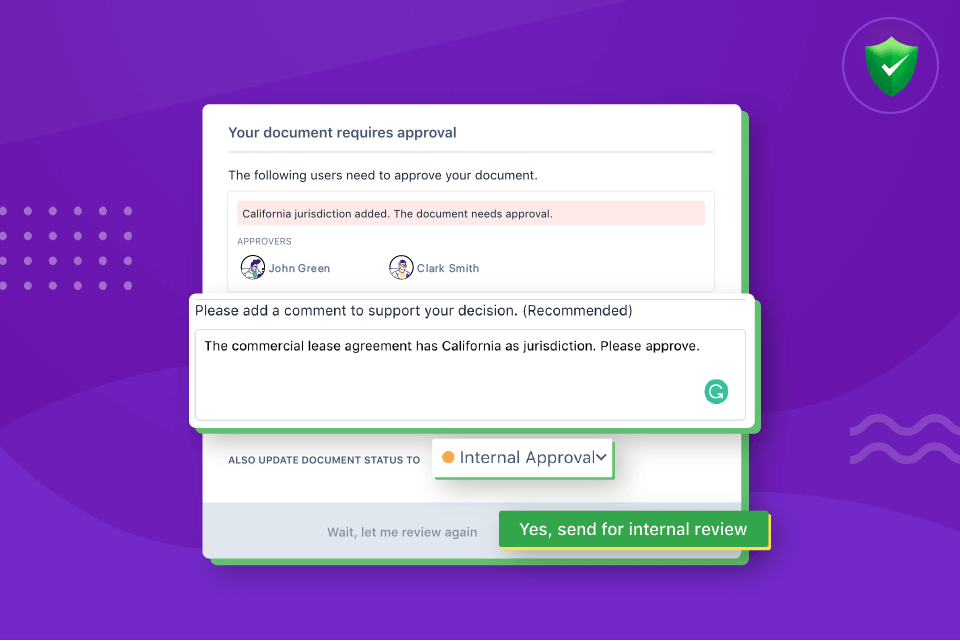
7. The approvers get immediately notified through email alerts. Click on ‘View document.’
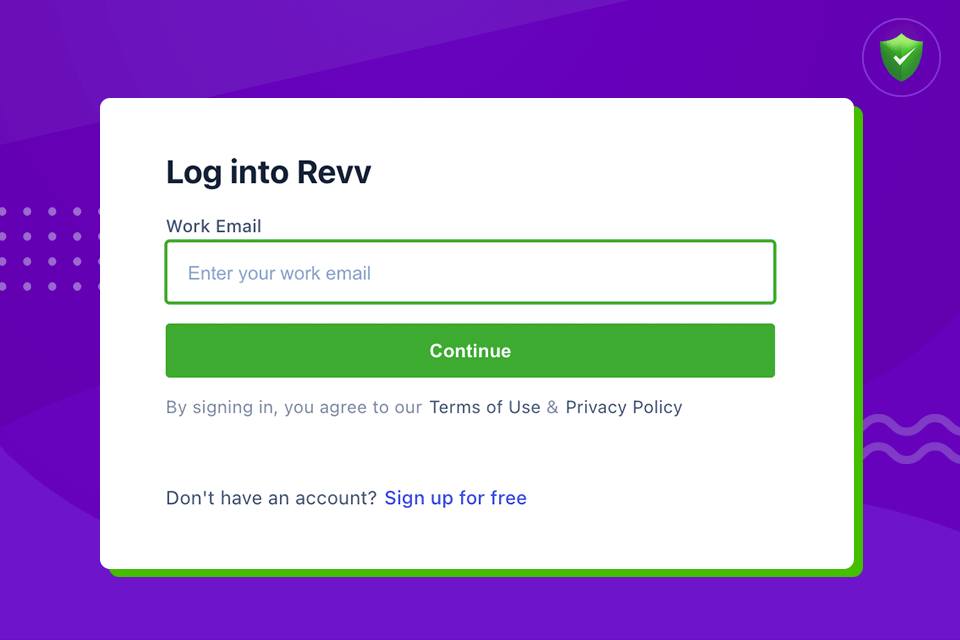
8. It will take you to Revv’s sign-up page. Enter credentials – login id and password.
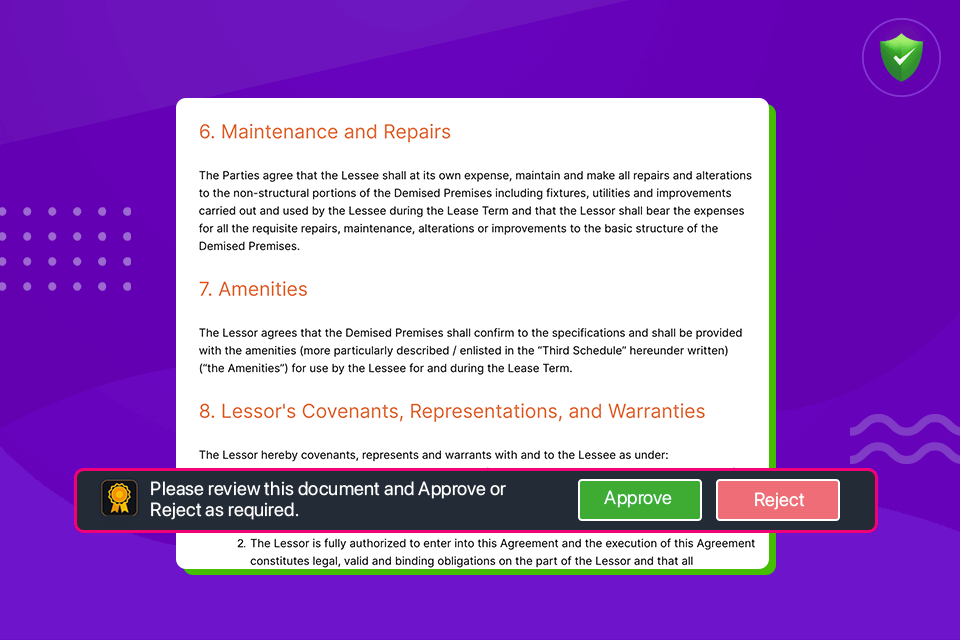
9. Approve/Reject it.
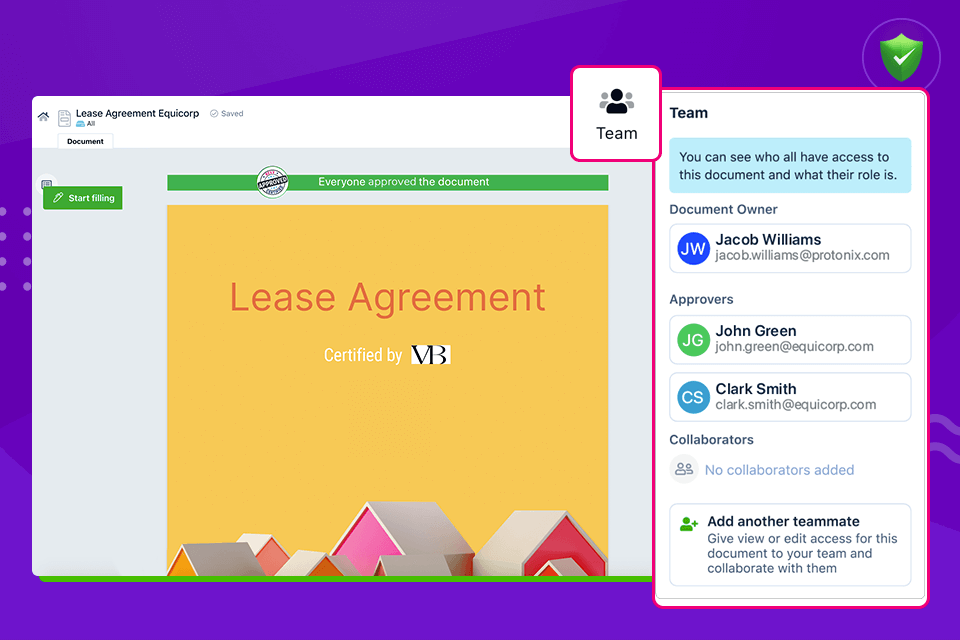
Step 4 – How to track approvers’ actions on documents?
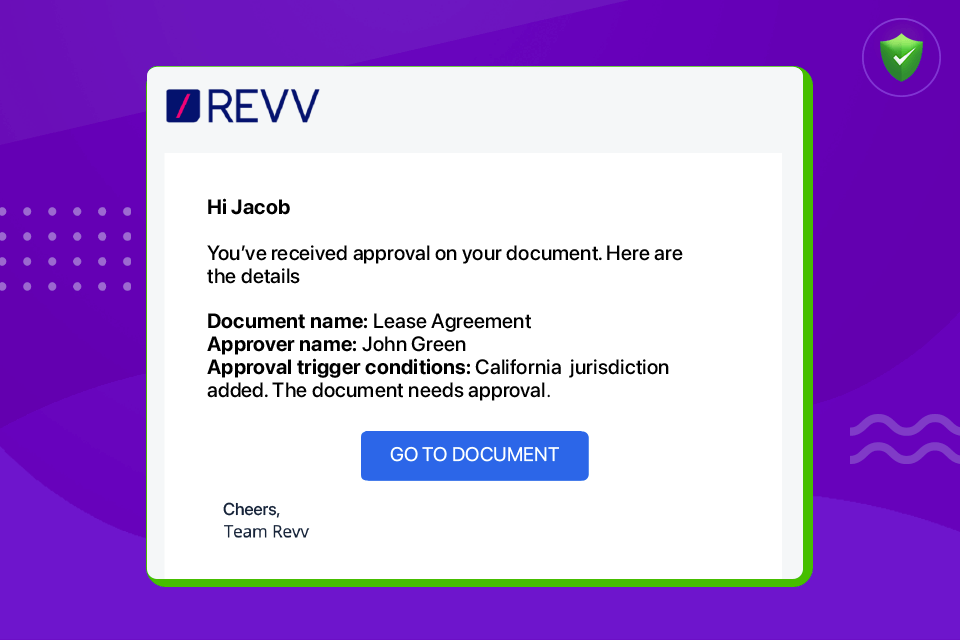
1. The ‘Activity’ tab provides clear visibility on all the actions taken or pending in documents. The sender can easily track who has approved it, pending approvals, where it is held up, and by whom.

2. Revv also sends email notifications to the sender when a document is approved.
3. The list of approvers can also be accessed through ‘Team’ tab.
Watch video:
How to create document approval workflows with form fields?
How to trigger document approval workflows with ‘Send for internal approval’ feature?
Connect the dots: Go beyond document approval – Embrace document automation with Revv’s unparalleled features
Document approval workflows are one part of the document management landscape.
In the report, Definitive Guide to America’s Most Broken Processes, 39% of the people interviewed observed broken document management/sales processes within their organization. In specific:
– 49% said they struggle to locate documents
– 43% have difficulty with document approval requests and document sharing
– 34% struggled with completing and filing new client paperwork
Revv’s document management solution is filled with vast capabilities that connect the before and after steps of a document approval process and help accomplish end-to-end document management. Here are the key features –
Pre-vetted template library – Revv provides 1000+ legally-vetted templates that are easy-to-use and completely customizable with a rich text editor. This saves significant search time that goes into looking for the right template in the search engine.
Electronic signatures – Revv’s in-built eSignature system with bank-grade security provides a pool of advanced options to obtain an electronic signature for legal documents. The eSignatures are completely safe and compliant to local and international laws. The recipient can also personalize their signatures and sign off the documents. They can draw signatures, upload their wet-ink signature, choose from pre-formatted text styles, and connect their crypto-wallet such as MetaMask to sign off.
The users can pick how they want the recipients to sign the dotted line – by writing their full name, drawing signatures, or signing it with just their initials.
Once sent, recipients can eSign the documents on the mobile app within minutes.
To ensure the security of documents, Revv offers OTP-based identity authentication via SMS.
If the users have their own files that need to be signed, Revv enables that too. The file types that Revv allows are PDF or DOCX. All users have to do is – upload these file types, add a signature placeholder, and send it for eSignatures.
Revv also provides an option of soft sign through its ‘Send for acceptance’ feature. Documents that need recipients’ consent to move forward can be closed using this feature.
API integration – Revv’s document management system enables integration of third-party applications like customer relationship management (CRM), accounting software, and many more through native APIs. This ensures consistent information management and records management across all applications.
Business apps integration – Revv also provides Zapier integration that allows the business apps to talk to one another. Automate tasks as per your business process and let data and documents flow effectively across multiple platforms.
Bonus: Revv’s Data Studio feature allows users to map simple to complex data to their documents seamlessly. No code, scripts, and APIs are required to avail this feature. All you have to do is connect your data source (Salesforce, Spreadsheets, HubSpot, etc.) to the Revv platform and map data from your source to the respective form fields inside the document.
Automated workflows – Whether it is about automating internal approval on documents or automating workflows between multiple apps, Revv ‘s document management system workflow outranks other such cloud-based solution systems.
Template access control with user management – Add security and prevent confidential data and information in templates by choosing each template’s users.
Machine learning on data – Revv is a machine learning-based document management software. Its Metalens feature allows users to extract relevant data and identify crucial information from any PDF or DOCX file type within Revv. This extracted data uncovers new insights that help to create workflows and optimize business processes.
And the features list doesn’t end here! Revv also provides –
- Stripe integration to collect online payments
- Collaboration within the document through @mentions, notes, and comments features
- Organized cloud storage of files which makes the search for electronic documents a breeze
- Right from creation to approval, distribution, eSignatures, and storage on the cloud, Revv brings a document control system in order. Businesses get an extensive view and tracking of documents and information that enables document control and improves compliance.
- Automated alerts to recipients to take action on documents
- Legally binding audit trail is also provided by Revv for all eSigned documents. It is called the Evidence Summary certificate. It is a digital certificate that chronologically records each action taken during the signing process. It includes – the signer’s information, date and time stamp of each action taken by the signer, the IP address of the signer, and other details that act as legal proof.
- Shareable online document links (magic and snap links) for external users for a quick view of the document without signing into Revv
Pricing of Revv – Cherry on the cake
Revv gives access to all these automation features with generous pricing plans that fit the pocket of both smaller and larger organizations, freelancers, or solopreneurs.
Revv offers customizable pricing plans, suiting your requirements.
Try out Revv! Sign up and commence your document management journey.
It’s time to take action
Revv frees up teams and departments from sluggish approval workflows. Manual or email approvals are tedious and can end up costing the company in terms of money, time, and brand value.
Revv accelerates the entire process and saves time by automatically routing the documents around the workplace. It tracks and identifies bottlenecks in real-time and enables teams to take prompt actions.
With Revv’s advanced automation features, businesses go one step ahead of approvals and manage the entire lifecycle of documents, right from creation to storage.
Partner with Revv and make your document management intelligent and smarter.
Frequently asked questions
What is an approval workflow?
An approval workflow is a series of tasks that route documents to recipients for their approval. Here, a document goes through multiple checks by the approvers to rule out the scope of any wrong information.
How do you create an approval workflow?
An approval workflow is created by establishing rules and criteria and automatically moving the documents to the approvers when a condition is triggered. Here’s how it is done in Revv –
- Create a condition by selecting the value
- Choose the routing method of approval – sequential or parallel
- Add who should approve the workflow
- Add a message that should appear to the approvers to give them a context
What are the best document management systems?
Revv is one of the best document management systems. It is equipped with 1000+ easy-to-use templates, a rich document editor, payment integration, form mode templates, collaboration through comments, notes, and attachments, eSignatures, activity trackers, online sharing and soft sign, no-code workflow automation, Google Sheets, business apps integration with Zapier, and many more.
What are the three benefits of a document management system?
Better compliance – A DMS elevates compliance with automated workflows, version control, and a tracking system. This rules out the scope of errors and makes everything identifiable and audit-ready.
Added security – Data stored in easily-accessible folders or file cabinets is vulnerable to theft or tampering. A DMS provides security and confidentiality of data through user-based access control. Only the chosen users can see or edit documents.
Centralized cloud storage – Document management systems provide abundant storage capacity (on the cloud) to store documents. The organized pool of electronic documents helps in better records management and quick search and retrieval of files.
Lesson 20: Reviewing Documents
/en/word2010/working-with-headers-and-footers/content/
Introduction
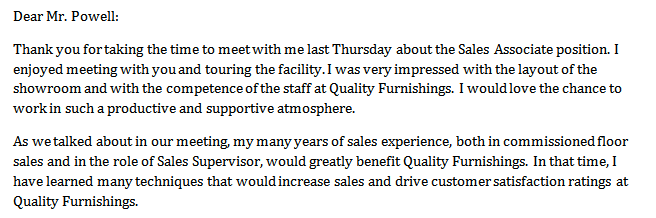
Let’s say someone asks you to proofread a report. If you have a hard copy of the report, you might use a red pen to cross out sentences, mark misspellings, or add comments in the margins. However, you could also do all of these things in Word using the Track Changes and Comments features.
When you’ve finished reviewing the document, the other person can choose to automatically accept all of your changes, or decide whether to accept or reject each change one by one.
In this lesson, you’ll learn how to track changes, add comments, and compare two versions of a document.
Using Track Changes and Comments
When you need to collaborate on the content of a document or if you need someone to proofread your document, Word’s Track Changes and Comments features make it easier for you to collaborate with others.
Optional: You can download this example for extra practice.
About Track Changes
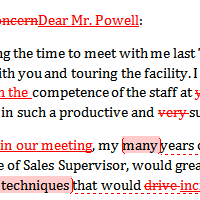
When you turn on the Track Changes option, all changes you make to the document show up as colored markups. If you delete some text, it won’t disappear but instead will have a visible strike through it. If you add text, it will be underlined. This allows another person to see which changes have been made before making the changes permanent.
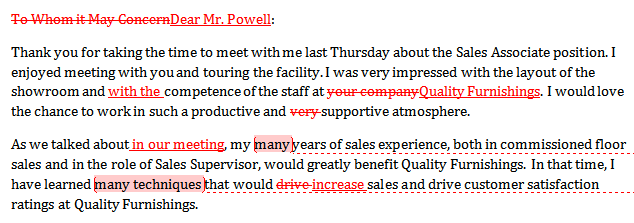 A document with tracked changes
The color of the markups will vary depending on who is reviewing the document, so if there are multiple reviewers you’ll be able to tell at a glance who made each change.
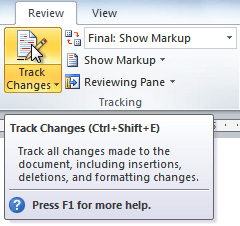
To turn on Track Changes:
- Click the Review tab.
- Click the Track Changes command. It should now be highlighted in gold to show that it is active.
 The Track Changes command
 - Any changes you make to the document will be shown as colored markups.
Tracked changes
- Click the Track Changes command again to turn it off.

Adding and deleting comments
Sometimes instead of changing something, you may want to make a comment about part of the document. Comments show up in balloons in the right margin and can be read by the original author or by any other reviewers.
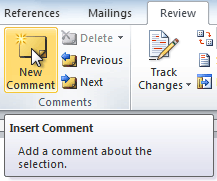
To add a comment:
- Highlight some text, or place the insertion point where you want the comment to appear.
- From the Review tab, click the New Comment command.
The New Comment command
- Type your comment.
A comment

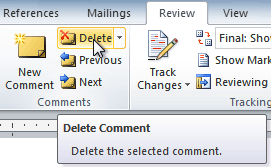
To delete a comment:
- Select the balloon containing the comment you want to delete.
A selected comment
- From the Review tab, click the Delete command.
Deleting a comment

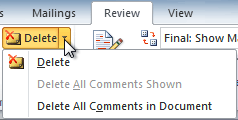
To delete all comments:
- From the Review tab, click the Delete drop-down arrow.
The Delete drop-down arrow
- Click Delete All Comments in Document.
Accepting and rejecting changes
Tracked changes are really just suggested changes. To become permanent, they have to be accepted. On the other hand, the original author may disagree with some of the tracked changes and choose to reject them.
To accept or reject changes:
- Select the change you want to accept or reject.
Selecting a change
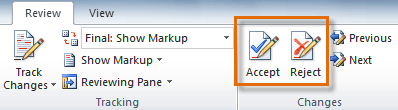
- From the Review tab, click the Accept or Reject command.
The Accept and Reject commands
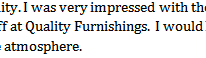
- If you accepted the change, the markup will disappear, and the text will look normal.
After accepting a change

For some tracked changes, you can reject the changes by deleting them as if they were normal text. For example, if a reviewer adds a word to a sentence, you can just delete the word.
To accept all changes:
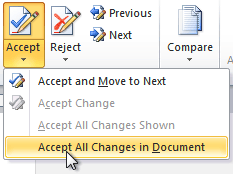
- From the Review tab, click the Accept drop-down arrow. A drop-down menu will appear.
Accepting all changes
- Select Accept All Changes in Document.
To reject all changes:
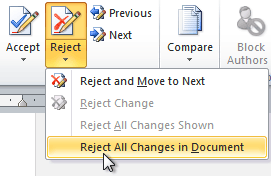
- From the Review tab, click the Reject drop-down arrow. A drop-down menu will appear.
Rejecting all changes
- Select Reject All Changes in Document.
Accepting or rejecting all changes does not affect comments, so if you want to delete them you’ll have to do so separately.
Changing how markups appear
If there are a lot of tracked changes in a document, they can become distracting if you’re trying to read through the document. There are a few settings you can use to hide the markups or change how they appear.
To hide tracked changes:
- From the Review tab, click the Display for Review command. The Display for Review command is located to the right of the Track Changes command, and it may not be labeled. It will probably say Final:Show Markup.
The Display for Review Command
- In the drop-down menu, there are four options:
- Final: Show Markup: Shows the final version along with the markup
- Final: Shows the final version and hides all markups
- Original: Show Markup: Shows the original version along with the markup
- Original: Shows the original version and hides all markups
- Choose Final or Original from the drop-down menu to hide markups.
Displaying the Final version (markups hidden)

Setting Display for Review to Final is not the same as accepting all changes. You will still need to accept or reject the changes before sending the final version of your document.
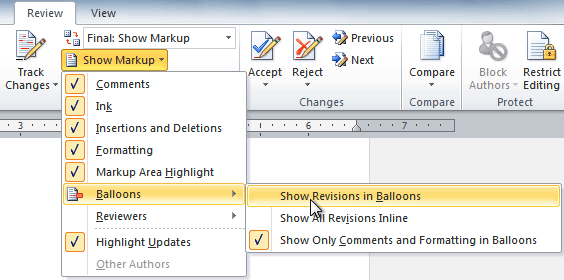
To show revisions in balloons:
By default, most revisions show up inline, meaning the text itself is marked. You can choose to show the revisions in balloons, which moves many of the revisions (such as deletions) to balloons in the right margin. This can make the document easier to read because there are fewer inline markups. Balloons also give you more detailed information about some markups.
- From the Review tab, click Show MarkupBalloonsShow Revisions in Balloons.
Showing revisions in balloons
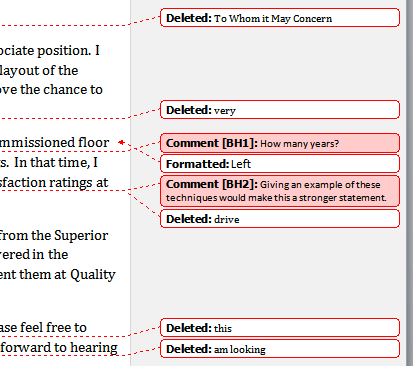
- Some of the revisions will move to the right margin.
Revisions in the right margin
To go back to inline markups, you can select either Show All Revisions Inline or Show Only Comments and Formatting in Balloons.
Comparing two documents
If you edit a document without tracking changes, it’s still possible to use reviewing features such as Accept and Reject. You can do this by comparing two versions of the document. All you need is the original document and the revised document, and they must have different file names.
To compare two documents:
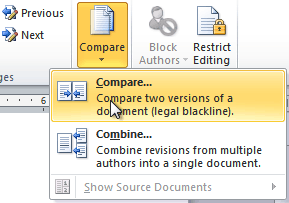
- From the Review tab, click the Compare command. A drop-down menu will appear.
- From the drop-down menu, click Compare.
The Compare command
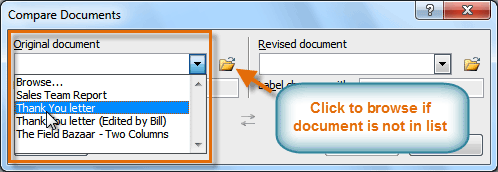
- A dialog box will appear. Choose your Original document by clicking the drop-down arrow and selecting the document from the list. If your document is not on the list, click the Browse button to browse for the file.
Choosing the Original document
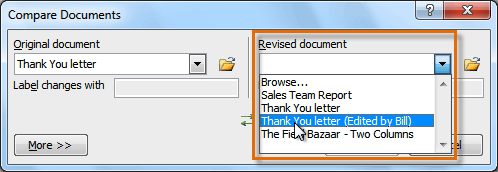
- Choose the Revised document the same way you chose the Original document, then click OK.
Choosing the Revised document
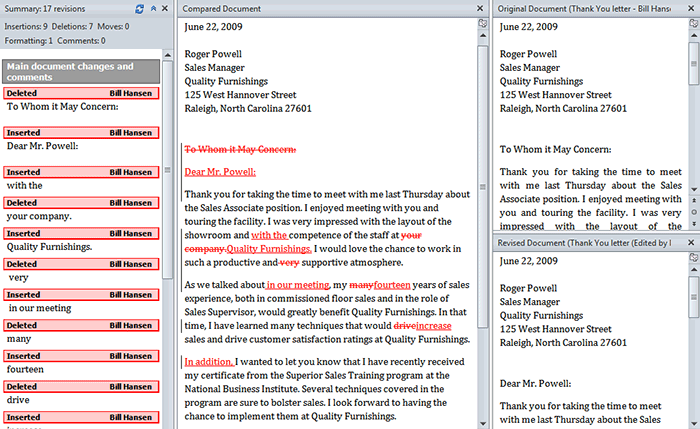
At this point, Word compares the two documents to determine which changes were made, and it creates a new document that you can save if you want. The changes show up as colored markups, just like the ones that appear when using Track Changes. You can then use the Accept and Reject commands to finalize the document.
 Comparing two documents
To the right of the new document, there’s a pane that displays the original and revised documents that you can use for reference (although you can’t edit them). If you don’t see the pane on the right, click Compare Show Source DocumentsShow Both.
Using the reviewing features safely
If there are any comments or tracked changes in your document, you should remove them before sending it to anyone you’re not collaborating with. Comments and tracked changes can reveal confidential information that could lead to embarrassment or make you or your company appear unprofessional—or worse.
Once you’ve removed all of the comments and tracked changes, it’s a good idea to double-check your document using the Document Inspector. The Document Inspector can tell you if there is any hidden data in your document that you may need to remove. It looks for data in many different places—not just comments and tracked changes.
To use the Document Inspector:
- Save your document.
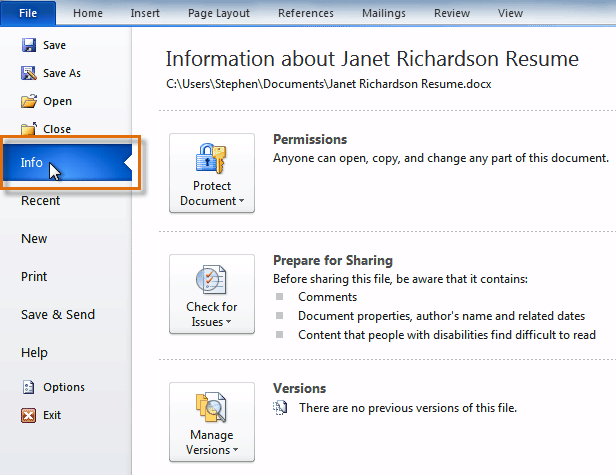
- Click the File tab to go to Backstage view.
- Select Info on the left side of the page.
Selecting Info
- Click the Check for Issues command. A drop-down menu will appear.
- Select Inspect Document.
Clicking Inspect Document
- Click Inspect.
Starting the inspection
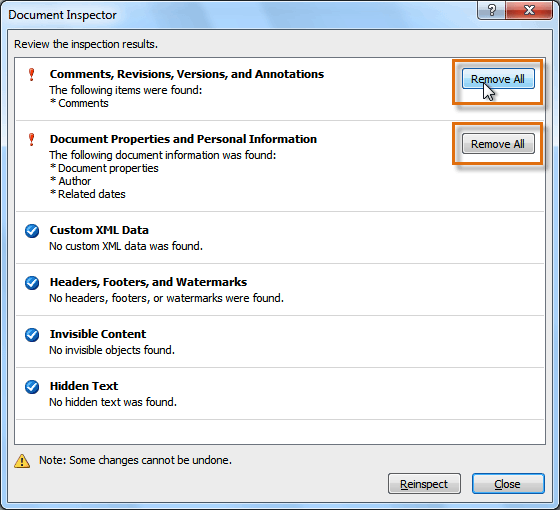
- The inspection results will show an exclamation mark for any categories where it found potentially sensitive data, and it will also have a Remove All button for each of these categories. Click Remove All to remove the data.
Removing possibly sensitive data
- Close the dialog box when you’re done.
- From Backstage view, click Save to make the changes permanent.


Challenge!
- Open an existing Word document. If you want, you can use this example.
- Turn on Track Changes.
- Delete some text.
- Add some text.
- Change some of the text formatting.
- Experiment with the Display for Review command.
- Accept all of the changes.
- Use the Document Inspector to check the document.
/en/word2010/working-with-tables/content/