
This is a list of the MIME Types of all well known and lesser known file formats and kinds of documents from the Microsoft Office family.
You can find the MIME Types in the table ordered by the corresponding application Microsoft Word, Excel, Power Point and Access as well as the extension of the file.
Microsoft Word
| Extension | MIME-Type |
| DOC | application/msword |
| DOCX | application/vnd.openxmlformats-officedocument.wordprocessingml.document |
| DOT | application/msword |
| DOTX | application/vnd.openxmlformats-officedocument.wordprocessingml.template |
| DOCM | application/vnd.ms-word.document.macroEnabled.12 |
| DOTM | application/vnd.ms-word.template.macroEnabled.12 |
| DOCM | application/vnd.ms-word.document.macroEnabled.12 |
| DOTM | application/vnd.ms-word.template.macroEnabled.12 |
| WORD | application/msword |
| W6W | application/msword |
Microsoft Excel
| Extension | MIME-Type |
| XLS | application/msexcel |
| XLSX | application/vnd.openxmlformats-officedocument.spreadsheetml.sheet |
| XLT | application/msexcel |
| XLTX | application/vnd.openxmlformats-officedocument.spreadsheetml.template |
| XLA | application/msexcel |
| XLW | application/msexcel |
| XLSM | application/vnd.ms-excel.sheet.macroEnabled.12 |
| XLSB | application/vnd.ms-excel.sheet.binary.macroEnabled.12 |
| XLTM | application/vnd.ms-excel.template.macroEnabled.12 |
| XLAM | application/vnd.ms-excel.addin.macroEnabled.12 |
Microsoft PowerPoint
| Extension | MIME-Type |
| PPT | application/mspowerpoint |
| PPTX | application/vnd.openxmlformats-officedocument.presentationml.presentation |
| POT | application/mspowerpoint |
| POTX | application/vnd.openxmlformats-officedocument.presentationml.template |
| PPS | application/mspowerpoint |
| PPSX | application/vnd.openxmlformats-officedocument.presentationml.slideshow |
| PPA | application/mspowerpoint |
| PPAM | application/vnd.ms-powerpoint.addin.macroEnabled.12 |
| PPTM | application/vnd.ms-powerpoint.presentation.macroEnabled.12 |
| PPSM | application/vnd.ms-powerpoint.slideshow.macroEnabled.12 |
| POTM | application/vnd.ms-powerpoint.template.macroEnabled.12 |
Microsoft Access
| Extension | MIME-Type |
| MDB | application/msaccess |
| ACCDA | application/msaccess |
| ACCDB | application/msaccess |
| ACCDE | application/msaccess |
| ACCDR | application/msaccess |
| ACCDT | application/msaccess |
| ADE | application/msaccess |
| ADP | application/msaccess |
| ADN | application/msaccess |
| MDE | application/msaccess |
| MDF | application/msaccess |
| MDN | application/msaccess |
| MDT | application/msaccess |
| MDW | application/msaccess |
Other
| Extension | MIME-Type |
| CALCX | application/vnd.ms-office.calx |
| HLP (Microsoft Windows Help) | application/x-winhelp |
| MPP (Microsoft Project) | application/msproject |
| THMX | application/vnd.ms-officetheme |
| WRI (Microsoft Write) | application/mswrite |
I hope, I could help you with this list. If I should have forgotten something, just write a comment.
Application Templates & Forms
Most of the business procedures implemented by an organization for external stakeholders entail the need for a document called an application form. An application form is a tool used by an individual or a business when applying for personal or for business purposes. This application form is one of the requirements needed to be complied with on any type of application.

Various application templates on the web, such as the job application templates and proposal application templates provide convenience to a number of applicants comprising of individuals and businesses. For more application templates that you can use, the following application templates downloadable in Word format are available for your perusal.
Family Reference Letter for School Application

Details
File Format
- Word
- Google Docs
- Apple Pages
Download
Membership Application Form Template

Details
File Format
- Word
- Google Docs
Download
Business Loan Application Letter

Details
File Format
- Word
- Google Docs
- Outlook
- Apple Pages
Download
Consumer Credit Application Template

Details
File Format
Size: MS Word, Pages
Download
Job Application Templates
Free Job Application for Student
 westcler.k12.oh.us
Details
File Format
- Doc
Size: 10 KB
Download
Assistant Job Application
 hollyhedge.com
Details
File Format
- Doc
Size: 11 KB
Download
Sample Job Application Template
 scctc.org
Details
File Format
- Doc
Size: 25 KB
Download
Patent Application Templates
Free Patent Assignment Application
 uplb.edu.ph
Employment Application Templates
Customizable Employment Application
 frugalentrepreneur.com
Details
File Format
- Doc
Size: 10 KB
Download
Dental Assistant Employment Application
 prosites.com
Details
File Format
- Doc
Size: 46 KB
Download
Consultant Employment Application
 ckec.org
Details
File Format
- Doc
Size: 162 KB
Download
How to Fill Out an Employment Application?
With the available employee application format provided in different application templates you can peruse, here are the steps on how to fill out an employment application:
- Write your basic personal information first. At the start of the employment application issued by the employer, you are to state your basic personal information like name, address, contact details, and other necessary information you need to disclose. This is similar to applications that use volunteer application templates and loan application templates.
- Know what the employer requires for the job position. When you apply for a job, you must identify what the employer needs for an individual to be hired for the open job position.
- State your work background relevant to the position for employment. Include only the relevant and the necessary information of your work and your educational background. An employment application highlights what you can do for the company in relation to the position you are vying for.
- Answer with diligence the questions that require elaborate answers. Other than answering spaces related to your general information, there are questions provided at the bottom parts of the affidavit of employment application that allows you to reveal something about your personality and your attitude towards work, which is another factor to consider by employers.
Credit Application Templates
Standard Credit Application
 ahn01.com
Details
File Format
- Doc
Size: 32 KB
Download
Business Credit Application
 stickybiz.com
Consultant Application Templates
Project Consultant Application
 odnoregon.org
Details
File Format
- Doc
Size: 48 KB
Download
Independent Consultant Application
 tianca.com
Scholarship Application Templates
General Scholarship
 hfpgscholarships.org
Details
File Format
- Doc
Size: 42 KB
Download
Postgraduate Scholarship
 grantist.com
Details
File Format
- Doc
Size: 591 KB
Download
Kinds of Application Templates
In order for you to sift through the application samples on this website, the following is a list of the kinds of application templates provided for your utilization:
Application Templates in Relation to Employment:
- Job Application – This application is the most commonly issued form for applicants of an open position.
- Apprenticeship Application – This application is filled out by individuals who are interested in becoming an apprentice template.
- Internship Application – Students have internship duties to fulfill by applying with the use of this application to desired establishment.
- Leave Application – This application is one of the basic Human Resource application forms used by employees in various businesses.
Application Templates in relation to Business:
- Patent Application – For an entity to gain the patent right to use a particular technology, this kind of application is necessary to be complied with by the proposing business.
- Consultant Application – Before consultants take the responsibility of providing consulting services to the business in need of a consultation, a request for consultation is procured with this type of application.
- Grant Application – Grants are given to requesting parties after approval is made by the entity giving the grant of this kind of application.
Application Templates in relation to Academic Concerns:
- Scholarship Application – A student avails of a scholarship grant once this type of application from the student is approved.
Application Templates in relation to Affiliations:
- Volunteer Application – If you want to volunteer on behalf of a organization, you are to comply with the requirements like this application template type.
- Membership Application – To become affiliated with an association, this type of application is procured by the interested individual to be given to the association he wants to become a member in.
Volunteer Application Templates
Teen Volunteer Application
 marianjoy.org
Details
File Format
- Doc
Size: 58 KB
Download
Application for Employment or Volunteer Service
 del.wa.gov
Details
File Format
- Doc
Size: 207 KB
Download
Staff/Volunteer Application
 threecirclesfoundation.com
Account Application
New Account Application
 portofbeaumont.com
Blank Account Application
 ctbaker.co.uk
Details
File Format
- Doc
Size: 14 KB
Download
Visa Application Templates
Application for Recommendation of Business Visa
 dti.gov.za
Details
File Format
- Doc
Size: 57 KB
Download
Apprenticeship Application Templates
Apprentice Recruitment Application
 opw.ie
Details
File Format
- Doc
Size: 276 KB
Download
Apprentice Permit Application
 dshs.texas.gov
Details
File Format
- Doc
Size: 51 KB
Download
Leave Application Templates
Application for Annual leave
 ucc.ie
Parental Leave Application
 soas.ac.uk
Details
File Format
- Doc
Size: 20 KB
Download
Application for Study Leave
 ucc.ie
Details
File Format
- Doc
Size: 13 KB
Download
How to Make an Application Template using Word?
Most of the free application templates on the web are application templates in PDF format. If you want to create an application template that is editable just for your company’s utilization, here are the steps you can follow on how to make an application template using Word:
- Click the Developer box to add it to the main tabs in Word. Right after you open Word program, look for the Customize the Ribbon dialog box from the Options tab on the File menu and enable Developer by ticking the box.
- Open a new document for your application template. You can now start opening a template on the Word program after enabling the Developer box. There are pre-made templates you can look into but if you’d like to prepare the application template from scratch, you can open a blank document for the template.
- Integrate the key details for the application you are making. The following component must be evident on your application template with a space provided as depicted on some of the school application templates and college application templates on this website:
- Applicant’s name
- Age and Date of Birth
- Address with Zip Code
- Contact Details
- Relevant Questions
Membership Application Template
Club Membership Application
 forsyth.k12.ga.us
Details
File Format
- Doc
Size: 10 KB
Download
Library membership Application
 fessingapore.org
Grant Application Templates
Master Grant Application
 npfunds.com
Details
File Format
- Doc
Size: 149 KB
Download
Standard Grant Application
 cordis.europa.eu
Details
File Format
- Doc
Size: 12 KB
Download
Project Grant Application
 barrie.ca
Details
File Format
- Doc
Size: 177 KB
Download
Project Application Templates
Project Proposal Application
 voice.global
Details
File Format
- Doc
Size: 127 KB
Download
Internship Application Templates
Internship Program Application
 pops.int
Details
File Format
- Doc
Size: 224 KB
Download
Summer Internship Application
 beringstraits.com
Details
File Format
- Doc
Size: 131 KB
Download
Job Internship Application
 clemson.edu
Guidelines to Creating Application Templates
The following are the guidelines you can take into consideration when you create application templates like the job application templates in PDF format and grant application templates provided on this website:
- It is better to add more than less on the details on your application template. When it comes to templates, it is easier for the user of the template to delete bits of information on the sample template than to add one. Thus, the template must provide the necessary details needed for an application.
- The spaces to be filled out must be clear for the user. The user of the template you are creating should clearly identify the spaces to be filled out with his information for the application.
- The application template should be named in a general manner. Once the application template is done, you must use a standard name for the template.
Take note that you can avail of the wide variety of application templates on the web when you make the application form to comply with the relevant application. The application templates that you can see on this website are available for you to use and are downloadable in Word format for your convenience.
More in Application Templates & Forms
![]()
Download Article
Learn the basics of formatting a Microsoft Word document
![]()
Download Article
- Formatting the Layout
- Formatting Text
- Adding Pictures, Graphs, & Tables
- Using a Formatted Template
- Saving in Other Formats
- Q&A
|
|
|
|
|
Microsoft Word is the world’s most popular word processing app. Depending on what kind of legal, formal, or personal paper you’re writing, each has its own formatting guidelines. Fortunately, Microsoft Word makes it easy to format the layout, text, and other objects in your document. If you’re new to using Microsoft Word, don’t worry. You can be formatting your document like a pro in no time. This wikiHow guide will teach you simple ways to format a Word document on your PC or Mac computer.
Things You Should Know
- You can find most of the formatting tools you’ll need in the Ribbon menu at the top of your document.
- If you don’t want to do all the formatting from scratch, try using one of Word’s premade templates.
- Save your document in different file formats using the Save a Copy or Save As menu.
-

1
Explore the Word user interface. You can access most of Word’s formatting tools from the Menu Bar or the Ribbon at the top of the window. You can modify which tools are visible using the View menu.
- The Menu Bar is the area at the top of the screen where you will find File, Edit, View, and other important menu commands.
- The Ribbon is at the top of your workspace and contains icons, menus, and shortcuts to common tasks.
-
2
Align your document. Different types of documents call for different text alignments. You can choose whether to align your entire document to the left, right, or at the center on the Home tab by clicking the Alignment buttons in the «Paragraph» section.
- These are the buttons that look like a small version of a document, with small black lines arranged according to their button’s alignment function.
- You can also adjust alignment by selecting the text and objects you want to align, right-clicking the selection, and choosing Paragraph. Select your preferred alignment from the Alignment menu under the General header.
- You can either set the alignment for the whole document or just a selected piece of text.
Advertisement
-
3
Set the line spacing of your document. Need to change your document to single or double-space? You can adjust the spacing of your entire document, or for selected text.
- If you haven’t begun typing or adding content to your Word document, click the Home tab, click the «Line and Paragraph Spacing» icon (a row of lines with vertical arrows to the left of the lines pointing up and down, and select an option.
- If your document already has text or other content, press Ctrl + A (PC) or Cmd + A (Mac) to select everything in the document, right-click the selection, and choose Paragraph. You can then choose your desired spacing from the «Line Spacing» menu.
- For a single-spaced document, choose 1.0. For double-spacing, choose 2.0.
- Many professional documents, like college essays and cover letters, should be double-spaced.
-
4
Adjust the page orientation. If you need to write the document in a different orientation, click the Layout tab at the top of Word, select Orientation, and choose either Portrait or Landscape.
-
5
Change the size of the paper. If you need to print the document on a specific paper size, click the Layout tab, click Size, and then select your desired size from the drop-down list.
- This will change the virtual size of the document you’re writing as well as the actual size of the printout.
-
6
Adjust the headers and footers. A header contains details that will appear on every page of the paper, such as page numbers, your name, or the document title.
- To set the header of your document, double-click on the topmost part of the page, and the header field will appear. You can also click the Insert tab and select Header.
- Footers are just like headers. All text in the footer will appear at the bottom of each page of your document. To set the footer, double-click on the bottommost part of the page, and the footer field will appear. You can also use the Footer button on the Insert tab.
- You can also format your headers and footers by selecting the View tab and clicking Header and Footer on the list. This action will open the headers and footers on your page and allow you to edit them.
-
7
Insert page or section breaks with the Breaks menu. Go to the Layout tab in the and click Breaks if you want to start a new page or section in your document. You can choose from a variety of types of breaks, including Page, Column, and Section. This is a very useful tool if you need to format different sections of your document in different ways.[1]
- For example, you can use section or page breaks to help you format your page numbers so that the numbering restarts with each new section.
-
8
Adjust the margin size with the Margins tool. Click the Margins button in the Layout tab and select a margin from the pre-defined margin settings listed on the drop-down list.
- If you want to use your own margin measurements, click Custom Margins at the very bottom of the drop-down list to set your own.
-
9
Add columns to split your text vertically on the page. If you need to create a newspaper-like document, you can do so by adjusting the format of the document to columns. Click the Layout tab, select the Columns option, and choose the number and alignment of columns from the drop-down list.
- The Columns button looks like a rectangle with two vertical columns of blue lines on it.
- If you want to create one, two, or three columns, you can do so from the preset options. If you’d like to create more, you’ll need to choose More Columns from the bottom of the dropdown menu.
- Note that this column option is different from the columns you get when you insert items like tables on your document.
-
10
Add bullets and numbers to make lists. Highlight the text that you would like to be numbered or bulleted and click the Numbering or Bullets button on the Home tab of the Ribbon.
- These buttons can be found side by side on the Ribbon, near the alignment buttons. The Numbering button displays three small lines with numbers to the left of the lines and the Bullets button displays three small lines with bullet points to the left of the lines.
- There’s also a third button that allows you to create more elaborate multi-level list styles, which is useful for formatting outlines.
-
11
Experiment with document styles. All documents have standard built-in styles (for example, Normal, Title, Heading 1). The default style for text is Normal. The template that a document is based on (for example, Normal.dotx) determines which styles appear on the Ribbon and on the Styles tab. You can see the current style presets for your document in the Home tab of the Ribbon.
- Before you apply a style, you can see all of the available styles and preview how they will appear when applied.
- On the Home tab, click a style to apply it to selected text.
- Click the Styles Pane button (the arrow pointing down and to the right) to view and select from advanced Style options.
- By default, Word applies a paragraph style (for example, Heading 1) to the entire paragraph. To apply a paragraph style to part of a paragraph, select only the specific part that you wish to modify.
-
12
Reveal hidden formatting symbols if you’re having trouble. Word documents often contain hidden code that can cause frustrating problems when you’re trying to modify your formatting. For instance, an invisible extra paragraph mark or section break can create unwanted spaces between paragraphs or lines of text. To see formatting symbols that are normally hidden so you can delete or modify them, you can click the ¶ button in the Home tab, or try one of the following:[2]
- On Windows, open File, select Options, and click Display. Tick the box next to Show all formatting marks.
- In Word for Mac, open the Word menu, then Preferences, then View. Check the box next to All in the Show Non-Printing Characters section of the View menu.
-
13
Use the View menu to change your view of the document. The View menu can let you change how your document looks in Word without actually making changes to the format. For example, Print Layout will show approximately what your document will look like when it’s printed out, while Web Layout will display the whole document in one long chunk without any page breaks.
- The View menu also lets you zoom in and out on your document.
- You can also change your view with the buttons and zoom slider at the bottom right side of the document pane, or with the View tab in the Ribbon.


Advertisement
-
1
Change the font face. On the Home tab, you will a drop-down menu containing a list of fonts to choose from. Use your mouse to select the text you want to change, then choose a font from the list.
-
2
Change font size and color. Also on the Home tab, you can change the size, color, and highlighting for your font. Select the text you want to format, then choose your options.
- By default, they will be set to the size and font associated with your document’s current Style settings. For example, if you’re using Word’s default template, the Normal style will use Calibri as the default font and 12 pt. as the default text size.
- Always consider the formatting guidelines of the document you are writing when choosing the font style and size.
- The standard font for most college and professional papers is Times New Roman font, text size 12.
-
3
Make text bold, underlined, or italicized. Besides setting the font style and size, you can also adjust the emphasis of words and lines in your document. Near the font and text size menus, you will see the Bold, Italics, and Underline buttons.
- Just click the buttons to make your text bold, underlined, or italicized.
- In this section, you can also find special text formatting options such as Strikethrough, Subscript, and Superscript.
-
4
Highlight text on the page. If you would like to change the background color behind selected text, similar to using a highlighter on a printed page, click the Text Highlight icon, which is a pen above a colored line.
- You can also add special text effects with the Text Effects button, which looks like a capital A with a glowing blue border.


Advertisement
-
1
Drag an image into your document. This is a quick way to add a picture to your Word document. Simply select an image on your desktop and drag and drop it into the document window. Make sure your image is placed exactly where you want it before you drop it.
- You can also insert an image by going to the Insert tab, then clicking Pictures. Select one of the options to browse for images on your computer, the web, or Word’s gallery of stock photos.
- You can also insert graphics or other media (such as video or audio clips) using the Shapes, Icons, or 3D Models, and Media buttons.
-
2
Enable text wrapping. Text wrapping changes the layout of your document, allowing the text to flow around the image no matter where it is placed. To turn on text wrapping:
- Right-click (or ctrl-click, on a Mac) on the image and hover over Wrap Text. Select the alignment that best suits your document. You will see a preview as you hover over each option.
- To change the location of the image in the document, select the image and then hold the Ctrl key. While holding the key, use the arrow keys to move the picture around the document.
- When you right-click or ctrl-click your image, you’ll also see an option in the context menu to add a caption under your image.
-
3
Edit your image in the Picture Format tab. Once you insert your image, you can select it to open a new Picture Format tab in the ribbon. From there, you can choose from a variety of tools, such as:
- Making corrections or adding artistic filters to the image
- Adding style effects, such as a drop shadow or frame, to the picture
- Entering alt text
- Tweaking the position of your image or changing the text-wrap settings
-
4
Add a graph or chart in the Insert tab. Click the Insert tab on the Ribbon, and then click the Chart option. Choose your preferred type of graph, such as a pie or bar chart, from the dropdown menu.
- Depending on the type of chart or graph you choose, Word may automatically launch Excel and create a new spreadsheet, where you can enter data for your chart.
-
5
Modify your graph. When you choose a graph type, a new tab will appear in the Ribbon menu called Chart Design. Navigate to that tab with the chart selected to make changes to the look of your graph or chart, or choose the Edit in Excel button to make changes to the data in your chart.
-
6
Use the Table tool to insert a table. If you want to add a table to your document, head over to the Insert tab and click the Table button. A menu will pop open where you can either scroll over a grid of squares to select your number of rows and columns, or select an option like Insert Table or Draw Table.
- Insert Table opens a pop-up menu where you can specify parameters like the number of rows and columns and whether or not the contents of the table autofit your document window.
- The Draw Table tool allows you to draw the table with your mouse directly in the document.
- Once you start creating a table, you’ll see several new table editing tools in the Layout tab.


Advertisement
-
1
Choose a template from the New Documents pane. Templates are a great way to create a nice-looking document without having to do all the formatting from scratch. To use one, open Word and select New from the side menu to create a new document, or select New from Template from the File menu. Click one of the templates on the screen to select it.[3]
- If you don’t see a template you like, use the Search bar at the top of the window to find one that fits your needs. For instance, use keywords like “flyer,” “resume,” or “research paper” to find different styles of templates.
-
2
Click Create to open the template. The template will open as a new document.
-
3
Select text within the template to modify it. Word templates are simply preformatted documents with text, graphics, and other elements already in place. To add your own text, select text anywhere on the document and type in your own. The new text will have the same format as whatever text you selected and replaced. You can also click on a blank area of the document and start typing to add new text.
- To select a single word, double-click it. You can select longer pieces of text by clicking and dragging your mouse, or positioning your cursor at the start of the selection and holding down Shift while pressing the Right Arrow key.
- You can also select and move, delete, or replace other elements in the template, such as images, graphs, or tables.
-
4
Modify your template with the Styles pane. Templates use styles to create their distinctive looks. If you want to change the look of the template, click the Styles button in the Home tab of the ribbon toolbar. Click the down arrow next to any of the style elements and select Modify Style… to make changes.
- You can also make any other types of changes you like using the rest of the tools in the ribbon menu or Format menu.
-
5
Save your modified template as a document. When you’ve made the changes you want to the template, save it the same way you would any other Microsoft Word document.


Advertisement
-
1
Click the file menu and select Save a Copy…. If you want to save a document as a file type other than .DOCX, you can do so with the Save a Copy function.
- If it’s a brand-new document that you haven’t already saved, select Save As… instead.
-
2
Open the File Format dropdown menu. You’ll see this menu at the bottom of the Save a Copy or Save As window.
-
3
Select the format you want from the menu. In addition to common formats like .DOC, .DOCX, .TXT and .RTF, you can also save your document as a PDF, an XML file, or a macro-enabled Word file.
- Check out the list of file formats that are supported in word here.


Advertisement
Add New Question
-
Question
What is Microsoft publishing?

UK_Gamer05
Community Answer
Publisher is a tool for making posters, leaflets, booklet,s etc. It’s for when you need to create something that isn’t a standard document.
-
Question
How do I move from page one to page two of a Word document?
UK_Gamer05
Community Answer
In Word 2016, on the insert tab, either select insert new page or page break.
Ask a Question
200 characters left
Include your email address to get a message when this question is answered.
Submit
Advertisement
Thanks for submitting a tip for review!
Tip
- Unless free-handedly writing your paper, consult the guidelines of your document first before adjusting its format.
- Besides the header, footer, and page layout formats (which affect the entire document), all the other formatting tools can be applied only on specific parts of the document.
About This Article
Thanks to all authors for creating a page that has been read 309,741 times.
Is this article up to date?
You can open or import a surprising number of file formats into Microsoft Word. Not to be confused with file formatting, which—in most programs—refers to the design of a page, file formats are little encoded programs that tell computers how to handle the files used in specific programs. Look for the three or four letters after the period that follows the file name—that’s the file extension revealing the associated program.
Not all file formats are compatible with all programs, especially those that are radically different, such as a word processor vs. a programming language, or a music file and a graphic file. However, many programs that are similar, such as Word and WordPerfect, are generally compatible.
Word is flexible enough even to bring in spreadsheets from Excel or slides from PowerPoint, as well as text from other word processors. Weird line breaks and other issues can arise, however, so follow these instructions for the smoothest results.
Notice how many file formats Word can open with its (hidden) built-in conversion utility.
1. Select File > Open
2. Click the down arrow beside the File Types list box (above the Open and Cancel buttons)
3. Select All Files from the list, and Word displays a long list of conversion-compatible file formats.
Select All Files from the MS Word file format list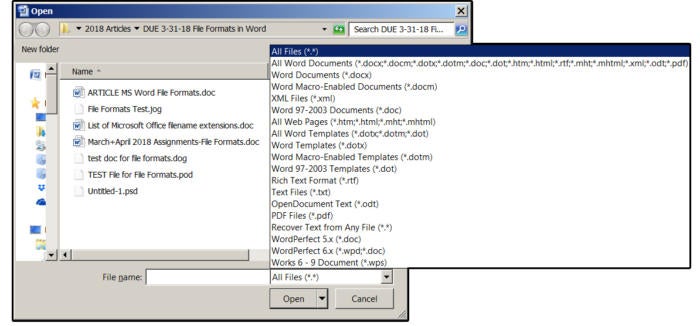 JD Sartain / PC World
4. Choose a format from the drop-down list—for our example, we’ll choose Text Files (TXT).
5. Navigate to the appropriate folder. Word displays a list of all the .TXT files available in the target folder.
6. Select the applicable file, and click Open.
7. If the text encoding is questionable, Word displays a dialog that asks you to choose the correct one (such as Windows Default). Click the appropriate button, then click OK, and the text file opens.
Choose the Text Files–TXT format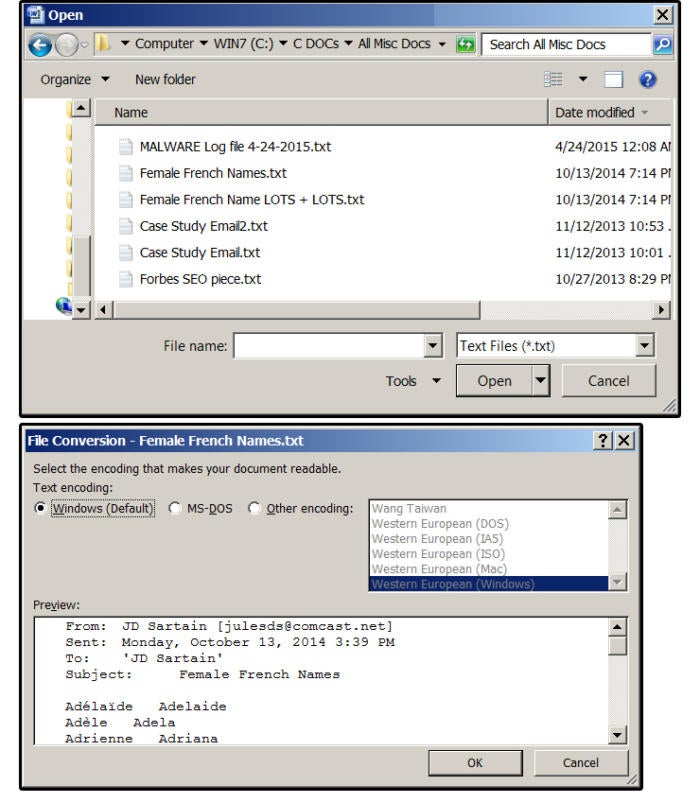 JD Sartain / PC World
Note: The first line on the All Files list says “All Word Documents,” which are NOT All Word documents but, in fact, all documents that can be opened with Word’s (behind the scenes) conversion utility, such as HTML, HTM, XML, ODT, PDF, and several more. For example, if you save your Word document as a webpage (File > Save as Web Page), Word uses its (hidden) conversion program to automatically convert your document page to an HTML webpage, and vice versa.
8. ODT files are part of the Open Document Format (ODF) files, which are XML-based, Open Source file formats. .ODT files are for word processing programs. Also included are .ODS for spreadsheets, .ODP for presentations, .ODG for graphics, and .ODF for formulas or other mathematical equations.
If you want to open an ODT file, it’s at the end of this first line that says All Word Documents (far right), which is not visible on most monitors. So, scroll down the All Files list and select ODT (Open Document Text) from the drop-down list of files.
9. The All Files list also shows Text files (.TXT), which includes ASCII files, Rich Text Format files (RTF), and Word Perfect files versions 5x through 9x (.DOC, .WPD, .WPS). Again, just select the format you need, navigate to the appropriate folder, and select a file from the list.
10. What about the Adobe Acrobat PDF file format? The PDF format is available on the All Files list in versions 2013 and 2016. Prior Word versions did not provide this option. If you don’t have Word 2013 or 2016, you can export the file to Word from Adobe Acrobat; however, older versions and some Reader versions do not provide this feature. But you can save your Word document as a PDF file (since Word 2000). Just choose File > Save As and select Adobe PDF from the submenu.
Save As Adobe PDF JD Sartain / PC World
How to open an Excel spreadsheet in Word
1. If you want to open an Excel spreadsheet in Word, first confirm that the spreadsheet is smaller than your screen (that is, no wider than your Word document minus margins). Otherwise, the cells will wrap to the next line and create a visual mess. You can change the margins or change the page orientation to landscape (Page Layout > Orientation > Landscape), and that will accommodate a few more columns. Or, make the columns in Excel smaller.
2. The easiest way to get a spreadsheet into Word is to highlight the spreadsheet in Excel, then copy and paste it in at your cursor’s location.
3. Another (more complicated way) is to position your cursor inside the Word document where you want the Excel spreadsheet to drop in.
4. Select Insert > Object > Object (from the Insert > Text group, click Object, then Object again).
5. In the Object dialog box, select the Create from File tab and then browse to the file’s location.
6. Select the appropriate file from the folder’s list and click Insert. The Object dialog box appears again. Click the checkbox Link to File if you want to link to the inserted spreadsheet file, so any changes you make on the spreadsheet are automatically updated in your Word document. Double-click anywhere on the inserted spreadsheet to open and edit the Excel file.
g. If your spreadsheet is too large to paste into Word, or if you’d prefer not to display the spreadsheet but still want others to see it and/or access it, click the checkbox Display as Icon. When you click the icon, notice the hint at the bottom of your screen. It says: “Double-click to edit the Microsoft Excel worksheet.”
04 Link to File or Display as Icon![]() JD Sartain / PC World
JD Sartain / PC World
Note: You won’t see any changes until you save both files, then re-open your Word document.
How to open PowerPoint slides in Word
1. Open one of your PowerPoint slideshow presentations.
2. Current versions: Select File > Export > Create Handouts, then press the Create Handouts button. Older versions: Select File > Publish > Create Handouts in Microsoft Word
3. All versions 2007–2016: The Send to Microsoft Word dialog box opens.
4. Click the radio button for one of the five formats you prefer, such as Notes Next To Slides, or Notes Below Slides.
5. Next, choose Paste or Paste Link.
Create Handouts in Microsoft Word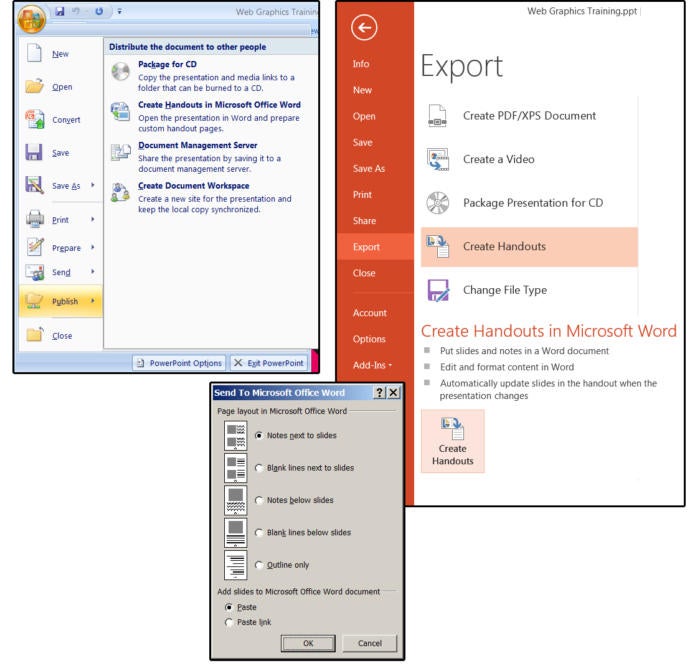 JD Sartain / PC World
6. Both Paste and Paste Link open Microsoft Word and paste all the slides from your presentation into Word. Paste places the larger slides on separate pages. Paste Link pastes several smaller slides on each page.
7. Paste allows you to edit the slides in Word (double-click the slide). Link opens PowerPoint and allows you to edit the slide in PowerPoint (also, double-click the slide). You can also edit the text, titles, fonts, page layout, and more in Word to customize your handouts for each audience.
Paste Link or Paste PowerPoint slides into Word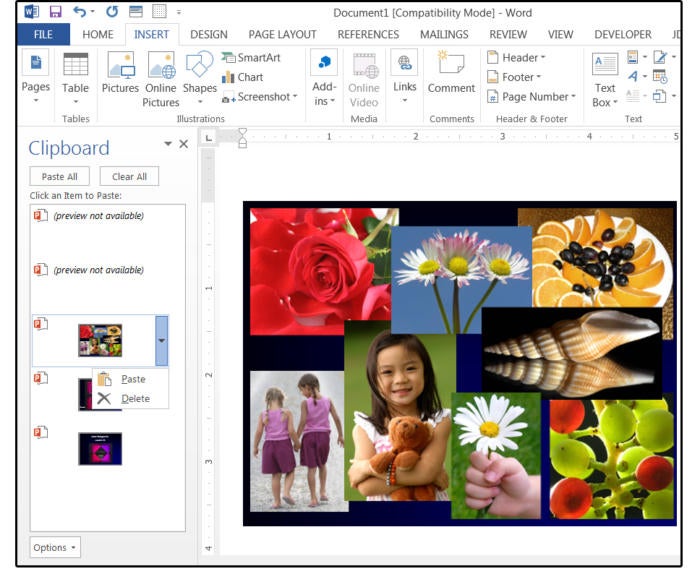 JD Sartain / PC World
8. Once satisfied with your changes, choose File > Print, then click the Print button to make paper copies of your handouts for distribution.
9. You can also Copy and Paste the slides from PowerPoint to Word. Just open both programs, select the slide you want to copy from PowerPoint to Word and choose Home > Copy (or Ctrl+ C); then in Word select Home > Paste (or Ctrl+ V). But, this only works for one slide at a time.
07 Double-click to edit Microsoft PowerPoint slide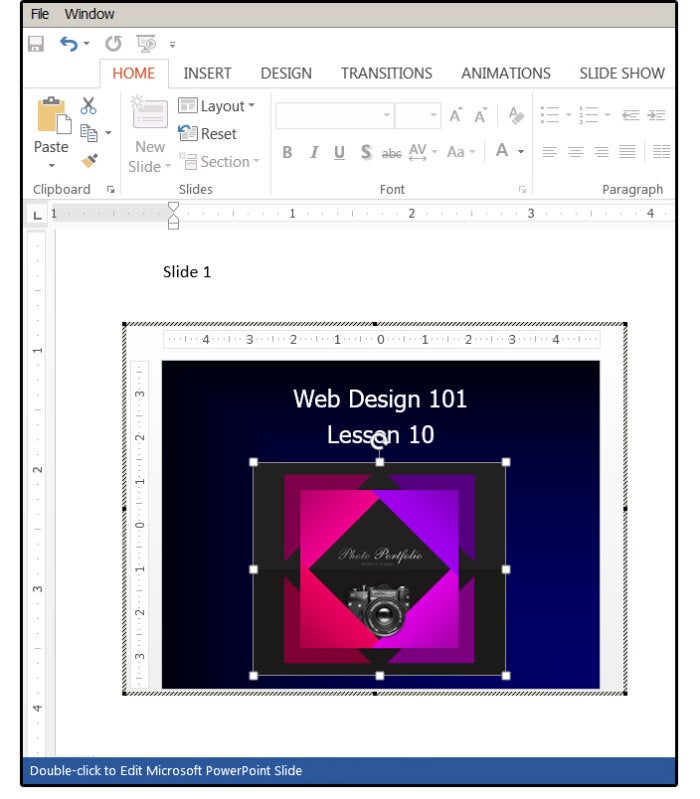 JD Sartain / PC World
Important Note: There are numerous articles on the Internet that instruct users how to copy and paste multiple slides (as opposed to the entire slide show presentation) from PowerPoint into Word. I have researched and tested this thoroughly and, using the Shift key to select a range of consecutive slides (1, 2, 3, 4, 5) or using the Ctrl key to select a range of non-consecutive slides (2, 4, 8, 9, 11) does not work. Every test (using many different methods) failed to copy and paste multiple slides. Each time, PowerPoint only copied one slide at a time (the first slide selected in the range you defined). I tested this process on PowerPoint/Word versions 2007, 2003, 2010, 2013, and 2016 and it failed on each of these versions. But there is a work-around.
Copy/paste multiple slides from PowerPoint to Word
1. Open Word and PowerPoint. In Word, open the clipboard: Under the File tab, click the tiny arrow beside Clipboard.
2. Go back to PowerPoint and select the first slide you want to copy from PowerPoint to Word, then press Ctrl+ C.
3. Still in PowerPoint, select the next slide you want and press Ctrl+ C again. Switch back to Word and notice that there are now two slides in your Clipboard.
4. Back to PowerPoint: Select the next slide and press Ctrl+ C, then another slide and press Ctrl+ C again.
5. Stay in PowerPoint until you have copied all the slides you want from this presentation into your Clipboard. But remember, you must select and copy one slide at a time.
6. When finished, move back to Word. Check to ensure that all your slides are in your Clipboard, then click the Paste All button.
08 Copy and Paste multiple slides work-around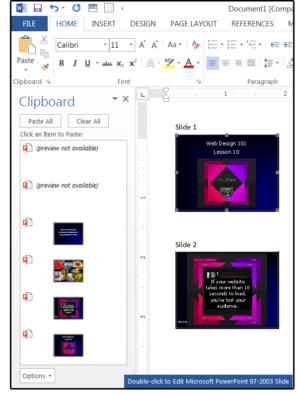 JD Sartain / PC World
Note: Go directly to Word after you have copied all of your slides. If you type or copy anything else, it will show up in Word’s Clipboard, (which you can always delete). Also, don’t worry if the Clipboard fails to display some of your slides (and says Preview Not available). It’s just a memory thing. They paste into your document without issue.
7. You can also paste individual slides one at a time. Hover over the target slide in the Clipboard and click the down arrow. A drop-down list appears that says Paste or Delete.
If you select the Paste All button at the top of the Clipboard, the slides will paste into the document one after the other, with no space in between. Scroll down through the pages and either enter a line/paragraph break between slides, or enter a page break between slides if you want only one slide per page.
How to import graphic files into Word
This one is easy. Just copy and paste, or Select Insert > Picture and choose an image from an internal or external source. You can also select Insert > Clip Art and chose an image from the Internet.
Whenever you need the money for any emergency reason but you don’t have enough money with you then you can ask your boss for a salary advance. You can make a salary advance request either through a written request letter or email.
Depending upon your company’s advance salary policy and your relationship with them, they will make a decision.
Here are the sample advance application formats which will be helpful in requesting an advance salary.
Simple Salary advance application
To
The Manager,
Company Name,
Address.
Sub: Application for advance salary.
Dear Sir/Madam,
I am writing this to request an advance salary amount of ……………. Rs due to some emergency reasons in my family. Kindly deduct an installment amount of …………. Rs each month from my salary until the total amount recovers.
I hope you consider my request.
Thanking you.
Sincerely,
Employee name,
Signature.
Designation.
Salary advance application for personal reasons
To
The manager,
Company name,
Address.
Sub: Salary advance request.
Dear Sir/Madam,
With due respect, I would like to request you to provide me with a salary advance of ………… Rs because of some personal reasons.
I will repay the advance amount in …. installments, in each installment you can deduct a sum of ………… Rs from my monthly salary.
I shall be obliged to you in this regard.
Thanking you.
Employee name,
Employee ID,
Designation,
Department.
Salary advance application for marriage
To
The Manager,
Company name,
Address.
Sub: Salary advance application due to marriage.
Dear Sir/Madam,
I would like to inform you that my marriage was fixed and it will be held on [date]. Keeping in view of my current financial condition I want to request you for a salary advance of ……………. Rs.
The amount can be recovered every month from my salary. In each installment, you can deduct a sum of …… Rs.
I hope you consider my salary advance request.
Thanking you.
Sincerely,
Employee name,
Employee ID,
Designation,
Department.
Salary advance application for medical treatment
To
The Manager,
Company name,
Address.
Sub: Salary advance application for medical treatment.
Dear Sir/Madam,
I, [your name] have been working as an [designation] at [company name] for last …. Years.
Here I am requesting you to please grant me a salary advance of …….. Rs which I need for my medical treatment [reason].
I will pay back the advance amount in each month from my salary …. Installments of each ………….. Rs.
I hope you do this favor to me and I shall be grateful to you in this matter.
Thanking you.
Sincerely,
Employee name,
Employee ID,
Designation,
Department.
Salary advance application for school fees
To
The Manager,
Company name,
Address.
Sub: Salary advance request.
Dear Sir/Madam,
With utmost respect, I am writing this to request a salary advance amount of ………. Rs for my children’s education fee.
The amount can be recovered from my salary, in each month you can deduct an amount of …………… Rs until the entire advance amount gets recovered.
In my present financial situation, this advance will be a great relief to me, so I hope you consider my request.
Thanking you.
Regards,
Employee name,
Employee ID,
Designation,
Department.
Salary advance application for wife’s delivery
To
The Manager,
Company Name,
Address.
Sub: Salary advance application for wife’s delivery.
Dear Sir/Madam,
I am writing this request letter for a salary advance of ………….. Rs which I need for the medical expenses of my wife’s delivery.
I would like to give my consent to deduct a sum of ………. Rs each month from my salary until the full amount is recovered.
Therefore please give your approval to provide a salary advance to me.
I shall be thankful to you in this matter.
Thanking you.
Sincerely,
Employee name,
Employee ID,
Designation,
Department.
Salary advance application for festivals like Diwali, Christmas & Eid al-Fitr
To
The Manager,
Company Name,
Address.
Sub: Salary advance request letter.
Dear Sir/Madam,
I, [your name] writing this to request a salary advance of …………… Rs for this ………….. Festival.
I will repay the advance amount each month from my salary in installments until the full amount gets recovered.
I hope you understand my situation and grant me the advance amount.
Thanking you.
Sincerely,
Your name,
Employee ID,
Designation,
Department.
Salary advance request mails to manager
Email format 1
Sub: Salary advance request.
Dear Sir/Madam,
This is a kind request for an advance salary of ……………. Rs due to some personal reasons. I will pay back the advance amount each month from my salary until the total amount gets recovered.
Therefore I request you to kindly approve my salary advance request.
Thank you.
Sincerely,
Your name.
Designation,
Employee ID.
Email Format 2
Sub: Salary advance application.
Dear Sir/Madam,
I, [your name] have been working as a [your designation] for the last …. years in [company name]. I am writing this to request a salary advance of ………… Rs due to some financial emergency.
I hereby give my consent for deduction of ……….. Rs every month from my salary to recover the advance amount.
I hope you consider my request.
Thanking you.
Regards,
Your name,
Employee ID,
Designation,
Department.
Recommended:
- Salary slip formats in excel, word, and PDF
- Pending salary request letters to boss/HR.