
Learn more advanced basic features of Microsoft Word. Full explanations of Microsoft Word use and features.
In this article, I am writing about detailed features and uses of the Microsoft word application. These features help you to learn the basics of MS Word 2007, 2013, and 2016 versions.
Microsoft Word is the most important word-processing office application used by students, teachers, IT professionals, and companies, etc. around the world. Microsoft Word is used to create and edit professional-looking documents such as resumes, books, admission forms, letters, papers, reports and booklets, cover pages, notes, assignments, brochures, and even web pages.
Features and uses of Microsoft Word 2007,2010 … and Microsoft 365
1. Microsoft Word Templates Features and uses
- Templates: – In MS Word are a pre-defined professional design for users. In which all the page layout, fonts, colors, graphics, outline, text boxes, etc. word processor user gets by default. To insert the template you need to go to File Menu -> New then you can see available templates and the office.com template. MS word application contains so many templates such as business cards, educational layouts and graphics, event planner documents and event management templates, flyers, invoice templates, invitations templates, many types of forms, resume templates, etc. This is the most beneficial feature of the Microsoft Word Application. Because of even less Microsoft word, literate users can use Microsoft word without the knowledge of other menus and functions.
The benefit of Templates in MS word technically is that any student or professional only needs to replace the existing text and their document is ready to print.
If anyone wants to create a resume but don’t how to do it then they have to go into the file menu->new->template they only need to search for a resume under the office.com template option. But to access these all features of MS word templates it is required users that they’re already connected to the Internet.
If the user wants to send an invitation card but doesn’t know how to create it in MS word then again they need to search for the invitation card template in MS Word, select the design and edit the pre-defined text.
This is the easiest way to use Microsoft Word and it saves lots of time for the users. This is how Microsoft Word use can be productive if anyone uses it smartly.
Related: Importance of MS Word in Education
2. Microsoft Word Home Menu Features and its Uses
Microsoft word home menu contains all the basic standard formatting options such as font settings, paragraphs, styles, and editing. The home menu is very important to practice for MS Word processor students.
- Clipboard: – In Microsoft Word Home Menu Clipboard is the first category menu that is used to store copied material temporarily. Such as text and pictures or any object in Microsoft Word. The uses of the clipboard function are that users can copy, replace, and place the text from one section to another section of the page. Also, the uses can be extended to this function such as copied texts remaining saved temporarily until not deleted. You can see your copied text and image in Clipboard when you click on the bottom right corner (little arrow sign-in box). And if you want to Copy then use CTRL+C and for paste use CTRL+V’
- Font: – In which the user can set the font style according to the nature of the document. For example, if someone is writing an application or resume then the font can be Calibri or any professional font. If anyone is writing a fancy paragraph or poem then the font can be Freestyle Script. You can also type in Hindi, and Punjabi in Microsoft Word by downloading Hindi or Punjabi fonts and then installing those fonts. Such as AGRA, Kruti Deve, Kundli, etc. Hindi fonts are common in use. MS word provides more advantages for users other than any word processor. In MS word, home menu users can set and change font sizes easily. They can fill the color background behind the text, and users can set text transformation to uppercase, lowercase and in Title case, etc. any line can be underlined and italic based on the document style. If you want to use all font options from one place then press Ctrl+Shift+F on the keyboard. This is a shortcut key to open Font options.
- Paragraph: – The paragraph sub-menu is another great feature in MS-word that can be used to align paragraphs, and highlight features and important points by using bullets and numbers. MS Word users can also set the line spacing to improve the readability of the document.
- Style: – If users don’t know anything about the font, or paragraph formatting then they can use the style category menu under the home menu. In which any text can be highlighted according to the predefined style. E.g. heading size, subheading size, etc. confusion can be easily solved in the styles category. Such as if you’re using various headings in your essay or document but don’t know how to set the font size, then you don’t need to worry, just select the text you want to make a heading and then click on Heading 1. In the styles category, there are 6 types of heading such as Heading1, Heading 2, Heading 3, Heading 4, Heading 5, and Heading 6. Such options are very useful in education or educational material. Books and study materials can be designed professionally by using these options in Microsoft Word.
- Change styles: – Users can set any style for their document in Microsoft Word. This is another very useful option in which document style can be edited or created according to the reader of the document. In the change style menu, you can set your document style to distinctive, elegant, fancy, formal, modern, newsprint, perspective, modern, simple and traditional, etc. Also, you can set paragraph spacing to tight, compact, relaxed, etc. based on the user’s demand or according to the reader’s point of view.
- Editing: – Another use of the home menu in Microsoft word by using the Editing Category Menu. The user can find any word or line in between documents. They only need to press F5 or Ctrl+F and then they can find and replace any text in the document. They can select, and replace any object in the document. They can visit any page or section in the document by pressing Ctrl+G from the keyboard then they can put the page number and click on Go To. These wonderful features are not available in one place in such an easy style in other word-processing applications.
Such technical users of the Microsoft word Home menu are very beneficial for all kinds of users such as students to create assignments and notes. Teachers can use these options to highlight the main topic of the document. A business professional can use these options to create professional-looking letters. E-book writers can design their books according to this. Bloggers can write their posts amazingly with the use of these options.
3. Insert Menu Features in Microsoft Word and Uses
- Insert means in MS Word to insert something from outside into the page. Such as pages (cover pages, blank pages, and page breaks), Tables, pictures, clip art, shapes, smart art, hyperlink, header and footer, and text boxes symbols) All are great features of the Insert menu in Microsoft Word. These functions provide exceptional uses for the word user. Let’s understand these features and uses below:
- Pages (Cover Page, Blank Page, and Page Break): – In MS Word, the Page sub-menu contains three main features.
- The cover page feature can be utilized at the start of the document or it will be used on the first page of the document. Such as students, teachers, professionals, and writers can insert cover pages in stories, assignments, notes, articles, etc. to highlight the title of the written story, notes, description, and author name. There are so many pre-defined cover page templates that can be used to get the attention of readers while they will receive your printed or pdf copy. Also if you’re not satisfied with these templates then there is another option called more cover pages from office.com. According to Google translator cover is a thing that lies on, around something, and conceals. The magazine’s front page is also a cover page it can be edited photographs or designed text. Books front page, and greeting cards’ first page are examples of the cover page. I think you got this.
- The blank page option provides the user for inserting any blank page after the cursor. For example, if you want a blank page after writing the first paragraph on one page then you can click on this option. You can also use Ctrl + Enter to insert a blank page after the cursor. The use of the blank page function is mostly found outs in book publishing or eBook designing. People also can use their notes and documents. The benefits of using this function are that it will consume less memory of a computer or it will help to create fewer .docx (extension of MS word file) file word or .pdf(Portable document file extension) files.
- Page break is similar to the blank page option (You can use the same key: Ctrl+Enter) but it will start a new page after the click. But the difference between a blank page and a page feature is that you can insert the blank page at the cursor position, where the page break starts the next page at the current position. No big difference.
- Tables Menu uses in Microsoft Word: – The use of the table menu is that you can insert or draw a table in the document. You can insert a table, draw the table, convert text into a table, and insert a quick table (pre-designed tables). This is the most important function in the Insert menu that is mostly used to design or draw calendars, reports, and invoices and is used while creating forms, labels, and newsletters.
- illustrations: – Illustrations menu is used to insert the picture, clip art, shapes, smart art, chart, and screenshots. The use of the illustrations menu in Microsoft word will help users to visualize the document’s view to readers. Such as by inserting an image, adding clips, smart art, etc. The purpose of using these visually appealing options is to explore the creativity in readers’ minds while reading printed word files or pdf documents.
- The picture menu is used to insert a picture from your computer hard drives or from the desktop to the current position of your cursor. You can also insert pictures anywhere in the text box, word art and smart art, etc. Whenever you have to insert the image inside any object in Microsoft word then click on Picture Option under Illustration Menu.
- Clip Art uses MS word to insert Art clips such as drawings, movie clips, and sounds that illustrate the concept written in the document. These features help students to understand the concept by seeing clips. Also good to use in all kinds of educational and study materials.
- The shapes feature is used to insert rectangular, circles, arrows, charts, lines, and symbols based on the demand of the document. For example, while giving examples of something such as water consumption or electricity consummation in a document then we can use these shapes in MS word. We can also highlight, colorize, decorate or insert text and images inside the shapes. This is also a great feature of presenting reports in meaningful and professional methods.
- Smart Art is one of my favorite options in MS word. The uses of this option are great especially while educating. You can visually communicate information by using process diagrams, hierarchy diagrams, list diagrams, and relationship diagrams such diagrams is very important and we can use them to display organizational structure, and processes such as (Input->Processor->Output). SmartArt is easy to understand and teaches any complex problem. The option is also available in Microsoft PowerPoint.
- Charts are used to illustrate and compare data in MS word by using Bar, Pie, Line, Area, and surface mostly used charts in MS word. We can insert an excel chart into MS word. When you click on the chart it will open a Microsoft Excel spreadsheet that we can use to write figures. The uses of a chart are very beneficial to display data comparison and data analytics. You can find such options mostly in math or economics books and newspaper economics pages. Publishers are using such kinds of charts to display facts and figures.
Related: Top 5 Microsoft Word Courses Online to become master in document writing and editing
- A screenshot is a great option in MS word and it is used to take a screenshots of opened programs or applications on the computer and on the internet. You can insert the same captured clip in an MS word document in real time. It’s like a web camera in MS word. The use of illustration options for teachers and students in Microsoft word is great. Students and teachers can use these options to explain data organization, story maps, cause and effect, topic building, and clocks to teach about time. Also, entrepreneurs or managers can use these options to highlight decision trees, pros, and cons, and brainstorming exercises. English tutors can use these options to enhance students’ English vocabulary etc. There are so many uses but tough to share them in one post. But I hope you got the ideas about the uses of Illustrations in Microsoft Word.
- Links: –Insert menu category contains a hyperlink, bookmark, and cross-reference function. What users use to link any internal or external file, picture, the web page from the document. Also, the bookmark can be inserted anywhere on the page, and then we can create the hyperlink to visit that position on the same document without scrolling.
- The hyperlink is used to create the link from text to any file, picture, video, or website. For example, if you want your reader to find more information about certain causes or solutions then you can link that source using the hyperlink option. Such as when you search on Google for something then all the list of search results is also hyperlinked.
- Cross-reference is similar to the Hyperlink option that is used to refer the user to headings, and tables. You can find such an option in E-books in which the table of content of the eBook is connected to the pages and figures. To insert a hyperlink on the selected document text from the keyword press Ctrl+K on the keyboard.
Here you can read the complete tutorial about hyperlinks: Hyperlink Example within Microsoft Word Document
- Header & Footer: – Microsoft Word users can use the header and footer option to insert text, image, and symbol that is important to appear at the top and bottom of each printed page. After adding content such as graphics, page number, author of the book, title of book, date, and time. Microsoft Word automatically inserts the same text with the correct page number and other graphics on the next pages or on each printed page. Such as if you want to highlight or want to print page numbers on each page you’re writing you can insert and align page numbers on the right or left or center of the document and after adding the page numbers, it will automatically appear on the next pages with number 2, 3,4. Word process users can also use a pre-designed header and footer and can edit too. If you want to insert only a page number then just click on the page number and select the desired position.
- Text: – Text category in Microsoft word under the home menu is used to insert TextBoxes, Quick Parts, Word Art, Drop Cap, Date &Time, and any kind of object. Uses of Text are very great for book writers, students and for teachers to insert preformatted text boxes anywhere in the document to highlight important words, sayings or main points of written paragraphs. The user can also draw text boxes from their own anywhere in the document such as forms, books, invitation cards, and invoices. Also if they don’t know how to format text boxes, then they can download more pre-formatted text boxes from office.com.
- Quick parts are used to insert a reusable piece of content including fields, document properties such as author name, the title of a document, comments, company name, etc. such options are mostly used by news editors, books, and magazine editors.
- WordArt is a good option to create and decorate a slogan, and quotes in documents in Microsoft Word. To use this you only need to select the piece of text and then select the appropriate color style or decorative text. WordArt is also useful to insert decorative text in invitation cards, happy birthday greetings and other kinds of funny or less professional documents.
- Drop Cap is used in books, letters, notes and new stories or newsletters to display the first letter larger at the beginning of the paragraph.
- Signature line: – The signature link is used mostly in the legalities of the document. Such as in government notification PDF files and legal notices signed with a stamp at the end of the page. This is similar to Microsoft Word in that government notification letters can use a signature line or they can add a digital signature on the spot. Also, any word user can insert a signature line at the end of the document or paragraph which specifies the individual who must sign or sign. Also, a digital signature is used in mostly Income tax returns, company audits, and company registration numbers and can be used in related legal documents.
- Date & Time: The date and time are easy-to-use features that can be inserted anywhere in the document. In Microsoft Word, there are so many dates and time formats (such as Saturday, December 31, 2016, or 31-Dec-16) that are two different formats that can be used according to the nature of the document.
Related: Top 5 Microsoft Word Courses Online to become master in document writing and editing
- Object: – Object is an advanced feature of Microsoft Word that is used to insert any object into the document and also by creating in real-time. Such as you can insert paint program functionality by creating a bitmap image in real-time, excel spreadsheets, videos, and PowerPoint presentations mean you can insert the embedded object.
- Symbols: – In this option, you can insert mathematical equations and can do plus, minus by using a table. Also, there is a symbol option that is used to insert a special character or symbol that is not commonly available on the keyboard. For example, you can insert a trademark symbol (™), copyright (©) and Unicode characters to display the ownership or authentication of the document that other people cannot use without permission.
This option in Microsoft word is mostly used in legal, marketing, and promotional documents. Also, you can find such symbols in the company’s logo, website footer, and Wikipedia contents footer.
4. Features and uses of Page Layout Menu in Microsoft Word
- Page layout menu in Microsoft word gives various uses for the user to set themes, page setup, page background, paragraph and arrangement in the document. Page layout features in Microsoft word is very useful for eBook publisher and document printing business and also for common word users.
- Themes: – In Microsoft Word, a theme is a set of pre-designed document designs fonts, headings, and effects. By the use of the theme option in Microsoft word, the user can change the overall design of the page such as fonts, effects, and colors.
- Page Setup: – Page setup is the most important option and the users start after creating a new document. I always recommend to all my students that before writing, creating, designing or doing anything in Microsoft you should first do the page setup. Why because all the page margins, page orientation and size create problems later when you print the document or do the arrangement of objects.
- The margins option is used to set blank spaces from edges toward the inside from outside. Margins are page edges that are outside the main content of the document. The margin will help us to define the paragraph’s starting point and ending point. By doing click on the margin option there are various pre-defined margins such as narrow in which margins are 0.5 from the top, bottom, left and right. Where normal is 1” from all four sides. If the physical paper is the A4 size it means its width is 8.27” and height is 11.69” then you can set 0.5” margin from all corners recommended. Because the fewer margins on the edges will use less paper for your document. Else if you set 1” then it will use more printouts for the same document.
- The orientation used is to set the page layout from Vertical to Horizontal or Portrait to Horizontal. A simple way to understand the uses of orientation in Microsoft Word is that it will allow the users to switch the page layout according to the text writing flow. Portrait means layout style from left to right and landscape means the right to left. This will be a best-used example, if you’re printing your document on the A4 size and your text in the document goes outside the page from the right and uses less space towards the bottom then you can set landscape. For example Exam Date Sheets, Marriage cards, and Diploma certificates. are printed in the Landscape layout. Where mark sheets and admission forms are printed in portrait. The best way to switch to one option then sees the document samples that you want to print or check if the page sizes or margins are not meeting your design criteria. Most 90% of the time we use a portrait layout in page setup. So, if you find your document text is not getting proper arrangement on the printed page then you can do the experiment to switch the portrait layout to the landscape in the Page setup option in Microsoft Word.
- Page size as I discussed above that it depends on the kind of document you’re printing. If you’re printing your document on the A4 paper size that you purchased in the market then set A4. Because you can’t set A5 in this condition because then some text will not be printed in the document. You can vary the page sizes according to the section. In Microsoft word, there are Letter sizes for letter documents, Tabloid, executive sizes and envelope sizes available. But if you want to become an expert in Microsoft Word or want to be proficient in printing documents then I will suggest you print the same text in various page sizes on A4 paper. It will give you practical knowledge about page setup settings and other things too.
- The columns option in Page Setup is used to split the text into two or more columns. Generally, this option is a classical text formatting style that is very beneficial in news printing, newsletter, and nobles. For example, see the newspaper in which they adjusted the text in small line width and paragraph and at the same time they converted the long paragraph into columns. So it will increase readership interest in particular news. Else you can see English and Hindi in which one page is divided into columns.
Breaks, lines, numbers, and hyphenation options are similar as we discussed in the Insert Menu options.
- Page Background: – The use of page background in Microsoft Word is to give extra effects or protection effects to the document such as the watermark, page color, and page borders.
- Watermark is used to insert ghosted text behind the text in the middle of the document. This is a very beneficial option that indicates that the document is confidential, and urgent and needs to be treated carefully. Watermarks are used in text documents, images, and PDF files. You can see the example in Google images or stock image which is protected by the website or company watermark so that no one can reuse the images. Also, you find watermarks in legal documents, letterheads, and bank passbooks or in checks. There is a pre-defined watermark in Microsoft Word such as Confidential, and urgent. You can change these into your company name, personal name or related to the document, you can also insert your company logo, school logo, or any other image that will indicate to the reader or finder that this document is important.
Related: Top 10 Basic and Advanced Microsoft Word skills
- The page Color option is used in Microsoft Word to set the color background of the page. Microsoft word document default color is white with black text color. So, official documents with page background colors you can’t see often. But it is used mostly in eBook or PDF files. Also, it depends on the document’s goal. You can also use the fill effects option in which you can set gradient colors, textures, patterns and picture backgrounds to your page. Setting page color will not print a document in colors it’s just for visual appeal.
Related: Top 5 Microsoft Word Courses Online to become master in document writing and editing
- The page Borders feature is very beneficial to add border styles with colors and art around the page. Also, it is used to add text color background by using shading options that will come in printout too.
- The paragraph option in the page layout is used to set left, and right text indents. This is used to set paragraph beginning and ending points. Similar to what I discussed above in Home Menu. This option is also in the home menu but the difference is that you can set the left indent by using figures.
For example, if you want to give more space to a paragraph from left in the current cursor positions then type 1.22” in the box and hit enter. This will move your paragraph toward the right. The use of this feature is to design the document style in which the reader will find it interesting or information is easy to read.
Also, there is the spacing option used for spaces between paragraphs. You can also use the TAB key on the keyboard to use Indent or paragraph margin functionality in Microsoft Word to set indents and spacing.
- Arrange: – The use of an arrange feature in Microsoft Word is to arrange document text professionally and efficiently. The most important option is the Wrap Text. I saw many students learning computers find it difficult to arrange the image or text objects correctly.
- Wrap text is used to align inserted images, and word Art correctly with text. For that, if you want to insert text around the inserted image then you can select a square option in Wrap Text. Also, you can set your image in Front of the Text or Behind the Text. You can also drag and adjust the object over text to align it.
But by default when you insert an image it will not move because it is “In Line with Text” by default then right-click or double-click on the image and choose Wrap Text and select the square or in front of text option then you can adjust the image according to your style by the use of the mouse.
You can find such text arrangement skills in newspapers, magazines, and book-style layouts. There are other options too which can work similarly to arrange the document such as position, bring forward, and send backward. But you can also use the option by right-clicking on the object. You can also use the drag-and-drop style to arrange different kinds of objects in the document.
The best way to learn Microsoft word is to use these options or click on these features after the selected text and you will find a result practically that is learnable.
5. Features of Reference Menu in Microsoft Word and Its Uses
Reference menu and options mean mentioning, or referring to the source of information. In this I will define the Footnotes feature:
- Footnote: – Footnote in Microsoft Word is used to add the special text or written text reference in the document at the end of the page. This is not the footer, this will come before the footer. For example, if you’re writing in a document, book page any figure or fact that is published in the newspaper then you can mention in the footnote the source of information that it is published in abcd newspaper.
- But the endnote is different and the output is similar. The endnote will come at the end of the paragraph. The endnote is used after the paragraph but the footnote is used at the end of the document. The font size of the endnote and footnote is small than other written text.
You can see footnote and EndNote examples in the dictionary’s bottom page, old English literate books, and in English nobles and magazines.
6. Microsoft Word Mailings Menu Features and Its Uses
In Microsoft Word Mailings Menu Mail Merge is the most powerful feature that is used to send bulk emails and printouts letters, and documents for thousands of people or print out thousands of copies with different names, addresses, and email fields but with same subject or company name.
This option is very beneficial to send a newsletter, reports, notifications, and updates. to team members by the Manager, to customers from banks to readers, from bloggers and to students from Teachers. Also, the mail merge is used by the printing press to print envelopes with the same subject line but with a different name on each printed page.
7. Microsoft Word Review Menu Features and Uses
Review functions and features used are to examine, test, and proofing of the written document in Microsoft Word. You can compare the two documents and also you can add a comment to certain lines or words.
- Proofing: – Use of the proofing feature is to check the spelling and grammatical mistakes in the document. You can also research any word and its meaning word thesaurus. For example, you can check spelling mistakes, and count the total written words, and paragraphs in the document. If you want to check your spelling mistakes then you can press the short key F7 then it will automatically highlight spacing mistakes with green color and spelling errors with Red color.
Related: Top 5 Microsoft Word Courses Online to become master in document writing and editing
- Comments: – Comments option output is similar to ToolTip. For example when you move your mouse to the “Window Button” it notifies the user with the text “Start Button” this is similar to comments. If you want to add more expression or more thoughts behind any used word in the document you can use the comment option.
8. View Menu Features and Uses MS Word
View menu uses are related to document views such as full screen, web layout, print layout, zoom, windows arrangement, and macros.
- Document view: – Document view menu features are used to view the documents in various styles. The printout is by default view to see the document while you’re writing the text. Also if you’re printing or creating something for printing purposes then use a print layout view.
- Full-screen reading view: used for reader and document designer to view the document in reading view in which all the pages are looking like you’re reading a book. Also, the full-screen reading view is helpful to design and see the page’s settings and visibility of text clearly.
Related: Top 11 Most important Computer Skills to learn for career development
- Web layout is used to see the document as a web page. The uses are for students and designers to view the text in a web layout. Also selecting a web layout view and then saving the document as a web page will save the file in HTML format and when you open the saved file, it will use the internet browser to view the document text instead of Microsoft Word.
- Outline: is used to see the document heading, and body text in levels. You can use this menu to edit the heading, body text, and document structure. You can also add control for sub-headings. Such as if you’re using H1 for the main heading and h2, h3, h4 for other headings then you place such subheadings under the H1 heading. Mostly this option is used in tutorials, support pages, and application or software documentation.
- Draft: is used to edit the text quickly.
Related: Top 5 Microsoft Word Courses Online to become master in document writing and editing
- The show feature is used to show gridlines to see the document text spacing and word spacing.
- Navigation is useful for eBooks and you can see such an option by default in Google Docs. The navigation option is used to view the document by heading when you checkmark on the navigation pane it will highlight the heading in the left sidebar in Microsoft word after that you can navigate the document by heading instead of scrolling down.
- The ruler or Ruler Bar is most useful and very important for document margins. Indents are important to align correctly with the use of the ruler bar. The ruler option in ms word is similar to the scale that we used for drawing in schools etc. You can see the first-line indent, hanging indent or left indent in the ruler bar. You can also use the rule bar to set the left, and center tab positions by a click on the ruler bar in Microsoft Word. This is beneficial to view the document correctly and align paragraph spacing correctly.
- Window: – The window feature used is to create a new document in New Window. For example, if you’re current file name is Microsoft Word Tutorials then the new windows file name will be Microsoft Word Tutorials 2.
- The split feature is used to split the page with a ruler bar in between the text. Not that common to use. Just feature users are while you’re creating the document in which spacing or margin detail is important.
- Arrange all will arrange multiple application windows in the current view. Such as we can shrink the window size towards the left and then we can arrange another application window on the right side.
- A switch window is used to switch between two application windows. But you can also use the Alt + Tab to switch between more than 2-3 applications without using the switch window option.
- Macros are used in Microsoft Word to automate repeated tasks such as font size, color size or series of commands and instructions in a group. You can run macros that will automate the formatting of other text in the document.
9. Format Menu Features and Uses MS Word
The format menu is used to edit font size, and color and to present object appearance with extra effects. Such as when you insert an image on the document format option will be highlighted on the Menu Bar. This indicates to the user that they can adjust color, brightness, border style, and other image effects such as picture shadow, cropping, and wrapping in Microsoft Word.
This option is very important for Microsoft Word students, and word operators to learn this practice as much as possible because it will be used in assignments, newsletters, and notes.
The format feature is also visible when you insert shapes or text boxes in the document. You can edit shape outlines, background colors, and text styles from the format menu.
After getting the basic knowledge of or Microsoft Word uses written in this article now it is really important that you can do as many as possible practical exercises. Such the above-discussed features of Microsoft Word are very important for every word processor user. School students should learn such features so they can create professional-looking notes. Professionals or people working in a government office and documenting related works in their daily life can learn such features.
If you study all the above features in the best possible way then you can understand if we all can are educated enough about Microsoft Word then we can get various benefits.
As you can see today there are various government and private documents you receive from offices that are not that professional technically. Even school question papers and books are printed with low-quality text formatting such things are not good even when someone is paying for the services.
If students learn these Microsoft word features in schools I will be sure that they will be great professionals in the future especially in documenting writing and editing related works.
Jobseeker also learns Microsoft Word features that help them in their job and also creates resumes professionally in Microsoft Word.
Because of the robust uses of Microsoft word, it is essential to learn Microsoft Word. There are various tutorials that you can use to learn Microsoft Word for free on the Internet. The best way to learn Microsoft word is that you can practice your skills by creating different kinds of admission forms, reports, tables, and advertisements in Microsoft Word.
You can also use Google Docs for Word Processing. Google Docs is available on Google Drive. You can also use MS word online by creating a Microsoft account on live.com or with an outlook account in OneDrive. A little advance but very beneficial if want to upgrade your MS office skills.
So, friends, I hope this article about the features and uses of Microsoft Word helps you to learn and understand the various uses of Microsoft word. And its features are important in our daily official life and career.
If you make any kind of document, you’ll want to consider Microsoft Word. This helpful tool helps to create a wide variety of professional documents quickly and easily. Now, Microsoft Word is a popular commercial word processor created by Microsoft. MS Word is also one of the widely used programs in the suite. There are many features of MS word. Although many other applications give it a competition, nothing has defeated it to date.
It is available for both Windows and Apple operating systems. Microsoft Word is in the Microsoft Office productivity package, although it is also available as a standalone application. Microsoft Word was first released in 1983 and has seen various revisions since then. It’s compatible with both Windows and Mac computers.
Features of MS word help to make professional write-ups, editing and formatting the existing documents. It also helps in creating graphical documents comprising images, and more. Millions of office workers, students and home users create, read and edit documents use this software program. It can also be useful to familiarize yourself with the basic features and characteristics of the application.
Also Read: Top 5 GTA 5 Like Games That You Can Play On Your Smartphone
This guide lets users who want to learn Microsoft Word basics but don’t have much experience with computers or Microsoft software. It will provide you with a solid foundation in MS Word, allowing you to progress to greater levels of proficiency.
Basics of Microsoft Word
You may use Microsoft Office Word to create and modify personal and business documents like letters, reports, invoices, emails, and books. Documents saved in Word are saved with the.docx extension by default.
Microsoft Word can be used for a variety of tasks:
- Creating business papers with a variety of images, such as photos, charts, and diagrams.
- Saving and reusing pre-formatted text and elements like cover pages and sidebars.
- Making letters and letterheads for both personal and professional use.
- Creating a variety of documents, including resumes and invitation cards.
- Producing a variety of letters, ranging from simple office memos to legal copies and reference documents.
Now, let us first understand some basic aspects of the application. You can open the application on your personal computer while following these simple steps:
Start → All Programs → MS Office → MS Word
Then, if you want to open a document,
Click on “New” on the left-hand side of the screen. This opens a screen where you can choose between a blank document, your old documents, and more.
Also Read: iPhone 13 Series Launched with A15 Bionic Chip: Price, Specs
List of Features of MS Word
Home
This feature of MS word has options like font colour, font size, font style, alignment, bullets, line spacing, etc. Additionally, all the basic elements that one may need to edit their document are available under the Home option.
Insert
You can enter tables, shapes, images, charts, graphs, header, footer, page number, etc., in the document. These Features of MS word are available in the “Insert” category.
Also Read: Complete List of GTA Vice City Cheat Codes for PC, PS4, Xbox
Design
You can create or select the template or the design under the Design Tab in which you want your document to be by using this Features of MS word. Moreover, choosing an appropriate tab will enhance the appearance of your document on MS Word.
Page Layout
This Features of MS word under the Page Layout tab come with options like margins, orientation, columns, lines, indentation, spacing, etc.
Also Read: Top 5 GTA 5 Like Games That You Can Play On Your Smartphone
References
This tab is the most useful feature of MS word for those who are creating a thesis or writing books or lengthy documents. Options like citation, footnote, table of contents, caption, bibliography, etc. are present under this tab.
Review
Spell check, grammar, thesaurus, word count, language, translation, comments, etc., everything is trackable under the review tab. Additionally, it benefits those who review their documents in Microsoft Word.
Also read: 5 Best Laptop Under 30000 to Buy in India
Advanced Features Of MS Word You Probably Didn’t Know About!
With the basic features of MS Word out of the way, here are a couple advanced features that many of you are most likely in the dark about. These features will totally blow you away as they offer a cleaner and more customised MS Word experience.
Moreover, we have listed the shortcuts to these features so that you don’t have to waste much of your time. Just use these shortcuts and see the magic! What are we waiting for? Let’s hop right in!
- Turn on the Distraction Free Mode by using the Alt + W + F shortcut
- Quickly summon the Clipboard and hold up to 24 items for you to cut, copy and paste around using the Ctrl + C Double Press shortcut
- You can translate documents anytime anywhere by heading over to Review > Translate
- Transform tables into graphs by navigating to Insert > Object > Object Types > Microsoft Graph Chart
- You can easily hide the Ribbon Panel by using the Ctrl + F1 shortcut
FAQs
Can I use MS Word without downloading it?
No, if you want to use Microsoft Word, you’ll need to have Microsoft Office installed. A doc file may then be created.
What is the MS Word file extension?
The.doc file extension identifies a Microsoft Word document.
What are the five primary uses for MS Word?
It is possible to make resumes and reports using Microsoft Word. For both authors and scholars, it may be used to compose books and dissertations. Besides this, it may be used as a basic text editor.
Also Read: Rock your Bio With The Best WhatsApp Bio For boys and girls
We hope that the information provided above in Microsoft Word is helpful to individuals seeking information.
Tired of your old smartphone? let’s make it worth something again. Sell phone online, or recycle old phone! A quick sale and eco-friendly recycling are guaranteed with Cashify.
Also read: Compare Mobile Phones
Comments
Featured Videos
-
The best reel downloader apps let you download reels in a jiffy. Instagram is definitely one of the best platforms to share photos and videos. And with the addition of reels, the social media platform has become even more engaging and exciting. Reels, basically, are short videos with audio and effect. Their short length is…
14th Mar 2023
-
Since we began using the Apple iPhone 14 Pro, we’ve encountered various issues and most of which are related to iOS 16. Several issues that we’ve faced are related to notifications, Always-on -display, battery life and wallpaper. Until these issues are officially fixed, we will have to live with them. We tried to tackle some of…
31st Oct 2022
-
The OnePlus 9RT, a T upgrade, was out the previous year, although it’s only available in price-sensitive areas like China and India. Moreover, the OnePlus 9RT has superior cameras, including a 50MP primary sensor, a little more prominent display, a premium design, good battery/charging and a more effective Snapdragon 888 CPU. Overall, this smartphone looks…
28th Oct 2022
-
We’ll discuss the overall camera setup & quality of the iPhone 14 Pro Vs iPhone 13 Pro Vs iPhone 12 Pro in the article. All of these phones come with a triple-camera setup. However, you might find some significant upgrades in the iPhone 14 Pro. Let’s find out the details about the camera quality of…
7th Oct 2022
-
The year 2022 is known as the year of the launch of many flagship smartphones. However, there is quite a decent competition between the phones in the price segment of Rs 50,000, and even there are too many options to choose from. Here in this article, we’ll compare the Moto Edge 30 Pro Vs IQOO…
6th Oct 2022
Latest Reviews
-
12th Apr 2023
-
7th Apr 2023
-
2nd Apr 2023
-
31st Mar 2023
-
30th Mar 2023
-
26th Mar 2023
-
25th Mar 2023
-
23rd Mar 2023
-
19th Mar 2023
-
16th Mar 2023
Guide to Microsoft Word Features – All of us adore the benefits Microsoft Office has provided us. Microsoft Word is arguably the most used digital word processor, universally accepted by students, professionals and businesses alike. If you’re migrating from another tool or if this is your first stint with the newer versions of Microsoft word features software, welcome. You’ll find your tryst with Microsoft word software application a multi-dimensional affair, ideal for beginners, advanced users and for making complex formatting changes.
Guide to Get Started With Microsoft Word Features
In this post, we outline a Beginner’s guide to Microsoft Word.
-
Documents, Blog Posts, and Microsoft Word Templates
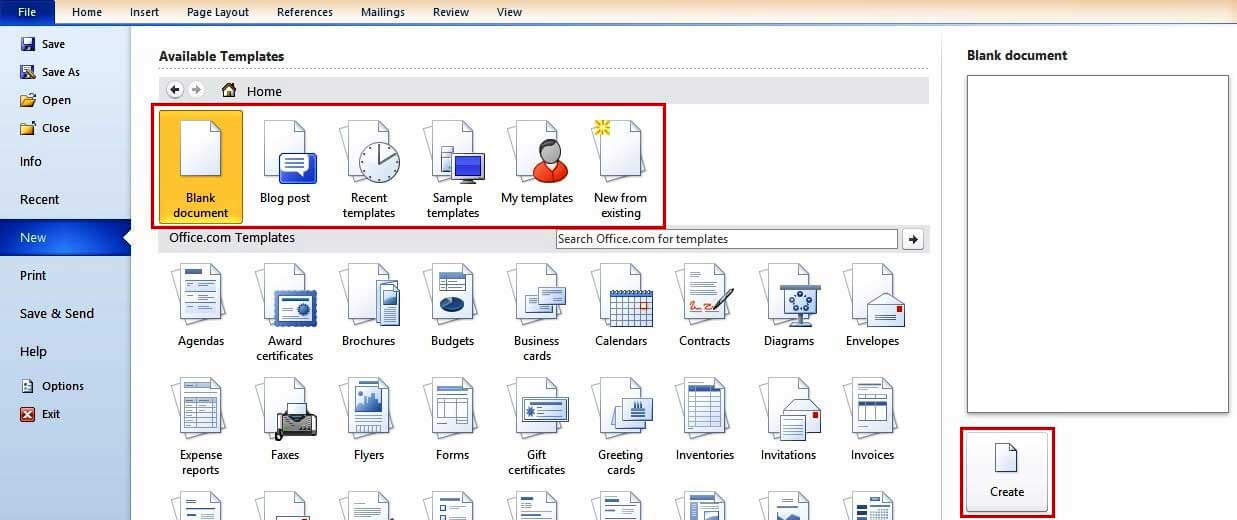
The first time you open up this tool, you’ll be prompted to “create” one of these three: a blank document, a blog post, or a new/existing Microsoft word templates.
- Documents are essentially like text files that support complex formatting. Each format has a page size and a layout.
- Blog posts are essentially for passionate bloggers. You will be prompted for your blog account details so you can upload your posts seamlessly.
- Microsoft word templates are essentially pre-defined formats.
As a new user, we suggest you create a blank template to get started on your journey to discover Microsoft Office Word.
-
The Tabbed Ribbon in newer versions of Microsoft Word Features
Newer versions of Microsoft Word features (2007 and above) come with the now-famous “Ribbon,” which is a sequence of Screens that capture all the capabilities of your Microsoft Word templates Software application.
Through this, MS Word makes its utilities available to use. The ribbon, in turn, contains:
-
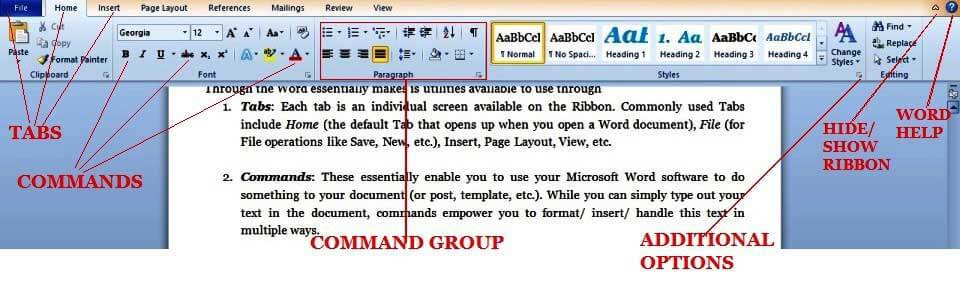
Tabs:
Each tab is an individual screen available on the Ribbon. Commonly used Tabs include Home (the default Tab that opens up when you open a Word document), File (for File operations like Save, New, etc.), Insert, Page Layout, View, etc.
-
Commands:
These enable you to use your Microsoft Word templates software to do something to your word document (or post, template, etc.). While you can simply type out your text in the document, commands empower you to format/ insert/ handle this text in multiple ways.
-
Command Groups:
Commands are grouped together based on their functionality for easy access. For instance, basic text-formatting commands are put together in one group, paragraph formatting commands in another group, and so on. In some cases, you’ll see a tiny arrow at the bottom of the group. You can click on it to open up additional commands and options related to the group.
In addition, here are some special commands available on the Ribbon:
- The caret symbol (^) at the top right-hand side corner of the Ribbon can be used to hide/show the command/groups. This is useful when you want to review your word document in a larger screen space without distractions.
- The question symbol in blue (?) brings up Microsoft Word features Help utility. (Alternately, you can use the F1 keyboard shortcut to bring this up.) You can either browse through existing categories or use the search text box to type out what you want to find.
You can customize this ribbon at any time: to add new commands to an existing group, create a new tab altogether with your favorite commands, etc. To do this, right-click on any part of the ribbon and choose “Customize the Ribbon….”
You will become familiar with the File, Home, Page Layout and View tabs through the rest of this post, as these are most commonly used for editing word documents.
-
The FILE Tab
When you click on the File Tab, you are immediately taken to the “Backstage View”, containing all the tiny details about your document. We’ll keep it simple in this basic tutorial and introduce you to the frequently used file-related commands.
-
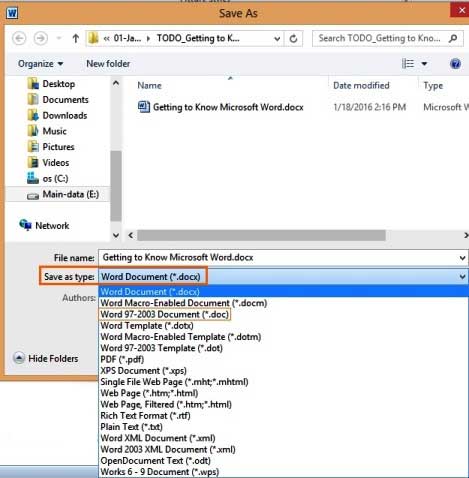
Save and Save As:
This is possibly the first command you should use when you type some text. It enables you to save your document on the hard disk as a .docx file (by default). Take note of the type of file here. If you wish to open your word document with older versions of Microsoft Word features, you will need to explicitly choose a backwards-compatible file type. You can additionally choose to save your file as a PDF file, self-contained web file, text file (.txt or .rtf, formatting changes are lost), etc.
-
New, Open, Close:
Names are self-explanatory as they enable you to open/close or create a new document/ blog post or template.
-
Recent:
This stores the list of recently accessed documents and folders so you can quickly open the last document you worked on.
-
Options:
This dialog box houses the master preferences for your document and controls your display and editing options. Here, the default setup will nicely do for most documents, so you will need to alter this only on rare occasions. But do explore each dialogue when you’re more familiar, for an advanced understanding of Office Word.
-
The HOME Tab
The Home Tab is perhaps the most commonly used Tab in Microsoft Word features. And it looks like this:
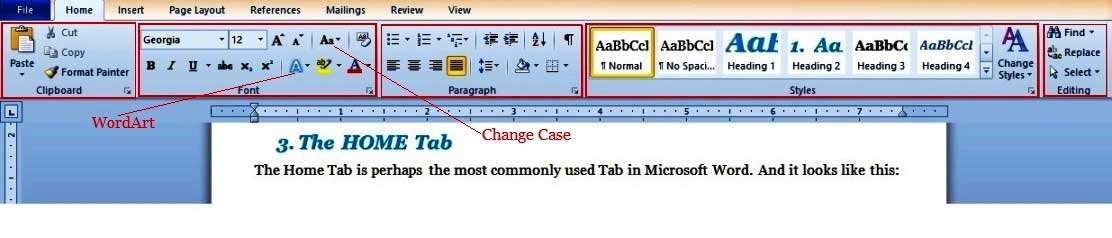
As you can see, this contains 5 formatting command groups. And there lies its most significant utility: formatting. You see, this is where Microsoft Word features wins heads over any other Word processing software tool (including Microsoft’s own WordPad), as it provides users with a host of complex formatting features all available with a mouse-click or two.
Before we dig in deeper, we suggest you play around a bit with a document. Type some sentences and be prepared to edit and format them to your heart’s content. Once you’re done, the Command groups in the Home tab can be used as below.
-
Clipboard group:
This has the mandatory copy and pastes commands. The paste command has additional options (click on the bottom-arrow symbol below) to paste formatted/ unformatted text/pictures. Also, spend time with Office Word’s special command, “Format Painter,” which allows you to paste formatting across text blocks. Try it now to experience its magic.
- Select a portion of text from anywhere in your document (using the Shift Key).
- Use the Keyboard shortcut (Control + B + I). This will make the selected text bold and italicized. Copy this selected text using the (Control + C); this copies everything in Word, text, and formatting.
- Now, select some other portion of (plain) text in your document and click on the Format Painter command. And voila, the formatting (alone) gets copied!
This is especially useful when formatting long documents with complex styles; you don’t have to repeat your special formatting needs across pages of a document. Capture them through the copy command and then “paste” them all over using the Format Painter command!
-
Font group:
Here, we’ll tell you to highlight text in your document and have a free play with this group. (There’s no better way to become familiar with Microsoft Word introduction font options). You can set the font typeface for text (based on your system’s inbuilt fonts), and change its look (includes size, bold, italics, underline, superscript, subscript, color highlight, etc.) and use Microsoft Word introduction Art to add instant drama to your text. Also, explore the command that changes the casing of selected text with just one click, to uppercase, lowercase, sentence case, etc. (refer pic above for details).
Microsoft Word introduction also provides for more advanced options through a single right-click of your mouse. Again, try this right now as you select some text, right-click, and choose the “Font…” option.
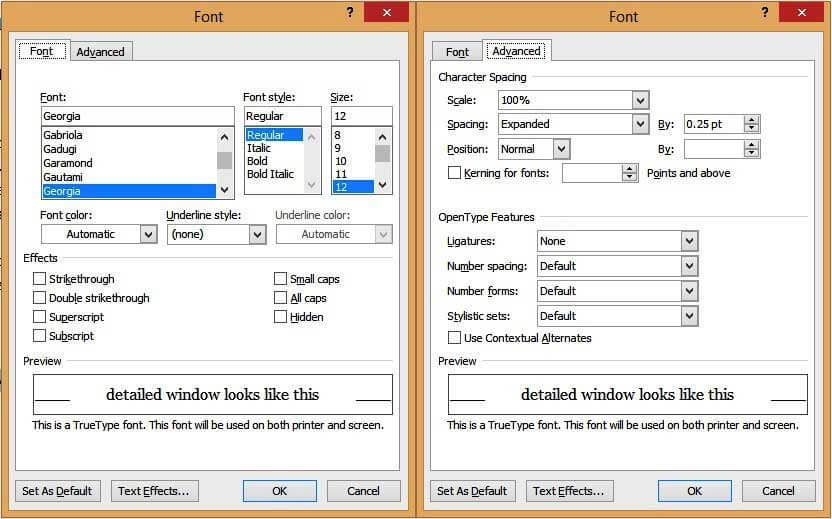
This window has advanced options that give you greater control of your text. Of special interest are the “Text Effects” and “Advanced” tabs to capture Microsoft Word introduction coveted formatting features. You can add shadows and reflections to your text, give it an outer glow, change the spacing between letters, and a lot more.
-
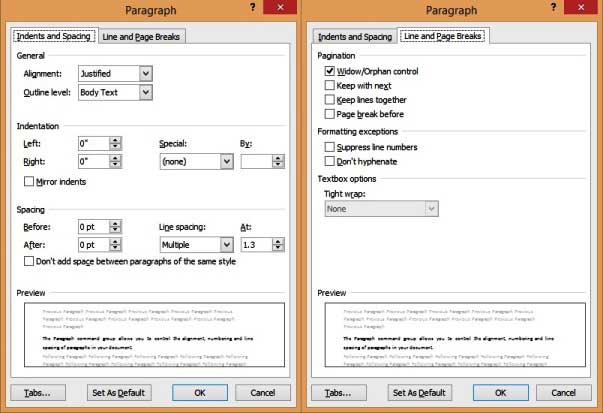
Paragraph:
The Paragraph command group allows you to control the alignment, numbering and line spacing of paragraphs in your document.
Do take note of:
- Text alignment: This determines how your text looks on your page and is left-aligned by default.
- Line spacing: This is the space between lines and is a single line spaced by default.
- Line and Page Breaks: This determines how a Style spawns across pages. For instance, if you check the “Widow/Orphan control” option, then when text with a Heading style falls towards the end of a page, it will automatically be bumped to the top of the next page.
-
Styles:
Styles are formatting templates used within a document. For instance, you’ll notice that all the Major Headings in this document are in blue, Georgia font size 16, bold and italicized, and have a light shadow. Likewise, all Minor Headings are in Italics, Georgia size 14. Now imagine that you want to consistently capture these format “styles” through a large text document (say 100 pages). Even with the Format-Painter command, it’s a lot of work. It’s also prone to manual error. With styles, you can do this with minimal effort.
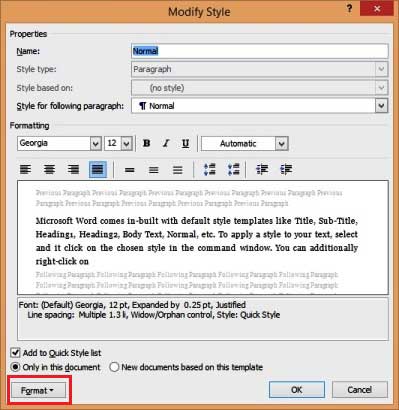
Microsoft Word introduction comes in-built with default style templates like Title, Sub-Title, Heading1, Heading2, Body Text, Normal, etc. To apply a style to your text, select text and click on the chosen style in the command window. You can additionally right-click on the style and “modify” it as desired. You can alter the font settings, text effects, paragraph settings (explained below) and other options in your document, all through the “Format tab” of the Style edit window.
Word also allows you to add your own custom styles. For this:
- Select formatted text.
- Right-click and select Styles…
- Choose the option, “Save Selection as a New Click Style”.
- Name your custom style.
However, custom styles are limited within the document in use (not available as a template in other documents).
-
Editing:
The final command group available in the Home Tab is the Editing tab. Like any good word processor, Microsoft Word introduction allows you to easily select, find and find-and-replace text blocks across your document. Of this, you can bring up the much-used find-replace dialog box with the Keyboard shortcut (Control + H), and it looks like this:
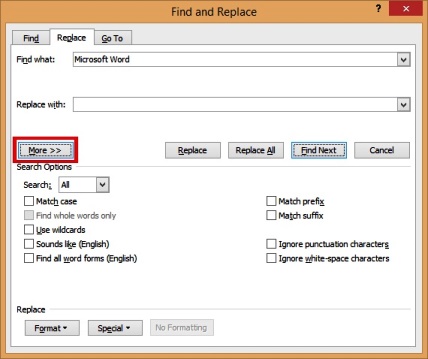
Do remember to click on the “More>>” button to bring up additional options. You can further choose the “Format” and “Special” boxes to find text based on specific formatting criteria.
So that was the Home Tab in a nutshell. Phew! But as you are sure to have noticed, more than 50% of your most used commands lie in this Tab. Explore this thoroughly until you’re comfortable with it, as this will determine your success with the Microsoft Word introduction.
-
The Page Layout Tab
This tab contains a host of command (groups) to control the behavior of each page in your document. And it roughly looks like this:

We’re going to keep it simple here and discuss (only) the Page Setup command group as this houses 2 commands you will most likely need to play with.
-
Size:
By default, a Microsoft Word features document is set to a letter’s size (8.5” X 11”). You can change this to A4, A3, Executive or other standard sizes or even define a custom size. Changes will apply to the whole document.
-
Orientation:
By default, this is set to “Portrait”; you can alternatively set it to Landscape. Again, the orientation applies to the whole document by default. (You can alter this by setting specific “Section Breaks”, but this is outside the scope of this Beginner’s guide).
-
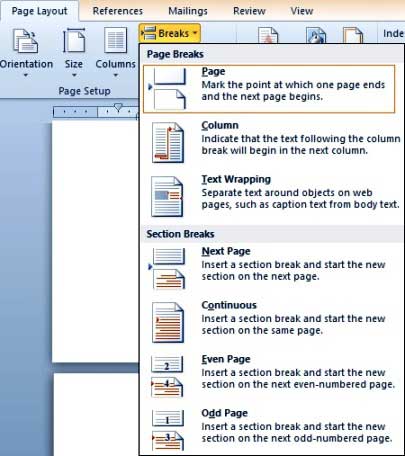
Breaks:
The most commonly used “Break” in a Microsoft Word features document is a Page Beak. When you insert a page break, the following text is bumped to a new page; This is immensely useful when you want to start new chapters/ headings on a fresh page.
-
The View Tab
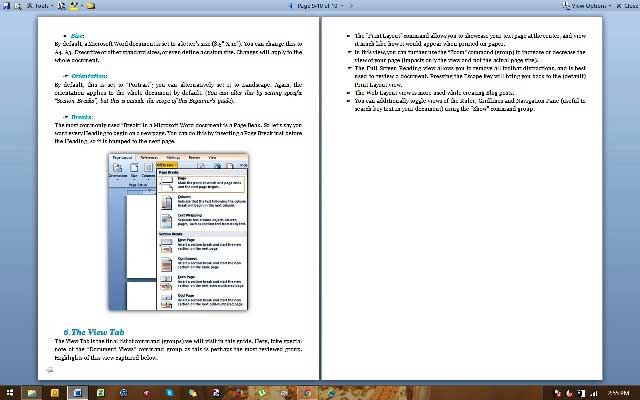
The View Tab is the final list of command (groups) we will visit in this guide. Here, take special note of the “Document Views” command group, as this is perhaps the most reviewed group.

Highlights of this view are captured below.
- The “Print Layout” command allows you to showcase your text page at the center and view it much like how it would appear when printed on paper.
- In this view, you can further use the “Zoom” command (group) to increase or decrease the size of your page (impacts only the view and not the actual page size).
- The Full-Screen Reading view allows you to remove all toolbar distractions and is best used to review a document. Pressing the Escape key will bring you back to the (default) Print Layout view.
- The Web Layout view is typically used to review Blog posts.
- You can additionally toggle views of the Ruler, Gridlines and Navigation Pane (useful to search key text in your document) using the “Show” command group.
And that marks the end of our Beginner’s guide to knowing Microsoft Word features!
-
Next Steps
As a beginner, your tryst with Word is sure to open up endless possibilities, for better formatting, for a cleaner layout and alignment, for an overall superior experience with any digital word processing tool. We encourage you to actively explore Microsoft word features software on your own, even as you look to more advanced micro-tutorials for guidance. Your efforts will be well worth it!
Recommended Articles
Here are some articles that will help you to get more detail about the Microsoft Word is arguably the most used digital word processor so just go through the link.
- Powerful Features of Microsoft Access
- Excel Skills
- Pivot Chart in Excel
- How to Improve your Microsoft Excel Skills?
One of the most widely used programs of Microsoft Office suite, MS Word is a word processor developed by Microsoft.
An introduction to MS Word, its features and its uses, have all been discussed in detail, in this article. Also, a few sample questions based on this MS Office program have been given further below for the reference of candidates preparing for competitive exams.
To know further about the MS Office suite and the various programs included in it, visit the linked article.
Since MS Word is one of the most used programs of the Office Suite, some basic information regarding its creation and development has been given below:
- Charles Simonyi, a developer and Richard Brodie, a software engineer, were the two creators of MS Word
- This program was initially named “Multi-Tool Word” but later, was renamed as MS Word
- It was introduced in 1983
- Word for Windows is available standalone or as a part of MS Office suite
- MS Word for Mac was introduced by Microsoft as Word 1.0 in 1985
- The extension for any word file is “.doc or .docx.”
Moving forward, details about the features and applications of Word have been discussed. To read more about the other Computer Knowledge topics, check the links given below:

Let us first understand some basic aspects of Microsoft Word.
What is MS Word?
Used to make professional-quality documents, letters, reports, etc., MS Word is a word processor developed by Microsoft. It has advanced features which allow you to format and edit your files and documents in the best possible way.
Where to find MS Word on your personal computer?
Follow these simple steps to open MS Word on your personal computer:
Start → All Programs → MS Office → MS Word.
What are the uses of MS Word?
MS Word enables users to do write-ups, create documents, resumes, contracts, etc. This is one of the most commonly used programs under the Office suite.
How to create an MS Word document?
To create an MS Word doc, follow the steps mentioned above to open Microsoft Word. Then once the program is open, click on “File” followed by “New”. This opens a new doc where something new can be created.
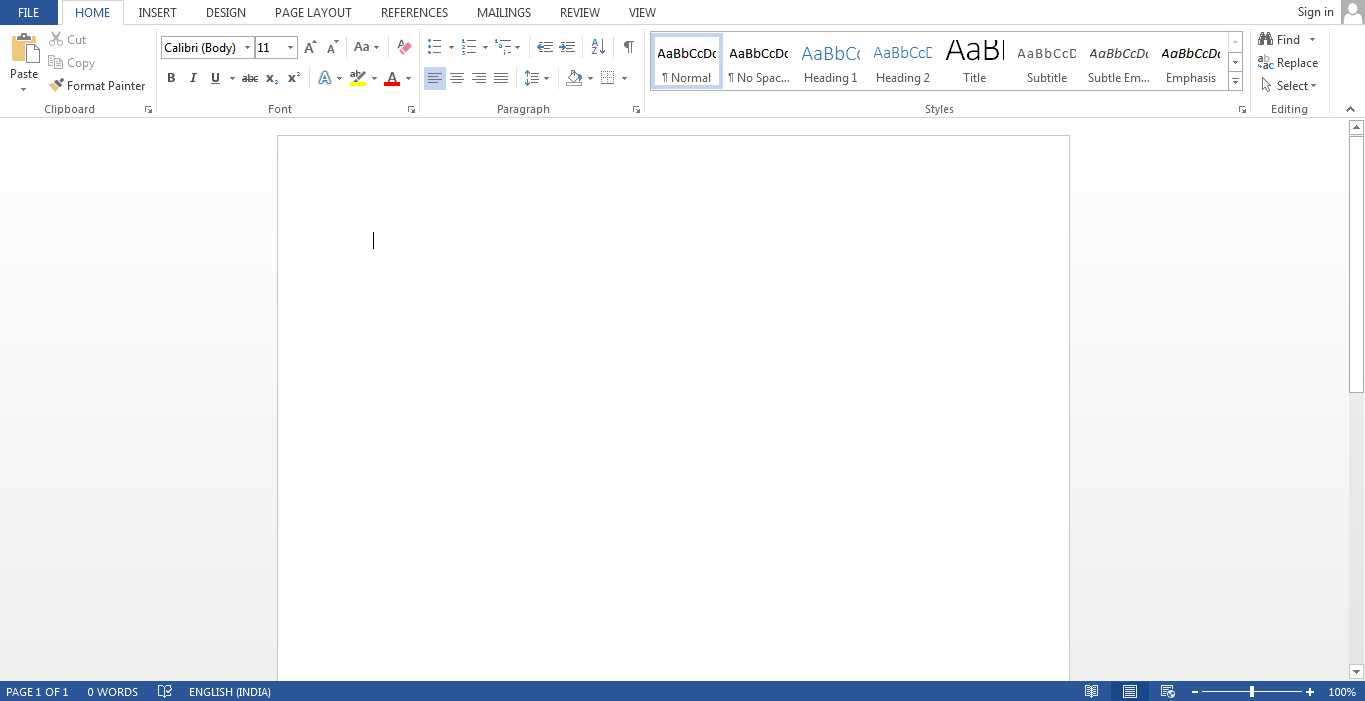
Since it is used by people of all age groups, in schools, in colleges and for official purposes, having proper knowledge of Microsoft Word is a must. The preview of the MS Doc file once it is opened is given below:
Also, from a competitive exam perspective, one must be well aware of this topic. To get the list of all major Government exams conducted in the country, aspirants can visit the linked article.
For a better understanding of how MS Word works and the features that are included in it, you can refer to the video given below and analyse its functioning easily.
Features of MS Word
Now let us read more about the features and components of an MS Word doc file in detail.
The image given below shows the different elements and categories which are available in MS Word doc:

- Home
This has options like font colour, font size, font style, alignment, bullets, line spacing, etc. All the basic elements which one may need to edit their document is available under the Home option.
- Insert
Tables, shapes, images, charts, graphs, header, footer, page number, etc. can all be entered in the document. They are included in the “Insert” category.
- Design
The template or the design in which you want your document to be created can be selected under the Design tab. Choosing an appropriate tab will enhance the appearance of your document.
- Page Layout
Under the Page Layout tab comes options like margins, orientation, columns, lines, indentation, spacing, etc.
- References
This tab is the most useful for those who are creating a thesis or writing books or lengthy documents. Options like citation, footnote, table of contents, caption, bibliography, etc. can be found under this tab.
- Review
Spell check, grammar, Thesaurus, word count, language, translation, comments, etc. can all be tracked under the review tab. This acts as an advantage for those who get their documents reviewed on MS Word.
Apart from all the above-mentioned features, the page can be set in different views and layouts, which can be added and optimised using the View tab on the Word document. Margins and scales are also available for the benefit of the users.
When compared with MS PowerPoint, MS Word is more of reading while PPT is more of visual and graphical representation of data.
To know more about Microsoft Windows, visit the linked article.
For Govt exam aspirants, given below are links to the other subjects which are a part of the competitive exam syllabus:
Uses of MS Word
Given below are the different fields in which MS Word is used and simplifies the work of an individual:
- In Education: It is considered as one of the simplest tools which can be used by both teachers and students. Creating notes is easier using MS Word as they can be made more interactive by adding shapes and images. It is also convenient to make assignments on MS Word and submitting them online
- In Workplace: Submitting letters, bills, creating reports, letterheads, sample documents, can all easily be done using MS Word
- Creating & Updating Resume: One of the best tools to create your resumes and is easy to edit and make changes in it as per your experience
- For Authors: Since separate options are available for bibliography, table of contents, etc., it is the best tool which can be used by authors for writing books and adjusting it as per the layout and alignment of your choice
Also, creating a Doc file and converting it into PDF is a more suitable option, so it is highly recommended.
For competitive exam aspirants, given below are links which may help you prepare yourself for the upcoming exams:
Sample MS Word Question and Answers
Some sample questions and answers with the competitive exam perspective have been given below. Refer to these for assistance.
Q 1. How can you open the column dialogue box?
- Alt+O+C
- Alt+A+C
- Alt+R+C
- Alt+C
- Alt+ctrl+C
Answer: (1) Alt+O+C
Q 2. Which is the default alignment in MS Word?
- Right
- Centre
- Left
- Justify
- None of the Above
Answer: (3) Left
Q 3. “Ctrl + =” is used for _________
- Change Alignment
- Subscript
- Superscript
- Change font to Bold
- None of the above
Answer: (2) Subscript
Q 4. A combination of which shortcut keys to use to split a table?
- Ctrl+shift+enter
- Ctrl+enter
- Shift+enter
- ctrl+alt+S
- alt+S
Answer: (1) Ctrl+shift+enter
Furthermore, to get the best tips to ace the upcoming Government exams, candidates can check the Preparation Strategy for Competitive Exams at the linked article.
Get the best study material and the latest exam information at BYJU’S.

Frequently Asked Questions on Microsoft Word
Q 1. Which formatting features can be added to the MS Word document?
Ans. The common formatting features which are available on MS Word include:
-
- Font Style, Size and Colour</li
- Header and Footer
- Insert Images
- Add tables and bulleted lists
- Set a page layout
- Add Word Art
The basic feature of why people choose MS Word over any other text editor is that it makes the document more visually interactive and appealing.
Q 2. What is Microsoft Word used for??
Ans. MS Word can also help you organize and write documents more efficiently. When the document is created in Word, the user can choose to start from a blank document or let a template do much of the work for the user. From then on, the basic steps in creating and sharing documents are the same.
Q 3. What are the basic functions of MS Word?
Ans. Given below are the basic functions of Microsoft Word:
- Creating text documents
- Editing and Formatting the existing documents
- Making a text document interactive with different features and tools
- Graphical documents, comprising images
- Used by Authors and Researchers
- Detect grammatical errors in a text document
Q 4. What is the extension of an MS Word file?
Ans. An MS Word file is always saved with the extension of .doc or .docx.
.
Q 5. What are the five basic fields of application for MS Word?
Ans. Using Microsoft Word, one can create resumes, reports, and write letters. Authors can use it to write their books and researchers for writing a thesis. Apart from this, it can be used as a simple text editor.
What is Word?

Overview
With Word on your PC, Mac, or mobile device, you can:
-
Create and format your document with Themes.
-
Review work with Track Changes.
-
Polish your words with proofing tools like Editor.
-
Save to OneDrive, to get your documents from your computer, tablet, or phone.
-
Share your work to chat, comment, and collaborate with others, wherever they are.
Want more?
What’s new in Word for Windows
Word Quick Start
Discover more Word training at LinkedIn Learning