on
June 15, 2021, 9:12 AM PDT
How to add an appendix to a table of contents in Microsoft Word
When creating an appendix isn’t as cut and dried as the default table of contents supports, try mapping!
We may be compensated by vendors who appear on this page through methods such as affiliate links or sponsored partnerships. This may influence how and where their products appear on our site, but vendors cannot pay to influence the content of our reviews. For more info, visit our Terms of Use page.

An appendix should probably be included in a document’s table of contents. In Microsoft Word, if you use the same level 1 heading for your section headings, including the appendix, you’ll have no problem. However, sometimes that’s not possible because the appendix heading uses a different format. Initially, you might be a bit stymied by that requirement, but it’s not difficult at all. In this article, I’ll show you how to include an appendix in the table of contents when you can’t use the same built-in level heading as other sections.
SEE: 83 Excel tips every user should master (TechRepublic)
I’m using Microsoft 365 on a Windows 10 64-bit system, but you can use earlier versions. You can work with your own data or download the demonstration .docx and .doc files. Word Online will display a table of contents, but you can’t make the modifications shown in this article.
Why is the appendix in Word a problem?
If a document includes an appendix and you want the appendix in the table of contents, the simplest solution is to apply a built-in heading style to all section headings. Word includes Heading 1, Heading 2, and Heading 3 in the table of contents by default. For example, if you use Heading 1 for all the section headings, you could also use Heading 1 for the appendix heading.
But what happens when you must apply a different set of formats to the appendix heading? You might try direct formatting, or you might modify Heading 4, Heading 5, and so on. Let’s try both of these possible solutions and see what happens.
How to apply direct formatting
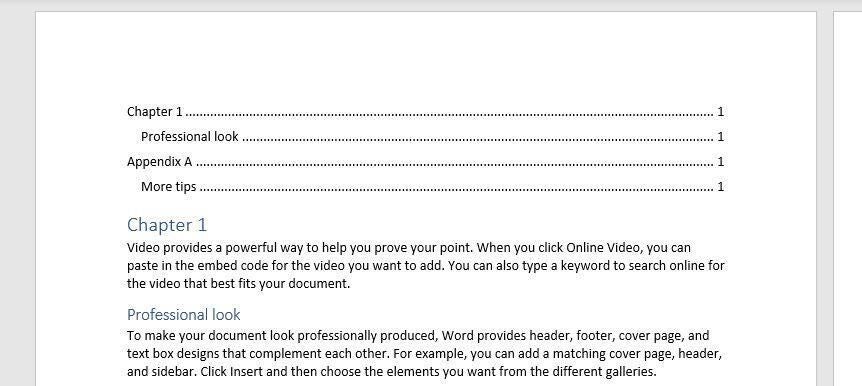
The document shown in Figure A has only two pages: Chapter 1 and Appendix. Both headings use the built-in heading style Heading 1. Each section has a second level that uses Heading 2. Now, let’s suppose you want the appendix heading to also be italicized: Select the appendix heading on page 2, Appendix, and apply italics.
Figure A

Now, let’s add a simple of table of contents, as follows:
- Move the insertion point to the beginning of page 1, before the Chapter 1 heading.
- Click the References tab.
- In the Table of Contents group, click Table of Contents.
- Choose the first option to include a simple table of contents, as shown in Figure B.
Figure B

The table of contents has its own built-in style. However, whether you want it or not, the table of contents displays the italics because the table of contents inherits direct formatting. Most likely, you’ll want all same-level headings to appear the same in the table of contents.
SEE: Windows 10: Lists of vocal commands for speech recognition and dictation (free PDF) (TechRepublic)
How to use a lower-level heading to add the appendix entry in Word
As mentioned earlier, Word includes Heading 1, Heading 2, and Heading 3 headings in the table of contents by default. This document isn’t using Heading 3, so let’s apply Modify Heading 3 to include italics and then apply it to the appendix heading as follows:
- First, clear the formatting from the appendix heading if you applied italics in the last section. Select it and apply Normal in the Styles gallery (on the Home tab).
- With Appendix still selected, click Heading 3 in the Styles gallery.
- Right-click the thumbnail in the gallery and choose Modify (Figure C).
- In the resulting dialog, click the Italics icon and click OK. You could update other formats, but let’s keep it simple for now.
Figure C

When you return to the document, Appendix is italicized. Now let’s see how the table of contents displays this change. Click inside the table of contents at the top of page 1, click the Update Table tab and when prompted, click the Update Entire Table option shown in Figure D. As you can see in Figure E, the Appendix heading is no longer italicized, but it’s in a level three position! Well, we chose Heading 3, so we should’ve expected that, correct? The problem is, you’ll want the Appendix heading on the same level as Chapter 1 because structurally, the are on the same level.
Figure D
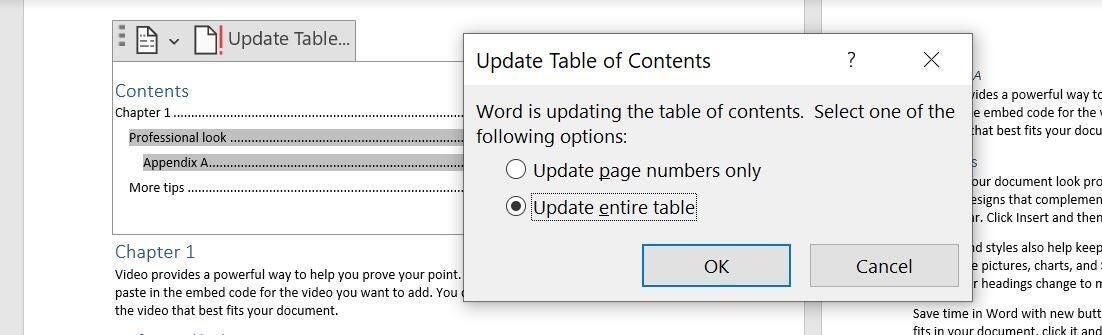
Figure E

If you thought either of these solutions might work, don’t be troubled. They seem reasonable off the top of your head.
How to solve the problem in Word
The solution is to modify a lower-level heading as you did in the last example, and then map it to the table of contents. If the term mapping is new to you, don’t worry.
At this point, we’re starting over, so remove the existing table of contents and apply the Normal style to Appendix (the heading on page 2). To begin, do the following:
- Select Appendix (the heading on page 2).
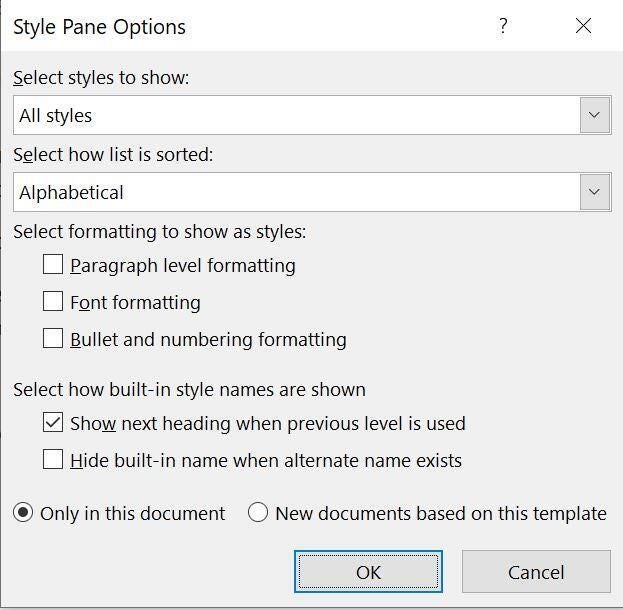
- Choose Heading 6 from the Styles gallery, if available. Right-click the thumbnail and choose Modify. If Heading 6 isn’t available, and it probably isn’t, click the Styles group More button, and click Options at the bottom of the Styles pane. From the Select Styles to Show dropdown, choose All Styles. From the Select How List is Sorted dropdown, choose Alphabetical (Figure F). Find Heading 6 is the Styles pane, right-click it, and choose Modify.
- In the resulting dialog, click the Italics icon and click OK. You could update other formats to make it matching Heading 1, but let’s keep it simple for now.
Figure F
I chose Heading 6 because it’s unlikely to be used for other headings in such a simple document. In addition, you need to know how to find a style that’s not in the Styles pane.
Appendix at the top of page 2 now uses Heading 6, but we already know that a default table of contents won’t include Heading 6 text. To include that level, we must map it using a custom table of contents as follows:
- Move the insertion point to the beginning of the document, click the References tab, and then click the Table of Contents option in the Table of Contents group. At this point, it’s the same as the built-in table of contents you chose earlier.
- Instead of choosing the first option, choose Custom Table of Contents. Take a minute to look around at the different settings. The preview windows show Heading 1, Heading 2, and Heading 3—the headings the table of contents includes by default.
- Click Options.
- Right now, you can see that the three headings are mapped as you might expect: Heading 1, 1; Heading 2, 2; and Heading 3, 3. Map Heading 6 in the resulting window: Thumb down to Heading 6 and enter 1, as shown in Figure G. Why 1? Because structurally, Appendix should be on the same level as Chapter 1, which is Heading 1, level 1.
- Click OK twice to return to the document.
Figure G
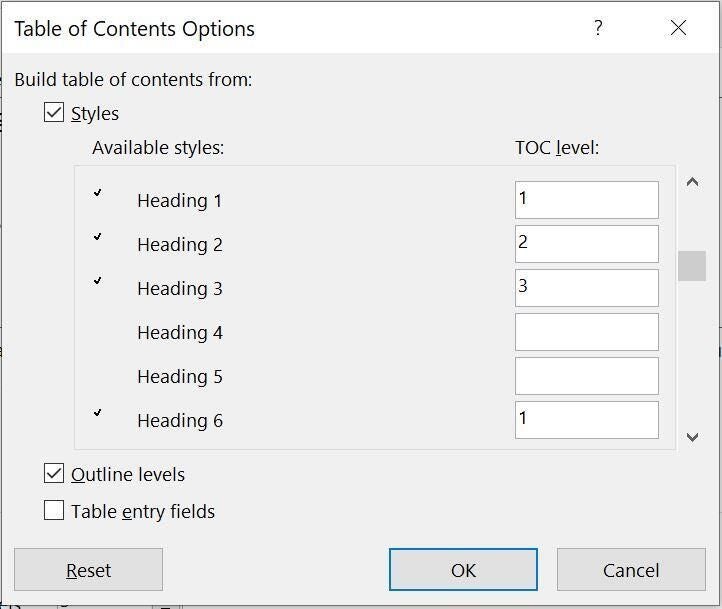
Figure H shows the custom table of contents. Appendix is a level 1 heading, and it isn’t italicized, even though the heading within the document is.
Figure H
Word’s table of contents feature does a great job most of the time. However, when you have special requirements such as those described in this article, you might need to turn the custom options. Knowing what you can do makes all the difference.
Also See
-
How to make fewer mistakes and work more efficiently using predictive text in Microsoft 365
(TechRepublic) -
How to use the many text wrapping options in Microsoft Word
(TechRepublic) -
Microsoft 365: A cheat sheet
(TechRepublic) -
Zoom vs. Microsoft Teams, Google Meet, Cisco WebEx and Skype: Choosing the right video-conferencing apps for you (free PDF)
(TechRepublic) -
Checklist: Securing Windows 10 systems
(TechRepublic Premium) -
Everything you need to know about the Microsoft Exchange Server hack
(ZDNet) -
Must-read coverage: Windows 10
(TechRepublic on Flipboard)
-
Microsoft
-
Software
Word 2013 Office for business Word 2010 Word 2007 More…Less
Summary
This step-by-step article describes several different numbering systems that you can use in documents that contain both chapter headings and appendix headings.
Microsoft Word does not support multiple heading-numbering schemes in a single document or master document. When you work with documents that contain both chapter headings and appendix headings, the headings must not use the same heading style level.
Example 1: Chapter Headings and Appendix Headings
When you design a document that contains both chapter headings and appendix headings, you can use different heading style levels to apply the different number formatting to each section. For example, to define a chapter and appendix heading-numbering scheme that resembles the following
-
Chapter One: This is the title to the first chapter.
-
Chapter Two: This is the title to the second chapter.
-
Appendix A: This is the title to the first appendix.
-
Appendix B: This is the title to the second appendix.
Follow these steps:
-
On the Format menu, click Bullets and Numbering, and then click the Outline Numbered tab.
Note: In Microsoft Office Word 2007 and Word 2010, click Multilevel List on the Home tab.
-
Select one of the styles, for example, Chapter 1 (the last style choice). Click Customize.
Note: In Word 2007 and Word 2010, click Define New Multilevel List.
-
In Level, click 7.
-
In the Number format field, type «Appendix», and then press the spacebar to insert a space after the word «Appendix».
-
In Number style, click A, B, C, ….
Note: In the Number format field, Appendix A should be shown, with the «A» highlighted.
-
In the Number format field, type a blank space after «Appendix A».
-
Click the More button.
-
In Link level to style, click Heading 7, and then click OK.
You can now apply Heading 1 to all paragraphs that are chapter styles and Heading 7 to all paragraphs that are appendix titles.
Note: Heading styles are predefined with certain paragraph and character formatting attributes. You may have to modify these styles by using the Style command on the Formatmenu to obtain the intended appearance.
Example 2: Inserting Page Numbers for Chapters and Appendixes
To insert page numbers of the style «1-1, A-1» that work with these heading styles, follow these steps:
-
Make sure that the document contains a section break of some type. The section break type that you want is typically Next Page. Use the section break to separate the main document area from the appendix area. If there is not a section break there, move your insertion point to a blank area above your appendix, and then follow these steps:
-
On the Insert menu, click Break.
-
In the Break popup window, click Next Page under Section break types, and then click OK.
Note: In Word 2007 and Word 2010, click Page Break on the Insert tab.
-
-
Format page numbers to include chapter numbering. To do this, follow these steps:
-
Move the insertion point to the page that contains the first chapter title.
-
On the Insert menu, click Page Numbers.
Note: In Word 2007 and Word 2010, click Page Number on the Insert tab.
-
Select the intended location for the page number by using the options provided in the Page Numbers popup window. Click the Format button.
Note: In Word 2007 and Word 2010, click Format Page Numbers.
-
Click to check the Include chapter number box.
-
In Chapter starts with style, click Heading 1, and then click OK.
-
Click OK in the Page Numbers dialog box.
-
-
To format page numbers to include appendix numbering, follow these steps:
-
Move the insertion point to the page that contains the first appendix title.
-
On the Insert menu, click Page Numbers.
Note: In Word 2007 and Word 2010, click Page Number on the Insert tab.
-
Select the intended location for the page number by using the options provided in the Page Numbers popup window. Click the Format button.
Note: In Word 2007 and Word 2010, click Format Page Numbers.
-
Check the Include chapter number box.
-
In Chapter starts with style click Heading 7.
-
In the Page numbering box, click Start at, and then click 1, so that each chapter or section begins with the number 1.
-
Click OK twice to return to your document.
-
Example 3: Building a Customized Table of Contents
To build a table of contents that includes both the chapters and the appendixes, and which also uses the defined page-numbering style, follow these steps:
-
Place the insertion point where you want the table of contents.
-
On the Insert menu, point to Reference, and then click Index and Tables.
Note: In Word 2007 and Word 2010, click Table of Contents on the References tab, and then click Insert Table of Contents.
-
Click the Table of Contents tab, then click the Options button.
-
In the TOC level boxes, type 1 in the text box to the right of Heading 7.
-
This configures Word to consider Heading 7 to be a Level 1 entry in the table of contents.
-
Click OK.
-
Click OK in the Index and Tables popup window.
Need more help?
Want more options?
Explore subscription benefits, browse training courses, learn how to secure your device, and more.
Communities help you ask and answer questions, give feedback, and hear from experts with rich knowledge.
Many years ago, I’d added a separate list of appendices in the front matter containing the table of contents (TOC), list of figures, list of tables etc. I’d forgotten how to do it, because these days almost every document I work on incorporates the appendix headings into the main TOC. However, I needed to do this for a new client, who had appendix placeholders in the document with no page numbering (the PDF’d appendices would be inserted later, so they only needed a heading page). Adding the appendix headings to the main TOC wasn’t an option because the main TOC has page numbers and you can’t tell some parts of the TOC to not have page numbers—you either have them for everything or for nothing, not for some and not others. So these appendix headings needed to go into a separate updateable and clickable list.
NOTE: You MUST be using a uniquely named style for your appendix headings, not Heading 1, etc. In the example below, the heading style for these level 1 appendix headings is ‘Appendix Heading’.
To add a new list of appendices to the front matter:
- Make sure you know the name of the style you use for the appendix headings.
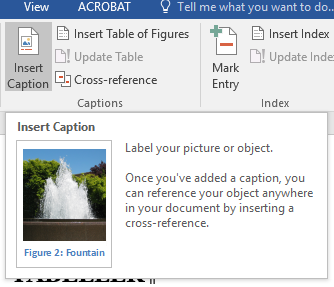
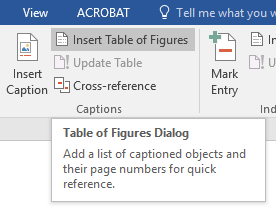
- Go to the References tab > Captions group.
- Click Insert Table of Figures.
- On the Table of Figures dialog box, click Options.
- Select the style you use for the appendix headings from the styles list. In this example, the style is called Appendix Heading.
- Check the Style checkbox.

- Click OK to close the Table of Figures Options dialog box. (Ignore the web preview panel—it won’t show what you’ve chosen.)
- Optional: Clear the Show page numbers checkbox if you don’t want page numbers; leave it selected if you do.

- Click OK.
- If you already have a list of figures etc., you’ll be asked if you want to replace it. Click No.
- Your new list of appendices will be added to the front matter section.


To update your list:
- Click anywhere inside the list of appendices.
- Either:
- Right-click and select Update Field, or
- Go to the References tab > Captions group, then click Update Table.
- If asked, select the option to update the entire table.
Appendices — Word 2010
Appendices should be labeled in alphabetical sequence, for example, Appendix A, Appendix B, and so on. Use style Heading 6 for the main heading in appendices and style Headings 7, 8, and 9 for subheadings within appendices.
Table and figure captions within appendices
For captions in an appendix, Word uses a continuation of the chapter numbering scheme (5-1, 5-2, etc.) instead of the A-1, A-2, A-3 format that’s required. To correct this, follow these steps:
This order in which these steps are completed is extremely sensitive. Start with the first figure/table in Appendix A and complete all steps in one operation – don’t stop until you’ve edited all captions, updated the Lists of Tables and List of Figures, and saved your file.
- Within your appendix, place your cursor at the beginning of the first figure or table caption to be revised.
- If the figure or caption number is not contained within a gray field, follow the steps described in the Captions for Figures and Tables section.
- Press Alt F9 (hold down the Alt key and press F9 key). You should now see the field codes underlying the number. For example:
Table {STYLEREF 1 s }—{SEQ Table * ARABIC s 1 }
- Replace each “1” with “6” as shown below. (This operation tells Word to apply the Heading 6 style, which is configured to use the A, B, C format.)
Table {STYLEREF 6 s }—{SEQ Table * ARABIC s 6 }
- Click in the STYLEREF field and right-click Update Field in the displayed menu. Repeat this for the SEQ field.
- Repeat steps 4-5 for all figures and tables in all your appendices.
- Finally, press Alt F9 to turn off the field codes.
- After all appendix captions have been edited, update your List of Tables and/or List of Figures. See the Table of Contents , List of Figures, and List of Tables section.
- Save your file!
How to make a Table of Figures in Microsoft Word.
By Michael Barden
In last week’s issue, we looked at how to make a table of contents.
This week, we’ll look at the similar concept of how to make a table of figures. That’s a list of the images, graphs, tables or equations in a document.
In Word a ‘figure’ can mean anything you like. Normally it’s the obvious things like pictures and graphs but it can also mean tables, equations or (as we’ll see) any place in the document you put a special field code.
Like the table of contents, you can have page references or links to each figure.
A Table of Figures can be useful for creating a proper appendix of figures or tables within more formal documentation. It can be handy to have a list of all the images used in a document either for publication or just for ‘in-house’ use during writing.
Since ‘Figures’ can mean anything in a document you can make reference “Tables of ” beyond anything intended by Word’s developers.
ADDING CAPTIONS TO FIGURES
To create a table of figures, you must first add captions beneath the figures in your document. These captions are usually in the format of “Figure #: Short Description of Figure”, although they can be tailored to suit more specific needs.
To manually add a caption to a figure, first select the item under which you want to create the caption. Navigate to Insert | Reference | Caption to bring up the “Caption” dialog box.

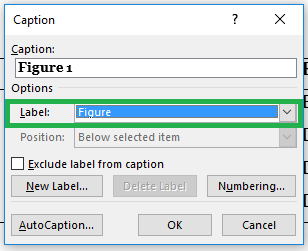
The “Label” drop-down list effectively groups the type of figure the caption belongs to, and has the following preset options: Figure, Equation, and Table. The ‘Label’ is used to define the type of table it will belong in.
For example ‘Figure 1’ will appear in a Table of Figures while a label ‘Equation 1’ will be in a ‘Table of Equations’.
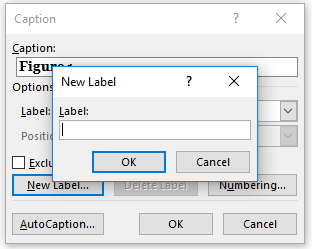
The “New Label” button allows you to replace the currently selected “Label” with a label of your choice. You can remove this custom label by clicking the “Delete Label” button. Just some ideas of additional labels are: Recipe, Diagram, Illustration, Chart or Quiz.
The “Numbering” button brings up a dialog that allows you to format the numbering system to be used on the label. These formats include the usual Word options.
The “Include chapter number” checkbox allows you even more control of the numbering format. It treats headings of a particular heading style (e.g. Heading 1) as the start of a new chapter, and the caption numbers increment accordingly. The first figure in the second chapter of a document using an ABC numbering format would appear as: Figure 2-A.
The “AutoCaption” button allows you to set up preferences that will automatically create a default caption when a particular type of object is inserted into the document. Selecting the “Microsoft Word Picture” or “Microsoft Word Table” options in this dialog would prevent you from having to manually create labels every time a new object of these types was inserted.
MAKING A SIMPLE TABLE OF FIGURES
How you have some ‘figures’ in the document you can make a reference table of them.
To create a simple table of figures, you must first click where you want the table to appear (most likely as an appendix or close to your table of contents). Navigate to Insert | Reference | Index and Tables to bring up the “Index and Tables” dialog then choose the “Table of Figures” tab. The options are similar to the TOC options discussed in the last issue.

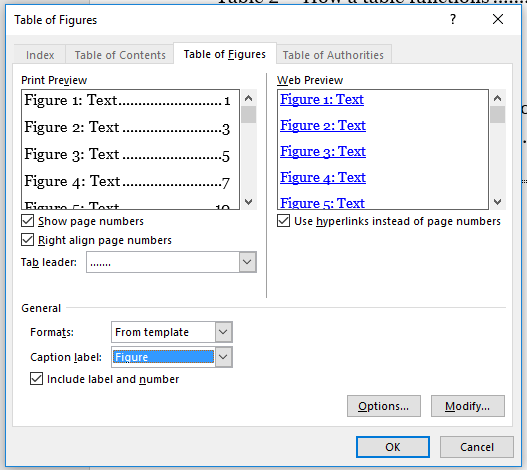
To start off, take a look at how the table of figures will appear in the “Print Preview” and “Web Preview” panes. By default, page numbers are displayed and aligned to the right, although you can change this.
The “Caption label” drop down list allows you to select which type of caption (a figure, equation, table or user-defined label) will appear in this table of figures. You can only select one grouping of caption labels per table of figures. Captions relating to images and tables for example, will not normally both appear within the same table of figures (although this can be done as we’ll see below). Instead, they can be placed in separate table of figures, for images and another for tables, thereby keeping the grouping of the image and table entries separate.
The “Formats” drop-down list directly affects the style of the table of figures as can be seen in the preview panes. The available options are:
- From template
- Classic
- Distinctive
- Centered
- Formal
- Simple
To design a custom table of figures layout, click the “Modify” button and create your own style.
When you are happy with the layout, and click “OK” to build you table of figures, Word will search for the captions, sort them by number, and display the table of figures in the document.
If all this seems familiar, that’s because it’s almost exactly the same as the ‘Table of Contents’ options. In fact, a Table of Figures uses the same underlying Word technology as Table of Contents (the {TOC } field).
UPDATING A TABLE OF FIGURES
Updating a table of figures to reflect changes to captions or page numbers works the same way as it does with a table of contents. Right-click on the table and choose the “Update Field” option.
In the “Update Table of Figures” dialog you are given the option to “Update page numbers only” or “Update entire table”. Just like ‘Table of Contents’, it is generally a good idea to choose the “Update entire table” option to make sure any and all changes made within the document are reflected within the table of figures.

REORDERING FIGURES AND CAPTIONS
The caption numbers will not automatically update themselves if you decide to add, delete or reorder the caption numbering for figures throughout your document after they have been labeled and numbered.
Let’s say you move “Figure 1” below “Figure 2”. Ideally, Word would recognize this and the numbering would be updated for each of the captions. In reality, the first figure as it appears within the document will now be labeled as “Figure 2”.
To fix this you must select the caption (or just the number within the caption), and press F9. This will correctly change the number for that particular caption, but NOT the numbers for the rest of the captions.
Your best bet is to select the entire document (excluding the table of figures) and press F9. This will completely update the numbering in all of the captions throughout the entire document. Then proceed to update the table of figures as described above.
Alternative: select the entire document and press F9 twice. This will update the captions then the table of figures (regardless of where it is in the document).
If you add, delete, move, or edit captions or other text in a document, you should always remember to update the table of figures before printing.
STYLISTIC OPTIONS
If you want a single table of figures that includes all of your captions in order of appearance regardless of whether they are a figure, table, equation or belong to a label you have created. Simple – group by style.
By default, Word applies a “Caption” style to any caption inserted into the document. If all of your captions are kept in this default style, or are all changed into another customized style, then you can create a complete table of figures.
Click where you want to insert the table of figures and navigate to Insert | Reference | Index and Tables, and click on the “Table of Figures” tab as before. Click on the “Options” button and select the “Style” checkbox. Now click the style name that you have used for the figure captions (by default this is “Captions”, although other options include “Normal”, “Heading 1” and so on), and then click the “OK” button.
The corresponding table of figures will now appear with all of your different types of captions placed within the same table in the order that they appear within the document.
In this instruction you will find advice on how you create a table of content for appendices, table and figures.
Common rules
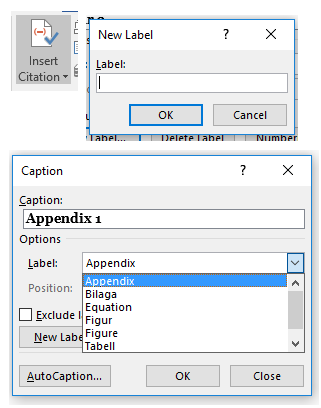
All are created by choosing “Insert Caption”:
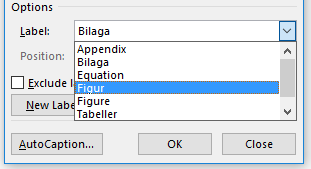
You will get at pop-up window where you can write in the “Caption” field the name of the appendices, table or figure. To get correct appendix, table or figure you must choose in the “Label” field the appropriate thing you need. For example if you want at table search it in the “Label” field. That way it will it will display automatically that it is a Table and which numbered table it is in your text.
Remember that the number is not dependent on the order the appendix/table/figure is in the text but the order in which you inserted it in the text! The numbering can end up incorrect if you start using “Insert Caption“ from the end of the text.
If there is not a correct label (such as being the wrong language for your purposes) you can create a new label by using “New Label”. Write in what you need and then choose the label.
Style for Figures and Tables
| Figures/Tables (Caption) | Georgia 9 | Bold |
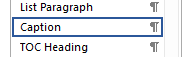
Once you have a figure or a table the text is probably not in the correct style. You can change the style by looking up in the style gallery Caption. If Caption is not visible then you have not yet used “Insert Caption”. The style will appear once you have used it.
More instruction over how one changes the style are available in this link.
Table of Figures
To create a Table of Contents (hereafter called a Table of Figures) for appendices, tables and figures one should use “Insert Table of Figures” and choose correct “Caption label“. The Table of Figures only includes everything which exists under the specific label which means that a Table of Figures should be created for all three labels.
Once you have created the Table of Figures the page number is displayed automatically for either appendices, tables or figures (as long as the page numbers and sections are correct).
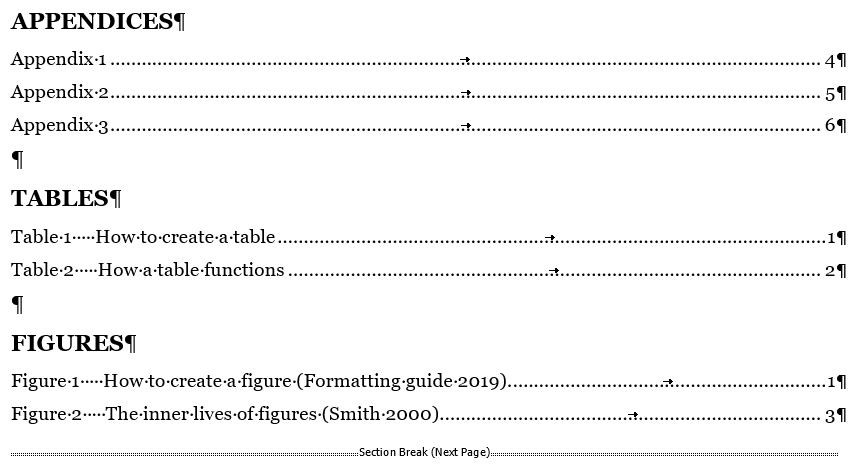
The appendices, tables and figures are always after the regular Table of Contents and in the sam order: APPENDICES, TABLES and FIGURES. Have a section break after the last Table of Figures! Your academic text should begin after the last table .
Headline
| TABLE OF FIGURES HEADLINE | Georgia 13 | Bold |
The Table of Figures headline is not a part of the table and as such has a few different ways on how you can create it. The important thing with the headlines is that they are in the correct format and do not show up automatically in the Table of Contents! Either you choose the Normal style and change it to the format above. The other way is to use TOC Headings for the headline. The third way is to create a new style for the headline which is should not interact automatically with the other parts of the text in ways that it should not. The headline should absolutely not be Heading 1 because that style interacts with the Table of Contents! The headline should be written with capital letters.
Appendix
| Appendix (Own style) | Georgia 13 | Bold |
The Appendices are always included last in a academic text even after the References. You create appendices according to the instructions above “Insert Caption”>“New Label”>“Label” appendix.
The difference with figures and tables is that the appendices have a different format even if they are all created by using “Insert Caption”. There are a couple of different ways to do the the appendices style. Either one uses the Normal style and manually change it to the format above.
The other way is to create a new style and put in the correct format:
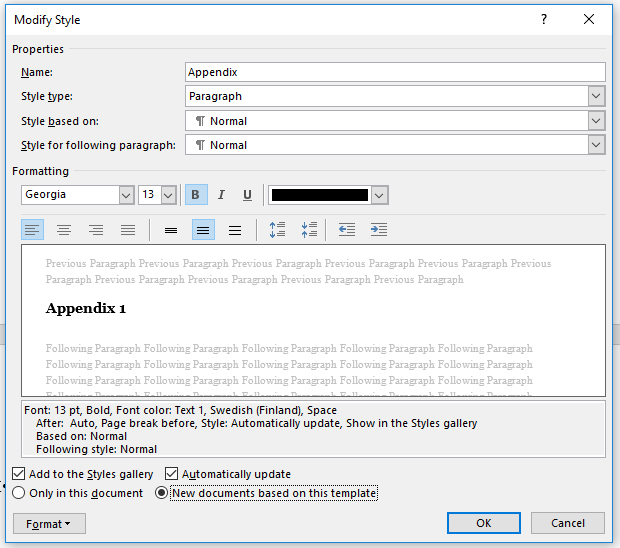
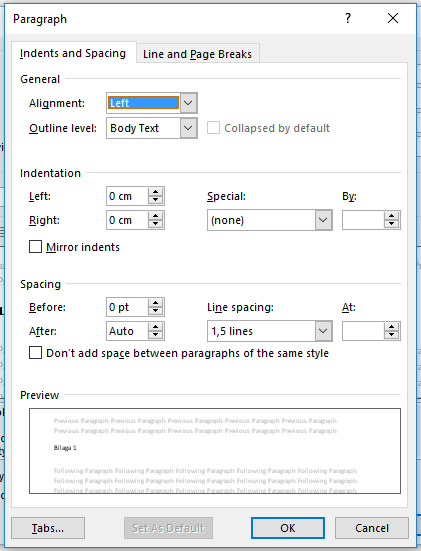
This way if you have used “Insert Caption” you can use the style Appendix so that you get the correct format for the appendices. Remember to use “Insert Caption” because without this the appendices will not function!
The Table of Figures are created with the same instructions as above.
Table
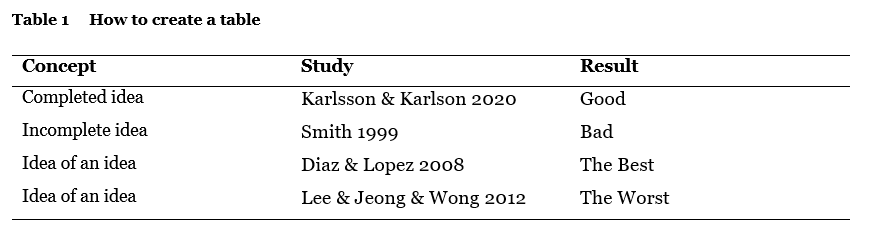
The Table text is usually over the table. Except for the description of the table, table of figures and the headline there are no standard rules over how the tables should look like. Usually the requirements of the assignment sets the standard of the table. Various departments in Hanken have their own requirements which can be quite different from each other.
Figure
The Figure text is usually under the figure. Except for the description of the figure, table of figures and the headline there are no standard rules over how the figures should look like. Usually the requirements of the assignment sets the standard of the figure. Various departments in Hanken have their own requirements which can be quite different from each other.