
Add Appendix Word Document To add an appendix Word document, you’ll first need to go to the “Layout” ribbon and choose the drop-down arrow next to “Breaks.” Then choose “Next Page” to start your appendix. This page break will keep your appendix at the end of your document as you add more content above it.
Contents
- 1 How do you add an appendix?
- 2 How do I find appendix in Word?
- 3 How do you list appendix in text?
- 4 How do you display appendix?
- 5 How do you write appendix?
- 6 Can an appendix be text?
- 7 Can an appendix include text?
- 8 How do I add an image to my appendix?
- 9 How do you reference an appendix image?
- 10 What is an example of an appendix?
- 11 Where do you include appendix?
- 12 Can you put a link as an appendix?
How do you add an appendix?
If you are attaching only one appendix, label it Appendix; if you are using more than one appendix label them with a capital letter (Appendix A, Appendix B etc.) in the order in which they are mentioned in the text of your assignment. In the text, refer to the appendices by their labels. e.g. (see Appendix A).
How do I find appendix in Word?
Follow these steps:
- On the Format menu, click Bullets and Numbering, and then click the Outline Numbered tab.
- Select one of the styles, for example, Chapter 1 (the last style choice).
- In Level, click 7.
- In the Number format field, type “Appendix”, and then press the spacebar to insert a space after the word “Appendix”.
How do you list appendix in text?
Text Appendices
In an appendix, all figures, tables, and other visuals should be labelled with the letter of the corresponding appendix followed by a number indicating the order in which each appears. For example, a table labelled “Table B1” would be the first table in Appendix B.
How do you display appendix?
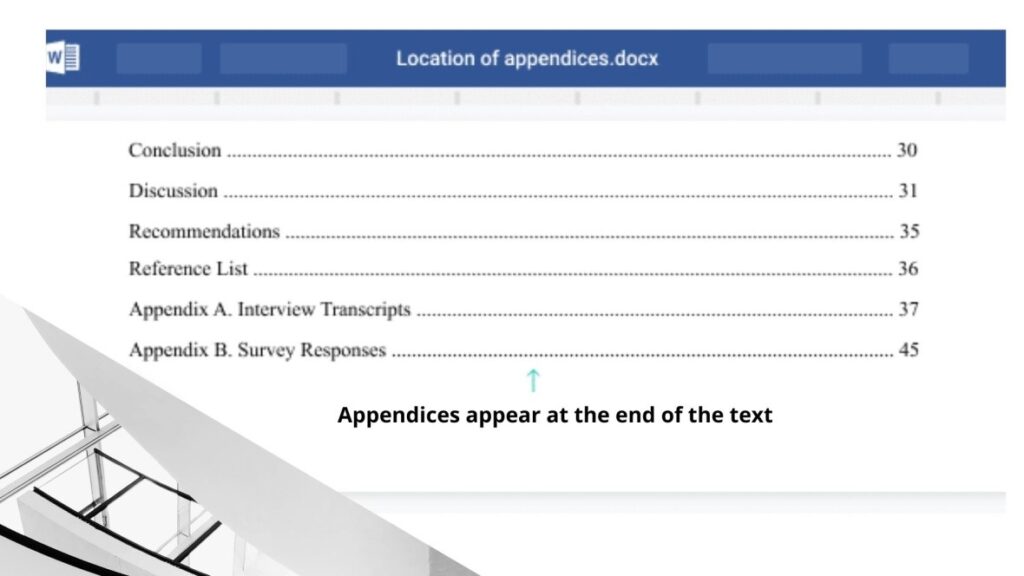
The heading should be “Appendix,” followed by a letter or number [e.g., “Appendix A” or “Appendix 1”], centered and written in bold. Appendices must be listed in the table of contents [if used]. The page number(s) of the appendix/appendices will continue on with the numbering from the last page of the text.
How do you write appendix?
The heading should be “Appendix,” followed by a letter or number [e.g., “Appendix A” or “Appendix 1”], centered and written in bold type. If there is a table of contents, the appendices must be listed. The page number(s) of the appendix/appendices will continue on with the numbering from the last page of the text.
Can an appendix be text?
An appendix is a section at the end of an academic text where you include extra information that doesn’t fit into the main text. The plural of appendix is “appendices.”
Can an appendix include text?
All appendices contain information that is relevant, but not essential, to the main text.
How do I add an image to my appendix?
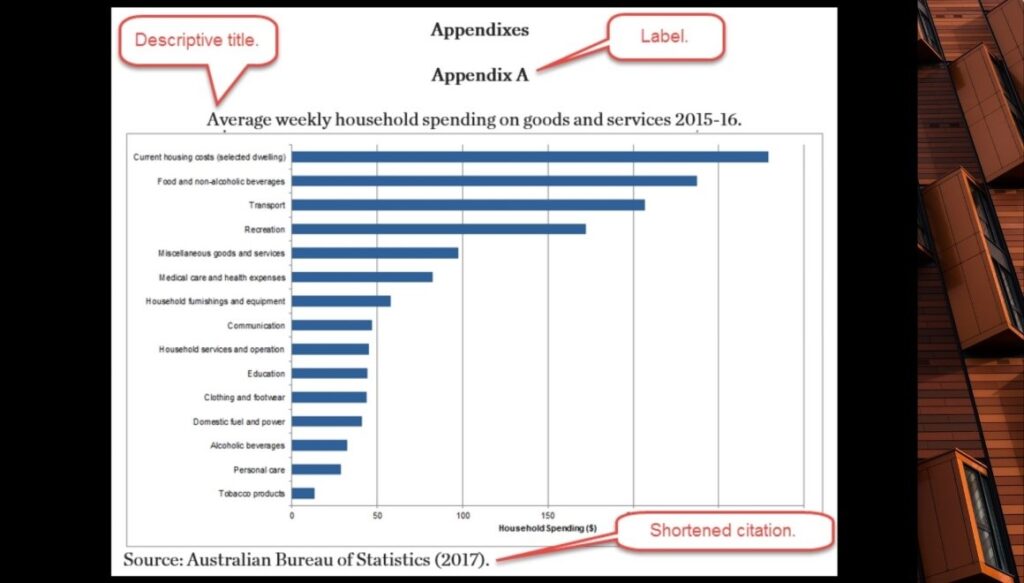
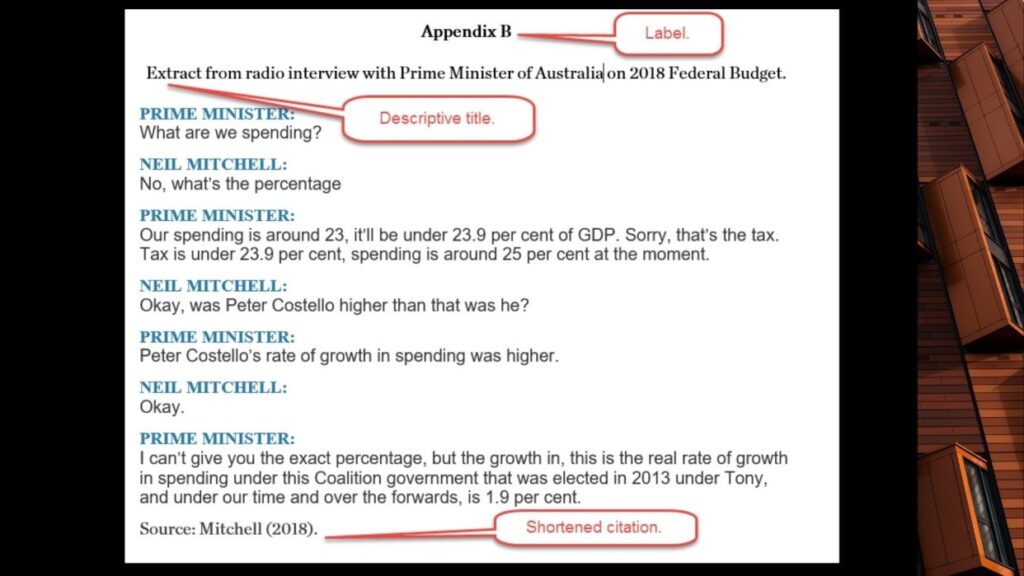
Follow these directions to format and cite your figure, image, or graph in APA style:
- Label and number the figure using bold font.
- Give it a descriptive title on the line after the figure label.
- Align the figure flush-left on the page.
- Include a “Note.” on the line under the figure.
How do you reference an appendix image?
Follow the format of the reference type (book, journal or website) in which you found the table/figure/image/appendix followed by: table/figure/image/appendix number of original source, Title of table/figure/image/appendix from original source; p.
What is an example of an appendix?
Appendices can consist of figures, tables, maps, photographs, raw data, computer programs, musical examples, interview questions, sample questionnaires, etc.
Where do you include appendix?
The appendix is supplemental material added to a paper to aid the reader in understanding your points, but can’t easily be worked into the text. If you choose to include an appendix in your paper, it should be at the end of your paper after the References page.
Can you put a link as an appendix?
What can you include in an appendix? You can include any or all of the types mentioned below as part of your appendix in a paper depending on the need. Note that you should include only those details in the appendix that you are going link as references in the main body of your writing.

on
June 15, 2021, 9:12 AM PDT
How to add an appendix to a table of contents in Microsoft Word
When creating an appendix isn’t as cut and dried as the default table of contents supports, try mapping!
We may be compensated by vendors who appear on this page through methods such as affiliate links or sponsored partnerships. This may influence how and where their products appear on our site, but vendors cannot pay to influence the content of our reviews. For more info, visit our Terms of Use page.

An appendix should probably be included in a document’s table of contents. In Microsoft Word, if you use the same level 1 heading for your section headings, including the appendix, you’ll have no problem. However, sometimes that’s not possible because the appendix heading uses a different format. Initially, you might be a bit stymied by that requirement, but it’s not difficult at all. In this article, I’ll show you how to include an appendix in the table of contents when you can’t use the same built-in level heading as other sections.
SEE: 83 Excel tips every user should master (TechRepublic)
I’m using Microsoft 365 on a Windows 10 64-bit system, but you can use earlier versions. You can work with your own data or download the demonstration .docx and .doc files. Word Online will display a table of contents, but you can’t make the modifications shown in this article.
Why is the appendix in Word a problem?
If a document includes an appendix and you want the appendix in the table of contents, the simplest solution is to apply a built-in heading style to all section headings. Word includes Heading 1, Heading 2, and Heading 3 in the table of contents by default. For example, if you use Heading 1 for all the section headings, you could also use Heading 1 for the appendix heading.
But what happens when you must apply a different set of formats to the appendix heading? You might try direct formatting, or you might modify Heading 4, Heading 5, and so on. Let’s try both of these possible solutions and see what happens.
How to apply direct formatting
The document shown in Figure A has only two pages: Chapter 1 and Appendix. Both headings use the built-in heading style Heading 1. Each section has a second level that uses Heading 2. Now, let’s suppose you want the appendix heading to also be italicized: Select the appendix heading on page 2, Appendix, and apply italics.
Figure A

Now, let’s add a simple of table of contents, as follows:
- Move the insertion point to the beginning of page 1, before the Chapter 1 heading.
- Click the References tab.
- In the Table of Contents group, click Table of Contents.
- Choose the first option to include a simple table of contents, as shown in Figure B.
Figure B

The table of contents has its own built-in style. However, whether you want it or not, the table of contents displays the italics because the table of contents inherits direct formatting. Most likely, you’ll want all same-level headings to appear the same in the table of contents.
SEE: Windows 10: Lists of vocal commands for speech recognition and dictation (free PDF) (TechRepublic)
How to use a lower-level heading to add the appendix entry in Word
As mentioned earlier, Word includes Heading 1, Heading 2, and Heading 3 headings in the table of contents by default. This document isn’t using Heading 3, so let’s apply Modify Heading 3 to include italics and then apply it to the appendix heading as follows:
- First, clear the formatting from the appendix heading if you applied italics in the last section. Select it and apply Normal in the Styles gallery (on the Home tab).
- With Appendix still selected, click Heading 3 in the Styles gallery.
- Right-click the thumbnail in the gallery and choose Modify (Figure C).
- In the resulting dialog, click the Italics icon and click OK. You could update other formats, but let’s keep it simple for now.
Figure C

When you return to the document, Appendix is italicized. Now let’s see how the table of contents displays this change. Click inside the table of contents at the top of page 1, click the Update Table tab and when prompted, click the Update Entire Table option shown in Figure D. As you can see in Figure E, the Appendix heading is no longer italicized, but it’s in a level three position! Well, we chose Heading 3, so we should’ve expected that, correct? The problem is, you’ll want the Appendix heading on the same level as Chapter 1 because structurally, the are on the same level.
Figure D
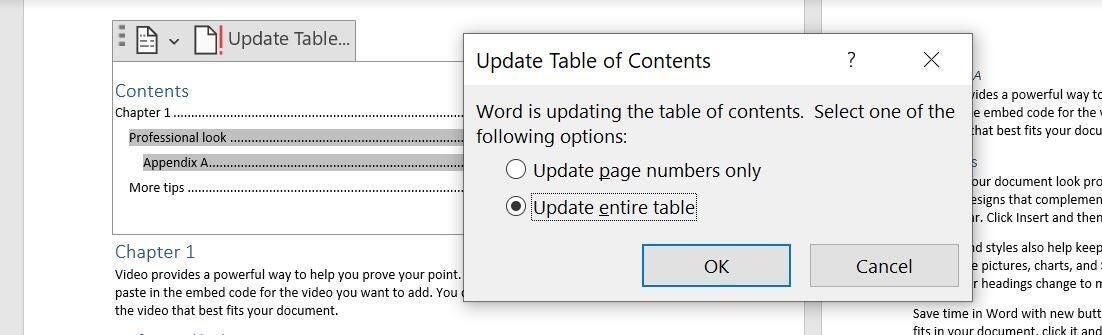
Figure E

If you thought either of these solutions might work, don’t be troubled. They seem reasonable off the top of your head.
How to solve the problem in Word
The solution is to modify a lower-level heading as you did in the last example, and then map it to the table of contents. If the term mapping is new to you, don’t worry.
At this point, we’re starting over, so remove the existing table of contents and apply the Normal style to Appendix (the heading on page 2). To begin, do the following:
- Select Appendix (the heading on page 2).
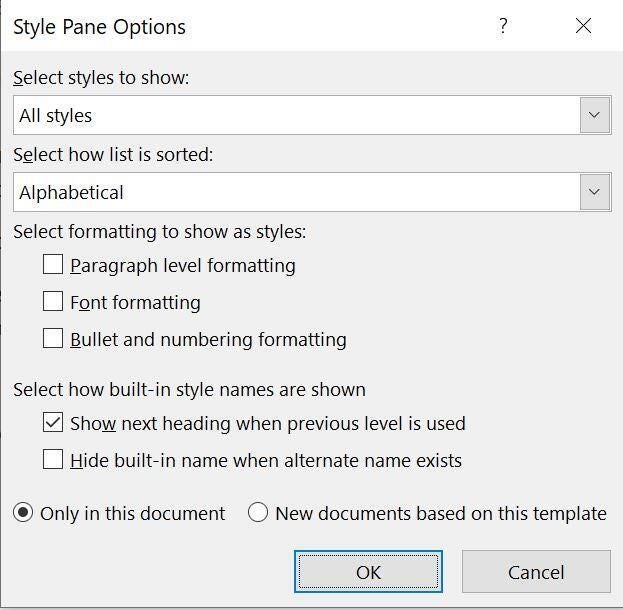
- Choose Heading 6 from the Styles gallery, if available. Right-click the thumbnail and choose Modify. If Heading 6 isn’t available, and it probably isn’t, click the Styles group More button, and click Options at the bottom of the Styles pane. From the Select Styles to Show dropdown, choose All Styles. From the Select How List is Sorted dropdown, choose Alphabetical (Figure F). Find Heading 6 is the Styles pane, right-click it, and choose Modify.
- In the resulting dialog, click the Italics icon and click OK. You could update other formats to make it matching Heading 1, but let’s keep it simple for now.
Figure F
I chose Heading 6 because it’s unlikely to be used for other headings in such a simple document. In addition, you need to know how to find a style that’s not in the Styles pane.
Appendix at the top of page 2 now uses Heading 6, but we already know that a default table of contents won’t include Heading 6 text. To include that level, we must map it using a custom table of contents as follows:
- Move the insertion point to the beginning of the document, click the References tab, and then click the Table of Contents option in the Table of Contents group. At this point, it’s the same as the built-in table of contents you chose earlier.
- Instead of choosing the first option, choose Custom Table of Contents. Take a minute to look around at the different settings. The preview windows show Heading 1, Heading 2, and Heading 3—the headings the table of contents includes by default.
- Click Options.
- Right now, you can see that the three headings are mapped as you might expect: Heading 1, 1; Heading 2, 2; and Heading 3, 3. Map Heading 6 in the resulting window: Thumb down to Heading 6 and enter 1, as shown in Figure G. Why 1? Because structurally, Appendix should be on the same level as Chapter 1, which is Heading 1, level 1.
- Click OK twice to return to the document.
Figure G
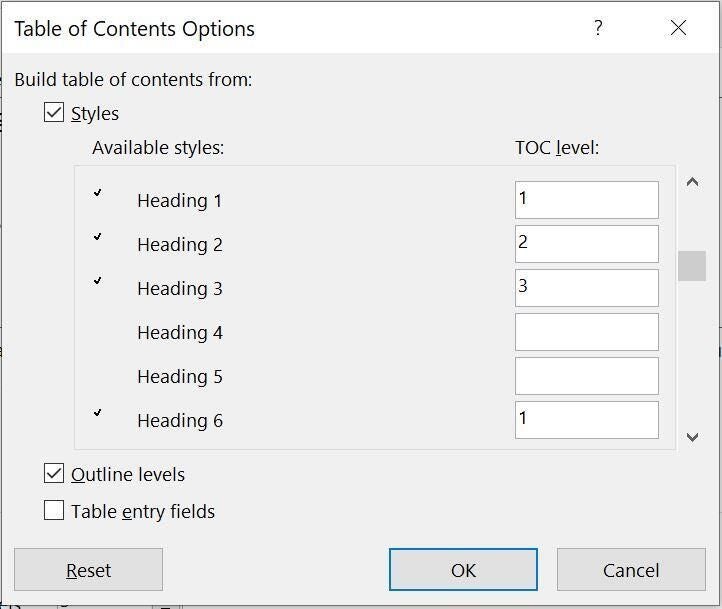
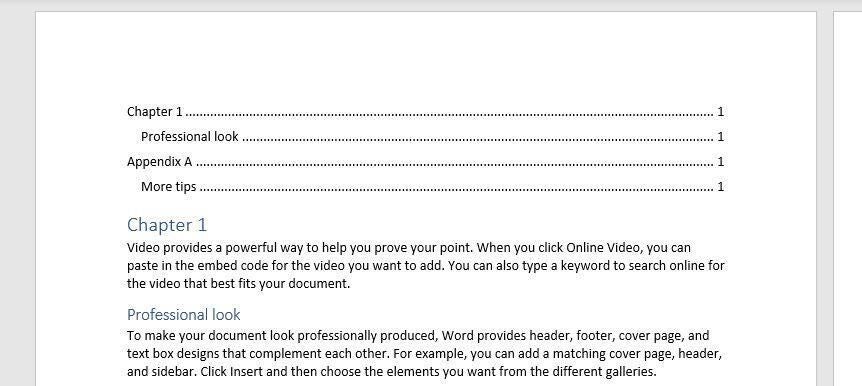
Figure H shows the custom table of contents. Appendix is a level 1 heading, and it isn’t italicized, even though the heading within the document is.
Figure H
Word’s table of contents feature does a great job most of the time. However, when you have special requirements such as those described in this article, you might need to turn the custom options. Knowing what you can do makes all the difference.
Also See
-
How to make fewer mistakes and work more efficiently using predictive text in Microsoft 365
(TechRepublic) -
How to use the many text wrapping options in Microsoft Word
(TechRepublic) -
Microsoft 365: A cheat sheet
(TechRepublic) -
Zoom vs. Microsoft Teams, Google Meet, Cisco WebEx and Skype: Choosing the right video-conferencing apps for you (free PDF)
(TechRepublic) -
Checklist: Securing Windows 10 systems
(TechRepublic Premium) -
Everything you need to know about the Microsoft Exchange Server hack
(ZDNet) -
Must-read coverage: Windows 10
(TechRepublic on Flipboard)
-
Microsoft
-
Software
Word 2013 Office for business Word 2010 Word 2007 More…Less
Summary
This step-by-step article describes several different numbering systems that you can use in documents that contain both chapter headings and appendix headings.
Microsoft Word does not support multiple heading-numbering schemes in a single document or master document. When you work with documents that contain both chapter headings and appendix headings, the headings must not use the same heading style level.
Example 1: Chapter Headings and Appendix Headings
When you design a document that contains both chapter headings and appendix headings, you can use different heading style levels to apply the different number formatting to each section. For example, to define a chapter and appendix heading-numbering scheme that resembles the following
-
Chapter One: This is the title to the first chapter.
-
Chapter Two: This is the title to the second chapter.
-
Appendix A: This is the title to the first appendix.
-
Appendix B: This is the title to the second appendix.
Follow these steps:
-
On the Format menu, click Bullets and Numbering, and then click the Outline Numbered tab.
Note: In Microsoft Office Word 2007 and Word 2010, click Multilevel List on the Home tab.
-
Select one of the styles, for example, Chapter 1 (the last style choice). Click Customize.
Note: In Word 2007 and Word 2010, click Define New Multilevel List.
-
In Level, click 7.
-
In the Number format field, type «Appendix», and then press the spacebar to insert a space after the word «Appendix».
-
In Number style, click A, B, C, ….
Note: In the Number format field, Appendix A should be shown, with the «A» highlighted.
-
In the Number format field, type a blank space after «Appendix A».
-
Click the More button.
-
In Link level to style, click Heading 7, and then click OK.
You can now apply Heading 1 to all paragraphs that are chapter styles and Heading 7 to all paragraphs that are appendix titles.
Note: Heading styles are predefined with certain paragraph and character formatting attributes. You may have to modify these styles by using the Style command on the Formatmenu to obtain the intended appearance.
Example 2: Inserting Page Numbers for Chapters and Appendixes
To insert page numbers of the style «1-1, A-1» that work with these heading styles, follow these steps:
-
Make sure that the document contains a section break of some type. The section break type that you want is typically Next Page. Use the section break to separate the main document area from the appendix area. If there is not a section break there, move your insertion point to a blank area above your appendix, and then follow these steps:
-
On the Insert menu, click Break.
-
In the Break popup window, click Next Page under Section break types, and then click OK.
Note: In Word 2007 and Word 2010, click Page Break on the Insert tab.
-
-
Format page numbers to include chapter numbering. To do this, follow these steps:
-
Move the insertion point to the page that contains the first chapter title.
-
On the Insert menu, click Page Numbers.
Note: In Word 2007 and Word 2010, click Page Number on the Insert tab.
-
Select the intended location for the page number by using the options provided in the Page Numbers popup window. Click the Format button.
Note: In Word 2007 and Word 2010, click Format Page Numbers.
-
Click to check the Include chapter number box.
-
In Chapter starts with style, click Heading 1, and then click OK.
-
Click OK in the Page Numbers dialog box.
-
-
To format page numbers to include appendix numbering, follow these steps:
-
Move the insertion point to the page that contains the first appendix title.
-
On the Insert menu, click Page Numbers.
Note: In Word 2007 and Word 2010, click Page Number on the Insert tab.
-
Select the intended location for the page number by using the options provided in the Page Numbers popup window. Click the Format button.
Note: In Word 2007 and Word 2010, click Format Page Numbers.
-
Check the Include chapter number box.
-
In Chapter starts with style click Heading 7.
-
In the Page numbering box, click Start at, and then click 1, so that each chapter or section begins with the number 1.
-
Click OK twice to return to your document.
-
Example 3: Building a Customized Table of Contents
To build a table of contents that includes both the chapters and the appendixes, and which also uses the defined page-numbering style, follow these steps:
-
Place the insertion point where you want the table of contents.
-
On the Insert menu, point to Reference, and then click Index and Tables.
Note: In Word 2007 and Word 2010, click Table of Contents on the References tab, and then click Insert Table of Contents.
-
Click the Table of Contents tab, then click the Options button.
-
In the TOC level boxes, type 1 in the text box to the right of Heading 7.
-
This configures Word to consider Heading 7 to be a Level 1 entry in the table of contents.
-
Click OK.
-
Click OK in the Index and Tables popup window.
Need more help?
Want more options?
Explore subscription benefits, browse training courses, learn how to secure your device, and more.
Communities help you ask and answer questions, give feedback, and hear from experts with rich knowledge.
Instructions
1. Type the heading for your appendix after the main body of the document. Place the cursor in front of the first word of this heading. On the menu bar select Insert, then Break, then Section Break (Next Page). Your appendix will now be in a separate section.
2. Click anywhere in the document’s appendix. On the menu bar click Insert, then Page Numbers. A box entitled «Page Numbers» will appear.
3. Use the Position drop-down box to select whether you want the page numbers to appear on the top (header) or bottom (footer) of the appendix’s pages. Use the Alignment drop-down box to select whether you want your page numbers to appear on the left or right or in the center of the appendix’s pages.
4. Click the Format button within the Page Numbers box. Select the desired numbering format (1, 2, 3…; i, ii, iii…; etc.). Under the «Page numbering» section click the «Start at» option. If you want the appendix to be numbered separately, enter the number 1.
5. Type the body of your appendix as desired. If creating a list, you may wish to select Format, then Bullets and Numbering.
6. Repeat the entire process if your work requires more than one appendix section.
Many years ago, I’d added a separate list of appendices in the front matter containing the table of contents (TOC), list of figures, list of tables etc. I’d forgotten how to do it, because these days almost every document I work on incorporates the appendix headings into the main TOC. However, I needed to do this for a new client, who had appendix placeholders in the document with no page numbering (the PDF’d appendices would be inserted later, so they only needed a heading page). Adding the appendix headings to the main TOC wasn’t an option because the main TOC has page numbers and you can’t tell some parts of the TOC to not have page numbers—you either have them for everything or for nothing, not for some and not others. So these appendix headings needed to go into a separate updateable and clickable list.
NOTE: You MUST be using a uniquely named style for your appendix headings, not Heading 1, etc. In the example below, the heading style for these level 1 appendix headings is ‘Appendix Heading’.
To add a new list of appendices to the front matter:
- Make sure you know the name of the style you use for the appendix headings.
- Go to the References tab > Captions group.
- Click Insert Table of Figures.
- On the Table of Figures dialog box, click Options.
- Select the style you use for the appendix headings from the styles list. In this example, the style is called Appendix Heading.
- Check the Style checkbox.

- Click OK to close the Table of Figures Options dialog box. (Ignore the web preview panel—it won’t show what you’ve chosen.)
- Optional: Clear the Show page numbers checkbox if you don’t want page numbers; leave it selected if you do.

- Click OK.
- If you already have a list of figures etc., you’ll be asked if you want to replace it. Click No.
- Your new list of appendices will be added to the front matter section.


To update your list:
- Click anywhere inside the list of appendices.
- Either:
- Right-click and select Update Field, or
- Go to the References tab > Captions group, then click Update Table.
- If asked, select the option to update the entire table.
Introduction
Most students will ask, “What is an appendix?”
“How do I write my own appendix?”
Well, an appendix will allow a better understanding of the information that has been written in an essay or academic paper.
An appendix will give a summary of the references added in an academic paper. Appendices are found in all essays or academic papers.
It will include the reference section, the paper’s summary of raw data, and any other details about the method used in doing the task.
The appendix will contain all the information included in the body of the paper. In addition, the statistics and references from different sources and authors are shown in the appendix.
An appendix is seen as a supplementary to the research paper. It contains non-essential information. The paper should stand alone without the appendix. Also, appendix pages don’t count as part of the research paper. It is essential not to confuse the appendix with the abstract, which contains very essential information and comes after the title page.
The critical point to keep in mind about an appendix is that it is not essential. The reader can still understand the information on the paper if it were to be removed.
If removed, it will not diminish the reader’s ability.
Why is an Appendix Necessary?
An appendix is necessary because it explains what a paper contains. In addition, it explains the complex information.
It presents information that adds to the reader’s understanding. Some of the information you might include in the appendix:
- Transcripts to interviews you conducted (which can be quoted from the main text).
- The documents you used in your research, such as instructions, questionnaires, scales, or tests.
- Details of the statistical data are represented in figures and tables.
- Details of the equipment used.
When discussing information found in the appendix, make sure you state it the first time you refer to it.

Also, note that there is no need to mention the appendix if you need to mention the interviews again each time.
Though the structure may vary slightly from person to person, there is a general structure that the appendix should follow.
The MLA and APA appendix forms are a bit different, but the structure is the same.
Each appendix contains the following:
- The crossover of body text and appendix
- References for the main body paragraphs
- Put page numbers for multiple appendices
- Label + Title (Should be at the center of the title page, with fonts capitalized). The title will be followed strictly by the label.
- In referencing an appendix, put (#) after a sentence
- Appendix letter or number
- Cite as normal references from third-party sources in the body text and appendix. You are advised not to create another separate reference list. (You may need to see our other guides on citing sources such as websites, books, and the bible to ensure you do it correctly).
- Add a reference number to the body in the case where the appendix contains data
- Paragraphs 2 and 3 are the following body texts
- The first paragraph is not indented
Appendix Format
It is crucial to understand what an appendix format looks like. The normal format will help when you want to write your dissertation.
- Heading (Appendix#). It entails having a letter or a number. The first appendix title can be A or 1.
- The list of references of body paragraphs.
- Index table. It follows the list of appendices.
- The page number.
- The footnotes.
An Appendix for the Various Writing Styles
APA Appendix
Many instructors will have their students include an appendix as part of their APA paper. Unfortunately, the APA Manual doesn’t cover the required appendices format. For the structure and information to be correct, follow the guidelines given below in APA style:
- The appendices need to begin with the header ‘Appendix’ and then by the heading Appendix A, Appendix B, and Appendix C. If you have additional appendices, you can use Appendix AA, Appendix BB, and Appendix CC. If there exists only one appendix, indicate it as just ‘Appendix.’
- It should be written atop the title of the appendix.
- Include abstracts.
- Each appendix section should follow the order in the paper you are writing.
- The appendix section should be on a separate page.
- You should include footnotes.

Some of the elements of APA appendices are:
- Statistics, figures, and graphs.
- Sample calculations like profit and loss accounts.
- Research instruments used like scales and questionnaires.
- Raw data as supporting evidence.
- Raw data such as responses to questionnaires.
- Press clippings for support of the author’s point of view.
- Lengthy information like interviews
- Legal documents like contracts, memorandum of understanding, and shareholder certificates.
- Interview transcripts.
- A detailed description of illustrations, maps, and images for visual evidence.
- Financial projections can be in the form of spreadsheets or other documents.
- Field observation information.
- Datasheets.
- Correspondences such as emails and letters.
- Specialized data or contributory facts that the college students or writer will capture in the appendix section summarize it in the main text.
- Charts and tables are helpful if the writer would like to provide actual statistics.
Rules to Follow in APA
- Have a title for every appendix section.
- In making references in the body paragraphs, add (see appendix B) following a text.
- All appendices need to show each a point of their own.
- For more than one appendix, use the alphabetical order ABC in labelling them.
- You should keep the title at the center.
- All the appendices should be on their own page, no matter the size.
- You should write the first paragraph without indenting it.
- You should have double spacing.
Remember to keep everything original to avoid plagiarism, via means such as paraphrasing!
Chicago Style Appendix
Writing a Chicago-style appendix is similar to that of the APA style. The appendix section should follow the guideline below:
- You describe more than one appendix in the appendices.
- Use the New Roman font.
- The font size has to be 12.
- Show the numbers on the top right of every page.
- Show the bibliography on the last page.
- Indicate the page numbers as 1, 2, and 3.
- Include the footnotes in the bibliography.
- Do not indicate on the cover page a page number.
Footnotes or endnotes are used to cite your sources. You will only need to use footnotes when you have copyright permission or explanatory notes.
The content notes have information that supplements the text but would not be appropriate if included in the main text.
MLA Format Appendix
The rules and guidelines are similar to those in the APA appendix. There only exist very few differences:
- The appendix section is indicated before the reference list.
- Each separate appendix will be Appendix A, Appendix B, and Appendix C to indicate their titles. It is advisable, if you have a complex appendix, to break it down into separate appendices.
- Every appendix should follow the order of the information stated.
- Include page numbers in each of the appendices.
- All the appendices should be on their own page, size notwithstanding.
Rules to Follow in MLA Format
- The title should be at the center.
- There should be double spacing.
- Ensure a hanging indent in your formatting of the references.
- Write the reference section alphabetically.
- Use italics in complete writings, titles, books, recordings, and internet sites.
You can check our guide on citing websites in MLA to learn more about the MLA style.
Harvard Style Appendix
In this case, the appendix will be before the reference list and at the very end of the paper or report. You should cite all the information included in the appendices in the essay’s body as Appendix.
If the information included in the appendix is from a published source, you will need to add a citation in the appendix pages. A full citation will consequently appear in the list of references.
The citation in full will be placed in the list of references in a systematic order by the author with the rest of the references from your paper.
- Begin writing an appendix by indicating the title.
- Ensure each distinct item in the appendix will follow the same order as the text.
- Create a descriptive title or label for each of the items in the appendix.
- Ensure the title and label are centred. Change the title to bold font, i.e., Appendix A
- If the content you are using is from a published source, indicate it as the word ‘Source,’ followed by a citation. You will then place it at the bottom left of the appendix. The reference list will show a complete reference.
Writing an Appendix
When writing an appendix, start by collecting information. You are also required to format the appendix appropriately.
Consequently, you should ensure the appendix is polished to be helpful, engaging, and accessible to the reader.
Collect Data for the Appendix
- Add raw statistical data – When writing an appendix, you should add the raw data you are confident is relevant to the paper or essay. The data should be relevant in supporting your findings. You should only include the raw data if you will refer to or discuss it in the paper.
- Raw data could have sample calculations referred to in the body of the paper. You should add it to the appendix.
- Choose to add the contributory facts gathered from different sources. It will support the findings. Ensure that you have cited appropriately information you get from other sources.
- Add supporting charts, graphs, and images – When writing an appendix, include visuals such as charts, maps, graphs, photographs, drawings, and images.
You can include charts or graphs you have created, or those gathered from a different source. Ensure you site the visuals you do not own in the appendix.
- Make a note of the research instruments used in the appendix – State the research instruments used to gather information. It could be a tape recorder, video camera, or any other device used in research. It helps the reader understand the instruments used in conducting the research. You can state that “All the surveys and interviews were carried out in a private setting in person and recorded using a video camera.”
- Include the interview surveys or transcripts – Add any surveys or interview transcripts for the research. The transcripts need to capture the whole interview. They should include even the Q and A sessions. Include also copies of surveys written by hand or the copies completed online.
You should also add the correspondences on various subjects in your paper like letters, notes, or email correspondences written from and involved in the research.
Format the Appendix
- Add a title to the appendix – It should be indicated clearly on top of the page. Capital letters, ‘APPENDIX’ should be used. Alternatively, use ‘Appendix.’ Use a similar font size and type to the one used in the chapter headers for your essay or paper.
- In case you have several appendices, order them by number or letter and do it consistently. If you are using numbers, let it be, Appendix 1, Appendix 2, and Appendix 3. If you are using letters, it should be Appendix A, Appendix B, or Appendix C.
- Each appendix begins on a new page if you have different appendices. It will help the reader not get lost as they look for the appendix.
- Make an order of the content – The content in the appendix should appear the same way it appears in the text.
- E.g., if raw data has been placed on one of your essays, ensure the raw data appears in line one in your appendix. If interview questions are mentioned last in your paper, they should be last in the appendix.
- Ensure the appendix appears after your list of references – Appendices appear after your list of references. If the instructor wishes to have it any other way, you should follow the stated requirements.
Also, ensure that you show the appendix on your paper’s table of contents.
- Insert page numbers – At the bottom right corner of the page, you should insert the appendix page numbers. It can also be centred. Use a numbering format that is consistent in the entire paper.
If the page numbering of the paper ends at 18, continue numbering from 18 when you insert the appendix.
Polish the Appendix
- Ensure you review the appendix to confirm cohesion and clarity – The word count or standard page is not certain for the appendix. It should also not be extremely long either. Go through your appendices and confirm you have included relevancy to the paper. You may choose to have another person go through the appendix to ensure that you have captured all the relevant information.
- Check for grammatical errors – Review the appendix and ensure it is free from any form of grammatical error. Use the different types of software available for grammar checking. Ensure the appendix appears as professional as possible.

- Make a reference to the appendix to the paper – Once you have completed your appendices, ensure you site your text in your appendix using the title.
It will indicate to the reader that what is contained in the appendix has relevance to the text. It allows the reader to use an appendix in accessing supplementary information.
Final Word
Once you follow the laid-out formats and guidelines, it is easy to learn how to make an appendix.
Take your time to study this guide. It will give your insight into how to write your appendix. Writing appendices has never been this easy.
Frequently Asked Questions
- What is an appendix?
An appendix is a section in an academic paper or essay that will supplement the understanding of your research by the reader. An appendix may include:
- Detailed descriptions of equipment used
- Interview transcripts
- Questionnaires
- Raw data
- How can one add an appendix to the paper?
Add an appendix to a paper by ensuring you indicate the appendix name, such as Appendix A, Appendix B, or Appendix C. Ensure you put the title in the right place depending on the writing style in use.
- How can one create an appendix in MS Word?
You will start by creating a section break in the area where you want the appendix to appear. A “continuous break” is what you will use when you want it to appear in a new section. Use “page break” when creating the appendix on a new page. Use the heading styles to create a header in the appendices. It will be easier to go through the document and locate the appendix without taking much of your time.
- How does one cite an appendix?
It is dependent on the style of citation in use. In the MLA style, use parenthetical citation. It will name the appendix being cited: (Wittenberg, Appendix B). When using the APA style, add the year of publication (Witterberg, 2018, Appendix B). In Chicago style, you will include the numbers of the pages.
- Should you have the appendix content in alphabetical order?
The listing of items in the appendix should follow alphabetical order. When there are numerical items that need to be included, they should follow the order of a number.
- Can I include references in the appendix?
If references have been used, yes, you should include the references in the appendix. It will thus allow the reader to authenticate the information sources in the appendix and further research.
- Can one input charts, figures, and photographs in the findings or body of the report?
If you are writing a report for a school course, consult your professor for a guideline. Otherwise, the rule is to always include it in the appendix supplementary figures. You can have as many visuals in a single appendix. If the visuals are necessary for the comprehension of a paragraph, then you can add them to the body. The table number and figures included need to be kept in a separate sequence.
Finally, our premium writers are ready to ace that assignment for you. A trial doesn’t hurt!

I‘m a freelance content and SEO writer with a passion for finding the perfect combination of words to capture attention and express a message. I create catchy, SEO-friendly content for websites, blogs, articles, and social media. My experience spans many industries, including health and wellness, technology, education, business, and lifestyle. My clients appreciate my ability to craft compelling stories that engage their target audience, but also help to improve their website’s search engine rankings. I’m also an avid learner and stay up to date on the latest SEO trends. I enjoy exploring new places and reading up on the latest marketing and SEO strategies in my free time.
When you’re creating or editing a long document, you’ll
probably have to create a table of contents. That might sound like a chore, but
fortunately, you can do it in just a few clicks. Then, if you change the document, Word can update the table of content instantly.
Best of all, Word includes hyperlinks to the various sections in your table of contents, so it isn’t just a visual aid for
printed documents, but it’s also perfect to make easy-to-browse online documents and PDFs with.
Creating the table of contents in Word itself is simple, but the tricky part is getting it to work the way you want. In this tutorial, I’ll show you everything you need to make a simple, auto-generated table of contents, and then get it to look the way you want in every version of Microsoft Word.
How to Make a Table of Contents in Microsoft Word (Screencast)
You can follow along using your own document, or if you prefer, download the zip file included for this tutorial. It contains a document called The Age of Einstein.docx, which is a public domain physics textbook (credit to the author, Professor Frank W.K. Firk).
Watch the video screencast above or follow the written tutorial instructions below for more detail on how to make a table of contents in Word.
Creating Your Table of Contents in Word
There are a few ways of creating a table of contents in Word, but only two that you’ll
ever use
- Create them automatically from built-in styles
- Create them from your custom styles
These methods work mostly the same in Windows and Mac versions of Microsoft Word.
Using MS Word built-in styles is the fastest and most common
technique, and using custom styles takes only a little more work. Sometimes,
you’ll want to use both techniques in the same document. Once you have a table of contents (TOC) in
a document, you can format it with its own styles. You don’t want to format the
TOC like regular text, because the formatting can easily get wiped out.
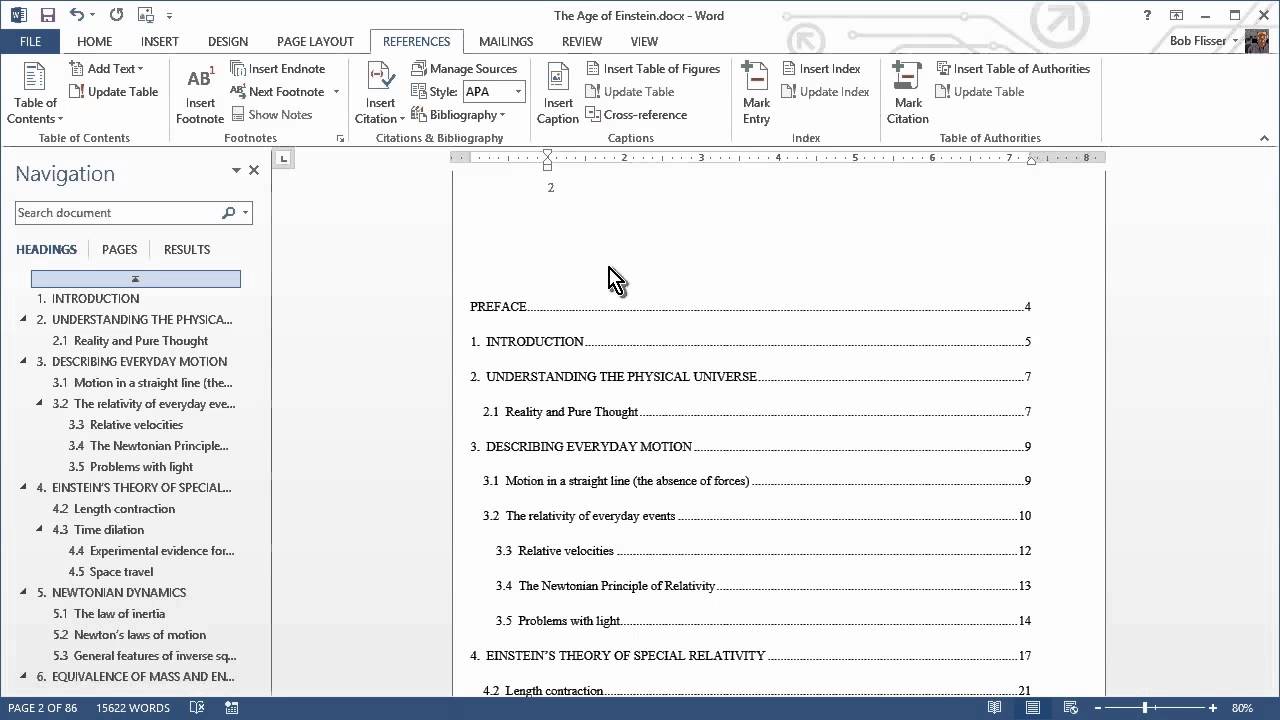
How the Textbook is Organized
Before doing anything to the document, let’s see how it’s
organized. Page 1 is the title, page 2 is blank and will hold the table of contents, page 3
is the preface, and after that comes the text. As you scroll down, notice that headings
and subheadings are formatted.
.jpg)
.jpg)
.jpg)
The best way to see the structure of the document is with
the Navigation Pane. (In some versions of Word for Mac, it may be called the Document Map Pane.)
In Windows, go to the View
tab, then click the check box to enable the Navigation Pane.
.jpg)
.jpg)
.jpg)
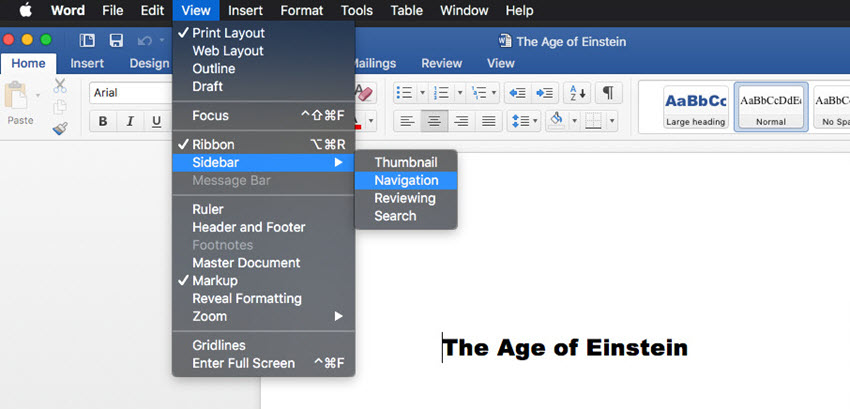
On the Mac, click the Sidebar option to show the drop-down menu. Click the arrow next to the option and click Navigation. (On older versions of the Mac software, the option is called Document Map Pane.)


On your Mac or PC, go back to the Home
tab if you’re not already there. Keep your eye on the Styles box on the ribbon,
and click the items in the pane to navigate through the book.
Notice that the
items with whole numbers – like 2.
Understanding the Physical Universe – are formatted as Heading 1, and items
with decimals – like 2.1 Reality and Pure
Thought – are formatted as Heading 2. There are also a few decimal items –
like 4.5 Space Travel – that are
formatted as Heading 3.
Tip: when
creating a document, the shortcuts for applying the Heading 1, 2 and 3 styles
are Ctrl-Alt-1, Ctrl-Alt-2, and Ctrl-Alt-3
(and Command-Opt-1, Command-Opt -2, and Command-Opt-3 on the Mac).
Generating a Table of Contents Using Built-In Header Styles in Word
Word can now turn those Heading styles into table of contents
entries. Click at the top of page 2. (Tip: in Windows, press Ctrl-G,
type 2, then press Enter. On the Mac, press Command-Opt-G, type 2, then press Return.)
In Windows, go to the References
tab on the ribbon, click the Table of
Contents button on the left, then choose one of the two built-in tables
from the list. Note that the thumbnails show that Headings 1, 2 and 3 will be
included.
It’s almost the same on the Mac. Go to the Insert menu, choose Index and Tables, then pick one of the
formats on the left and click OK.
This dialog box also shows that Headings 1-3 will be included.
.jpg)
.jpg)
.jpg)
As soon as you choose one, the table of contents gets inserted starting on
page 2, and Word automatically inserts a couple of more pages, so it all fits. In Windows, you can Ctrl-click one of the items, and it will hyperlink to the item in the document.
.jpg)
.jpg)
.jpg)
This works great, but there’s one problem. Before the
Introduction, there is a Preface that
should be included in the table of contents. And just before Appendix A1 is the heading for
the Appendix, and that should also be
included. But they weren’t, because they’re both formatted with a custom style
called Large heading, and custom
styles don’t get included in the default table of contents. The second method of creating table of contents in Word will fix that.
Creating a Table of Contents From Custom Styles in Word
Word can include any styles in a table of contents. We just
have to tell it which ones to choose. And we can update the table, rather than having
to delete it and start over.
In Windows, go back to the References tab, click the Table
of Contents button, then near the bottom of the menu, choose Custom Table of Contents. Click the Options button near the bottom of the dialog box to display the Table of Contents Options dialog box.
On the Mac, go to back to the Insert menu and choose Index
and Tables. In the Table of Contents section, click the Options button.
On the Mac or PC the Table of Contents Options dialog box shows that the Heading 1 style will have TOC level 1,
the Heading 2 style will have TOC level 2, and the Heading 3 style will have
TOC level 3.
.jpg)
.jpg)
.jpg)
Scroll down to the bottom of the list (on the Mac, you’ll use the down slider). Then, in the box for Large heading, type a 1 to make it level 1. Table of Content levels can
come from more than one style.
.jpg)
.jpg)
.jpg)
Click OK in the
Table of Contents Options dialog, then OK again in the Table of Contents dialog box. When Word displays a message asking if you want to replace the
table, choose Yes. The Preface and Appendix are now both included in the table
of contents.
.jpg)
.jpg)
.jpg)
Manually Updating the Table of Contents in Word
There are other times when you’ll want to update the table
manually. This is handy when you change the text of one of the headings and
want the change reflected in the table of contents.
Scroll down to the page with the preface. At the top of the page replace
PREFACE with FORWARD. Make sure it still uses the Large heading style.
Go back to the top of the table of contents and click in it. Note that it
has a gray background; that means it’s a field, and fields can usually be
updated.
Click the Update Table
button either on the TOC itself (that button doesn’t always appear) or on the References tab, and the first entry changes to FORWARD. (On the Mac, right-click the table and choose Update Field from the pop-up menu. Choose the Update entire table option and click OK.)
.jpg)
.jpg)
.jpg)
Now that the table of contents displays the correct text, we
can apply nicer formatting though.
How to Modify Table of Contents Styles in Word
Each heading level of the table of contents has its own
style that’s automatically applied. All we have to do is change the formatting
of the styles to change the table’s appearance, here’s how:
- In Windows, in the References tab of the ribbon, click again on the Table of Contents button and choose Custom Table of Contents, near the
bottom. In the Table of Contents dialog box, click Modify. - On the Mac, click Insert > Index
and Tables. On the left side, choose From Template, then
click Modify. Everything else works
the same way as in Windows. - In the Table of Contents dialog box, click Modify, and another dialog box appears,
showing style names and formatting for the TOC heading levels. Select TOC
1. - Click the Modify
button just below it, and the Style dialog box appears. (On the Mac, it’s called the Properties dialog box.)
.jpg)
.jpg)
.jpg)
Format the style with Arial or Helvetica, 12 points, bold.
Then click OK.
.jpg)
.jpg)
.jpg)
- Repeat for the TOC 2 style, and set it to Arial
or Helvetica, 12 points, normal. - Repeat for the TOC 3 style, and set it to Arial
or Helvetica, 11 points, normal.
The table of contents should now look like this:
.jpg)
.jpg)
.jpg)
Conclusion
When you have a long document, you don’t have to fear
creating a table of contents. Whether you’re using Windows or a Mac, you can
insert one in just a few clicks, then use the same dialog box to change the
formatting.
As you learned in this table of contents tutorial, remember not to apply formatting directly to the table, because it
can get wiped out if you replace it. If you make any changes to the Word document itself, remember to click the top of the TOC and update it. Leave a comment below if you have any trouble making or tweaking your table of contents.
To learn more about working with Microsoft Word, study the following tutorials:
Editorial Note: This post was
originally published in 2014. It has been comprehensively revised to make it
current, accurate, and up to date by our staff—with special assistance from Laura Spencer.
Did you find this post useful?

Bob Flisser has authored many videos and books about Microsoft and Adobe products, and has been a computer trainer since the 1980s. He is also a web and multimedia developer. Bob is a graduate of The George Washington University with a degree in financial economics.