
| title | description | ms.date | ms.prod | ms.localizationpriority |
|---|---|---|---|---|
|
Word add-in tutorial |
In this tutorial, you’ll build a Word add-in that inserts (and replaces) text ranges, paragraphs, images, HTML, tables, and content controls. You’ll also learn how to format text and how to insert (and replace) content in content controls. |
03/14/2023 |
word |
high |
Tutorial: Create a Word task pane add-in
In this tutorial, you’ll create a Word task pane add-in that:
[!div class=»checklist»]
- Inserts a range of text
- Formats text
- Replaces text and inserts text in various locations
- Inserts images, HTML, and tables
- Creates and updates content controls
[!TIP]
If you’ve already completed the Build your first Word task pane add-in quick start, and want to use that project as a starting point for this tutorial, go directly to the Insert a range of text section to start this tutorial.
Prerequisites
[!includeYeoman generator prerequisites]
-
Office connected to a Microsoft 365 subscription (including Office on the web).
[!NOTE]
If you don’t already have Office, you can join the Microsoft 365 developer program to get a free, 90-day renewable Microsoft 365 subscription to use during development.
Create your add-in project
[!includeYeoman generator create project guidance]
- Choose a project type:
Office Add-in Task Pane project - Choose a script type:
JavaScript - What do you want to name your add-in?
My Office Add-in - Which Office client application would you like to support?
Word

After you complete the wizard, the generator creates the project and installs supporting Node components.
[!includeYeoman generator next steps]
Insert a range of text
In this step of the tutorial, you’ll programmatically test that your add-in supports the user’s current version of Word, and then insert a paragraph into the document.
Code the add-in
-
Open the project in your code editor.
-
Open the file ./src/taskpane/taskpane.html. This file contains the HTML markup for the task pane.
-
Locate the
<main>element and delete all lines that appear after the opening<main>tag and before the closing</main>tag. -
Add the following markup immediately after the opening
<main>tag.<button class="ms-Button" id="insert-paragraph">Insert Paragraph</button><br/><br/>
-
Open the file ./src/taskpane/taskpane.js. This file contains the Office JavaScript API code that facilitates interaction between the task pane and the Office client application.
-
Remove all references to the
runbutton and therun()function by doing the following:-
Locate and delete the line
document.getElementById("run").onclick = run;. -
Locate and delete the entire
run()function.
-
-
Within the
Office.onReadyfunction call, locate the lineif (info.host === Office.HostType.Word) {and add the following code immediately after that line. Note:- This code adds an event handler for the
insert-paragraphbutton. - The
insertParagraphfunction is wrapped in a call totryCatch(both functions will be added in the next step). This allows any errors generated by the Office JavaScript API layer to be handled separately from your service code.
// Assign event handlers and other initialization logic.
document.getElementById("insert-paragraph").onclick = () => tryCatch(insertParagraph);
- This code adds an event handler for the
-
Add the following functions to the end of the file. Note:
-
Your Word.js business logic will be added to the function passed to
Word.run. This logic doesn’t execute immediately. Instead, it’s added to a queue of pending commands. -
The
context.syncmethod sends all queued commands to Word for execution. -
The
tryCatchfunction will be used by all the functions interacting with the workbook from the task pane. Catching Office JavaScript errors in this fashion is a convenient way to generically handle uncaught errors.
async function insertParagraph() {
    await Word.run(async (context) => {

        // TODO1: Queue commands to insert a paragraph into the document.

        await context.sync();
    });
}

/** Default helper for invoking an action and handling errors. */
async function tryCatch(callback) {
    try {
        await callback();
    } catch (error) {
        // Note: In a production add-in, you'd want to notify the user through your add-in's UI.
        console.error(error);
    }
}
-
-
Within the
insertParagraph()function, replaceTODO1with the following code. Note:-
The first parameter to the
insertParagraphmethod is the text for the new paragraph. -
The second parameter is the location within the body where the paragraph will be inserted. Other options for insert paragraph, when the parent object is the body, are «End» and «Replace».
const docBody = context.document.body;
docBody.insertParagraph("Office has several versions, including Office 2016, Microsoft 365 subscription, and Office on the web.",
                        Word.InsertLocation.start);
-
-
Save all your changes to the project.
Test the add-in
-
Complete the following steps to start the local web server and sideload your add-in.
[!INCLUDE alert use https]
[!TIP]
If you’re testing your add-in on Mac, run the following command in the root directory of your project before proceeding. When you run this command, the local web server starts.-
To test your add-in in Word, run the following command in the root directory of your project. This starts the local web server (if it isn’t already running) and opens Word with your add-in loaded.
-
To test your add-in in Word on the web, run the following command in the root directory of your project. When you run this command, the local web server starts. Replace «{url}» with the URL of a Word document on your OneDrive or a SharePoint library to which you have permissions.
[!INCLUDE npm start:web command syntax]
-
-
In Word, if the «My Office Add-in» task pane isn’t already open, choose the Home tab, and then choose the Show Taskpane button in the ribbon to open the add-in task pane.

-
In the task pane, choose the Insert Paragraph button.
-
Make a change in the paragraph.
-
Choose the Insert Paragraph button again. Note that the new paragraph appears above the previous one because the
insertParagraphmethod is inserting at the start of the document’s body.


Format text
In this step of the tutorial, you’ll apply a built-in style to text, apply a custom style to text, and change the font of text.
Apply a built-in style to text
-
Open the file ./src/taskpane/taskpane.html.
-
Locate the
<button>element for theinsert-paragraphbutton, and add the following markup after that line.<button class="ms-Button" id="apply-style">Apply Style</button><br/><br/>
-
Open the file ./src/taskpane/taskpane.js.
-
Within the
Office.onReadyfunction call, locate the line that assigns a click handler to theinsert-paragraphbutton, and add the following code after that line.document.getElementById("apply-style").onclick = () => tryCatch(applyStyle);
-
Add the following function to the end of the file.
async function applyStyle() {
    await Word.run(async (context) => {

        // TODO1: Queue commands to style text.

        await context.sync();
    });
}
-
Within the
applyStyle()function, replaceTODO1with the following code. Note that the code applies a style to a paragraph, but styles can also be applied to ranges of text.const firstParagraph = context.document.body.paragraphs.getFirst(); firstParagraph.styleBuiltIn = Word.Style.intenseReference;
Apply a custom style to text
-
Open the file ./src/taskpane/taskpane.html.
-
Locate the
<button>element for theapply-stylebutton, and add the following markup after that line.<button class="ms-Button" id="apply-custom-style">Apply Custom Style</button><br/><br/>
-
Open the file ./src/taskpane/taskpane.js.
-
Within the
Office.onReadyfunction call, locate the line that assigns a click handler to theapply-stylebutton, and add the following code after that line.document.getElementById("apply-custom-style").onclick = () => tryCatch(applyCustomStyle);
-
Add the following function to the end of the file.
async function applyCustomStyle() {
    await Word.run(async (context) => {

        // TODO1: Queue commands to apply the custom style.

        await context.sync();
    });
}
-
Within the
applyCustomStyle()function, replaceTODO1with the following code. Note that the code applies a custom style that does not exist yet. You’ll create a style with the name MyCustomStyle in the Test the add-in step.const lastParagraph = context.document.body.paragraphs.getLast(); lastParagraph.style = "MyCustomStyle";
-
Save all your changes to the project.
Change the font of text
-
Open the file ./src/taskpane/taskpane.html.
-
Locate the
<button>element for theapply-custom-stylebutton, and add the following markup after that line.<button class="ms-Button" id="change-font">Change Font</button><br/><br/>
-
Open the file ./src/taskpane/taskpane.js.
-
Within the
Office.onReadyfunction call, locate the line that assigns a click handler to theapply-custom-stylebutton, and add the following code after that line.document.getElementById("change-font").onclick = () => tryCatch(changeFont);
-
Add the following function to the end of the file.
async function changeFont() {
    await Word.run(async (context) => {

        // TODO1: Queue commands to apply a different font.

        await context.sync();
    });
}
-
Within the
changeFont()function, replaceTODO1with the following code. Note that the code gets a reference to the second paragraph by using theParagraphCollection.getFirstmethod chained to theParagraph.getNextmethod.const secondParagraph = context.document.body.paragraphs.getFirst().getNext(); secondParagraph.font.set({ name: "Courier New", bold: true, size: 18 });
-
Save all your changes to the project.
Test the add-in
-
[!includeStart server and sideload add-in instructions]
-
If the add-in task pane isn’t already open in Word, go to the Home tab and choose the Show Taskpane button in the ribbon to open it.
-
Be sure there are at least three paragraphs in the document. You can choose the Insert Paragraph button three times. Check carefully that there’s no blank paragraph at the end of the document. If there is, delete it.
-
In Word, create a custom style named «MyCustomStyle». It can have any formatting that you want.
-
Choose the Apply Style button. The first paragraph will be styled with the built-in style Intense Reference.
-
Choose the Apply Custom Style button. The last paragraph will be styled with your custom style. (If nothing seems to happen, the last paragraph might be blank. If so, add some text to it.)
-
Choose the Change Font button. The font of the second paragraph changes to 18 pt., bold, Courier New.

Replace text and insert text
In this step of the tutorial, you’ll add text inside and outside of selected ranges of text, and replace the text of a selected range.
Add text inside a range
-
Open the file ./src/taskpane/taskpane.html.
-
Locate the
<button>element for thechange-fontbutton, and add the following markup after that line.<button class="ms-Button" id="insert-text-into-range">Insert Abbreviation</button><br/><br/>
-
Open the file ./src/taskpane/taskpane.js.
-
Within the
Office.onReadyfunction call, locate the line that assigns a click handler to thechange-fontbutton, and add the following code after that line.document.getElementById("insert-text-into-range").onclick = () => tryCatch(insertTextIntoRange);
-
Add the following function to the end of the file.
async function insertTextIntoRange() {
    await Word.run(async (context) => {

        // TODO1: Queue commands to insert text into a selected range.

        // TODO2: Load the text of the range and sync so that the
        //        current range text can be read.

        // TODO3: Queue commands to repeat the text of the original
        //        range at the end of the document.

        await context.sync();
    });
}
-
Within the
insertTextIntoRange()function, replaceTODO1with the following code. Note:-
The function is intended to insert the abbreviation [«(M365)»] into the end of the Range whose text is «Microsoft 365». It makes a simplifying assumption that the string is present and the user has selected it.
-
The first parameter of the
Range.insertTextmethod is the string to insert into theRangeobject. -
The second parameter specifies where in the range the additional text should be inserted. Besides «End», the other possible options are «Start», «Before», «After», and «Replace».
-
The difference between «End» and «After» is that «End» inserts the new text inside the end of the existing range, but «After» creates a new range with the string and inserts the new range after the existing range. Similarly, «Start» inserts text inside the beginning of the existing range and «Before» inserts a new range. «Replace» replaces the text of the existing range with the string in the first parameter.
-
You saw in an earlier stage of the tutorial that the
insert*methods of the body object don’t have the «Before» and «After» options. This is because you can’t put content outside of the document’s body.
const doc = context.document;
const originalRange = doc.getSelection();
originalRange.insertText(" (M365)", Word.InsertLocation.end);
-
-
We’ll skip over
TODO2until the next section. Within theinsertTextIntoRange()function, replaceTODO3with the following code. This code is similar to the code you created in the first stage of the tutorial, except that now you are inserting a new paragraph at the end of the document instead of at the start. This new paragraph will demonstrate that the new text is now part of the original range.doc.body.insertParagraph("Original range: " + originalRange.text, Word.InsertLocation.end);
Add code to fetch document properties into the task pane’s script objects
In all previous functions in this tutorial, you queued commands to write to the Office document. Each function ended with a call to the context.sync() method which sends the queued commands to the document to be executed. But the code you added in the last step calls the originalRange.text property, and this is a significant difference from the earlier functions you wrote, because the originalRange object is only a proxy object that exists in your task pane’s script. It doesn’t know what the actual text of the range in the document is, so its text property can’t have a real value. It’s necessary to first fetch the text value of the range from the document and use it to set the value of originalRange.text. Only then can originalRange.text be called without causing an exception to be thrown. This fetching process has three steps.
-
Queue a command to load (that is, fetch) the properties that your code needs to read.
-
Call the context object’s
syncmethod to send the queued command to the document for execution and return the requested information. -
Because the
syncmethod is asynchronous, ensure that it has completed before your code calls the properties that were fetched.
The following step must be completed whenever your code needs to read information from the Office document.
-
Within the
insertTextIntoRange()function, replaceTODO2with the following code.originalRange.load("text"); await context.sync();
When you’re done, the entire function should look like the following:
async function insertTextIntoRange() {
    await Word.run(async (context) => {

        const doc = context.document;
        const originalRange = doc.getSelection();
        originalRange.insertText(" (M365)", Word.InsertLocation.end);

        originalRange.load("text");
        await context.sync();

        doc.body.insertParagraph("Original range: " + originalRange.text, Word.InsertLocation.end);

        await context.sync();
    });
}
Add text between ranges
-
Open the file ./src/taskpane/taskpane.html.
-
Locate the
<button>element for theinsert-text-into-rangebutton, and add the following markup after that line.<button class="ms-Button" id="insert-text-outside-range">Add Version Info</button><br/><br/>
-
Open the file ./src/taskpane/taskpane.js.
-
Within the
Office.onReadyfunction call, locate the line that assigns a click handler to theinsert-text-into-rangebutton, and add the following code after that line.document.getElementById("insert-text-outside-range").onclick = () => tryCatch(insertTextBeforeRange);
-
Add the following function to the end of the file.
async function insertTextBeforeRange() {
    await Word.run(async (context) => {

        // TODO1: Queue commands to insert a new range before the
        //        selected range.

        // TODO2: Load the text of the original range and sync so that the
        //        range text can be read and inserted.

    });
}
-
Within the
insertTextBeforeRange()function, replaceTODO1with the following code. Note:-
The function is intended to add a range whose text is «Office 2019, » before the range with text «Microsoft 365». It makes an assumption that the string is present and the user has selected it.
-
The first parameter of the
Range.insertTextmethod is the string to add. -
The second parameter specifies where in the range the additional text should be inserted. For more details about the location options, see the previous discussion of the
insertTextIntoRangefunction.
const doc = context.document;
const originalRange = doc.getSelection();
originalRange.insertText("Office 2019, ", Word.InsertLocation.before);
-
-
Within the
insertTextBeforeRange()function, replaceTODO2with the following code.originalRange.load("text"); await context.sync(); // TODO3: Queue commands to insert the original range as a // paragraph at the end of the document. // TODO4: Make a final call of context.sync here and ensure // that it runs after the insertParagraph has been queued.
-
Replace
TODO3with the following code. This new paragraph will demonstrate the fact that the new text is not part of the original selected range. The original range still has only the text it had when it was selected.doc.body.insertParagraph("Current text of original range: " + originalRange.text, Word.InsertLocation.end);
-
Replace
TODO4with the following code.
Replace the text of a range
-
Open the file ./src/taskpane/taskpane.html.
-
Locate the
<button>element for theinsert-text-outside-rangebutton, and add the following markup after that line.<button class="ms-Button" id="replace-text">Change Quantity Term</button><br/><br/>
-
Open the file ./src/taskpane/taskpane.js.
-
Within the
Office.onReadyfunction call, locate the line that assigns a click handler to theinsert-text-outside-rangebutton, and add the following code after that line.document.getElementById("replace-text").onclick = () => tryCatch(replaceText);
-
Add the following function to the end of the file.
async function replaceText() {
    await Word.run(async (context) => {

        // TODO1: Queue commands to replace the text.

        await context.sync();
    });
}
-
Within the
replaceText()function, replaceTODO1with the following code. Note that the function is intended to replace the string «several» with the string «many». It makes a simplifying assumption that the string is present and the user has selected it.const doc = context.document; const originalRange = doc.getSelection(); originalRange.insertText("many", Word.InsertLocation.replace);
-
Save all your changes to the project.
Test the add-in
-
[!includeStart server and sideload add-in instructions]
-
If the add-in task pane isn’t already open in Word, go to the Home tab and choose the Show Taskpane button in the ribbon to open it.
-
In the task pane, choose the Insert Paragraph button to ensure that there’s a paragraph at the start of the document.
-
Within the document, select the phrase «Microsoft 365 subscription». Be careful not to include the preceding space or following comma in the selection.
-
Choose the Insert Abbreviation button. Note that » (M365)» is added. Note also that at the bottom of the document a new paragraph is added with the entire expanded text because the new string was added to the existing range.
-
Within the document, select the phrase «Microsoft 365». Be careful not to include the preceding or following space in the selection.
-
Choose the Add Version Info button. Note that «Office 2019, » is inserted between «Office 2016» and «Microsoft 365». Note also that at the bottom of the document a new paragraph is added but it contains only the originally selected text because the new string became a new range rather than being added to the original range.
-
Within the document, select the word «several». Be careful not to include the preceding or following space in the selection.
-
Choose the Change Quantity Term button. Note that «many» replaces the selected text.

Insert images, HTML, and tables
In this step of the tutorial, you’ll learn how to insert images, HTML, and tables into the document.
Define an image
Complete the following steps to define the image that you’ll insert into the document in the next part of this tutorial.
-
In the root of the project, create a new file named base64Image.js.
-
Open the file base64Image.js and add the following code to specify the Base64-encoded string that represents an image.
export const base64Image =
    "iVBORw0KGgoAAAANSUhEUgAAAZAAAAEFCAIAAABCdiZrAAAACXBIWXMAAAsSAAALEgHS3X78AAAgAElEQVR42u2dzW9bV3rGn0w5wLBTRpSACAUDmDRowGoj1DdAtBA6suksZmtmV3Qj+i8w3XUB00X3pv8CX68Gswq96aKLhI5bCKiM+gpVphIa1qQBcQbyQB/hTJlpOHUXlyEvD885vLxfvCSfH7KIJVuUrnif+z7nPOd933v37h0IIWQe+BEvASGEgkUIIRQsQggFixBCKFiEEELBIoRQsAghhIJFCCEULEIIBYsQQihYhBBCwSKEULAIIYSCRQghFCxCCAWLEEIoWIQQQsEihCwQCV4CEgDdJvYM9C77f9x8gkyJV4UEznvs6U780rvAfgGdg5EPbr9CyuC1IbSEJGa8KopqBWC/gI7Fa0MoWCROHJZw/lxWdl3isITeBa8QoWCRyOk2JR9sVdF+qvwnnQPsF+SaRSEjFCwSCr0LNCo4rYkfb5s4vj/h33YOcFSWy59VlIsgIRQs4pHTGvYMdJvIjupOx5Ir0Tjtp5K/mTKwXsSLq2hUWG0R93CXkKg9oL0+ldnFpil+yhlicIM06NA2cXgXySyuV7Fe5CUnFCziyQO2qmg8BIDUDWzVkUiPfHY8xOCGT77EWkH84FEZbx4DwOotbJpI5nj5CQWLTOMBj8votuRqBWDP8KJWABIr2KpLwlmHpeHKff4BsmXxFQmhYBGlBxzoy7YlljxOcfFAMottS6JH+4Xh69IhEgoWcesBNdVQozLyd7whrdrGbSYdIqFgkQkecMD4epO9QB4I46v4tmbtGeK3QYdIKFhE7gEHjO/odSzsfRzkS1+5h42q+MGOhf2CuPlIh0goWPSAogcccP2RJHI1riP+kQYdVK9Fh0goWPSAk82a5xCDG4zPJaWTxnvSIVKwKFj0gEq1go8QgxtUQQeNZtEhUrB4FZbaA9pIN+98hhhcatbNpqRoGgRKpdAhUrDIMnpAjVrpJSNApK/uRi7pEClYZIk84KDGGQ+IBhhicMP6HRg1ycedgVI6RELBWl4POFCr8VWkszpe3o76G1aFs9ws+dMhUrDIInvAAeMB0ZBCDG6QBh2kgVI6RAoWWRYPqBEI9+oQEtKgg3sNpUOkYJGF8oADxgOioUauXKIKOkxV99EhUrDIgnhAG+mCUQQhBpeaNb4JgOn3AegQKVhkvj2gjXRLLrIQgxtUQYdpNYsOkYJF5tUDarQg4hCDS1u3VZd83IOw0iFSsMiceUCNWp3WYH0Wx59R6ls9W1c6RAoWmQ8PaCNdz55hiMEN4zsDNhMDpXSIFCwylx5Qo1a9C3yVi69a2ajCWZ43NOkQKVgkph5wwHi+KQ4hBs9SC9+RMTpEChaJlwfUFylWEafP5uMKqIIOPv0sHSIFi8TFAzpLiXxF/KCbdetEGutFUSa6TXQsdKypv42UgZQhfrWOhbO6q8nPqqCD/zU4OkQKFpm9B7SRbrTpQwzJHNaL/VHyiRVF0dfC2xpOzMnKlUgjW0amhGRW/ZM+w5sqzuqTNWtb9nKBZDLoEClYZGYe0EYaENWHGDaquHJv5CPnz/H9BToWkjmsFkTdOX0GS22p1ovYNEdUr9vCeR3dJlIG1gojn2o8RKPiRX+D0iw6RAoWmYEH1HioiQZqq47VW32dalUlfi1fQf7ByEdUQpMpYfOJ46UPcFweKaMSaWyaWL8z/Mibxzgqe3G4CC6pT4dIwSLReUCNWrkJMdjh8sMSuk1d3bReRGb3hy97iS/SEl+5bQ0LqM4B9gvytaptC6kbwz++vD3ZG0r3EBDoWUg6RAoWCd0D9isXReTKTYghZbhdUB/UYlKV2TSHitZtYc9QrqynDGy/GnGg+4XJr779ShJ0gNdAKR3i/PAjXoIZe8BGBS+uhqtWAF4VXUWu3G//ORVqdVRiEumhWgFoVHT7gB1LnFAvVaJxYZJ+qx/XRuo1X0+RFqzPsF/QFZuEgrVcHnDPCGbFylnajN/wAZZvqgpR8IzO275tTvjnwl/4sORC6C9xWJLoYCKNrbpuR3Jazp/jxdUJmksoWIvvAfcLsD4LuLfn5hOJhWlVQ+lyNZDFcUl636GY5/Wpyzo3FRZ+WBeT1JhpGDVlIMMbjYfYM3Ba4zuXgkUPGBD5B5Kl6LaJ4/uh/CCDTvDjW4ROxZm4gj7+dwZLY24067AkF9OtesCaRYdIwaIHDIzMrmSzv2NNTgl4fLlSXw6kjs8pWN+FfHu3n8p/xpSBjWrwL0eHSMGiB/TL+h1JnNJ+xTA6MawXh1ogTWA5S5tvLS8vMVUM6s1j+TKZEASjQ6RgkVl6wH4pcUM+zs8qBq9WyRyMGozP+5J0/nzygrrLSkS4ONPmNg/vyr1npiQG9+kQKVhkBh5woFbSI8EuQwxTkS1j2xoG0zsHeBVcRsl/RNMqyoMOG9WRjAUd4pzD4GhoHjDsMIEqchX48JuUgU1zJN+kSa4D+LnjHfXiqqsa5Oejb8J/fs9TAZjFtiXXvgADpaqXZsqUFRY94NRq1agErFbrRWzVR9Tq9JlOrWy75NncCf982n+o+sYCDJTSIVKw6AGnRhoQbZsBv3S+MlyxAtC7xPF9WMUJDsi5M+gmVCWImpvolorOgXzTMPBAKR0iBWvuPWB4+4CiWj2Rz3MPcFSXHb90NmawbWDLRVZAc2pHZTkF2fWDKugQRqBUCvcQKVj0gI6qRxYQtfvGBIUdvHQ2fmk/VR7fk5Q5jr+2fmfygrpTfM+fu8qa6lEFHcIIlGocolWkQwwcLrr79oBB9YRxg7SDXbDjJISue71LHJWnrno+vRh+BX2Xq2QOO6+Hf3TTXsYl43M3BhVcZFNjEyvIluUNvAgrrIX1gINqRdpvM0C1EhatbBvowaM5neOVe/L2VX176/jip88CUysAhyV5SRheoFRSfV+i8RAvckH+XKyweBW8qNWeEelEP1XkKqgQw3j/T3sxyNv6cSKNm02xA3KrOvLV1gq4Xh1u3vUusWcE7KESK7jZlHvSoDqU+q/4CAUrItomWtUoRvup1KpRCWxb0KiNqFXvcoreWCem/ETh+ILRYJnvJzlxz+7wrt/l9qkuHUIIrMk9bxaZEjIltl2mYMWDjoVWFae1sAouVeQq2LUYZwfRaVG1dR9PnKp802EpxG016TCOgZsOb6tk9RayZVZVFKwZ8cff4b/+Htcq8sd17wInJt5UA17SUqnVWR0vbwf5Qn5KgPO6bo0mU0K2LJetbgtvqjgxQw8uqcbthDH+OrHS/5FV19MuJDXreoSCFQC9C3yxisQK8hVk1dteZ3W8qQY2VFm68OF/emj0JNJ430DKQCKN3gU6FrrNSHf9VaMrfI68F+ynXVKpkhxndRyX0TlQzv4hFKyABWuwMPGROWxiJ6kdmmibaJu+7gTpPRbgDbZsqJa9/T8AMrvIlnWx/m4Tx+XhY4yC5RXGGjzRbeHlbd3ZsWQO+Qp2mth84nFtSBoQtS0M1cobqqCD50BpMovrj/Dpufyk1OBXZueKgyq6KVjEI/bZMf3ef6aErTp2XiOzO8UtIe0gCuCoHMWm5MLWyJfK09HTdihdvwPjc+w0J4wvbJv4KhfF2VIKFnHLm8f4KjfhkF0yh00TN5vYfDJ510wVED0qR7ENv7Sa5SZQmlhB/gF2XsOoTdj+O6tjz8Dh3Tlbaow9XMNy/153rGGpDIJ+Ycv5bm6bcvVR5YaiPFCy8Kze6s+4lj4VpIHS1Vv4sORqa09YrlL5fa5hUbBmLFiDd/am6Soi0LtAqzqyMK9Sq8BDDEQVdMBooDSxgvXihAV14RfqxgBSsChYcREsmyv3lImtcU5raJs4q8sjV/MYYpgLrj9SxlP2C/iuiXxFl1EYL4GPym5/TRQsCla8BKu/3qFNbLl80a9yVKuwUIWzpmKQrnIPBcsrXHQPT+AucXzf70l91lahclT2FV7tNmEV8fI2t24jI8FLEC52Ysv9wpbAtsVLGNNy2+VyFWGFNX+4SWyReYHpKgrWUuAmsUXiDNNVFKwlsxJBLGyRGVh7LlfFAq5hzeTd38LL27oo0ABpnykSIG766pzWYH3GS0XBWvJr7yLg8/1F1J18l4pk1lXuhM1CaQkJPixN/jvXKlGMpVpa8u7CvSkj9CGshIIV92e7tOvxeBXGhGFIrN6Sp0ZPa5Jw1gfsdEzBWmbGb4BuE4d3JbdKtszHe1jllZTjsqTBvJtymFCwFpbxpRM77nAouzE+MnnBAiazK++rYZ9Flw4B4mODgrWkpG5I1nHf1gDFrPa1gveRNmQc+5jnOL2L/pDqzoGkN2mArpChFgrWXD3eS5J38KDJjDTKsMG4aaDlrXTjr1UdJkJPTLpCChYBAEmzSqcHOX8utySZXV65AFBFGezjgULBS1dIwaIflDzehVVeVZHFiIN/VFEGoZtVtyUxbtwrpGDNDb3fheUH26Z4Nq3bkhw5TKT9dtciqihDtynpWN2mK6RgzS/vemH5QemU9kZF0tohX6Er8VteSTmWPQlOZa5w4gwRQsFaZD/Yu5APLOhdyvs6XOfqu+faVhFlOKsrfwXjRRZHzFOwlumeKbkqr2xaVUmOdL3IiEPA5ZXmhPn4b2edy1gUrOVh/O2uaY/Vu2TEITi1eiCPMrRNnD9XC9Yz0Zgnc3SFFKxl9YPd5oT+Su2nkgQjIw7TklhR7ldMbOBzQldIwVpOxu+Z8SWScY7K8iKLEQf3bFTlUYZWdZjXVT4zTLrCGD16eAlm6QfdCJZ9WEdYLbYjDmG3FU/mRqoJD90EV3+Ga//o5aUPS77m2QiFrbQm6l24+ok6B+g2R0pj2xWy9SgFa6HV6o74kO9Ykx/vNsdlyficfGVkanRIgpV/4Euw3v/E4xZBMheYYKn2VZ0HcfS0quK6YaaE4/t8U9MSLlN55X4aRedAXouxVZab54Q0ytBtTnH933KvkIJFwdIEGsaRVjeZEiMOHsurRmWKyTfdlrj1wb1CCtZy+cHT2nSjorotuWbFvMj6w6/xhxN81xL/G/zsvY7ks384wfdBDHBURRmkB3EmukIBHpOaBVzDmlF55Wa5ffyeyZZF4VsrILM79e0XGb/5JX7zS8nHt+r92rDz79gvhPPWVkcZpF0S9cgTpHf51maFtQSCpTqOo0d1WCfPQRUyVFGGs7ouKaq5+IJmJdJYv8PLTMFaDj/ojcZDyd5ZMkd7IqKKMsDHqEcGsihYS+oHT0zvX016v3FQhYBqrV1/EGeCKxw7pkPBomAtGokV8W3dbXq/Z6A4rMNpYE5Wb8mjDPA9SZuucOb3Ey9B6OVVUH5wwFEZW3Xxg5kSTkxfUmjj/MrCdz7+ovpvclxYo2HTVKqVz5xtqyo6zfWil+VIQsGaGz/4xnevBelhHQD5Cl7eDqA88fCpcX6cns0Fv3JPHmUQWrZ7Y/yYDvcKaQkX2Q+6P46j5+uS5IN2xCEO9C7xrTWbC36toiyOpgq+KS25SVfICmtpyqsTM5ivbA/7HN8Iy1emjqQKOGu0lIHrj+SfEhD+5mFJ0t85AlQDJrrNwA6Kt01xuZCukIK1sILlIS+qolGRLJDZEQc/N6dmxqfmU85dufbTANbpPKCa3wXfa+3Co6JjIWX4coWzWt2jJSRT+EGftc/4nSNdlMmWo86R5ivDg3XdlryBVwR8ZCrVIdiTACdjrnBaJx7g24CCRcIqrwKvO1pVifNKpCPtoZwyRlrQfD0jM6iJMgQuoEyQUrAWX7B6F8ELVu8S38jMTqYUXS8BZ4ag8VBnGyP7NgQb6z/qMX7ZhV/lepGnoyhYMeP/vouRHxzw5rG80V0008CcZrBzEORS0VSoogxQDBz0D6fpULAWSrAi8IPDukYmE2uF0LfbBTPooQVCIGiiDG0zrEbG7ac8pkPBWiCEwEG3GeLOd/up3IiFXWQ5Xdjx/ZntfKmiDEC4FR9dIQVrQUhmxQXgsLf5pXem0JE9PDN4/jyAELnnS62JMoTa8P7EpCukYC0EH4QZv5JiH9YZJ6SIg9MM9i5nZgY1VWQgB3EmXnNh9ZCCRcGaSz4cvYE7VhQjoaSHdUKKODjNYIDzuKZl9ZZSI76pRJF1oiukYC2CH3TGoBHccRw99mGdcQKPODjN4Omz2YTabVRa3G3izeMovoHxc+wssihYc+8H30Z1Szcq8tBmgKvv8TGDmV3xweC8DtEwPk2HgkXBmm8/eFoLd+lXuH+kCzcBRhycZtAqzibUDiCxoiyvzuqRjuQQyuf1Ilu/UrDm2Q9G7Jikh3WCKrKcZvDN41BC7X/+NzBq+Nk3yurJZnx6UPTllap8/oBFFgVrfv1gxILVu5QfnUvmcOWe3y8+CBB0DuRHgvyI1F//Cp9+i7/6Bdbv4E/zuv5/yayyH3QYB3EmVrXCr/jDEu8DCtZ8+sG2OYNz+e2n8m27a76ngQ3+eYDtrlZv9UXqp3+BRMrVP9FUi1/PQiwEwUoZdIUULPrBaZAeoAtqUEXj4SzbOWmiDG0zuuVC4bcsyDddIQVrDhCO43iblhrMLfRMmSP1+fCP4ITz//4WHUuZ7dpQJ0VndfR6vHkDXSEFa/4E68Sc5Tejuns/Mn3dmVY4tUOvg9//J379C/zbTdQ/wN7HcsHSRBla1dmUV3SFFKy5JHVD7HAS9nEcPefP5YZ0rTDd8BtBBIMKtf/oJwDwP/+N869w/Hf44n3861/iP/4WFy+U/0QTZfB/EGe9qOyo5bKkFa4MXWE4sKd7OOVVtxnFcRw9x2X5cs+miRdXXX2Fb62RwRMB5hga/4Df/2o6+dNEGfwfxLle7ddEnqOwp7WRY9gfliJK27PCIh4f0YJDmTmqwzruIw69C5zVh/8FyG//aTq10nRl8H8QJ1/pq1VmVzKIyCXCpaYrpGDNkx98W4vFN3ZUlucPrlXm7JhueE2vEukRKfS8kdo5EDdPPWsfoWBF6gfP6gEvAKcM5Cv9/zIl5a0rKZEu5bVeUBGHaFi9pbz5/R/E2aiOaHcy611oTkwKVti89+7dO14Fd49QC3sfyz+183qkwjosBXacba2AfEVcJrdlSHUKR9SmFdxsyjXuRW6WO2vu+eRL5USc/YKvaHvKwPYriZV+kfPy1ZJZ7Iz63D1DuZT5c953rLBi4gcDyYsmc9g08cmXkk29xAryD3CzqbyNBXVTzbnyE3GIrnrdVf6YpzW/B3Gc247dVl++PRdZ3Za40qf5OrM6N07Boh8U7yKfO1a2VO28njCeM7GCT750dWupDuv4iThEQ2JFZ119TsRZL478+F+Xhsthnv2ysPSu6TbzLYc/U7BmgvCm9Bm/ShnYtiRS1TlA4yEaD3H+fEQQN5+46imq2q3fqMb62mbLyvld/g/iOM8k2mcDBl/Tc5ElFNfJXHQDIilYxIVa3Rm5o3wex0kZ2KqL+3ftp3hxFXsGGhU0Ktgv4Is0Xt4eytaVe5MrAlXT95Qx9Zj1yNBEGXoXk+c5pwydZR5EGWzXPCjWfBZZvUvxicWldwrWbHjXm1xe+Vy92jRH1KpzgL2P5U3Tz+ojp2TyD5SVyADV9r+wTRYfNFGGVnWC706kYdTwyZfYqktkS4gytKrDKzxw9EEVWexBSsGaDb3fTRYsP3lRofl65wD7BV1fBGFH302RJbWrwt0bEzRRBjcHca79UECt3pLIllOju60RKXd+cW9F1umzkQV1ukIKVoz8oLME8Hkcx6l9vUvsFyZvJDnv29XC5JdQFVlOfxSf8krFUXlCeZXMiWLnlC3BBY+30BqUb56LrBO6QgpWHAUr0OV2Z49NVUJdoGMNb103iqNq+o7wx0RPV2yqowzd5uSMW7eJPUOymDiQLWc1NL6057/Icr9XSChY8ypYmnUQvWYNcBPLUk3WEfb4Z0ggUYZuE1YR1meSWmxgBp1r7SrF8VZkdQ5Glh2TubjHRyhYS+cHO5bfXXan9LhPFTrvBDfHiVWHdRCbiIMmynBWn24T9rSGr3LKo9HfXygX9Z11nLciS7jIbOlHwYpXeeW/PcP3DpHSz4xRlVQu+x84N8WcxCHikFjR7QB4OOdsByBe3pYsLyaz2H6FTVOuj4PX8lZkveVeIQUrzoI10cQl0hNaxDkrLDfbdon0yMKT+0Mqvcv4Rhw2qsqqx89BnLM69gx5CZzZxc5ryev6LLKEGauJdGCjISlYxK8fnHgcZ72Im01dh1+MtsfL7E7OVW1UR/bLT8wpvn/VYZ3ZRhxSN3S1jM+DOGuF4b6EcFoAwJV7uNkUk1+DqtlbkSUU3SyyKFhzU14Zn/crF826eO9iZP9r09S1kcmWR+zb6bOpl/xVh3VmGHHQ7FT6b9k+qJJ6l3hVxJ4h7jYOjpQPtKljDWs6D0UWE6QUrFiQWBl53gpCI7d7Pyyg6B/UDUer39Vb2KpLNCuRxkYV1x+NfHEPjX1Vh3Uwo4jD+h2lmvufiOM85m235ek2cVjCy9uizUysYPMJdn6QLT8rWcI0HbpCCtZ8lFdOd5C6oSuy7LvIaZGcD/y1AjIlbFsjDY57l97HmqpM1kwiDvryymcDDLuNcrclbpKe1bFfwOFd8esns9h80k9s+SmyGMgKGjbwc81ZvT+Rwfh85J3npodcIo2bzb4rPH+O/cIEQRQOFWqe4frjOxPZfCIvHAY/bDTkHyjlwE6BBjVAO5nTLd7lH8i+gdbQIx/endp6f3o+LJN7F/hitf//mq6EhBVWkH7QqVbdpqutK2d4WjO7eFCyfZVD4+GEgz7+1QrqoMBaIbqIw8QoQ1BqBXXyw3adL65KfpvOFT2fK1l0hRSsOfCD475m05zwdLXvnz0DL66i8VByx3YOsGcEMDJeOPo7UvVENahCE2VwcxAnQLpN7Bfw8rZygd/DShb3CilYMRKsN67Xp3sXw/Upu1mopn2KfXzXqGHnNfIPROGwTWVQM01VveGTuSgiDvoog+cpgT69/4scju8HU9kJx3TWi3M2ryhmcA1rmvexVcSnjntbM5ZCxaY5YrXsjaSOhY6FRBopA8kcUoauIUnjod8tM0kxpVhC6l0o85ZBoVnKiXgdTeJV09iojvy+vM2nEC6vPaOEa1gUrNAFq22OpNWPyl5GeAqa5Z7z52hUAh5oOkAY/DOgbeLwbmjl6h0Yak/tcyJOYDWggY1qf9vUw6I7xqbpnNZgfUbBoiWM3A96a89wWJrabpw+w8vb2C+EpVZQr75nSiFGHDRRhrYZC7Wy6+j9AqzPvKRzB3WZc7WRrpAVVhRc/AvSPxOfk37sxnoRawUkc0ikJR6w28J5HWd1nNYiGgm1/Up+cigka3blnq4/xLzMTPT2wx6WkCmxwqJghcnvj/DTDXElItgVk/cNAPjWms3QOjtbr6oKA/5h1eNdAbSqOL6/UG+exMrI6udpDYk0BYuCFSZ//B3+5M/6/9+7wFe5IPNBMUG1sBJsehPA9Ue6iTgLeW2FvHHHcttEiDjgGpZrBmqFIKalxhPVYZ1gIw6a+V0I4iBOPBEie1QrCtbM3nwLQ+dAua6cLQfWxeEjU/mpbhONh4t5bdtPOZ6egjULuk1f01JjjqrpeyLtfYC7k9VburWbwCNmfM5RsFheLbQcqyfrCJMTvaFpu9qxIj2IEz0nJu8eClb0tf2iv+1Uh3Xgu1XWlXu6TqpH5QW/sOfPAztQRcEiruhYvqalzgW9S3yjsGZrBe/9BhIruKZ2fGf1uCRFWZ5TsFjVzxlvHitrAc9FluawN3y3bGd5TsEiEt4uzRNStf6dzMkb3enRRxna5uLXrf0K/SCApkAULOK2nl+k8yITaoGnyqOL2fLUp+E+Mr2II4t0QsHyJVhLhUpH7L4r7pkYZViex8BSFekULApWpGgm60wVcdCom7N59JLQbXHp3TMJXgK3vOvBqKF3gY6FbhPdJr5rLn5p8HVppJeTk+tVV10c9ONjF/UgzshNtoKUgR+nkTKGbRqJJ3j42f8Ds4luEx2rr2XfX6BjLdRNqJqsA8AqTgj967sydJt4cXWh3gypG8M2DKsFAGzJQMGaE2wzdV7v/3/vYl43wpJZbFty0ZmoOJr5XQiha02U1+QnOSRz/ZbWdmsgTWiDULDmkt5Fv93VfPlKje40KsrjykJr4HFBn23Lds9ujoaOgkVfGWtfqXF2mvZVQgcogZi0bKebo2CRBfSVmo7G0gahmv6lsy2v6OYoWMuL7ewiftPPyleqJutA1oJd1SFe9fcXz83ZD5vvmlPPXiUUrBBpm8Pooz1gZmAr7LtlYXylZiqXUDFldnVtZAIfHTZbN6e67IkVZMvIllm+UbDiR6uKRkWuDs5HfTI39CPz6Cs10/QGa1L6KIOf4ayzdXNTFbaZXWxUKVUUrBhjh7bdJyHt289pW+LvKzUrU4OIgz7KoNlVjJub8ybxmV3kK9xJpGDNj2wdlX3Fi2LuKzV7f0dlvK3pogzjW4rxdHOef3H5CvcWKVhzSLeJ43KQrd/j4yuTOeUqsl21ae7YjoXT2tyUk1N51Y9MShUFa845q6NRCTdtNFtfGc9rjgiDIMks8hXuA1KwFojTGo7LUcfZZ+srI3Nz3/3g6aKP2nITkIK1yLRNHJVnHF6fua/06eZsVYrDYaYr93CtQqmiYC00024jRkZMfKUtSQM3B8RxLAU3ASlYSydb31Tw5vEcfKsh+cqZuznPV2OjyhHzFKylpNtEozKXzVXc+8p4ujkPpG7gepWbgBSspSeCbcRoGA+LzkX3GDdmmZuAsXpc8hLMkrUC1uo4q+Pr0nINYpiLQjJb1kX2ySzgEIp4yNZOE5tPkMzyYsSlYLzZpFpRsIiaTAnbFvIPph75R4L8Lexi5/WEIdWEgkUAIJFGvoKbTS+jlYlPVm9h5zU2TUYWKFhketnaeY3MLi9GRFL1yZfYqlOqKFjEK8kcNk1sv+qHoUgoFzmLzSfYqjOyQMEiQZAysFXHJ19OMWaZuCpjV3D9EXbYv5iCRQJnrYBti9uIgUmVvYzBIcUAAAIqSURBVAmYLfNiULBIaGRK2GlyG9HfNdzFtsVNQAoWiYrBNiJlayq4CUjBIjMyNWnkK9i2uI3oVqq4CUjBIjPG3kbcec1tRPUlysL4nJuAFCwSJ9mytxEpWyNF6Ao2n2CnqZyXQShYZGasFbBV5zZiX6rsTUDmFShYJNbY24jXHy3venxmt39omZuAFCwyH2TLy7iNuH6nvwlIqaJgkXmzRcu0jWhvAho1bgJSsMg8M9hGXL+zoD9gtp9X4CYgBYssjmwZtUXbRrQPLe80KVUULLKI2NuIxudzv41obwJuW9wEpGCRRWe92O/FPKfr8VfucROQgkWWjExp/rYR7c7FG1VKFQWLLB+DXszx30a0NwF5aJlQsChb/W3EeMpW6gY3AQkFi4xipx9itY1obwJuW5QqIj5keQkIEJuRrhxfSlhhkSlka4YjXTm+lFCwyNREP9KV40sJBYv4sGY/bCNeuRfuC63ewvYrbgISChYJQrY2qmFtIw46F6cMXmlCwSIBEfhIV44vJRQsEi6BjHTl+FJCwSLR4XmkK8eXEgoWmQ3TjnTl+FJCwSIzZjDSVQPHl5JAee/du3e8CsQX3Sa6Y730pB8khIJFCKElJIQQChYhhFCwCCEULEIIoWARQggFixBCwSKEEAoWIYRQsAghFCxCCKFgEUIIBYsQQsEihBAKFiGEULAIIRQsQgihYBFCCAWLEELBIoQQChYhhILFS0AIoWARQkjA/D87uqZQTj7xTgAAAABJRU5ErkJggg==";
Insert an image
-
Open the file ./src/taskpane/taskpane.html.
-
Locate the
<button>element for thereplace-textbutton, and add the following markup after that line.<button class="ms-Button" id="insert-image">Insert Image</button><br/><br/>
-
Open the file ./src/taskpane/taskpane.js.
-
Locate the
Office.onReadyfunction call near the top of the file and add the following code immediately before that line. This code imports the variable that you defined previously in the file ./base64Image.js.import { base64Image } from "../../base64Image";
-
Within the
Office.onReadyfunction call, locate the line that assigns a click handler to thereplace-textbutton, and add the following code after that line.document.getElementById("insert-image").onclick = () => tryCatch(insertImage);
-
Add the following function to the end of the file.
async function insertImage() {
    await Word.run(async (context) => {

        // TODO1: Queue commands to insert an image.

        await context.sync();
    });
}
-
Within the
insertImage()function, replaceTODO1with the following code. Note that this line inserts the Base64-encoded image at the end of the document. (TheParagraphobject also has aninsertInlinePictureFromBase64method and otherinsert*methods. See the following «Insert HTML» section for an example.)context.document.body.insertInlinePictureFromBase64(base64Image, Word.InsertLocation.end);
Insert HTML
-
Open the file ./src/taskpane/taskpane.html.
-
Locate the
<button>element for theinsert-imagebutton, and add the following markup after that line.<button class="ms-Button" id="insert-html">Insert HTML</button><br/><br/>
-
Open the file ./src/taskpane/taskpane.js.
-
Within the
Office.onReadyfunction call, locate the line that assigns a click handler to theinsert-imagebutton, and add the following code after that line.document.getElementById("insert-html").onclick = () => tryCatch(insertHTML);
-
Add the following function to the end of the file.
async function insertHTML() {
    await Word.run(async (context) => {

        // TODO1: Queue commands to insert a string of HTML.

        await context.sync();
    });
}
-
Within the
insertHTML()function, replaceTODO1with the following code. Note:-
The first line adds a blank paragraph to the end of the document.
-
The second line inserts a string of HTML at the end of the paragraph; specifically two paragraphs, one formatted with the Verdana font, the other with the default styling of the Word document. (As you saw in the
insertImagemethod earlier, thecontext.document.bodyobject also has theinsert*methods.)
const blankParagraph = context.document.body.paragraphs.getLast().insertParagraph("", Word.InsertLocation.after);
blankParagraph.insertHtml('<p style="font-family: verdana;">Inserted HTML.</p><p>Another paragraph</p>', Word.InsertLocation.end);
-
Insert a table
-
Open the file ./src/taskpane/taskpane.html.
-
Locate the
<button>element for theinsert-htmlbutton, and add the following markup after that line.<button class="ms-Button" id="insert-table">Insert Table</button><br/><br/>
-
Open the file ./src/taskpane/taskpane.js.
-
Within the
Office.onReadyfunction call, locate the line that assigns a click handler to theinsert-htmlbutton, and add the following code after that line.document.getElementById("insert-table").onclick = () => tryCatch(insertTable);
-
Add the following function to the end of the file.
async function insertTable() {
    await Word.run(async (context) => {

        // TODO1: Queue commands to get a reference to the paragraph
        //        that will precede the table.

        // TODO2: Queue commands to create a table and populate it with data.

        await context.sync();
    });
}
-
Within the
insertTable()function, replaceTODO1with the following code. Note that this line uses theParagraphCollection.getFirstmethod to get a reference to the first paragraph and then uses theParagraph.getNextmethod to get a reference to the second paragraph.const secondParagraph = context.document.body.paragraphs.getFirst().getNext();
-
Within the
insertTable()function, replaceTODO2with the following code. Note:-
The first two parameters of the
insertTablemethod specify the number of rows and columns. -
The third parameter specifies where to insert the table, in this case after the paragraph.
-
The fourth parameter is a two-dimensional array that sets the values of the table cells.
-
The table will have plain default styling, but the
insertTablemethod returns aTableobject with many members, some of which are used to style the table.
const tableData = [
        ["Name", "ID", "Birth City"],
        ["Bob", "434", "Chicago"],
        ["Sue", "719", "Havana"],
    ];
secondParagraph.insertTable(3, 3, Word.InsertLocation.after, tableData);
-
-
Save all your changes to the project.
Test the add-in
-
[!includeStart server and sideload add-in instructions]
-
If the add-in task pane isn’t already open in Word, go to the Home tab and choose the Show Taskpane button in the ribbon to open it.
-
In the task pane, choose the Insert Paragraph button at least three times to ensure that there are a few paragraphs in the document.
-
Choose the Insert Image button and note that an image is inserted at the end of the document.
-
Choose the Insert HTML button and note that two paragraphs are inserted at the end of the document, and that the first one has the Verdana font.
-
Choose the Insert Table button and note that a table is inserted after the second paragraph.

Create and update content controls
In this step of the tutorial, you’ll learn how to create Rich Text content controls in the document, and then how to insert and replace content in the controls.
[!NOTE]
There are several types of content controls that can be added to a Word document through the UI, but currently only Rich Text content controls are supported by Word.js.Before you start this step of the tutorial, we recommend that you create and manipulate Rich Text content controls through the Word UI, so you can be familiar with the controls and their properties. For details, see Create forms that users complete or print in Word.
Create a content control
-
Open the file ./src/taskpane/taskpane.html.
-
Locate the
<button>element for theinsert-tablebutton, and add the following markup after that line.<button class="ms-Button" id="create-content-control">Create Content Control</button><br/><br/>
-
Open the file ./src/taskpane/taskpane.js.
-
Within the
Office.onReadyfunction call, locate the line that assigns a click handler to theinsert-tablebutton, and add the following code after that line.document.getElementById("create-content-control").onclick = () => tryCatch(createContentControl);
-
Add the following function to the end of the file.
async function createContentControl() {
    await Word.run(async (context) => {

        // TODO1: Queue commands to create a content control.

        await context.sync();
    });
}
-
Within the
createContentControl()function, replaceTODO1with the following code. Note:-
This code is intended to wrap the phrase «Microsoft 365» in a content control. It makes a simplifying assumption that the string is present and the user has selected it.
-
The
ContentControl.titleproperty specifies the visible title of the content control. -
The
ContentControl.tagproperty specifies an tag that can be used to get a reference to a content control using theContentControlCollection.getByTagmethod, which you’ll use in a later function. -
The
ContentControl.appearanceproperty specifies the visual look of the control. Using the value «Tags» means that the control will be wrapped in opening and closing tags, and the opening tag will have the content control’s title. Other possible values are «BoundingBox» and «None». -
The
ContentControl.colorproperty specifies the color of the tags or the border of the bounding box.
const serviceNameRange = context.document.getSelection();
const serviceNameContentControl = serviceNameRange.insertContentControl();
serviceNameContentControl.title = "Service Name";
serviceNameContentControl.tag = "serviceName";
serviceNameContentControl.appearance = "Tags";
serviceNameContentControl.color = "blue";
-
Replace the content of the content control
-
Open the file ./src/taskpane/taskpane.html.
-
Locate the
<button>element for thecreate-content-controlbutton, and add the following markup after that line.<button class="ms-Button" id="replace-content-in-control">Rename Service</button><br/><br/>
-
Open the file ./src/taskpane/taskpane.js.
-
Within the
Office.onReadyfunction call, locate the line that assigns a click handler to thecreate-content-controlbutton, and add the following code after that line.document.getElementById("replace-content-in-control").onclick = () => tryCatch(replaceContentInControl);
-
Add the following function to the end of the file.
async function replaceContentInControl() {
    await Word.run(async (context) => {

        // TODO1: Queue commands to replace the text in the Service Name
        //        content control.

        await context.sync();
    });
}
-
Within the
replaceContentInControl()function, replaceTODO1with the following code. Note:- The
ContentControlCollection.getByTagmethod returns aContentControlCollectionof all content controls of the specified tag. We usegetFirstto get a reference to the desired control.
const serviceNameContentControl = context.document.contentControls.getByTag("serviceName").getFirst();
serviceNameContentControl.insertText("Fabrikam Online Productivity Suite", Word.InsertLocation.replace);
- The
-
Save all your changes to the project.
Test the add-in
-
[!includeStart server and sideload add-in instructions]
-
If the add-in task pane isn’t already open in Word, go to the Home tab and choose the Show Taskpane button in the ribbon to open it.
-
In the task pane, choose the Insert Paragraph button to ensure that there’s a paragraph with «Microsoft 365» at the top of the document.
-
In the document, select the text «Microsoft 365» and then choose the Create Content Control button. Note that the phrase is wrapped in tags labelled «Service Name».
-
Choose the Rename Service button and note that the text of the content control changes to «Fabrikam Online Productivity Suite».

Next steps
In this tutorial, you’ve created a Word task pane add-in that inserts and replaces text, images, and other content in a Word document. To learn more about building Word add-ins, continue to the following article.
[!div class=»nextstepaction»]
Word add-ins overview
See also
- Office Add-ins platform overview
- Develop Office Add-ins
Word add-ins programming guide
Applies to: Word 2016
Microsoft Word 2016 (this list will be updated when we get new hosts) introduces a new object model for working with Word objects. This object model is an addition to the existing object model provided by OfficeJS to create add-ins for Word. This object model is accessed via JavaScript hosted by a web application.
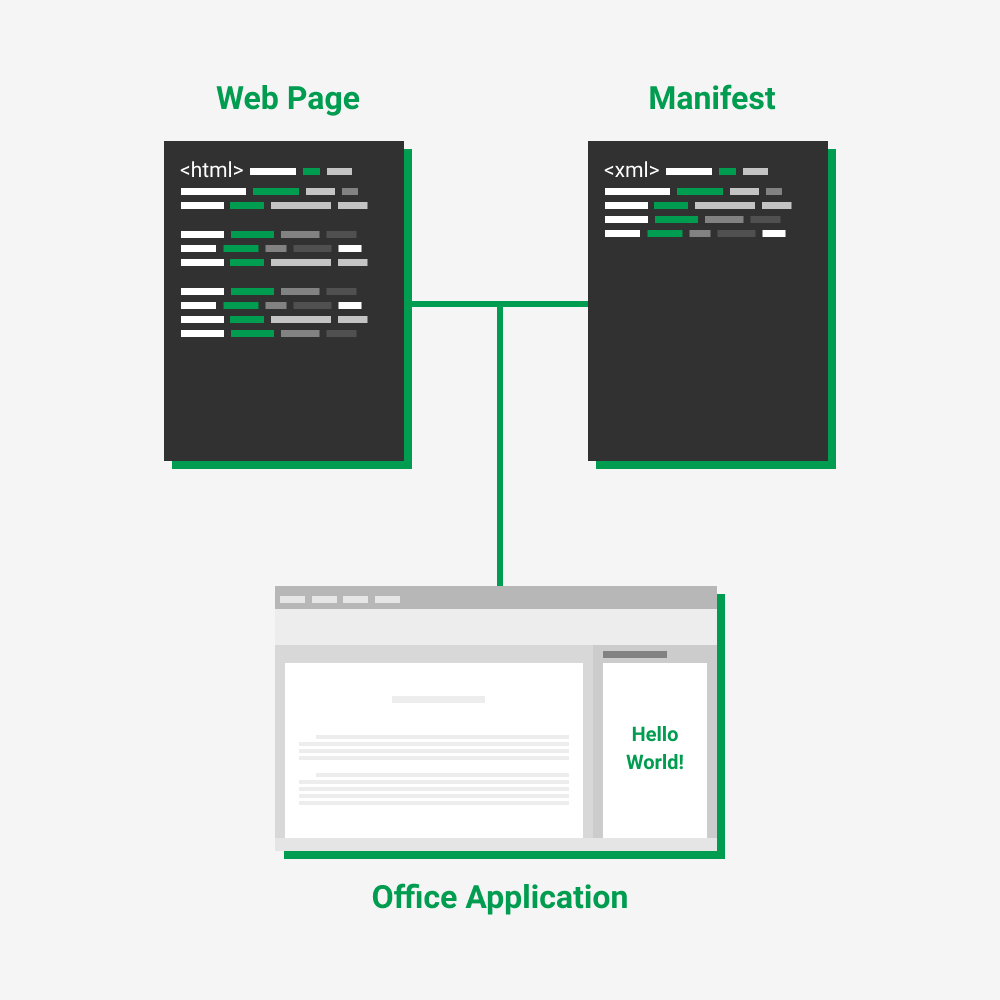
Manifest
The new Word add-in Javascript API uses the same manifest format as is used for the old Word add-in model. The manifest describes where the add-in is hosted, how it is displayed, permissions, and other information. Learn more about how you can customize the add-in manifests.
You have a few options for publishing Word add-in manifests. Read about how you can publish your Office add-in to a network share, and app catalog, or to the Office store.
Understanding the Javascript API for Word
The Javascript API for Word is loaded by Office.js. It provides a set of proxy objects that are used to queue a set of commands that interact with the contents of a Word document. These commands are run as a batch. The results of the batch are actions taken on the Word document like inserting content, and synchronizing the Word objects with the Javascript proxy objects.
Running your add-in
Let’s take a look at what you’ll need when you run your add-in. All add-ins should have an Office.initialize event handler. Read Understanding the API for more information about add-in initialization. Your Word add-in executes by passing a function into the Word.run() method. The function passed into the run method has a context argument. This context object is different than the context object you get from the Office object, although it is used for the same purpose which is to interact with the Word runtime enviroment. The context object provides access to the Word Javascript object model. Let’s take a look at the comments and code of a basic Word add-in:
Example 1. Initialization and execution of a Word add-in
    (function () {
        "use strict";

        // The initialize event handler is run each time a the page is loaded.
        Office.initialize = function (reason) {

            // Checks for the DOM to load using the jQuery ready function.
            $(document).ready(function () {
                // Set your initialization code. You can use the reason argument
                // to determine how the add-in was loaded.
            });
        };

        // Run a batch operation against the Word object model.
        // Use the context argument to get access to the Word document.
        Word.run(function (context) {

            // Create a proxy object for the document.
            var thisDocument = context.document;
        })
    })();
Proxy objects
The Word Javascript object model is loosely coupled with the objects in Word. The Word Javascript objects are proxy objects for the real objects in a Word document. All actions taken on proxy objects are not realized in Word, and the state of the Word document is not realized in the proxy objects, until the document state has been synchronized. The document state is synchronized when context.sync() is run. Example 2. shows the creation of a proxy object, a queued command to load the text property on the body proxy object, and then the synchronization of the body contents in the Word document with the body proxy object.
Example 2. Synchronization of the document body with the body proxy object.
    // Run a batch operation against the Word object model.
    Word.run(function (context) {

        // Create a proxy object for the document body.
        // The body object hasn't been set with any property values.
        var body = context.document.body;

        // Queue a commmand to load the text property for the proxy document body object.
        context.load(body, 'text');

        // Synchronize the document state by executing the queued-up commands,
        // and return a promise to indicate task completion.
        return context.sync().then(function () {
            console.log("Body contents: " + body.text);
        });
    })
Command queue
The Word proxy objects have methods for accessing and updating the object model. These methods are executed sequentially in the order in which they were queued in the batch. In example 3., we demonstrate how the queue of commands works. When context.sync() is run, the first thing that happens is that the commmand to load the body text is executed in Word. Then, the command to insert text into the body on Word occurs. The results are then returned to the body proxy object. The value of the body.text property in the Word Javascript will be the value of the Word document body before the text was inserted into Word document.
Example 3. Executing a batch of commands.
    // Run a batch operation against the Word object model.
    Word.run(function (context) {

        // Create a proxy object for the document body.
        var body = context.document.body;

        // Queue a commmand to load the text in document body.
        context.load(body, 'text');

        // Queue a command to insert text into the end of the body.
        body.insertText('This is text inserted after loading the body.text property',
                        Word.InsertLocation.end);

        // Synchronize the document state by executing the queued-up commands,
        // and return a promise to indicate task completion.
        return context.sync().then(function () {
            console.log("Body contents: " + body.text);
        });
    })
— The methods, how they are used to send instruction to the document, how they, how there is a queue, when they executed
Synchronize the document and proxy objects
- synchronize from the document to object model. sync from object model to the document.
The Basics
This section introduces key concepts that you need to understand to work with the Word API.
RequestContext()
All actions that target a Word document start by using the client request context returned by the Word.RequestContext method. The client request context serves two major roles:
- Contains the queue of commands that will be performed on the contents of a Word document.
- Provide the bridge between the Office add-in and the Word application since they run in two different processes. The JavaScript runs in the user’s browser within the task pane. Word runs in a different process, and in the case of Word Online, on a remote server cluster.
Here’s how you get the request context:
var ctx = new Word.RequestContext();
You can now create a queue of commands that will target the contents of a Word document. For example, let’s create a set of commands that will get the current selection and add some text to the selection. The selection will be contained in a range object returned by document.getSelection(). We are going to add some text at
the end of the selection. We’ll use the context given in the previous line of code.
    var range = ctx.document.getSelection();
    range.insertText("Hello World!", Word.InsertLocation.end);
At this point, no changes have occurred. You have specified a set of commands that will run in the future. Let’s expand on this by looking at the load method.
executeAsync()
The Word JavaScript objects created in the add-ins are local proxy objects. Invoking methods and setting properties queues the set of commands in JavaScript, but does not submit them until executeAsync() is called. executeAsync submits the request queue to Word and returns a promise object, which can be used for chaining further commands. executeAsync runs each command in the order in which they were added to the queue. A best practice is to group related commands into a single executeAsync call.
executeAsync() example
This example shows how to insert text at the end of a selection. The queue is filled with two commands: getting the user’s selection and inserting text at the end of the user’s selection. These commands are ran when ctx.executeAsync() is called. executeAsync() returns a promise which can be used to chain it with other operations.
    var ctx = new Word.RequestContext();

    // Queue: get the user's current selection and create a range object named range.
    // Queue: insert 'Hello World!' at the end of the selection.
    var range = ctx.document.getSelection();
    range.insertText("Hello World!", Word.InsertLocation.end);

    // Run the set of commands in the queue. In this case, we are inserting text
    // at the end of the range.
    ctx.executeAsync()
        .then(function () {
            console.log("Done");
        })
        .catch(function(error){
            console.log("ERROR: " + JSON.stringify(error));
        });
load()
The load method specifies which collections, objects, and properties will be loaded into the object model. You use the client request context to specify the load options and the object to load. There are two options for using the load method. We’ll use the client request context we created above:
    ctx.load(object, options);
    // or
    object.load(options);
object identifies the object that will be loaded into the object model.
options identifies which properties are loaded and the paging arguments. Properties to load can be specified as either a string, a string of comma-separated values, an array of strings, or in a loadOption object.
Note — You can use multiple load statements that will be dispatched in a single executeAsync() call. Do this instead of creating complicated select and expand statements.
For example, we’ll use the context given in the previous code to load the text content of all of the paragraphs contained in the current selection that was captured in the range object.
ctx.load(range.paragraphs, 'text');
Here is key information for using the load method:
- You SHOULD specify the property set you want to load for the object in the options parameter. Not including the options parameter is the equivalent of using a «SELECT * from Table1», which will affect performance and SHOULD NOT be done for production applications.
- If the loaded object is a collection, then the specified properties will be loaded for all objects in the collection.
loadOption object
The loadOption object specifies which properties to load and how to page through a collection. There are four loading options:
- select
- expand
- top
- skip
select
You use the select option to load properties that are primitive types. You can use either a string or an object literal to specify which properties to load. For example, if you are going to make simple load statement, you don’t need to create an object literal to specify the property. The following code will load the text string for a range object:
Use commas to separate properties if you use the string form.
ctx.load(range, 'text, style, font');
You can specify the property set in the following object literal forms:
    {select: 'propertyName'}
    {select: "propertyName1, propertyName2"}
    {select: ['propertyName1', 'propertyName2']}
Let’s build on the last code snippet and load the style property on the range object.
ctx.load(range, 'style');
If you take a look at the range object documentation, you can see that you can select the style, and text properties as they are all primitive types. You use methods to load HTML and OOXML properties.
There’s also a select path notation to access properties on objects specified by the expand statement.
expand
You use the expand option to load properties that are in nested Word API objects and collections. Using the range object from the previous examples, we can load the paragraphCollection and the font object for the range by specifying the objects in the expand option. We identify which properties are returned in the select statement.
    ctx.load(range, {select: 'font/color, paragraphs/text',
                     expand: 'font, paragraphs'});
Notice how we specify a path to the selected properties in the select statement. The select statement can be used not only to specify the properties on the loaded object, but also to specify the properties loaded on the child objects identified by the expand option. We would have gotten all the properties for the font object and paragraphs collection if we hadn’t added the select statement. It is a best practice to always use the select statement with the expand statement.
Use multiple load method calls if you find that your loadOption objects are getting too complex.
Pulling it all together
Let’s put it all together by taking a look at a simple example that shows how you can use the client request context, load method, references, and the executeAsync() method.
Example: How to load the font color and paragraph text for all fonts and paragraphs in a range
    // Run a batch operation against the Word object model.
    Word.run(function (ctx) {

        // Create a proxy object for the document.
        var thisDocument = ctx.document;

        // Queue a command to get the user's current selection.
        // Create a proxy range object for the selection.
        var range = thisDocument.getSelection();

        // Queue a command to insert text into the selection.
        range.insertText("Hello World!", Word.InsertLocation.end);

        // Queue a command to load the range object's font color and the text
        // for all paragraphs in the paragraph collection.
        ctx.load(range, {select: 'font/color, paragraphs/text',
                         expand: 'font, paragraphs'});

        // Synchronize the document state by executing the queued-up commands,
        // and return a promise to indicate task completion.
        return ctx.sync().then(function () {

            // The document has been updated with text inserted in to the selection.
            // The proxy range object that was created based on the selection
            // has been loaded. You can access the font color and the text content
            // in the paragraph collection on the proxy range object.

            var contents = '';

            for (i=0; i < range.paragraphs.items.length; i++) {
                contents = contents + range.paragraphs.items[i].text;
            }

            // Show the contents of the paragraphs
            console.log("OUTPUT: paragraph text in the range object: " + contents);

            // Queue a command to add a paragraph to the end of the range.
            range.insertParagraph("This is a new paragraph.", Word.InsertLocation.after);

            // Synchronize the document state by executing the queued-up commands,
            // and return a promise to indicate task completion. In this case,
            // we are inserting a paragraph into the selection.
            return ctx.sync();
        });
    })
    .catch(function (error) {
        console.log("Error: " + JSON.stringify(error));
        if (error instanceof OfficeExtension.Error) {
            console.log("Debug info: " + JSON.stringify(error.debugInfo));
        }
    });

Максим Колоколов
техлид в Dunice
Для решений многих повседневных задач используются продукты Microsoft Office, такие, как Word, Excel, PowerPoint и т.д. Но не все знают, что в этих приложениях можно использовать надстройки (Add-ins), доступные из Microsoft AppSource. Эти надстройки позволяют расширить стандартный функционал Office, например, осуществлять перевод текста, искать изображения в интернете или даже планировать встречи в Starbucks. Стоит отметить, что многие современные надстройки работают с Office для iPad, Office Online и Office для Mac, а не только с традиционными настольными версиями Office для Windows.
Мне необходимо было интегрировать виджет для работы с уже существующим веб-сайтом, написанным ранее. Основные задачи надстройки можно выделить в следующие пункты:
- получение данных из открытого документа Microsoft Office в контекст виджета;
- анализ полученных данных из текущего документа, выделение ключевых слов с помощью простого NLP алгоритма (подсчет наиболее используемых слов, не считая предлогов и союзов), а также поиск по этим словам и отображение соответствующего контента (карточки с различными типами содержания: текст, изображения, видео, опросники и т.д.), посредством API уже написанного сервера;
- возможность быстрой вставки контента из результатов поиска в рабочую область документа.
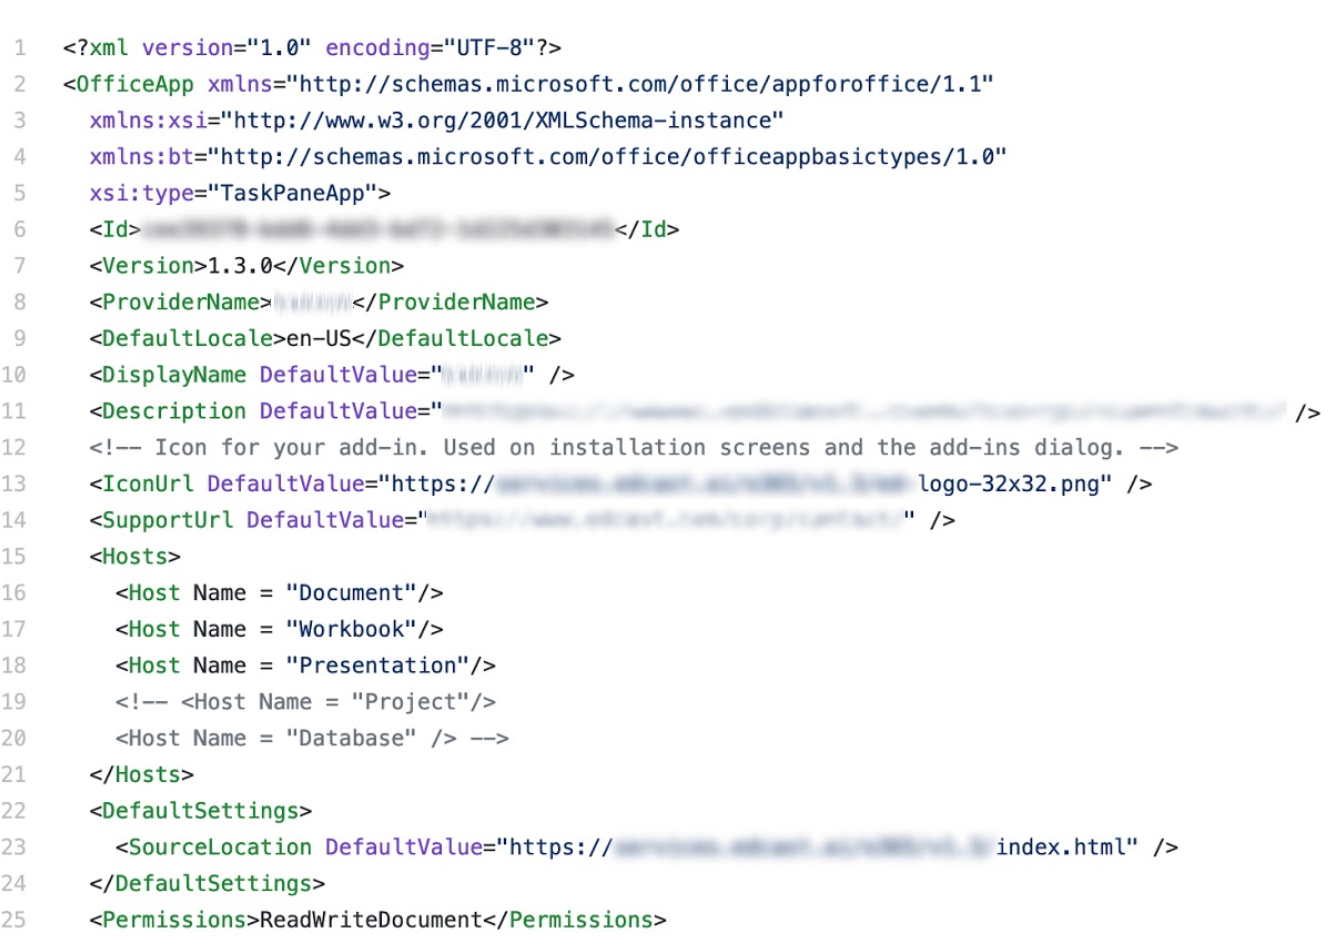
Для реализации собственной надстройки Office, нам нужно подготовить два основных компонента — файл манифеста и веб-приложение.
Манифест представляет собой XML-файл, который определяет следующие параметры и возможности надстройки:
- Отображаемое имя, описание, идентификатор, версию и языковой стандарт надстройки по умолчанию.
- Способ интеграции надстройки с Office.
- Уровень разрешений и требования для доступа к данным для надстройки.
Веб-приложение — это HTML-страница, которая отображается в приложении Office. Для создания кода, который взаимодействует с документами Office, а также позволяет пользователю взаимодействовать с веб-ресурсами из приложения Office, можно применять любые технологии, как клиентские, так и серверные. В свою очередь, Microsoft предоставляет интерфейсы API JavaScript Office.js для взаимодействия с документами. Выглядит это следующим образом:
Перед началом разработки, Microsoft Office предлагает ознакомиться, и соответственно придерживаться следующих принципов оформления надстроек:
- Разрабатывайте специально для Office.
- Сосредоточьтесь на нескольких ключевых задачах.
- Содержимое важнее, чем хром (внешний вид).
- Сделайте работу с надстройкой приятной и разрешите пользователям самим выбирать, что делать.
- Поддержка всех платформ и способов ввода.
Так же Microsoft разработал Office UI Fabric — официальный front-end framework для создания интерфейсов в Office. И конечно же, рекомендует его использовать при разработке.
Написание файла манифеста
Для начала подготовим файл манифеста. На следующей схеме показана иерархия элементов, используемых для задания команд надстройки.
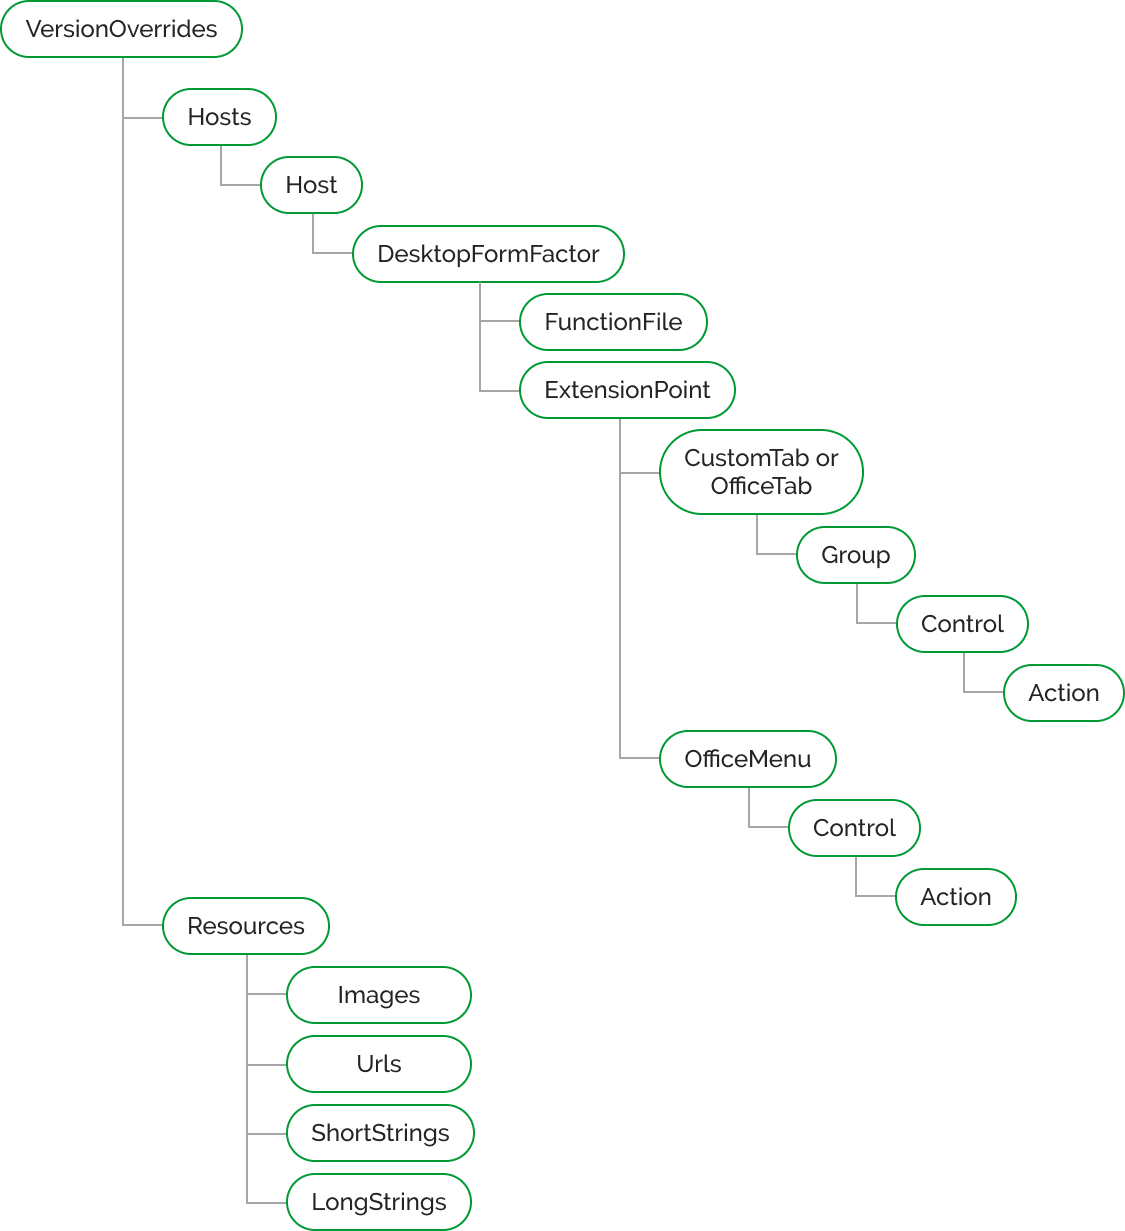
Весь файл манифеста разбиваем на 3 части:
- Общая информация о надстройке — тут отображается название, версия, описание надстройки и т.д, а также поддерживаемые типы платформ в нашей надстройке (доступны: Word, Excel, PowerPoint, Outlook, Project и SharePoint).

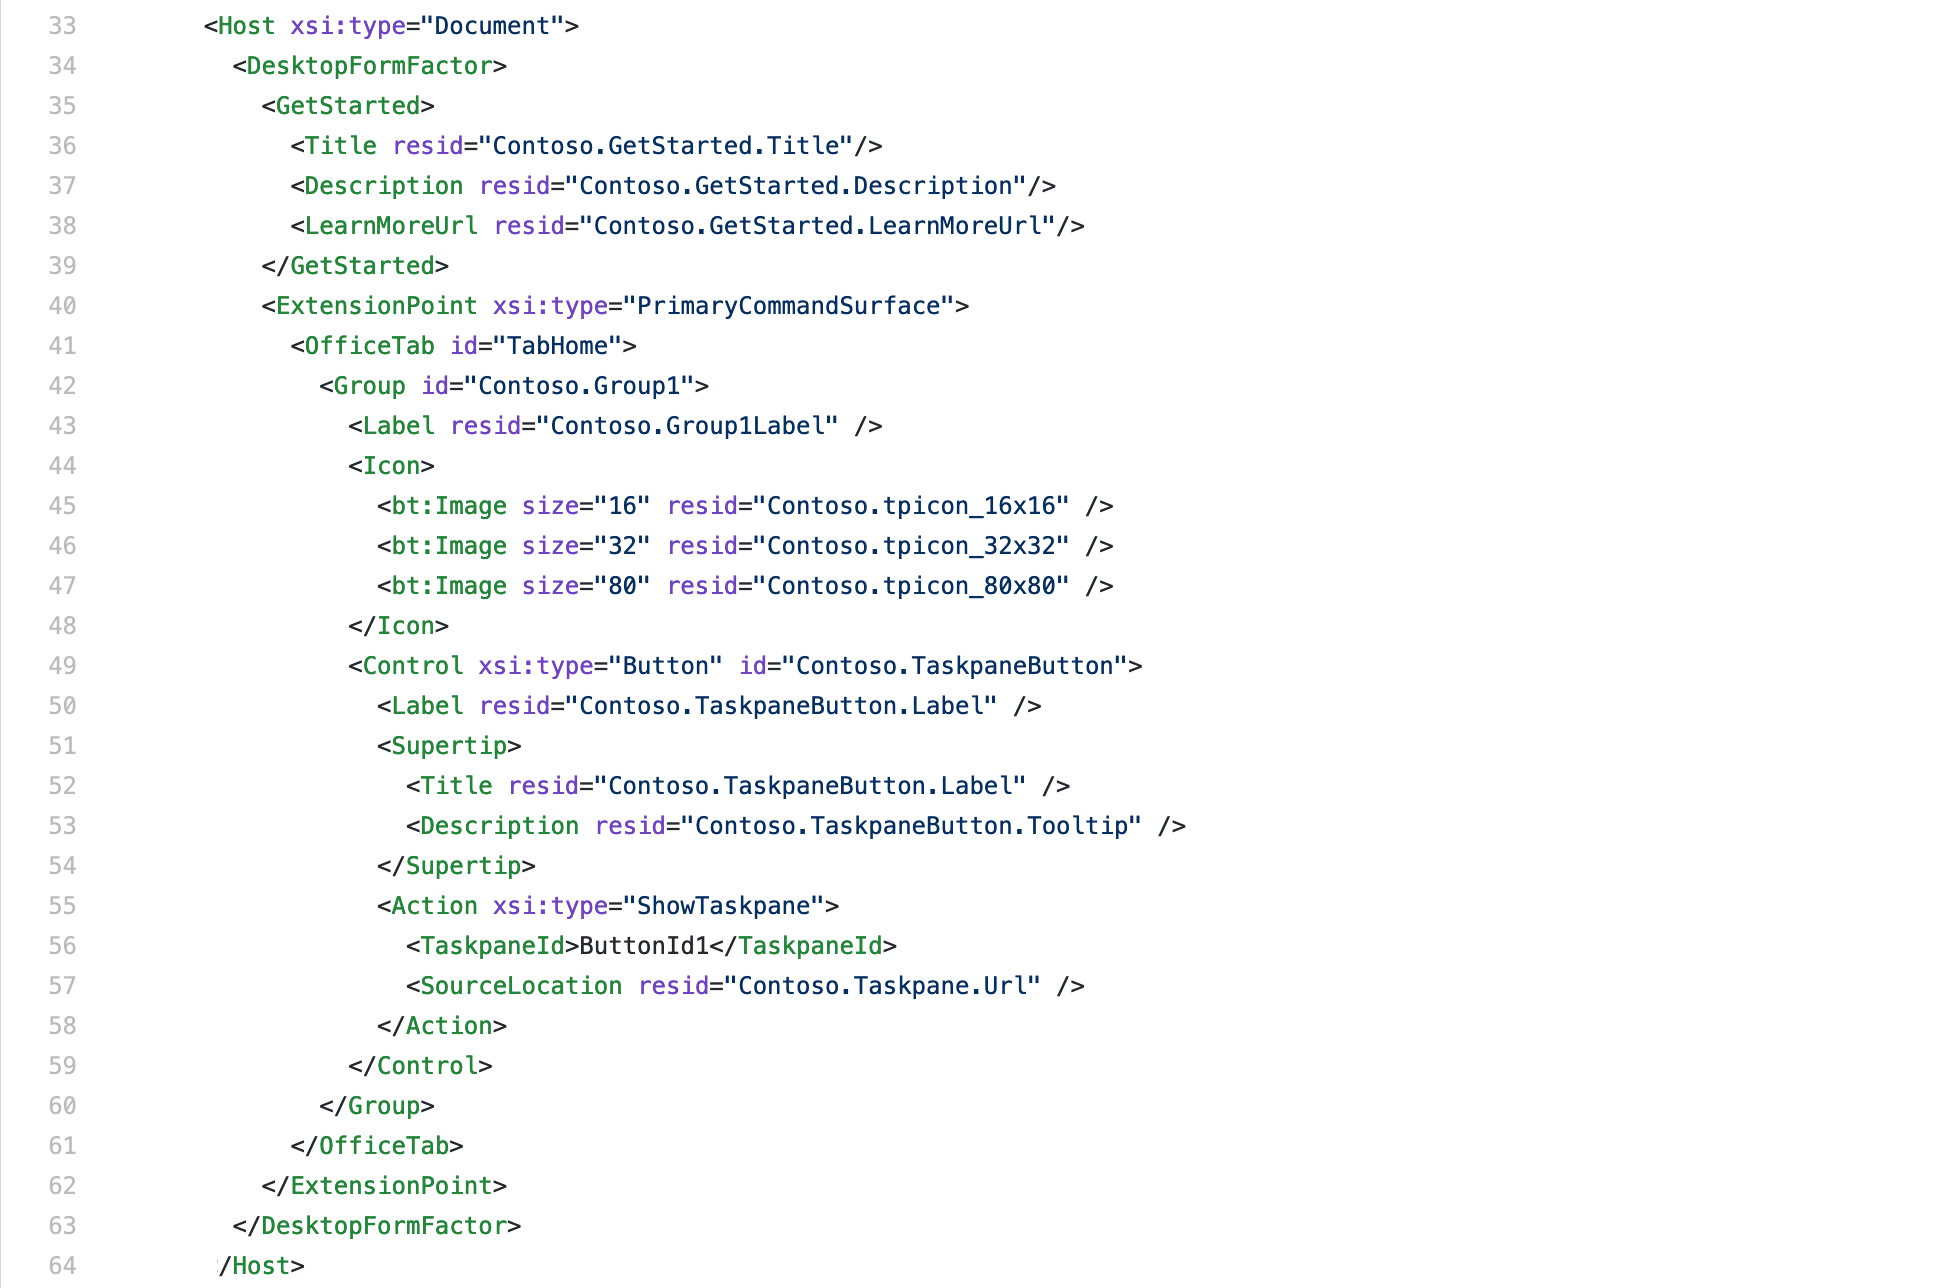
- Далее идет информационный блок для каждого типа платформы, которые мы объявили. Тут содержится информация для конкретного типа. Пример для Word:

- В последней части, мы описываем информационный блок ресурсов:

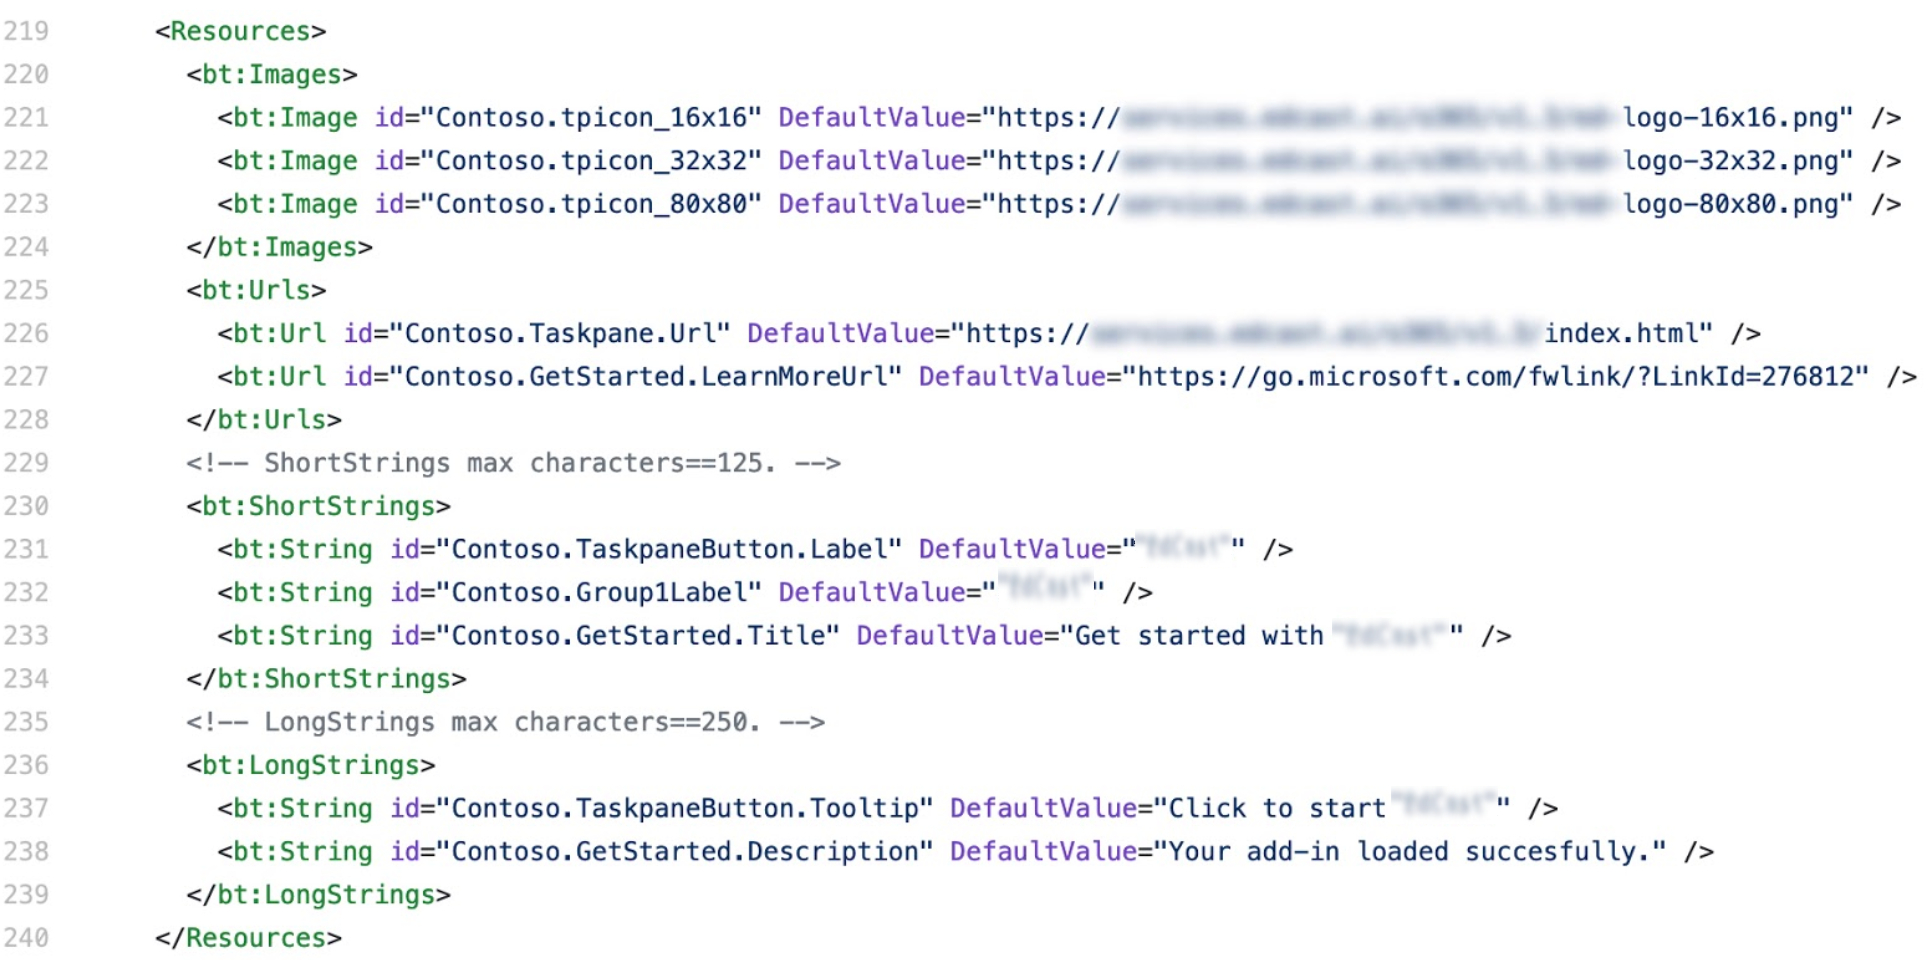
Детальную информацию по созданию файла манифеста можно прочитать в официальной документации.
Написание веб-приложения
Для разработки веб-приложения нам понадобится API JavaScript для Office. Библиотека API JavaScript для Office состоит из файла Office.js и связанных JS-файлов. Простейший способ сослаться на API — использовать сеть доставки содержимого (CDN), добавив следующий код <script> в тег <head> страницы:
<script src="https://appsforoffice.microsoft.com/lib/1/hosted/Office.js" type="text/javascript"></script>
Начать работу с библиотекой необходимо с инициализации библиотеки Office, для этого предусмотрен метод Office.onReady() — это асинхронный метод, который возвращает объект Promise во время проверки загрузки библиотеки Office.js. Когда библиотека будет загружена, объект Promise сопоставляется в качестве объекта, определяющего приложение Office, с числовым значением Office.HostType (Excel, Word и т. д.), а платформа — с числовым значением Office.PlatformType (PC, Mac, OfficeOnline и т. д.). Объект Promise сопоставляется незамедлительно, если библиотека уже загружена, когда вызывается Office.onReady().
Надстройки взаимодействует с объектами в Office с помощью двух типов объектных моделей JavaScript:
Общий API JavaScript для Office используется, если вам нужно:
- создать надстройки для Word 2013;
- выполнить начальные действия для приложения;
- проверить поддерживаемый набор требований;
- получить доступ к метаданным документа, его параметрам и сведениям о среде;
- создать привязку к разделам документа и записать события;
- использовать пользовательские XML-части;
- открыть диалоговое окно.
API JavaScript для Excel, Word, PowerPoint предоставляют строго типизированные объекты, с помощью которых можно получать доступ к различным объектам рабочей области документов.
Например, для получения контента из рабочей области документа можно воспользоваться методом getSelectedDataAsync:
А для вставки контента в рабочую область, можем воспользоваться методом setSelectedDataAsync: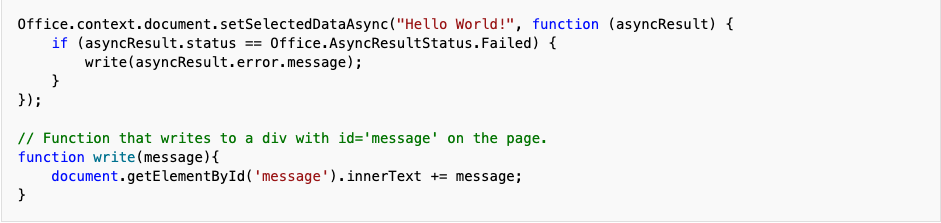
Также хотелось бы выделить использование Dialog API в надстройках Office. В настоящее время оно поддерживается для Word, Excel, PowerPoint и Outlook. Dialog API позволяет реализовать:
- Отобразить страницу входа, которую невозможно открыть непосредственно в области задач.
- Предоставить больше места на экране (или даже весь экран) для некоторых задач в надстройке.
- Разместить видео, которое будет слишком маленьким в области задач.
Важно отметить, что страница веб-приложения и ресурсы диалоговых окон должны иметь одинаковые полные доменные имена.
В целом, для создания веб-приложения можно использовать любые веб-технологии и фреймворки. Так как я разрабатывал надстройку для уже готового веб-сайта, то в качестве клиентского фреймворка я выбрал React, как и в основном сайте, также использовал API уже готового бэкенда написанного на Ruby. В итоге у меня получилась вот такая надстройка, которую можно найти в общем доступе, правда она вам пригодится, если вы являетесь пользователем платформы ProjectX.
На данный момент AppSource содержит около 6,5 тысяч готовых приложений разделенные на определенные категории и отрасли. Майкрософт продолжает развивать и поддерживать данное направление, облегчая процесс создания надстроек и расширяя возможности интерфейсов API JavaScript Office.js. На сайте Майкрософта можно найти много полезных ресурсов для разработки. В конечном счете, перед тем как надстройка окажется в общем доступе, она должна пройти этап тестирования, а также должна соответствовать всем требованиям для запуска надстроек Office от Microsoft.
Introduction
Word documents are everywhere and are used for countless tasks so you may have a requirement to support their generation from within your web application or webpage, this could include downloading a C.V from your personal site to the generation of a report based on data from within your web application that can be printed out or emailed by your client.
Goals
Create and save a Word document using only client-side vanilla/plain JavaScript.
Prerequisites
In order to complete this example you should have some basic knowledge of HTML and JavaScript.
Step 1 — Setup project
In order to concentrate on the job in hand and to get up and running as quickly as possible we are going to use CodeSandbox and their vanilla starter project.
A new CodeSandbox project can be created by opening the following link vanilla JavaScript project.
Step 2 — Install dependencies needed to create a Word document
With the project setup we can now install the two modules/dependencies needed to successfully create and save a Word document. The first package (docx) allows you to build your Word document and the second package (file-saver) gives the ability to save the document locally.
Add the two packages using the «Add Dependency» button.

Step 3 — Add a button to create our Word document
Before we start writing the code required to generate our Word documents lets add a button to the index.html file. We can then use this button to fire off the actions needed to generate the Word document.
<!DOCTYPE html>
<html>
  <head>
    <title>Parcel Sandbox</title>
    <meta charset="UTF-8" />
  </head>

  <body>
    <div id="app"></div>
    <button id="generate">Generate Word Document</button>
    <script src="src/index.js"></script>
  </body>
</html>
Enter fullscreen mode
Exit fullscreen mode
Step 4 — Create a blank Word document
From now one we will be working solely within the index.js JavaScript file, lets start by deleting everything that is currently there as this is not need.
All we will need to create a blank word document is the Document and Packer features from the docx module and the saveAs feature from file-saver module.
import { Document, Packer } from "docx"
import { saveAs } from "file-saver"
Enter fullscreen mode
Exit fullscreen mode
Next add an event listener that is listening for clicks on the button we created in Step 3.
// Listen for clicks on Generate Word Document button
document.getElementById("generate").addEventListener(
  "click",
  function(event) {
    generateWordDocument(event)
  },
  false
)
Enter fullscreen mode
Exit fullscreen mode
Once the event listener is triggered we will call a function that will create a new instance of Document from the docx module and send this instance to a saveDocumentToFile function.
function generateWordDocument(event) {
  event.preventDefault()
  // Create a new instance of Document for the docx module
  let doc = new Document()
  // Call saveDocumentToFile with the document instance and a filename
  saveDocumentToFile(doc, "New Document.docx")
}
Enter fullscreen mode
Exit fullscreen mode
The saveDocumentToFile function creates a new instance of Packer from the docx modules, Packers in docx are used to turn your JavaScript code into a .docx file. We then send our document instance to Packers toBlob function which in turn converts our instance of Document into a Blob object, a mimeType is added to the Blob and finally the Blob is sent to saveAs feature of the file-saver module which will create the file and prompt you to save or open.
function saveDocumentToFile(doc, fileName) {
  // Create new instance of Packer for the docx module
  const packer = new Packer()
  // Create a mime type that will associate the new file with Microsoft Word
  const mimeType =
    "application/vnd.openxmlformats-officedocument.wordprocessingml.document"
  // Create a Blob containing the Document instance and the mimeType
  packer.toBlob(doc).then(blob => {
    const docblob = blob.slice(0, blob.size, mimeType)
    // Save the file using saveAs from the file-saver package
    saveAs(docblob, fileName)
  })
}
Enter fullscreen mode
Exit fullscreen mode
Clicking the ‘Generate Word Document’ button will now create and save a blank Word document.
Step 5 — Create content of the Word document
We can now start adding some content to the Word document. We will simply add a title, subtitle, two headings and a long paragraph as this will make it easier to understand once we come to start styling the document.
function generateWordDocument(event) {
  event.preventDefault()
  let doc = new Document()
  doc.createParagraph("Title")
  doc.createParagraph("Subtitle")
  doc.createParagraph("Heading 1")
  doc.createParagraph("Heading 2")
  doc.createParagraph(
    "Aliquam gravida quam sapien, quis dapibus eros malesuada vel. Praesent tempor aliquam iaculis. Nam ut neque ex. Curabitur pretium laoreet nunc, ut ornare augue aliquet sed. Pellentesque laoreet sem risus. Cras sodales libero convallis, convallis ex sed, ultrices neque. Sed quis ullamcorper mi. Ut a leo consectetur, scelerisque nibh sit amet, egestas mauris. Donec augue sapien, vestibulum in urna et, cursus feugiat enim. Ut sit amet placerat quam, id tincidunt nulla. Cras et lorem nibh. Suspendisse posuere orci nec ligula mattis vestibulum. Suspendisse in vestibulum urna, non imperdiet enim. Vestibulum vel dolor eget neque iaculis ultrices."
  )
  saveDocumentToFile(doc, "New Document.docx")
}
Enter fullscreen mode
Exit fullscreen mode
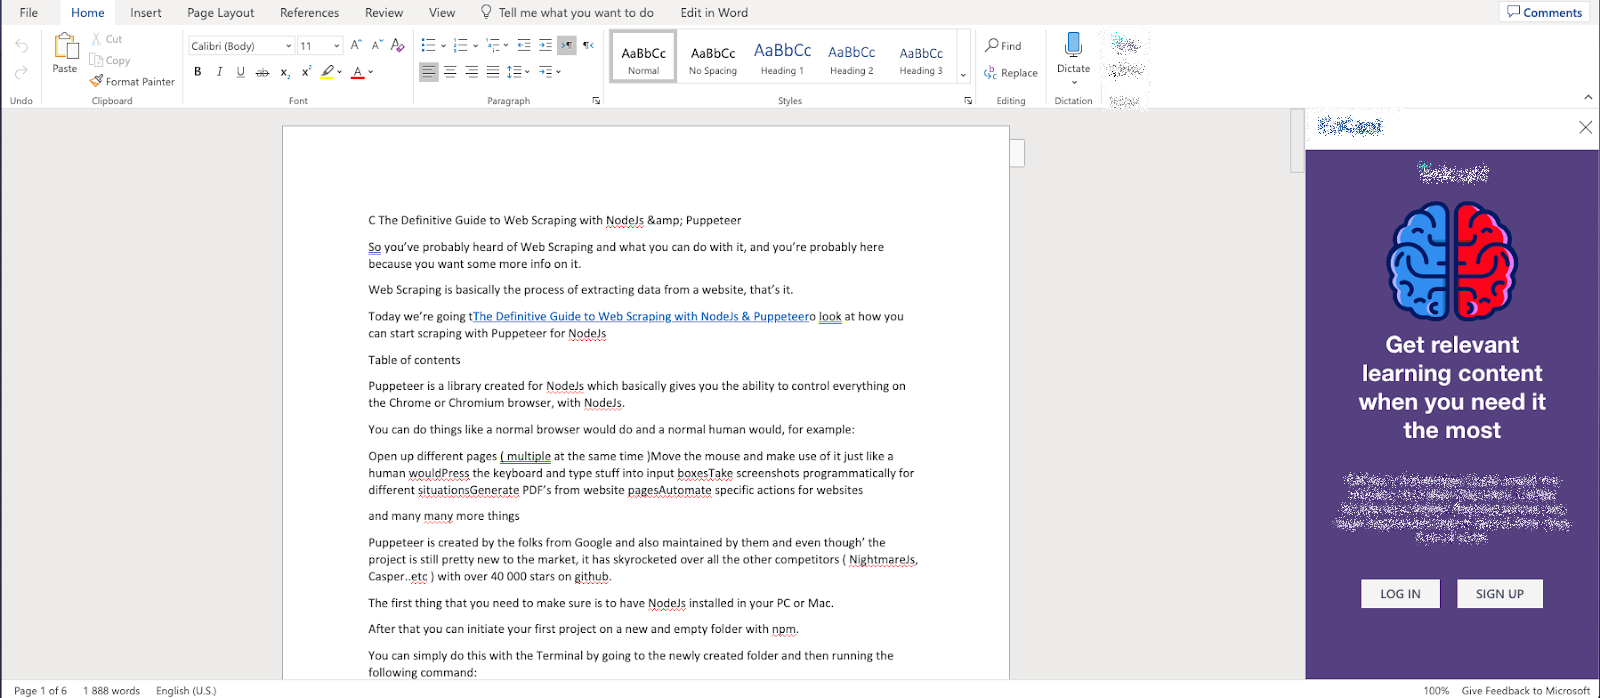
The Word document will now look something like this

Step 6 — Style the Word document
Now that we have some content we can look at styling the document.
Firstly we will create a theme object that will hold all the information about which fonts and colours we want to use.
function generateWordDocument(event) {
  event.preventDefault()
  // Create new instance of Document for the docx module
  let doc = new Document()
  doc.theme = {
    font: {
      normal: {
        family: "Calibri",
        color: "303856",
      },
      header: { family: "Calibri Light" },
    },
    title: {
      color: "4ABDAC",
    },
    headings: {
      one: {
        color: "FC4A1A",
      },
      two: {
        color: "F7B733",
      },
    },
  }
  ...
  ...
  // Call saveDocumentToFile withe the document instance and a filename
  saveDocumentToFile(doc, "New Document.docx")
}
Enter fullscreen mode
Exit fullscreen mode
After creating the theme object we can start creating our styles. We will create 5 styles
- Custom Heading 1
- Custom Heading 2
- Custom Title
- Custom Subtitle
- Custom Normal
These should tie up nicely to the content that we created in Step 5.
You can learn more about styles in Microsoft Word here
function generateWordDocument(event) {
  event.preventDefault()
  // Create new instance of Document for the docx module
  let doc = new Document()
  ...
  ...
  doc.Styles.createParagraphStyle("customHeading1", "Custom Heading 1")
    .basedOn("Heading 1")
    .next("Normal")
    .quickFormat()
    .font(doc.theme.font.header.family)
    .size(32)
    .bold()
    .color(doc.theme.headings.one.color)
    .spacing({ after: 250 })

  doc.Styles.createParagraphStyle("customHeading2", "Custom Heading 2")
    .basedOn("Heading 2")
    .next("Normal")
    .quickFormat()
    .font(doc.theme.font.header.family)
    .size(26)
    .bold()
    .color(doc.theme.headings.two.color)
    .spacing({ after: 150 })

  doc.Styles.createParagraphStyle("customTitle", "Custom Title")
    .basedOn("Title")
    .next("Normal")
    .quickFormat()
    .font(doc.theme.font.header.family)
    .size(56)
    .bold()
    .color(doc.theme.font.normal.color)
    .spacing({ after: 250 })

  doc.Styles.createParagraphStyle("customSubtitle", "Custom Subtitle")
    .basedOn("Subtitle")
    .next("Normal")
    .quickFormat()
    .font(doc.theme.font.header.family)
    .size(22)
    .color(doc.theme.font.normal.color)
    .spacing({ after: 150 })

  doc.Styles.createParagraphStyle("customNormal", "Custom Normal")
    .basedOn("Normal")
    .quickFormat()
    .font(doc.theme.font.normal.family)
    .size(20)
    .color(doc.theme.font.normal.color)
    .spacing({ after: 150 })
  ...
  ...
  // Call saveDocumentToFile withe the document instance and a filename
  saveDocumentToFile(doc, "New Document.docx")
}
Enter fullscreen mode
Exit fullscreen mode
With our styles in place we can apply them to our content.
function generateWordDocument(event) {
  event.preventDefault()
  // Create new instance of Document for the docx module
  let doc = new Document()
  ...
  ...
  doc.createParagraph("Title").style("customTitle")
  doc.createParagraph("Subtitle").style("customSubtitle")
  doc.createParagraph("Heading 1").style("customHeading1")
  doc.createParagraph("Heading 2").style("customHeading2")
  doc
    .createParagraph(
      "Aliquam gravida quam sapien, quis dapibus eros malesuada vel. Praesent tempor aliquam iaculis. Nam ut neque ex. Curabitur pretium laoreet nunc, ut ornare augue aliquet sed. Pellentesque laoreet sem risus. Cras sodales libero convallis, convallis ex sed, ultrices neque. Sed quis ullamcorper mi. Ut a leo consectetur, scelerisque nibh sit amet, egestas mauris. Donec augue sapien, vestibulum in urna et, cursus feugiat enim. Ut sit amet placerat quam, id tincidunt nulla. Cras et lorem nibh. Suspendisse posuere orci nec ligula mattis vestibulum. Suspendisse in vestibulum urna, non imperdiet enim. Vestibulum vel dolor eget neque iaculis ultrices."
    )
    .style("customNormal")
  // Call saveDocumentToFile withe the document instance and a filename
  saveDocumentToFile(doc, "New Document.docx")
}
Enter fullscreen mode
Exit fullscreen mode
Clicking the ‘Generate Word Document’ button now will create a Word document that look something like this

Conclusion
With the use of a couple of great packages we can easily create a nice looking Word document using solely client side JavaScript. Docx is very powerful and this article only covers the basics to get you up and running with a simple Word document.
Complete Example
A complete example of the code can be found here