
Содержание
- Визуализация данных с помощью Oracle Apex
- Exporting data from Oracle to Excel with ApEx – and vice versa.
- Excel upload in Apex
- 1. Overview
- 2. Technologies and Tools Used
- 3. Use Case
- 4. Architecture
Визуализация данных с помощью Oracle Apex

Oracle Apex – компонент для разработки конечных приложений, входящий в состав поставки СУБД Oracle, позволяющий быстро «доставать» данные из базы и доставлять их через веб-интерфейс конечному пользователю. Как правило, данные для просмотра и редактирования выдаются в табличном виде и Apex предоставляет богатые возможности для настраивания отчета: можно накладывать фильтры, делать сортировку и группировку, скрывать имеющиеся столбцы и добавлять расчетные новые, делать сводные отчеты, выгружать данные в формате csv, pdf и даже Excel. Каждый пользователь может сохранить предпочитаемые им настройки каждого отчета как индивидуально, так и для совместного использования. В таком формате Apex функционирует у большинства наших заказчиков.
Однако мало кто использует довольно широкие возможности Apex’а для построения графиков. Эта тема, на наш взгляд, довольно интересна и мало освещена в интернете.
В этой статье будем предполагать, что читатель имеет представление о разработке приложений с помощью Oracle Apex.
В качестве примера рассмотрим гипотетический дашборд, показывающий переработки и недоработки сотрудников департамента за отчетный период, а также распределение трудозатрат по активностям.
С точки зрения разработки добавление графика на страницу приложения в Apex’е представляет собой добавление региона типа Chart. У него есть ряд обычных для региона свойств, которые можно заполнить значениями по умолчанию или не заполнять вообще.
В интерфейсе разработки Apex 5.1 часть свойств самого региона заполнялась через пункт меню Attributes, что вносило некую неразбериху: было интуитивно не всегда понятно, что и где лежит. Надеюсь, в новых версиях UI эту путаницу убрали. В частности, именно в «атрибутах» указывался тип графика, который мы хотим получить (Рисунок 1). Как видим, выбор достаточно большой и охватывает все основные визуальные представления, используемые аналитиками в большинстве случаев.
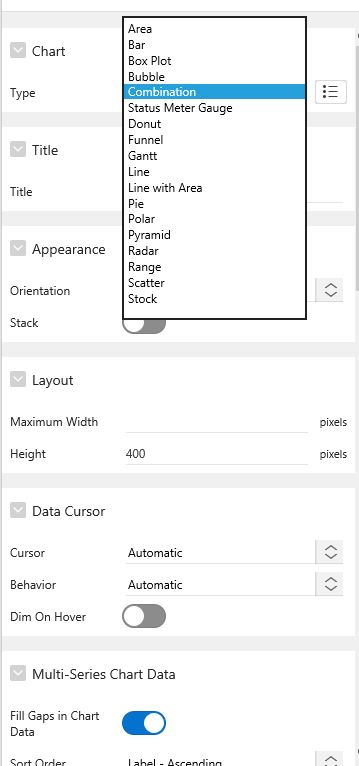 Рисунок 1 Выбор типа графика
Здесь же мы указываем ориентацию столбцов гистограммы (вертикальная или горизонтальная), высоту панели, настройку всплывающих подсказок (показывать ли их вообще, а если показывать, то что именно выводить), настройку легенды, а также можем добавить код на JavaScript для тонкой «подгонки» графика под требования заказчика. Это нужно, например, в том случае, если каждому столбцу на диаграмме мы хотим задать цвет на наш выбор. Код можно добавить явно или указать наименование функции, реализацию которой мы можем привести где-то еще (Apex позволяет добавлять в приложение js-файлы для определения кода на «высшем» уровне или указывать код в рамках одной страницы веб-приложения).
В каждом графическом регионе может быть несколько графиков, если они объединены общей осью абсцисс (при этом по оси ординат может быть две шкалы). В таком случае мы добавляем их через пункт меню Series и указываем SQL-запрос, который будет возвращать нам значения по осям и – при желании – некоторую дополнительную информацию: наименование ряда, значения для всплывающих подсказки или даже ссылку для перехода на другую страницу приложения (Рисунок 2). В нашем примере табличный тип данных, возвращаемый запросом, объявлен следующим образом:
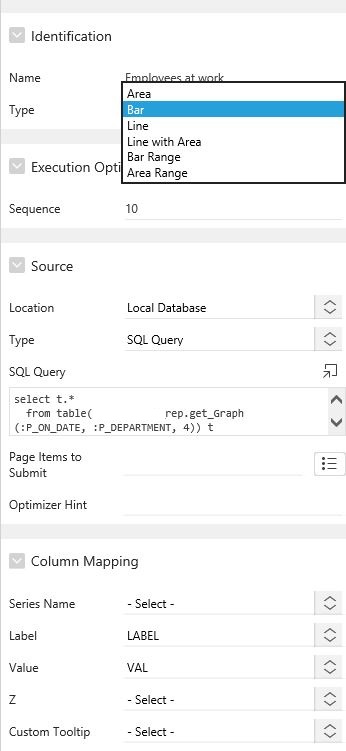 Рисунок 2 Настройка графика
Передача параметров (в нашем случае – даты отчета и идентификатора департамента или какого-либо из его подразделений) из формы ввода на сервер происходит стандартным для Apex образом: или через кнопку Submit, или путем создания DynamicAction, который реализует технологию Ajax и может обновить тот или иной регион, их совокупность (ограничения по числу обновляемых регионов нет) на странице динамически. Лично я предпочитаю второй вариант. Изменение графиков при этом происходит в режиме мультфильма: столбцы гистограмм, к примеру, при этом «вырастают» или «съеживаются», появляются стрелки-указатели динамики изменений – пользователь может немного развлечься.
Графики «из коробки» выглядят вполне прилично, но иногда требуется их подстройка под требования заказчика. Например, мой заказчик долгое время получал отчеты в Excel и уже привык к его цветовой гамме, маркерам и т.п. На помощь может прийти JavaScript.
Например, этот код задает цвета для трех вхождений в круговой диаграмме:
Итоговый вид круговой диаграммы приведен на Рисунке 3.
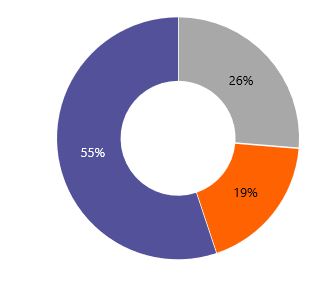 Рисунок 3 Круговая диаграмма Лирическое отступление про цвета
Предположим, например, что нам нужно показать диаграмму распределения трудозатрат по ранее заданному довольно широкому списку активностей. Т.е. активностей много, но в отчетный период заранее неизвестно, работали ли сотрудники над каждой конкретной из них. График строился динамически, поэтому появилась задача подбора цветов для их различения таким образом, что два соседних оттенка довольно контрастно отличались между собой. Выяснилось, что цветов из стандартной поставки буквально не хватает и активности могли начать смешиваться между собой.
 Рисунок 4 О цветовой дифференциации – распределение по активностям, в каждой из групп активностей – Co, Ho, Su, могут быть активности из списка над графиком
Почитав пару обсуждений на stackoverflow.com, я решил изобрести свой велосипед следующим образом. Взял таблицу цветов с сайта material design, отсортировал, чтобы близкие группы оттенков (например, «розовый» и «фиолетовый» или «лимонный» и «светло-зеленый») не оказались соседними, какие-то группы цветов исключил и взял только оттенки, которые в css имеют индекс 300, 500, 700 или 900.
В результате получил вот такой список из заведомо избыточных 76 цветов, который и используется в графике (Рисунок 4).
Тех, кому интересна эта тема, могу отправить в обсуждения вот здесь, здесь или здесь.
Надо отметить, что справочных материалов по графикам довольно мало, и настройка через JS может потребовать какое-то время, в первую очередь, на выяснение доступных методов API.
 Рисунок 5 Переработка сотрудников какого-то подразделения в феврале какого-то года
Например, для того, чтобы отобразить цифры в кружках на левом графике (см. Рисунок 5), потребовалось сделать настройки для каждого элемента в отдельности:
А референсная линия «0» на правом графике настраивается вот таким кодом:
Мне всё-таки кажется, что подобное вмешательство в установленную функциональность инструмента напоминает костыли. Надеюсь, что в новых версиях Oracle Apex этих «костылей» потребуется меньше. Справедливости ради надо отметить, что в моей практике был случай, когда мне пришлось «допиливать» какие-то настройки BI-отчета с помощью JavaScript в «профессиональном» Oracle BI EE версии 12. На мой взгляд, это говорит о том, что каким бы ни продвинутым инструмент ни был, найдется требование заказчика, выходящее за рамки его штатной функциональности.
В качестве заключения можно сказать, что возможности Oracle Apex как инструмента графического представления данных, конечно, несопоставимы с профессиональными BI-инструментами, особенно если вам потребуется выводить на дашборд что-нибудь вроде линий тренда. Но если вы уже используете БД Oracle, то этими возможностями пренебрегать не стоит. Опять же, с учетом весьма низкого порога входа в эту технологию, она кажется весьма заслуживающей внимания.
Автор статьи: Вадим Бояркин, ведущий консультант группы разработки Big Data Solutions в компании Neoflex
Источник
Exporting data from Oracle to Excel with ApEx – and vice versa.
If you’re ever asked to export some data from the database into an Excel file (or vice versa), do check if you have ApEx installed on your server. There are some handy utilities available there, especially for end-user tasks.
One of these utilities is export to file.
To get there, do the following:
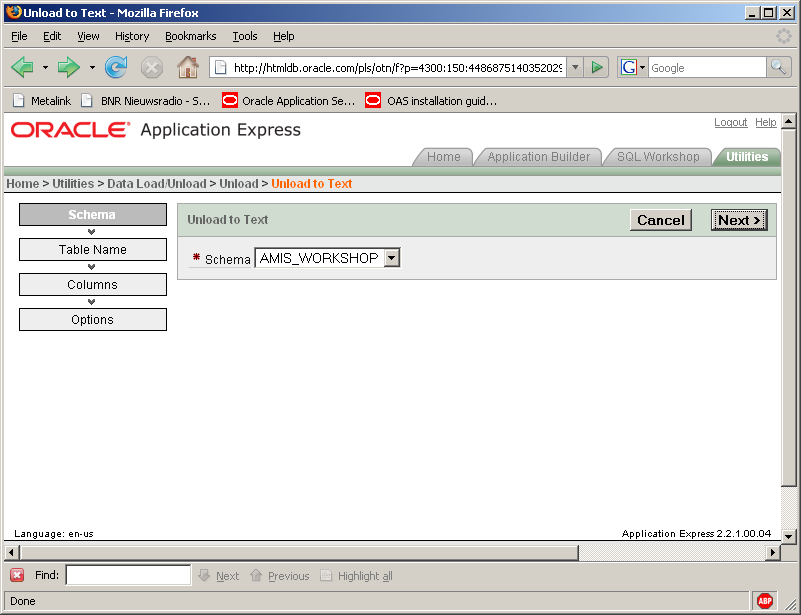
Login to Oracle ApEx and click the Utilities tab or button.
Then, press the data load/unload button, press Data unload and finally Unload to Text.
A wizard starts:
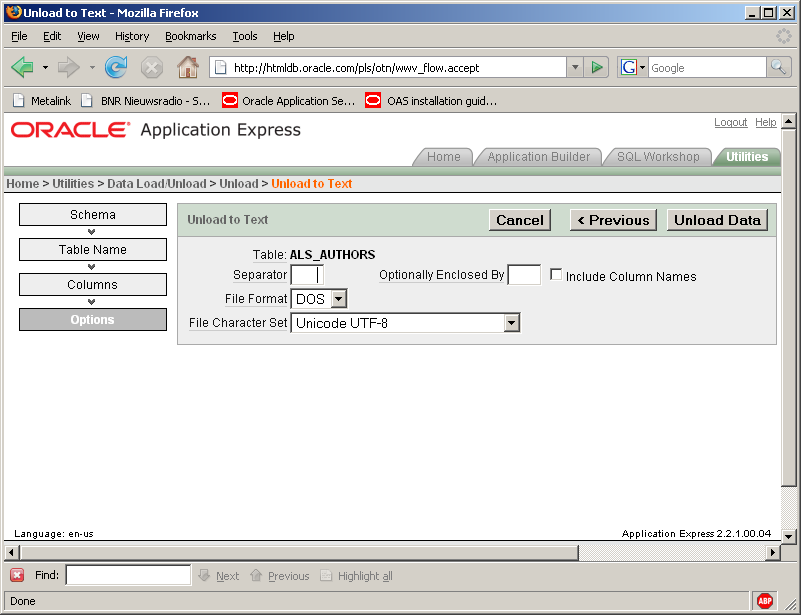
From here it’s very staight-forward. Select your schema, then the desired table, and next the columns in the selection and a where-clause to restrict the selection. The final step has a small catch. You can provide a separator here. Usually you would use a comma or semi-colon as seperator. The disadvantage is, that you can’t open the file straight away but have to import it. An alternative is to press TAB key in Notepad or another editor and copy-paste this in the separator field.
When you press Unload data you can immediately open the presented file in Excel.
The other way around might be handy to convert all those user-managed Excel sheets to decent Oracle tables. You can upload csv or text files or even copy-paste some comma- or tabdelimited data into an input field.
You might have noticed on the way that there is also the possibility to create output in XML format. This is just as straightforward as the excel-method.
Источник
Excel upload in Apex
1. Overview
This document will be helpful to upload a excel file directly and view it as a report.
3. Use Case
Customer wants to upload a excel file and view it as a report.
4. Architecture
We can achieve this by using below simple method.
Steps to follow.
Step:1
Create a region and File browser item as PX_XLSX_FILE.
Step:2
Set PX_XLSX_FILE item Setting .
storage type : APEX_APPLICATION_TEMP_FILES
Purge File at : End of Session.
Run the below plsql object.
create or replace package body xlsx_parser is
g_worksheets_path_prefix constant varchar2(14) := ‘xl/worksheets/’;
–==================================================================================================================
function get_date( p_xlsx_date_number in number ) return date is
begin
return
case when p_xlsx_date_number > 61
then DATE’1900-01-01′ – 2 + p_xlsx_date_number
else DATE’1900-01-01′ – 1 + p_xlsx_date_number
end;
end get_date;
–==================================================================================================================
procedure get_blob_content(
p_xlsx_name in varchar2,
p_xlsx_content in out nocopy blob )
is
begin
if p_xlsx_name is not null then
select blob_content into p_xlsx_content
from apex_application_temp_files
where name = p_xlsx_name;
end if;
exception
when no_data_found then
null;
end get_blob_content;
–==================================================================================================================
function extract_worksheet(
p_xlsx in blob,
p_worksheet_name in varchar2 ) return blob
is
l_worksheet blob;
begin
if p_xlsx is null or p_worksheet_name is null then
return null;
end if;
l_worksheet := apex_zip.get_file_content(
p_zipped_blob => p_xlsx,
p_file_name => g_worksheets_path_prefix || p_worksheet_name || ‘.xml’ );
if l_worksheet is null then
raise_application_error(-20000, ‘WORKSHEET “‘ || p_worksheet_name || ‘” DOES NOT EXIST’);
end if;
return l_worksheet;
end extract_worksheet;
–==================================================================================================================
procedure extract_shared_strings(
p_xlsx in blob,
p_strings in out nocopy wwv_flow_global.vc_arr2 )
is
l_shared_strings blob;
begin
l_shared_strings := apex_zip.get_file_content(
p_zipped_blob => p_xlsx,
p_file_name => ‘xl/sharedStrings.xml’ );
if l_shared_strings is null then
return;
end if;
select shared_string
bulk collect into p_strings
from xmltable(
xmlnamespaces( default ‘http://schemas.openxmlformats.org/spreadsheetml/2006/main’ ),
‘//si’
passing xmltype.createxml( l_shared_strings, nls_charset_id(‘AL32UTF8’), null )
columns
shared_string varchar2(4000) path ‘t/text()’ );
–==================================================================================================================
procedure extract_date_styles(
p_xlsx in blob,
p_format_codes in out nocopy wwv_flow_global.vc_arr2 )
is
l_stylesheet blob;
begin
l_stylesheet := apex_zip.get_file_content(
p_zipped_blob => p_xlsx,
p_file_name => ‘xl/styles.xml’ );
if l_stylesheet is null then
return;
end if;
select lower( n.formatCode )
bulk collect into p_format_codes
from
xmltable(
xmlnamespaces( default ‘http://schemas.openxmlformats.org/spreadsheetml/2006/main’ ),
‘//cellXfs/xf’
passing xmltype.createxml( l_stylesheet, nls_charset_id(‘AL32UTF8’), null )
columns
numFmtId number path ‘@numFmtId’ ) s,
xmltable(
xmlnamespaces( default ‘http://schemas.openxmlformats.org/spreadsheetml/2006/main’ ),
‘//numFmts/numFmt’
passing xmltype.createxml( l_stylesheet, nls_charset_id(‘AL32UTF8’), null )
columns
formatCode varchar2(255) path ‘@formatCode’,
numFmtId number path ‘@numFmtId’ ) n
where s.numFmtId = n.numFmtId ( + );
–==================================================================================================================
function convert_ref_to_col#( p_col_ref in varchar2 ) return pls_integer is
l_colpart varchar2(10);
l_linepart varchar2(10);
begin
l_colpart := replace(translate(p_col_ref,’1234567890′,’__________’), ‘_’);
if length( l_colpart ) = 1 then
return ascii( l_colpart ) – 64;
else
return ( ascii( substr( l_colpart, 1, 1 ) ) – 64 ) * 26 + ( ascii( substr( l_colpart, 2, 1 ) ) – 64 );
end if;
end convert_ref_to_col#;
–==================================================================================================================
procedure reset_row( p_parsed_row in out nocopy xlsx_row_t ) is
begin
— reset row
p_parsed_row.col01 := null; p_parsed_row.col02 := null; p_parsed_row.col03 := null; p_parsed_row.col04 := null; p_parsed_row.col05 := null;
p_parsed_row.col06 := null; p_parsed_row.col07 := null; p_parsed_row.col08 := null; p_parsed_row.col09 := null; p_parsed_row.col10 := null;
p_parsed_row.col11 := null; p_parsed_row.col12 := null; p_parsed_row.col13 := null; p_parsed_row.col14 := null; p_parsed_row.col15 := null;
p_parsed_row.col16 := null; p_parsed_row.col17 := null; p_parsed_row.col18 := null; p_parsed_row.col19 := null; p_parsed_row.col20 := null;
p_parsed_row.col21 := null; p_parsed_row.col22 := null; p_parsed_row.col23 := null; p_parsed_row.col24 := null; p_parsed_row.col25 := null;
p_parsed_row.col26 := null; p_parsed_row.col27 := null; p_parsed_row.col28 := null; p_parsed_row.col29 := null; p_parsed_row.col30 := null;
p_parsed_row.col31 := null; p_parsed_row.col32 := null; p_parsed_row.col33 := null; p_parsed_row.col34 := null; p_parsed_row.col35 := null;
p_parsed_row.col36 := null; p_parsed_row.col37 := null; p_parsed_row.col38 := null; p_parsed_row.col39 := null; p_parsed_row.col40 := null;
p_parsed_row.col41 := null; p_parsed_row.col42 := null; p_parsed_row.col43 := null; p_parsed_row.col44 := null; p_parsed_row.col45 := null;
p_parsed_row.col46 := null; p_parsed_row.col47 := null; p_parsed_row.col48 := null; p_parsed_row.col49 := null; p_parsed_row.col50 := null;
end reset_row;
–==================================================================================================================
function parse(
p_xlsx_name in varchar2 default null,
p_xlsx_content in blob default null,
p_worksheet_name in varchar2 default ‘sheet1’,
p_max_rows in number default 1000000 ) return xlsx_tab_t pipelined
is
l_worksheet blob;
l_xlsx_content blob;
l_shared_strings wwv_flow_global.vc_arr2;
l_format_codes wwv_flow_global.vc_arr2;
l_parsed_row xlsx_row_t;
l_first_row boolean := true;
l_value varchar2(32767);
l_line# pls_integer := 1;
l_real_col# pls_integer;
l_row_has_content boolean := false;
begin
if p_xlsx_content is null then
get_blob_content( p_xlsx_name, l_xlsx_content );
else
l_xlsx_content := p_xlsx_content;
end if;
if l_xlsx_content is null then
return;
end if;
l_worksheet := extract_worksheet(
p_xlsx => l_xlsx_content,
p_worksheet_name => p_worksheet_name );
extract_shared_strings(
p_xlsx => l_xlsx_content,
p_strings => l_shared_strings );
extract_date_styles(
p_xlsx => l_xlsx_content,
p_format_codes => l_format_codes );
— the actual XML parsing starts here
for i in (
select
r.xlsx_row,
c.xlsx_col#,
c.xlsx_col,
c.xlsx_col_type,
c.xlsx_col_style,
c.xlsx_val
from xmltable(
xmlnamespaces( default ‘http://schemas.openxmlformats.org/spreadsheetml/2006/main’ ),
‘//row’
passing xmltype.createxml( l_worksheet, nls_charset_id(‘AL32UTF8’), null )
columns
xlsx_row number path ‘@r’,
xlsx_cols xmltype path ‘.’
) r, xmltable (
xmlnamespaces( default ‘http://schemas.openxmlformats.org/spreadsheetml/2006/main’ ),
‘//c’
passing r.xlsx_cols
columns
xlsx_col# for ordinality,
xlsx_col varchar2(15) path ‘@r’,
xlsx_col_type varchar2(15) path ‘@t’,
xlsx_col_style varchar2(15) path ‘@s’,
xlsx_val varchar2(4000) path ‘v/text()’
) c
where p_max_rows is null or r.xlsx_row 0 and
instr( l_format_codes( i.xlsx_col_style + 1 ), ‘m’ ) > 0 )
then
l_value := to_char( get_date( i.xlsx_val ), c_date_format );
else
l_value := i.xlsx_val;
end if;
end if;
pragma inline( convert_ref_to_col#, ‘YES’ );
l_real_col# := convert_ref_to_col#( i.xlsx_col );
if l_real_col# between 1 and 50 then
l_row_has_content := true;
end if;
— we currently support 50 columns – but this can easily be increased. Just add additional lines
— as follows:
— when l_real_col# = then l_parsed_row.col := l_value;
case
when l_real_col# = 1 then l_parsed_row.col01 := l_value;
when l_real_col# = 2 then l_parsed_row.col02 := l_value;
when l_real_col# = 3 then l_parsed_row.col03 := l_value;
when l_real_col# = 4 then l_parsed_row.col04 := l_value;
when l_real_col# = 5 then l_parsed_row.col05 := l_value;
when l_real_col# = 6 then l_parsed_row.col06 := l_value;
when l_real_col# = 7 then l_parsed_row.col07 := l_value;
when l_real_col# = 8 then l_parsed_row.col08 := l_value;
when l_real_col# = 9 then l_parsed_row.col09 := l_value;
when l_real_col# = 10 then l_parsed_row.col10 := l_value;
when l_real_col# = 11 then l_parsed_row.col11 := l_value;
when l_real_col# = 12 then l_parsed_row.col12 := l_value;
when l_real_col# = 13 then l_parsed_row.col13 := l_value;
when l_real_col# = 14 then l_parsed_row.col14 := l_value;
when l_real_col# = 15 then l_parsed_row.col15 := l_value;
when l_real_col# = 16 then l_parsed_row.col16 := l_value;
when l_real_col# = 17 then l_parsed_row.col17 := l_value;
when l_real_col# = 18 then l_parsed_row.col18 := l_value;
when l_real_col# = 19 then l_parsed_row.col19 := l_value;
when l_real_col# = 20 then l_parsed_row.col20 := l_value;
when l_real_col# = 21 then l_parsed_row.col21 := l_value;
when l_real_col# = 22 then l_parsed_row.col22 := l_value;
when l_real_col# = 23 then l_parsed_row.col23 := l_value;
when l_real_col# = 24 then l_parsed_row.col24 := l_value;
when l_real_col# = 25 then l_parsed_row.col25 := l_value;
when l_real_col# = 26 then l_parsed_row.col26 := l_value;
when l_real_col# = 27 then l_parsed_row.col27 := l_value;
when l_real_col# = 28 then l_parsed_row.col28 := l_value;
when l_real_col# = 29 then l_parsed_row.col29 := l_value;
when l_real_col# = 30 then l_parsed_row.col30 := l_value;
when l_real_col# = 31 then l_parsed_row.col31 := l_value;
when l_real_col# = 32 then l_parsed_row.col32 := l_value;
when l_real_col# = 33 then l_parsed_row.col33 := l_value;
when l_real_col# = 34 then l_parsed_row.col34 := l_value;
when l_real_col# = 35 then l_parsed_row.col35 := l_value;
when l_real_col# = 36 then l_parsed_row.col36 := l_value;
when l_real_col# = 37 then l_parsed_row.col37 := l_value;
when l_real_col# = 38 then l_parsed_row.col38 := l_value;
when l_real_col# = 39 then l_parsed_row.col39 := l_value;
when l_real_col# = 40 then l_parsed_row.col40 := l_value;
when l_real_col# = 41 then l_parsed_row.col41 := l_value;
when l_real_col# = 42 then l_parsed_row.col42 := l_value;
when l_real_col# = 43 then l_parsed_row.col43 := l_value;
when l_real_col# = 44 then l_parsed_row.col44 := l_value;
when l_real_col# = 45 then l_parsed_row.col45 := l_value;
when l_real_col# = 46 then l_parsed_row.col46 := l_value;
when l_real_col# = 47 then l_parsed_row.col47 := l_value;
when l_real_col# = 48 then l_parsed_row.col48 := l_value;
when l_real_col# = 49 then l_parsed_row.col49 := l_value;
when l_real_col# = 50 then l_parsed_row.col50 := l_value;
else null;
end case;
end loop;
if l_row_has_content then
l_parsed_row.line# := l_line#;
pipe row( l_parsed_row );
end if;
return;
end parse;
–==================================================================================================================
function get_worksheets(
p_xlsx_content in blob default null,
p_xlsx_name in varchar2 default null ) return apex_t_varchar2 pipelined
is
l_zip_files apex_zip.t_files;
l_xlsx_content blob;
begin
if p_xlsx_content is null then
get_blob_content( p_xlsx_name, l_xlsx_content );
else
l_xlsx_content := p_xlsx_content;
end if;
l_zip_files := apex_zip.get_files(
p_zipped_blob => l_xlsx_content );
for i in 1 .. l_zip_files.count loop
if substr( l_zip_files( i ), 1, length( g_worksheets_path_prefix ) ) = g_worksheets_path_prefix then
pipe row( rtrim( substr( l_zip_files ( i ), length( g_worksheets_path_prefix ) + 1 ), ‘.xml’ ) );
end if;
end loop;
return;
end get_worksheets;
Step:3
Create a button as Submit in File browser region.
Step:4
Create a Classic report region with sql code as
Code:
select *
from table( xlsx_parser.parse(
p_xlsx_name => :PX_XLSX_FILE ) )
Источник
Skip to content
![]() 0
0 ![]() 0
0
Read Time:1 Minute, 16 Second
If you’re ever asked to export some data from the database into an Excel file (or vice versa), do check if you have ApEx installed on your server. There are some handy utilities available there, especially for end-user tasks.
One of these utilities is export to file.
To get there, do the following:
Login to Oracle ApEx and click the Utilities tab or button.
Then, press the data load/unload button, press Data unload and finally Unload to Text.
A wizard starts:
From here it’s very staight-forward. Select your schema, then the desired table, and next the columns in the selection and a where-clause to restrict the selection. The final step has a small catch. You can provide a separator here. Usually you would use a comma or semi-colon as seperator. The disadvantage is, that you can’t open the file straight away but have to import it. An alternative is to press TAB key in Notepad or another editor and copy-paste this in the separator field.
When you press Unload data you can immediately open the presented file in Excel.
The other way around might be handy to convert all those user-managed Excel sheets to decent Oracle tables. You can upload csv or text files or even copy-paste some comma- or tabdelimited data into an input field.
You might have noticed on the way that there is also the possibility to create output in XML format. This is just as straightforward as the excel-method.
![]()
Happy
0 %
![]()
Sad
0 %
![]()
Excited
0 %
![]()
Sleepy
0 %
![]()
Angry
0 %
![]()
Surprise
0 %
Average Rating
- Book reviews and Publications
Publications written in 2006
Mon Dec 4 , 2006
Name EJB 3.0 Persistence – Nieuwe Industriestandaard voor Java/Database communicatie date Wed, 11 Jan 2006 EJB 3.0 Persistence komt eraan: een nieuwe standaard voor Java applicaties om met relationele databases te communiceren. EJB 3.0 Persistence wordt gesteund door alle belangrijke partijen die zich bezig houden met de mapping tussen Java […]

1. Overview
This document will be helpful to upload a excel file directly and view it as a report.
2. Technologies and Tools Used
- Oracle Plsql.
3. Use Case
Customer wants to upload a excel file and view it as a report.
4. Architecture
We can achieve this by using below simple method.
Steps to follow.
Step:1
Create a region and File browser item as PX_XLSX_FILE.
Step:2
Set PX_XLSX_FILE item Setting .
storage type : APEX_APPLICATION_TEMP_FILES
Purge File at : End of Session.
Code:
Run the below plsql object.
create or replace package body xlsx_parser is
g_worksheets_path_prefix constant varchar2(14) := ‘xl/worksheets/’;
–==================================================================================================================
function get_date( p_xlsx_date_number in number ) return date is
begin
return
case when p_xlsx_date_number > 61
then DATE’1900-01-01′ – 2 + p_xlsx_date_number
else DATE’1900-01-01′ – 1 + p_xlsx_date_number
end;
end get_date;
–==================================================================================================================
procedure get_blob_content(
p_xlsx_name in varchar2,
p_xlsx_content in out nocopy blob )
is
begin
if p_xlsx_name is not null then
select blob_content into p_xlsx_content
from apex_application_temp_files
where name = p_xlsx_name;
end if;
exception
when no_data_found then
null;
end get_blob_content;
–==================================================================================================================
function extract_worksheet(
p_xlsx in blob,
p_worksheet_name in varchar2 ) return blob
is
l_worksheet blob;
begin
if p_xlsx is null or p_worksheet_name is null then
return null;
end if;
l_worksheet := apex_zip.get_file_content(
p_zipped_blob => p_xlsx,
p_file_name => g_worksheets_path_prefix || p_worksheet_name || ‘.xml’ );
if l_worksheet is null then
raise_application_error(-20000, ‘WORKSHEET “‘ || p_worksheet_name || ‘” DOES NOT EXIST’);
end if;
return l_worksheet;
end extract_worksheet;
–==================================================================================================================
procedure extract_shared_strings(
p_xlsx in blob,
p_strings in out nocopy wwv_flow_global.vc_arr2 )
is
l_shared_strings blob;
begin
l_shared_strings := apex_zip.get_file_content(
p_zipped_blob => p_xlsx,
p_file_name => ‘xl/sharedStrings.xml’ );
if l_shared_strings is null then
return;
end if;
select shared_string
bulk collect into p_strings
from xmltable(
xmlnamespaces( default ‘http://schemas.openxmlformats.org/spreadsheetml/2006/main’ ),
‘//si’
passing xmltype.createxml( l_shared_strings, nls_charset_id(‘AL32UTF8’), null )
columns
shared_string varchar2(4000) path ‘t/text()’ );
end extract_shared_strings;
–==================================================================================================================
procedure extract_date_styles(
p_xlsx in blob,
p_format_codes in out nocopy wwv_flow_global.vc_arr2 )
is
l_stylesheet blob;
begin
l_stylesheet := apex_zip.get_file_content(
p_zipped_blob => p_xlsx,
p_file_name => ‘xl/styles.xml’ );
if l_stylesheet is null then
return;
end if;
select lower( n.formatCode )
bulk collect into p_format_codes
from
xmltable(
xmlnamespaces( default ‘http://schemas.openxmlformats.org/spreadsheetml/2006/main’ ),
‘//cellXfs/xf’
passing xmltype.createxml( l_stylesheet, nls_charset_id(‘AL32UTF8’), null )
columns
numFmtId number path ‘@numFmtId’ ) s,
xmltable(
xmlnamespaces( default ‘http://schemas.openxmlformats.org/spreadsheetml/2006/main’ ),
‘//numFmts/numFmt’
passing xmltype.createxml( l_stylesheet, nls_charset_id(‘AL32UTF8’), null )
columns
formatCode varchar2(255) path ‘@formatCode’,
numFmtId number path ‘@numFmtId’ ) n
where s.numFmtId = n.numFmtId ( + );
end extract_date_styles;
–==================================================================================================================
function convert_ref_to_col#( p_col_ref in varchar2 ) return pls_integer is
l_colpart varchar2(10);
l_linepart varchar2(10);
begin
l_colpart := replace(translate(p_col_ref,’1234567890′,’__________’), ‘_’);
if length( l_colpart ) = 1 then
return ascii( l_colpart ) – 64;
else
return ( ascii( substr( l_colpart, 1, 1 ) ) – 64 ) * 26 + ( ascii( substr( l_colpart, 2, 1 ) ) – 64 );
end if;
end convert_ref_to_col#;
–==================================================================================================================
procedure reset_row( p_parsed_row in out nocopy xlsx_row_t ) is
begin
— reset row
p_parsed_row.col01 := null; p_parsed_row.col02 := null; p_parsed_row.col03 := null; p_parsed_row.col04 := null; p_parsed_row.col05 := null;
p_parsed_row.col06 := null; p_parsed_row.col07 := null; p_parsed_row.col08 := null; p_parsed_row.col09 := null; p_parsed_row.col10 := null;
p_parsed_row.col11 := null; p_parsed_row.col12 := null; p_parsed_row.col13 := null; p_parsed_row.col14 := null; p_parsed_row.col15 := null;
p_parsed_row.col16 := null; p_parsed_row.col17 := null; p_parsed_row.col18 := null; p_parsed_row.col19 := null; p_parsed_row.col20 := null;
p_parsed_row.col21 := null; p_parsed_row.col22 := null; p_parsed_row.col23 := null; p_parsed_row.col24 := null; p_parsed_row.col25 := null;
p_parsed_row.col26 := null; p_parsed_row.col27 := null; p_parsed_row.col28 := null; p_parsed_row.col29 := null; p_parsed_row.col30 := null;
p_parsed_row.col31 := null; p_parsed_row.col32 := null; p_parsed_row.col33 := null; p_parsed_row.col34 := null; p_parsed_row.col35 := null;
p_parsed_row.col36 := null; p_parsed_row.col37 := null; p_parsed_row.col38 := null; p_parsed_row.col39 := null; p_parsed_row.col40 := null;
p_parsed_row.col41 := null; p_parsed_row.col42 := null; p_parsed_row.col43 := null; p_parsed_row.col44 := null; p_parsed_row.col45 := null;
p_parsed_row.col46 := null; p_parsed_row.col47 := null; p_parsed_row.col48 := null; p_parsed_row.col49 := null; p_parsed_row.col50 := null;
end reset_row;
–==================================================================================================================
function parse(
p_xlsx_name in varchar2 default null,
p_xlsx_content in blob default null,
p_worksheet_name in varchar2 default ‘sheet1’,
p_max_rows in number default 1000000 ) return xlsx_tab_t pipelined
is
l_worksheet blob;
l_xlsx_content blob;
l_shared_strings wwv_flow_global.vc_arr2;
l_format_codes wwv_flow_global.vc_arr2;
l_parsed_row xlsx_row_t;
l_first_row boolean := true;
l_value varchar2(32767);
l_line# pls_integer := 1;
l_real_col# pls_integer;
l_row_has_content boolean := false;
begin
if p_xlsx_content is null then
get_blob_content( p_xlsx_name, l_xlsx_content );
else
l_xlsx_content := p_xlsx_content;
end if;
if l_xlsx_content is null then
return;
end if;
l_worksheet := extract_worksheet(
p_xlsx => l_xlsx_content,
p_worksheet_name => p_worksheet_name );
extract_shared_strings(
p_xlsx => l_xlsx_content,
p_strings => l_shared_strings );
extract_date_styles(
p_xlsx => l_xlsx_content,
p_format_codes => l_format_codes );
— the actual XML parsing starts here
for i in (
select
r.xlsx_row,
c.xlsx_col#,
c.xlsx_col,
c.xlsx_col_type,
c.xlsx_col_style,
c.xlsx_val
from xmltable(
xmlnamespaces( default ‘http://schemas.openxmlformats.org/spreadsheetml/2006/main’ ),
‘//row’
passing xmltype.createxml( l_worksheet, nls_charset_id(‘AL32UTF8’), null )
columns
xlsx_row number path ‘@r’,
xlsx_cols xmltype path ‘.’
) r, xmltable (
xmlnamespaces( default ‘http://schemas.openxmlformats.org/spreadsheetml/2006/main’ ),
‘//c’
passing r.xlsx_cols
columns
xlsx_col# for ordinality,
xlsx_col varchar2(15) path ‘@r’,
xlsx_col_type varchar2(15) path ‘@t’,
xlsx_col_style varchar2(15) path ‘@s’,
xlsx_val varchar2(4000) path ‘v/text()’
) c
where p_max_rows is null or r.xlsx_row <= p_max_rows
) loop
if i.xlsx_col# = 1 then
l_parsed_row.line# := l_line#;
if not l_first_row then
pipe row( l_parsed_row );
l_line# := l_line# + 1;
reset_row( l_parsed_row );
l_row_has_content := false;
else
l_first_row := false;
end if;
end if;
if i.xlsx_col_type = ‘s’ then
if l_shared_strings.exists( i.xlsx_val + 1) then
l_value := l_shared_strings( i.xlsx_val + 1);
else
l_value := ‘[Data Error: N/A]’ ;
end if;
else
if l_format_codes.exists( i.xlsx_col_style + 1 ) and (
instr( l_format_codes( i.xlsx_col_style + 1 ), ‘d’ ) > 0 and
instr( l_format_codes( i.xlsx_col_style + 1 ), ‘m’ ) > 0 )
then
l_value := to_char( get_date( i.xlsx_val ), c_date_format );
else
l_value := i.xlsx_val;
end if;
end if;
pragma inline( convert_ref_to_col#, ‘YES’ );
l_real_col# := convert_ref_to_col#( i.xlsx_col );
if l_real_col# between 1 and 50 then
l_row_has_content := true;
end if;
— we currently support 50 columns – but this can easily be increased. Just add additional lines
— as follows:
— when l_real_col# = {nn} then l_parsed_row.col{nn} := l_value;
case
when l_real_col# = 1 then l_parsed_row.col01 := l_value;
when l_real_col# = 2 then l_parsed_row.col02 := l_value;
when l_real_col# = 3 then l_parsed_row.col03 := l_value;
when l_real_col# = 4 then l_parsed_row.col04 := l_value;
when l_real_col# = 5 then l_parsed_row.col05 := l_value;
when l_real_col# = 6 then l_parsed_row.col06 := l_value;
when l_real_col# = 7 then l_parsed_row.col07 := l_value;
when l_real_col# = 8 then l_parsed_row.col08 := l_value;
when l_real_col# = 9 then l_parsed_row.col09 := l_value;
when l_real_col# = 10 then l_parsed_row.col10 := l_value;
when l_real_col# = 11 then l_parsed_row.col11 := l_value;
when l_real_col# = 12 then l_parsed_row.col12 := l_value;
when l_real_col# = 13 then l_parsed_row.col13 := l_value;
when l_real_col# = 14 then l_parsed_row.col14 := l_value;
when l_real_col# = 15 then l_parsed_row.col15 := l_value;
when l_real_col# = 16 then l_parsed_row.col16 := l_value;
when l_real_col# = 17 then l_parsed_row.col17 := l_value;
when l_real_col# = 18 then l_parsed_row.col18 := l_value;
when l_real_col# = 19 then l_parsed_row.col19 := l_value;
when l_real_col# = 20 then l_parsed_row.col20 := l_value;
when l_real_col# = 21 then l_parsed_row.col21 := l_value;
when l_real_col# = 22 then l_parsed_row.col22 := l_value;
when l_real_col# = 23 then l_parsed_row.col23 := l_value;
when l_real_col# = 24 then l_parsed_row.col24 := l_value;
when l_real_col# = 25 then l_parsed_row.col25 := l_value;
when l_real_col# = 26 then l_parsed_row.col26 := l_value;
when l_real_col# = 27 then l_parsed_row.col27 := l_value;
when l_real_col# = 28 then l_parsed_row.col28 := l_value;
when l_real_col# = 29 then l_parsed_row.col29 := l_value;
when l_real_col# = 30 then l_parsed_row.col30 := l_value;
when l_real_col# = 31 then l_parsed_row.col31 := l_value;
when l_real_col# = 32 then l_parsed_row.col32 := l_value;
when l_real_col# = 33 then l_parsed_row.col33 := l_value;
when l_real_col# = 34 then l_parsed_row.col34 := l_value;
when l_real_col# = 35 then l_parsed_row.col35 := l_value;
when l_real_col# = 36 then l_parsed_row.col36 := l_value;
when l_real_col# = 37 then l_parsed_row.col37 := l_value;
when l_real_col# = 38 then l_parsed_row.col38 := l_value;
when l_real_col# = 39 then l_parsed_row.col39 := l_value;
when l_real_col# = 40 then l_parsed_row.col40 := l_value;
when l_real_col# = 41 then l_parsed_row.col41 := l_value;
when l_real_col# = 42 then l_parsed_row.col42 := l_value;
when l_real_col# = 43 then l_parsed_row.col43 := l_value;
when l_real_col# = 44 then l_parsed_row.col44 := l_value;
when l_real_col# = 45 then l_parsed_row.col45 := l_value;
when l_real_col# = 46 then l_parsed_row.col46 := l_value;
when l_real_col# = 47 then l_parsed_row.col47 := l_value;
when l_real_col# = 48 then l_parsed_row.col48 := l_value;
when l_real_col# = 49 then l_parsed_row.col49 := l_value;
when l_real_col# = 50 then l_parsed_row.col50 := l_value;
else null;
end case;
end loop;
if l_row_has_content then
l_parsed_row.line# := l_line#;
pipe row( l_parsed_row );
end if;
return;
end parse;
–==================================================================================================================
function get_worksheets(
p_xlsx_content in blob default null,
p_xlsx_name in varchar2 default null ) return apex_t_varchar2 pipelined
is
l_zip_files apex_zip.t_files;
l_xlsx_content blob;
begin
if p_xlsx_content is null then
get_blob_content( p_xlsx_name, l_xlsx_content );
else
l_xlsx_content := p_xlsx_content;
end if;
l_zip_files := apex_zip.get_files(
p_zipped_blob => l_xlsx_content );
for i in 1 .. l_zip_files.count loop
if substr( l_zip_files( i ), 1, length( g_worksheets_path_prefix ) ) = g_worksheets_path_prefix then
pipe row( rtrim( substr( l_zip_files ( i ), length( g_worksheets_path_prefix ) + 1 ), ‘.xml’ ) );
end if;
end loop;
return;
end get_worksheets;
end xlsx_parser;
Step:3
Create a button as Submit in File browser region.
Step:4
Create a Classic report region with sql code as
Code:
select *
from table( xlsx_parser.parse(
p_xlsx_name => :PX_XLSX_FILE ) )
where line# != 1
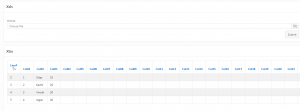
1. Screen Shot
Output:
Excel input file content
| Sno | Name | Id |
| 1 | Uday | 10 |
| 2 | Karthi | 20 |
| 3 | Vinoth | 30 |
| 4 | Jegan | 40 |
Source Link: https://blogs.oracle.com/apex/easy-xlsx-parser:-just-with-sql-and-plsql
Post Views:
1,007
Excel Gateway for Oracle APEX
No possibility to let your users access your APEX app? Consider using our tool to handle that in a good and modern way.
Create your own Excel template(s) in APEX, email them to your recipient(s) and then upload the finished file.
Now you can check and correct the data. If everything is well, publish the data for further analysis, reports etc.

Requirement
- Oracle Application Express 21.1 (or higher)
- Oracle Database 12.2 (or higher)
Installation
Go into the APEX workspace, where you like to install the «Excel Gateway for Oracle APEX» app and import the file «/src/apex/excel_gateway_for_oracle_apex.sql» as a database application.
This will install all DB-Objects and the application
Getting Started

1. Create Template
First step is to create a new Excel template

- Click «Create Template» and follow the wizard
- Give your template a unique name
- Optional you can enter a deadline which is needed to calculate when the application will send reminders
- You need a sheet protection to prevent various actions. Then choose a password for your workbook here
- You can enter a maximum number of rows which indicates how many rows are available to the editor
- Adopt specifications from existing templates
Second step is to add column headings to the template

- Drag and drop the titles from the left area (1) to the right (2)
Use the up or down arrows to change the order
The title can be deleted with the recycle bin - If you need new titles, click «Add Header» (3)

- Enter the name of the title
- Enter the width for the column in your Excel Spreadsheet
- If the column in your table needs validation, choose one here (for example number, date, email…)
- If you want the column shows a dropdown list, enter the values here
Next step is to add header-groups to the template (optional)

Choose a heading group for each column that needs merge cells
If you need new header-groups, click on «Add Header-Group» and create a new one
For this you have to enter the name, background and font color
The next step is to set the background and font color for the columns

You can use the Color Picker for this
In the last step, formulas or min/max values can be set for the validations

For number or date validations, use Formula 1 as the minimum and Formula 2 as the maximum value.
If the validation is «Formula», enter the formula you need in Formula 1.
Click «Show Columns/Info» for more details and examples.
Finally, you get an overview.
Before you create the template you can download a preview file. To do this, click the «Preview» button.
Everything is fine, click «Save Template» to create.

2. Send Template

First of all the template has to be selected (1).
Next, person(s) need to be added (2). All person(s) involved in the process are listed in the grid (3).
If you want to add person(s), click on «Add Person» and select the person(s) in the modal dialog.

Click «Add Person» to continue.
Now all persons involved in the process are displayed and the template can be sent by email.
To do this, a mailtype must be selected first.
There are three different types:
- Initial Mail — all templates that have not yet been sent and processed
- Correction Mail — all templates where corrections must be made
- Reminder Mail — all templates where the deadline has passed

When a selection is made, the grid is always updated and only the affected recipients are displayed.
For example, the initial email can be sent only once a time and a reminder can be sent only when the deadline is exceeded.
So first select «Initial Mail» and then click «Send Mail» to send everyone the initial email with the selected template.
All available emails can also be sent automatically.
To do this, click on «Automations». The dialog shows how the status of the automation is and on which days it should be sent if the function is enabled.

3. Upload Template
After sending e-mails, the recipient must fill them out and send them back.
To upload the finished template, navigate to «Upload template» in the navigation menu and click «Upload».

Note: If something should fail during the upload, you can check the error log to find out what the problem is.
4. Check Data
If the upload was successful, the data can be checked.
To do this, navigate to «Check data» and select the one to be checked.

This example shows data without errors that were detected by the application via the previously defined validations.

If incorrect data were detected by the application, this is displayed in the «Validation» column.
For example, an incorrect email address was detected here.

Now there are two options.
- The incorrect data can be corrected directly in the application or
- a new excel file will be created in which all incorrect rows are listed. To create this, click «Provide Correction» and then sent it as a «Correction Mail» (navigate to «Send Mail» and select the mailtype «Correction Mail»).
If everything is fine, the status can be set to «Completed».
All the data that are «Completed» are available for export.

5. Publication / Export Data
All data are displayed here and are available for download.
Alternatively, interactive reporting can be done here.

How to contribute as a developer to this project
This github repository is for developers willing to contribute to the upcoming version of Excel Gateway for Oracle APEX
- Clone/fork the repository apex-excel-gateway to get your own copy.
- Create a workspace with the ID 33850085021086653. For this you will
need your own APEX environment. - Run /src/install_all_scratch_dev.sql.
When prompted enter the parameters.
This will install all DB-Objects and the application with fixed ID 445.
Make sure you have Application ID 445 free for this. - Make your changes in the app and/or db objects.
- Commit your changes in your own branch.
Preferable a dedicated branch for the feature you’re working on. - Send in a pull request for review.
We will then verify the changes before accepting the pull request.
We might ask you to update your pull request based on our findings.
Some important rules:
- Retain Workspace ID and Application ID, otherwise each and every file of the application export will be marked as changed.
Easiest way to achieve this is to use the provided development install script mentioned above. - Always enable «Export as ZIP» and «Export with Original IDs».
Getting in touch
Send a DM on Twitter to Timo Herwix (@therwix) to get involved.
Add Office reporting feature to your APEX application
Why use APEX.report?
APEX.report allows you to easily generate Excel files based on XLSX template files and data returned by SQL query.
This unique solution on the market gives you the possibility to edit template files using an Excel application (e.g. to apply formatting and computations) and provide a query that fills this template during runtime XLSX generation. Query can have bind variables (parameters) that allow you to reference APEX session variables.
How it works?
- Create a template in the MS Excel
No special tool or XML knowledge is needed to prepare templates. Anyone who knows Excel is able to generate XLSX templates. - Prepare SQL statement
just enter SQL statement that fills your XLSX template and you are ready to go. - Upload template to the APEX application or use predefined one
Template has been filled with data from the data source and as a result we get a file in .xlsx format
How to install it?
- Just load plugin file to your application from Application Builder. No SYS, Instance admin nor shell access is needed!
- Compile PL/SQL package
You are ready to use!
Main functions/ features:
-
- you can easily export data to .xlsx file
- SQL query or function returning SQL as a data source
- data export based on dynamic SQL
- dynamically created set of result columns
- you can pass parameters to SQL query
- you can present data using the chart in your template
- you can easily and flexibly create and use of templates using Microsoft Office Excel
- support two results set in the same xlsx
- you can hide any sheets in template (for example hide sheets with source data or not applicable sheets in report)
- further customization using page item substitution
Usage examples:
Sample application using APEX.report:
Report and dynamic chart:
Charts can be dynamically adjusted and resized by plugin to match number of columns.
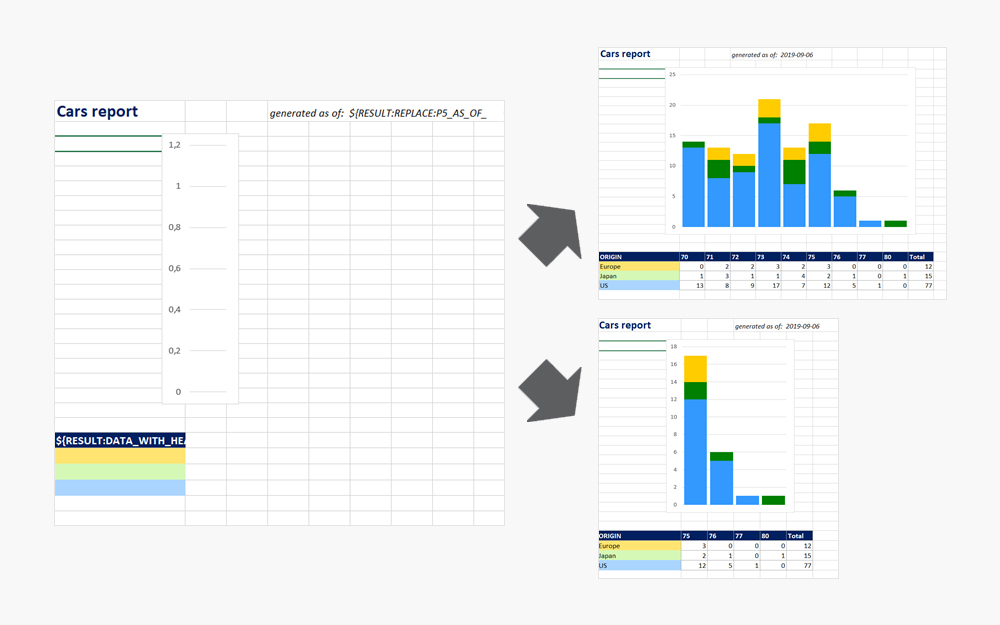
Data from: https://www.kaggle.com/jingbinxu/sample-of-car-data
Licencing and pricing:
- 1500 euro – one time licence fee for two APEX instances (includes email support and free software updates for 1 year).
- Optional: 20% maintenance and support fee per year starting from second year (includes email support and free software updates).