
Рассказывает автор блога javarevisited.blogspot.ru
Из этой статьи вы сможете узнать о записи и чтении данных из Excel файлов в Java (будет рассмотрен как XLS, так и XLSX формат). Мы будем использовать библиотеку Apache POI и сосредоточимся на работе с типами String и Date, работа с последним происходит достаточно хитро. Напомню, что работу с числами мы уже рассмотрели в другой статье.
Библиотеку poi-XX.jar вы можете использовать для всех старых (xls, doc, ppt) файлов Microsoft Office, для новых (xlsx, docx, pptx) вам понадобится poi-ooxml-XX.jar. Очень важно понимать, что к чему относится, т.к. используемые классы тоже разные — для старых расширений это HSSFWorkbook, а для новых — XSSFWorkbook.
Подготовка: загрузка библиотек и зависимостей
Конечно, существует достаточно много открытых библиотек, которые позволяют работать с Excel файлами в Java, например, JXL, но мы будем использовать имеющую самый обширный API и самую популярную — Apache POI. Чтобы её использовать, вам нужно скачать jar файлы и добавить их через Eclipse вручную, или вы можете предоставить это Maven.
Во втором случае вам нужно просто добавить следующие две зависимости:
<dependencies>
    <dependency>
        <groupId>org.apache.poi</groupId>
        <artifactId>poi</artifactId>
        <version>3.12</version>
    </dependency>
    <dependency>
        <groupId>org.apache.poi</groupId>
        <artifactId>poi-ooxml</artifactId>
        <version>3.12</version>
    </dependency>
  </dependencies>
Самое удобное в Maven — что он загрузит не только указанные poi.jar и poi-ooxml.jar, но и все jar файлы, которые используются внутри, то есть xmlbeans-2.6.0.jar, stax-api-1.0.1.jar, poi-ooxml-schemas-3.12.jar и commons-codec-1.9.jar.
Если вы будете добавлять библиотеки вручную — не забудьте о вышеназванных файлах. Скачать всё можно отсюда. Помните — если вы загрузите только poi-XX.jar, то ваш код скомпилируется без ошибок, но потом упадёт с java.lang.NoClassDefFoundError: org/apache/xmlbeans/XmlObject, так как внутри будет вызываться xmlbeans.jar.
Запись
В этом примере мы запишем в xls файл следующие данные: в первую ячейку — строку с именем, а во вторую — дату рождения. Вот пошаговая инструкция:
- Создаём объект
HSSFWorkBook; - Создаём лист, используя на объекте, созданном в предыдущем шаге,
createSheet(); - Создаём на листе строку, используя
createRow(); - Создаём в строке ячейку —
createCell(); - Задаём значение ячейки через
setCellValue(); - Записываем
workbookвFileчерезFileOutputStream; - Закрываем
workbook, вызываяclose().
Для записи строк или чисел этого вполне достаточно, но чтобы записать дату, нам понадобится сделать ещё кое-что:
- Создать
DateFormat; - Создать
CellStyle; - Записать
DateFormatвCellStyle; - Записать
CellStyleв ячейку; - Теперь в эту ячейку можно записать объект
Dateчерез всё тот жеsetCellValue; - Чтобы дата поместилась в ячейку, нам нужно добавить столбцу свойство автоматически менять размер:
sheet.autoSizeColumn(1).
Всё вместе это будет выглядеть так:
@SuppressWarnings("deprecation")
    public static void writeIntoExcel(String file) throws FileNotFoundException, IOException{
        Workbook book = new HSSFWorkbook();
        Sheet sheet = book.createSheet("Birthdays");

        // Нумерация начинается с нуля
        Row row = sheet.createRow(0);

        // Мы запишем имя и дату в два столбца
        // имя будет String, а дата рождения --- Date,
        // формата dd.mm.yyyy
        Cell name = row.createCell(0);
        name.setCellValue("John");

        Cell birthdate = row.createCell(1);

        DataFormat format = book.createDataFormat();
        CellStyle dateStyle = book.createCellStyle();
        dateStyle.setDataFormat(format.getFormat("dd.mm.yyyy"));
        birthdate.setCellStyle(dateStyle);


        // Нумерация лет начинается с 1900-го
        birthdate.setCellValue(new Date(110, 10, 10));

        // Меняем размер столбца
        sheet.autoSizeColumn(1);

        // Записываем всё в файл
        book.write(new FileOutputStream(file));
        book.close();
    }
Чтение
Теперь мы считаем из только что созданного файла то, что мы туда записали.
- Для начала создадим
HSSFWorkBook, передав в конструкторFileInputStream; - Получаем лист, передавая в
getSheet()его номер или название; - Получаем строку, используя
getRow(); - Получаем ячейку, используя
getCell(); - Узнаём тип ячейки, используя на ней
getCellType(); - В зависимости от типа ячейки, читаем её значения, используя
getStringCellValue(),getNumericCellValue()илиgetDateCellValue(); - Закрываем
workbookиспользуяclose().
Напомню, что дату Excel хранит как числа, т.е. тип ячейки всё равно будет CELL_TYPE_NUMERIC.
В виде кода это будет выглядеть следующим образом:
public static void readFromExcel(String file) throws IOException{
        HSSFWorkbook myExcelBook = new HSSFWorkbook(new FileInputStream(file));
        HSSFSheet myExcelSheet = myExcelBook.getSheet("Birthdays");
        HSSFRow row = myExcelSheet.getRow(0);

        if(row.getCell(0).getCellType() == HSSFCell.CELL_TYPE_STRING){
            String name = row.getCell(0).getStringCellValue();
            System.out.println("name : " + name);
        }

        if(row.getCell(1).getCellType() == HSSFCell.CELL_TYPE_NUMERIC){
            Date birthdate = row.getCell(1).getDateCellValue();
            System.out.println("birthdate :" + birthdate);
        }

        myExcelBook.close();

    }
В заключение
Как уже упомналось выше, чтение из xlsx файлов ничем принципиально не отличается — нужно только вместо HSSFWorkBook, HSSFSheet, HSSFRow (и прочих) из poi-XX.jar использовать XSSFWorkBook, XSSFSheet, XSSFRow из poi-ooxml-XX.jar. Это всё, что вам нужно знать для чтения и записи в файлы Excel. Разумеется, с помощью библиотеки Apache POI вы можете сделать гораздо больше, но эта статья должна помочь вам быстрее в ней освоиться.
Перевод статьи «How to Read Write Excel file in Java — POI Example»
Learn to read excel, write excel, evaluate formula cells and apply custom formatting to the generated excel files using Apache POI library with examples.
If we are building software for the HR or Finance domain, there is usually a requirement for generating excel reports across management levels. Apart from reports, we can also expect some input data for the applications coming in the form of excel sheets and the application is expected to support this requirement.
Apache POI is a well-trusted library among many other open-source libraries to handle such usecases involving excel files. Please note that, in addition, we can read and write MS Word and MS PowerPoint files also using the Apache POI library.
This Apache POI tutorial will discuss some everyday excel operations in real-life applications.
- 1. Maven Dependency
- 2. Important Classes in POI Library
- 3. Writing an Excel File
- 4. Reading an Excel File
- 5. Add and Evaluate Formula Cells
- 6. Formatting the Cells
- 7. Conclusion
1. Maven Dependency
If we are working on a maven project, we can include the Apache POI dependencies in pom.xml file using this:
<dependency>
  <groupId>org.apache.poi</groupId>
  <artifactId>poi</artifactId>
  <version>5.2.2</version>
</dependency>

<dependency>
  <groupId>org.apache.poi</groupId>
  <artifactId>poi-ooxml</artifactId>
  <version>5.2.2</version>
</dependency>
2. Important Classes in POI Library
-
HSSF, XSSF and XSSF classes
Apache POI main classes usually start with either HSSF, XSSF or SXSSF.
- HSSF – is the POI Project’s pure Java implementation of the Excel 97(-2007) file format. e.g., HSSFWorkbook, HSSFSheet.
- XSSF – is the POI Project’s pure Java implementation of the Excel 2007 OOXML (.xlsx) file format. e.g., XSSFWorkbook, XSSFSheet.
- SXSSF (since 3.8-beta3) – is an API-compatible streaming extension of XSSF to be used when huge spreadsheets have to be produced and heap space is limited. e.g., SXSSFWorkbook, SXSSFSheet. SXSSF achieves its low memory footprint by limiting access to the rows within a sliding window, while XSSF gives access to all rows in the document.
-
Row and Cell
Apart from the above classes, Row and Cell interact with a particular row and a particular cell in an excel sheet.
-
Styling Related Classes
A wide range of classes like CellStyle, BuiltinFormats, ComparisonOperator, ConditionalFormattingRule, FontFormatting, IndexedColors, PatternFormatting, SheetConditionalFormatting etc. are used when you have to add formatting to a sheet, primarily based on some rules.
-
FormulaEvaluator
Another helpful class FormulaEvaluator is used to evaluate the formula cells in an excel sheet.
3. Writing an Excel File
I am taking this example first so we can reuse the excel sheet created by this code in further examples.
Writing excel using POI is very simple and involves the following steps:
- Create a workbook
- Create a sheet in workbook
- Create a row in sheet
- Add cells to sheet
- Repeat steps 3 and 4 to write more data
It seems very simple, right? Let’s have a look at the code doing these steps.
Java program to write an excel file using Apache POI library.
package com.howtodoinjava.demo.poi;
//import statements
public class WriteExcelDemo
{
    public static void main(String[] args)
    {
        //Blank workbook
        XSSFWorkbook workbook = new XSSFWorkbook();

        //Create a blank sheet
        XSSFSheet sheet = workbook.createSheet("Employee Data");

        //This data needs to be written (Object[])
        Map<String, Object[]> data = new TreeMap<String, Object[]>();
        data.put("1", new Object[] {"ID", "NAME", "LASTNAME"});
        data.put("2", new Object[] {1, "Amit", "Shukla"});
        data.put("3", new Object[] {2, "Lokesh", "Gupta"});
        data.put("4", new Object[] {3, "John", "Adwards"});
        data.put("5", new Object[] {4, "Brian", "Schultz"});

        //Iterate over data and write to sheet
        Set<String> keyset = data.keySet();
        int rownum = 0;
        for (String key : keyset)
        {
            Row row = sheet.createRow(rownum++);
            Object [] objArr = data.get(key);
            int cellnum = 0;
            for (Object obj : objArr)
            {
               Cell cell = row.createCell(cellnum++);
               if(obj instanceof String)
                    cell.setCellValue((String)obj);
                else if(obj instanceof Integer)
                    cell.setCellValue((Integer)obj);
            }
        }
        try
        {
            //Write the workbook in file system
            FileOutputStream out = new FileOutputStream(new File("howtodoinjava_demo.xlsx"));
            workbook.write(out);
            out.close();
            System.out.println("howtodoinjava_demo.xlsx written successfully on disk.");
        }
        catch (Exception e)
        {
            e.printStackTrace();
        }
    }
}
See Also: Appending Rows to Excel
4. Reading an Excel File
Reading an excel file using POI is also very simple if we divide this into steps.
- Create workbook instance from an excel sheet
- Get to the desired sheet
- Increment row number
- iterate over all cells in a row
- repeat steps 3 and 4 until all data is read
Let’s see all the above steps in code. I am writing the code to read the excel file created in the above example. It will read all the column names and the values in it – cell by cell.
Java program to read an excel file using Apache POI library.
package com.howtodoinjava.demo.poi;
//import statements
public class ReadExcelDemo
{
public static void main(String[] args)
{
try
{
FileInputStream file = new FileInputStream(new File("howtodoinjava_demo.xlsx"));
//Create Workbook instance holding reference to .xlsx file
XSSFWorkbook workbook = new XSSFWorkbook(file);
//Get first/desired sheet from the workbook
XSSFSheet sheet = workbook.getSheetAt(0);
//Iterate through each rows one by one
Iterator<Row> rowIterator = sheet.iterator();
while (rowIterator.hasNext())
{
Row row = rowIterator.next();
//For each row, iterate through all the columns
Iterator<Cell> cellIterator = row.cellIterator();
while (cellIterator.hasNext())
{
Cell cell = cellIterator.next();
//Check the cell type and format accordingly
switch (cell.getCellType())
{
case Cell.CELL_TYPE_NUMERIC:
System.out.print(cell.getNumericCellValue() + "t");
break;
case Cell.CELL_TYPE_STRING:
System.out.print(cell.getStringCellValue() + "t");
break;
}
}
System.out.println("");
}
file.close();
}
catch (Exception e)
{
e.printStackTrace();
}
}
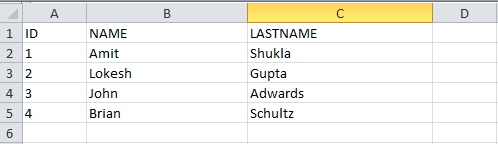
}Program Output:
ID      NAME        LASTNAME
1.0     Amit        Shukla
2.0     Lokesh      Gupta
3.0     John        Adwards
4.0     Brian       Schultz
See Also: Apache POI – Read an Excel File using SAX Parser
5. Add and Evaluate Formula Cells
When working on complex excel sheets, we encounter many cells with formulas to calculate their values. These are formula cells. Apache POI also has excellent support for adding formula cells and evaluating already present formula cells.
Let’s see one example of how to add formula cells in excel?
The sheet has four cells in a row and the fourth one in the multiplication of all the previous 3 rows. So the formula will be: A2*B2*C2 (in the second row)
Java program to add formula in an excel file using Apache POI library.
public static void main(String[] args)
{
    XSSFWorkbook workbook = new XSSFWorkbook();
    XSSFSheet sheet = workbook.createSheet("Calculate Simple Interest");

    Row header = sheet.createRow(0);
    header.createCell(0).setCellValue("Pricipal");
    header.createCell(1).setCellValue("RoI");
    header.createCell(2).setCellValue("T");
    header.createCell(3).setCellValue("Interest (P r t)");

    Row dataRow = sheet.createRow(1);
    dataRow.createCell(0).setCellValue(14500d);
    dataRow.createCell(1).setCellValue(9.25);
    dataRow.createCell(2).setCellValue(3d);
    dataRow.createCell(3).setCellFormula("A2*B2*C2");

    try {
        FileOutputStream out =  new FileOutputStream(new File("formulaDemo.xlsx"));
        workbook.write(out);
        out.close();
        System.out.println("Excel with foumula cells written successfully");

    } catch (FileNotFoundException e) {
        e.printStackTrace();
    } catch (IOException e) {
        e.printStackTrace();
    }
}
Similarly, we want to read a file with formula cells and use the following logic to evaluate formula cells.
Java program to evaluate formula in an excel file using Apache POI library.
public static void readSheetWithFormula()
{
    try
    {
        FileInputStream file = new FileInputStream(new File("formulaDemo.xlsx"));

        //Create Workbook instance holding reference to .xlsx file
        XSSFWorkbook workbook = new XSSFWorkbook(file);

        FormulaEvaluator evaluator = workbook.getCreationHelper().createFormulaEvaluator();

        //Get first/desired sheet from the workbook
        XSSFSheet sheet = workbook.getSheetAt(0);

        //Iterate through each rows one by one
        Iterator<Row> rowIterator = sheet.iterator();
        while (rowIterator.hasNext())
        {
            Row row = rowIterator.next();
            //For each row, iterate through all the columns
            Iterator<Cell> cellIterator = row.cellIterator();

            while (cellIterator.hasNext())
            {
                Cell cell = cellIterator.next();
                //Check the cell type after eveluating formulae
                //If it is formula cell, it will be evaluated otherwise no change will happen
                switch (evaluator.evaluateInCell(cell).getCellType())
                {
                    case Cell.CELL_TYPE_NUMERIC:
                        System.out.print(cell.getNumericCellValue() + "tt");
                        break;
                    case Cell.CELL_TYPE_STRING:
                        System.out.print(cell.getStringCellValue() + "tt");
                        break;
                    case Cell.CELL_TYPE_FORMULA:
                        //Not again
                        break;
                }
            }
            System.out.println("");
        }
        file.close();
    }
    catch (Exception e)
    {
        e.printStackTrace();
    }
}
Program Output:
Pricipal        RoI         T       Interest (P r t)
14500.0 9.25 3.0 402375.0 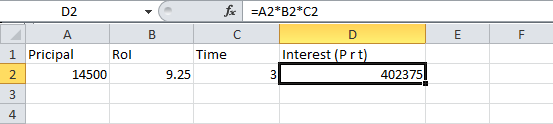
6. Formatting the Cells
So far we have seen examples of reading/writing and excel files using Apache POI. But, when creating a report in an excel file, it is essential to add formatting on cells that fit into any pre-determined criteria.
This formatting can be a different coloring based on a specific value range, expiry date limit etc.
In the below examples, we are taking a couple of such cell formatting examples for various purposes.
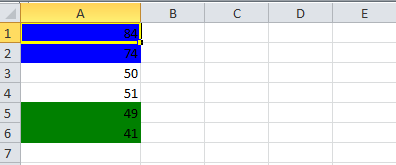
6.1. Cell value in a specific range
This code will color any cell in a range whose value is between a configured range. [e.g., between 50 and 70]
static void basedOnValue(Sheet sheet)
{
    //Creating some random values
    sheet.createRow(0).createCell(0).setCellValue(84);
    sheet.createRow(1).createCell(0).setCellValue(74);
    sheet.createRow(2).createCell(0).setCellValue(50);
    sheet.createRow(3).createCell(0).setCellValue(51);
    sheet.createRow(4).createCell(0).setCellValue(49);
    sheet.createRow(5).createCell(0).setCellValue(41);

    SheetConditionalFormatting sheetCF = sheet.getSheetConditionalFormatting();

    //Condition 1: Cell Value Is   greater than  70   (Blue Fill)
    ConditionalFormattingRule rule1 = sheetCF.createConditionalFormattingRule(ComparisonOperator.GT, "70");
    PatternFormatting fill1 = rule1.createPatternFormatting();
    fill1.setFillBackgroundColor(IndexedColors.BLUE.index);
    fill1.setFillPattern(PatternFormatting.SOLID_FOREGROUND);

    //Condition 2: Cell Value Is  less than      50   (Green Fill)
    ConditionalFormattingRule rule2 = sheetCF.createConditionalFormattingRule(ComparisonOperator.LT, "50");
    PatternFormatting fill2 = rule2.createPatternFormatting();
    fill2.setFillBackgroundColor(IndexedColors.GREEN.index);
    fill2.setFillPattern(PatternFormatting.SOLID_FOREGROUND);

    CellRangeAddress[] regions = {
            CellRangeAddress.valueOf("A1:A6")
    };

    sheetCF.addConditionalFormatting(regions, rule1, rule2);
}
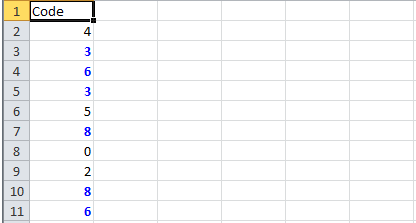
6.2. Highlight Duplicate Values
Highlight all cells which have duplicate values in observed cells.
static void formatDuplicates(Sheet sheet) {
    sheet.createRow(0).createCell(0).setCellValue("Code");
    sheet.createRow(1).createCell(0).setCellValue(4);
    sheet.createRow(2).createCell(0).setCellValue(3);
    sheet.createRow(3).createCell(0).setCellValue(6);
    sheet.createRow(4).createCell(0).setCellValue(3);
    sheet.createRow(5).createCell(0).setCellValue(5);
    sheet.createRow(6).createCell(0).setCellValue(8);
    sheet.createRow(7).createCell(0).setCellValue(0);
    sheet.createRow(8).createCell(0).setCellValue(2);
    sheet.createRow(9).createCell(0).setCellValue(8);
    sheet.createRow(10).createCell(0).setCellValue(6);

    SheetConditionalFormatting sheetCF = sheet.getSheetConditionalFormatting();

    // Condition 1: Formula Is   =A2=A1   (White Font)
    ConditionalFormattingRule rule1 = sheetCF.createConditionalFormattingRule("COUNTIF($A$2:$A$11,A2)>1");
    FontFormatting font = rule1.createFontFormatting();
    font.setFontStyle(false, true);
    font.setFontColorIndex(IndexedColors.BLUE.index);

    CellRangeAddress[] regions = {
            CellRangeAddress.valueOf("A2:A11")
    };

    sheetCF.addConditionalFormatting(regions, rule1);

    sheet.getRow(2).createCell(1).setCellValue("<== Duplicates numbers in the column are highlighted.  " +
            "Condition: Formula Is =COUNTIF($A$2:$A$11,A2)>1   (Blue Font)");
}
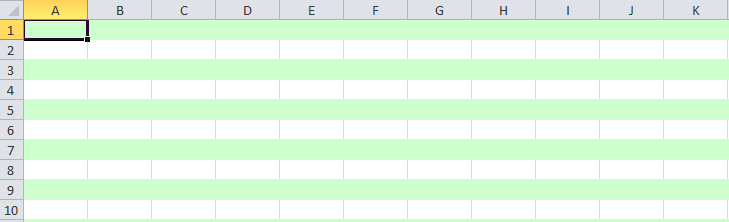
6.3. Alternate Color Rows in Different Colors
A simple code to color each alternate row in a different color.
static void shadeAlt(Sheet sheet) {
    SheetConditionalFormatting sheetCF = sheet.getSheetConditionalFormatting();

    // Condition 1: Formula Is   =A2=A1   (White Font)
    ConditionalFormattingRule rule1 = sheetCF.createConditionalFormattingRule("MOD(ROW(),2)");
    PatternFormatting fill1 = rule1.createPatternFormatting();
    fill1.setFillBackgroundColor(IndexedColors.LIGHT_GREEN.index);
    fill1.setFillPattern(PatternFormatting.SOLID_FOREGROUND);

    CellRangeAddress[] regions = {
            CellRangeAddress.valueOf("A1:Z100")
    };

    sheetCF.addConditionalFormatting(regions, rule1);

    sheet.createRow(0).createCell(1).setCellValue("Shade Alternating Rows");
    sheet.createRow(1).createCell(1).setCellValue("Condition: Formula Is  =MOD(ROW(),2)   (Light Green Fill)");
}
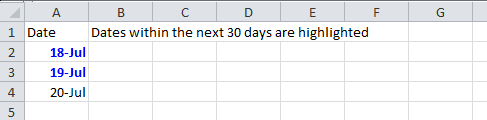
6.4. Color amounts that are going to expire in the next 30 days
A handy code for financial projects which keeps track of deadlines.
static void expiryInNext30Days(Sheet sheet)
{
    CellStyle style = sheet.getWorkbook().createCellStyle();
    style.setDataFormat((short)BuiltinFormats.getBuiltinFormat("d-mmm"));

    sheet.createRow(0).createCell(0).setCellValue("Date");
    sheet.createRow(1).createCell(0).setCellFormula("TODAY()+29");
    sheet.createRow(2).createCell(0).setCellFormula("A2+1");
    sheet.createRow(3).createCell(0).setCellFormula("A3+1");

    for(int rownum = 1; rownum <= 3; rownum++) sheet.getRow(rownum).getCell(0).setCellStyle(style);

    SheetConditionalFormatting sheetCF = sheet.getSheetConditionalFormatting();

    // Condition 1: Formula Is   =A2=A1   (White Font)
    ConditionalFormattingRule rule1 = sheetCF.createConditionalFormattingRule("AND(A2-TODAY()>=0,A2-TODAY()<=30)");
    FontFormatting font = rule1.createFontFormatting();
    font.setFontStyle(false, true);
    font.setFontColorIndex(IndexedColors.BLUE.index);

    CellRangeAddress[] regions = {
            CellRangeAddress.valueOf("A2:A4")
    };

    sheetCF.addConditionalFormatting(regions, rule1);

    sheet.getRow(0).createCell(1).setCellValue("Dates within the next 30 days are highlighted");
}
I am ending this apache poi tutorial here to keep the post within a limit.
7. Conclusion
In this tutorial, we learned to read excel, write excel, set and evaluate formula cells, and format the cells with color codings using the Apache POI library.
Happy Learning !!
Source Code on Github
Learn how to create an Excel spreadsheet from within Java using Apache POI, a library for working with Microsoft Documents.
Contents
- 1. Introduction
- 2. Maven Dependency
- 3. The Basics
- 4. The First Spreadsheet
- 5. Creating a Row and Cells
- 6. Auto Sizing Columns
- 7. Multi-Line Column
- 8. Adding Rows
- 9. Fixing “Number Stored As Text”
- 10. Using NumberFormat for Parsing
- 11. Setting Cell Style
- 12. Some More Formatting
- Summary
- See Also
- See Also
1. Introduction
Apache POI is a Java library to read and write Microsoft Documents including Word and Excel. Java Excel API can read and write Excel 97-2003 XLS files and also Excel 2007+ XLSX files. In this article, we show how to get going using the Apache POI library to work with Excel files.
2. Maven Dependency
You need the following maven dependency to work with Apache POI.
<poi.version>3.15</poi.version>
...
<dependency>
  <groupId>org.apache.poi</groupId>
  <artifactId>poi-ooxml</artifactId>
  <version>${poi.version}</version>
</dependency>
3. The Basics
Create an Excel 2007 XLSX file by using the class XSSFWorkbook as follows:
Workbook wb = new XSSFWorkbook();
To Work with the older Excel 97-2003 XLS format, use the following:
Workbook wb = new HSSFWorkbook();
Once you have a Workbook, you can use the interfaces Sheet, Row, Cell, CellStyle to avoid tying your application to the version-specific interfaces.
4. The First Spreadsheet
Let’s say hello to a Hello-World spreadsheet created in Java. The code below creates an Excel spreadsheet with a single sheet named “Population”.
Workbook wb = new XSSFWorkbook();
String safeName = WorkbookUtil.createSafeSheetName("Population");
Sheet sheet = wb.createSheet(safeName);
FileOutputStream fileOut = new FileOutputStream("hello.xlsx");
wb.write(fileOut);
fileOut.close();
The WorkbookUtil.createSafeSheetName() is used since certain characters are invalid in a sheet name. This utility method replaces such characters with the space character.

5. Creating a Row and Cells
A Row object needs to be created inside a sheet before you can fill it with data. A sheet is considered to be comprised of a set or rows. Create a specific numbered row with the call:
int rowNum = 0;
Row row = sheet.createRow((short)rowNum);
Let us now add some cells to this row. This row will serve as the header row since we will add some column titles to the row. There is no such concept of header row in Apache POI or Excel; we just treat the first row as such.
row.createCell(0).setCellValue(ch.createRichTextString("Rank"));
row.createCell(1).setCellValue(ch.createRichTextString("Country"));
row.createCell(2).setCellValue(ch.createRichTextString("Total(persons)"));
row.createCell(3).setCellValue(ch.createRichTextString("per sq.km"));
row.createCell(4).setCellValue(ch.createRichTextString("Date"));
Here is what the sheet looks like after adding the header row:

6. Auto Sizing Columns
You will notice that the columns are of equal size and some text in the columns is not visible. Wouldn’t it be nice to auto size the columns so all the text is visible? Here is how you can do it. Note that you should do this once just before writing the spreadsheet to a file to avoid having to resize columns when not required.
for (short i = sheet.getRow(0).getFirstCellNum(),
    end = sheet.getRow(0).getLastCellNum() ; i < end ; i++) {
    sheet.autoSizeColumn(i);
}
7. Multi-Line Column
In the above code, we might want to split the text in a column into multiple lines. This is not just a matter of inserting a new-line (or a carriage-return-new-line). You need to set the cell style to allow multi-line cells to show the data.
Assume we need to show a header cell in two lines:
Cell cell = row.createCell(2);
cell.setCellValue("Totalrn(persons)");
Once the data is inserted into the cell, set the cell style to allow wrapping.
CellStyle style = sheet.getWorkbook().createCellStyle();
style.setWrapText(true);
cell.setCellStyle(style);
After this, the cell data shows multiple lines if required.

8. Adding Rows
Let us now add rows in a loop to our spreadsheet. The data we want to add looks like this:
List<List<String>> list = Arrays
    .asList(Arrays.asList("1","China","1,378,020,000","147.75","2016"),
    Arrays.asList("2","India","1,266,884,000","426.10","2016 WFB"),
    Arrays.asList("3","United States of America","323,128,000","35.32","2016"),
    Arrays.asList("4","Indonesia","257,453,000","142.12","2016"),
    Arrays.asList("5","Brazil","206,081,000","24.66","2016"));
And here is the loop creating each row:
for (List<String> arr : list) {
    row = sheet.createRow(rowNum); rowNum++;
    row.createCell(0).setCellValue(arr.get(0));
    row.createCell(1).setCellValue(arr.get(1));
    row.createCell(2).setCellValue(arr.get(2));
    row.createCell(3).setCellValue(arr.get(3));
    row.createCell(4).setCellValue(arr.get(4));
}
The spreadsheet now looks like this. Notice that we have a few Excel errors: “Number Stored As Text”. That is because we are using Cell.setCellValue(String) method to set the cell value. Let us see how we can fix it.

9. Fixing “Number Stored As Text”
The solution is simple. Parse the text value to integer or double and use that to set the value. Pretty simple fix for the “Rank“.
int value = Integer.parseInt(arr.get(0));
row.createCell(0).setCellValue(value);
Similarly for the floating point value.
double value = Double.parseDouble(arr.get(3));
row.createCell(3).setCellValue(value);
After these changes, the error disappears on the two columns.

10. Using NumberFormat for Parsing
The fix for the Total field is a bit more involved. The numeric value is formatted with commas for the thousands-separator which we need to parse to obtain the value.
First we create a NumberFormat with the correct Locale. We store the NumberFormat for re-use (without recreating it every time).
private NumberFormat fmt = NumberFormat.getInstance(Locale.US);
We use the NumberFormat for parsing the string value into a double.
Cell cell = row.createCell(2);
String value = arr.get(2);
try {
    Number n = fmt.parse(value);
    cell.setCellValue(n.intValue());
} catch(java.text.ParseException ex) {
    System.err.println("Row " + rowNum + ": " + value + ": " +
		       ex.getMessage());
}
With that update, the “Number Stored As Text” error has disappeared.

11. Setting Cell Style
However, we would still like to store the number with thousands-separator as before. For this, we need to tell Excel that the number is to be formatted with the correct formatter. This is done by setting the cell style. (The CellStyle is expensive to create and use. It should be created outside the loop and stored for reuse).
CellStyle popStyle = workbook.createCellStyle();
short format = (short)BuiltinFormats.getBuiltinFormat("#,##0");
popStyle.setDataFormat(format);
After the style is created, we need to set it on the cell.
Cell cell = row.createCell(2);
String value = arr.get(2);
try {
 Number n = fmt.parse(value);
 cell.setCellStyle(popStyle);
 cell.setCellValue(n.intValue());
} catch(java.text.ParseException ex) {
 System.err.println("Row " + rowNum + ": " + value + ": " +
 ex.getMessage());
}
Now we can see that the numbers are formatted correctly.

12. Some More Formatting
The last bit of formatting we need is to eliminate the “Number Stored as Text” on the Date column. As you can see, some rows have an integer value and some have a non-numeric value mixed in. We handle that column as follows. Try to parse the value for a number to set it as a number, and if it fails set the value as a string.
String value = arr.get(4);
try {
    int year = Integer.parseInt(value);
    row.createCell(4).setCellValue(year);
} catch(NumberFormatException ex) {
    row.createCell(4).setCellValue(value);
}
Looks like the spreadsheet is now all fixed up. Woo hoo!

Summary
And that was a beginner introduction to using the Apache POI library to create a spreadsheet. We have just scratched the surface of what the library can do. Hope you learned something useful today.
Check out the next part of this guide where we show you how to convert CSV to Excel along with more formatting examples.
See Also
- Apache POI Excel Example part 2
import java.io.FileOutputStream;
import java.io.IOException;
import org.apache.poi.ss.usermodel.Cell;
import org.apache.poi.ss.usermodel.Row;
import org.apache.poi.xssf.usermodel.XSSFSheet;
import org.apache.poi.xssf.usermodel.XSSFWorkbook;
public class GFG {
public static void main(String[] args)
{
XSSFWorkbook workbook = new XSSFWorkbook();
XSSFSheet sheet
= workbook.createSheet("student Details");
Map<String, Object[]> data
= new TreeMap<String, Object[]>();
data.put("1",
new Object[] { "ID", "NAME", "LASTNAME" });
data.put("2",
new Object[] { 1, "Pankaj", "Kumar" });
data.put("3",
new Object[] { 2, "Prakashni", "Yadav" });
data.put("4", new Object[] { 3, "Ayan", "Mondal" });
data.put("5", new Object[] { 4, "Virat", "kohli" });
Set<String> keyset = data.keySet();
int rownum = 0;
for (String key : keyset) {
Row row = sheet.createRow(rownum++);
Object[] objArr = data.get(key);
int cellnum = 0;
for (Object obj : objArr) {
Cell cell = row.createCell(cellnum++);
if (obj instanceof String)
cell.setCellValue((String)obj);
else if (obj instanceof Integer)
cell.setCellValue((Integer)obj);
}
}
try {
FileOutputStream out = new FileOutputStream(
new File("gfgcontribute.xlsx"));
workbook.write(out);
out.close();
System.out.println(
"gfgcontribute.xlsx written successfully on disk.");
}
catch (Exception e) {
e.printStackTrace();
}
}
}
- Details
- Written by
- Last Updated on 30 May 2019 | Print Email
In this tutorial, I’d love to share with you guys some examples of writing data to Excel files using the Apache POI library. If today is the first day you get to know Apache POI and you haven’t written any code snippet to read/write Excel files yet, I recommend you to read the sections 1 and 2 in the tutorial How to Read Excel Files in Java using Apache POI to understand the fundamentals of Apache POI.
Or if you are a kind of person who likes getting your hands-dirty first, let jump directly into the following examples.
1. Apache POI API Basics for Writing Excel Files
The fundamental interfaces include Workbook, Sheet, Row and Cell. For basic formatting, use the CellStyle and Font interfaces. Concrete implementing classes include:
- Excel 2003: HSSFWorkbook, HSSFSheet, HSSFRow, HSSFCell, etc.
- Excel 2007: XSSFWorkbook, XSSFSheet, XSSFRow, XSSFCell, etc.
But I recommend using the common interfaces for greater flexibility with both Excel formats 2003 (XLS) and 2007(XLSX).
Here are the basic steps for writing an Excel file:
- Create a Workbook.
- Create a Sheet.
- Repeat the following steps until all data is processed:
- Create a Row.
- Create Cellsin a Row. Apply formatting using CellStyle.
- Write to an OutputStream.
- Close the output stream.
Now, let’s see some examples that demonstrate writing a list of books to an Excel file.
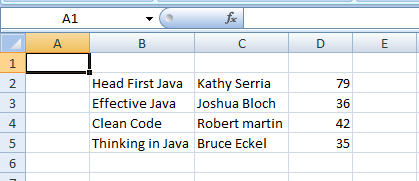
2. A Simple Example to create an Excel file in Java
The following code snippet is a very simple program that demonstrates writing a list of books to an Excel file in the simplest and dirty form:
package net.codejava.excel;

import java.io.FileOutputStream;
import java.io.IOException;

import org.apache.poi.ss.usermodel.Cell;
import org.apache.poi.ss.usermodel.Row;
import org.apache.poi.xssf.usermodel.XSSFSheet;
import org.apache.poi.xssf.usermodel.XSSFWorkbook;

/**
 * A very simple program that writes some data to an Excel file
 * using the Apache POI library.
 * @author www.codejava.net
 *
 */
public class SimpleExcelWriterExample {

	public static void main(String[] args) throws IOException {
		XSSFWorkbook workbook = new XSSFWorkbook();
		XSSFSheet sheet = workbook.createSheet("Java Books");

		Object[][] bookData = {
				{"Head First Java", "Kathy Serria", 79},
				{"Effective Java", "Joshua Bloch", 36},
				{"Clean Code", "Robert martin", 42},
				{"Thinking in Java", "Bruce Eckel", 35},
		};

		int rowCount = 0;

		for (Object[] aBook : bookData) {
			Row row = sheet.createRow(++rowCount);

			int columnCount = 0;

			for (Object field : aBook) {
				Cell cell = row.createCell(++columnCount);
				if (field instanceof String) {
					cell.setCellValue((String) field);
				} else if (field instanceof Integer) {
					cell.setCellValue((Integer) field);
				}
			}

		}


		try (FileOutputStream outputStream = new FileOutputStream("JavaBooks.xlsx")) {
			workbook.write(outputStream);
		}
	}

}
This program creates an Excel 2007 document which looks like the following screenshot (File: JavaBooks.xlsx):
3. A More Object-Oriented Example to create an Excel file in Java
The following code snippets demonstrate a nicer program that focuses on OOP approach. That makes the program more flexible and easy to extend or upgrade in the future.
- Create the model class (Book.java):
package net.codejava.excel; public class Book { private String title; private String author; private float price; public Book() { } public Book(String title, String author, double price) { this.title = title; this.author = author; this.price = price; } // getters and setters } - The method that writes a list of books to an Excel file (in 2003 format):
public void writeExcel(List<Book> listBook, String excelFilePath) throws IOException { Workbook workbook = new HSSFWorkbook(); Sheet sheet = workbook.createSheet(); int rowCount = 0; for (Book aBook : listBook) { Row row = sheet.createRow(++rowCount); writeBook(aBook, row); } try (FileOutputStream outputStream = new FileOutputStream(excelFilePath)) { workbook.write(outputStream); } } - The method that writes information of a book to cells:
private void writeBook(Book aBook, Row row) { Cell cell = row.createCell(1); cell.setCellValue(aBook.getTitle()); cell = row.createCell(2); cell.setCellValue(aBook.getAuthor()); cell = row.createCell(3); cell.setCellValue(aBook.getPrice()); } - The following method creates some dummy data (a list of books):
private List<Book> getListBook() { Book book1 = new Book("Head First Java", "Kathy Serria", 79); Book book2 = new Book("Effective Java", "Joshua Bloch", 36); Book book3 = new Book("Clean Code", "Robert Martin", 42); Book book4 = new Book("Thinking in Java", "Bruce Eckel", 35); List<Book> listBook = Arrays.asList(book1, book2, book3, book4); return listBook; } - And the following code snippet is for testing:
NiceExcelWriterExample excelWriter = new NiceExcelWriterExample();

List<Book> listBook = excelWriter.getListBook();
String excelFilePath = "NiceJavaBooks.xls";

excelWriter.writeExcel(listBook, excelFilePath);
4. Formatting Cells of the Excel file
Of course you may need to format the Excel file to make it looks nicely and professionally. Formatting is diversity and quite complex so in this introductory tutorial, I just show you how to format the basics like setting font style. Here are the steps:
- Create a CellStyle object what holds formatting information:
CellStyle cellStyle = sheet.getWorkbook().createCellStyle();
- Invoke the appropriate setters to apply the formatting you want. For example:
cellStyle.setAlignment(CellStyle.ALIGN_CENTER);
cellStyle.setFont(font);
cellStyle.setWrapText(true);
For example, the following method writes a header row for the document with font style bold and size is 16:
private void createHeaderRow(Sheet sheet) {

	CellStyle cellStyle = sheet.getWorkbook().createCellStyle();
	Font font = sheet.getWorkbook().createFont();
	font.setBold(true);
	font.setFontHeightInPoints((short) 16);
	cellStyle.setFont(font);

	Row row = sheet.createRow(0);
	Cell cellTitle = row.createCell(1);

	cellTitle.setCellStyle(cellStyle);
	cellTitle.setCellValue("Title");

	Cell cellAuthor = row.createCell(2);
	cellAuthor.setCellStyle(cellStyle);
	cellAuthor.setCellValue("Author");

	Cell cellPrice = row.createCell(3);
	cellPrice.setCellStyle(cellStyle);
	cellPrice.setCellValue("Price");
}
You can see the complete program (FormattedExcelWriterExample.java) which can be found in the source code attached to this article.
5. Writing both Excel 2003 and Excel 2007 formats in Java
For better flexibility (supporting both common Excel formats), I recommend writing a factory method that either returns a HSSFWorkbook or XSSFWorkbook, depending on the extension of the file (.xls or .xlsx). Here’s the method:
private Workbook getWorkbook(String excelFilePath)
		throws IOException {
	Workbook workbook = null;

	if (excelFilePath.endsWith("xlsx")) {
		workbook = new XSSFWorkbook();
	} else if (excelFilePath.endsWith("xls")) {
		workbook = new HSSFWorkbook();
	} else {
		throw new IllegalArgumentException("The specified file is not Excel file");
	}

	return workbook;
}
You can see the complete program (FlexibleExcelWriterExample.java) which can be found in the source code attached to this article.
That’s how to read Excel files in Java programmatically. To learn more in-depth about Java programming, this Java software developers course would be good choice.
Related Java Excel Tutorials:
- How to Read Excel Files in Java using Apache POI
- Java Example to Read Password-protected Excel Files Using Apache POI
- Java Example to Update Existing Excel Files Using Apache POI
- Working with Formula Cells in Excel using Apache POI
References
- Apache POI — the Java API for Microsoft Documents
- POI API Documentation (Javadocs)
- Apache POI Quick Guide
- Apache POI HOWTO
About the Author:
 Nam Ha Minh is certified Java programmer (SCJP and SCWCD). He started programming with Java in the time of Java 1.4 and has been falling in love with Java since then. Make friend with him on Facebook and watch his Java videos you YouTube.