
Рассказывает автор блога javarevisited.blogspot.ru
Из этой статьи вы сможете узнать о записи и чтении данных из Excel файлов в Java (будет рассмотрен как XLS, так и XLSX формат). Мы будем использовать библиотеку Apache POI и сосредоточимся на работе с типами String и Date, работа с последним происходит достаточно хитро. Напомню, что работу с числами мы уже рассмотрели в другой статье.
Библиотеку poi-XX.jar вы можете использовать для всех старых (xls, doc, ppt) файлов Microsoft Office, для новых (xlsx, docx, pptx) вам понадобится poi-ooxml-XX.jar. Очень важно понимать, что к чему относится, т.к. используемые классы тоже разные — для старых расширений это HSSFWorkbook, а для новых — XSSFWorkbook.
Подготовка: загрузка библиотек и зависимостей
Конечно, существует достаточно много открытых библиотек, которые позволяют работать с Excel файлами в Java, например, JXL, но мы будем использовать имеющую самый обширный API и самую популярную — Apache POI. Чтобы её использовать, вам нужно скачать jar файлы и добавить их через Eclipse вручную, или вы можете предоставить это Maven.
Во втором случае вам нужно просто добавить следующие две зависимости:
<dependencies>
    <dependency>
        <groupId>org.apache.poi</groupId>
        <artifactId>poi</artifactId>
        <version>3.12</version>
    </dependency>
    <dependency>
        <groupId>org.apache.poi</groupId>
        <artifactId>poi-ooxml</artifactId>
        <version>3.12</version>
    </dependency>
  </dependencies>
Самое удобное в Maven — что он загрузит не только указанные poi.jar и poi-ooxml.jar, но и все jar файлы, которые используются внутри, то есть xmlbeans-2.6.0.jar, stax-api-1.0.1.jar, poi-ooxml-schemas-3.12.jar и commons-codec-1.9.jar.
Если вы будете добавлять библиотеки вручную — не забудьте о вышеназванных файлах. Скачать всё можно отсюда. Помните — если вы загрузите только poi-XX.jar, то ваш код скомпилируется без ошибок, но потом упадёт с java.lang.NoClassDefFoundError: org/apache/xmlbeans/XmlObject, так как внутри будет вызываться xmlbeans.jar.
Запись
В этом примере мы запишем в xls файл следующие данные: в первую ячейку — строку с именем, а во вторую — дату рождения. Вот пошаговая инструкция:
- Создаём объект
HSSFWorkBook; - Создаём лист, используя на объекте, созданном в предыдущем шаге,
createSheet(); - Создаём на листе строку, используя
createRow(); - Создаём в строке ячейку —
createCell(); - Задаём значение ячейки через
setCellValue(); - Записываем
workbookвFileчерезFileOutputStream; - Закрываем
workbook, вызываяclose().
Для записи строк или чисел этого вполне достаточно, но чтобы записать дату, нам понадобится сделать ещё кое-что:
- Создать
DateFormat; - Создать
CellStyle; - Записать
DateFormatвCellStyle; - Записать
CellStyleв ячейку; - Теперь в эту ячейку можно записать объект
Dateчерез всё тот жеsetCellValue; - Чтобы дата поместилась в ячейку, нам нужно добавить столбцу свойство автоматически менять размер:
sheet.autoSizeColumn(1).
Всё вместе это будет выглядеть так:
@SuppressWarnings("deprecation")
    public static void writeIntoExcel(String file) throws FileNotFoundException, IOException{
        Workbook book = new HSSFWorkbook();
        Sheet sheet = book.createSheet("Birthdays");

        // Нумерация начинается с нуля
        Row row = sheet.createRow(0);

        // Мы запишем имя и дату в два столбца
        // имя будет String, а дата рождения --- Date,
        // формата dd.mm.yyyy
        Cell name = row.createCell(0);
        name.setCellValue("John");

        Cell birthdate = row.createCell(1);

        DataFormat format = book.createDataFormat();
        CellStyle dateStyle = book.createCellStyle();
        dateStyle.setDataFormat(format.getFormat("dd.mm.yyyy"));
        birthdate.setCellStyle(dateStyle);


        // Нумерация лет начинается с 1900-го
        birthdate.setCellValue(new Date(110, 10, 10));

        // Меняем размер столбца
        sheet.autoSizeColumn(1);

        // Записываем всё в файл
        book.write(new FileOutputStream(file));
        book.close();
    }
Чтение
Теперь мы считаем из только что созданного файла то, что мы туда записали.
- Для начала создадим
HSSFWorkBook, передав в конструкторFileInputStream; - Получаем лист, передавая в
getSheet()его номер или название; - Получаем строку, используя
getRow(); - Получаем ячейку, используя
getCell(); - Узнаём тип ячейки, используя на ней
getCellType(); - В зависимости от типа ячейки, читаем её значения, используя
getStringCellValue(),getNumericCellValue()илиgetDateCellValue(); - Закрываем
workbookиспользуяclose().
Напомню, что дату Excel хранит как числа, т.е. тип ячейки всё равно будет CELL_TYPE_NUMERIC.
В виде кода это будет выглядеть следующим образом:
public static void readFromExcel(String file) throws IOException{
        HSSFWorkbook myExcelBook = new HSSFWorkbook(new FileInputStream(file));
        HSSFSheet myExcelSheet = myExcelBook.getSheet("Birthdays");
        HSSFRow row = myExcelSheet.getRow(0);

        if(row.getCell(0).getCellType() == HSSFCell.CELL_TYPE_STRING){
            String name = row.getCell(0).getStringCellValue();
            System.out.println("name : " + name);
        }

        if(row.getCell(1).getCellType() == HSSFCell.CELL_TYPE_NUMERIC){
            Date birthdate = row.getCell(1).getDateCellValue();
            System.out.println("birthdate :" + birthdate);
        }

        myExcelBook.close();

    }
В заключение
Как уже упомналось выше, чтение из xlsx файлов ничем принципиально не отличается — нужно только вместо HSSFWorkBook, HSSFSheet, HSSFRow (и прочих) из poi-XX.jar использовать XSSFWorkBook, XSSFSheet, XSSFRow из poi-ooxml-XX.jar. Это всё, что вам нужно знать для чтения и записи в файлы Excel. Разумеется, с помощью библиотеки Apache POI вы можете сделать гораздо больше, но эта статья должна помочь вам быстрее в ней освоиться.
Перевод статьи «How to Read Write Excel file in Java — POI Example»
Learn to read excel, write excel, evaluate formula cells and apply custom formatting to the generated excel files using Apache POI library with examples.
If we are building software for the HR or Finance domain, there is usually a requirement for generating excel reports across management levels. Apart from reports, we can also expect some input data for the applications coming in the form of excel sheets and the application is expected to support this requirement.
Apache POI is a well-trusted library among many other open-source libraries to handle such usecases involving excel files. Please note that, in addition, we can read and write MS Word and MS PowerPoint files also using the Apache POI library.
This Apache POI tutorial will discuss some everyday excel operations in real-life applications.
- 1. Maven Dependency
- 2. Important Classes in POI Library
- 3. Writing an Excel File
- 4. Reading an Excel File
- 5. Add and Evaluate Formula Cells
- 6. Formatting the Cells
- 7. Conclusion
1. Maven Dependency
If we are working on a maven project, we can include the Apache POI dependencies in pom.xml file using this:
<dependency>
  <groupId>org.apache.poi</groupId>
  <artifactId>poi</artifactId>
  <version>5.2.2</version>
</dependency>

<dependency>
  <groupId>org.apache.poi</groupId>
  <artifactId>poi-ooxml</artifactId>
  <version>5.2.2</version>
</dependency>
2. Important Classes in POI Library
-
HSSF, XSSF and XSSF classes
Apache POI main classes usually start with either HSSF, XSSF or SXSSF.
- HSSF – is the POI Project’s pure Java implementation of the Excel 97(-2007) file format. e.g., HSSFWorkbook, HSSFSheet.
- XSSF – is the POI Project’s pure Java implementation of the Excel 2007 OOXML (.xlsx) file format. e.g., XSSFWorkbook, XSSFSheet.
- SXSSF (since 3.8-beta3) – is an API-compatible streaming extension of XSSF to be used when huge spreadsheets have to be produced and heap space is limited. e.g., SXSSFWorkbook, SXSSFSheet. SXSSF achieves its low memory footprint by limiting access to the rows within a sliding window, while XSSF gives access to all rows in the document.
-
Row and Cell
Apart from the above classes, Row and Cell interact with a particular row and a particular cell in an excel sheet.
-
Styling Related Classes
A wide range of classes like CellStyle, BuiltinFormats, ComparisonOperator, ConditionalFormattingRule, FontFormatting, IndexedColors, PatternFormatting, SheetConditionalFormatting etc. are used when you have to add formatting to a sheet, primarily based on some rules.
-
FormulaEvaluator
Another helpful class FormulaEvaluator is used to evaluate the formula cells in an excel sheet.
3. Writing an Excel File
I am taking this example first so we can reuse the excel sheet created by this code in further examples.
Writing excel using POI is very simple and involves the following steps:
- Create a workbook
- Create a sheet in workbook
- Create a row in sheet
- Add cells to sheet
- Repeat steps 3 and 4 to write more data
It seems very simple, right? Let’s have a look at the code doing these steps.
Java program to write an excel file using Apache POI library.
package com.howtodoinjava.demo.poi;
//import statements
public class WriteExcelDemo
{
public static void main(String[] args)
{
//Blank workbook
XSSFWorkbook workbook = new XSSFWorkbook();
//Create a blank sheet
XSSFSheet sheet = workbook.createSheet("Employee Data");
//This data needs to be written (Object[])
Map<String, Object[]> data = new TreeMap<String, Object[]>();
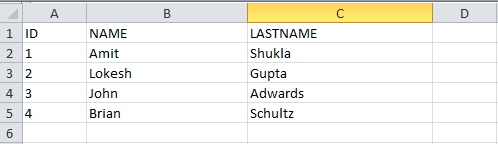
data.put("1", new Object[] {"ID", "NAME", "LASTNAME"});
data.put("2", new Object[] {1, "Amit", "Shukla"});
data.put("3", new Object[] {2, "Lokesh", "Gupta"});
data.put("4", new Object[] {3, "John", "Adwards"});
data.put("5", new Object[] {4, "Brian", "Schultz"});
//Iterate over data and write to sheet
Set<String> keyset = data.keySet();
int rownum = 0;
for (String key : keyset)
{
Row row = sheet.createRow(rownum++);
Object [] objArr = data.get(key);
int cellnum = 0;
for (Object obj : objArr)
{
Cell cell = row.createCell(cellnum++);
if(obj instanceof String)
cell.setCellValue((String)obj);
else if(obj instanceof Integer)
cell.setCellValue((Integer)obj);
}
}
try
{
//Write the workbook in file system
FileOutputStream out = new FileOutputStream(new File("howtodoinjava_demo.xlsx"));
workbook.write(out);
out.close();
System.out.println("howtodoinjava_demo.xlsx written successfully on disk.");
}
catch (Exception e)
{
e.printStackTrace();
}
}
}
See Also: Appending Rows to Excel
4. Reading an Excel File
Reading an excel file using POI is also very simple if we divide this into steps.
- Create workbook instance from an excel sheet
- Get to the desired sheet
- Increment row number
- iterate over all cells in a row
- repeat steps 3 and 4 until all data is read
Let’s see all the above steps in code. I am writing the code to read the excel file created in the above example. It will read all the column names and the values in it – cell by cell.
Java program to read an excel file using Apache POI library.
package com.howtodoinjava.demo.poi;
//import statements
public class ReadExcelDemo
{
    public static void main(String[] args)
    {
        try
        {
            FileInputStream file = new FileInputStream(new File("howtodoinjava_demo.xlsx"));

            //Create Workbook instance holding reference to .xlsx file
            XSSFWorkbook workbook = new XSSFWorkbook(file);

            //Get first/desired sheet from the workbook
            XSSFSheet sheet = workbook.getSheetAt(0);

            //Iterate through each rows one by one
            Iterator<Row> rowIterator = sheet.iterator();
            while (rowIterator.hasNext())
            {
                Row row = rowIterator.next();
                //For each row, iterate through all the columns
                Iterator<Cell> cellIterator = row.cellIterator();

                while (cellIterator.hasNext())
                {
                    Cell cell = cellIterator.next();
                    //Check the cell type and format accordingly
                    switch (cell.getCellType())
                    {
                        case Cell.CELL_TYPE_NUMERIC:
                            System.out.print(cell.getNumericCellValue() + "t");
                            break;
                        case Cell.CELL_TYPE_STRING:
                            System.out.print(cell.getStringCellValue() + "t");
                            break;
                    }
                }
                System.out.println("");
            }
            file.close();
        }
        catch (Exception e)
        {
            e.printStackTrace();
        }
    }
}
Program Output:
ID      NAME        LASTNAME
1.0     Amit        Shukla
2.0     Lokesh      Gupta
3.0     John        Adwards
4.0     Brian       Schultz
See Also: Apache POI – Read an Excel File using SAX Parser
5. Add and Evaluate Formula Cells
When working on complex excel sheets, we encounter many cells with formulas to calculate their values. These are formula cells. Apache POI also has excellent support for adding formula cells and evaluating already present formula cells.
Let’s see one example of how to add formula cells in excel?
The sheet has four cells in a row and the fourth one in the multiplication of all the previous 3 rows. So the formula will be: A2*B2*C2 (in the second row)
Java program to add formula in an excel file using Apache POI library.
public static void main(String[] args)
{
    XSSFWorkbook workbook = new XSSFWorkbook();
    XSSFSheet sheet = workbook.createSheet("Calculate Simple Interest");

    Row header = sheet.createRow(0);
    header.createCell(0).setCellValue("Pricipal");
    header.createCell(1).setCellValue("RoI");
    header.createCell(2).setCellValue("T");
    header.createCell(3).setCellValue("Interest (P r t)");

    Row dataRow = sheet.createRow(1);
    dataRow.createCell(0).setCellValue(14500d);
    dataRow.createCell(1).setCellValue(9.25);
    dataRow.createCell(2).setCellValue(3d);
    dataRow.createCell(3).setCellFormula("A2*B2*C2");

    try {
        FileOutputStream out =  new FileOutputStream(new File("formulaDemo.xlsx"));
        workbook.write(out);
        out.close();
        System.out.println("Excel with foumula cells written successfully");

    } catch (FileNotFoundException e) {
        e.printStackTrace();
    } catch (IOException e) {
        e.printStackTrace();
    }
}
Similarly, we want to read a file with formula cells and use the following logic to evaluate formula cells.
Java program to evaluate formula in an excel file using Apache POI library.
public static void readSheetWithFormula()
{
    try
    {
        FileInputStream file = new FileInputStream(new File("formulaDemo.xlsx"));

        //Create Workbook instance holding reference to .xlsx file
        XSSFWorkbook workbook = new XSSFWorkbook(file);

        FormulaEvaluator evaluator = workbook.getCreationHelper().createFormulaEvaluator();

        //Get first/desired sheet from the workbook
        XSSFSheet sheet = workbook.getSheetAt(0);

        //Iterate through each rows one by one
        Iterator<Row> rowIterator = sheet.iterator();
        while (rowIterator.hasNext())
        {
            Row row = rowIterator.next();
            //For each row, iterate through all the columns
            Iterator<Cell> cellIterator = row.cellIterator();

            while (cellIterator.hasNext())
            {
                Cell cell = cellIterator.next();
                //Check the cell type after eveluating formulae
                //If it is formula cell, it will be evaluated otherwise no change will happen
                switch (evaluator.evaluateInCell(cell).getCellType())
                {
                    case Cell.CELL_TYPE_NUMERIC:
                        System.out.print(cell.getNumericCellValue() + "tt");
                        break;
                    case Cell.CELL_TYPE_STRING:
                        System.out.print(cell.getStringCellValue() + "tt");
                        break;
                    case Cell.CELL_TYPE_FORMULA:
                        //Not again
                        break;
                }
            }
            System.out.println("");
        }
        file.close();
    }
    catch (Exception e)
    {
        e.printStackTrace();
    }
}
Program Output:
Pricipal        RoI         T       Interest (P r t)
14500.0 9.25 3.0 402375.0 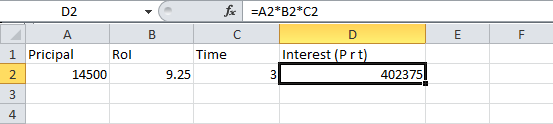
6. Formatting the Cells
So far we have seen examples of reading/writing and excel files using Apache POI. But, when creating a report in an excel file, it is essential to add formatting on cells that fit into any pre-determined criteria.
This formatting can be a different coloring based on a specific value range, expiry date limit etc.
In the below examples, we are taking a couple of such cell formatting examples for various purposes.
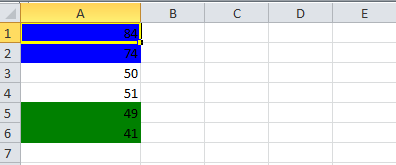
6.1. Cell value in a specific range
This code will color any cell in a range whose value is between a configured range. [e.g., between 50 and 70]
static void basedOnValue(Sheet sheet)
{
    //Creating some random values
    sheet.createRow(0).createCell(0).setCellValue(84);
    sheet.createRow(1).createCell(0).setCellValue(74);
    sheet.createRow(2).createCell(0).setCellValue(50);
    sheet.createRow(3).createCell(0).setCellValue(51);
    sheet.createRow(4).createCell(0).setCellValue(49);
    sheet.createRow(5).createCell(0).setCellValue(41);

    SheetConditionalFormatting sheetCF = sheet.getSheetConditionalFormatting();

    //Condition 1: Cell Value Is   greater than  70   (Blue Fill)
    ConditionalFormattingRule rule1 = sheetCF.createConditionalFormattingRule(ComparisonOperator.GT, "70");
    PatternFormatting fill1 = rule1.createPatternFormatting();
    fill1.setFillBackgroundColor(IndexedColors.BLUE.index);
    fill1.setFillPattern(PatternFormatting.SOLID_FOREGROUND);

    //Condition 2: Cell Value Is  less than      50   (Green Fill)
    ConditionalFormattingRule rule2 = sheetCF.createConditionalFormattingRule(ComparisonOperator.LT, "50");
    PatternFormatting fill2 = rule2.createPatternFormatting();
    fill2.setFillBackgroundColor(IndexedColors.GREEN.index);
    fill2.setFillPattern(PatternFormatting.SOLID_FOREGROUND);

    CellRangeAddress[] regions = {
            CellRangeAddress.valueOf("A1:A6")
    };

    sheetCF.addConditionalFormatting(regions, rule1, rule2);
}
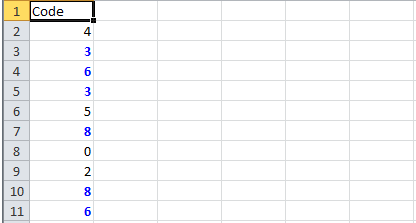
6.2. Highlight Duplicate Values
Highlight all cells which have duplicate values in observed cells.
static void formatDuplicates(Sheet sheet) {
    sheet.createRow(0).createCell(0).setCellValue("Code");
    sheet.createRow(1).createCell(0).setCellValue(4);
    sheet.createRow(2).createCell(0).setCellValue(3);
    sheet.createRow(3).createCell(0).setCellValue(6);
    sheet.createRow(4).createCell(0).setCellValue(3);
    sheet.createRow(5).createCell(0).setCellValue(5);
    sheet.createRow(6).createCell(0).setCellValue(8);
    sheet.createRow(7).createCell(0).setCellValue(0);
    sheet.createRow(8).createCell(0).setCellValue(2);
    sheet.createRow(9).createCell(0).setCellValue(8);
    sheet.createRow(10).createCell(0).setCellValue(6);

    SheetConditionalFormatting sheetCF = sheet.getSheetConditionalFormatting();

    // Condition 1: Formula Is   =A2=A1   (White Font)
    ConditionalFormattingRule rule1 = sheetCF.createConditionalFormattingRule("COUNTIF($A$2:$A$11,A2)>1");
    FontFormatting font = rule1.createFontFormatting();
    font.setFontStyle(false, true);
    font.setFontColorIndex(IndexedColors.BLUE.index);

    CellRangeAddress[] regions = {
            CellRangeAddress.valueOf("A2:A11")
    };

    sheetCF.addConditionalFormatting(regions, rule1);

    sheet.getRow(2).createCell(1).setCellValue("<== Duplicates numbers in the column are highlighted.  " +
            "Condition: Formula Is =COUNTIF($A$2:$A$11,A2)>1   (Blue Font)");
}
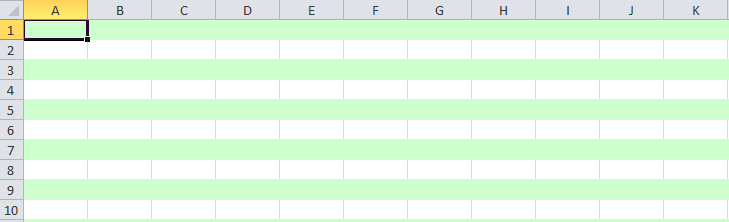
6.3. Alternate Color Rows in Different Colors
A simple code to color each alternate row in a different color.
static void shadeAlt(Sheet sheet) {
    SheetConditionalFormatting sheetCF = sheet.getSheetConditionalFormatting();

    // Condition 1: Formula Is   =A2=A1   (White Font)
    ConditionalFormattingRule rule1 = sheetCF.createConditionalFormattingRule("MOD(ROW(),2)");
    PatternFormatting fill1 = rule1.createPatternFormatting();
    fill1.setFillBackgroundColor(IndexedColors.LIGHT_GREEN.index);
    fill1.setFillPattern(PatternFormatting.SOLID_FOREGROUND);

    CellRangeAddress[] regions = {
            CellRangeAddress.valueOf("A1:Z100")
    };

    sheetCF.addConditionalFormatting(regions, rule1);

    sheet.createRow(0).createCell(1).setCellValue("Shade Alternating Rows");
    sheet.createRow(1).createCell(1).setCellValue("Condition: Formula Is  =MOD(ROW(),2)   (Light Green Fill)");
}
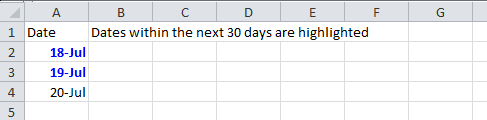
6.4. Color amounts that are going to expire in the next 30 days
A handy code for financial projects which keeps track of deadlines.
static void expiryInNext30Days(Sheet sheet)
{
    CellStyle style = sheet.getWorkbook().createCellStyle();
    style.setDataFormat((short)BuiltinFormats.getBuiltinFormat("d-mmm"));

    sheet.createRow(0).createCell(0).setCellValue("Date");
    sheet.createRow(1).createCell(0).setCellFormula("TODAY()+29");
    sheet.createRow(2).createCell(0).setCellFormula("A2+1");
    sheet.createRow(3).createCell(0).setCellFormula("A3+1");

    for(int rownum = 1; rownum <= 3; rownum++) sheet.getRow(rownum).getCell(0).setCellStyle(style);

    SheetConditionalFormatting sheetCF = sheet.getSheetConditionalFormatting();

    // Condition 1: Formula Is   =A2=A1   (White Font)
    ConditionalFormattingRule rule1 = sheetCF.createConditionalFormattingRule("AND(A2-TODAY()>=0,A2-TODAY()<=30)");
    FontFormatting font = rule1.createFontFormatting();
    font.setFontStyle(false, true);
    font.setFontColorIndex(IndexedColors.BLUE.index);

    CellRangeAddress[] regions = {
            CellRangeAddress.valueOf("A2:A4")
    };

    sheetCF.addConditionalFormatting(regions, rule1);

    sheet.getRow(0).createCell(1).setCellValue("Dates within the next 30 days are highlighted");
}
I am ending this apache poi tutorial here to keep the post within a limit.
7. Conclusion
In this tutorial, we learned to read excel, write excel, set and evaluate formula cells, and format the cells with color codings using the Apache POI library.
Happy Learning !!
Source Code on Github
import jxl.*;
import java.util.Map;
import java.util.HashMap;
import java.util.ArrayList;
import java.util.List;
import jxl.read.biff.BiffException;
import java.io.File;
import java.io.IOException;
import jxl.write.*;
import jxl.write.Number;
import jxl.format.Colour;
public class JExcelSampleHelper {
public Map<Integer, List<String>> readJExcelContents(String fileLocation) throws IOException, BiffException {
Map<Integer, List<String>> dataMap = new HashMap<>();
Workbook workbook = Workbook.getWorkbook(new File(fileLocation));
Sheet workSheet = workbook.getSheet(0);
int noOfRows = workSheet.getRows();
int noOfColumns = workSheet.getColumns();
for (int i = 0; i < noOfRows; i++) {
dataMap.put(i, new ArrayList<String>());
for (int j = 0; j < noOfColumns; j++) {
dataMap.get(i).add(workSheet.getCell(j, i).getContents());
}
}
return dataMap;
}
public void writeJExcelContents() throws IOException, WriteException {
WritableWorkbook writableWorkBook = null;
try {
File currentDirectory = new File(".");
String absolutePath = currentDirectory.getAbsolutePath();
String fileLocation = absolutePath.substring(0, absolutePath.length() - 1) + "temp.xls";
writableWorkBook = Workbook.createWorkbook(new File(fileLocation));
WritableSheet writableSheet = writableWorkBook.createSheet("Sheet 1", 0);
WritableCellFormat headerFormat = new WritableCellFormat();
WritableFont font = new WritableFont(WritableFont.ARIAL, 16, WritableFont.BOLD);
headerFormat.setFont(font);
headerFormat.setBackground(Colour.LIGHT_BLUE);
headerFormat.setWrap(true);
Label headerLabel = new Label(0, 0, "GeekEmployeeName", headerFormat);
writableSheet.setColumnView(0, 60);
writableSheet.addCell(headerLabel);
headerLabel = new Label(1, 0, "GeekEmployeeAge", headerFormat);
writableSheet.setColumnView(0, 40);
writableSheet.addCell(headerLabel);
WritableCellFormat cellFormat = new WritableCellFormat();
cellFormat.setWrap(true);
Label cellLabel = new Label(0, 2, "Rachel", cellFormat);
writableSheet.addCell(cellLabel);
Number cellNumber = new Number(1, 2, 30, cellFormat);
writableSheet.addCell(cellNumber);
writableWorkBook.write();
} finally {
if (writableWorkBook != null) {
writableWorkBook.close();
}
}
}
}
Apache POI is a popular and easy to use java library to manage excel files. This apache POI example will tell you how to install apache POI library in your java project, how to use apache POI provided java classes to create, load an excel file data.
1. How To Install Apache POI Library In Eclipse Java Project.
There are two ways to install apache POI library jar files in eclipse java project.
1.1 Download Apache POI Jar Library File And Add The Jar Files To Eclipse Java Project Java Build Path.
- Go to https://poi.apache.org/ , click Download in the left panel.
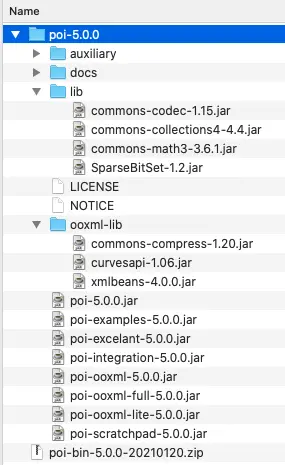
- Download the version which you need( version 5.0.0 in this example ), and extract the downloaded zip file to a local folder.
- Right-click your java project name in eclipse. Click “Build Path —> Configure Build Path” in the popup menu. If you can not find the Build Path menu, then click Properties menu item.
- Click Libraries tab on the right panel, then click Add External JARs button. Add all below POI jars ( in poi-5.0.0 folder ), POI dependent lib jars ( in poi-5.0.0/lib folder ), and OOXML lib jars ( in poi-5.0.0/ooxml-lib folder ) to the java project java build path.

1.2 Install Apache POI Library In Java Maven Project.
- If your eclipse java project is a maven project, you can use this method.
- If your eclipse java project is not a maven project, you can convert it to a maven java project like below.
- Right-click the project name, click Configure —> Convert to Maven Project menu item.
- It will popup the Create new POM dialog, check the data in the dialog carefully, click Finish button.
- It will add a pom.xml file under the project.
- Edit pom.xml file, add below dependency in the dependencies directive. For more poi related dependencies please access https://mvnrepository.com/search?q=apache+poi.
<!-- https://mvnrepository.com/artifact/org.apache.poi/poi --> <dependency> <groupId>org.apache.poi</groupId> <artifactId>poi</artifactId> <version>5.0.0</version> </dependency> <dependency> <groupId>org.apache.poi</groupId> <artifactId>poi-ooxml</artifactId> <version>5.0.0</version> </dependency> - Right-click the maven project, click Maven —> Update Project menu item in the pop-up menu list, then it will download the above maven dependencies jar files to the maven project,
2. Apache POI Classes That Support Excel File Format Xlsx & Xls.
- There are two excel file formats, one is .xls which is the older format (excel 97 – 2007) the other is .xlsx which is the newer format ( excel 2007, 2010, 2013). So we had better use the .xlsx format.
- Apache POI provides xssf, hssf packages to operate the two file format. Below are some generally used java classes in those packages.
1. package org.apache.poi.ss.*: contains base interfaces or classes that xssf and hssf pacakge will implement.

   org.apache.poi.ss.usermodel.Workbook: base interface to operate excel file workbook.

   org.apache.poi.ss.usermodel.Sheet: base interface to operate excel file worksheet in a workbook.

   org.apache.poi.ss.usermodel.Row: base interface to operate row in a worksheet.

   org.apache.poi.ss.usermodel.Cell: base interface to operate cell in a row.


2. package org.apache.poi.xssf.*: contain below classes that operate .xlsx excel file format.

   org.apache.poi.xssf.usermodel.XSSFWorkbook: implement org.apache.poi.ss.usermodel.Workbook interface, operate XLSX format excel file workbook.

   org.apache.poi.xssf.usermodel.XSSFSheet: implement org.apache.poi.ss.usermodel.Sheet interface, operate XLSX fromat excel file worksheet.

   org.apache.poi.xssf.usermodel.XSSFRow: implement org.apache.poi.ss.usermodel.Row interface, operate XLSX format excel file row in a worksheet.

   org.apache.poi.xssf.usermodel.XSSFCell: implement org.apache.poi.ss.usermodel.Cell interface, operate XLSX fromat excel file cell in a worksheet row.


3. package org.apache.poi.hssf.*: contain classes that operate .xls excel file format.

   org.apache.poi.hssf.usermodel.HSSFWorkbook: implement org.apache.poi.ss.usermodel.Workbook interface, operate XLS format excel file workbook.

   org.apache.poi.hssf.usermodel.HSSFSheet: implement org.apache.poi.ss.usermodel.Sheet interface, operate XLS fromat excel file worksheet in workbook.

   org.apache.poi.hssf.usermodel.HSSFRow: implement org.apache.poi.ss.usermodel.Row interface, operate XLS format excel file row in a worksheet.

   org.apache.poi.hssf.usermodel.HSSFCell: implement org.apache.poi.ss.usermodel.Cell interface, operate XLS fromat excel file cell in a worksheet row.
3. Apache POI Read / Write Excel File Code Example.
- EmployeeDTO.java : PoJo to save employee info data. One EmployeeDTO object represents one row in a worksheet, each attribute of this object represents one cell. A list of this object represents on worksheet.
/* This is the class to save employee information. */ public class EmployeeDTO { private String eName; private String ePasswd; private String eEmail; private String eAge; private String eDepartment; private String eSkill; public String geteName() { return eName; } public void seteName(String eName) { this.eName = eName; } public String getePasswd() { return ePasswd; } public void setePasswd(String ePasswd) { this.ePasswd = ePasswd; } public String geteEmail() { return eEmail; } public void seteEmail(String eEmail) { this.eEmail = eEmail; } public String geteAge() { return eAge; } public void seteAge(String eAge) { this.eAge = eAge; } public String geteDepartment() { return eDepartment; } public void seteDepartment(String eDepartment) { this.eDepartment = eDepartment; } public String geteSkill() { return eSkill; } public void seteSkill(String eSkill) { this.eSkill = eSkill; } public EmployeeDTO(String eName, String ePasswd, String eEmail, String eAge, String eDepartment, String eSkill) { super(); this.eName = eName; this.ePasswd = ePasswd; this.eEmail = eEmail; this.eAge = eAge; this.eDepartment = eDepartment; this.eSkill = eSkill; } @Override public String toString() { StringBuffer retBuf = new StringBuffer(); retBuf.append("Employee Info : Name = "); retBuf.append(this.geteName()); retBuf.append(" , Password = "); retBuf.append(this.getePasswd()); retBuf.append(" , Email = "); retBuf.append(this.geteEmail()); retBuf.append(" , Age = "); retBuf.append(this.geteAge()); retBuf.append(" , Department = "); retBuf.append(this.geteDepartment()); retBuf.append(" , Skill = "); retBuf.append(this.geteSkill()); return retBuf.toString(); } - Create excel xslx file method. This method will create an excel file and write the input EmployeeDTO list to a worksheet in the excel file workbook.
/* Use Apacje POI to create a xlsx format excel file. * filePath : The excel file save path. * employeeDtoList : A list of employee info that need to save. * */ private void createExcel(String filePath, List<EmployeeDTO> employeeDtoList) { if(filePath!=null && !"".equals(filePath.trim())) { try { /* Create excel workbook. */ Workbook excelWookBook = new XSSFWorkbook(); /* */ CreationHelper createHelper = excelWookBook.getCreationHelper(); /* Create employee info sheet. */ Sheet employeeSheet = excelWookBook.createSheet("Employee Info"); /* Create employee info row. Row number start with 0. * The input parameter for method createRow(int rowNumber) is the row number that will be created. * */ /* First create header row. */ Row headerRow = employeeSheet.createRow(0); headerRow.createCell(0).setCellValue("Name"); headerRow.createCell(1).setCellValue("Password"); headerRow.createCell(2).setCellValue("Email"); headerRow.createCell(3).setCellValue("Age"); headerRow.createCell(4).setCellValue("Department"); headerRow.createCell(5).setCellValue("Skill"); /* Loop for the employee dto list, add each employee data info into one row. */ if(employeeDtoList!=null) { int size = employeeDtoList.size(); for(int i=0;i<size;i++) { EmployeeDTO eDto = employeeDtoList.get(i); /* Create row to save employee info. */ Row row = employeeSheet.createRow(i+1); row.createCell(0).setCellValue(eDto.geteName()); row.createCell(1).setCellValue(eDto.getePasswd()); row.createCell(2).setCellValue(eDto.geteEmail()); row.createCell(3).setCellValue(eDto.geteAge()); row.createCell(4).setCellValue(eDto.geteDepartment()); row.createCell(5).setCellValue(eDto.geteSkill()); } } /* Write to excel file */ FileOutputStream fOut = new FileOutputStream(filePath); excelWookBook.write(fOut); fOut.close(); System.out.println("File " + filePath + " is created successfully. "); }catch(Exception ex) { ex.printStackTrace(); } } } - Read data from excel xlsx file. This method will read a worksheet in an excel file and return an EmployeeDTO list.
	/* Read data from an excel file.
	 * Return: a 2 dimension list that contain all rows data in the file.
	 * filePath :  The excel file saved path.
	 * sheetName : The sheetName that need to read data.
	 * */
	private List<List<String>> readExcel(String filePath, String sheetName)
	{
		List<List<String>> ret = new ArrayList();
		if(filePath!=null && !"".equals(filePath.trim()) && sheetName!=null && !"".equals(sheetName.trim()))
		{
			try{
				/* First need to open the file. */
				FileInputStream fInputStream = new FileInputStream(filePath.trim());

				/* Create the workbook object. */
				Workbook excelWookBook = new XSSFWorkbook(fInputStream);

				/* Get the sheet by name. */
				Sheet employeeSheet = excelWookBook.getSheet(sheetName);

				int firstRowNum = employeeSheet.getFirstRowNum();
				int lastRowNum = employeeSheet.getLastRowNum();

				System.out.println("firstRowNum = " + firstRowNum);
				System.out.println("lastRowNum = " + lastRowNum);

				/* Because first row is header row, so we read data from second row. */
				for(int i=firstRowNum+1; i<lastRowNum+1; i++)
				{
					Row row = employeeSheet.getRow(i);

					int firstCellNum = row.getFirstCellNum();
					int lastCellNum = row.getLastCellNum();

					System.out.println("firstCellNum = " + firstCellNum);
					System.out.println("lastCellNum = " + lastCellNum);

					List<String> rowDataList = new ArrayList<String>();
					for(int j = firstCellNum; j < lastCellNum; j++)
					{
						String cellValue = row.getCell(j).getStringCellValue();
						rowDataList.add(cellValue);
					}

					ret.add(rowDataList);
				}

			}catch(Exception ex){
				ex.printStackTrace();
			}
		}
		return ret;
	}
If you want to translate the returned 2D data list into a 2D array. Please read below article Save 2D List Data In 2D Array, Vice Versa
- Main method. This method will invoke the above two methods.
public static void main(String[] args) {

    String excelFilePath = "C:/Workspace/EmployeeInfo.xlsx";

    /* Create six employee data DTO object, add them all to a list. */
    List<EmployeeDTO> employeeDtoList = new ArrayList<EmployeeDTO>();

    EmployeeDTO employee1 = new EmployeeDTO("jack", "jack1232123", "[email protected]", "35", "Dev" , "Java, Solr, Selenium.");
    EmployeeDTO employee2 = new EmployeeDTO("jackie", "jackie888888", "[email protected]", "35", "QA" , "Javascript, C++, Selenium.");
    EmployeeDTO employee3 = new EmployeeDTO("tom", "tom666666", "[email protected]", "35", "Dev" , "C++, Sybase, Objective C.");
    EmployeeDTO employee4 = new EmployeeDTO("richard", "richard9898", "[email protected]", "38", "Dev" , "Java, J2EE, Spring.");
    EmployeeDTO employee5 = new EmployeeDTO("lily", "lily998889", "[email protected]", "35", "QA" , "Hibernate, Struts, Webwork.");
    EmployeeDTO employee6 = new EmployeeDTO("steven", "steven9999999", "[email protected]", "30", "Dev" , "MFC, .net, Objective C.");
    employeeDtoList.add(employee1);
    employeeDtoList.add(employee2);
    employeeDtoList.add(employee3);
    employeeDtoList.add(employee4);
    employeeDtoList.add(employee5);
    employeeDtoList.add(employee6);

    /* Save above employee data in to excel file.*/
    ApachePOIExcel excelObj = new ApachePOIExcel();
    excelObj.createExcel(excelFilePath, employeeDtoList);

    /* Read excel file data out, return a 2D list. */
    ApachePOIExcel excelObj1 = new ApachePOIExcel();
    List<List<String>> dataList = excelObj1.readExcel(excelFilePath, "Employee Info");
  }
Apache POI (Poor Obfuscation Implementation) is an open-source Java API library for manipulating the various Microsoft files format such as Excel, PowerPoint, Word in Java. This article shows you how to set up the environment to build a POI application for manipulating the Microsoft Excel file (XLS and XLSX) format.
Apache POI – Overview
Apache POI is an API provided by Apache Software Foundation for manipulating various file formats based upon Microsoft’s OLE2 Compound Document Format (OLE2) and Office Open XML standards (OOXML). Click here to know more about Apache POI.
Apache POI – Supported Java Version
- Apache POI 4.0 and later require JDK version 1.8 or later.
- Apache POI 3.11 and later 3.x versions require JDK version 1.6 or later.
- Apache POI 3.5 to 3.10 required the JDK version 1.5 or later.
- Apache POI versions prior to 3.5 required JDK 1.4+.
In this article, we are going to use the Apache poi-4.0.1 version so it required JDK 1.8+
How to Install Apache POI?
There are two ways for installing Apache POI in Eclipse based on your project type:
- Maven Project
- Stand alone Java Project
1. Apache poi Maven Project
If you are going to create a maven project for poi, then you have to add the following maven dependency in the pom.xml file of your project:
<!-- https://mvnrepository.com/artifact/org.apache.poi/poi -->
<dependency>
    <groupId>org.apache.poi</groupId>
    <artifactId>poi</artifactId>
    <version>4.0.1</version>
</dependency>
<!-- https://mvnrepository.com/artifact/org.apache.poi/poi-ooxml -->
<dependency>
    <groupId>org.apache.poi</groupId>
    <artifactId>poi-ooxml</artifactId>
    <version>4.0.1</version>
</dependency>
2. Apache poi standalone Java Project
If you are going to create a standalone java project for poi then you have to add the following jar files into your java build path:
- poi-4.0.1.jar
- poi-ooxml-4.0.1.jar
- poi-ooxml-schemas-4.0.1.jar
- xmlbeans-3.0.2.jar
- curvesapi-1.05.jar
- commons-codec-1.11.jar
- commons-collections4-4.2.jar
- commons-compress-1.18.jar
- commons-math3-3.6.1.jar
How to download Apache POI?
You can easily download all the above jars for poi in one place: Download Apache POI Jars

Steps to add poi jar files into java build path
In Eclipse, right-click on your Project > Properties > select Java Build Path > Libraries Tab > Add External JARs… then choose above mention jars after that click on Apply and Close button as you can see in the below image:

How to create an Apache POI maven application?
You are going to see, how to build or create a sample poi maven application in Eclipse and add the poi maven dependency:
Steps to create poi maven application
Step-1: Create a new maven project by clicking File Menu > New > Maven Project and simply clicking on the Next button as below image:

Step-2: Select the maven archetype: maven-archetype-quickstart and click on Next as below image:

Step-3: Provide Group Id: com.javacodepoint and Artifact Id: DemoApplication and click on the Finish button as below image:

Step-4: Now add the below maven dependency into the pom.xml file:
<!-- https://mvnrepository.com/artifact/org.apache.poi/poi -->
<dependency>
<groupId>org.apache.poi</groupId>
	<artifactId>poi</artifactId>
	<version>4.0.1</version>
</dependency>
<!-- https://mvnrepository.com/artifact/org.apache.poi/poi-ooxml -->
<dependency>
	<groupId>org.apache.poi</groupId>
	<artifactId>poi-ooxml</artifactId>
	<version>4.0.1</version>
</dependency>
Once you add the above dependency you would see the poi jars get added into your project as you can see in the below image:

That’s all, now you are ready with the Apache POI environment setup.
Conclusion
In this article, you have seen how to get started with Apache POI for manipulating the Microsoft Excel file(XLS and XLSX) format. Here you have seen we have taken Apache poi-4.0.1 version to demonstrate it.
Related Articles:
- Apache POI – Read and Write Excel files in java
- How to create password-protected Excel in java?
- How to Read password-protected Excel in java?
- How to write data to an existing Excel file in java?