
Word automatically generates a bibliography from the sources you used to write your paper. Each time you add a new citation to your document, Word adds that source so that it appears in the bibliography in the proper format, such as MLA, APA, and Chicago-style.
Add a citation after a quote
-
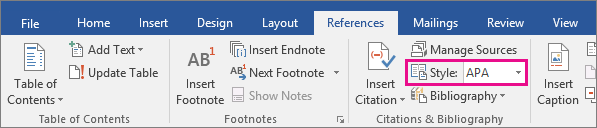
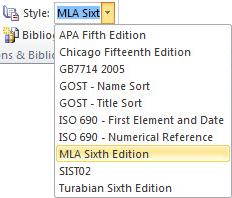
On the References tab , in the Citations & Bibliography group, click the arrow next to Style.

-
Click the style that you want to use for the citation and source.
-
Click at the end of the sentence or phrase that you want to cite.
-
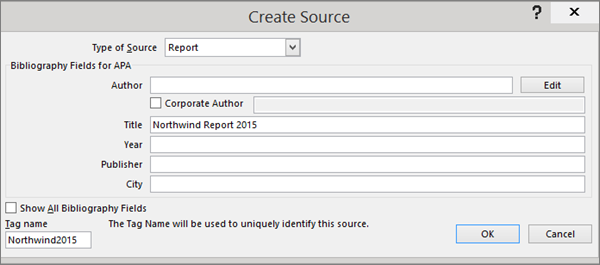
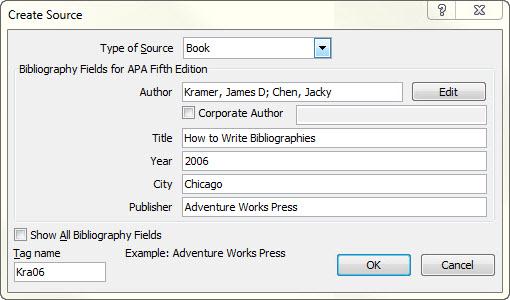
Click Insert Citation and then select Add New Source.
-
In the Create Source box, type in the citation details, and then click OK.
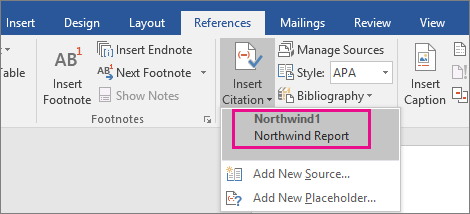
When you’ve completed these steps, the citation is added to the list of available citations. The next time you quote this reference, you don’t have to type it all out again, just click Insert Citation and select the citation you want to use.
Important: APA and MLA can change their formats, so you’ll want to ensure that these format versions meet your requirements. You can create your own updated version of a style or build custom styles. For more information see Bibliography & Citations 102 – Building Custom styles.
Create a bibliography from your sources
If you want to create a bibliography from your sources, do the following:
-
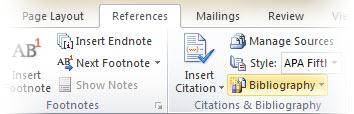
Click where you want to insert a bibliography. Typically, they are at the end of a document.
-
On the References tab, in the Citations & Bibliography group, click Bibliography.
Similar to the Table of Contents builder in Word, you can select a predesigned bibliography format that includes a title, or you can just click Insert Bibliography to add the citation without a title.
If you want to learn more about using citation placeholders and editing sources, take a look at Create a bibliography. Or, if you want to export your bibliography sources to another computer, check out this post on the Microsoft Word blog.
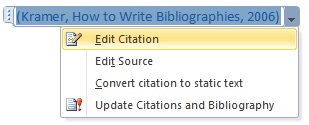
APA 6th Edition citation style fix procedure.
APA style uses the author’s name and publication date. If you have multiple citations from the same author, there is a known Word bug where the citation generator fills in the publication title when it’s not supposed to. If this happens to you, here’s how to fix the problem:
-
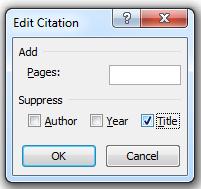
In the Word document, click the citation.
-
Click the down-arrow, and then click Edit Citation.
-
Click the Title checkbox, and then click OK.

APA and MLA can change their formats, so you’ll want to ensure that these format versions meet your requirements. You can create your own updated version of a style or build custom styles. For more information see Bibliography & Citations 102 – Building Custom styles.
If you are using the APA 5th Edition citation style, there’s one issue you should be aware of. APA style uses the author’s name and publication date. If you have multiple citations from the same author, there is a known Word 2010 bug where the citation generator fills in the publication title when it’s not supposed to. If this happens to you, see the section entitled, ‘APA 5th Edition citation style fix procedure below.
Add a citation after a quote
-
In your Word document, click on the References tab in the Ribbon.
-
In the Citations & Bibliography group, click the arrow next to Style.
-
Click the style that you want to use for the citation and source.
-
Click at the end of the sentence or phrase that you want to cite.
-
Click Insert Citation and then select Add New Source.
-
Type in the citation details and then click OK.
When you’ve completed these steps, the citation is added to the Insert Citation button, so the next time you quote this reference, you don’t have to type it all out again.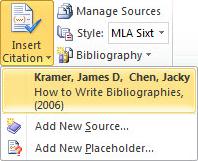
Create a bibliography from your sources
If you want to create a bibliography from your sources, do the following:
-
Click where you want to insert a bibliography. Typically they are at the end of a document.
-
On the References tab, in the Citations & Bibliography group, click Bibliography.
Much like the Table of Contents builder in Word, you can select a predesigned bibliography format that includes a title or you can just click Insert Bibliography to add the citation without a title.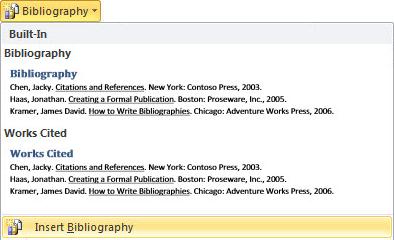
If you want to learn more about using citation placeholders and editing sources, take a look at Creating a bibliography in Word 2010. Or if you want to export your bibliography sources to another computer, check out this post on the Microsoft Word blog.
APA 5th Edition citation style fix procedure
APA style uses the author’s name and publication date. If you have multiple citations from the same author, there is a known Word 2010 bug where the citation generator fills in the publication title when it’s not supposed to. If this happens to you, here’s how to fix the problem:
-
In the Word document, click the citation.
-
Click the down-arrow and then click Edit Citation.
-
Click the Title checkbox and then click OK.
You can’t automatically generate citations in Word Online. Word Online preserves the bibliography in your document, but it doesn’t provide a way to create one.
Instead, if you have the desktop version of Word, select Open in Word to open the document.

Then follow the steps for Word desktop.
When you’re done and you save the document in Word, you’ll see the table of contents when you reopen the doc in Word Online.

Академические документы часто должны соответствовать определенным правилам стиля, таким как MLA или APA. Если вы хотите настроить документ в стиле APA в Word, следуйте этому руководству.
Формат документа APA является официальным стилем Американской психологической ассоциации (APA). APA, как и формат MLA, представляет собой особый тип форматирования документов, используемый в определенных типах академических документов.
APA часто используется в академических документах, особенно в тех, которые относятся к психологии, образованию и другим общественным наукам. Если вы никогда не создавали документ Word в стиле APA, вам может быть трудно понять это, но это легко, если вы знаете правила.
Если вы хотите знать, как форматировать стиль APA в Microsoft Word, вот что вам нужно сделать.
APA похож на другие стили академических документов — все дело в правилах, которым должен следовать ваш документ. К счастью, Microsoft Word позволяет легко настроить документ в соответствии с форматом APA.
Чтобы написать документ в стиле APA в Microsoft Word:
- Сначала установите поля страницы на 1 дюйм с каждой стороны, нажав вкладку «Макет», а затем нажав «Поля» > «Нормальный».

- Установите шрифт Times New Roman на вкладке «Главная».
- Измените размер шрифта на 12, используя раскрывающееся меню.

- Включите текст с двойным интервалом, выбрав «Главная», а затем нажав инструмент «Интервал между строками и абзацами» в разделе «Абзац».

- В раскрывающемся списке выберите 2.0, чтобы сделать текст двойным интервалом.

- Чтобы убедиться, что между абзацами в вашей статье нет лишних пробелов, снова нажмите кнопку «Интервал между строками и абзацами» и выберите «Удалить пробел после абзаца» в меню.


Настройте заголовок документа
На этом этапе ваш документ должен быть почти отформатирован для APA, но вам нужно будет внести некоторые дополнительные изменения в заголовок, чтобы вставить номера страниц.
Чтобы настроить заголовок документа для APA:
- Нажмите вкладку «Вставка» на ленточной панели.
- Нажмите «Номер страницы», затем наведите указатель мыши на «Верх страницы».
- Из вариантов выберите Обычный номер 3.

- Word переключится в режим редактирования заголовка, где вы увидите номер страницы справа.

- Выбрав число, нажмите «Домой», затем установите шрифт и размер шрифта на Times New Roman и 12.

- Если вы добавляете название, используйте для этого заглавные буквы — нажмите клавишу Caps Lock и введите название статьи.

- После ввода заголовка нажмите клавишу «Пробел» один раз, чтобы создать пробел между заголовком и номером страницы.
- Вы захотите переместить заголовок влево, поэтому выберите заголовок, затем нажмите «Выровнять по левому краю» на вкладке «Главная».

- Заголовок теперь выровнен по левому краю, как и номер страницы. Чтобы это исправить, убедитесь, что мигающий курсор находится прямо слева от номера страницы.
- Перейдите на вкладку Верхний и нижний колонтитулы и выберите Вставить вкладку выравнивания.
- Когда появится окно вкладки «Выравнивание», нажмите «Вправо» и «ОК».

- Если все пойдет хорошо, вы должны увидеть номер страницы справа и заголовок слева — теперь ваш заголовок настроен для APA.


Настройте титульный лист
Теперь ваш документ готов к форматированию APA с использованием шрифта Times New Roman и размером 12 пунктов по всему телу и заголовку. Следующим шагом будет создание титульного листа.
Чтобы добавить титульный лист в Word:
- Нажмите на свободное место на первой странице.
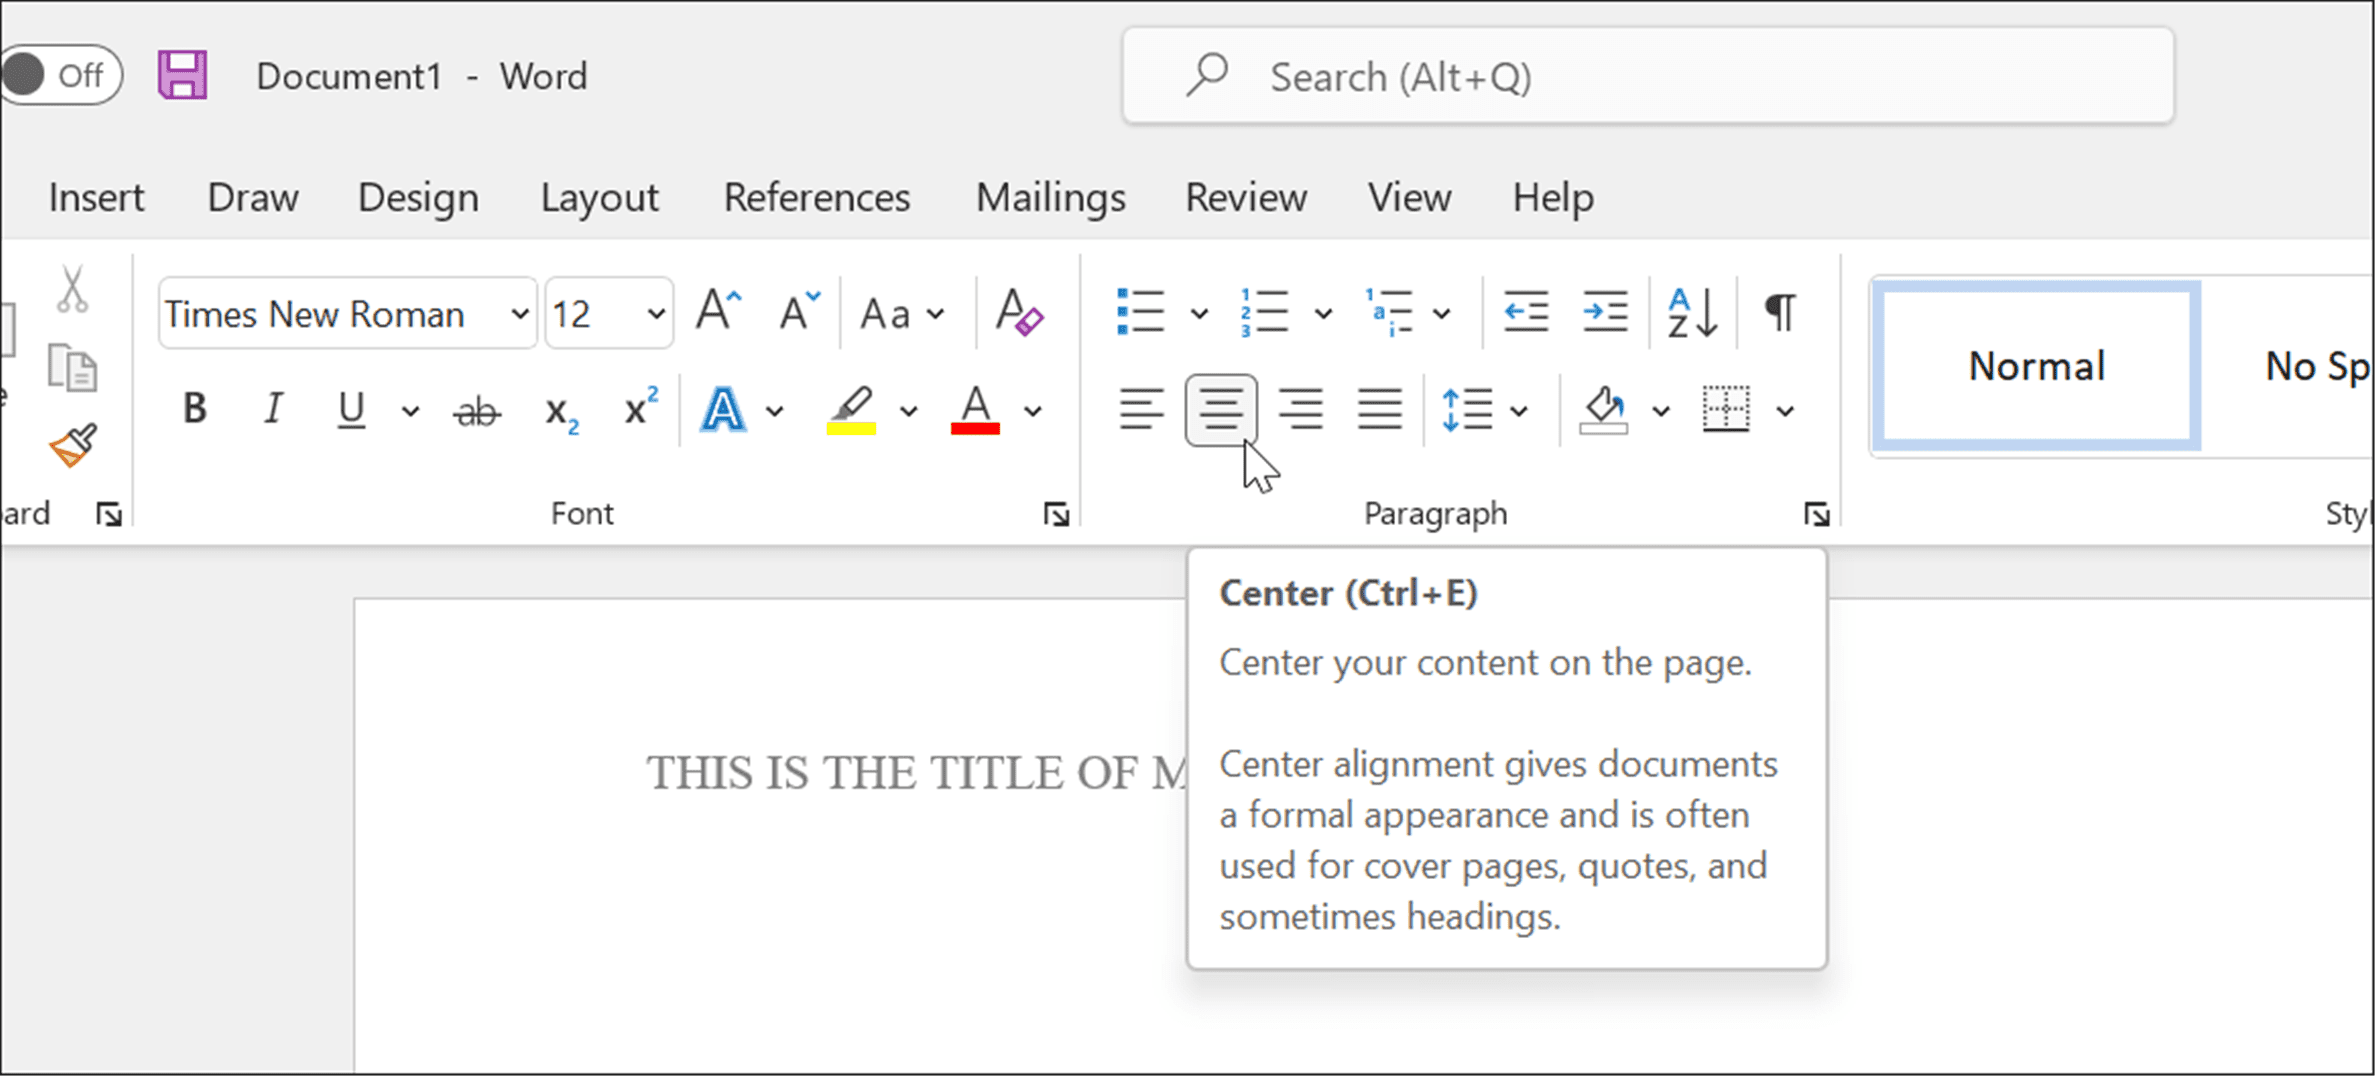
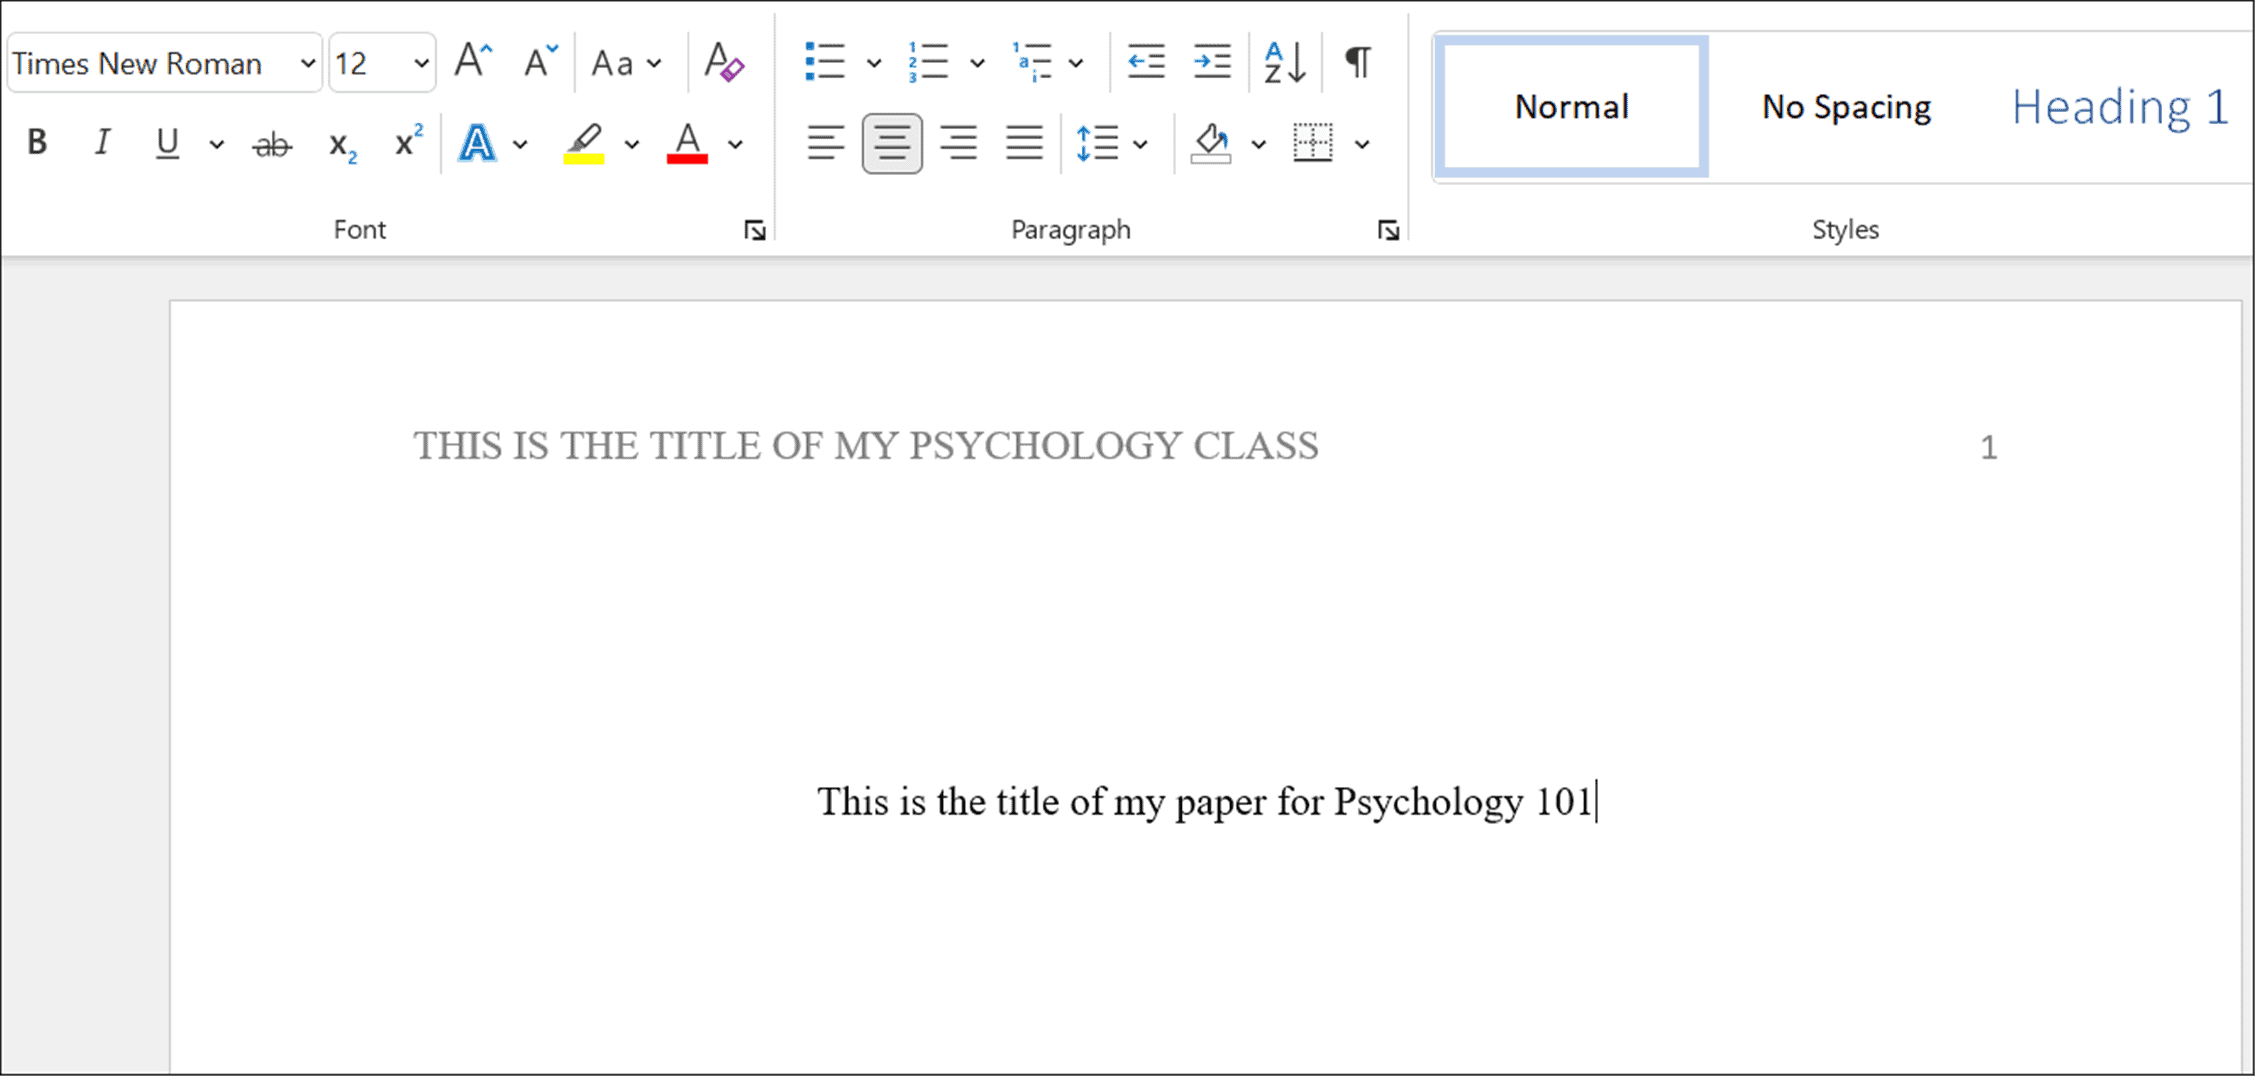
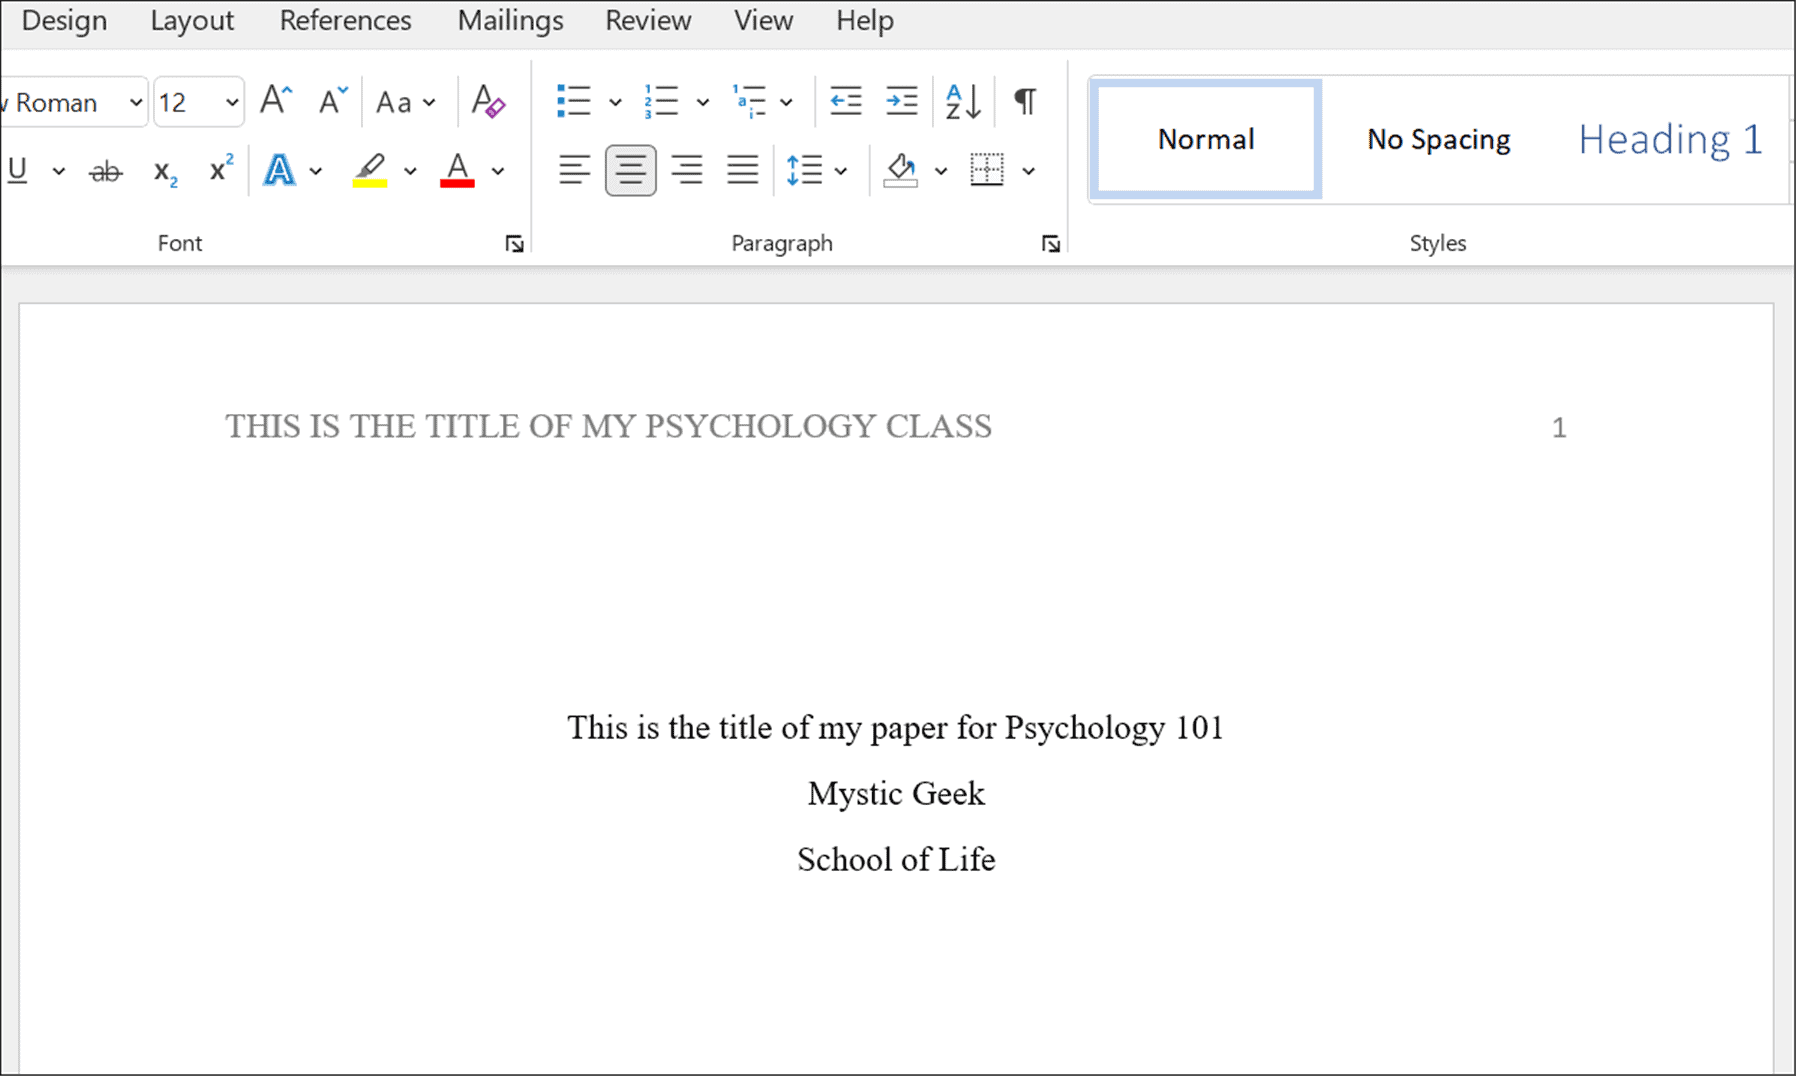
- Установите для текста значение «По центру» в разделе «Абзац» на вкладке «Главная».

- Введите название своей статьи, убедившись, что самые важные термины выделены заглавными буквами.
- Нажмите Enter, чтобы перейти на новую строку, и введите свое имя.
- Нажмите Enter еще раз, чтобы ввести название учреждения.

- При необходимости внесите дополнительные изменения стиля в документ, убедившись, что они соответствуют стиль АПА.
Написание академических документов в Microsoft Word
Приведенные выше шаги помогут вам настроить форматирование в стиле APA в документе Microsoft Word. Конечно, контекст и цитаты на ваше усмотрение. Вашему преподавателю может потребоваться дополнительная информация на титульном листе, например номер вашего студента и текущая дата, поэтому обязательно свяжитесь с ним, прежде чем писать свою работу.
В дополнение к стилю APA вы также можете использовать формат MLA в Word. Другие полезные вещи, которые вы можете сделать, это транскрибировать аудиоформат или посмотреть количество слов в Microsoft Word.
Помимо настройки формата APA или MLA в Word, вы можете вставлять пользовательские верхние и нижние колонтитулы, а также вставлять и форматировать текстовое поле в Word.
Introduction: Formatting APA Style in Microsoft Word 2013
Formatting a paper in APA style can be tricky, so I have created this step-by-step guide on how to format APA correctly, from the title page to the reference section, using Microsoft Word 2013.
Step 1: Font, Spacing, and Margins
To begin with, the entire paper should be double-spaced and written in a highly readable 12-point font, preferably Times New Roman. There should also be 1-inch margins on all sides of the document.
To create 1-inch margins, you will:
- Click the Page Layout tab.
- In the Page Setup section, click on «Margins.» Choose the first option, which is to create 1-inch margins on all sides of the paper.
To double-space the paper, you will:
- Highlight any text that you have typed thus far (skip this step if you have not begun yet).
- Click the Home tab or the Page Layout tab.
- In the Paragraph section of either of those tabs, click the tiny arrow in the bottom right corner. A paragraph page will pop up. Click the arrow under «Line Spacing,» and Choose «double.»
To correct the font, you will:
- Highlight any text that you have typed thus far (skip this step if you have not begun yet).
- Click the Home tab.
- In the Font section of this tab, click the arrow next to the name of the font you are currently using, and then scroll down to choose Times New Roman (or another easily readable font).
- In the same section, click the arrow next to the size of the font, and choose 12.
Step 2: Running Head for the Title Page
At this point, you may want to add the header and page number (although you can perform this step at any point). This might be the most intimidating portion in the process, but it is simple once you become familiar with a few basic steps.
To add a header to the first page:
- Begin on the first page, which will be the title page.
- Click the Insert tab.
- In the Header and Footer section, click on «Header,» and choose the first option.
- A special Header and Footer Toolbar will then appear. Within this Toolbar, go to the Options section, and check the box next to «Different First Page.» This needs to be done because the header for the title page will be different than the header for the rest of the document.
- Click inside of the brackets in the upper left-hand corner, and type the words «Running head» (without quotations), followed by a colon and a shortened or full version of the title of your paper (up to 50 characters in length). This abbreviated title should be written in all caps. The following is an example: Running head: OPENING UP SCIENCE
- Remain in the the Header and Footer Toolbar for the next set of steps.
Step 3: Page Number for the Title Page
To add a page number to the first page:
- Be sure that you are in the Header and Footer Toolbar (double-click on the running head you just made to return to it if you are not).
- Begin with your cursor at the end of the running head you just typed.
- Click the tab button on your keyboard twice.
- In the Header and Footer section at the far left of the Header and Footer Toolbar, click on «Page Number,» and scroll to the fourth option, «Current Position.» Choose the first option, «Plain Number,» in the list that appears. The number 1 will then appear in the top left corner of your title page.
Step 4: Header and Page Number for the Rest of the Pages
To add a header and page number to the rest of the pages:
- Go the the second page of your paper.
- Be sure that you are in the Header and Footer Toolbar. If you have left this toolbar, then there should still be a set of brackets in the upper left-hand corner of the second page with the words «Type Here» between them. Double click on these brackets, and then you will be back in the Header and Footer Toolbar.
- Type the header that will be added to the rest of the paper. It will be the same abbreviated, all-caps title from the title page, except this time, you will not include «Running head:» before it. The following is an example: OPENING UP SCIENCE
- To add the rest of the page numbers, start with your cursor at the end of the header you just typed.
- Click the tab button on your keyboard twice.
- In the Header and Footer section at the far left of the Header and Footer Toolbar, click on «Page Number,» and scroll to the fourth option, «Current Position.» Choose the first option, «Plain Number,» in the list that appears. The number 2 will appear in the top left corner of the page, and the numbering will continue consecutively throughout the paper.
- On the far right of the Header and Footer Toolbar, there is a button to click so that you can exit the Header and Footer Toolbar and continue writing your paper.
Step 5: Title Page
The first step to creating your title page is to add the running head and the page number, which is discussed in the previous step.
There are still a few other components to the title, which include:
- The full title
- The author(s)’s name(s)
- The institution the author(s) are from (usually a college or university)
- An optional author note
To format the title, name(s), and institution name, there are a few easy steps to follow:
- If it is easiest for you, start typing the text in left alignment (the default). List the full title of your paper, which should be no more than twelve words, should have no abbreviations, and should not include any words that are not completely necessary. On the very next line, list the names of all the authors involved with the writing of the paper. On the third line, list the name of the institution.
- Place the cursor before the very first letter in this group of text, and press the enter key approximately 2-4 times (the exact placement is up to you). It is only important that the text remain in the top half of the page.
- Highlight all of this text. Click the Home tab. In the Paragraph section of this tab, click the icon which is a picture of lines that represent centered text (it will be the second one from the left). This will center the text.
Optionally, you can include an author note in the bottom half of the page. Most professors do not require this, however. The 6th edition of the APA manual specifies that the author note should include four paragraphs (each with its own indent) under the centered title «Author Note.» Each of the four paragraphs should correspond to the following information in the following order:
- Complete departmental information
- Changes in affiliation
- Acknowledgements and special circumstances
- Person to contact with mailing address, e-mail
Step 6: Abstract
Some professors do not require an abstract page, especially for papers that do not describe an actual study. If they do require it, however, the abstract will be on its own separate page immediately after the title page. The title «Abstract» will be centered at the top and will be followed by a non-indented paragraph of 150-250 words. This paragraph will fully summarize your study or research paper, including any findings. Optionally, you can add a list of keywords immediately under the abstract. To do this, you will begin a new line under the abstract; press the tab key on your keyboard once; click the crooked «I,» the italics icon, between the «B» and the «U» in the Font section of the Home tab; type the word «Keywords«;click the italics icon again to undo the italics; type a colon; and list any key words from your abstract, separated by commas, on the same line.
Step 7: Body of Paper
The first page of the main body of the paper will begin with the full title of the paper centered at the top of the page. The title will not be in bold, and it will serve as the head of the introduction of the paper.
You may include subsequent subheadings that will usually be centered and in bold throughout the paper. To bold text, you will highlight the text that needs to be in bold, click the Home tab, and click the thick «B» in the Font section.
One of the more complicated tasks in writing the paper is doing in-text citations correctly. Here are a few rules to consider as far as this is concerned:
- General rules
- You generally want to include three pieces of information: the author(s)’s last name(s), the date, and the page numbers, if applicable.
- If the author’s name is mentioned in the sentence, their name does not have to also appear in the citation at the end of the sentence (the same goes for the date).
- An in-text citation with all three pieces of information looks like this: (Schmidt, 2012, p. 30)
- Specific rules
- Author(s)’s name(s)
- If the author is unknown, then an abbreviated version of the article title can be substituted, in quotation marks. Example: («Welcome,» 2014)
- If there are two authors, the in-text citation will look like this: (Wilbanks & Boyle, 2006).
- If there are three to five authors, then, in the first in-text citation, all of their names must be spelled out, like this: (Shere, Zhao, & Koren, 2014). You may then write subsequent in-text citations from the same source like this: (Shere et al., 2014).
- If there are more than five authors, you can omit the previous rule about spelling all of the names out the first time and write all in-text citations like this: (Khatib et al., 2011).
- Date
- If the date is not available, as is the case with many webpages, then the initials n.d. will be substituted for the year in the in-text citation, as such: («Crowdsourcing,» n.d.)
- Page numbers
- All quotations must be cited using page numbers if possible, but page numbers are optional, though encouraged, for citing paraphrased material.
- If there are no page numbers, and you are citing a direct quotation, you should find an alternative way to direct the reader to the specific spot in the text, such as by counting the paragraphs. Example: (Khatib et al., 2011, para. 1)
- If multiple pages are being cited, then it will look like this: (Schmidt, 2012, pp. 30-33).
- Author(s)’s name(s)
Step 8: References
The reference section for you paper will begin on an entirely new page. It will begin with the word «Reference» (no quotation marks), which will be centered at the top.
The entries will be in alphabetical order, with a hanging indent. The procedure for doing a hanging indent is as follows:
- Begin each entry on a separate line.
- Once you have written all of the entries, highlight the text.
- Click either the Home tab or the Page Layout tab.
- In the Paragraph section of either of these tabs, click the tiny arrow in the bottom left corner; this will bring up a small Paragraph page.
- In this page, go to the indentation section, and click the arrow under the word «Special.» Choose the option «hanging indent.» This will automatically add a 0.5-inch hanging indent to every highlighted entry in the reference section.
To conclude, here are examples of how to format some of the most common reference entries:
- Books in print
- Fish, S. (2011). How to write a sentence and how to read one. New York, NY: HarperCollins.
- Journal articles
- Fox, J. (2012). Can blogging change how ecologists share ideas? In economics, it already has. Ideas in Ecology and Evolution, 5, 74-77. doi: 10.4033/iee.2012.5b.15.f
- Articles in online periodicals
- Bryce, E. (2012, October 24). Insights into the koala’s genetic challenge. The New York Times. Retrieved from http://nytimes.com
- Short works from websites
- Bert, A. (2014, Feb 25). How to use social media for science. Retrieved from http://www.elsevier.com/connect/how-to-use-social-media-for-science
Step 9: Take a Break!
Eat a cookie.
Be the First to Share
Recommendations
Academic documents often need to follow certain style rules, such as MLA or APA. If you want to set up an APA style document in Word, follow this guide.
The APA document format is the official style of the American Psychological Association (APA). APA, like the MLA format, is a specific type of document formatting used in certain types of academic documents.
APA is often used in academic documents, specifically those that relate to psychology, education, and other social sciences. If you’ve never created a Word document in the APA style, you may have difficulty figuring it out, but it’s easy once you know the rules.
If you want to know how to format APA style in Microsoft Word, here’s what you’ll need to do.
APA is like other academic document styles—it’s all about the rules your document needs to follow. Thankfully, Microsoft Word makes it easy to set up a document to follow the APA format.
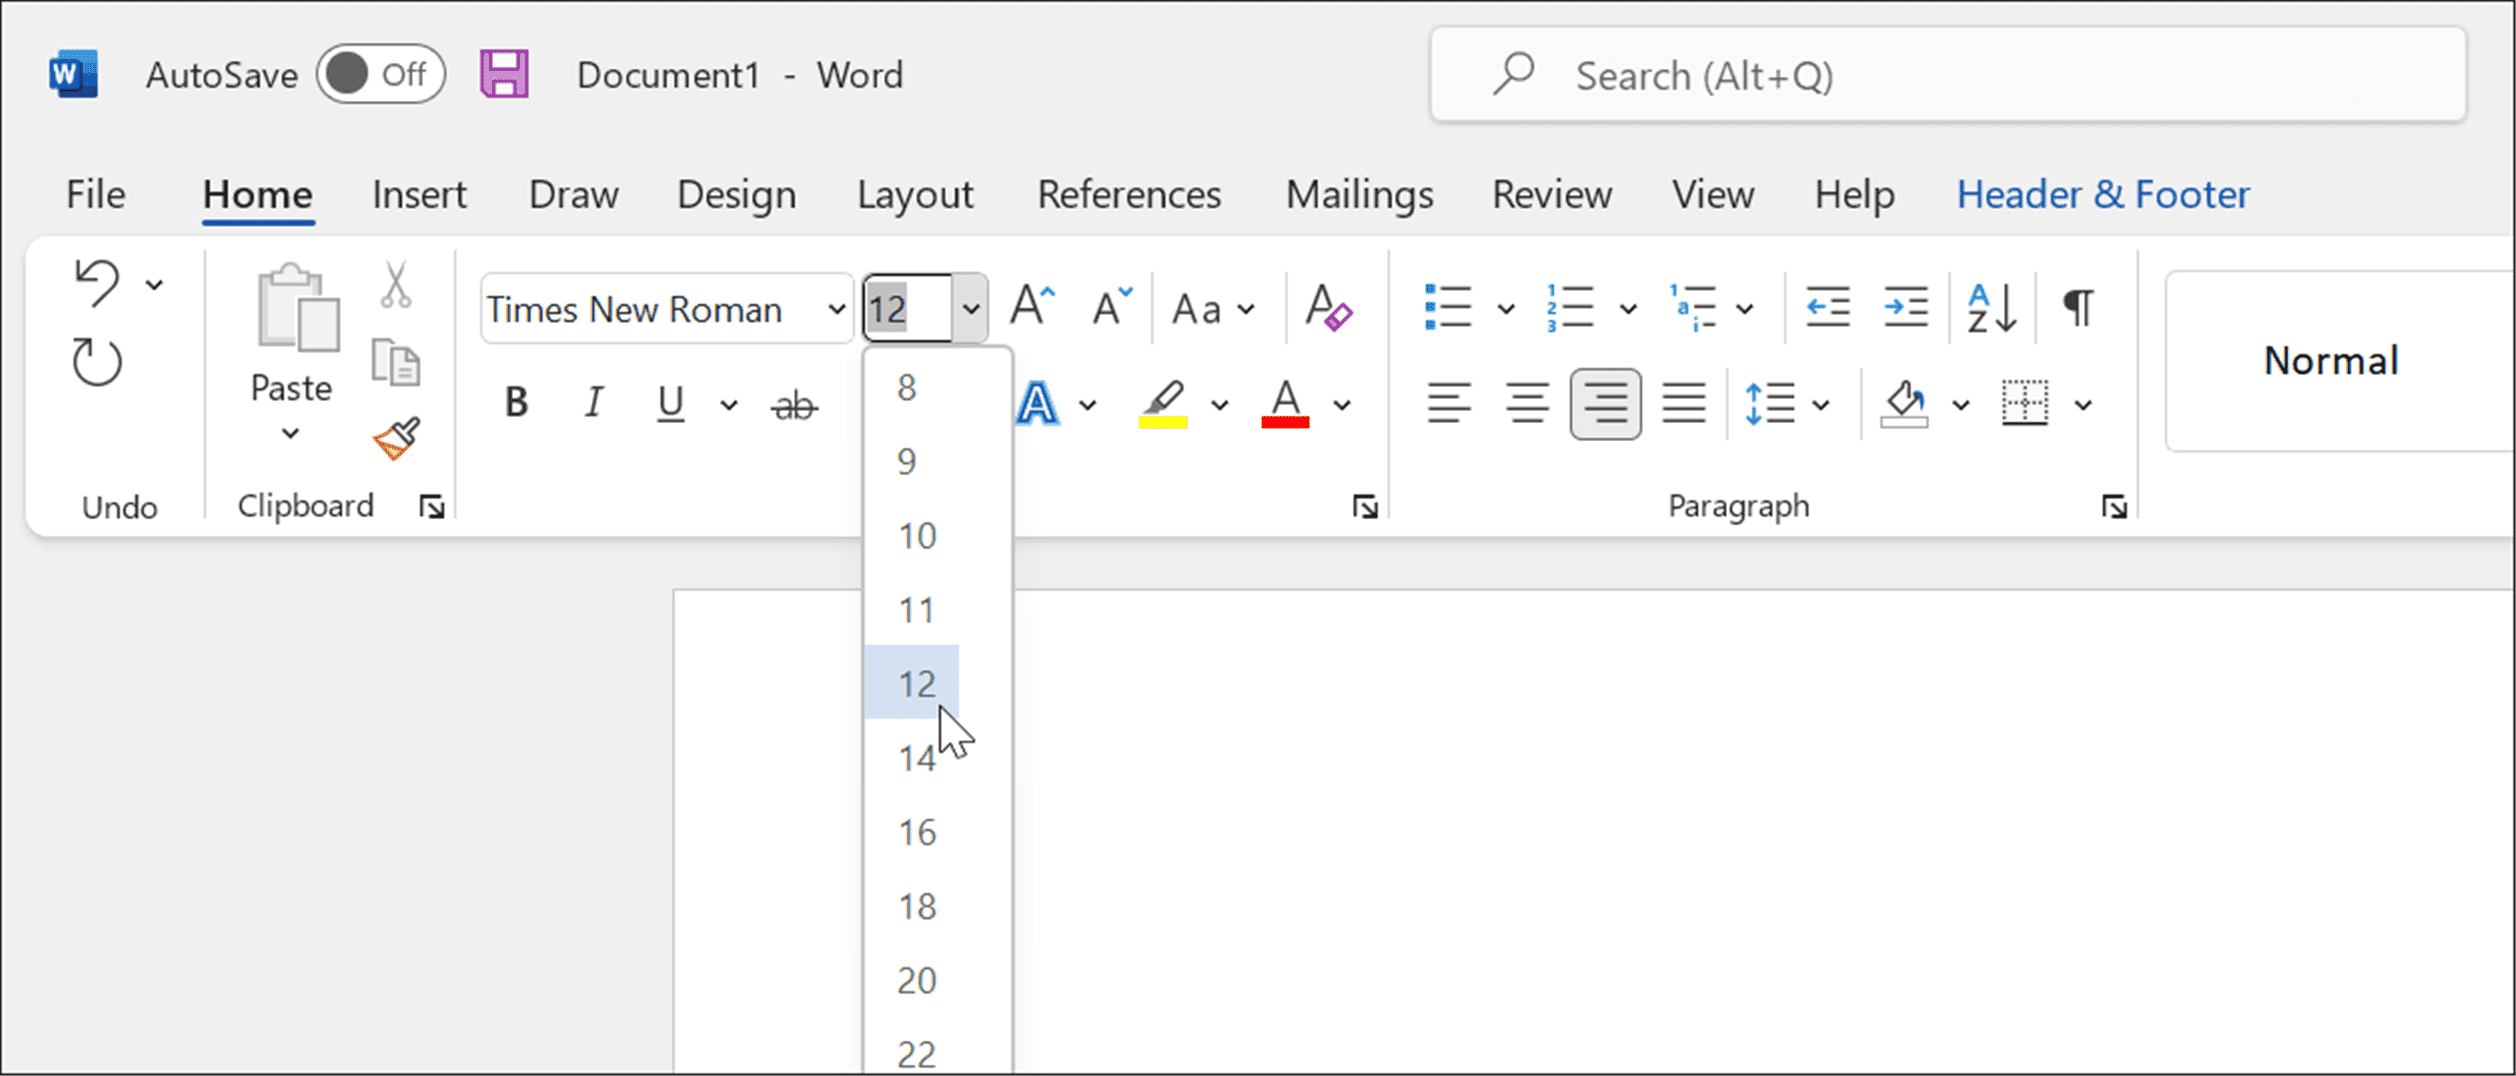
To write a document in APA style in Microsoft Word:
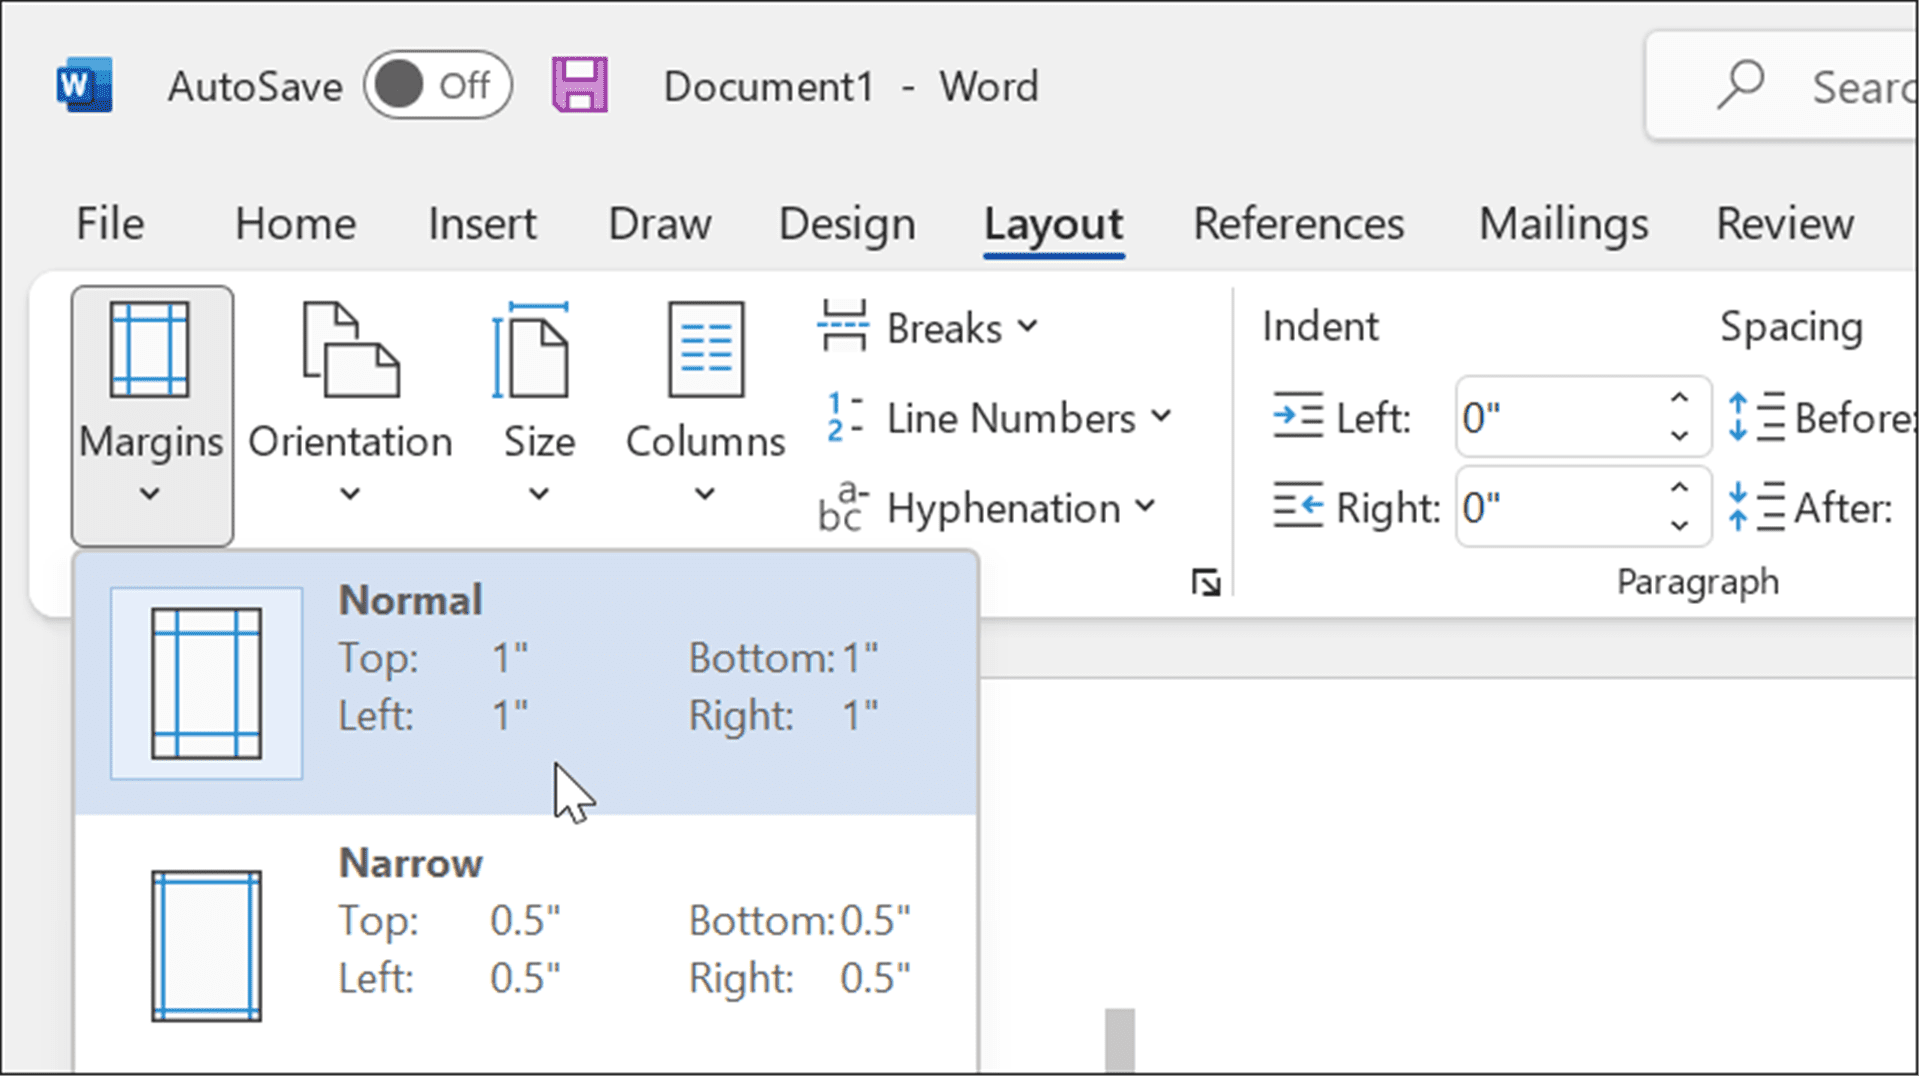
- First, set your page margins to 1 inch on each side by pressing the Layout tab, then pressing Margins > Normal.
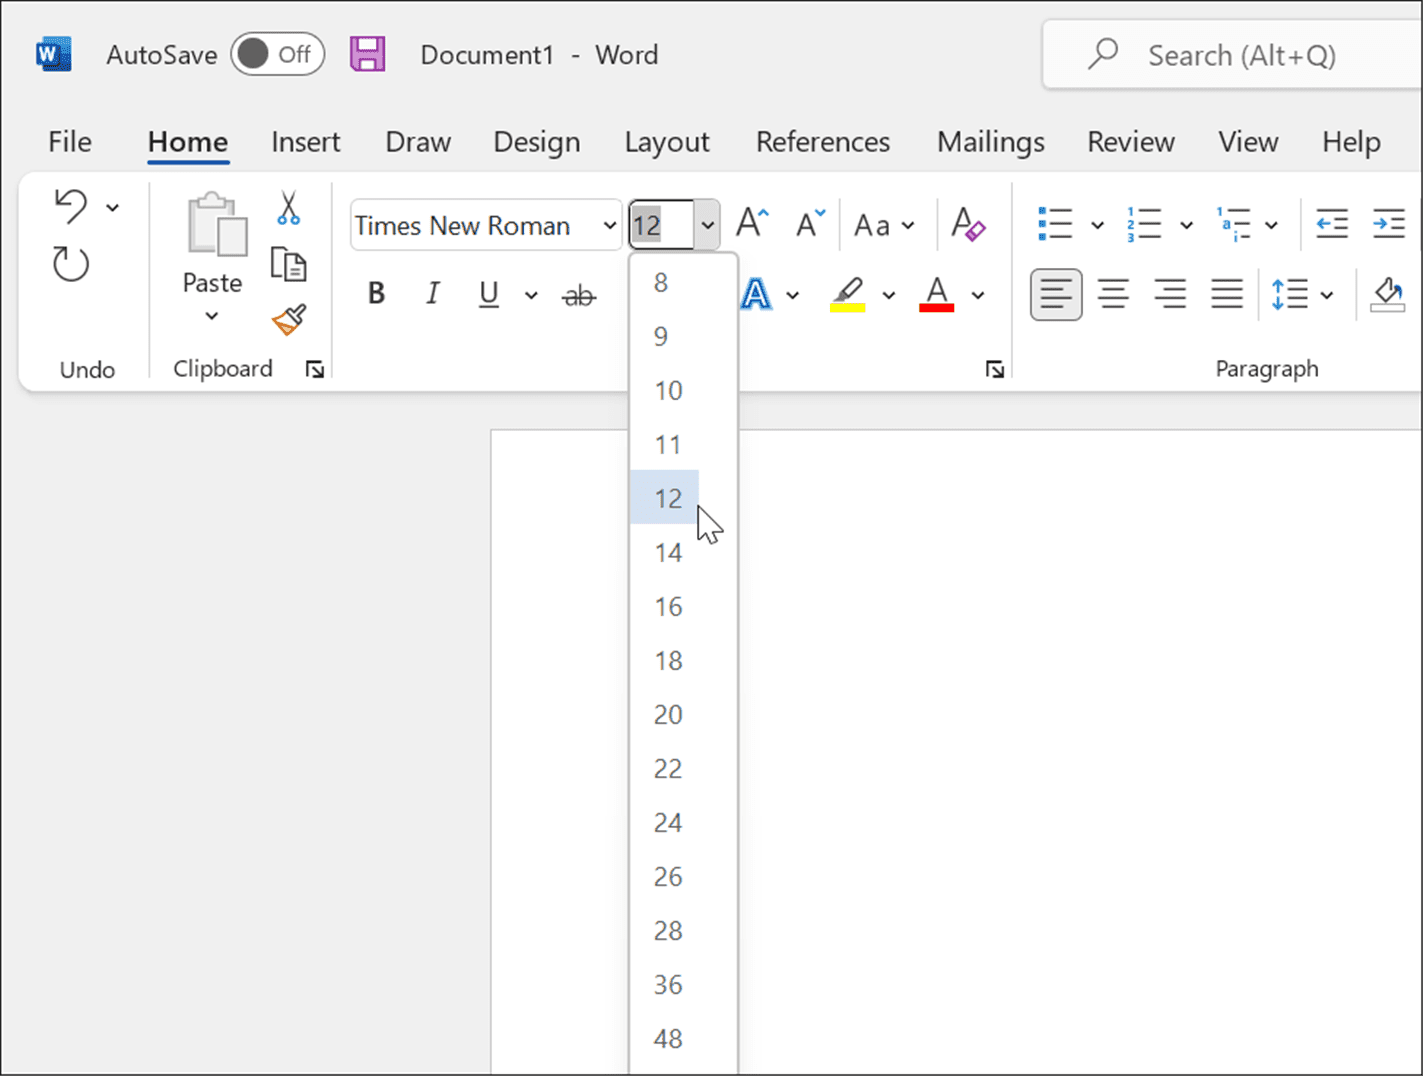
- Set your font to Times New Roman in the Home tab.
- Change your font size to 12 using the drop-down menu.
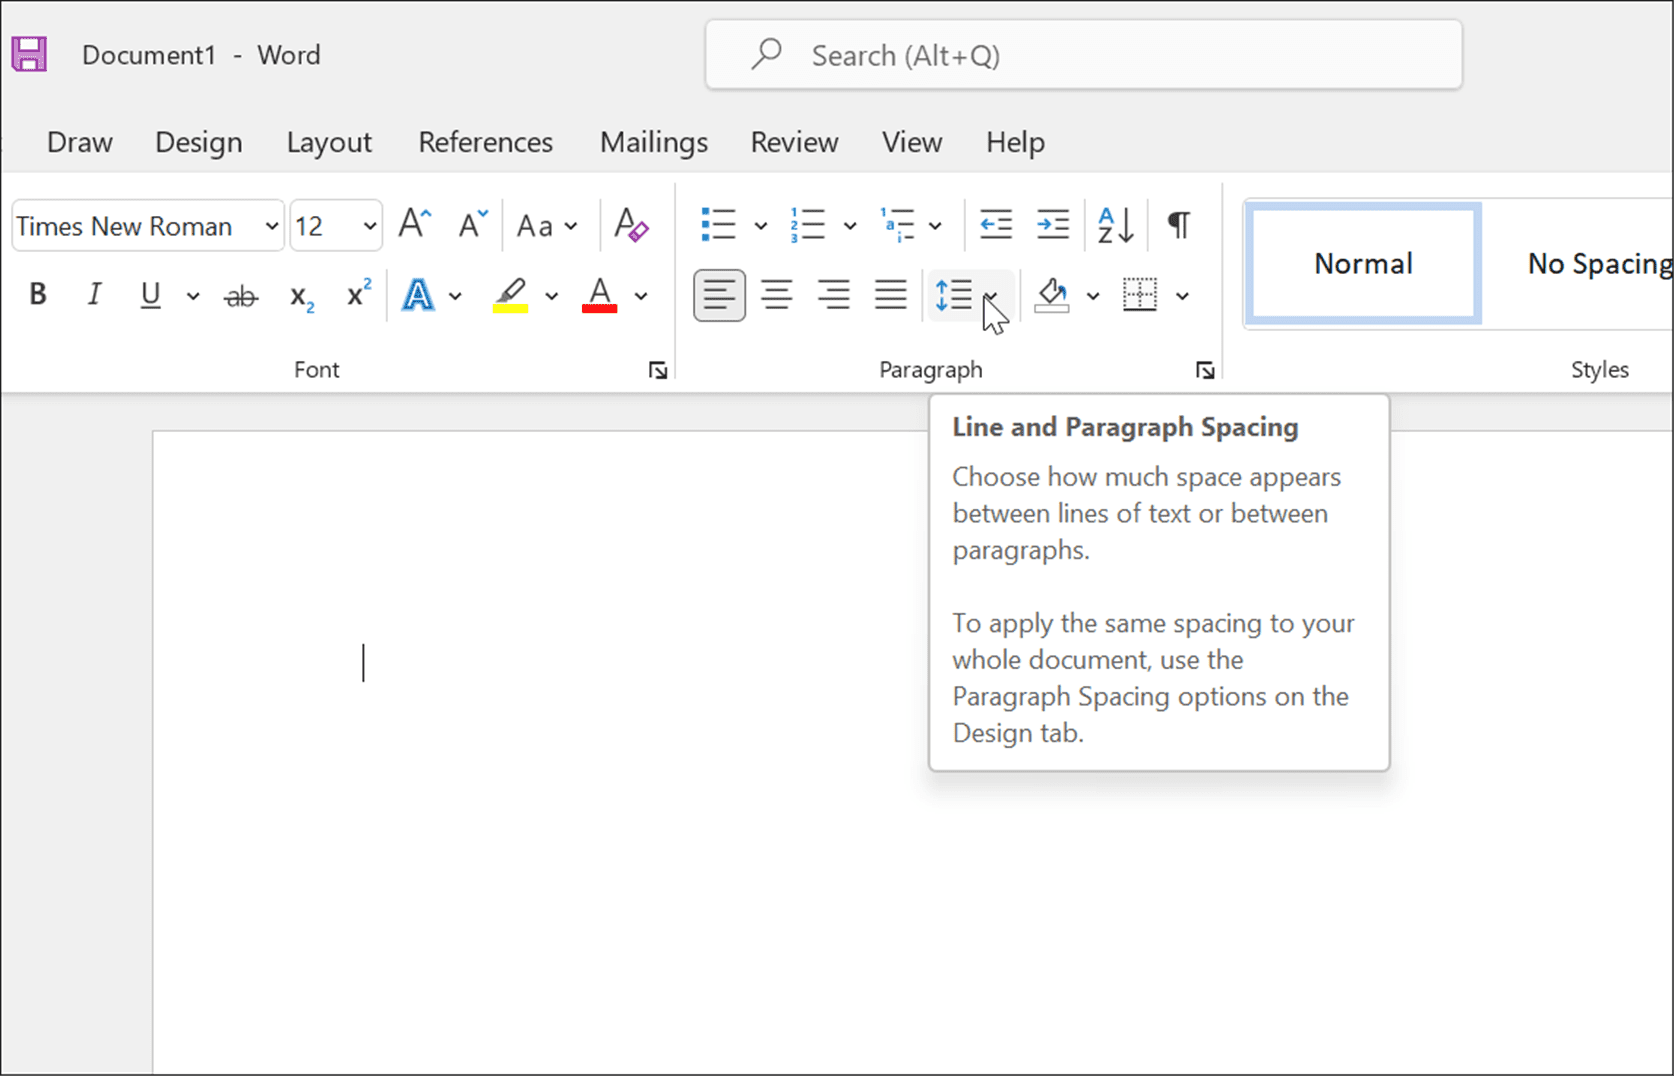
- Enable double-spaced text by choosing Home, then pressing the Line and Paragraph Spacing tool in the Paragraph section.
- In the drop-down, choose 2.0 to double-space the text.
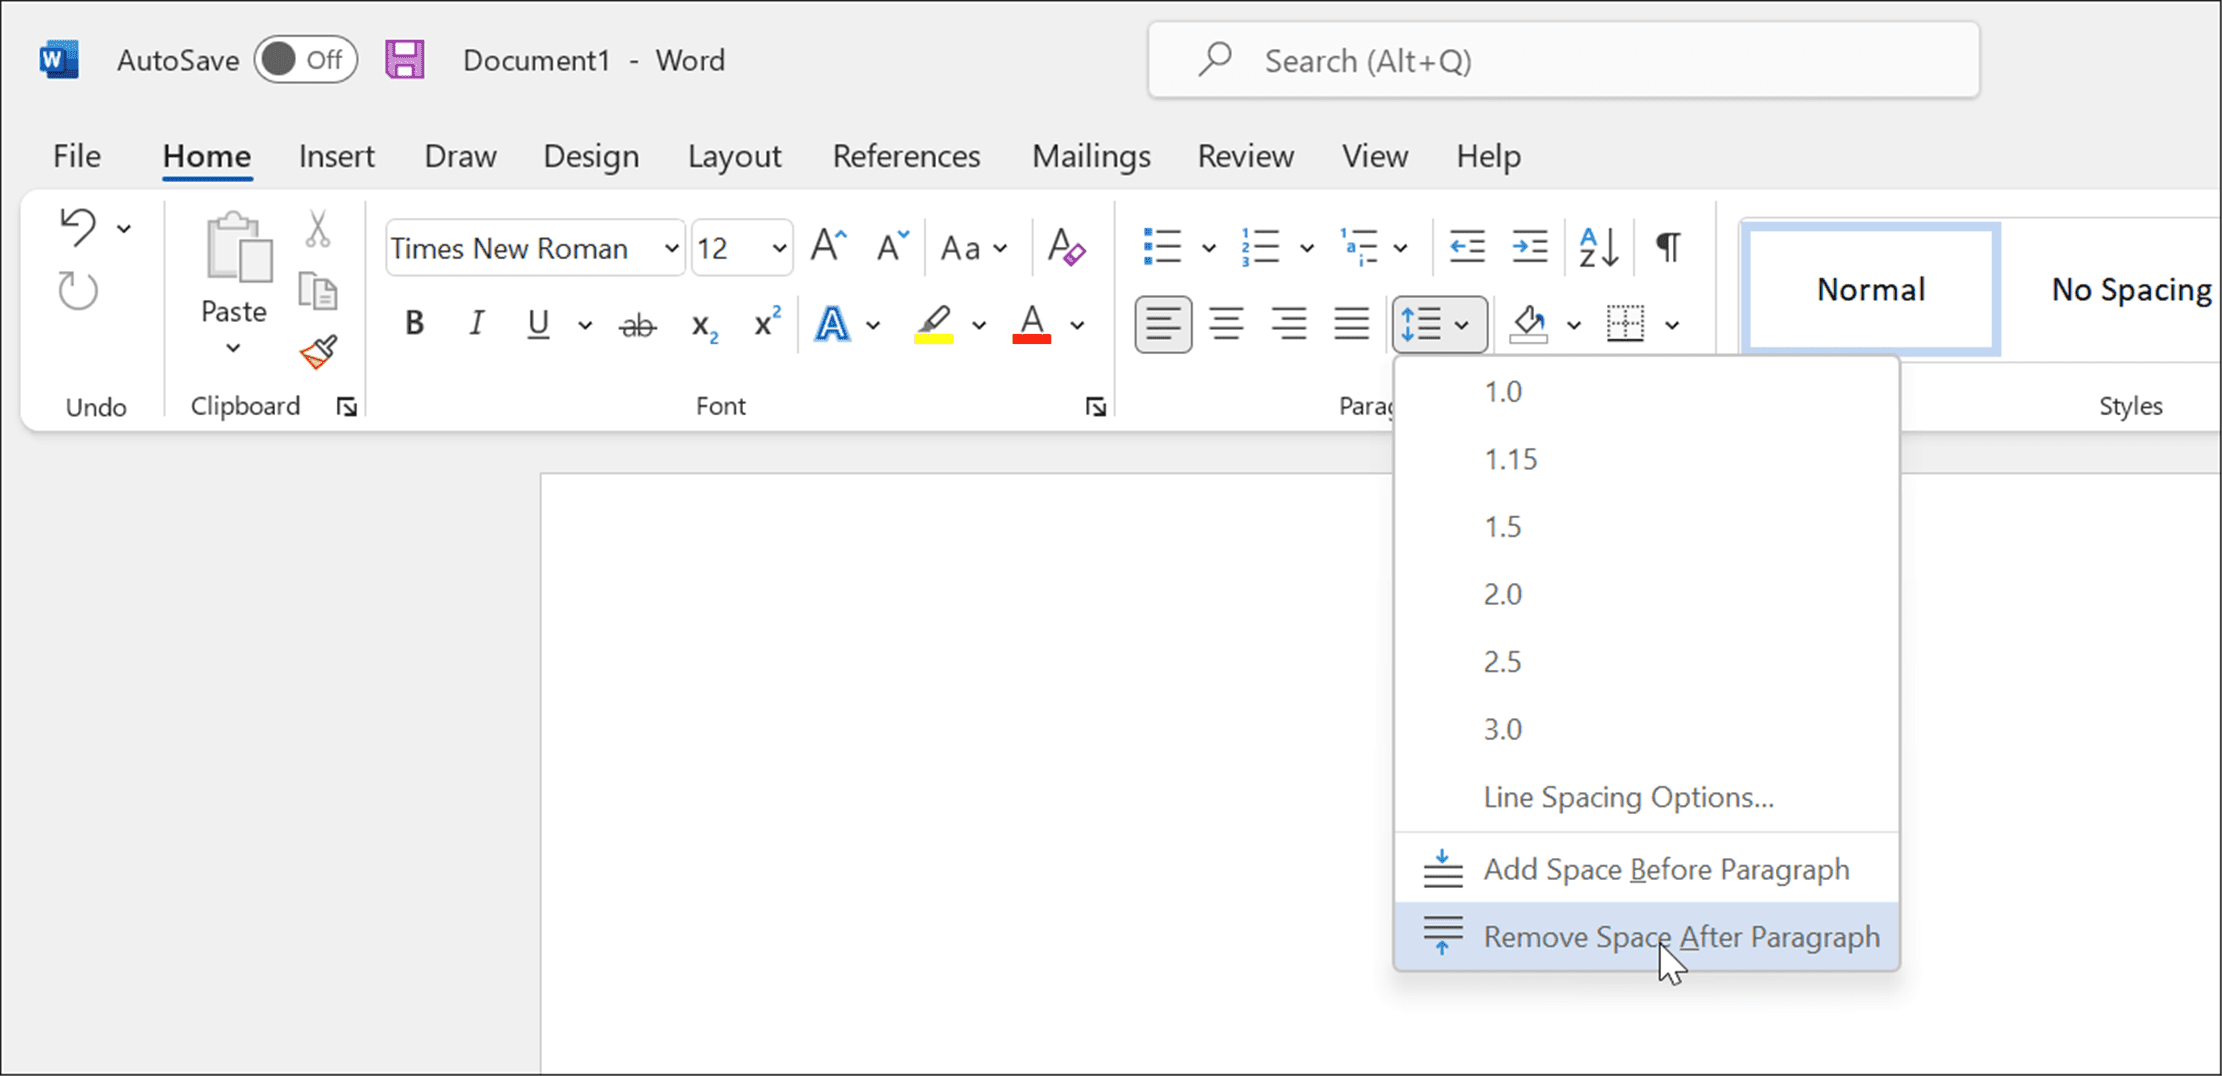
- To verify there are no extra spaces between paragraphs in your paper, press the Line and Paragraph Spacing button again and select Remove Space After Paragraph from the menu.
Configure Your Document Header
At this point, your document should be nearly formatted for APA, but you’ll need to make some additional changes to your header to insert page numbers.
To configure your document header for APA:
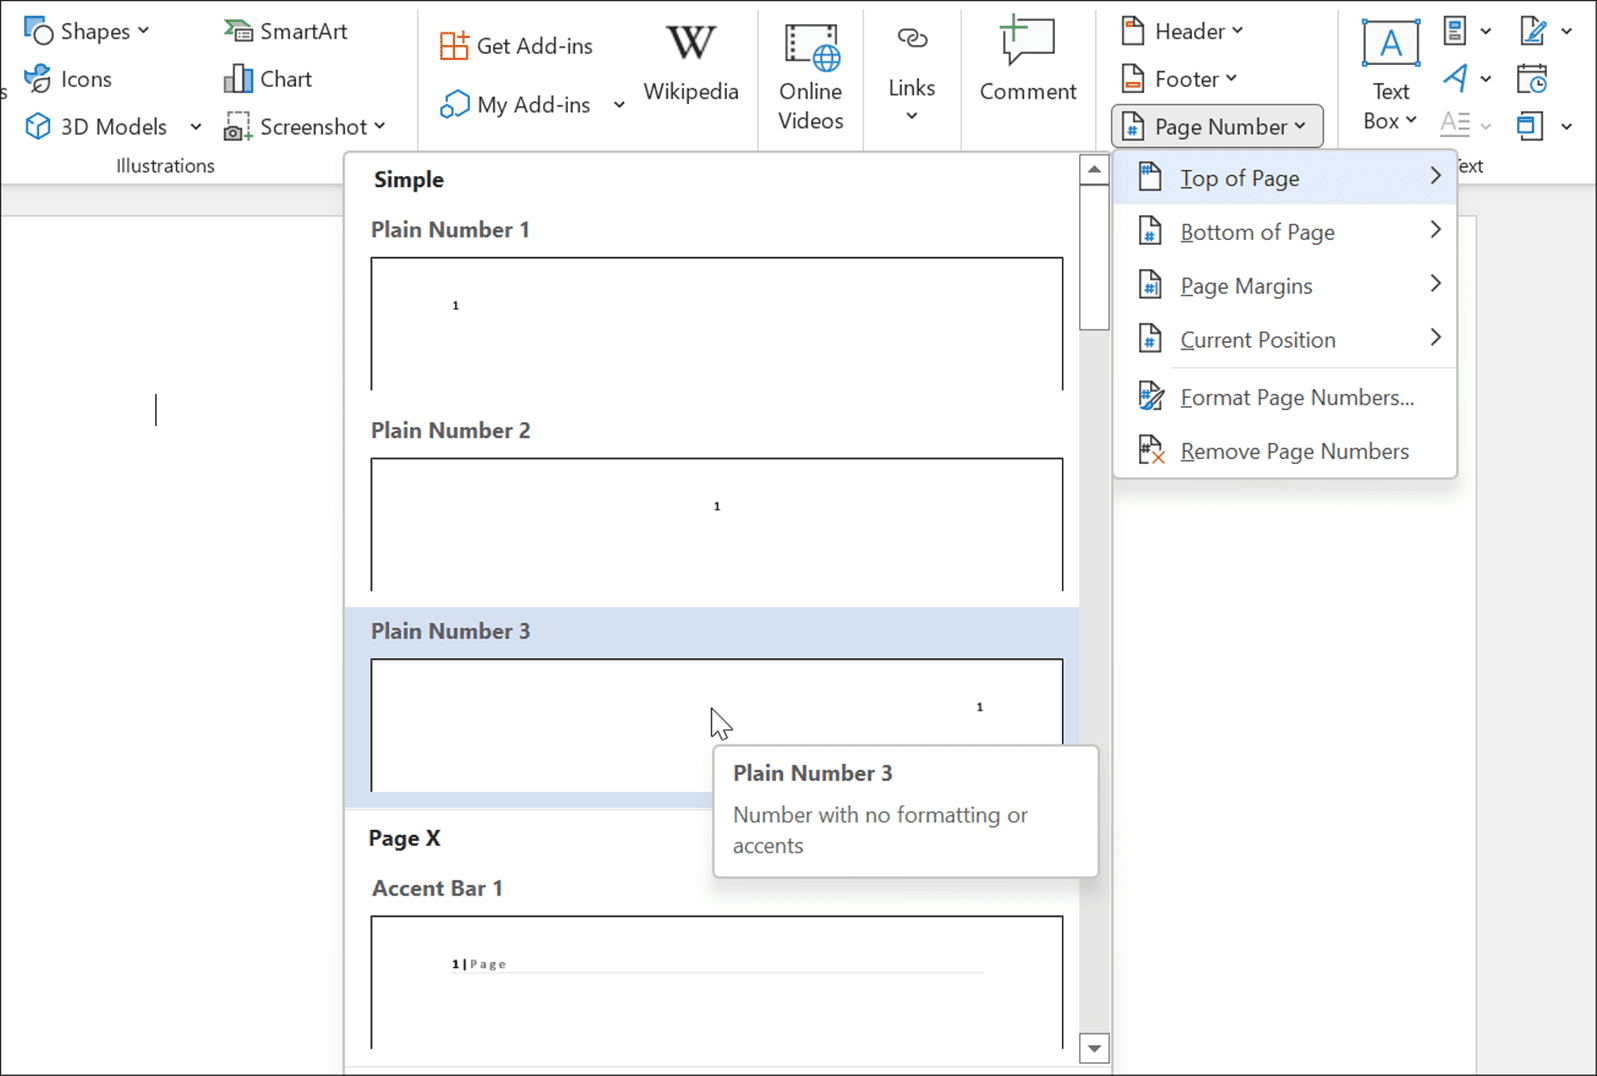
- Press the Insert tab on the ribbon bar.
- Press Page Number, then hover over Top of Page.
- From the options, select Plain Number 3.
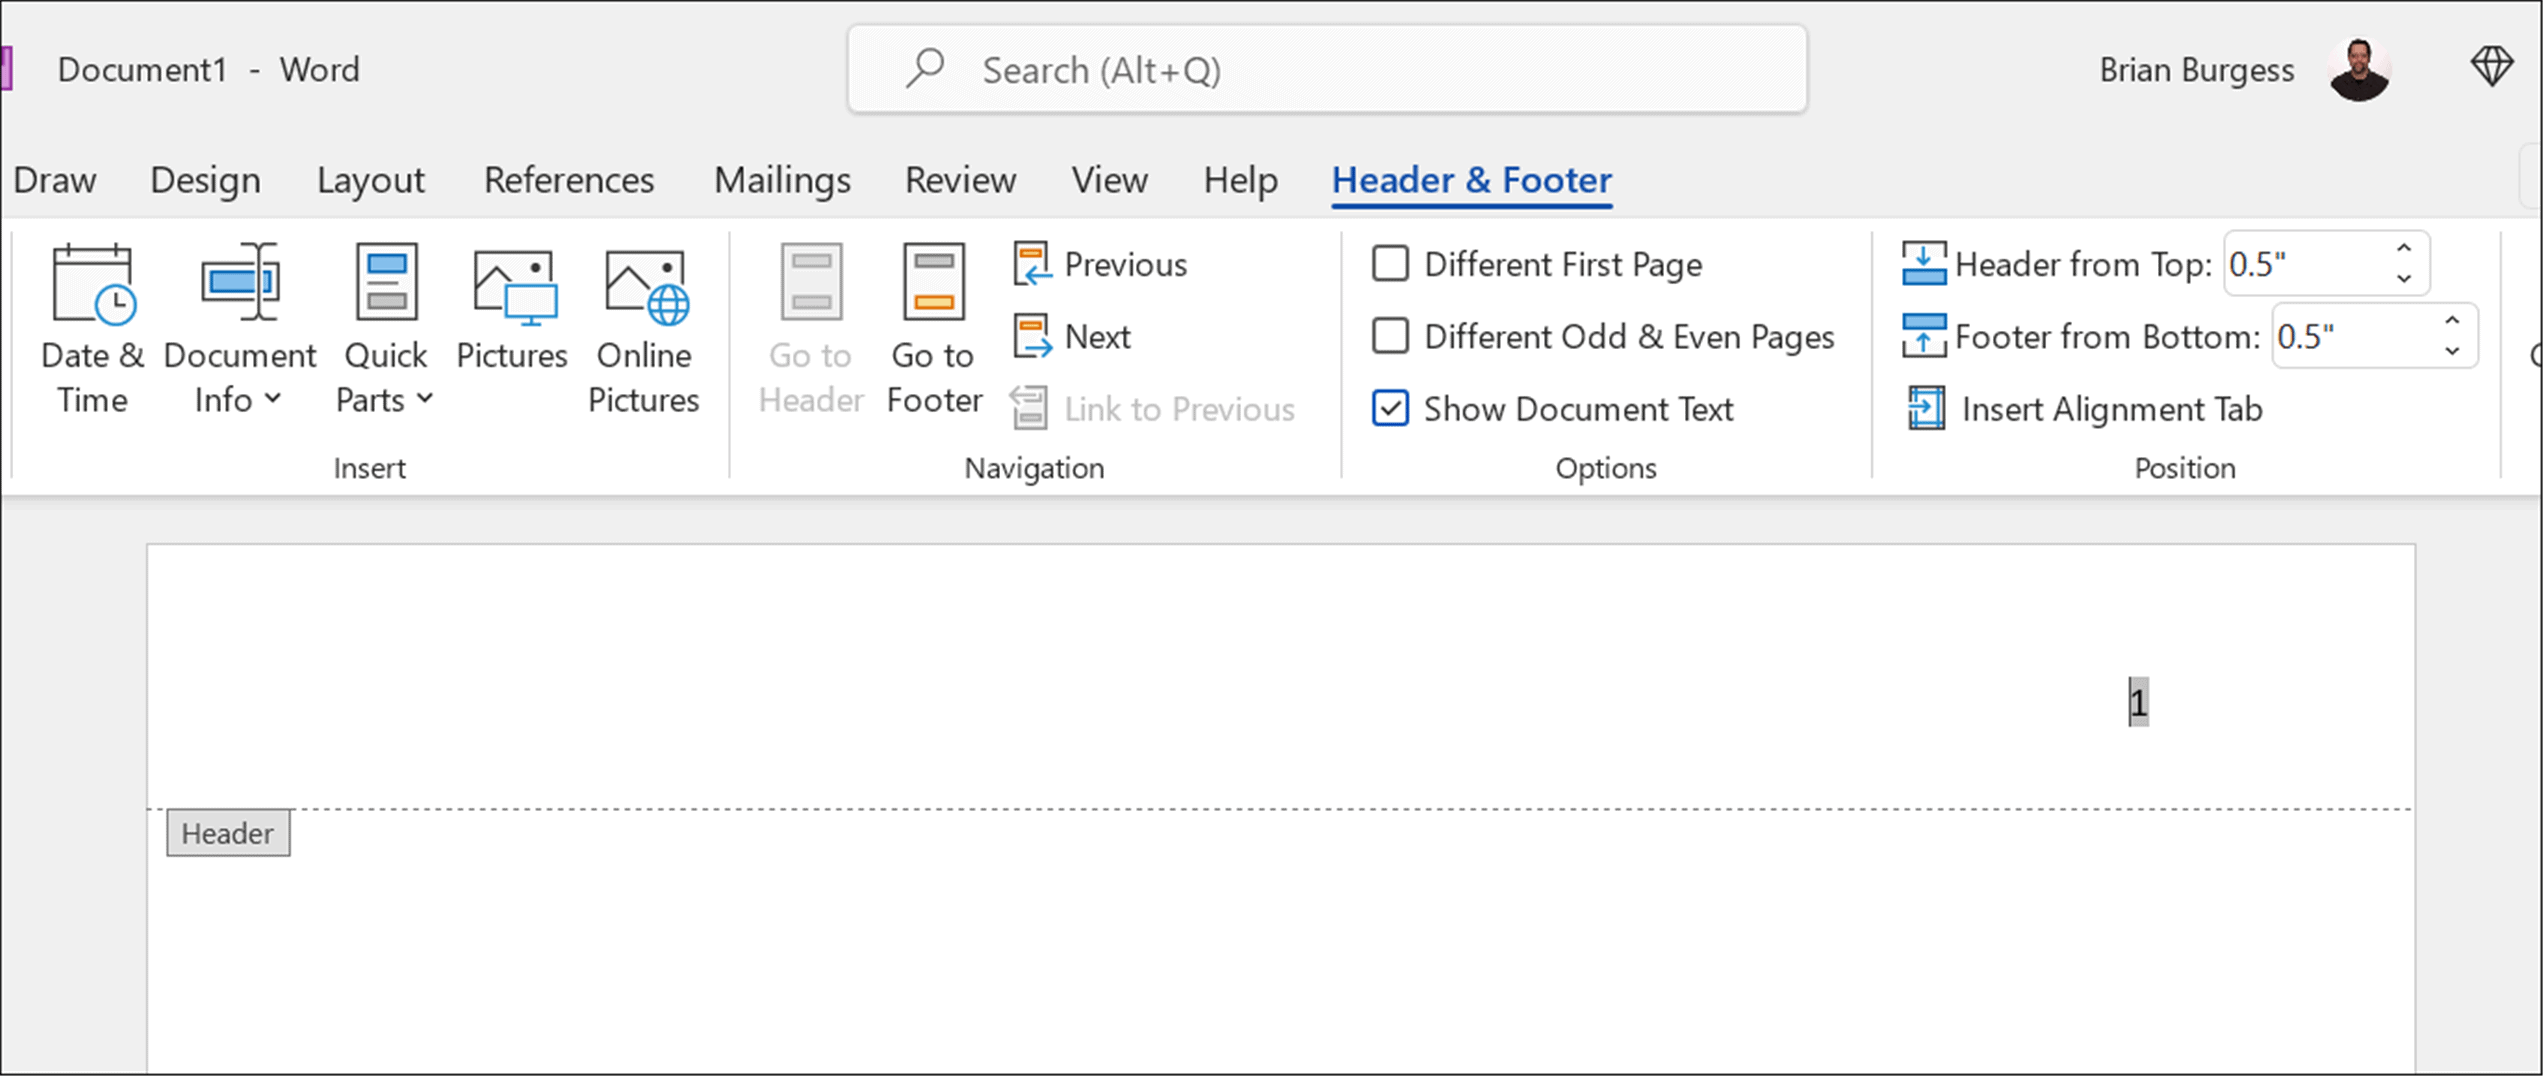
- Word will switch to the Header editing mode, where you’ll see the page number appear on the right-hand side.
- With the number selected, press Home, then set the font and font size to Times New Roman and 12.
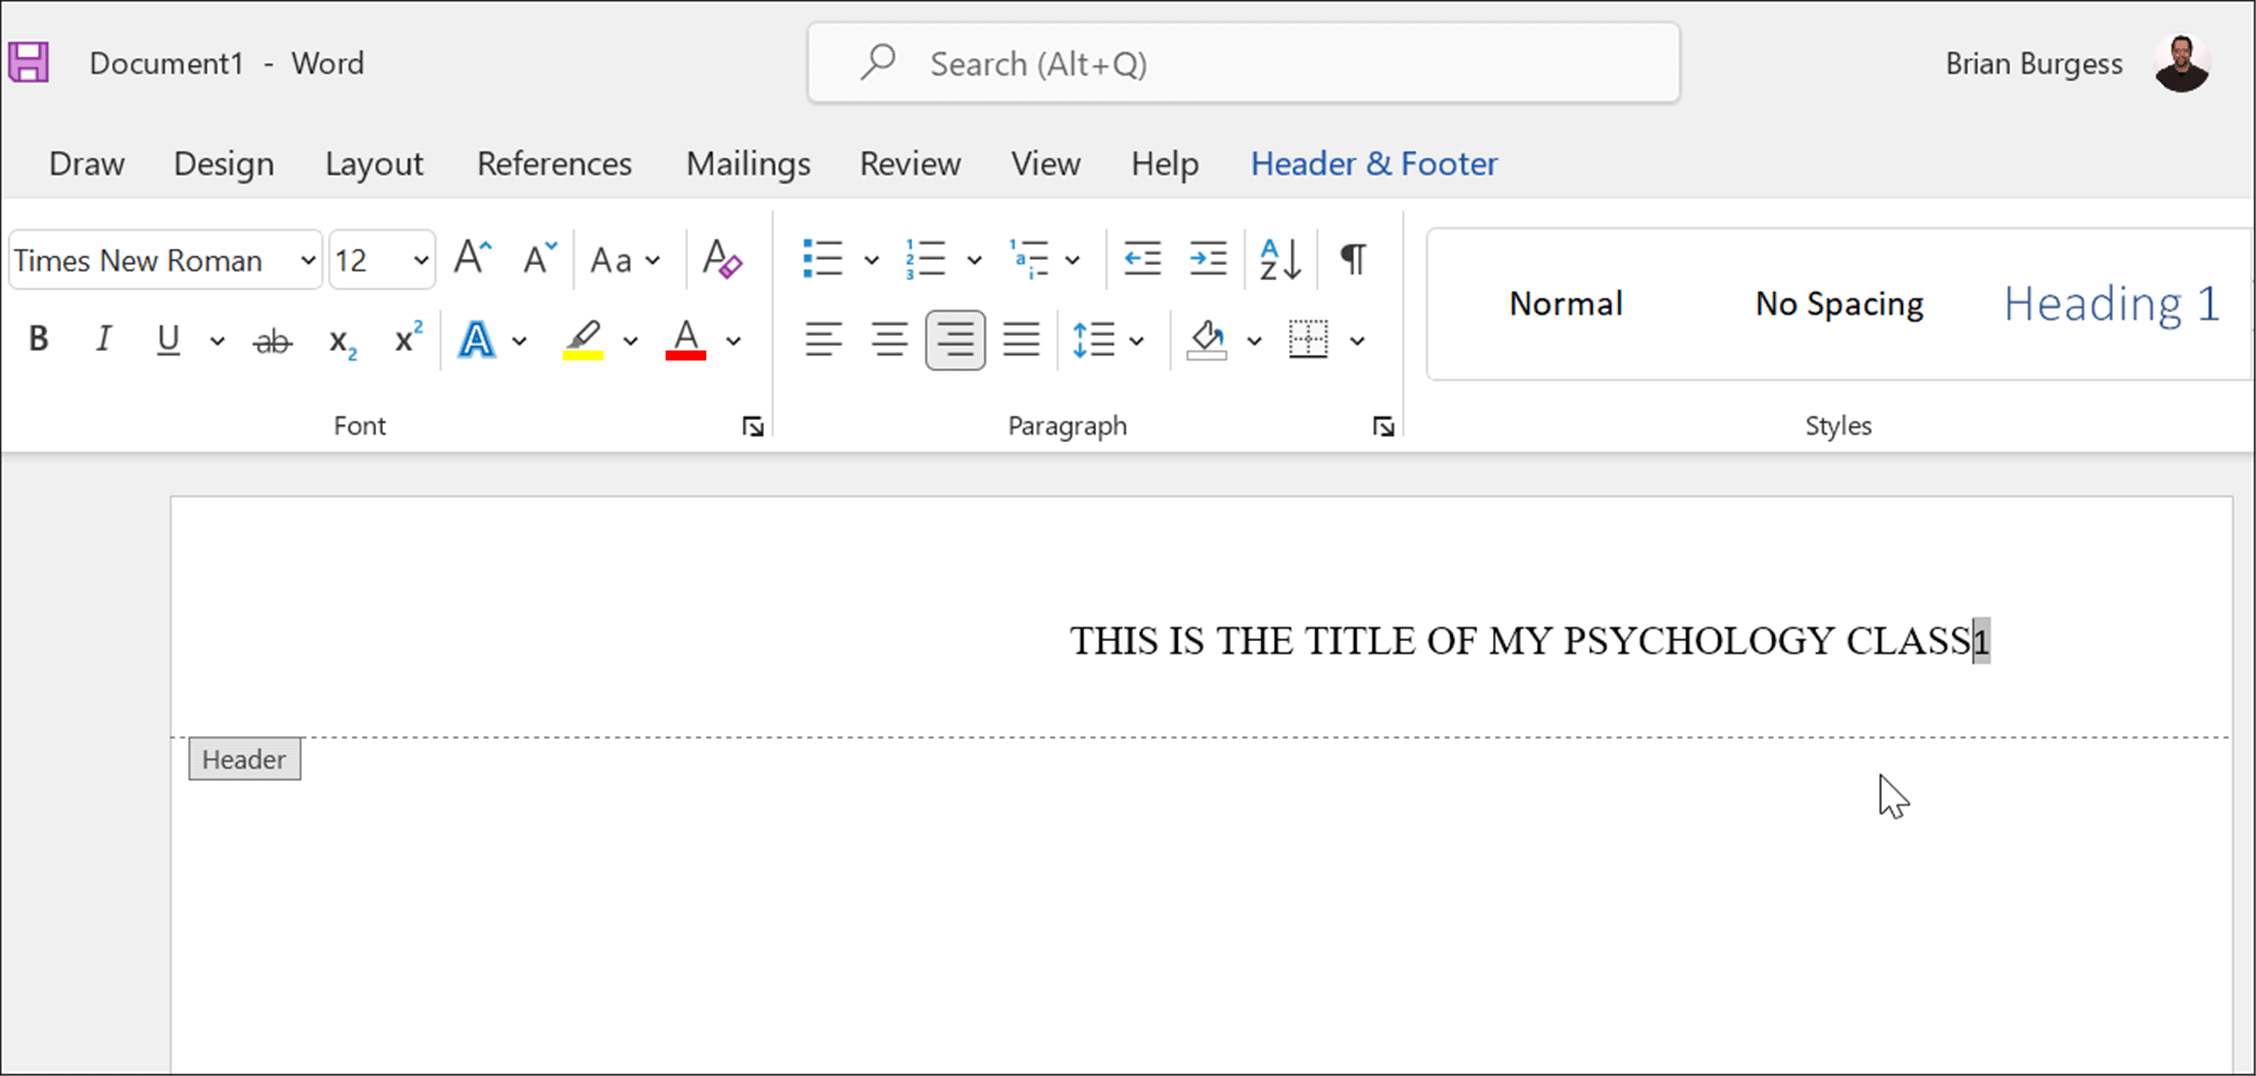
- If you’re adding a title, use capital letters to do so—press the Caps Lock key and type in the title for your paper.
- After typing your title, hit the Space key once to create a space between the title and the page number.
- You’ll want to move the title to the left, so select the title, then press Align Left under the Home tab.
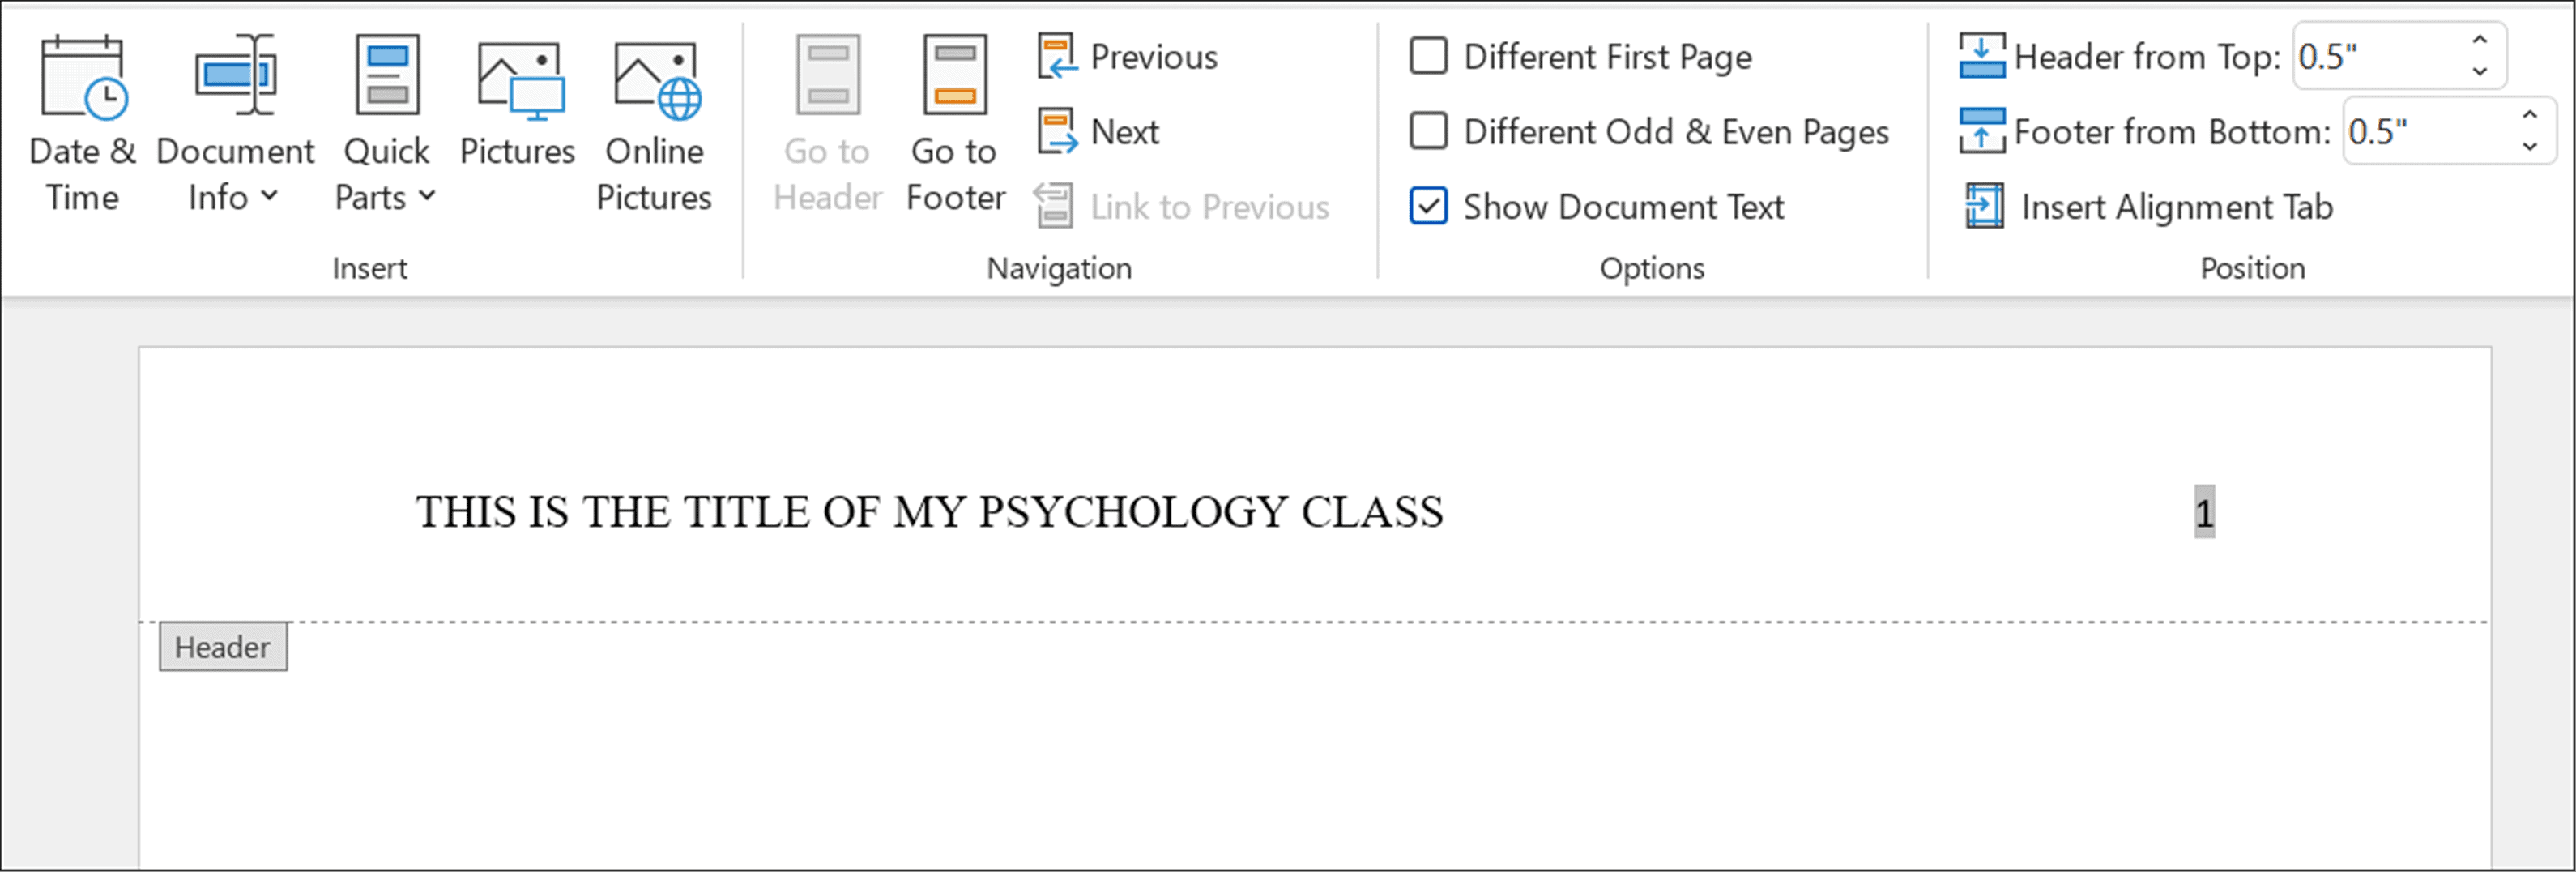
- The title is now aligned to the left, but so is the page number. To fix that, make sure the blinking cursor is direct to the left of the page number.
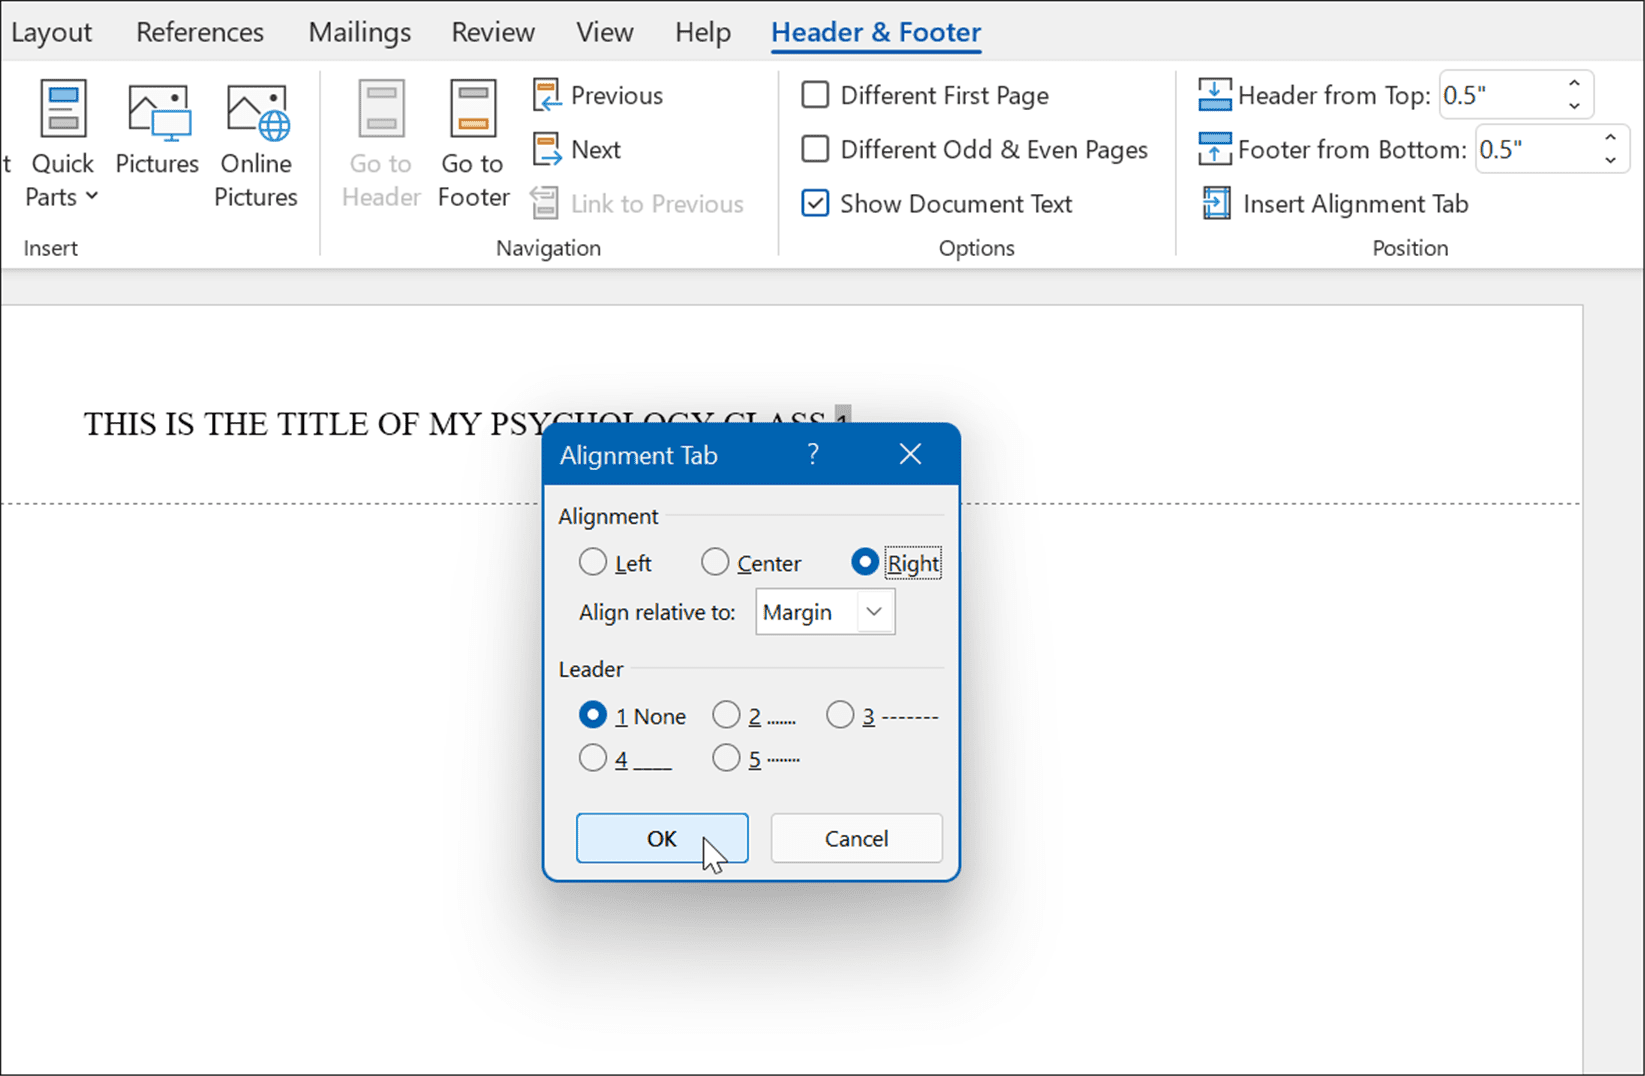
- Click the Header & Footer tab, and select Insert Alignment Tab.
- When the Alignment Tab window appears, click Right and OK.
- If all goes well, you should see the page number on the right and the title on the left—your header is now configured for APA.
Set Up a Title Page
Your document is now ready for APA formatting with Times New Roman and 12-point font sizing across the body and header. The next step is to set up a title page.
To add a title page to Word:
- Click an open area on your first page.
- Set the text to Centered in the Paragraph section of the Home tab.
- Type in the title of your paper, making sure to capitalize the most important terms.
- Press Enter to move to a new line and type your name.
- Press Enter again to type in the institution’s name.
- Make further style changes to your document as required, making sure they follow the APA style.
Writing Academic Documents in Microsoft Word
The steps above will help you to set up APA style formatting in a Microsoft Word document. Of course, the context and citations are up to you. Your instructor may require additional information on the title page, like your student number and current date, so make sure to check in with them before writing your paper.
In addition to APA style, you can also use MLA format in Word. Other neat things you can do is transcribe an audio format or see the word count in Microsoft Word.
In addition to setting up APA or MLA format in Word, you can insert custom headers and footers and insert and format a text box in Word.
![]()
How do I format a footnote in APA Style?
APA footnotes use superscript numbers and should appear in numerical order. You can place footnotes at the bottom of the relevant pages, or on a separate footnotes page at the end:
- For footnotes at the bottom of the page, you can use your word processor to automatically insert footnotes.
- For footnotes at the end of the text in APA, place them on a separate page entitled “Footnotes,” after the reference page. Indent the first line of each footnote, and double-space them.
For both approaches, place a space between the superscript number and the footnote text.
Is the passive voice allowed in APA Style?
Yes, it’s perfectly valid to write sentences in the passive voice. The APA language guidelines do caution against overusing the passive voice, because it can obscure your meaning or be needlessly long-winded. For this reason, default to the active voice in most cases.
The passive voice is most useful when the point of the sentence is just to state what was done, not to emphasize who did it. For example, “The projector was mounted on the wall” is better than “James and I mounted the projector on the wall” if it’s not particularly important who mounted the projector.
Can I write in the first person in APA Style?
Yes, APA language guidelines encourage you to use the first-person pronouns “I” or “we” when referring to yourself or a group including yourself in your writing.
In APA Style, you should not refer to yourself in the third person. For example, do not refer to yourself as “the researcher” or “the author” but simply as “I” or “me.” Referring to yourself in the third person is still common practice in some academic fields, but APA Style rejects this convention.
How do I cite multiple sources by the same author in APA Style?
If you cite several sources by the same author or group of authors, you’ll distinguish between them in your APA in-text citations using the year of publication.
If you cite multiple sources by the same author(s) at the same point, you can just write the author name(s) once and separate the different years with commas, e.g., (Smith, 2020, 2021).
To distinguish between sources with the same author(s) and the same publication year, add a different lowercase letter after the year for each source, e.g., (Smith, 2020, 2021a, 2021b). Add the same letters to the corresponding reference entries.
Should I cite laws using public law numbers in APA Style?
Generally, you should identify a law in an APA reference entry by its location in the United States Code (U.S.C.).
But if the law is either spread across various sections of the code or not featured in the code at all, include the public law number in addition to information on the source you accessed the law in, e.g.:
Lilly Ledbetter Fair Pay Act of 2009, Pub. L. No. 111-2, 123 Stat. 5 (2009).
What should I include in an APA methods section?
In your APA methods section, you should report detailed information on the participants, materials, and procedures used.
- Describe all relevant participant or subject characteristics, the sampling procedures used and the sample size and power.
- Define all primary and secondary measures and discuss the quality of measurements.
- Specify the data collection methods, the research design and data analysis strategy, including any steps taken to transform the data and statistical analyses.
How do I cite a court case reported in multiple publications in APA Style?
With APA legal citations, it’s recommended to cite all the reporters (publications reporting cases) in which a court case appears. To cite multiple reporters, just separate them with commas in your reference entry. This is called parallel citation.
Don’t repeat the name of the case, court, or year; just list the volume, reporter, and page number for each citation. For example:
Brown v. Collins, 541 U.S. 948, 2004 U.S. LEXIS 2215, 124 S. Ct. 1684, 158 L. Ed. 2d 377, 72 U.S.L.W. 3598 (U.S. 2004).
When should I use tables or figures to present numbers?
In APA style, statistics can be presented in the main text or as tables or figures. To decide how to present numbers, you can follow APA guidelines:
- To present three or fewer numbers, try a sentence,
- To present between 4 and 20 numbers, try a table,
- To present more than 20 numbers, try a figure.
Since these are general guidelines, use your own judgment and feedback from others for effective presentation of numbers.
Who is listed as the author of a podcast in APA Style?
When citing a podcast episode in APA Style, the podcast’s host is listed as author, accompanied by a label identifying their role, e.g. Glass, I. (Host).
When citing a whole podcast series, if different episodes have different hosts, list the executive producer(s) instead. Again, include a label identifying their role, e.g. Lechtenberg, S. (Producer).
What is an appendix?
An appendix contains information that supplements the reader’s understanding of your research but is not essential to it. For example:
- Interview transcripts
- Questionnaires
- Raw data
- Detailed descriptions of equipment
Something is only worth including as an appendix if you refer to information from it at some point in the text (e.g. quoting from an interview transcript). If you don’t, it should probably be removed.
When should I use a table or figure to present data?
In an APA Style paper, use a table or figure when it’s a clearer way to present important data than describing it in your main text. This is often the case when you need to communicate a large amount of information.
Before including a table or figure in your text, always reflect on whether it’s useful to your readers’ understanding:
- Could this information be quickly summarized in the text instead?
- Is it important to your arguments?
- Does the table or figure require too much explanation to be efficient?
If the data you need to present only contains a few relevant numbers, try summarizing it in the text (potentially including full data in an appendix). If describing the data makes your text overly long and difficult to read, a table or figure may be the best option.
How do I cite social media content in APA Style?
To cite a public post from social media, use the first 20 words of the post as a title, include the date it was posted and a URL, and mention the author’s username if they have one:
Dorsey, J. [@jack]. (2018, March 1). We’re committing Twitter to help increase the collective health, openness, and civility of public conversation, and to hold ourselves publicly [Tweet]. Twitter. https://twitter.com/jack/status/969234275420655616
To cite content from social media that is not publicly accessible (e.g. direct messages, posts from private groups or user profiles), cite it as a personal communication in the text, but do not include it in the reference list:
When contacted online, the minister stated that the project was proceeding “according to plan” (R. James, Twitter direct message, March 25, 2017).
How do I cite a source with no page numbers in APA Style?
When you quote or paraphrase a specific passage from a source, you need to indicate the location of the passage in your APA in-text citation. If there are no page numbers (e.g. when citing a website) but the text is long, you can instead use section headings, paragraph numbers, or a combination of the two:
(Caulfield, 2019, Linking section, para. 1).
Section headings can be shortened if necessary. Kindle location numbers should not be used in ebook citations, as they are unreliable.
If you are referring to the source as a whole, it’s not necessary to include a page number or other marker.
How do I cite a source with no author in APA Style?
When no individual author name is listed, but the source can clearly be attributed to a specific organization—e.g., a press release by a charity, a report by an agency, or a page from a company’s website—use the organization’s name as the author in the reference entry and APA in-text citations.
When no author at all can be determined—e.g. a collaboratively edited wiki or an online article published anonymously—use the title in place of the author. In the in-text citation, put the title in quotation marks if it appears in plain text in the reference list, and in italics if it appears in italics in the reference list. Shorten it if necessary.
When should I include a DOI or URL in an APA journal citation?
In an APA journal citation, if a DOI (digital object identifier) is available for an article, always include it.
If an article has no DOI, and you accessed it through a database or in print, just omit the DOI.
If an article has no DOI, and you accessed it through a website other than a database (for example, the journal’s own website), include a URL linking to the article.
How many authors do I include in an APA reference list entry?
You may include up to 20 authors in a reference list entry.
When an article has more than 20 authors, replace the names prior to the final listed author with an ellipsis, but do not omit the final author:
Davis, Y., Smith, J., Caulfield, F., Pullman, H., Carlisle, J., Donahue, S. D., James, F., O’Donnell, K., Singh, J., Johnson, L., Streefkerk, R., McCombes, S., Corrieri, L., Valck, X., Baldwin, F. M., Lorde, J., Wardell, K., Lao, W., Yang, P., . . . O’Brien, T. (2012).
How do I format a DOI in APA Style?
Include the DOI at the very end of the APA reference entry. If you’re using the 6th edition APA guidelines, the DOI is preceded by the label “doi:”. In the 7th edition, the DOI is preceded by ‘https://doi.org/’.
- 6th edition: doi:10.1177/0894439316660340
- 7th edition: https://doi.org/10.1177/0894439316660340
APA citation example (7th edition)
Hawi, N. S., & Samaha, M. (2016). The relations among social media addiction, self-esteem, and life satisfaction in university students. Social Science Computer Review, 35(5), 576–586. https://doi.org/10.1177/0894439316660340
What does an APA in-text citation for a website look like?
When citing a webpage or online article, the APA in-text citation consists of the author’s last name and year of publication. For example: (Worland & Williams, 2015). Note that the author can also be an organization. For example: (American Psychological Association, 2019).
If you’re quoting you should also include a locator. Since web pages don’t have page numbers, you can use one of the following options:
- Paragraph number: (Smith, 2018, para. 15).
- Heading or section name: (CDC, 2020, Flu Season section)
- Abbreviated heading: (CDC, 2020, “Key Facts” section)
Who uses APA Style?
APA format is widely used by professionals, researchers, and students in the social and behavioral sciences, including fields like education, psychology, and business.
Be sure to check the guidelines of your university or the journal you want to be published in to double-check which style you should be using.